

Table of Contents
- Before You Start
- Stack of Pastel Macarons
- Strawberry Mochi Plate
- Tiramisu Slice
- Iced Cinnamon Roll
- Matcha Ice Cream Bowl
- Chocolate Dipped Strawberries
- Lemon Meringue Tart Slice
- Donut With Sprinkles
- Croissant With Jam
- Red Velvet Cupcake
- Blueberry Pie Slice
- Parfait With Berries
- Chocolate Cake Wedge
- Waffle With Syrup
- Peach Cobbler Bowl
- Birthday Cupcake With Candle
- Coffee and Pastry Corner
- Dessert Table Display
- Frequently Asked Questions
Every dessert drawing here starts the same cozy way: light pencil, clean fineliner, then that satisfying moment when the first marker layer hits the paper. I keep coming back to sweets as subjects because they forgive wobbly lines, they are small enough to finish in one sitting, and they look adorable no matter how simple your shading stays.
Below you get eighteen trending treats, each one broken into four to six stages with its own little color swatch, so you always know which marker to grab next. Pick whichever one is calling your name today and work through it panel by panel, the way you would follow a recipe.
Using these images: free for personal projects such as printing, coloring, cards, journals and gifts. Handmade items that include them may be sold up to 30 pieces per design. More than that is commercial use and is not permitted, and neither is selling or sharing the images themselves or passing them off as your own. Please ask before any other use.
Before You Start
- Sketch everything in light pencil first and press gently, because dark pencil lines will smudge under alcohol markers and muddy your colors.
- Go over your pencil with a fine black fineliner only once you are happy with the shapes, then let the ink dry fully before erasing.
- Test every new marker color on a scrap corner of the same paper, since paper brands change how warm or saturated a color looks.
- Alcohol markers work best in smooth layers, so lay color down in one direction and let each layer dry before going back over it.
- Keep your palette soft and warm by leaning on blush pinks, cream, caramel and warm browns rather than reaching for pure black or neon shades.
- Save the white gel pen for the very last stage, when every color is dry, so the highlights sit crisp on top instead of smearing into wet ink.
Stack of Pastel Macarons
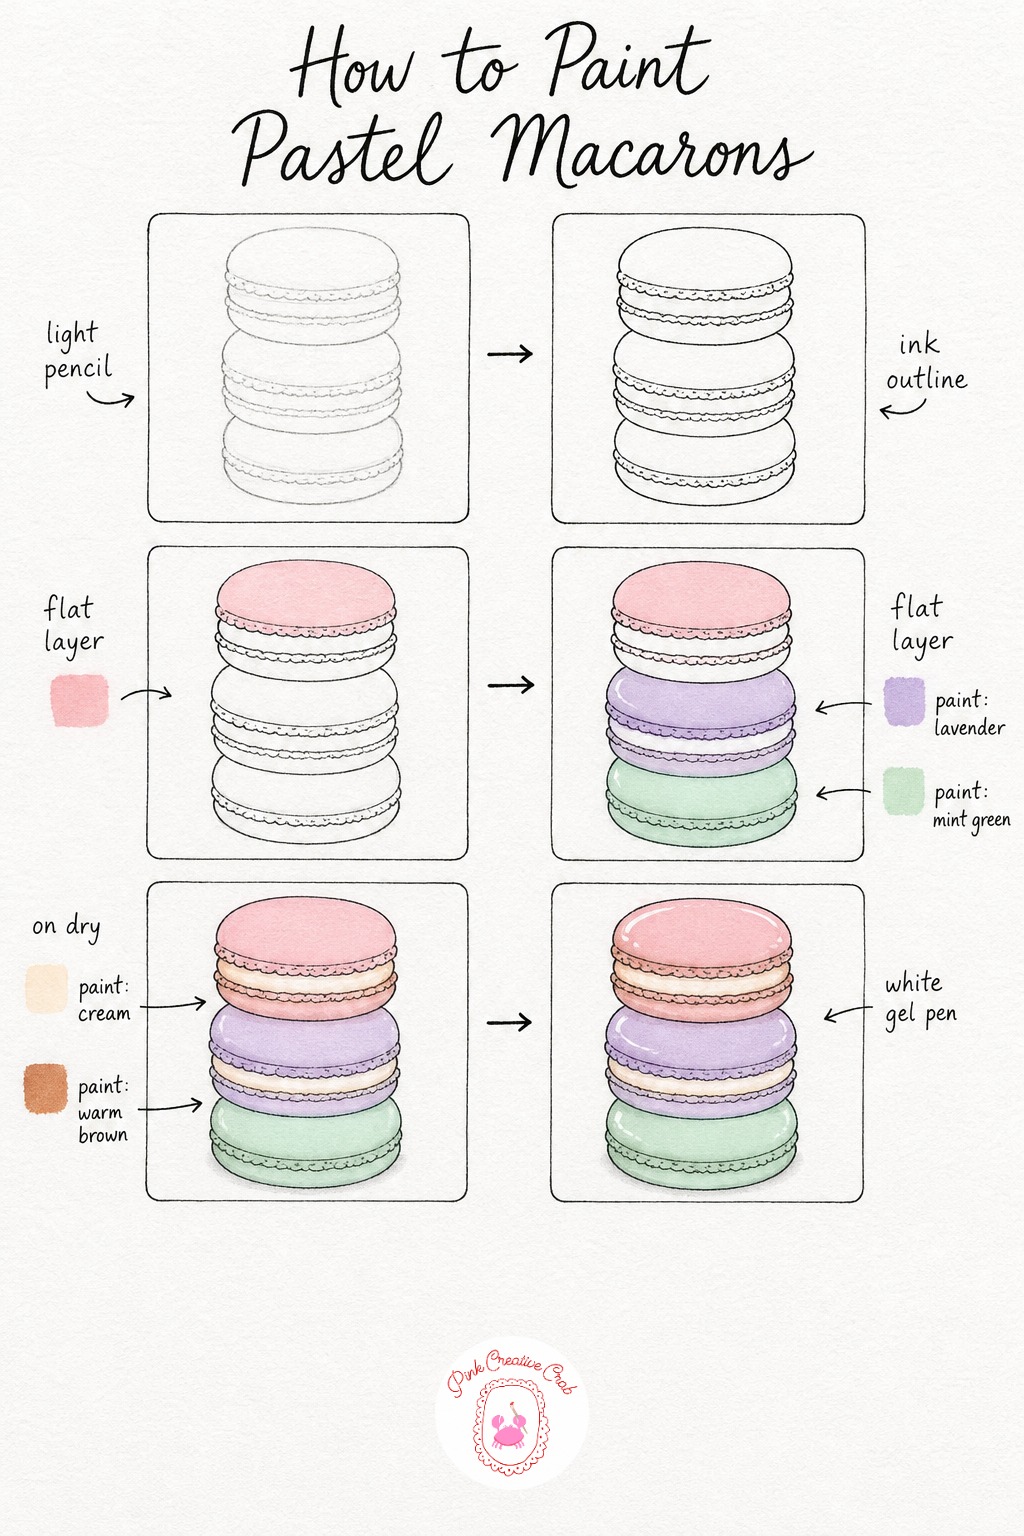
Start with light pencil, stacking three macaron shells slightly off center so the stack feels playful rather than perfectly symmetrical. Keep the ruffled feet (the crinkly edge where filling peeks out) loose and bumpy, since that texture is part of what makes a macaron read as a macaron.
Once the pencil feels right, trace it in fineliner and let the ink sit for a minute before erasing any stray pencil marks. Lay your first marker layer flat and even, working quickly so the color does not streak, and always let one shell dry before coloring the shell touching it.
Beginners often rush the filling layer and skip the shadow underneath each shell, which is what makes the stack look like it is actually resting on something solid. If a color goes on patchy, a second light pass of the same marker usually evens it out once dry.
Tip: keep your three shell colors from the same soft family (pink, lavender, mint) so the stack feels cohesive rather than like three separate cookies.
Strawberry Mochi Plate
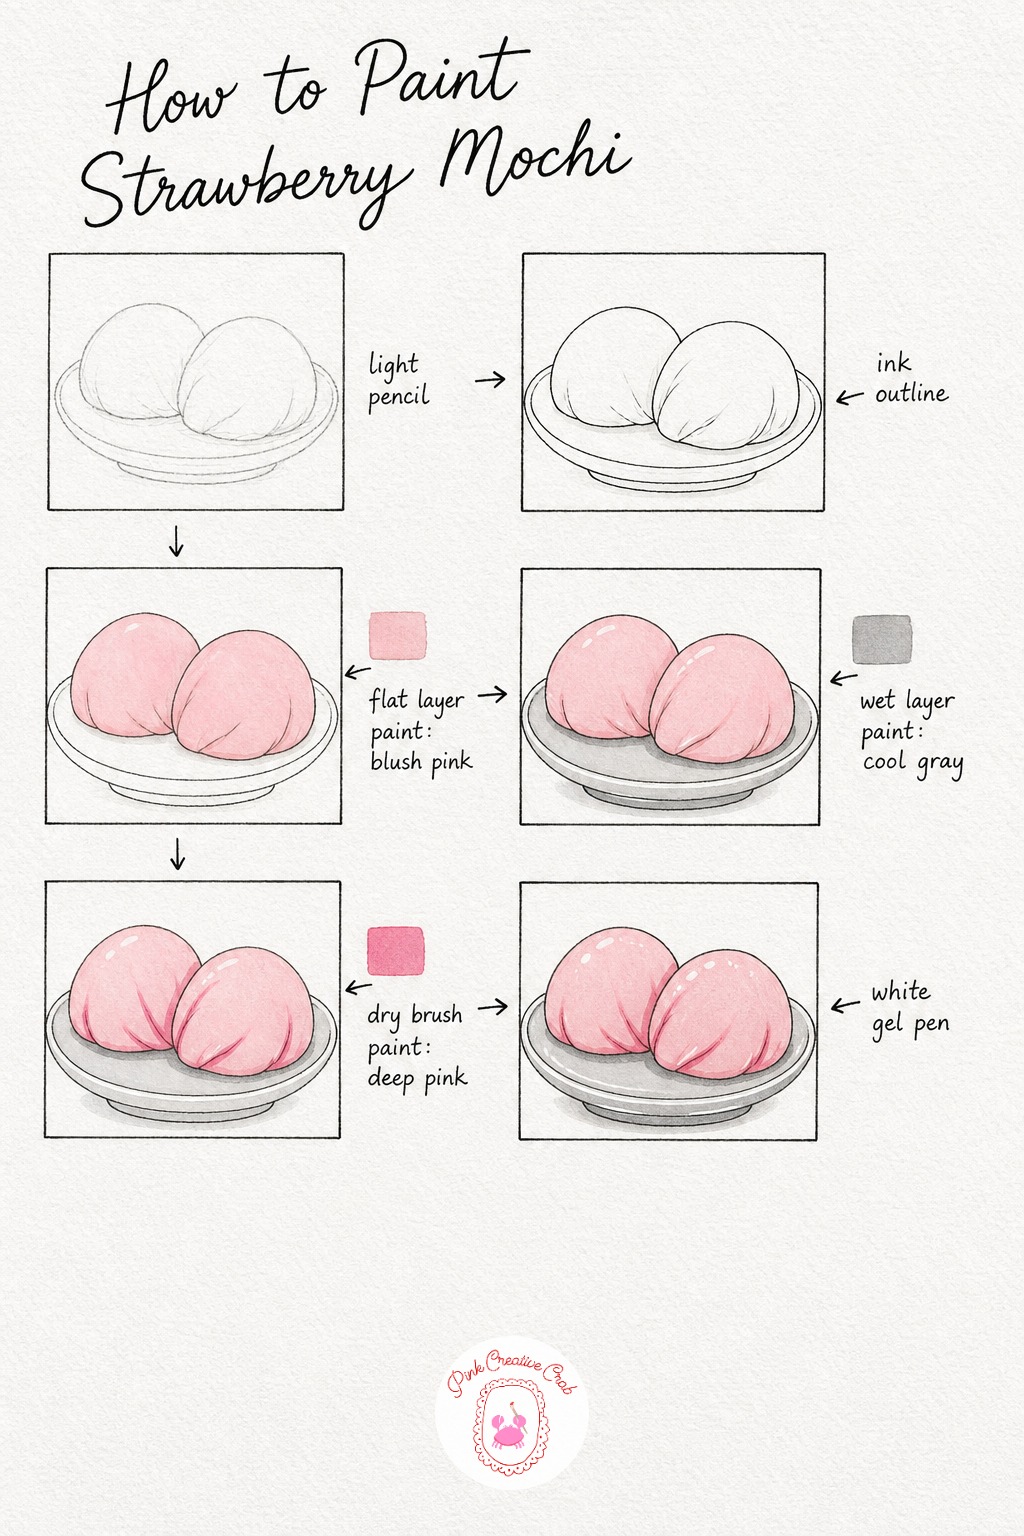
Pencil in two soft round mochi shapes on a small plate, leaving the tops slightly flattened and the bottoms a little wider, like dough that has settled. Add a few gentle fold lines near the base of each mochi where the dough gathers, since that detail sells the soft texture.
Trace your shapes in fineliner, keeping the fold lines light and a touch wobbly rather than perfectly curved. Lay the first pink marker layer flat across both domes, letting it dry completely before you add the plate’s gray wash so the colors stay clean and do not bleed into each other.
The most common mistake here is coloring the mochi one flat pink with no depth, so take time with the deeper pink creases once the base layer is dry, pushing color only into the folds. If your marker bleeds past the fineliner, a slightly darker marker traced right along the edge usually hides it.
Tip: leave a thin uncolored ring of white paper between the mochi and its cast shadow, it keeps the dome looking soft rather than glued to the plate.
Tiramisu Slice
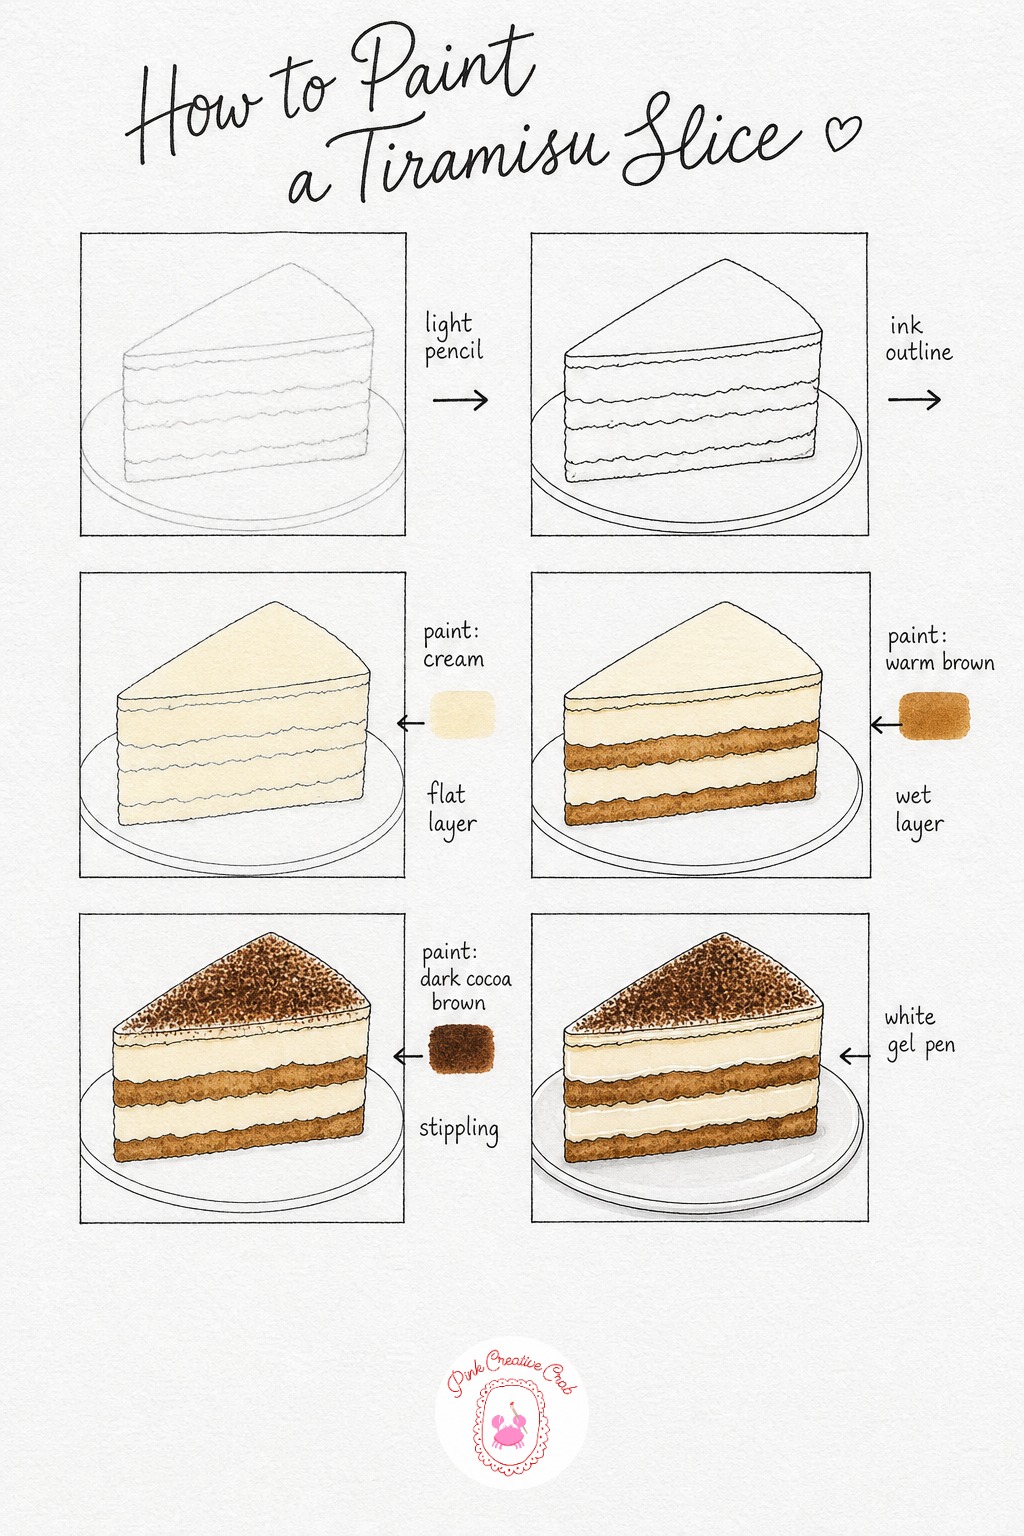
Sketch a simple triangular slice standing on its side, then draw two or three horizontal lines through it to mark where sponge meets cream. Keep the top edge slightly uneven, tiramisu is rarely a perfect rectangle once it is cut and plated.
Go over your lines in fineliner, including the little dividing lines between layers, then erase any leftover pencil once the ink is dry. Color the cream layers first with a flat, even pass, letting that dry fully before you bring warm brown into the sponge sections so the two tones stay crisp against each other.
The cocoa dust stage is where most beginners either overdo it or forget it entirely, so use the tip of your marker to dab small irregular dots rather than one solid patch of brown. If your marker tip is too thick for fine dots, a fineliner dipped lightly can stand in for cocoa texture instead.
Tip: keep the cocoa dust only on the very top surface, any on the side layers will read as dirt rather than powder.
Iced Cinnamon Roll
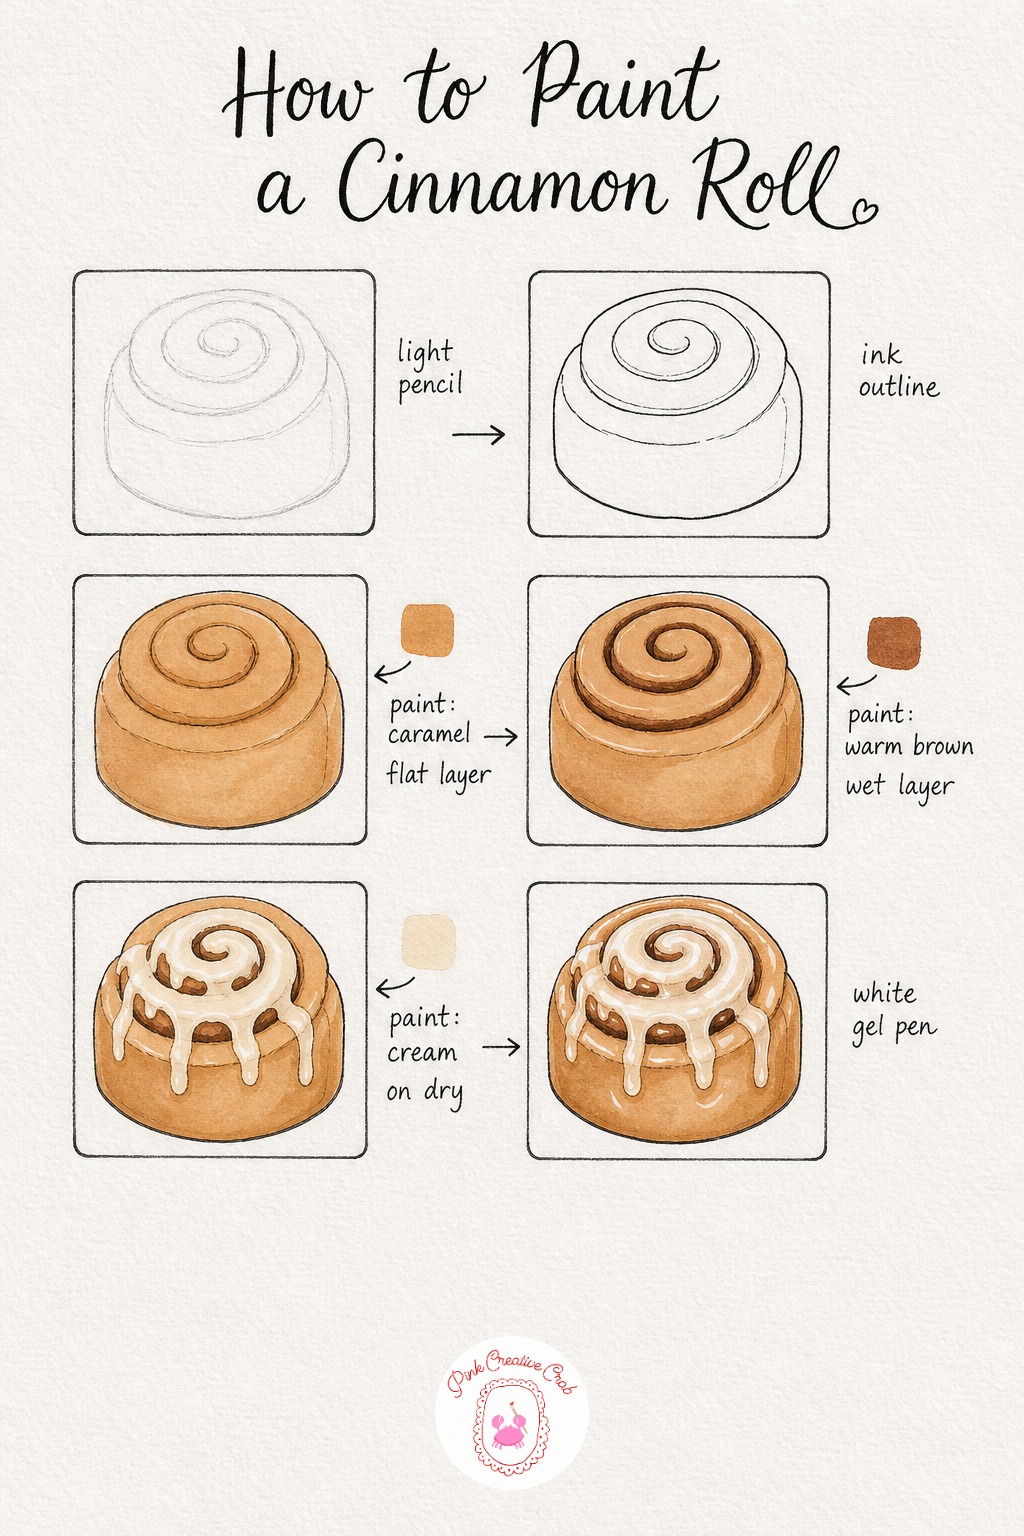
Draw a round roll shape in light pencil, then add a spiral line winding from the outer edge into the center, like a cinnamon roll looks from above. Keep the spiral a little uneven, since a too perfect swirl can look stiff instead of fresh baked.
Trace the roll and spiral in fineliner, letting it dry before you erase the pencil underneath. Lay a flat caramel wash over the entire roll first, then once that is dry, go back into the spiral grooves with a deeper brown so the swirl has real depth and dimension.
Beginners often paint the icing as one flat white shape, but cream drizzle actually pools thicker in the middle and thins toward the edges, so vary your pressure as you color it. If your cream marker looks too pale against the caramel, warm it slightly with a touch of pale yellow underneath before it dries.
Tip: let a little caramel peek through the icing drizzle rather than covering the whole top, it keeps the roll looking warm and fresh.
Matcha Ice Cream Bowl
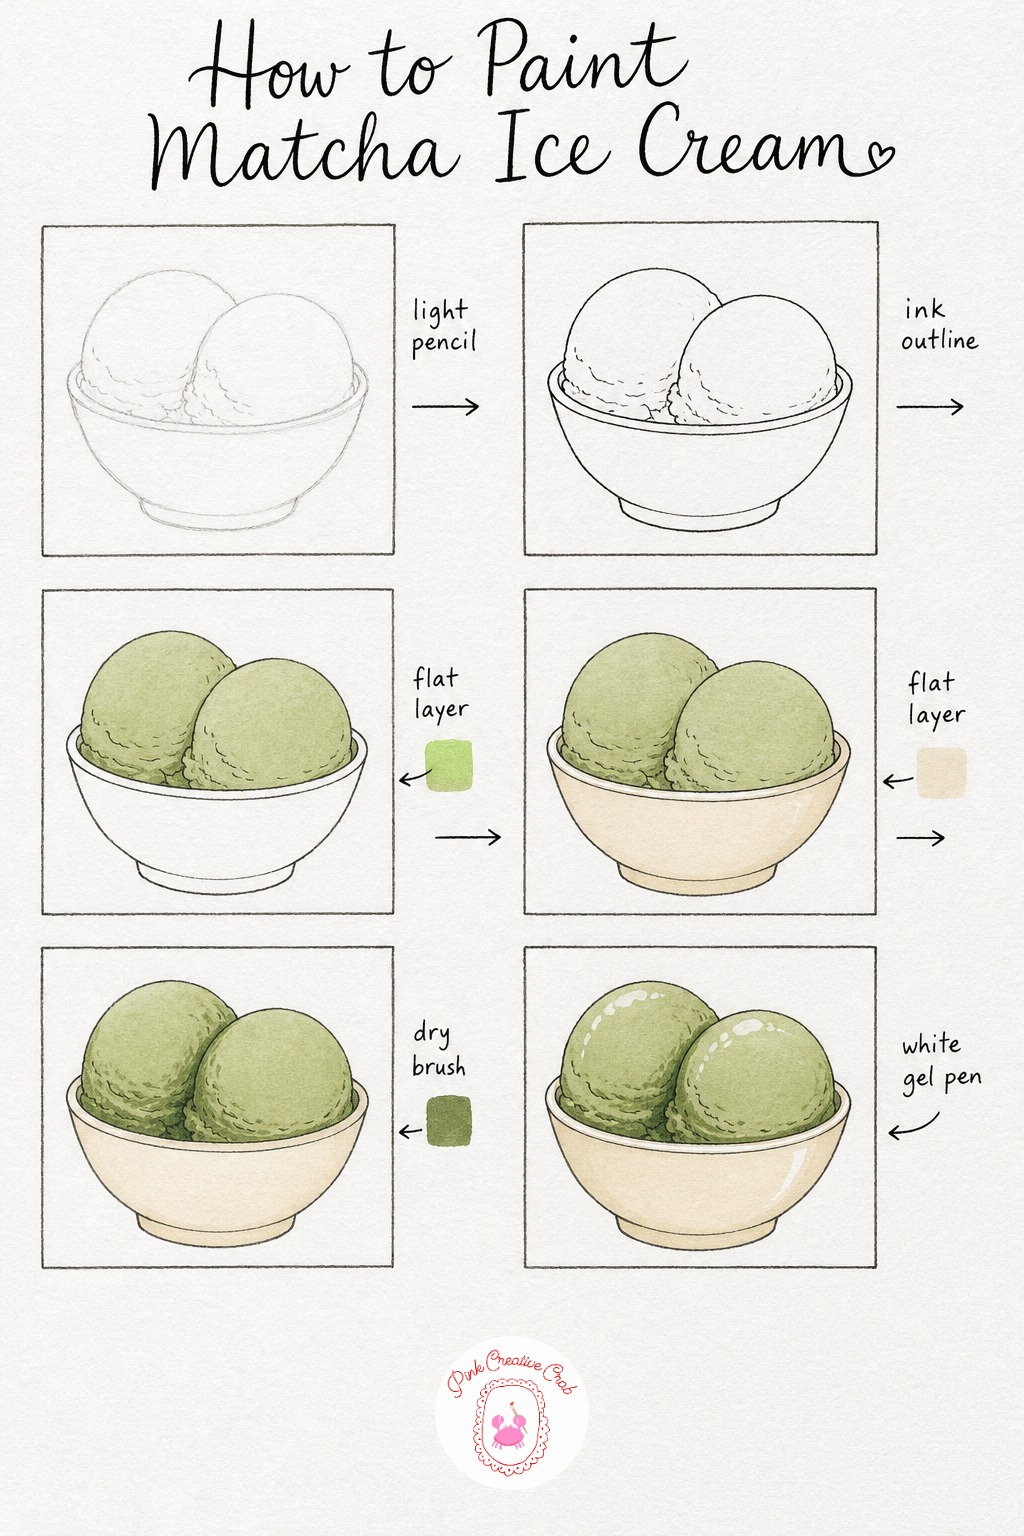
Sketch a simple round bowl, then two soft scoops sitting inside it, slightly overlapping like real scoops do when they melt together a little. Keep the scoop edges a touch uneven rather than perfectly smooth circles.
Once the pencil feels right, trace it in fineliner and let it dry fully before erasing. Lay your pale matcha wash across both scoops in one even layer, then switch to cream for the bowl, keeping the two colors from touching until both layers are completely dry.
The scoops will look flat without a second green layer, so once dry, shade deeper matcha green where the scoops press together and along their lower curves. If your pale green looks too similar to your deep green, test both swatches side by side on scrap paper before committing to the shading stage.
Tip: a few tiny white gel pen dots scattered on the scoops can suggest a light dusting of matcha powder for extra texture.
Chocolate Dipped Strawberries
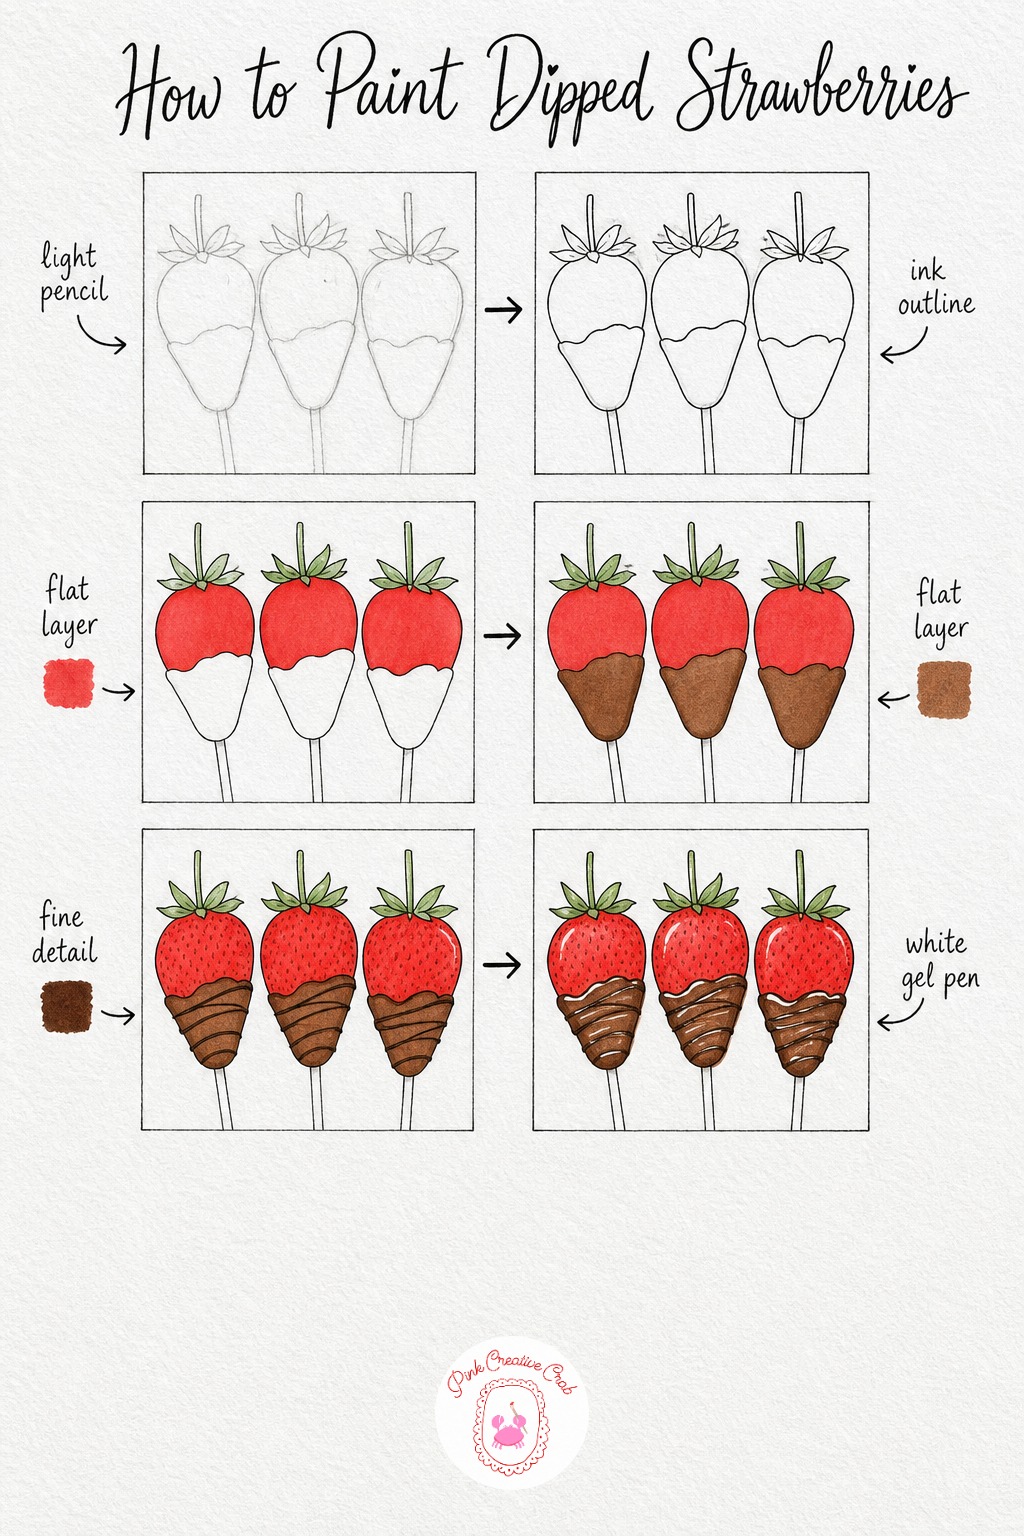
Draw three strawberries in light pencil, each on a short skewer line, with a wavy horizontal line partway up marking where the chocolate coating ends. Vary the height of the dip line on each berry so the set does not look identical.
Trace everything in fineliner, keeping the seed texture for later, then erase your pencil once the ink has dried. Color the uncovered strawberry tops in red first, letting that dry completely before adding warm brown to the dipped sections, since red and brown can muddy fast if they touch while wet.
A common slip is drawing seeds too large or too evenly spaced, so scatter small comma shaped dots at slightly random intervals across the red areas instead. If your fineliner tip is too thick for tiny seeds, a fine gel pen in dark brown works just as well.
Tip: add one thin drizzle line of white gel pen zigzagging over the chocolate for that classic dipped strawberry look.
Lemon Meringue Tart Slice
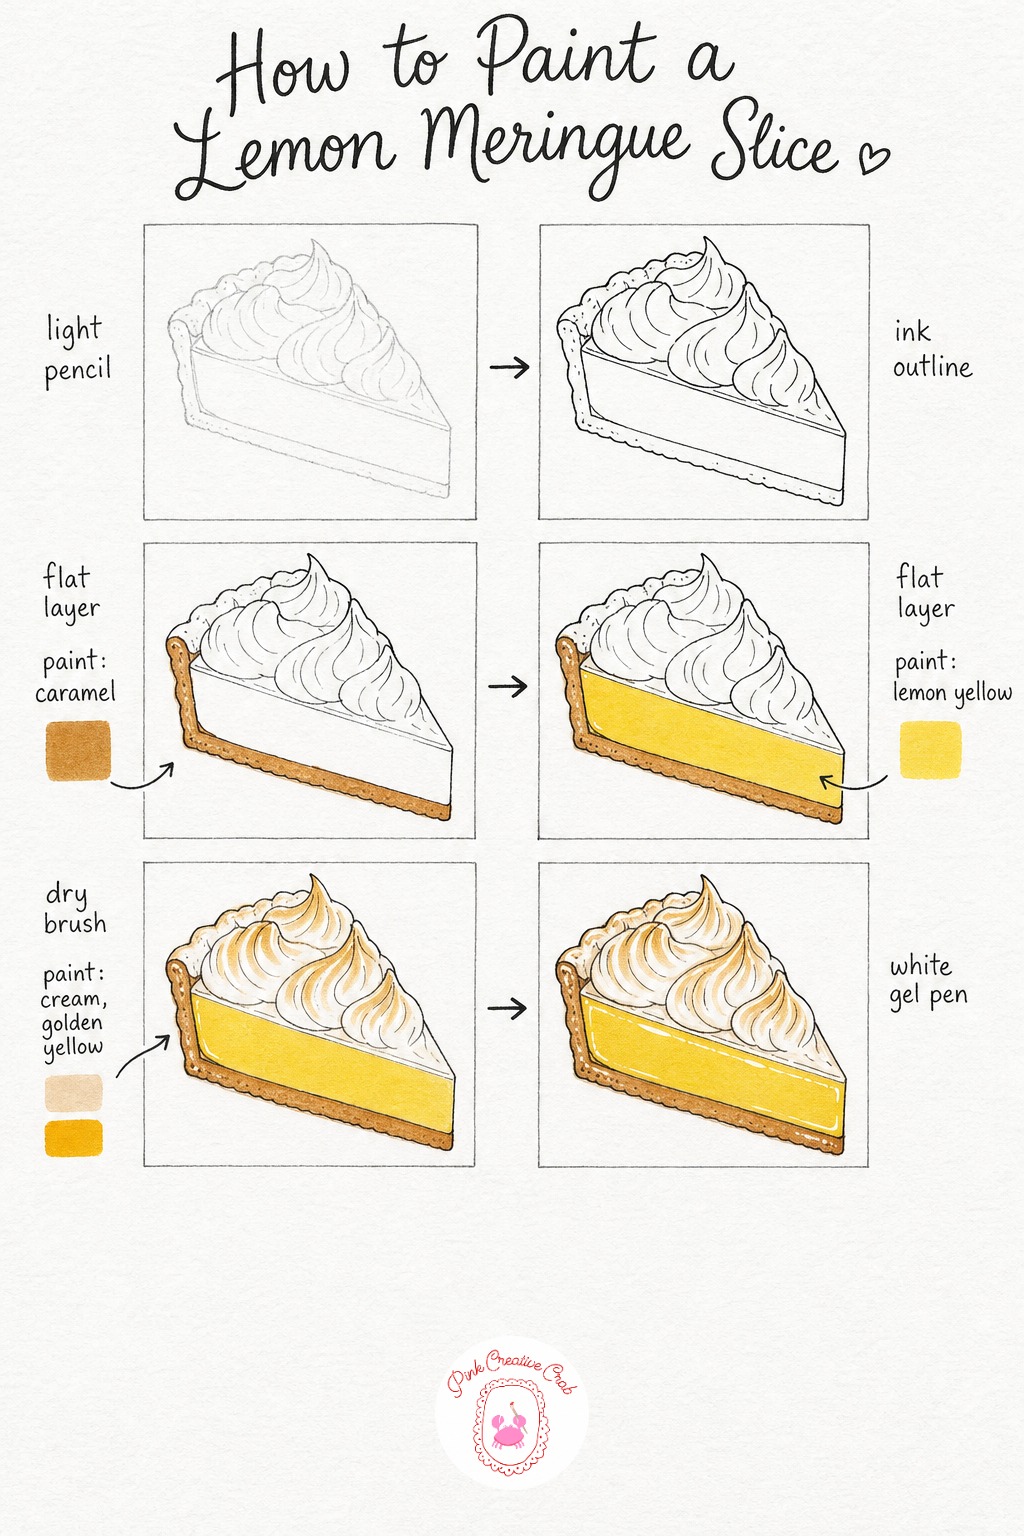
Pencil a wedge shaped slice, then draw a cloud of swirled peaks on top for the meringue, like soft dollops piled up rather than one smooth dome. Keep the crust at the base thin and slightly crumbly looking.
Trace the whole shape in fineliner, taking your time on the meringue swirls since those curved lines carry most of the charm. Once dry, erase the pencil and color the crust in caramel first, letting it dry before the bright yellow curd layer goes in right above it.
Many beginners flatten the meringue with one even cream layer, but real meringue has shadow in the dips between peaks and a touch of golden toasting at the very tips, so add both once the base cream is dry. If your yellow curd looks too pale next to the caramel crust, a second thin layer once dry will deepen it without muddying the edge.
Tip: dot a little golden yellow only at the highest points of the meringue swirls to suggest a light torched finish.
Donut With Sprinkles
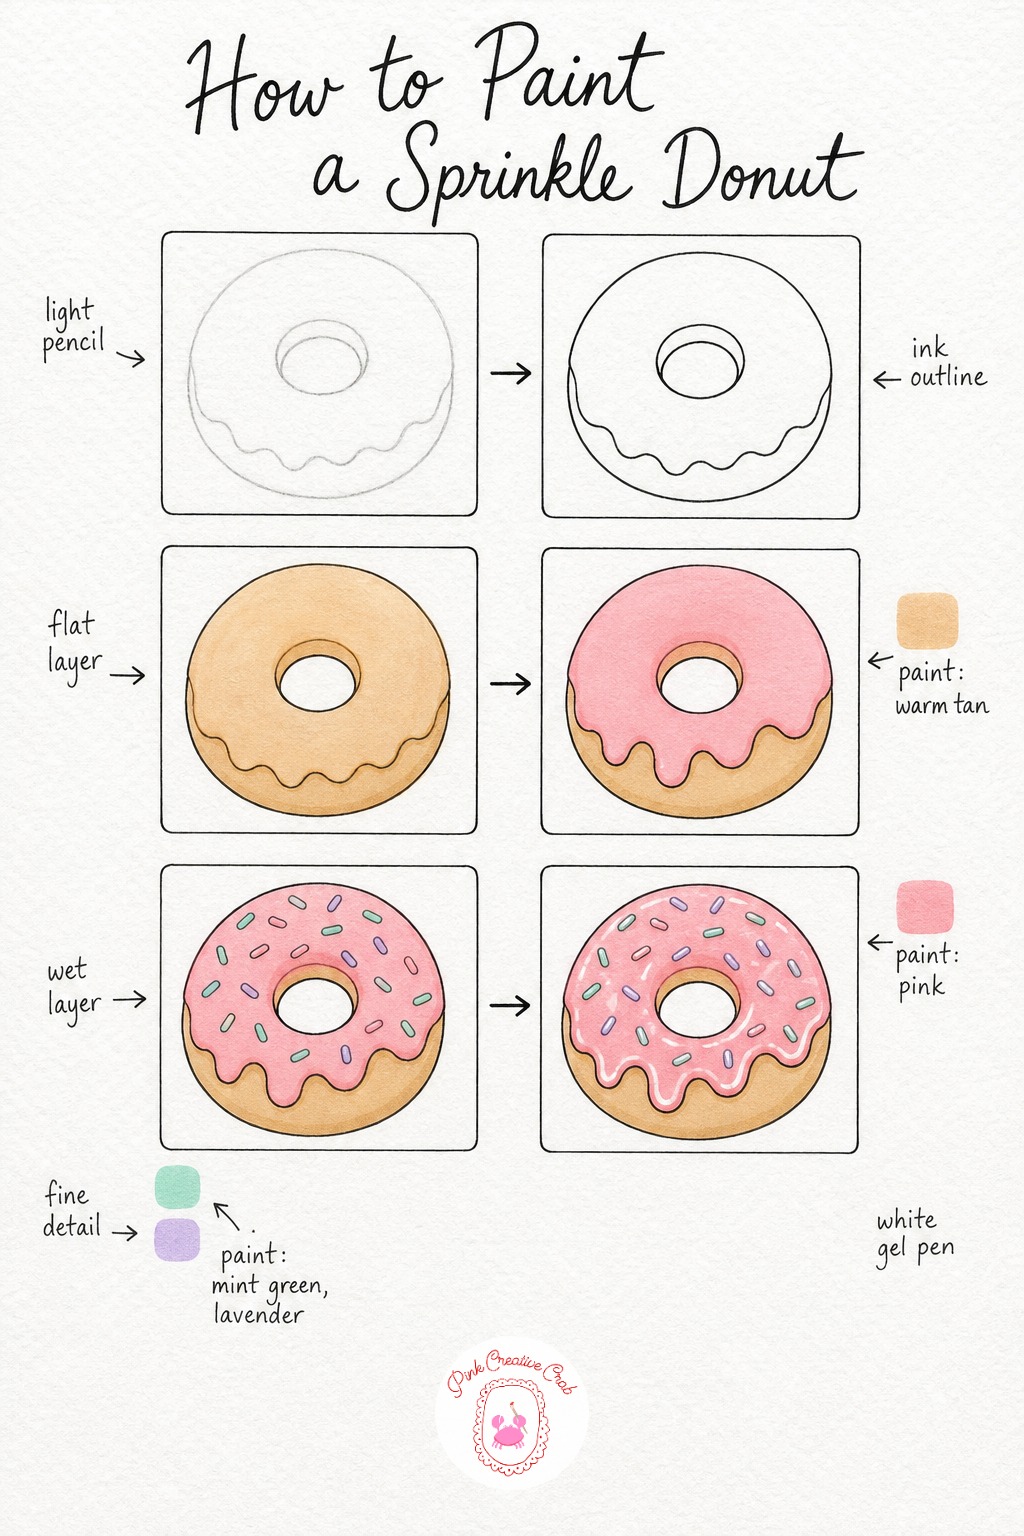
Draw a simple ring shape in light pencil, keeping the donut slightly puffy rather than a flat perfect circle, and mark where the glaze drips down the sides. Trace it in fineliner, including a few drip tails hanging off the bottom edge of the glaze line.
Once the ink is dry, erase the pencil and lay a warm tan wash across the entire ring first, since this base layer will peek through at the glaze edges and give it warmth. Let that dry fully before adding the pink glaze wash only over the top portion.
Sprinkles are where beginners tend to overcrowd the donut, so space them unevenly in small clusters rather than a uniform grid, and mix in two or three colors instead of just one. If your sprinkle colors look washed out against the pink, outline a few in fineliner once dry to make them pop.
Tip: let the glaze drip irregularly past the donut’s edge in two or three spots for a fresh glazed look rather than a clean straight line.
Croissant With Jam
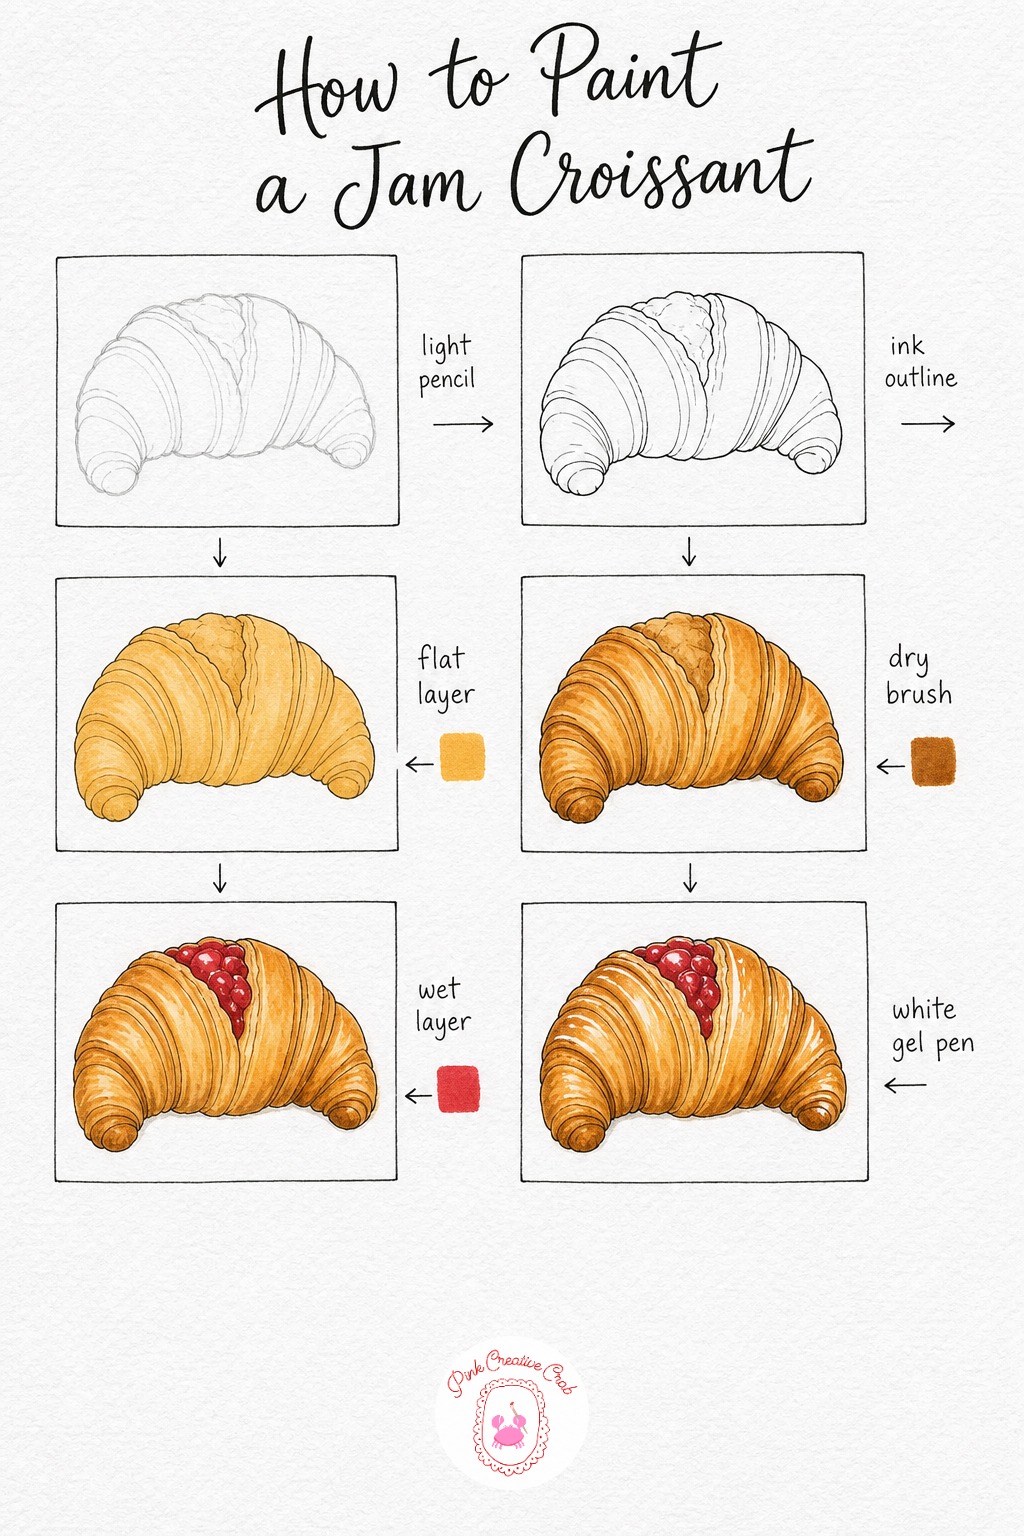
Sketch a curved crescent shape in light pencil, then add a few diagonal lines across it to suggest the flaky layered texture, and a small split near the top where jam will sit. Keep the curve asymmetrical, a perfectly even crescent looks more like a banana than a croissant.
Trace your lines in fineliner, paying extra attention to the flaky ridge lines since they give the croissant its texture before any color goes down. Erase the pencil once dry, then lay a golden wash across the whole shape, letting it dry before deepening the ridges with brown.
Beginners often paint the jam as a flat red blob, but real jam pools and glistens, so leave a tiny gap of golden paper showing through near its edge for shine. If your red looks too flat once dry, a second small patch of red layered only in the center deepens it nicely.
Tip: shade the underside curve of the croissant a touch darker than the top, it gives the whole shape real roundness.
Red Velvet Cupcake
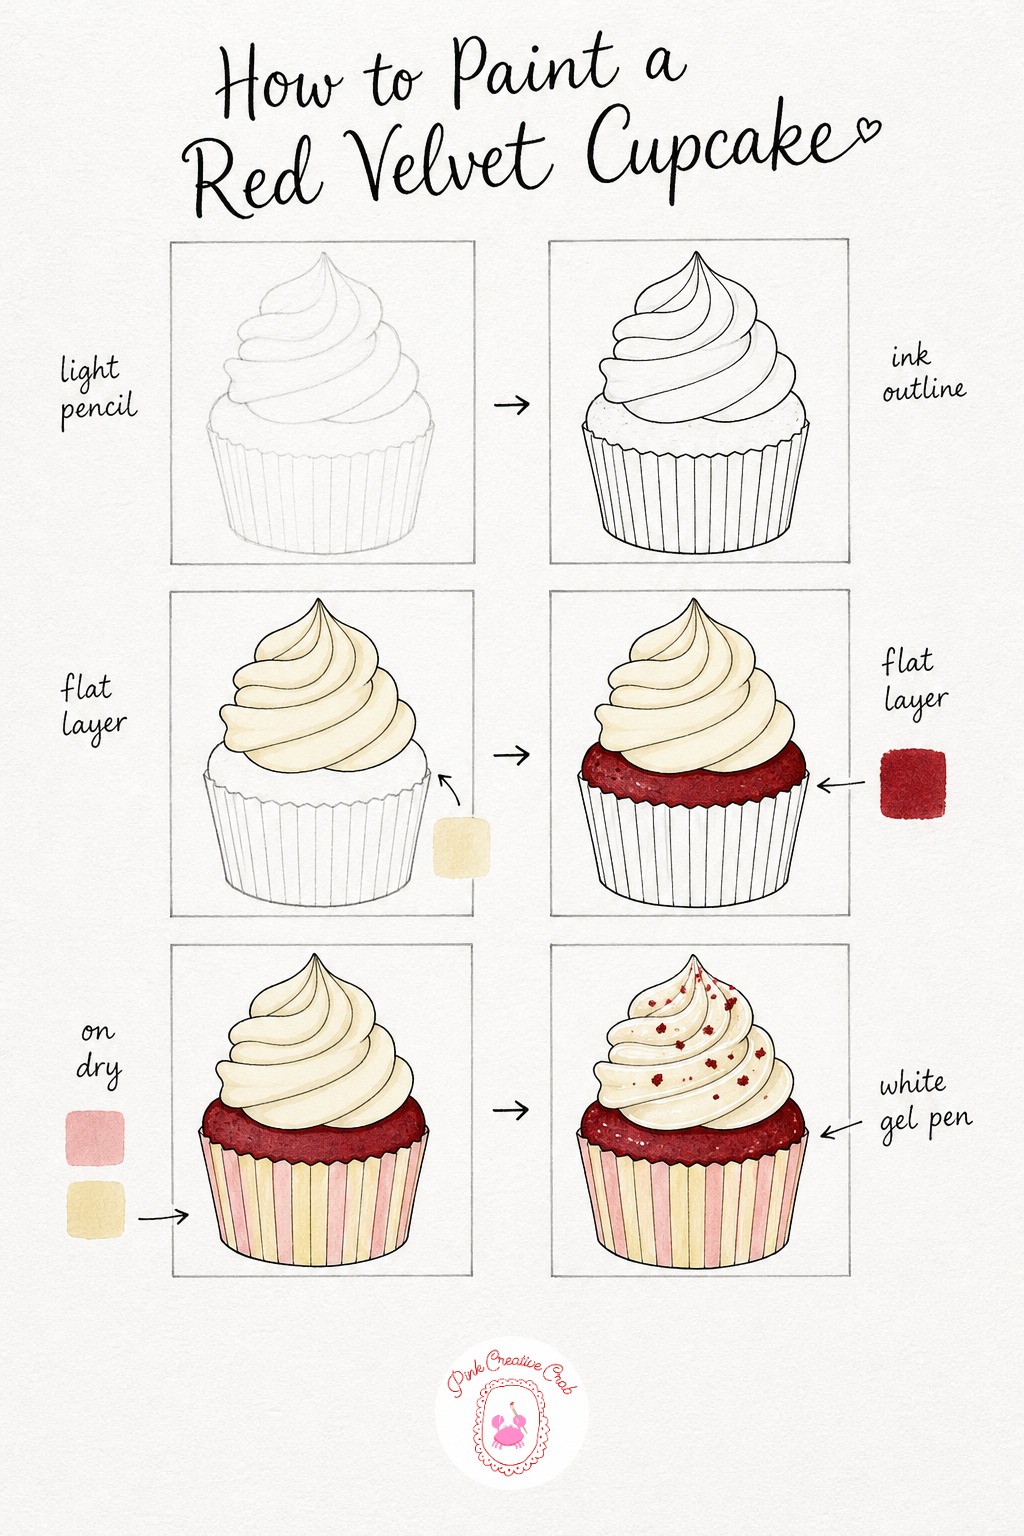
Draw a cupcake shape with a pleated liner at the base and a swirled frosting peak on top, keeping the swirl lines spiraling gently rather than sharp and angular. Trace the whole thing in fineliner, including the pleats in the liner, then let it dry before erasing pencil.
Color the frosting swirl in cream first since it is the largest light area, then once dry, bring in deep red for the small strip of cake visible beneath it. The red and cream should never touch while either is still wet, or the frosting will pick up a pink tint you did not plan for.
The liner is where this cupcake gets its personality, so alternate two pastel colors down each pleat rather than coloring it one flat shade. If your pleat lines blur together, redraw the fineliner divisions lightly once the color is fully dry.
Tip: a few tiny dark red crumb flecks scattered on the cream frosting hint at the red velvet cake underneath.
Blueberry Pie Slice
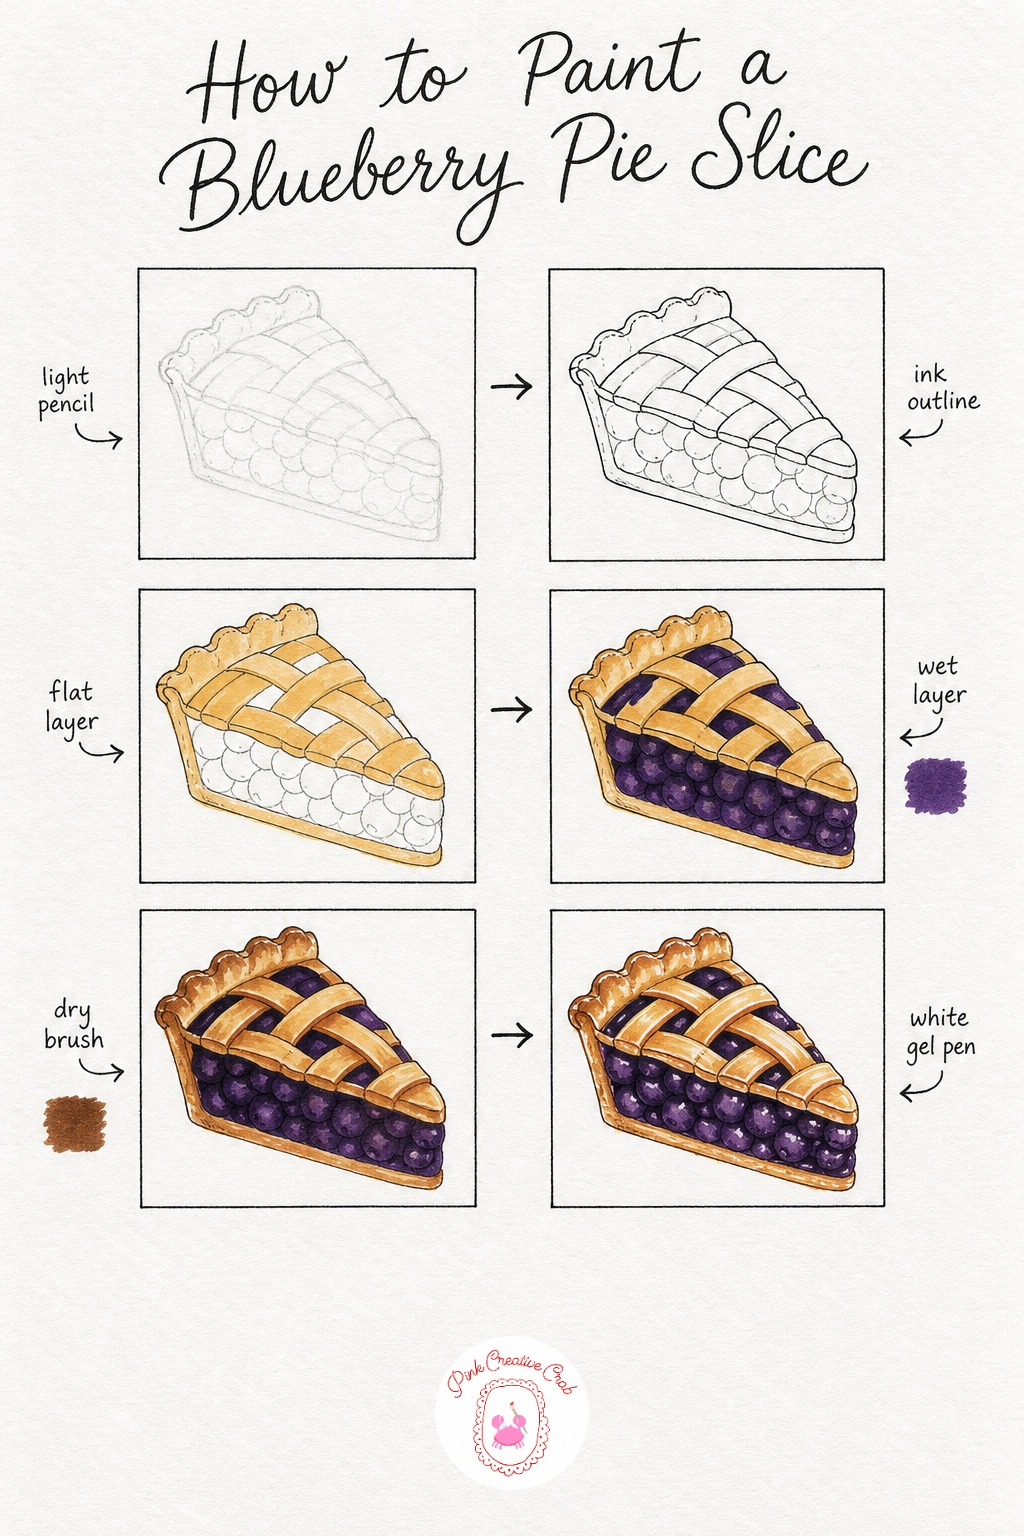
Sketch a wedge shaped slice with a crimped edge crust, then draw a simple woven lattice of three or four strips across the top. Keep the lattice strips slightly uneven in width, a hand pressed lattice never comes out perfectly matched.
Trace it all in fineliner, taking care where the lattice strips cross over each other, then erase the pencil once dry. Color the whole crust in golden brown first, letting it dry before filling the gaps between lattice strips with deep blueberry purple.
Beginners sometimes color the lattice strips themselves purple by accident, so work slowly and keep your purple only inside the gaps where filling peeks through. If the purple bleeds onto a strip, a quick golden layer over the top once dry can usually cover the mistake.
Tip: shade the underside of each lattice strip a touch darker where it casts a tiny shadow onto the filling below, it makes the weave look three dimensional.
Parfait With Berries
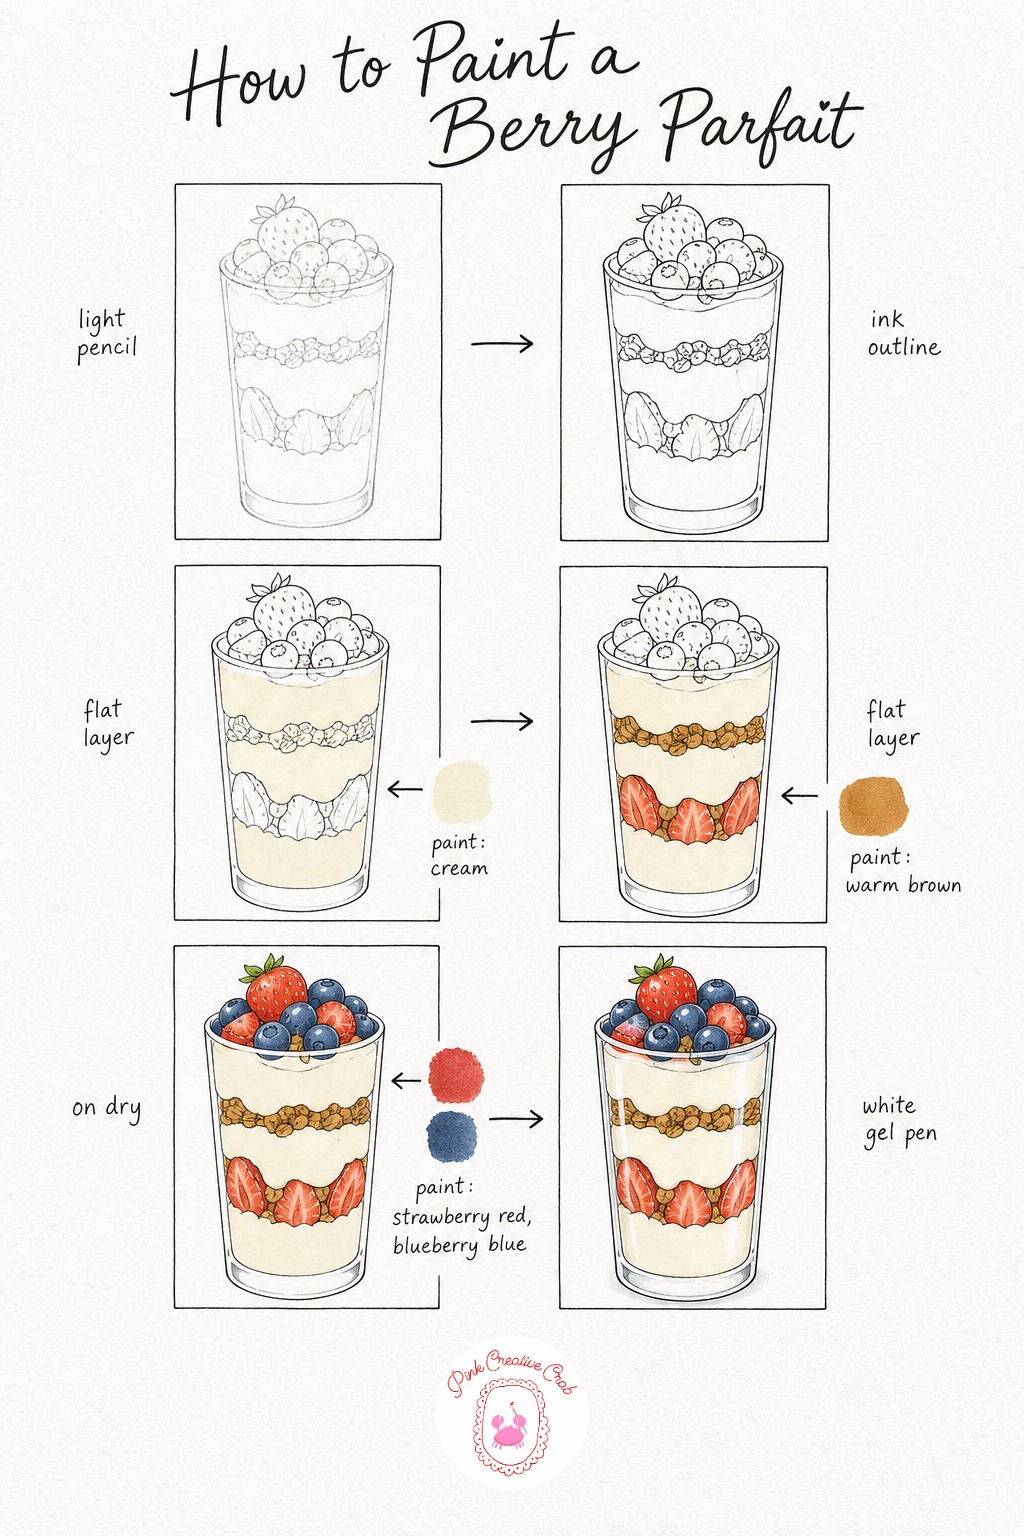
Draw a tall straight sided glass, then divide the inside into three or four horizontal bands for yogurt and granola layers, finishing with a small pile of berries mounded on top. Keep the layer lines slightly curved rather than ruler straight, since liquid settles with a gentle dip.
Trace everything in fineliner, including the glass rim and each berry outline, then erase pencil once dry. Color the cream yogurt bands first, letting each dry before the warm brown granola bands go in right next to them, so the layers stay distinct instead of blending into mud.
The berries on top are the most fun part but also where edges get lost, so paint the red strawberries and blue berries with a visible gap of white paper between each one. If a berry color bleeds into its neighbor, a thin dark outline in fineliner once dry can separate them again.
Tip: vary the thickness of each layer band slightly, it keeps the parfait looking hand layered rather than machine perfect.
Chocolate Cake Wedge
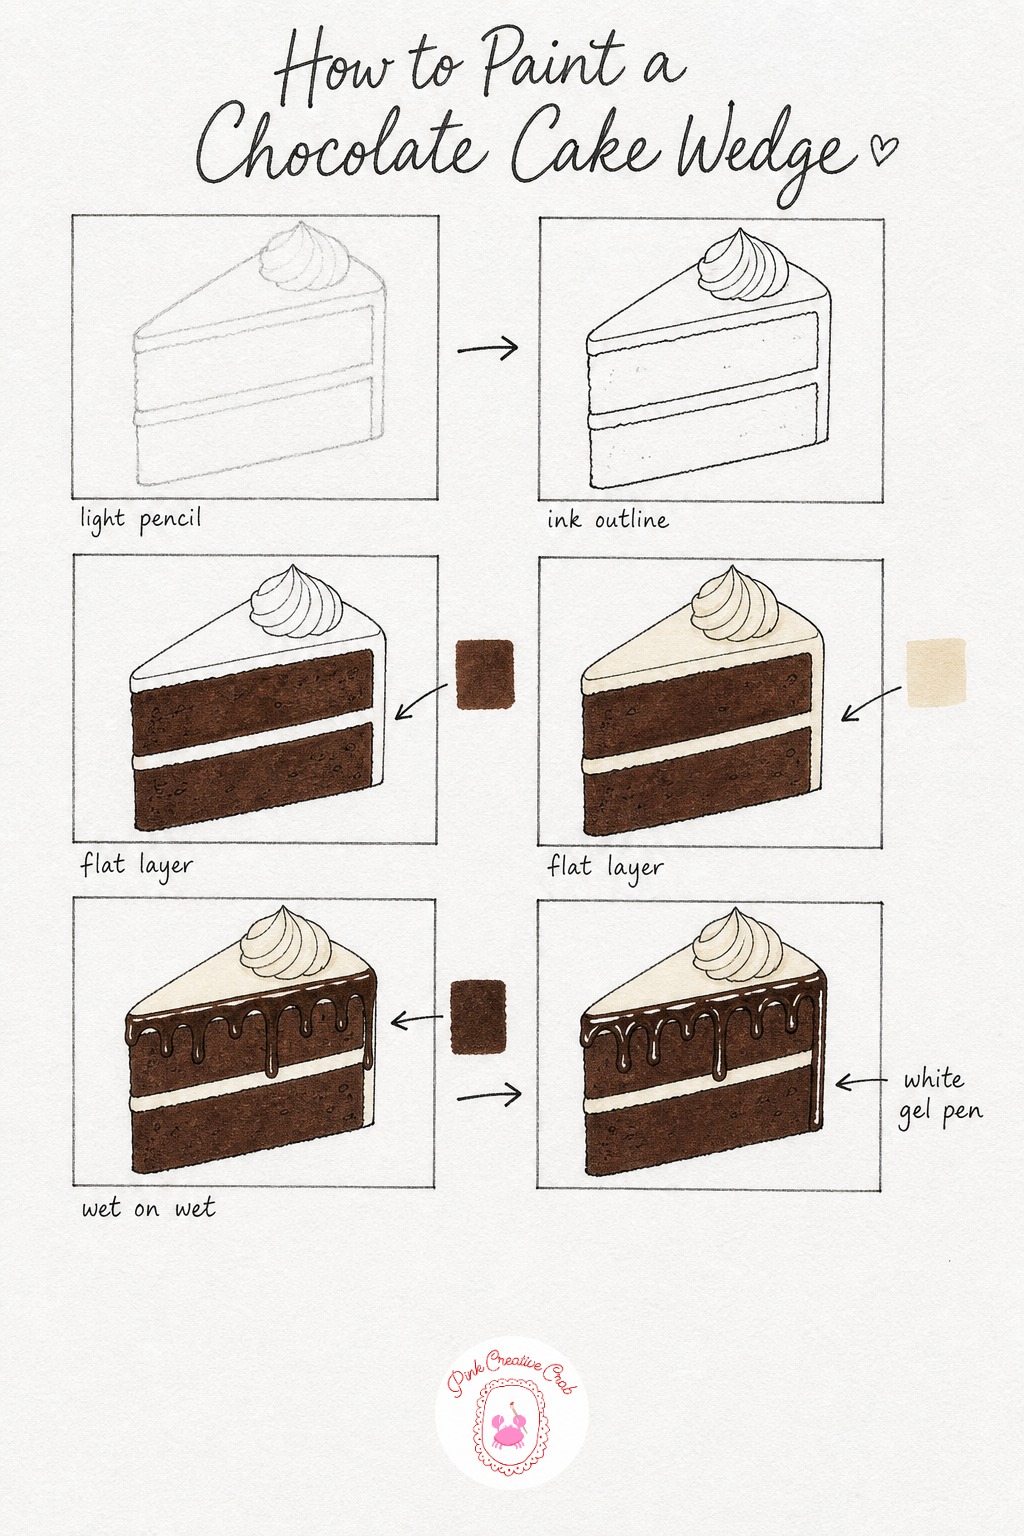
Pencil a tall wedge of cake standing upright, with one thin horizontal band marking the filling layer and a frosted cap on top. Keep the top edge slightly rounded rather than flat, since frosting naturally domes a little.
Trace it in fineliner, then erase your pencil once dry. Lay the dark chocolate wash across both cake sections first in one confident pass, letting it dry completely before the cream filling band and top frosting go in, so the dark and light stay crisp against each other.
The drip detail trips up a lot of beginners because it needs to look wet and uneven, so paint it in short irregular drips of varying length hanging from the frosted edge rather than one even line. If the drip color looks too flat, a second thin layer only at the very tip of each drip adds a nice pooled look.
Tip: leave a sliver of cream filling peeking out at the cut edge, it makes the wedge read instantly as cake rather than a solid brown block.
Waffle With Syrup
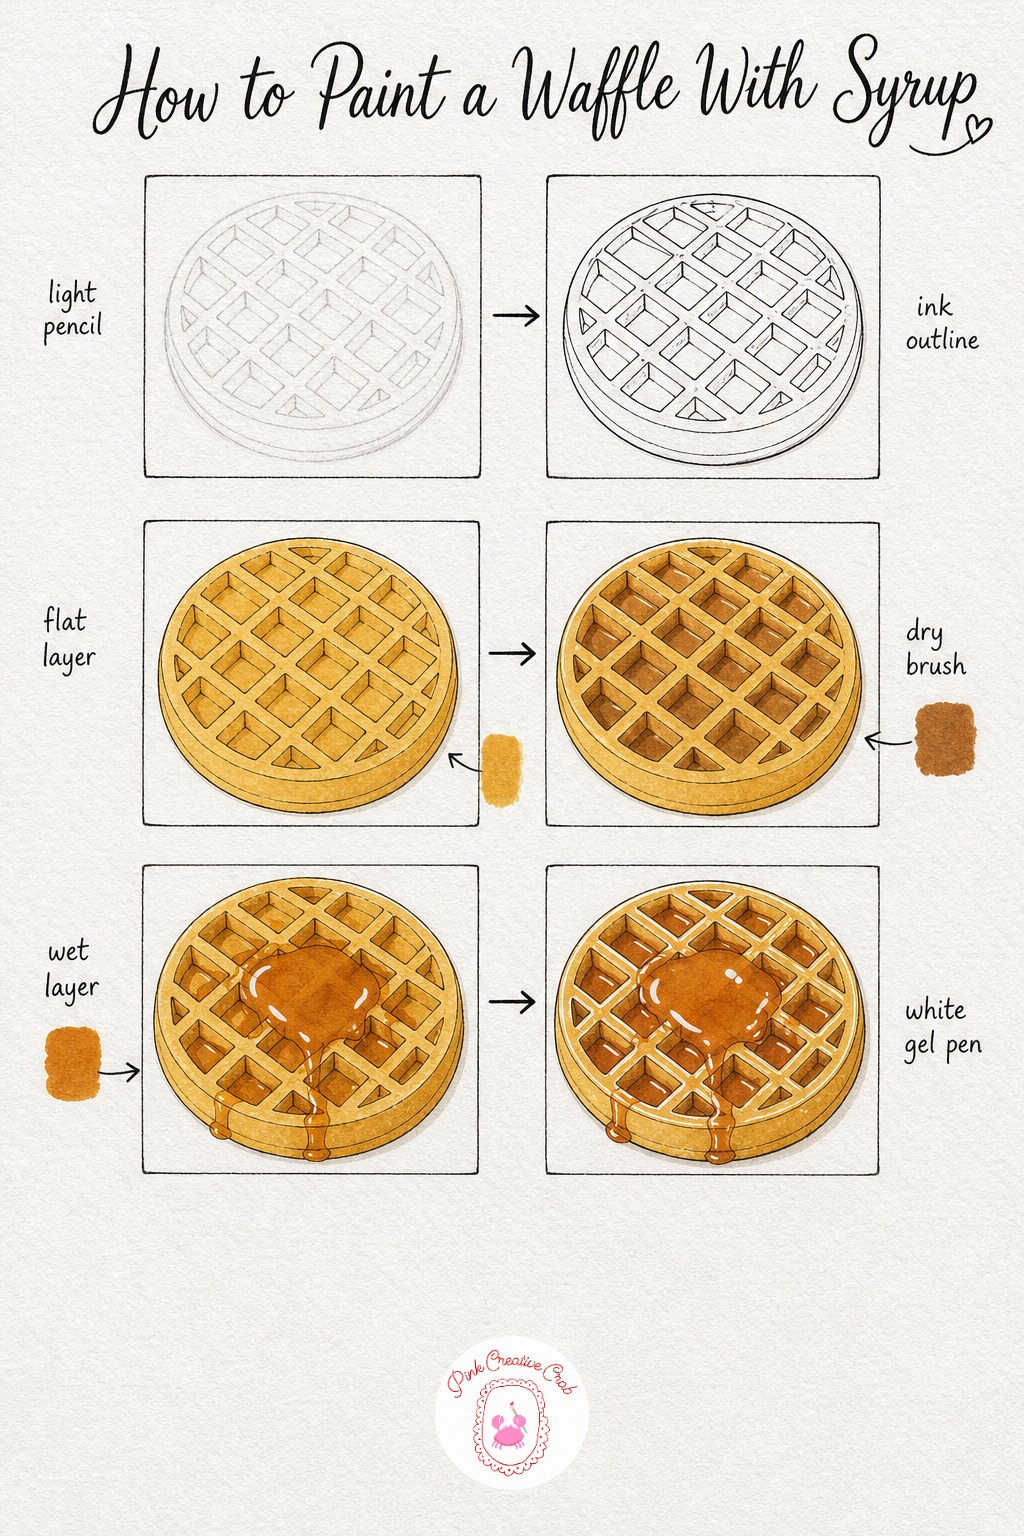
Draw a round waffle shape divided into a simple grid, keeping the lines slightly wavy to suggest a soft baked texture rather than a ruled graph. Trace the outer edge and grid lines in fineliner, then let it dry fully before erasing pencil.
Lay a golden wash across the entire waffle first, then once dry, shade the inside of each little grid pocket with a deeper brown, leaving the raised ridges lighter so the grid pattern actually reads. This is the step beginners tend to rush, but the contrast between pocket and ridge is what gives a waffle its texture.
Add the amber syrup wash last, pooling it thicker in the center square and letting thin trails bleed into two or three neighboring pockets. If your syrup color looks too orange, a second thin golden layer underneath before it dries can warm it down to a richer amber.
Tip: leave a few grid ridges completely free of syrup so the dry waffle texture still shows through the shine.
Peach Cobbler Bowl
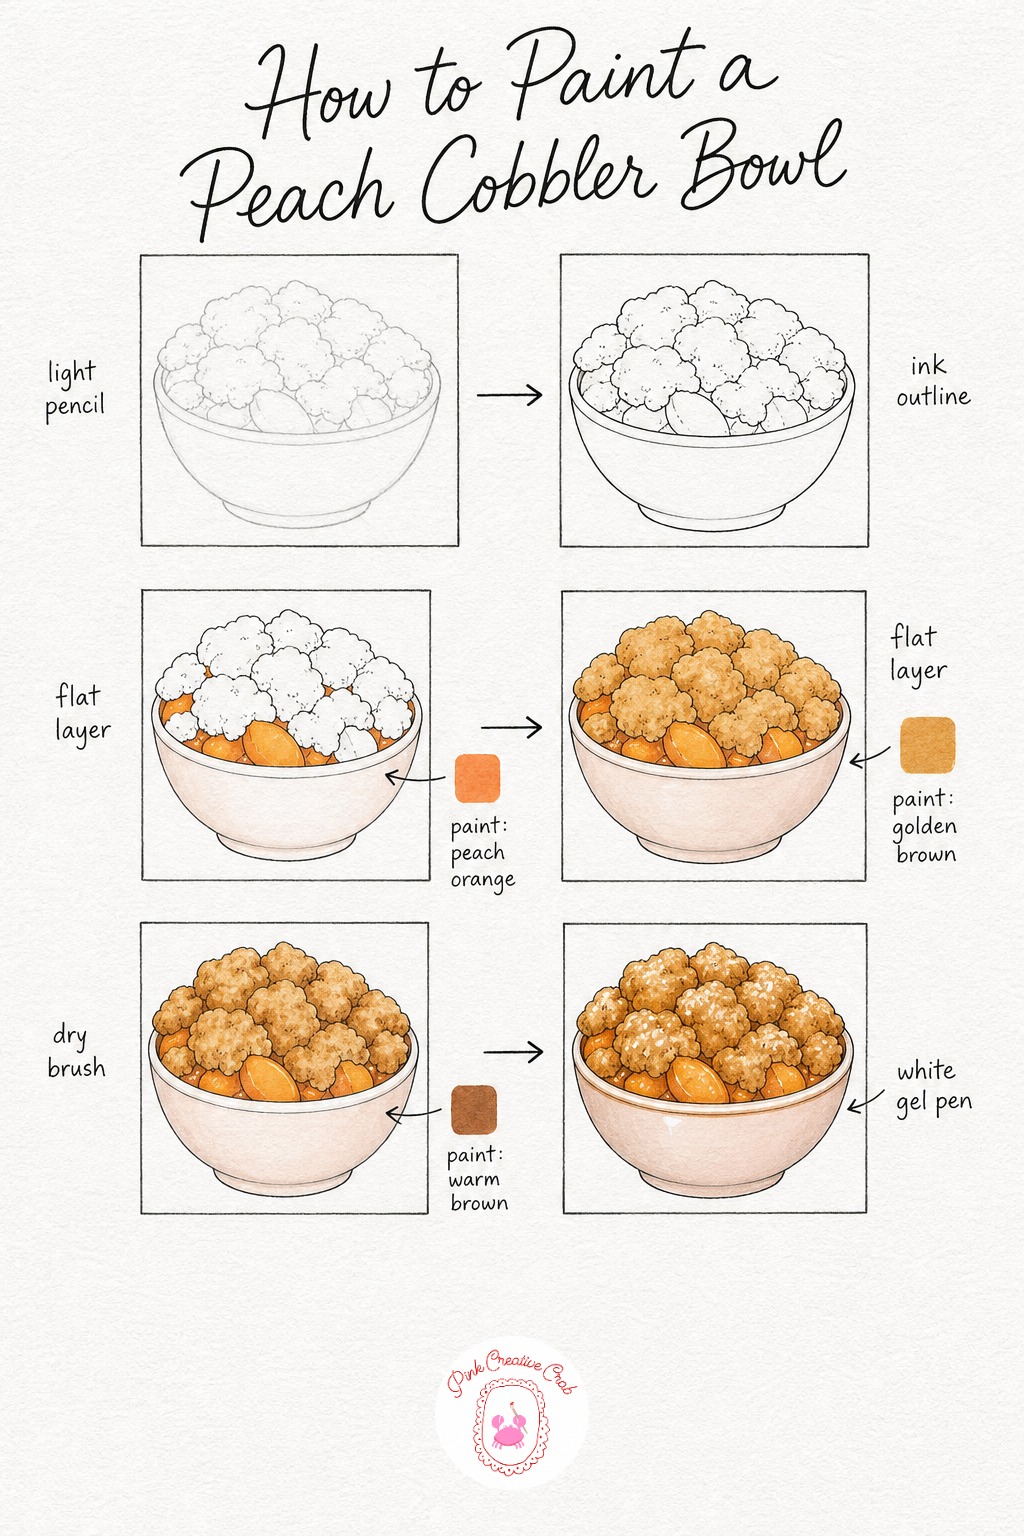
Sketch a shallow bowl filled with an irregular crumbly topping, drawing lots of small uneven lumps rather than one smooth dome, with a few gaps where orange filling shows through underneath. Trace it in fineliner, letting the crumb edges stay a little jagged and informal.
Once dry, erase pencil and color the visible peach filling gaps first in warm orange, then move to the golden topping once that orange layer is fully dry so the two tones do not blend together. Keep your marker strokes short and varied across the topping rather than one smooth sweep, which helps sell the crumbly texture.
The shading stage is what turns a flat golden blob into something that actually looks baked, so push deeper brown into the little crevices between crumb clusters rather than across the whole surface. If the topping still looks flat, a few extra dark brown dots scattered on top add instant texture.
Tip: let a tiny bit of orange filling bubble up and over the edge of the topping in one spot for a fresh out of the oven look.
Birthday Cupcake With Candle
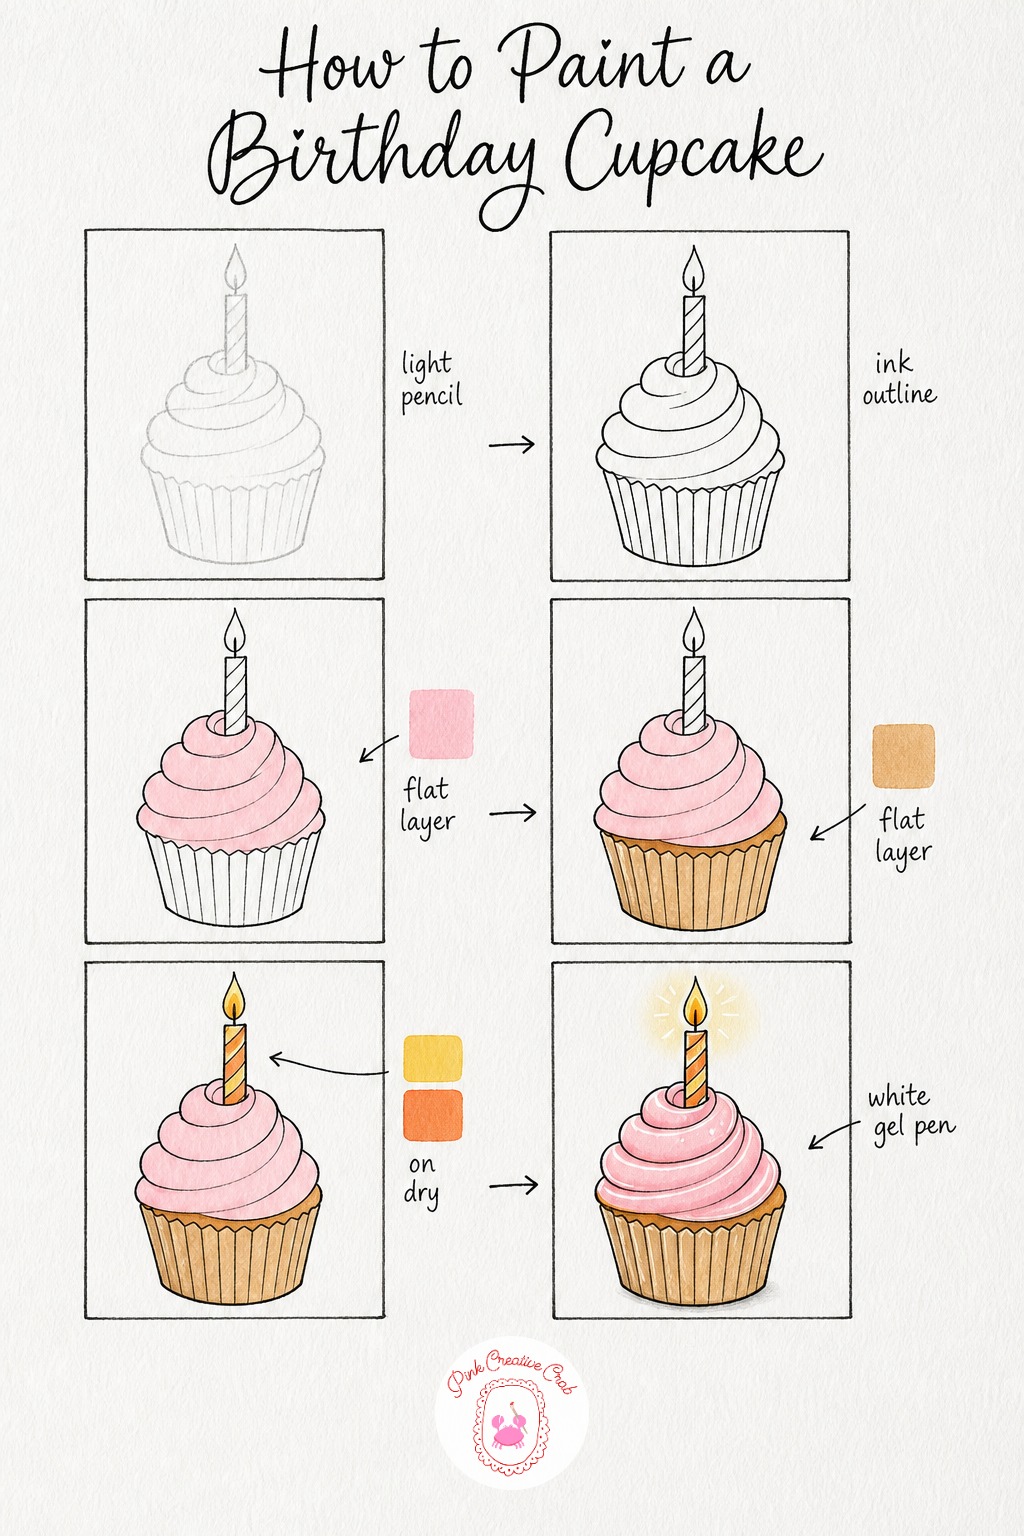
Draw a cupcake with a swirled frosting peak, a pleated liner, and one thin candle standing in the center with a small flame on top. Keep the flame shape teardrop soft rather than sharply pointed.
Trace everything in fineliner, then erase the pencil once the ink is dry. Color the frosting swirl in blush pink first, letting it dry before the tan cake base goes in right below, keeping the two separated cleanly at the liner line.
The candle and flame are small but important, so take your time painting the flame in yellow with a touch of orange at its base, since that gradient is what makes it glow rather than look like a solid triangle. If your flame colors blend too much, let the yellow dry fully before adding orange only at the very bottom.
Tip: a soft white gel pen glow ring around the flame, not just on it, makes the whole cupcake feel lit from within.
Coffee and Pastry Corner
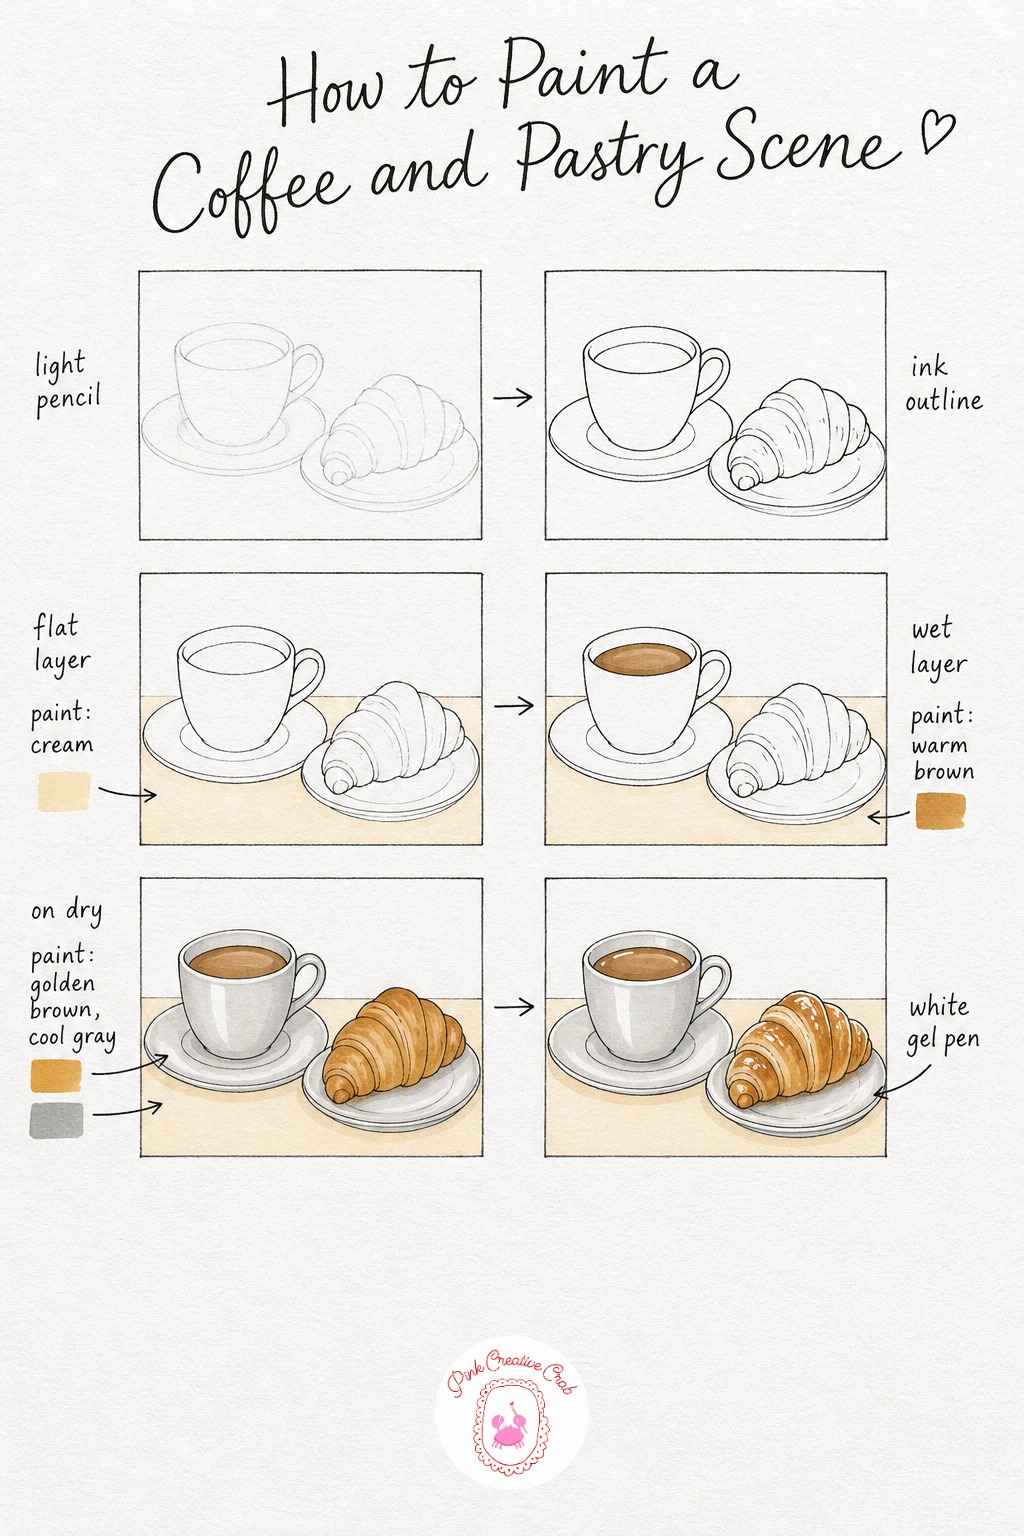
Lay out a small scene with a coffee cup and saucer on one side and a croissant resting on a little plate beside it, keeping both objects close together so the composition feels cozy rather than scattered. Light pencil first, then trace the whole arrangement in fineliner once you are happy with the placement.
Fill the background tabletop with a very pale cream wash so it reads as a surface without pulling attention from the food, and let that dry completely before working on the cup. Paint the coffee itself with a warm brown wash kept just inside the rim, leaving a thin ring of white cup showing at the very top edge.
Beginners often color the cup and croissant the same warmth of brown, which flattens the whole scene, so cool the cup down with a soft gray while keeping the croissant warm and golden. If your coffee wash looks too dark, a lighter brown layered on top once dry can soften it into a creamier tone.
Tip: a thin curl of steam drawn only in fineliner above the cup, left uncolored, adds warmth without any extra marker work. For more small scene ideas like this one, the picnic drawing lessons follow a similar cozy approach.
Dessert Table Display
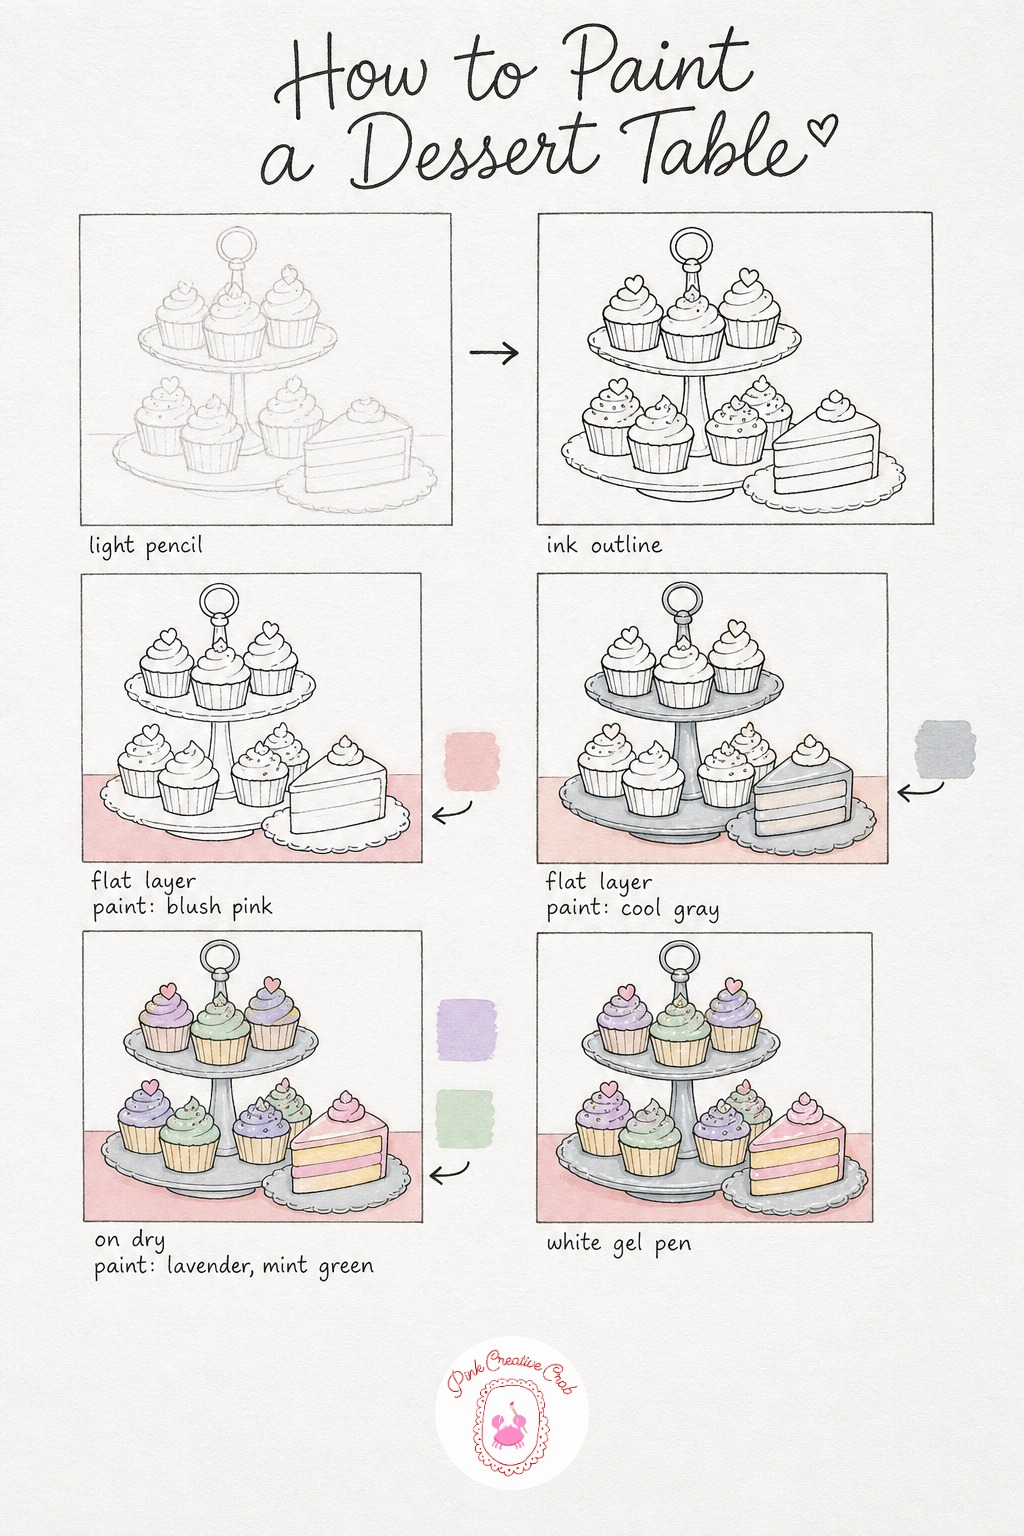
Sketch a simple two tier stand holding three or four small cupcakes, with a single cake slice sitting on the table just beside it, keeping the whole grouping fairly compact. Trace it all in fineliner once the layout feels balanced, then erase the pencil underneath.
Wash the background in a very pale pink first, letting it dry fully before the gray stand goes in, since the stand needs to read as a separate solid object rather than blending into the backdrop. Keep your gray cool and light so it does not compete with the pastel treats sitting on it.
With several small desserts in one scene, the easiest mistake is making every frosting the same color, so split your pastels across lavender, mint and cream and let each cupcake dry before its neighbor gets colored. If two colors touch while wet, a quick fineliner redraw along that edge once dry can clean it back up.
Tip: scatter a few tiny white gel pen sprinkle dots across different treats rather than just one, it ties the whole display together. If you enjoy composing small sweet scenes like this, the easy step by step drawing ideas offer more gentle scene practice.
What to Do Next
Pick one dessert from the list, gather your fineliners and markers, and work through its stages one at a time rather than rushing to the finish. Each little sheet is meant for a single relaxed sitting, so keep your pencil light, your colors layered slow, and let the white gel pen have the last word.
Frequently Asked Questions
Do I need alcohol markers to draw these desserts, or can I use regular markers?
Alcohol markers blend smoother and layer better, but regular felt tip markers or colored pencils still work fine for dessert drawing, you just build color gradually in thinner layers instead of one smooth wash.
Why does my marker color look patchy once it dries?
Patchy color usually means the layer dried before you finished coloring that section, so work in quick even strokes across one shape at a time and go back over lightly once fully dry if needed.
What paper works best for marker dessert drawing?
Smooth marker or bristol paper works best because it resists bleeding and keeps fineliner lines crisp, while regular printer paper tends to let alcohol marker ink feather past your ink outlines.
How do I stop my fineliner ink from smudging under the markers?
Let the fineliner dry for at least a minute before erasing pencil or adding marker, and always let one marker color dry fully before placing another color right beside it.
In what order should I color each dessert drawing?
Always start with the lightest, largest areas like backgrounds or cream tones, then move to the main dessert colors, and finish with darker shading and white gel pen highlights last.
Have any thoughts?
Share your reaction or leave a quick response — we’d love to hear what you think!
-
 0
-
0
-
0
-
0
-
0
-
0


