

Table of Contents
- Lemon Tree in Porcelain Pot
- Gingham Bow
- Hydrangea Bloom
- Bowl of Blueberries
- Blueberry Jam Jar
- Blue and White Teapot With Olive Sprig
- Chinoiserie Ginger Jar
- Delft Tile
- Chinoiserie Teacup and Saucer
- Cornflower Stems in a Jug
- Blue and White China Stack
- Scene: Lemon Tree Terrace Corner
- Scene: Hydrangea Bush by a Blue Door
- Scene: Blueberry Picking Basket in a Garden
- Frequently Asked Questions
If you love that classic grandmillennial look, blue and white painting is the most satisfying way to bring it onto paper. I keep coming back to this palette because one pot of cobalt, a little navy and a touch of sky blue can carry an entire picture, with just a whisper of green and yellow to keep things fresh and alive.
Below you will find fourteen small subjects, from a gingham bow to a lemon tree in its porcelain pot, each one built in a handful of easy stages so you can start with a pencil line and finish with a painted piece before you put your brush down. Pick whichever one catches your eye today and paint along.
Using these images: free for personal projects such as printing, coloring, cards, journals and gifts. Handmade items that include them may be sold up to 30 pieces per design. More than that is commercial use and is not permitted, and neither is selling or sharing the images themselves or passing them off as your own. Please ask before any other use.
Lemon Tree in Porcelain Pot
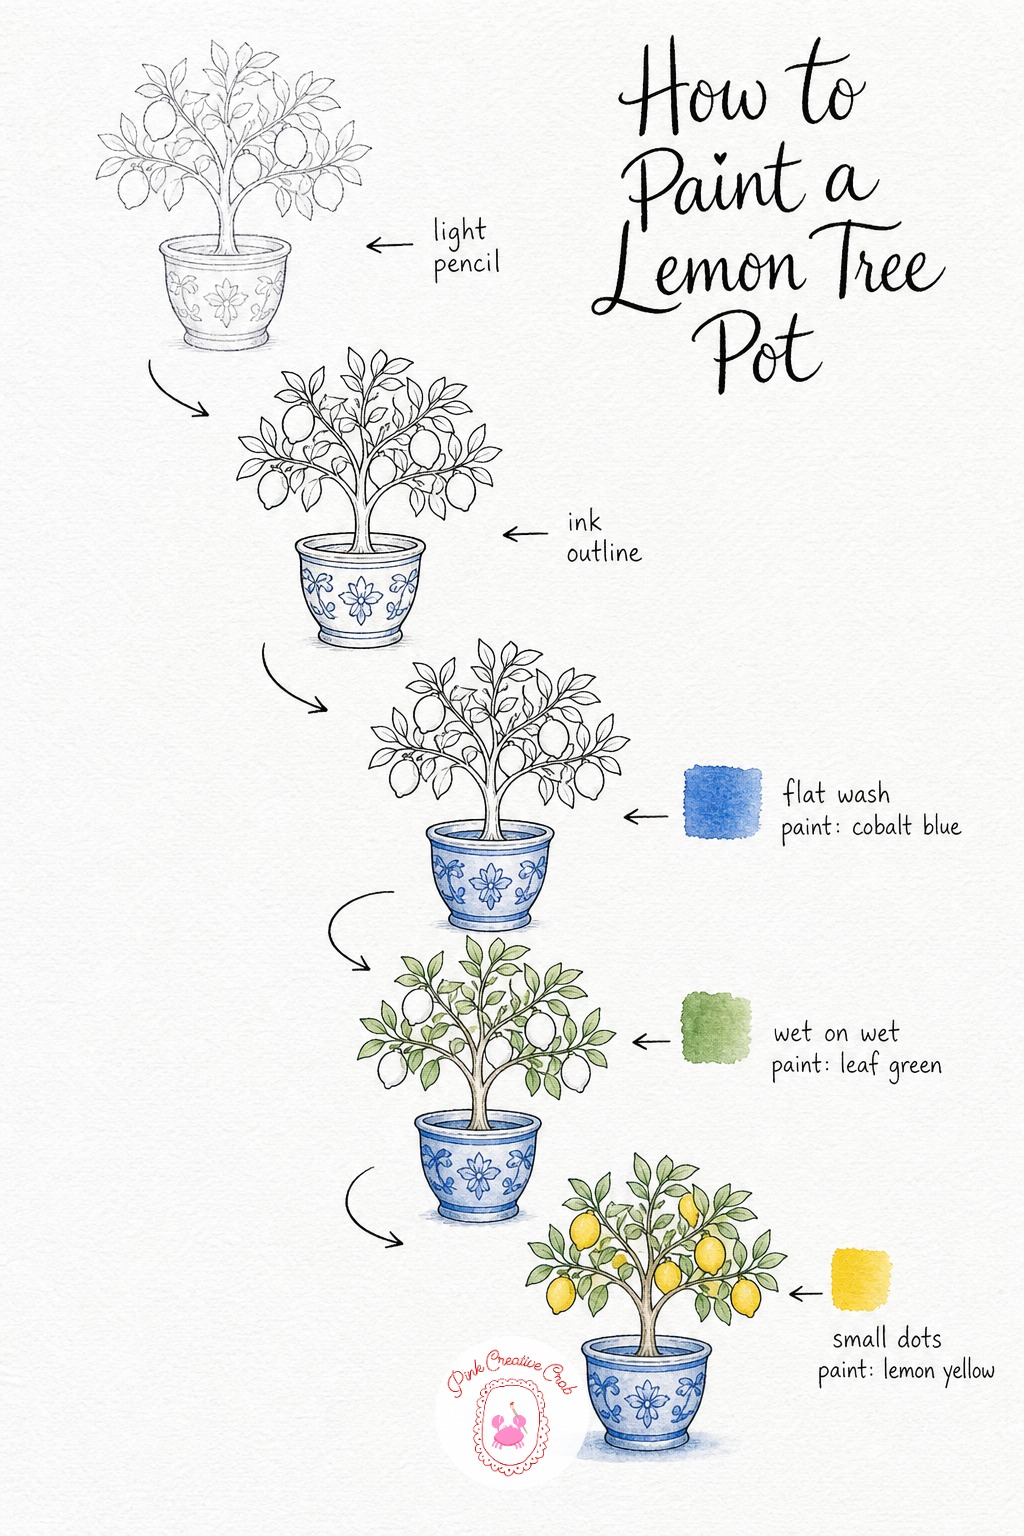
Start with a light pencil sketch of a stubby little tree in a round pot, then go over the whole thing with a fine black ink line so the shape stays crisp under the paint. Once the ink is dry, lay a pale cobalt wash across the whole pot and let a soft leaf green wash settle wet on wet over every leaf cluster.
Add little lemon yellow dots for fruit once the green has dried a touch, then finish with navy pattern lines and a shadow along one side of the pot to give it real weight. Keep the lemons small and scattered rather than perfectly round, it reads more natural that way.
Gingham Bow
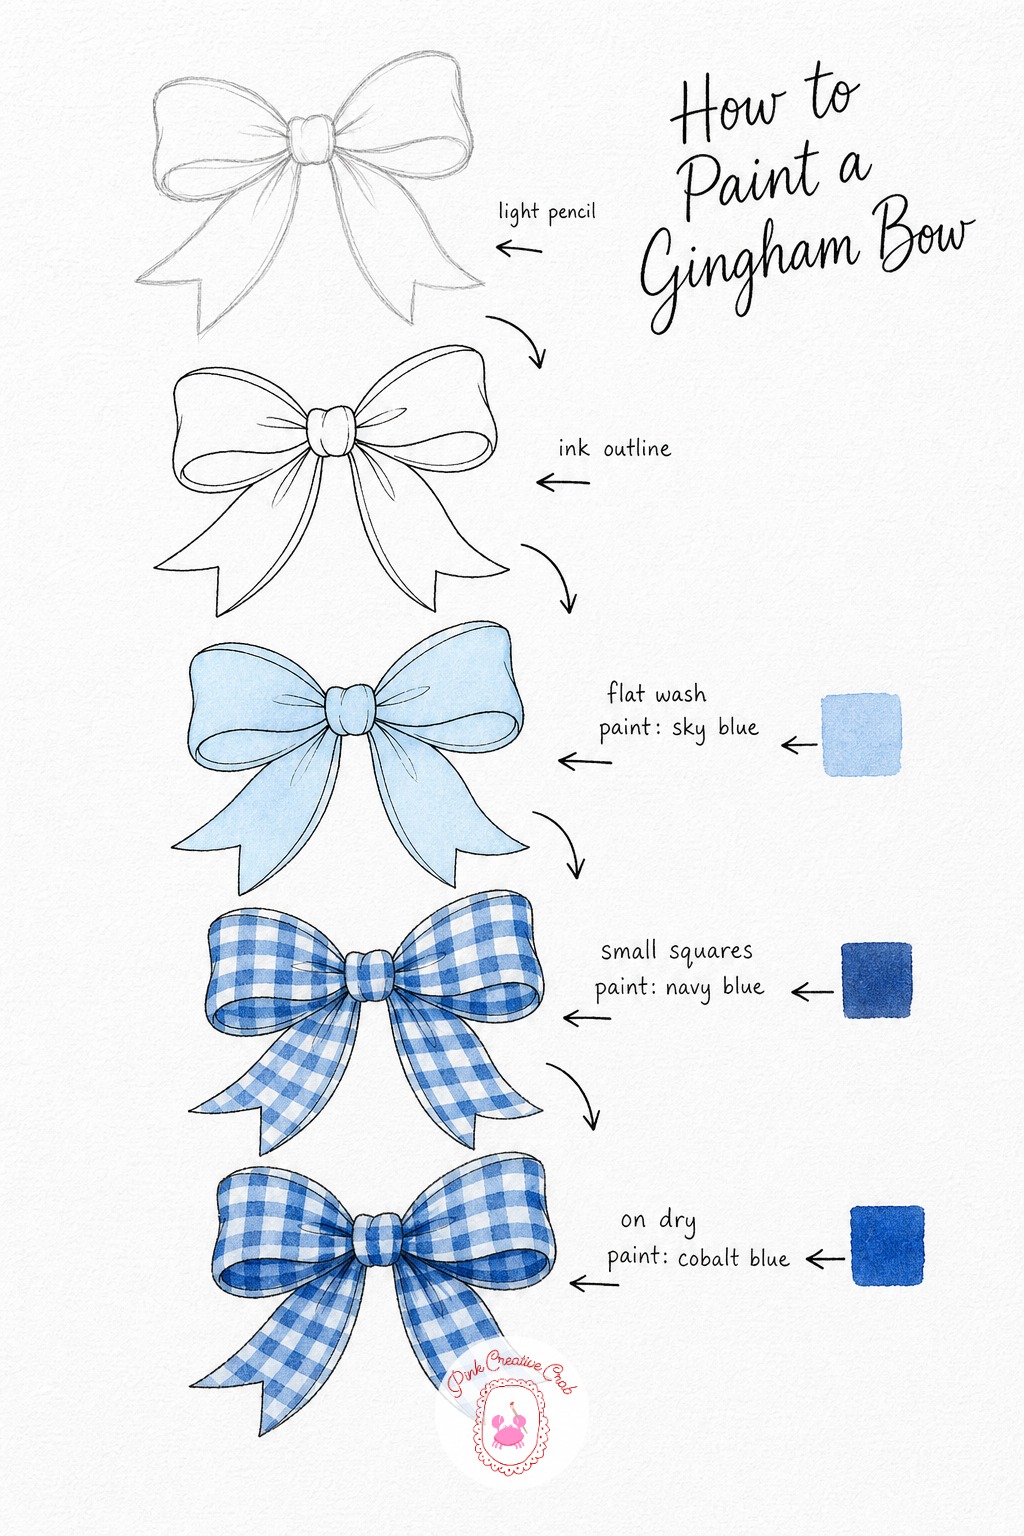
Sketch a loose, looping bow with two trailing ribbon ends in light pencil, keeping the folds soft rather than sharp. Trace the whole shape in fine black ink, then lay one pale sky blue wash over the entire ribbon so every section starts the same soft color.
Once that wash is dry, paint small navy squares in a loose grid to build the gingham pattern, letting the checks curve gently with each fold. Finish with a deeper cobalt shadow tucked under every loop so the bow looks like it has real dimension, not just flat pattern.
Hydrangea Bloom
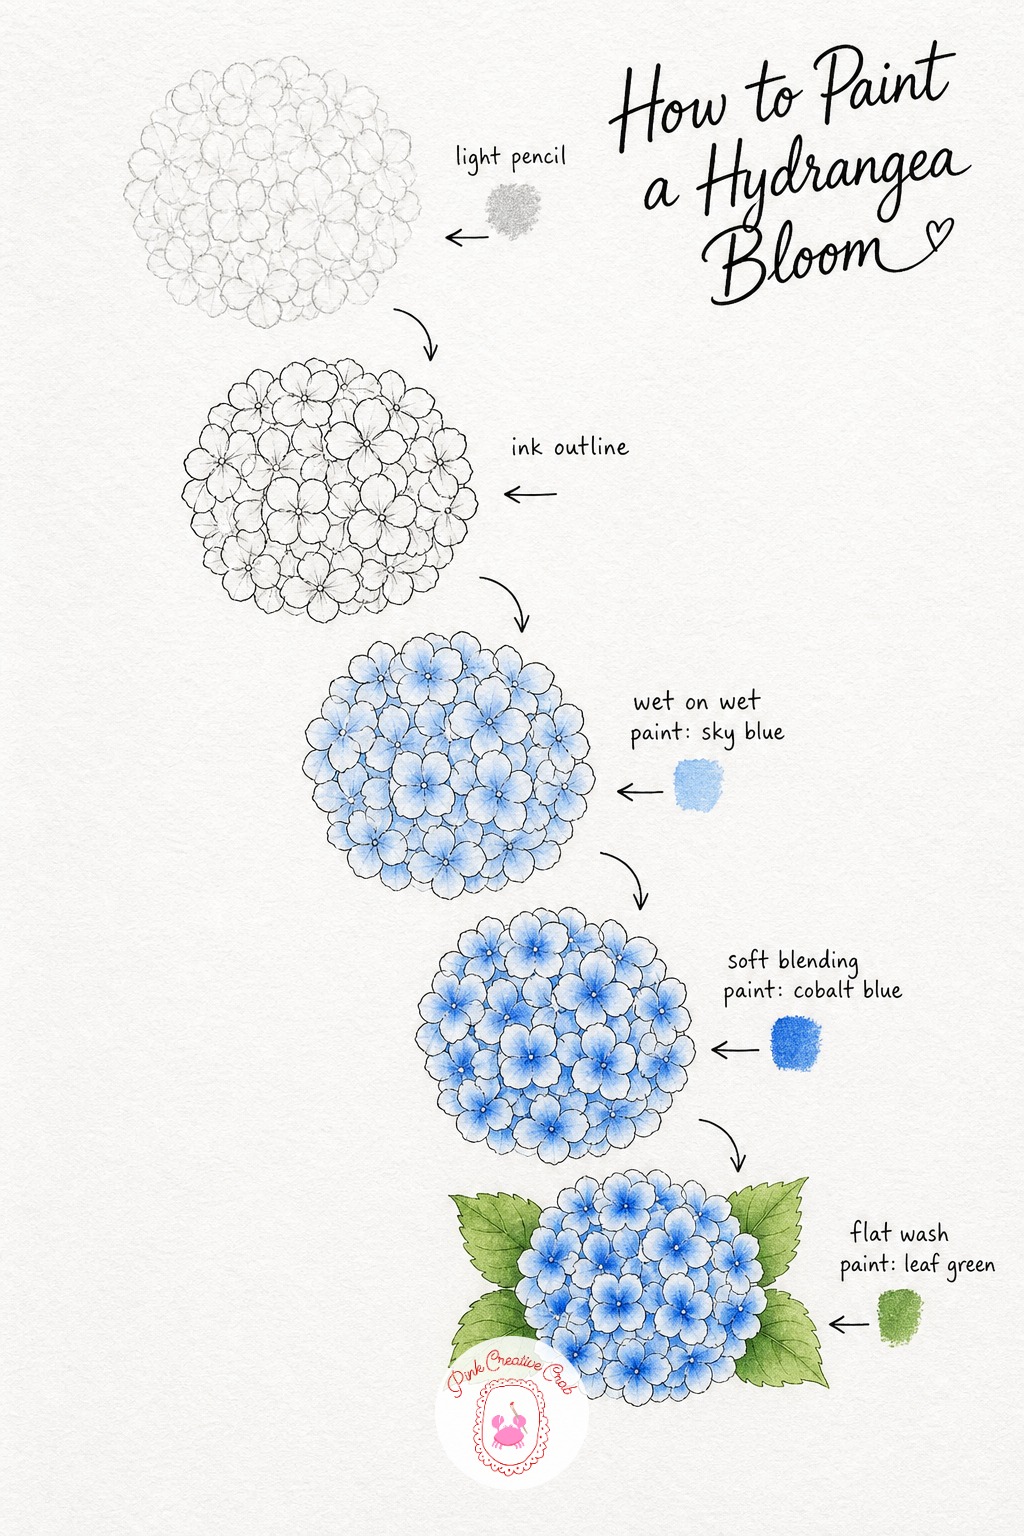
Pencil a round cluster of small four-petal shapes packed together the way hydrangeas really grow, then ink each tiny petal cluster with a fine, steady line. Drop a pale sky blue wash onto the petals while the paper is still damp, letting the color pool softly at the center of each one.
While that is still a little wet, touch cobalt blue into the centers so the color deepens naturally outward. Paint a few simple leaf shapes behind the bloom in leaf green, then add fine navy shadow lines between the petal clusters so the whole flower head reads as rounded rather than flat.
Bowl of Blueberries
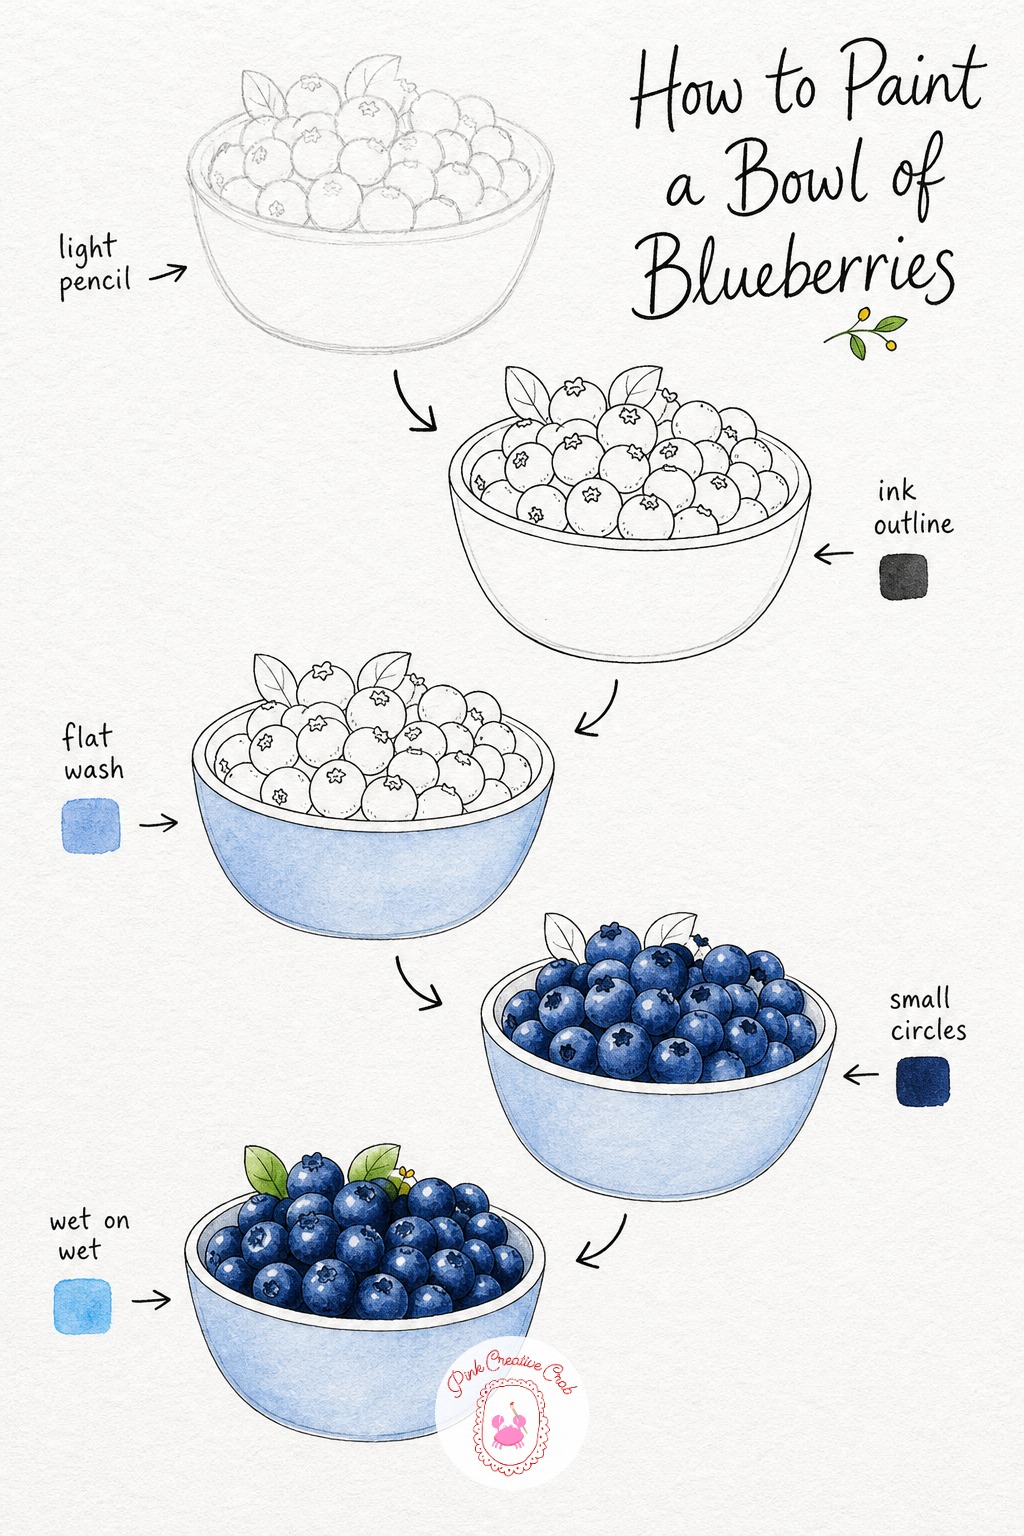
Draw a simple round bowl heaped with small overlapping circles for berries, keeping the pile loose and a little uneven. Ink the bowl’s outline along with every berry, then wash pale cobalt over just the outside of the bowl so the porcelain reads clean and simple.
Paint each berry in navy blue, leaving a tiny gap of white paper near the top of a few for shine, and drop a touch of sky blue in wet so the navy softens at the edges. Finish with a white gel pen dot on two or three berries so the whole bowl catches a little sparkle.
Blueberry Jam Jar
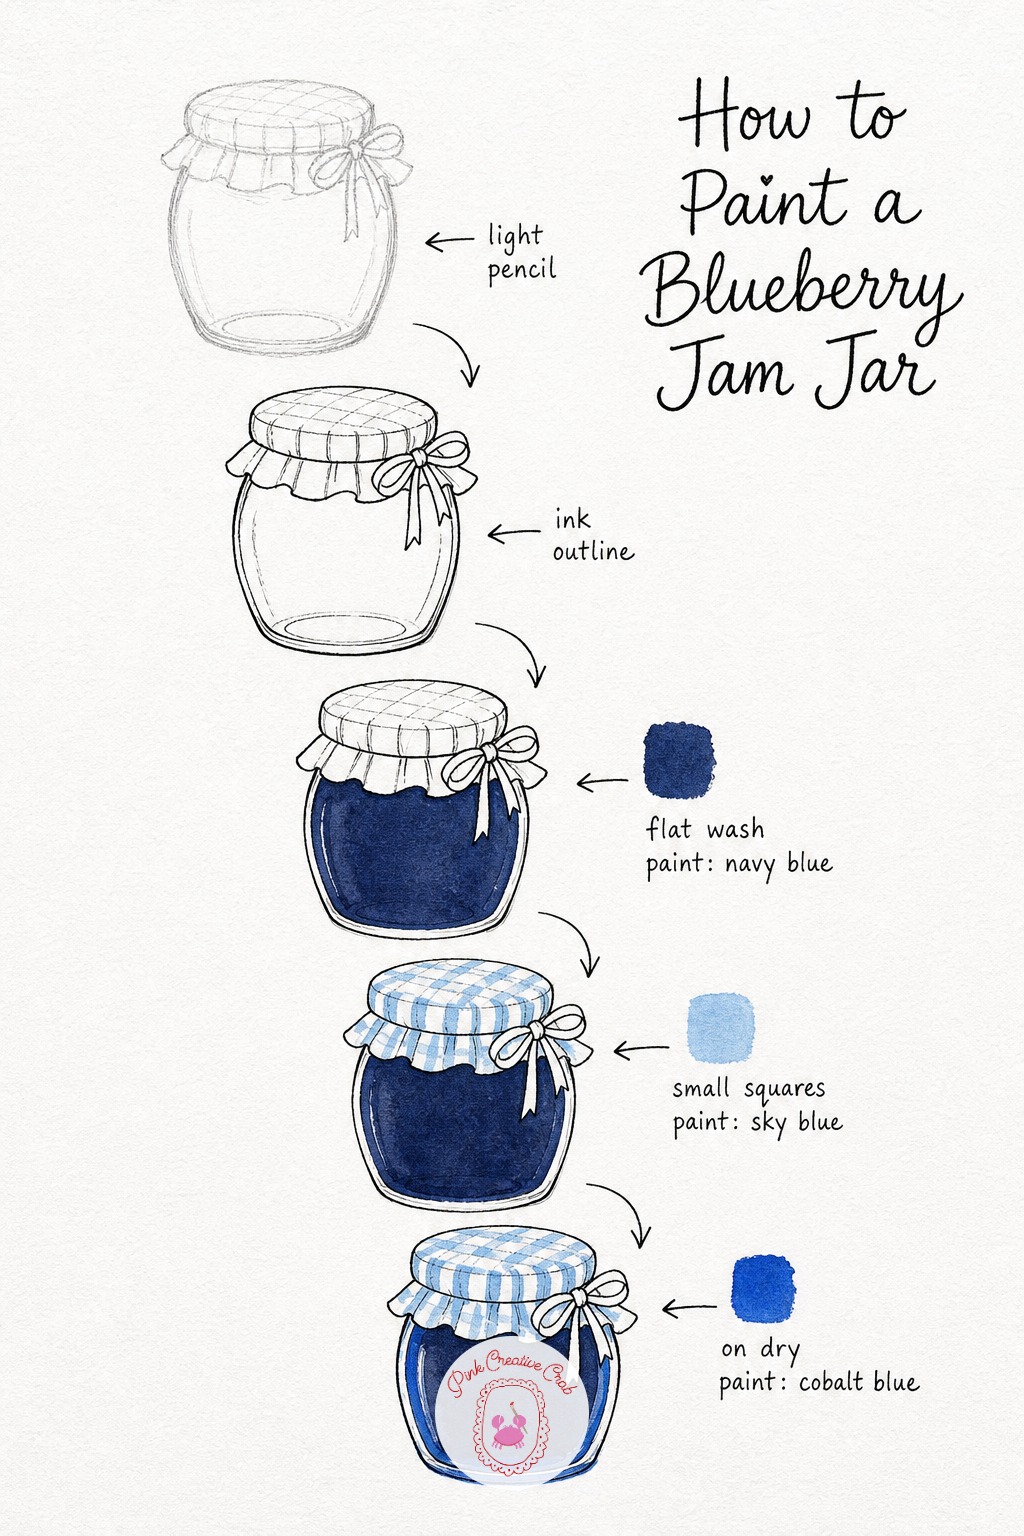
Sketch a simple round jar with a scrap of checked fabric tied over the lid, then ink the glass outline, the lid and the little knotted tie. Fill the body of the jar with a rich navy wash to stand in for the jam, leaving a thin strip of bare paper along one side for shine.
Paint a loose gingham check in pale sky blue across the fabric lid, then add a cobalt shadow where the glass meets the table and along its base. A single white gel pen streak down the glass finishes the shine and makes the jar look truly glassy.
Blue and White Teapot With Olive Sprig
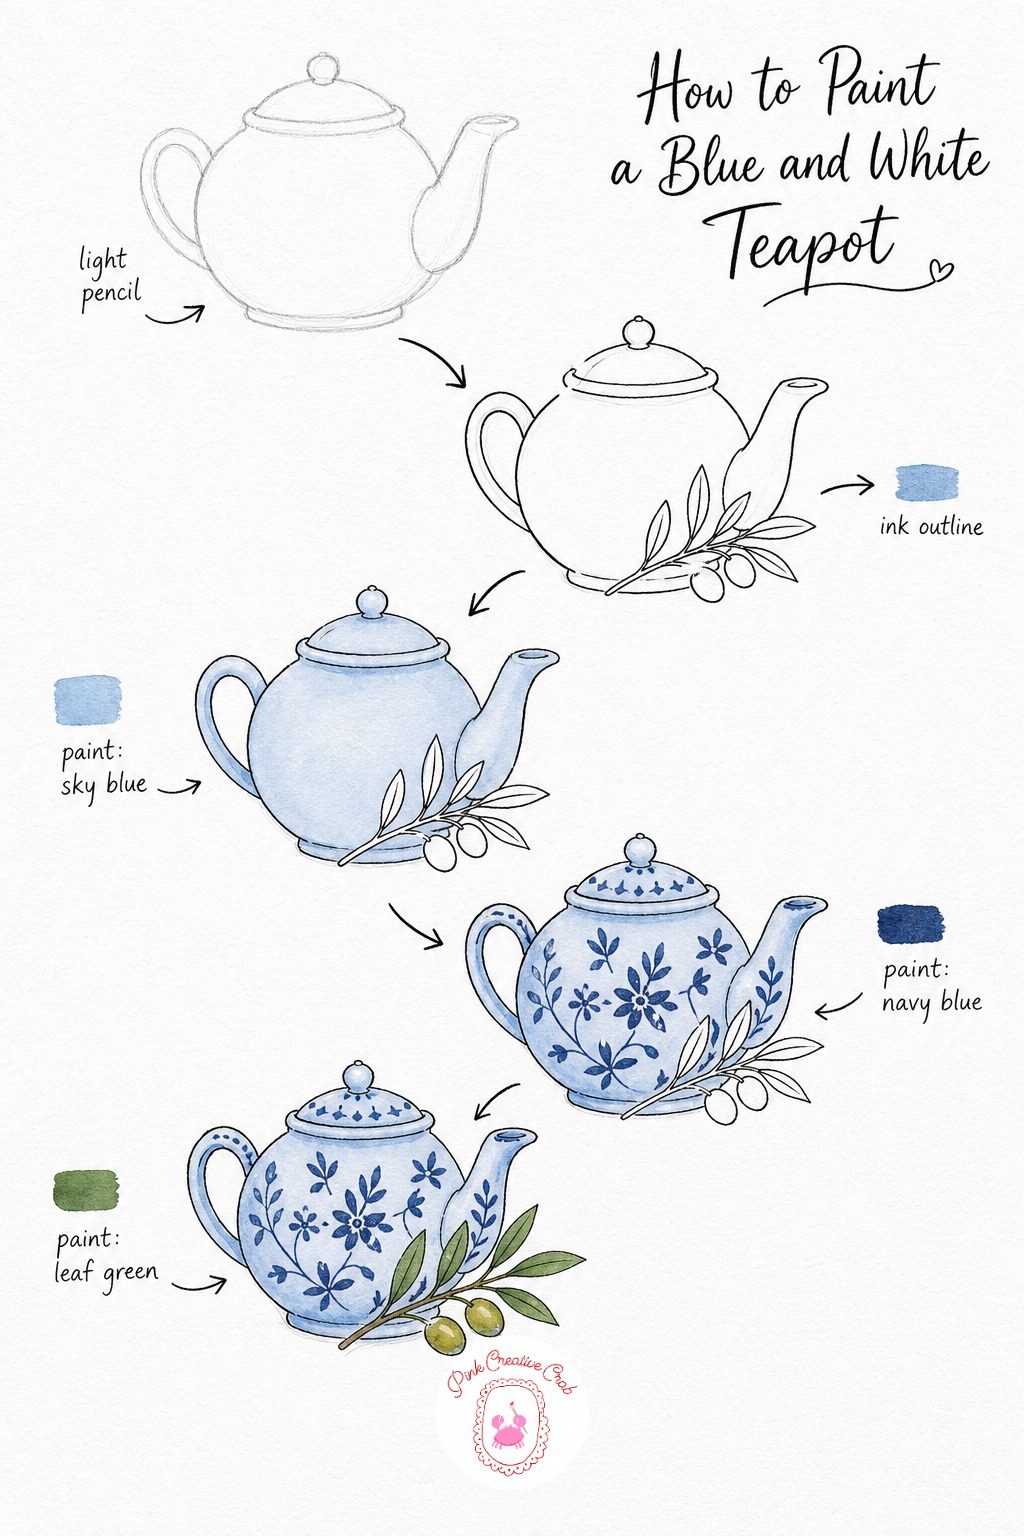
Pencil a round bellied teapot with a curved spout, loop handle and a small knob on the lid, then ink the whole shape with a fine steady line. Lay one pale sky blue wash across the entire body so the porcelain has an even base color to build on.
Once that is dry, paint small navy motifs, dots, little flowers or simple swirls, scattered across the body the way old transferware patterns look. Tuck a thin olive sprig in leaf green beside the spout, then finish with a soft cobalt shadow under the handle and base so the teapot sits firmly on the page.
Chinoiserie Ginger Jar
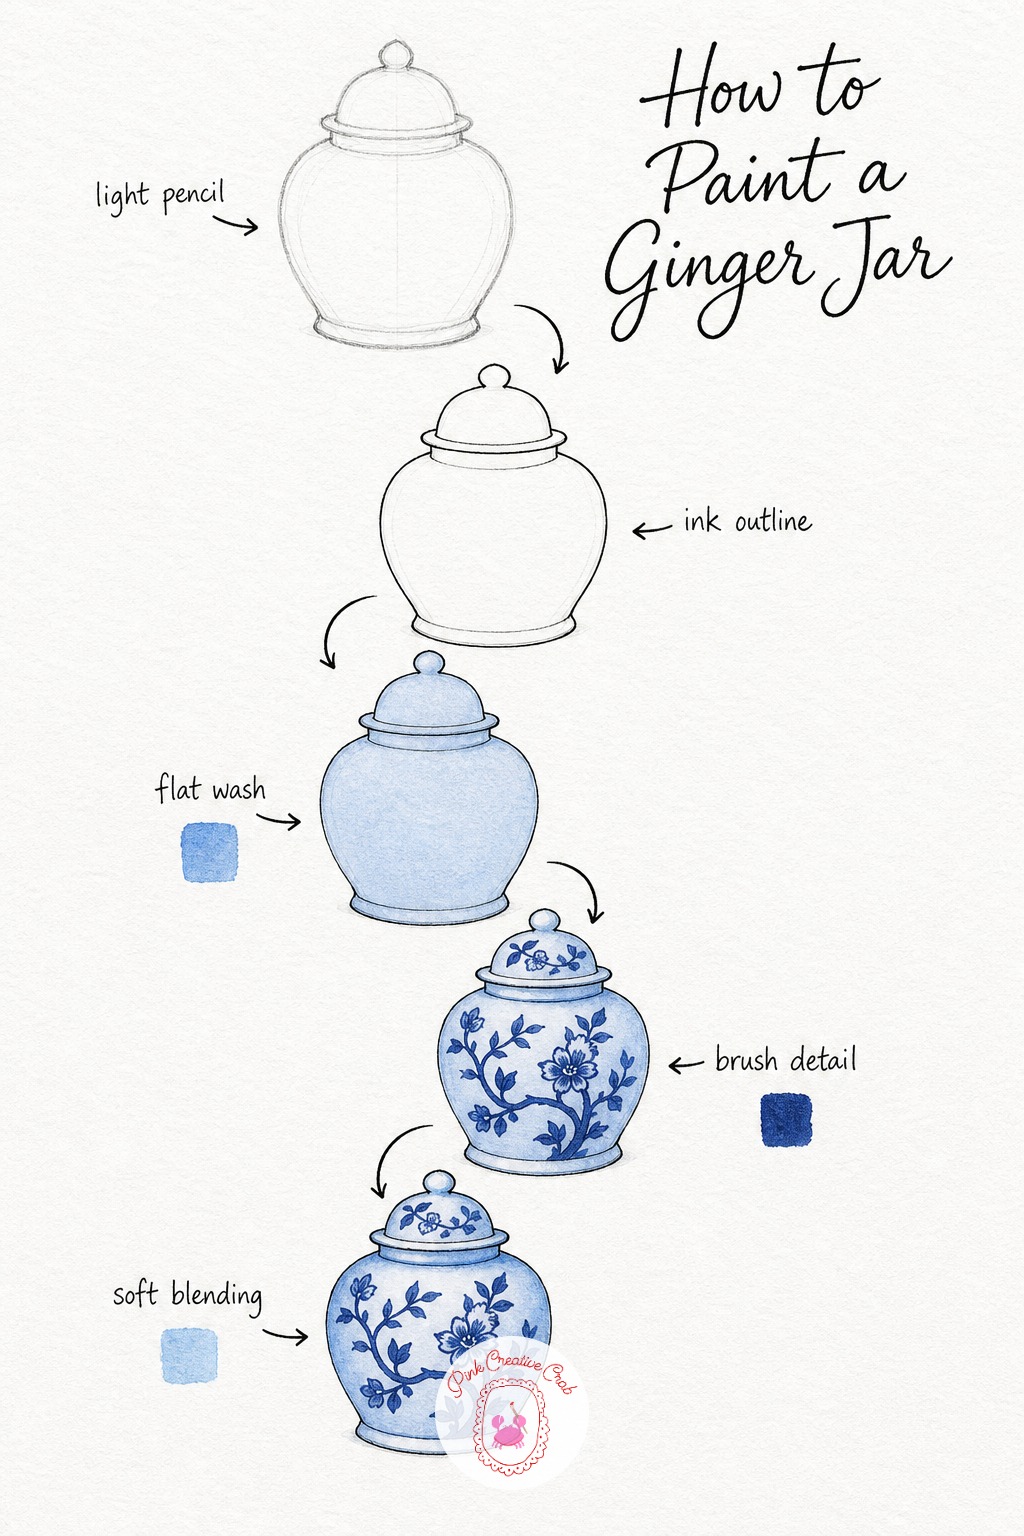
Draw a rounded jar shape with a small domed lid, keeping the curve of the body nice and full, then trace it in fine black ink. Lay one pale cobalt wash over the whole surface so the jar has a soft, even base tone before any pattern goes on.
Once dry, paint a loose branch with a few blossoms across the body in navy blue, letting the pattern curve with the jar’s shape rather than sitting flat. Add a touch of sky blue shading around the shoulders and base to round the form out, and keep your branch asymmetrical for a more authentic look.
Delft Tile
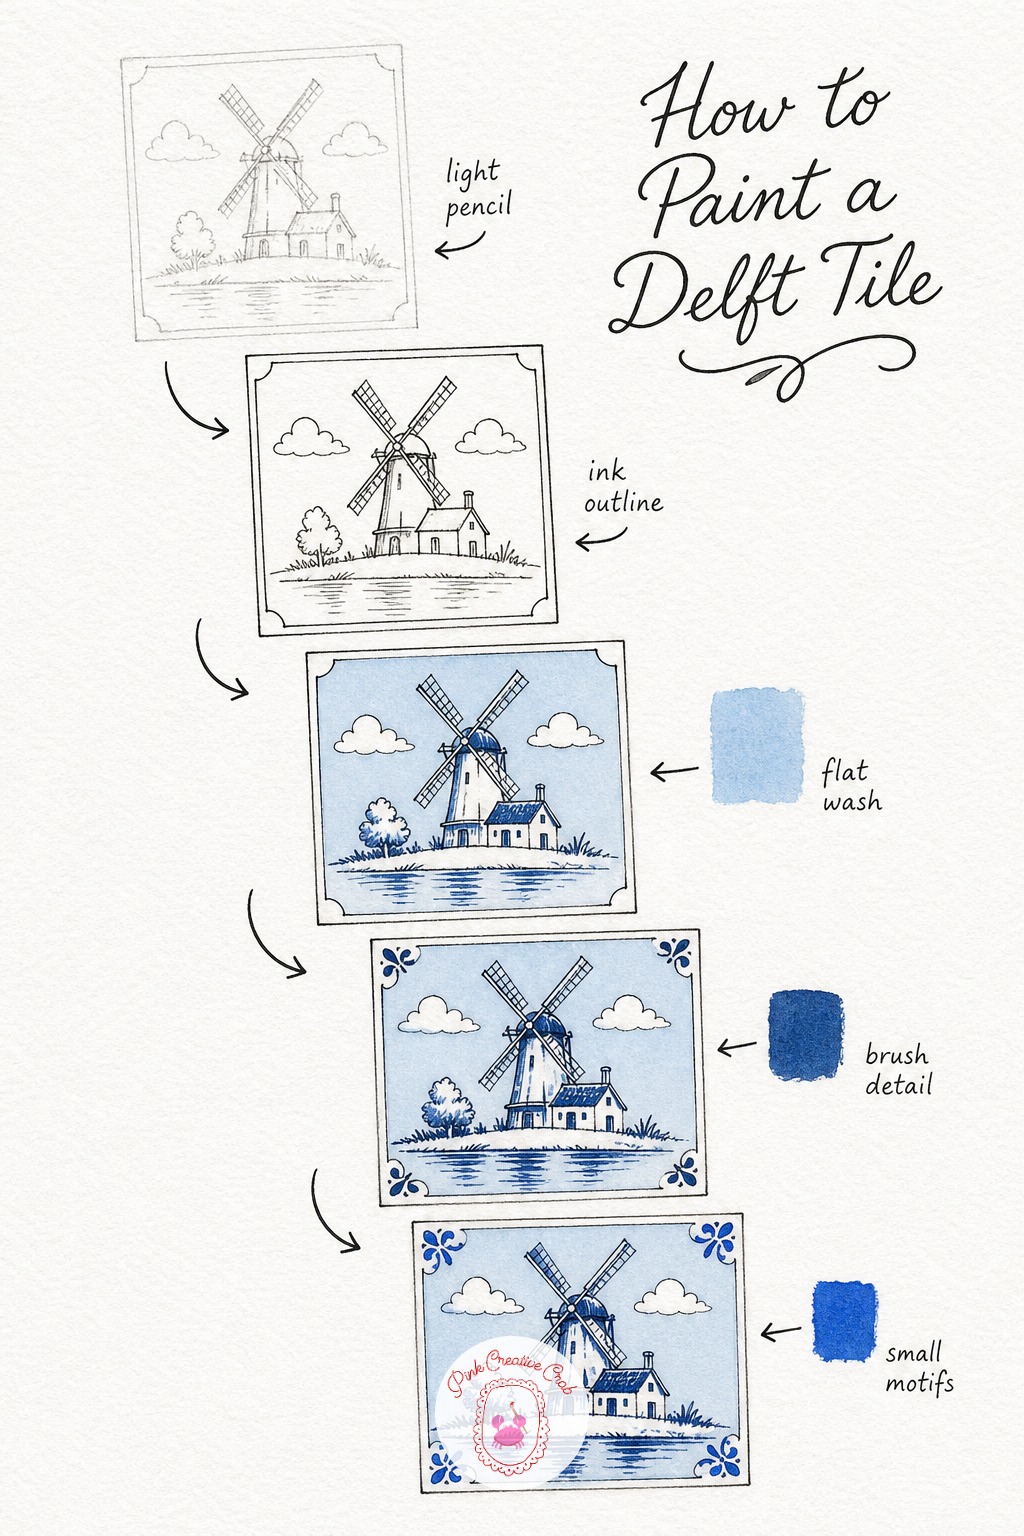
Sketch a simple square tile with a tiny windmill, a strip of ground and a curling cloud in the center, the way classic Delft tiles look. Ink the border and every shape, then wash the whole background in pale sky blue so the scene sits on a soft, even field.
Paint the windmill, clouds and a simple border pattern in navy blue once the wash is dry, keeping the lines a little wobbly for charm. Finish with a small cobalt motif tucked into each corner of the tile, a classic touch that pulls the whole square together.
Chinoiserie Teacup and Saucer
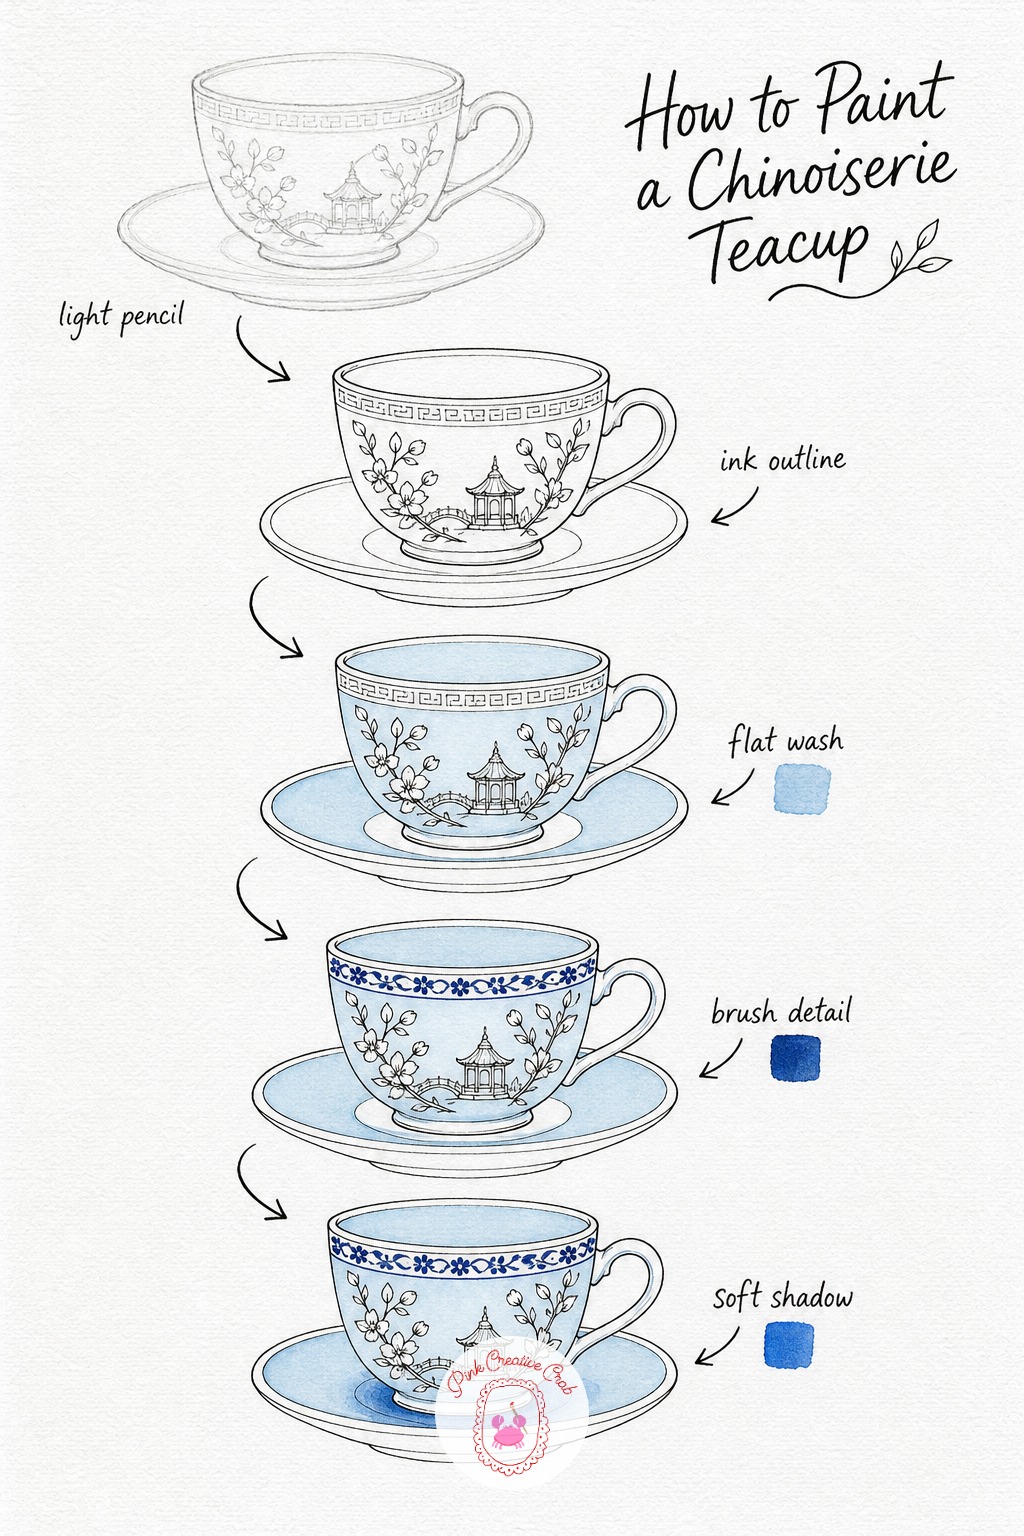
Pencil a simple teacup with a curved handle sitting on its round saucer, keeping the ellipse of the rim nice and even. Ink the whole shape, then wash a pale sky blue over both the cup and the edge of the saucer so they read as one matching set.
Paint a thin navy border of tiny flowers or dots around the rim of the cup once that wash is dry, then add a soft cobalt shadow where the cup meets the saucer. That small shadow is what makes the cup look like it is actually sitting down rather than floating.
Cornflower Stems in a Jug
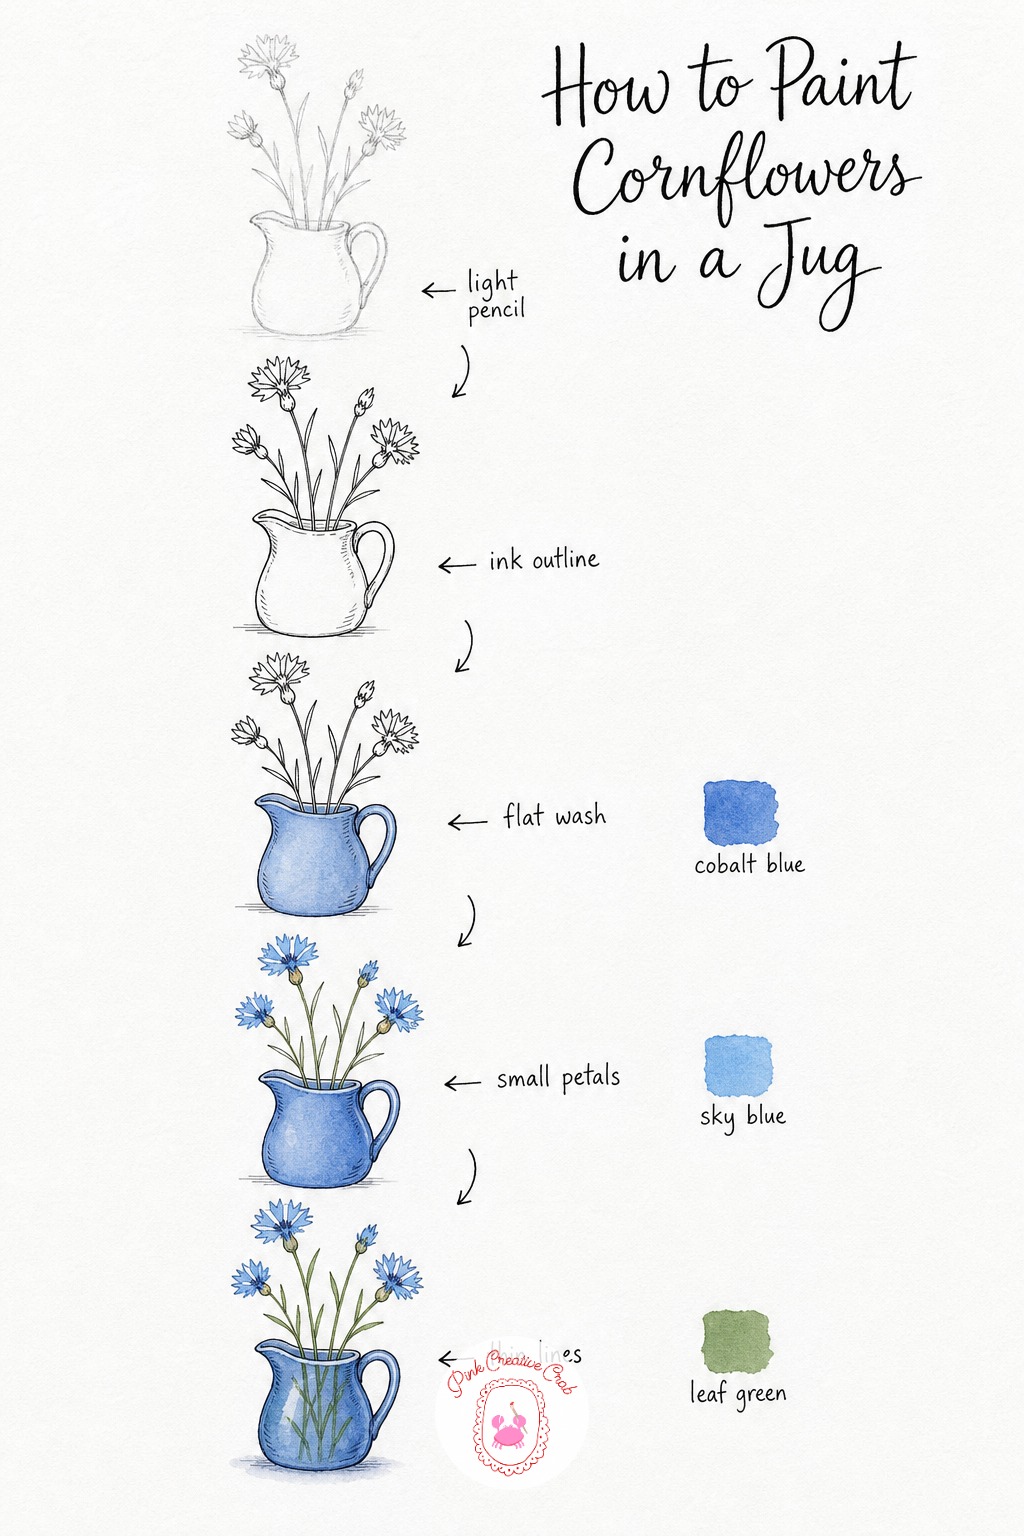
Sketch a small rounded jug with a handful of thin stems rising out of it, each one topped with a cluster of tiny petals. Ink the jug and every stem, then wash the jug’s body in pale cobalt so it reads as simple glazed porcelain.
Paint each little flower head in sky blue, letting the petals stay loose and slightly irregular, then add thin leaf green stems and a few narrow leaves running down toward the jug. Finish with tiny navy dots at the center of each flower for that classic cornflower look.
Blue and White China Stack
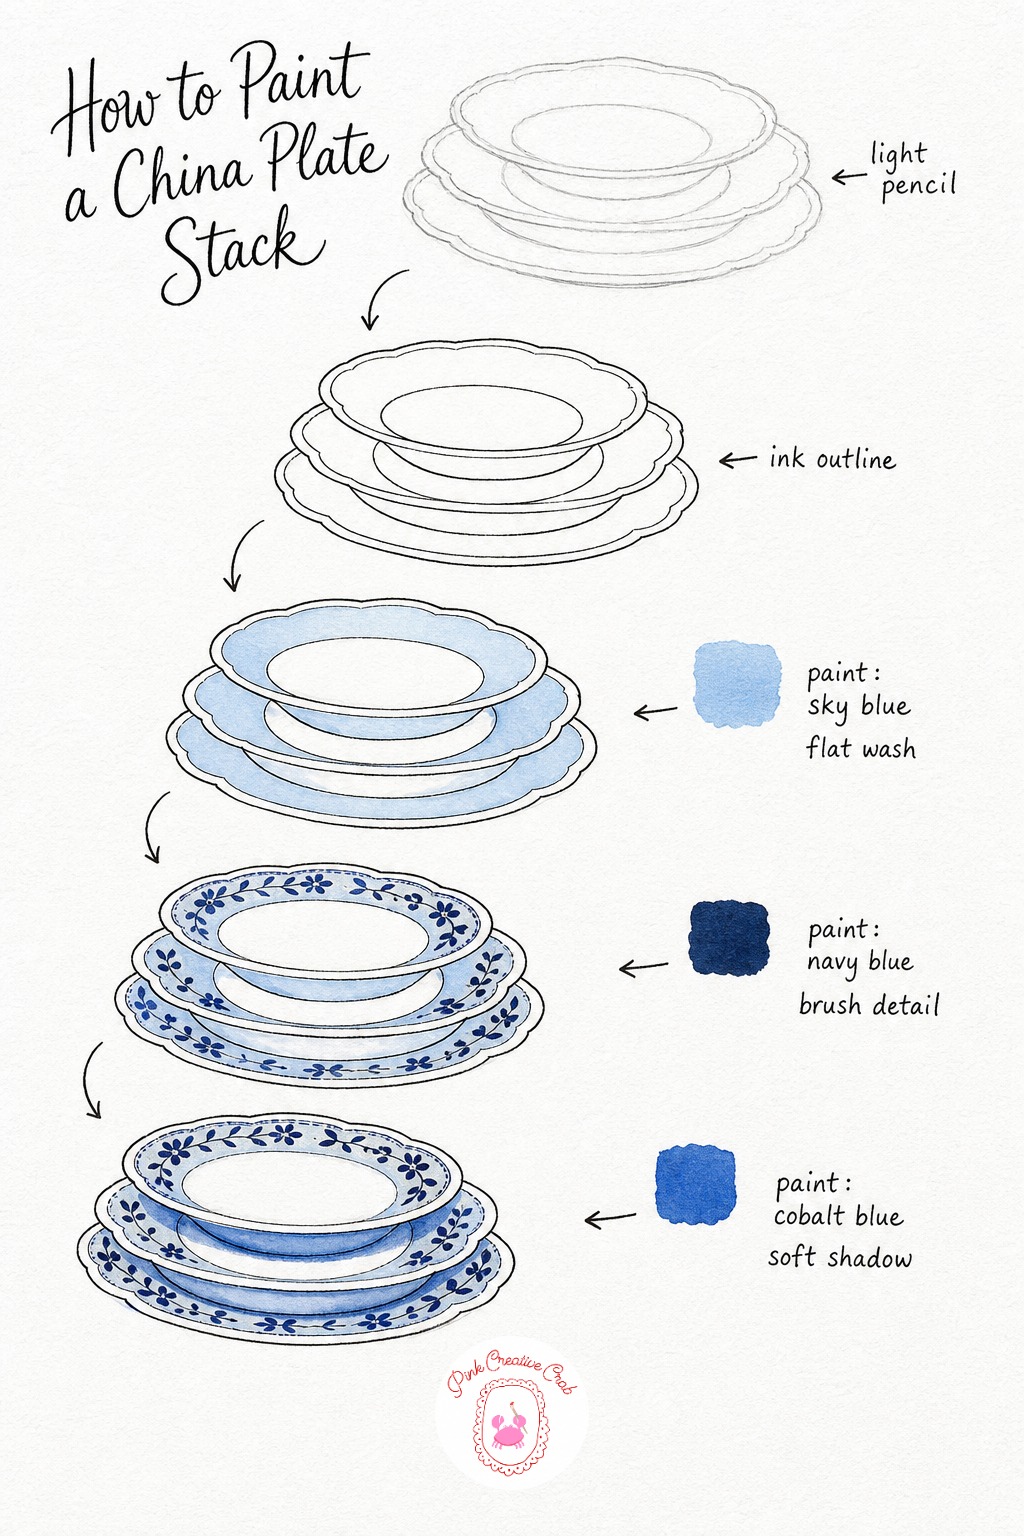
Draw three plates stacked a little off center from each other, so you can see the rim of each one peeking out below the plate above it. Ink every edge and rim, then wash a pale sky blue across each rim so the stack reads as one matching set of china.
Paint a simple repeating pattern, dots, small flowers or thin lines, around each rim in navy blue once the wash has dried. Add a cobalt shadow in the gap where each plate meets the one beneath it, which is really what sells the idea of a stack rather than a flat row.
Scene: Lemon Tree Terrace Corner
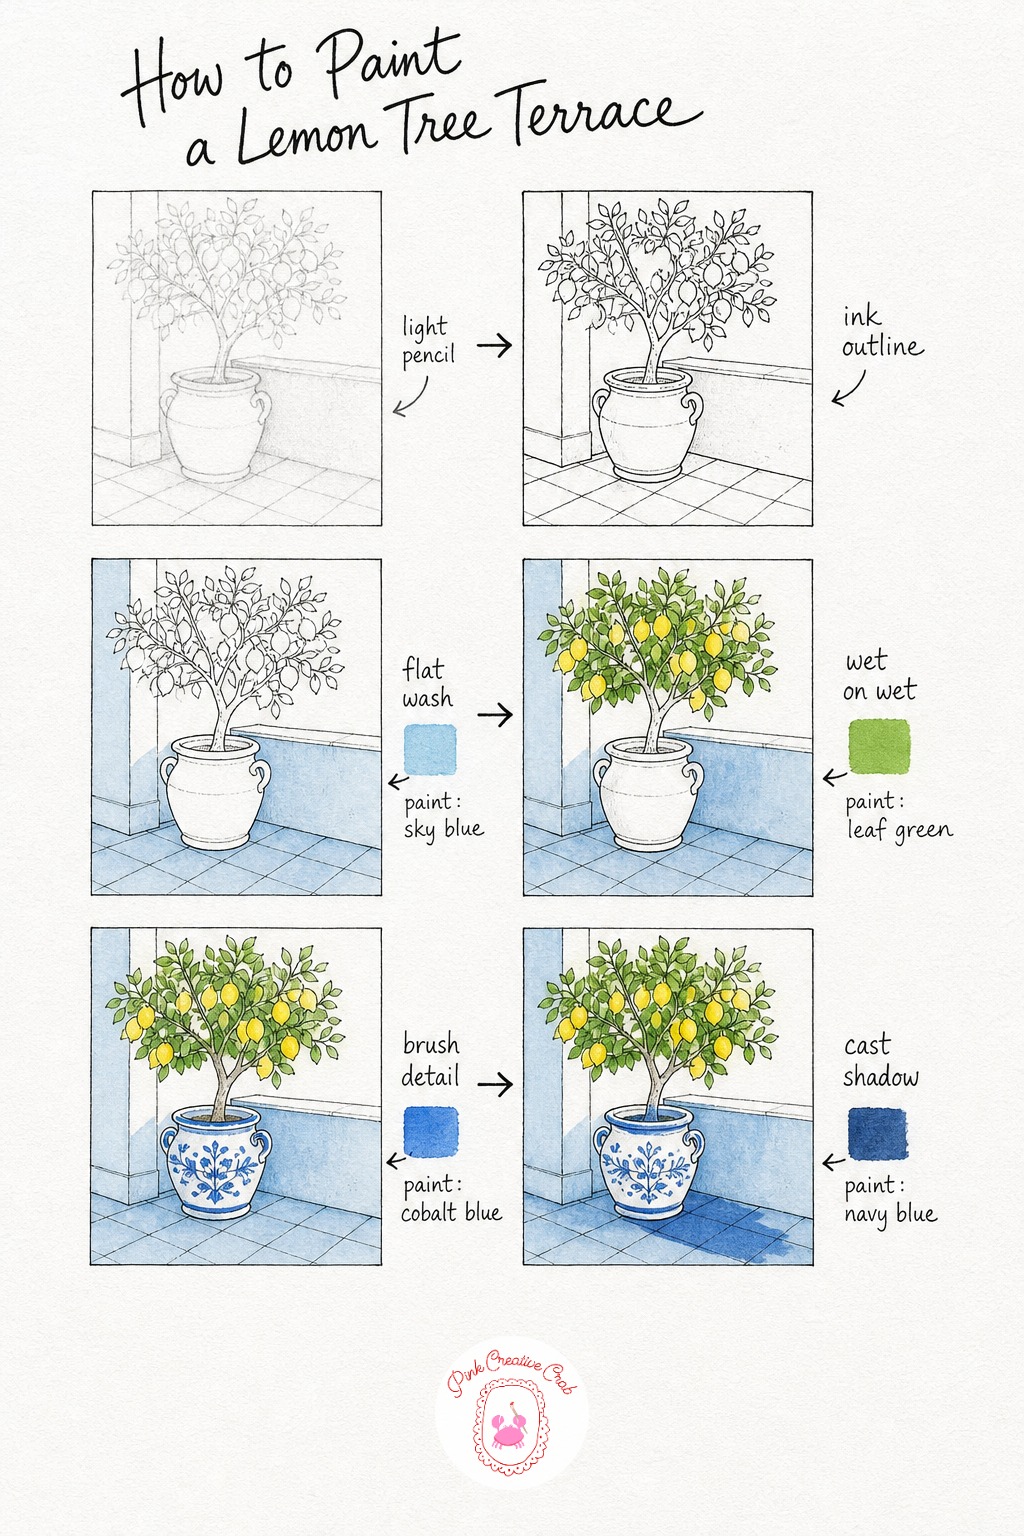
Sketch a small potted lemon tree tucked into the corner of a tiled terrace, with a low wall behind it, then ink the whole little scene in fine line. Wash the wall and floor tiles in pale sky blue so the background stays soft and unified behind the tree.
Let a loose leaf green wash settle wet on wet across the foliage, dotting in a few lemon yellow fruits once it has dried a touch. Paint cobalt pattern onto the pot and finish with a long navy shadow stretching across the tiles, which grounds the whole corner and gives it real afternoon light.
Scene: Hydrangea Bush by a Blue Door
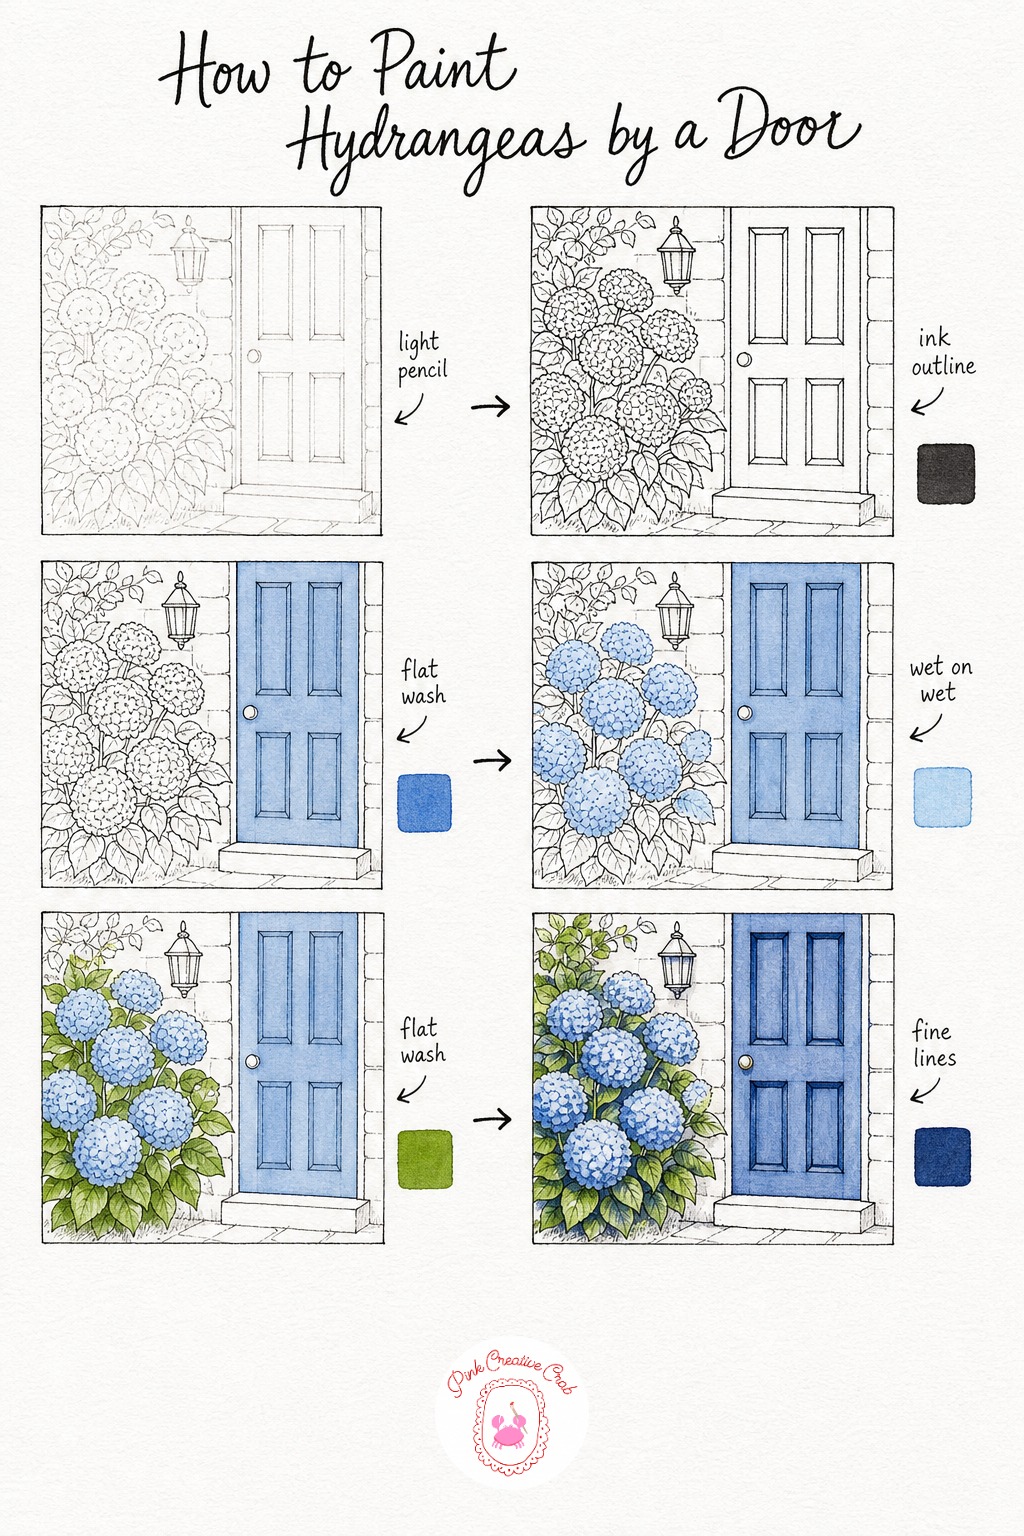
Pencil a tall paneled door with a full hydrangea bush spilling up beside it, keeping the bush rounded and a little wild. Ink the door panels and every small petal cluster, then wash the whole door in a pale cobalt so it reads as painted wood.
Drop sky blue wet onto each hydrangea cluster so the petals bloom softly into one another, then wash loose leaves in around them in leaf green. Finish with navy shadow lines inside the door panels and tucked between the hydrangea clusters, which separates the door from the flowers at a glance.
Scene: Blueberry Picking Basket in a Garden
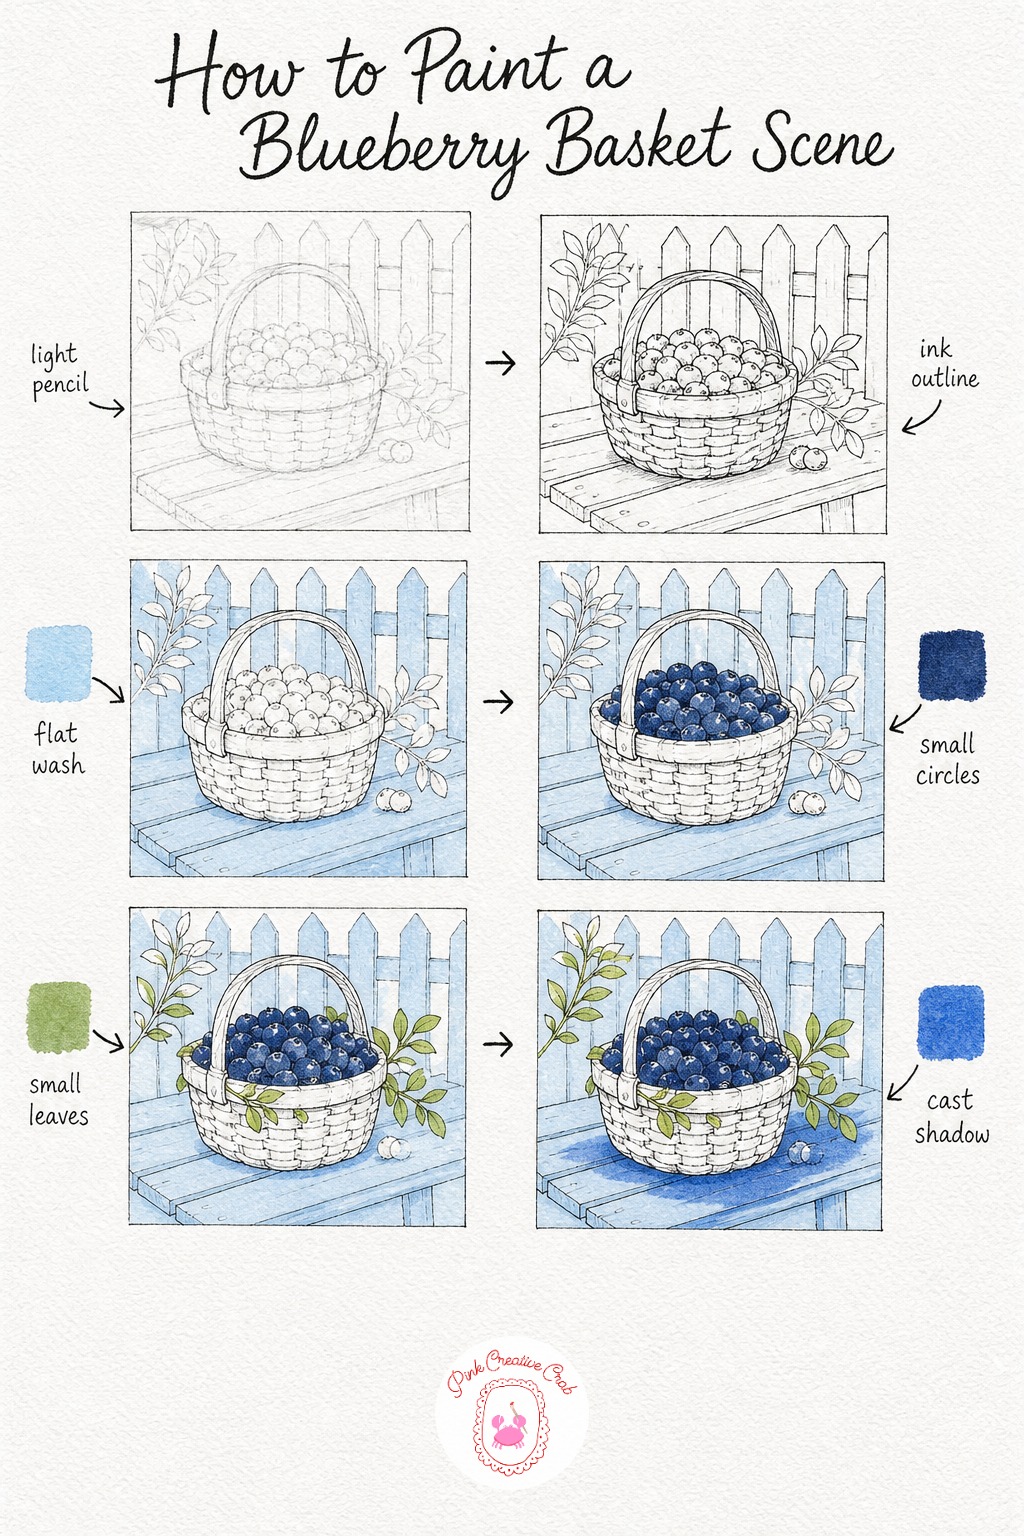
Sketch a woven basket heaped with berries sitting on a simple garden bench, with a low fence or hedge sketched loosely behind it. Ink the basket weave, every berry and the bench boards, then wash the bench and background in pale sky blue to keep the setting quiet.
Paint each blueberry in navy, leaving tiny white gaps for shine, then tuck a few small leaf green sprigs around the basket rim for a fresh, just-picked feel. A cobalt shadow stretching from the base of the basket across the bench finishes the scene and makes it feel like a real sunny afternoon.
What to Do Next
Pick the subject that is calling to you most, print or sketch out your own version of the sheet, and get your cobalt blue wet. Work through the stages in order and let each wash dry before the next layer goes on top, and you will have a finished blue and white piece by the end of your sitting.
Frequently Asked Questions
What colors do I need for blue and white painting?
You really only need three blues: a bright cobalt, a deep navy and a soft sky blue, plus a small leaf green and lemon yellow for accents. That narrow palette is exactly what gives this style its clean, cohesive look across every subject.
Do I need to know how to use ink pens before trying these?
No, a basic fine liner pen is enough, and a shaky line actually adds charm to gingham and china patterns. Practice a few loops and small squares on scrap paper first so your hand feels warmed up before you ink the real sketch.
Why do the stages go from pale washes to dark details?
Watercolor dries lighter than it looks wet, so painting pale background washes first keeps the picture from turning muddy. Saving navy accents and shadows for the final stages lets you judge exactly how much contrast the piece really needs.
Can I use a regular watercolor set instead of buying cobalt specifically?
Yes, any basic set with a blue, a darker blue and a green will work fine for these lessons. Just mix your own navy by adding a touch of black or dark brown to blue if your set does not include one already.
How long does one of these paintings take to finish?
Most of these subjects take between thirty and sixty minutes from pencil to final details, depending on how many stages the sheet has. Objects with four stages go faster, while the small scenes with five or six stages take a little longer to build up.
Have any thoughts?
Share your reaction or leave a quick response — we’d love to hear what you think!
-
 0
-
0
-
0
-
0
-
0
-
0


