

Table of Contents
- Gingham Blanket With Strawberries
- Wicker Basket With Baguette And Flowers
- Two Glasses And Cake By A Lake
- Book And Lemonade Under A Tree
- Girl Reading On A Blanket With Her Dog
- Straw Hat On The Blanket
- Sliced Watermelon Plate
- Checkered Thermos And Mug
- Bunch Of Wildflowers In A Jar
- Fruit Tart On A Cake Stand
- Woven Blanket Folded With Pillow
- Mason Jar Of Iced Tea
- Cheese Board With Grapes
- Butterflies Over The Picnic
- Vintage Bicycle With Flower Basket
- Lakeside Dock With Dangling Feet
- Frequently Asked Questions
Picnic drawing is my favorite excuse to mix red gingham, cream and fresh green until a page feels like a warm afternoon outside. Every scene here starts as a simple pencil layout, gets inked with a fine pen and then filled in with alcohol markers, the kind of project you can finish over one cup of tea.
Below you get sixteen small picnic scenes: blankets, baskets, lemonade glasses, lakeside cake, a girl reading with her dog and more. Pick whichever one matches your mood today, follow the stages in order and let the swatches guide your color choices.
Using these images: free for personal projects such as printing, coloring, cards, journals and gifts. Handmade items that include them may be sold up to 30 pieces per design. More than that is commercial use and is not permitted, and neither is selling or sharing the images themselves or passing them off as your own. Please ask before any other use.
Gingham Blanket With Strawberries
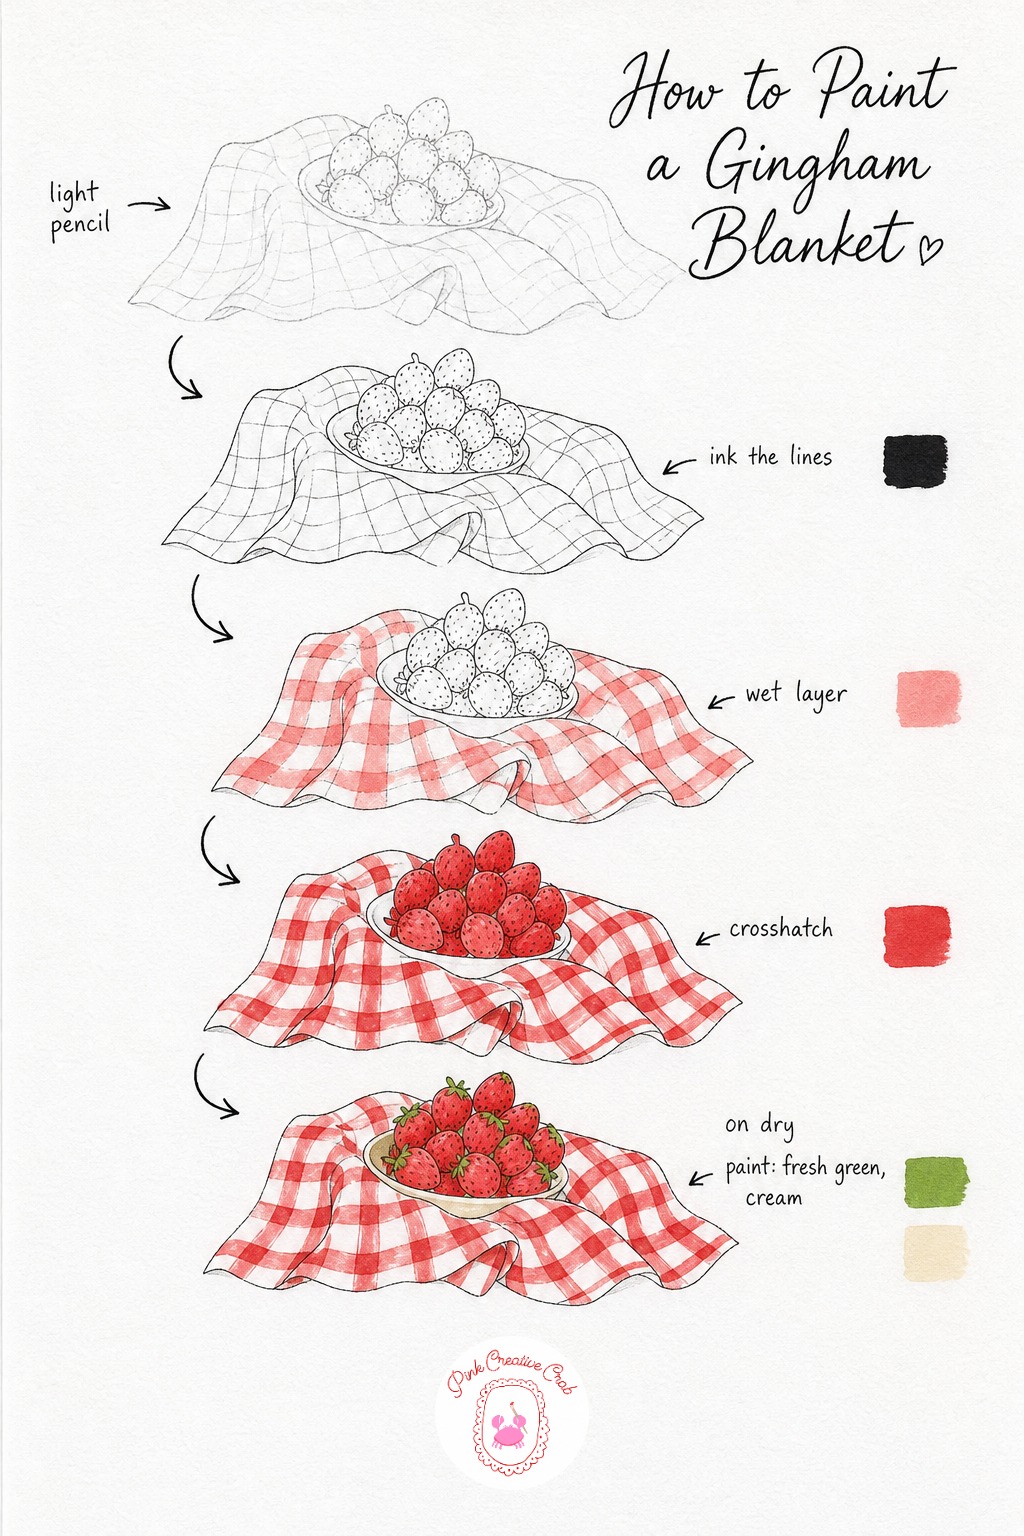
Start with a loose pencil layout of the blanket corners folding softly, then pile a few strawberries near the center. Ink the folds and fruit outlines with a fine pen so the shapes stay crisp once color goes on top.
Lay a pale red wash across every gingham square first, then come back with a second red layer only where the lines cross, which is how real gingham gets its depth. Finish the strawberries with fresh green tops, a touch of cream shading and tiny white seed dots.
Tip: keep your gingham squares slightly uneven rather than ruler straight, it reads as soft fabric instead of a printed grid.
Wicker Basket With Baguette And Flowers
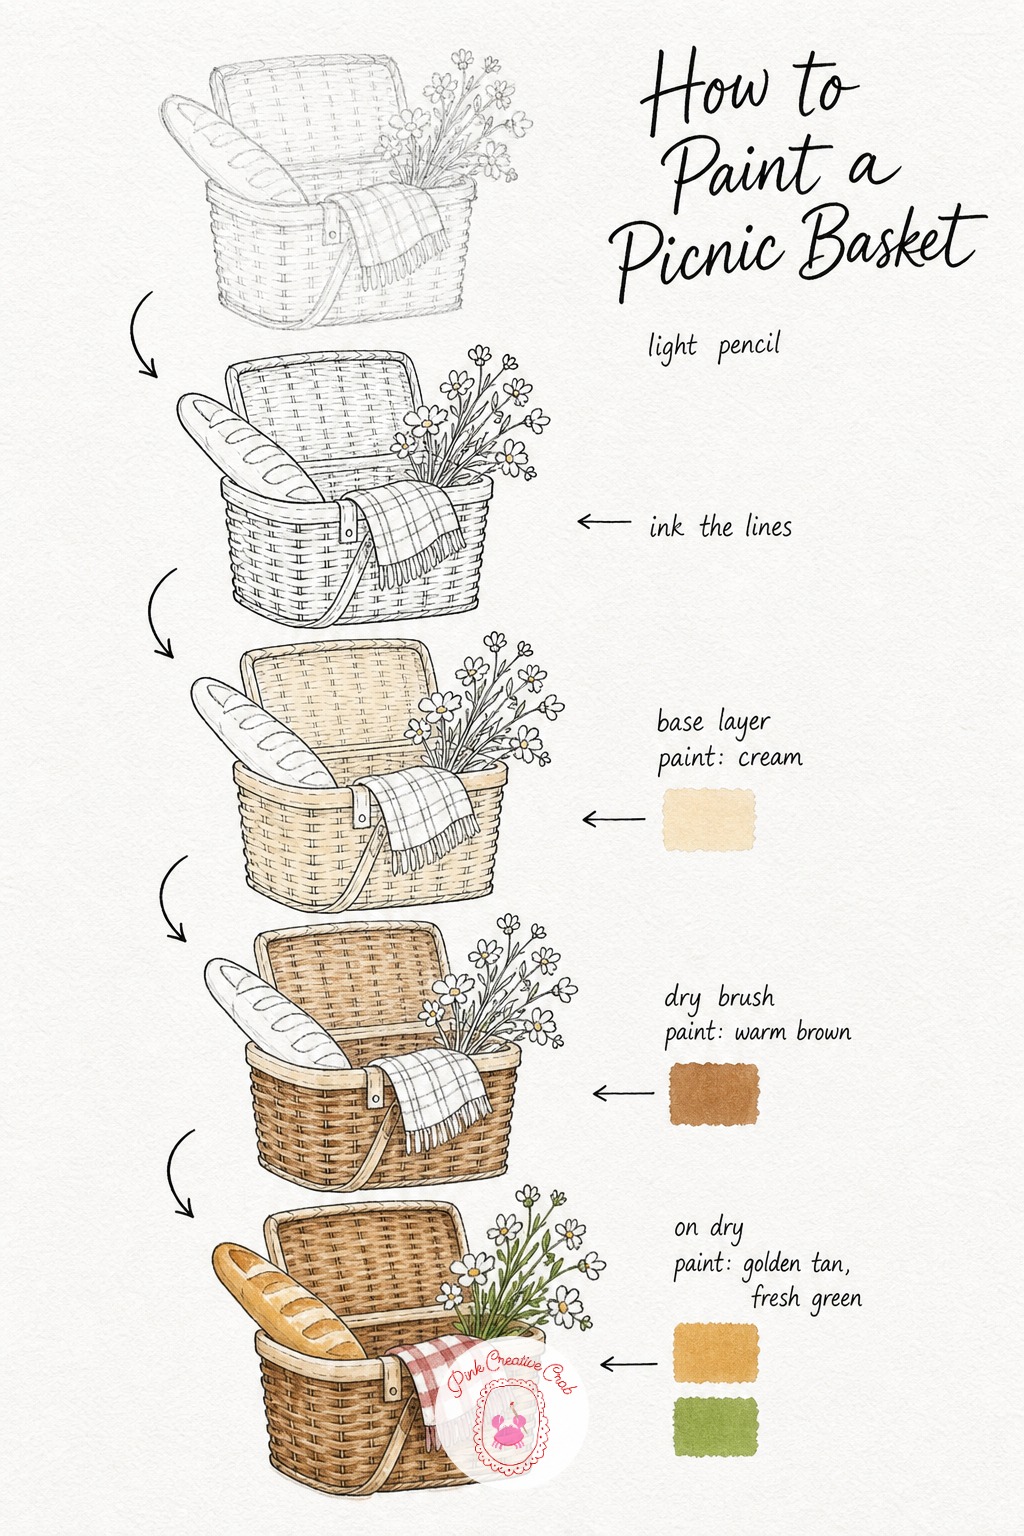
Sketch the basket as a simple curved box with the lid tipped open, a baguette leaning out one side and a few flower stems poking from the other. Ink the weave pattern loosely, it does not need to be perfect, wicker is forgiving.
Wash the whole basket cream first, then add warm brown strokes following the curve of the weave for texture. Color the baguette golden tan with a few darker crust lines, and let the flowers stay soft pink against fresh green stems.
Tip: leave tiny cream gaps between your brown weave lines, that sliver of paper is what sells the basket texture.
Two Glasses And Cake By A Lake
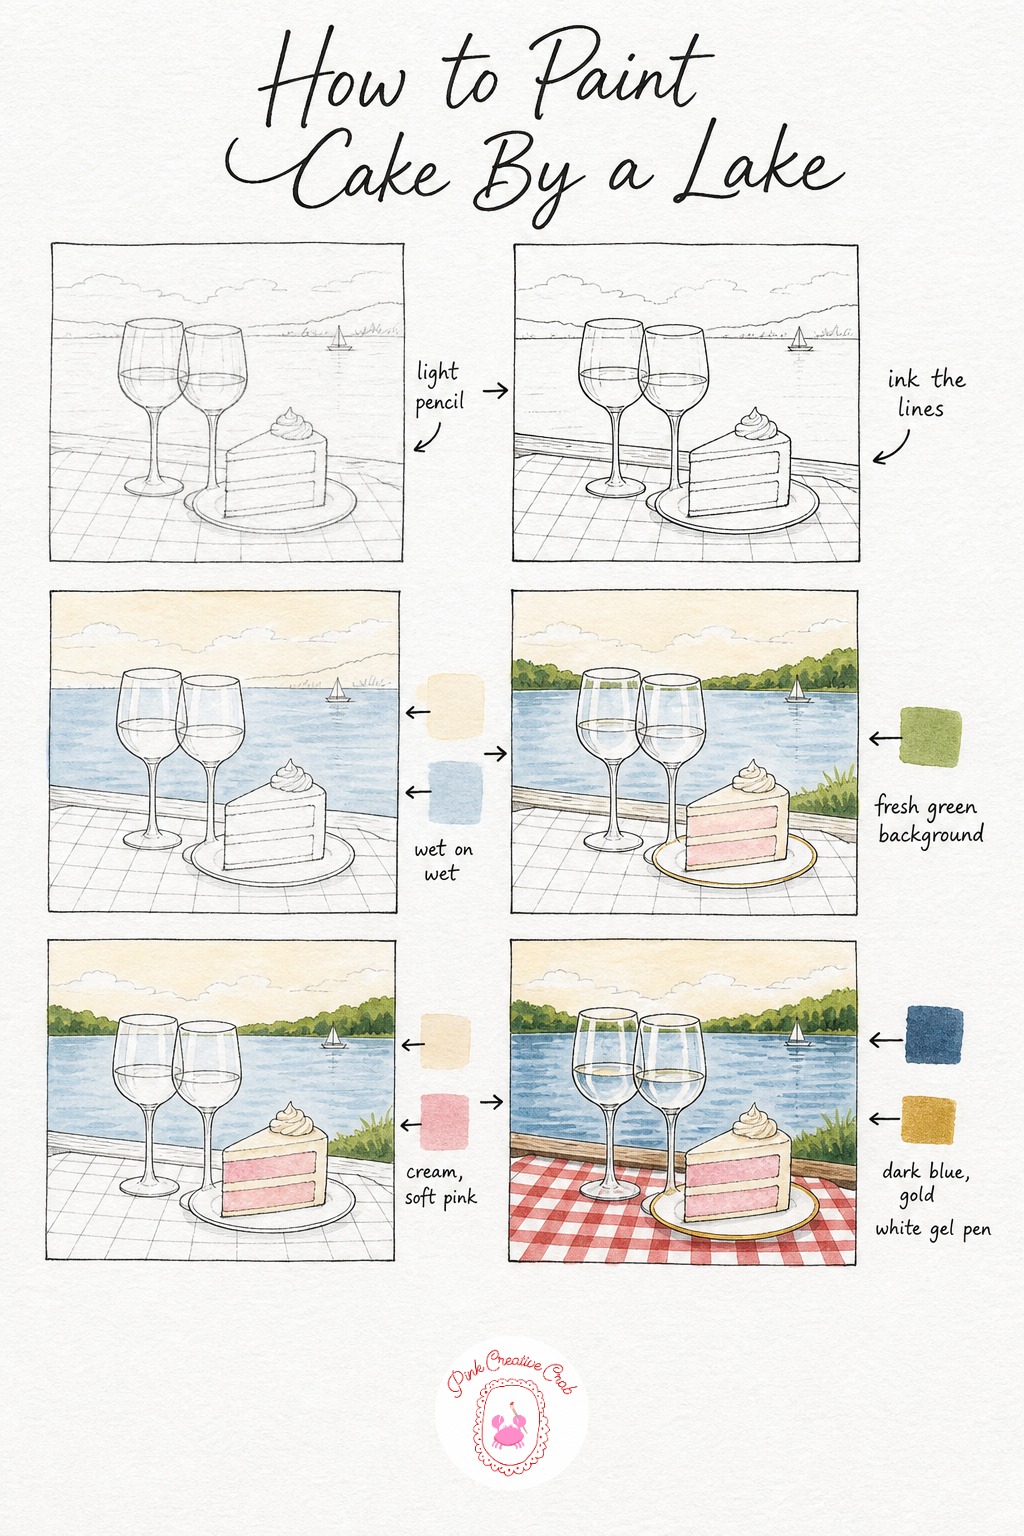
Lay out a calm lake line low on the page with two glasses and a little iced cake sitting close to the water’s edge. Ink the glass rims and cake layers with a steady fine line so the reflections read clearly later.
Wash the sky and lake pale together first, then bring fresh green along the shoreline for depth. Build the cake in cream and soft pink layers before adding gold on the plate rim and dark blue shadow ripples across the water.
Tip: leave the glass bodies almost entirely white, a couple of thin blue reflection lines is all glass needs to look full of lake light.
Book And Lemonade Under A Tree
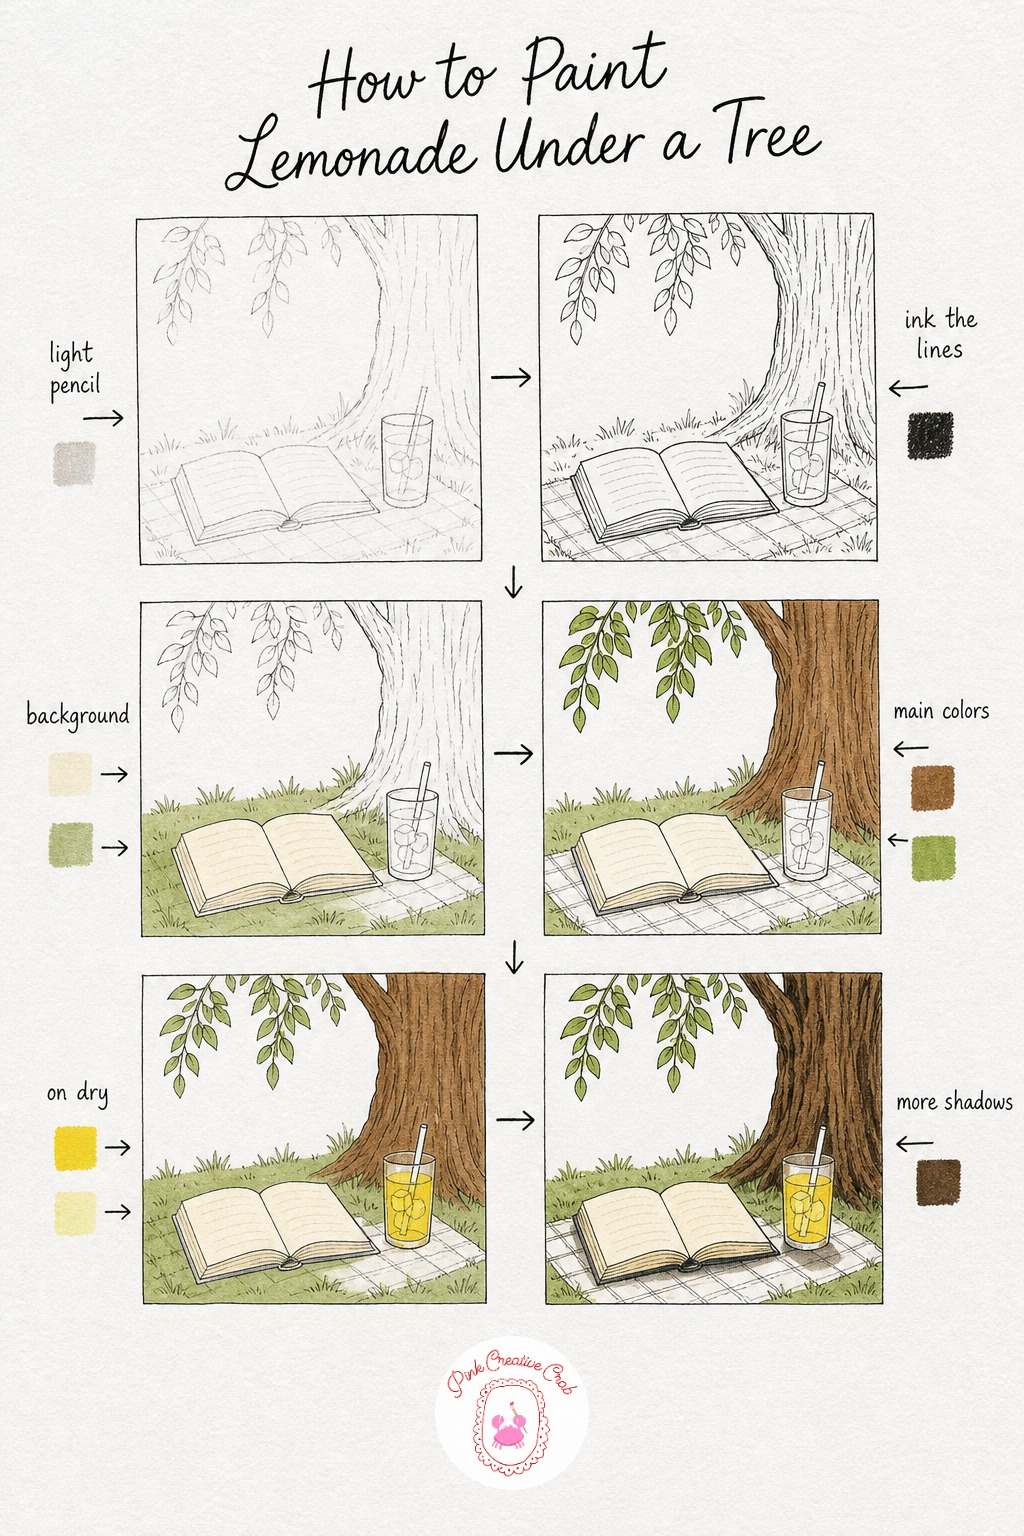
Sketch a tree trunk leaning in from one side with an open book lying flat on the grass and a sweating glass of lemonade beside it. Ink the page lines and glass outline lightly so the picture still feels like a lazy afternoon.
Wash the grass and book pale first, then bring warm brown into the trunk with fresh green leaves drifting above. Fill the glass with bright yellow lemonade and a few pale ice cubes before darkening the bark texture.
Tip: tilt the book pages slightly open rather than flat, it makes the whole scene feel caught mid read.
Girl Reading On A Blanket With Her Dog
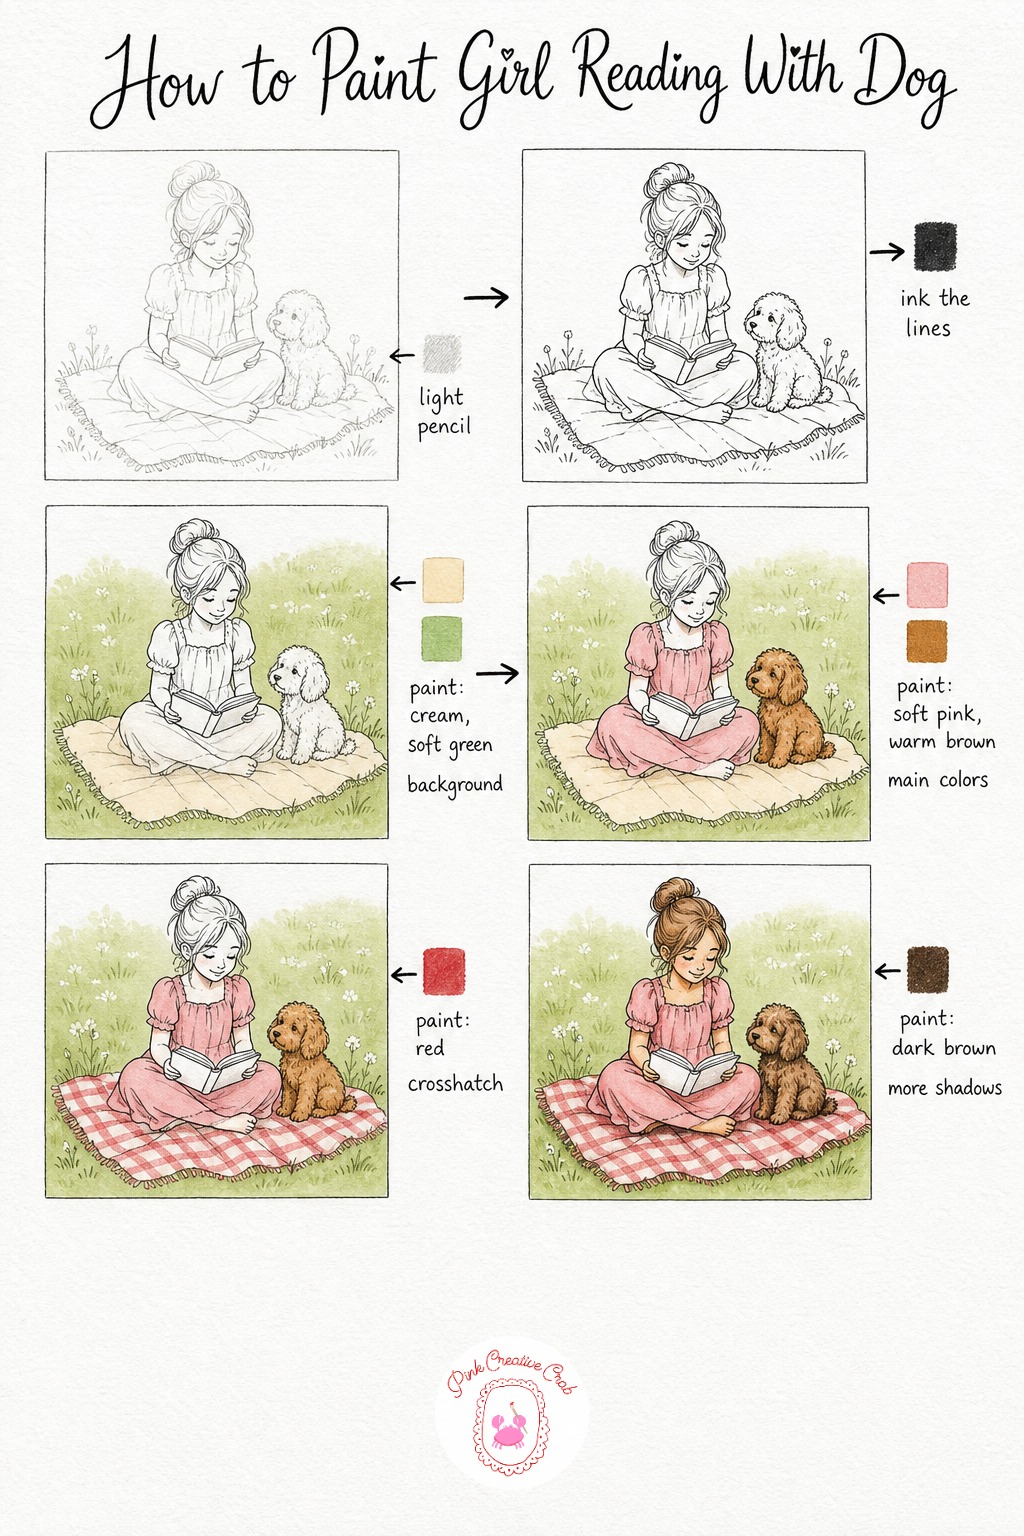
Lay the girl sitting cross legged with her book resting on her knees, her dog curled or sitting close beside her on the blanket. Ink the folds of her dress and the dog’s outline with a soft steady line, keeping the mood relaxed rather than stiff.
Wash the blanket and grass pale first, then bring color into the dress and the dog’s coat. Finish the blanket with a full gingham pattern and add gentle shadow under both figures to settle them onto the fabric.
If you want more dog pencil drawing ideas to pair with this companion, that collection has plenty of easy poses to borrow from.
Straw Hat On The Blanket
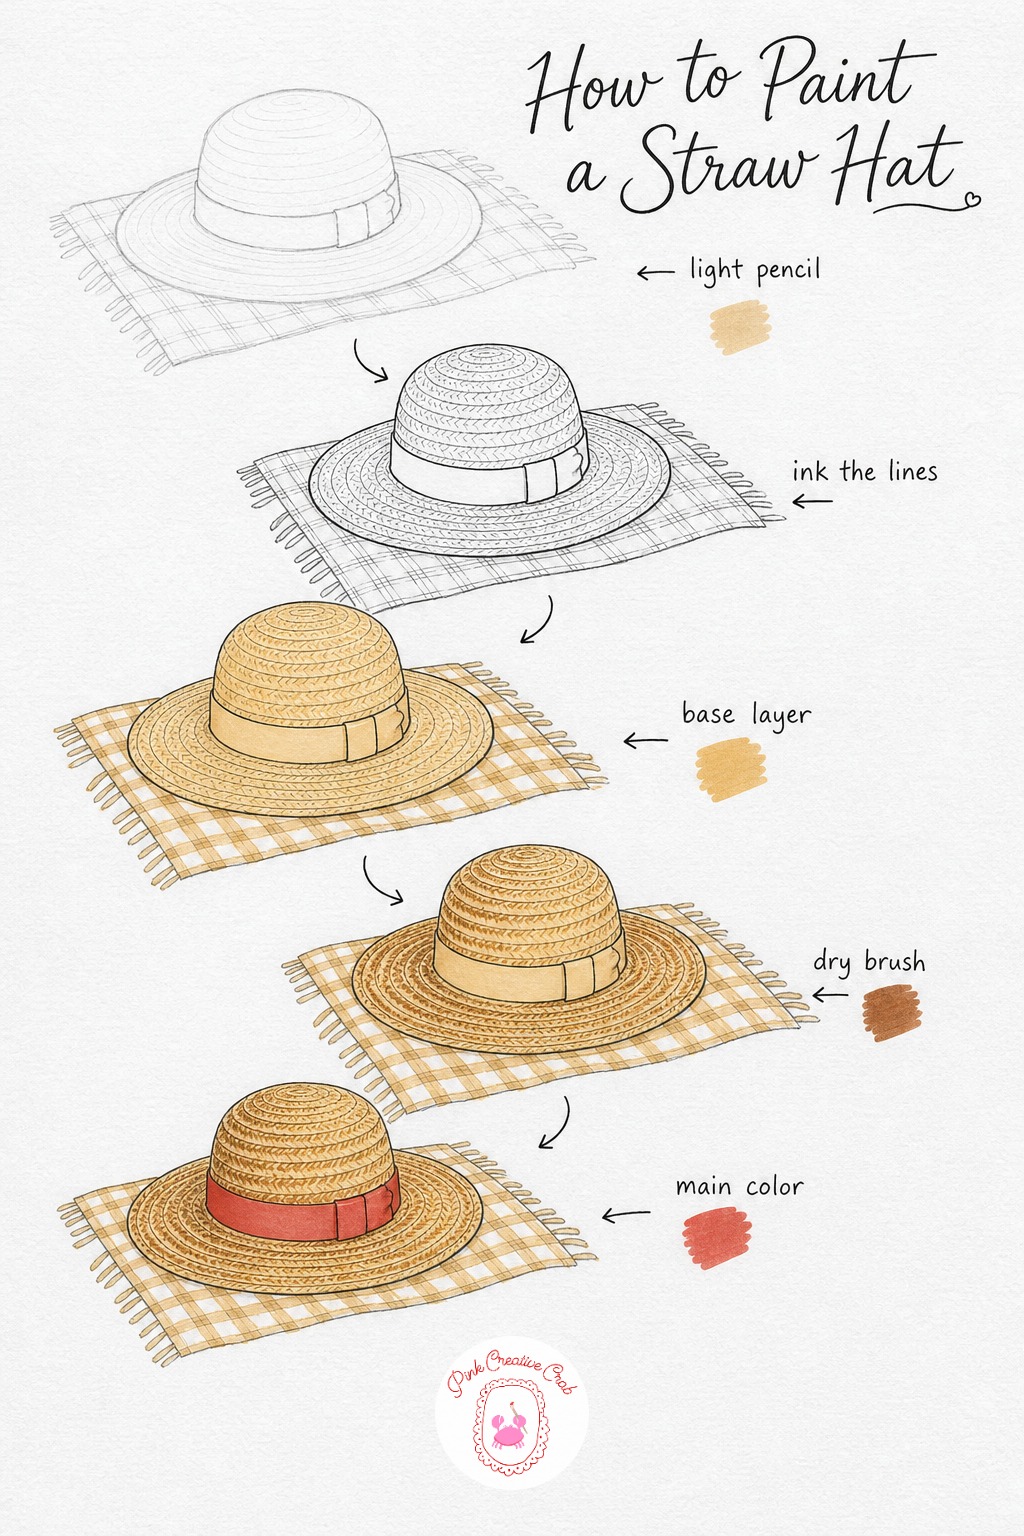
Draw the hat as a wide curved oval brim with a rounded crown sitting slightly tilted, as if it just got set down between bites of strawberries. Ink the weave lines loosely in short curved strokes rather than straight ones.
Wash the whole hat golden tan, then layer warm brown strokes along the weave direction for texture. Wrap a soft red ribbon around the crown to tie it back into your gingham blanket, then shade the underside of the brim where it dips closest to the fabric.
Tip: a slightly uneven brim edge looks more like woven straw than a perfectly round one.
Sliced Watermelon Plate
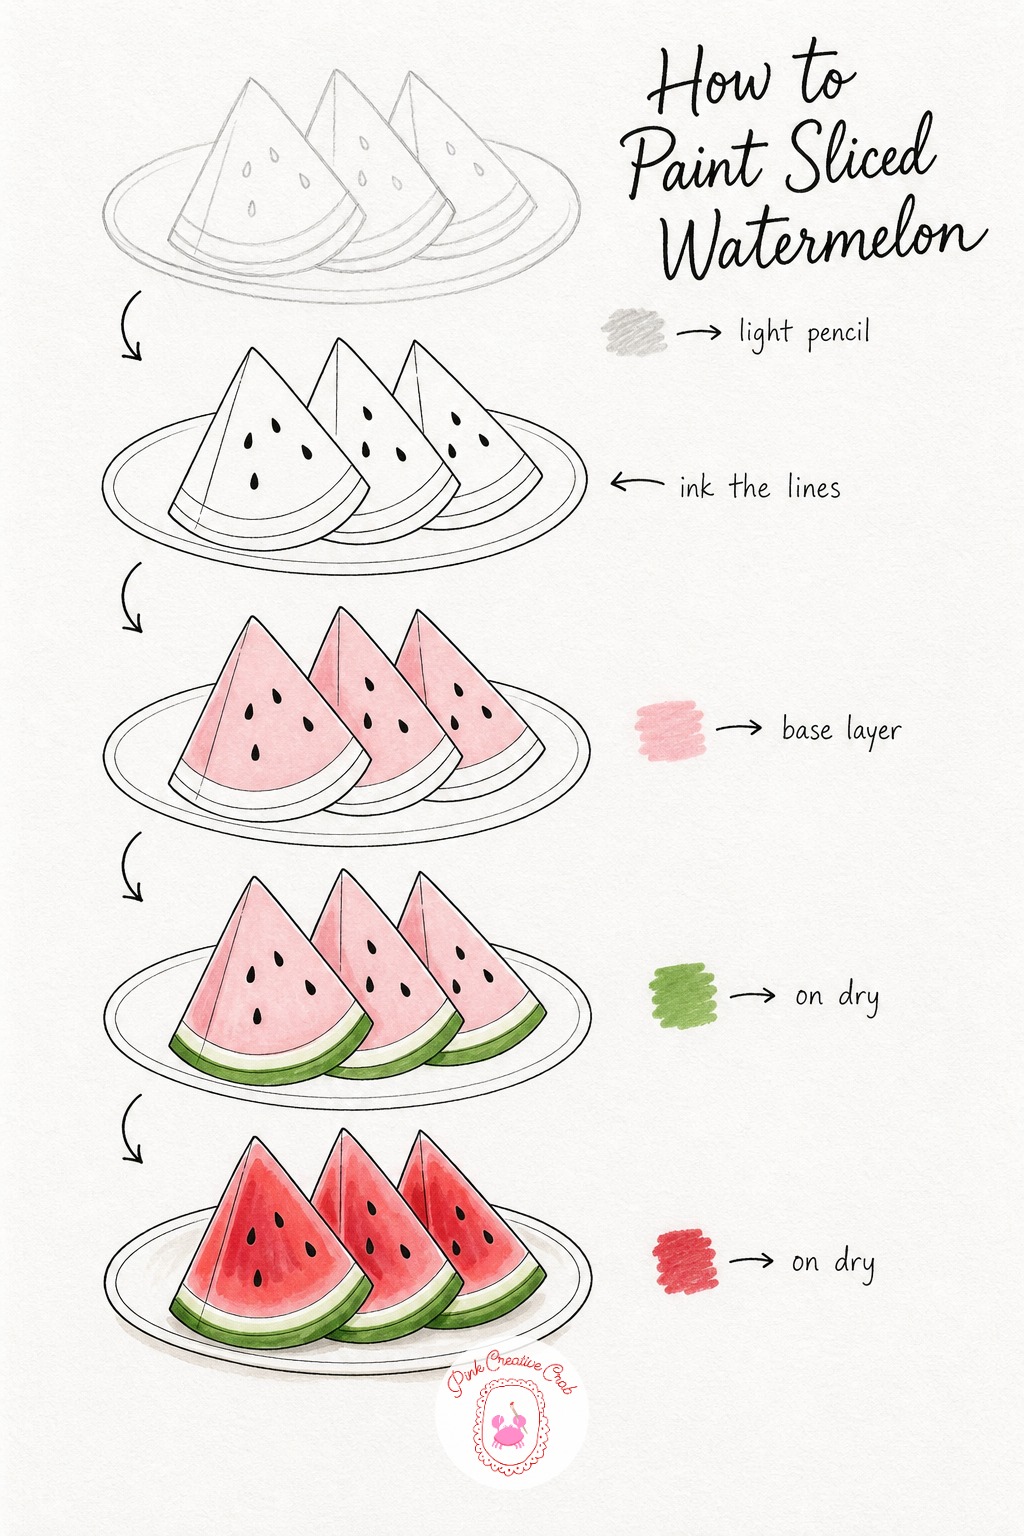
Fan three watermelon wedges across a small plate, pencil in the curved rind and a scatter of seeds before inking the clean outer edges. Keep the slices slightly different sizes so the plate feels casually arranged rather than measured.
Wash the flesh pale pink first, then bring fresh green into the rind band at the base of each wedge. Deepen the center of the flesh with another layer of red before dotting in dark seeds and a soft cream shadow under the plate.
Tip: leave a thin white line between the pink flesh and green rind, that gap is what makes the slice look juicy.
Checkered Thermos And Mug
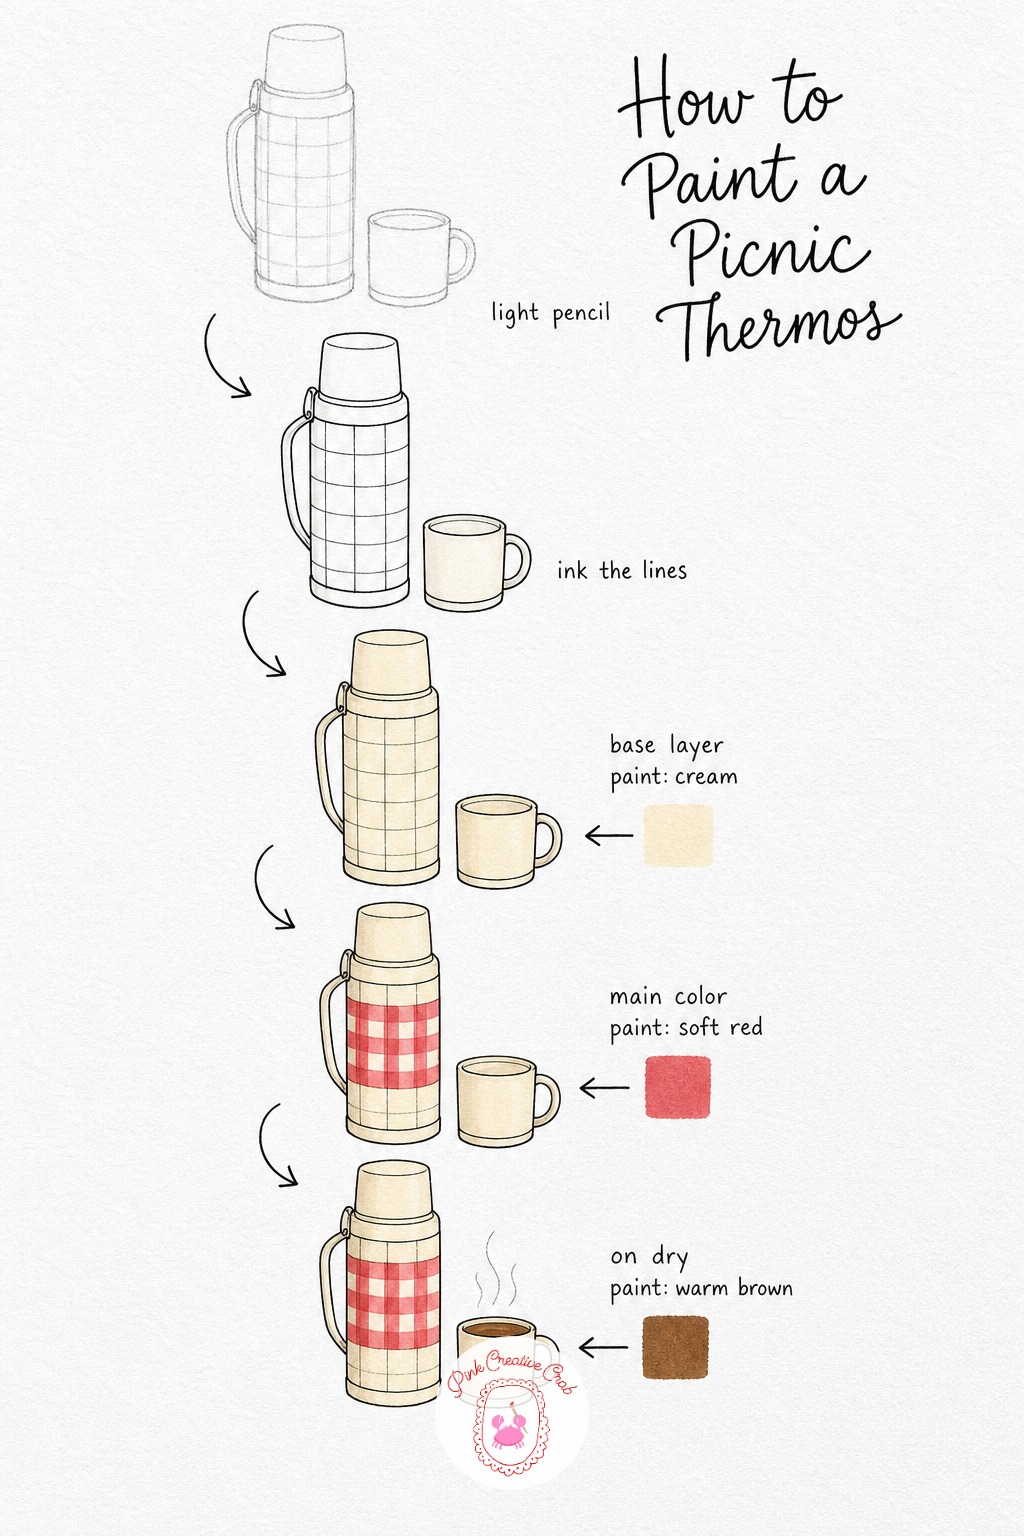
Sketch a tall rounded thermos with a simple lid and a small mug standing just beside it, catching a thin curl of steam. Ink the lid seams and mug handle cleanly so the metal and ceramic read differently once colored.
Wash both pieces cream first, then wrap a soft red gingham band around the thermos to echo your blanket pattern. Fill the mug with warm brown coffee, leaving the steam lines as bare white paper, and finish with shadow folds on the band.
Tip: curve the gingham band slightly to follow the roundness of the thermos, a flat straight band flattens the whole shape.
Bunch Of Wildflowers In A Jar
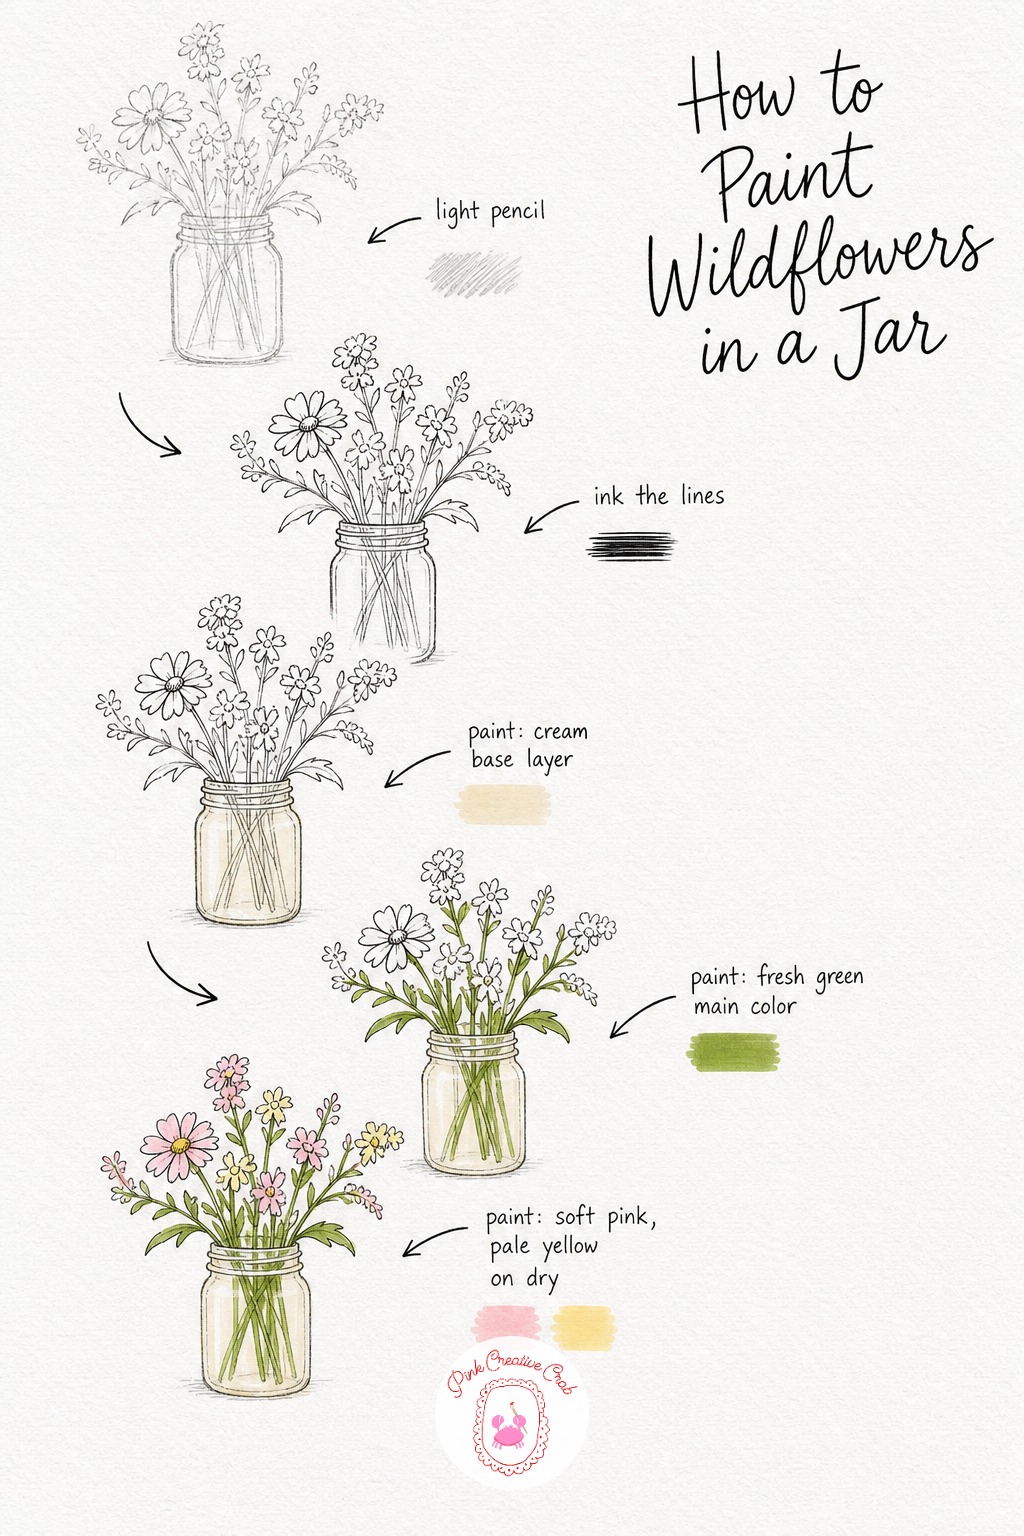
Draw a simple glass jar with a cluster of loose wildflower stems leaning in different directions, some taller than others for a relaxed gathered look. Ink the jar rim with a confident curved line and keep petal edges soft.
Leave most of the jar glass bare or barely washed with cream so it reads as clear, then build fresh green through every stem and leaf. Scatter soft pink and pale yellow across the petals before adding a short water line inside the jar.
Tip: vary your flower sizes and tilt the stems unevenly, a perfectly symmetrical bunch looks stiff instead of wild.
Fruit Tart On A Cake Stand
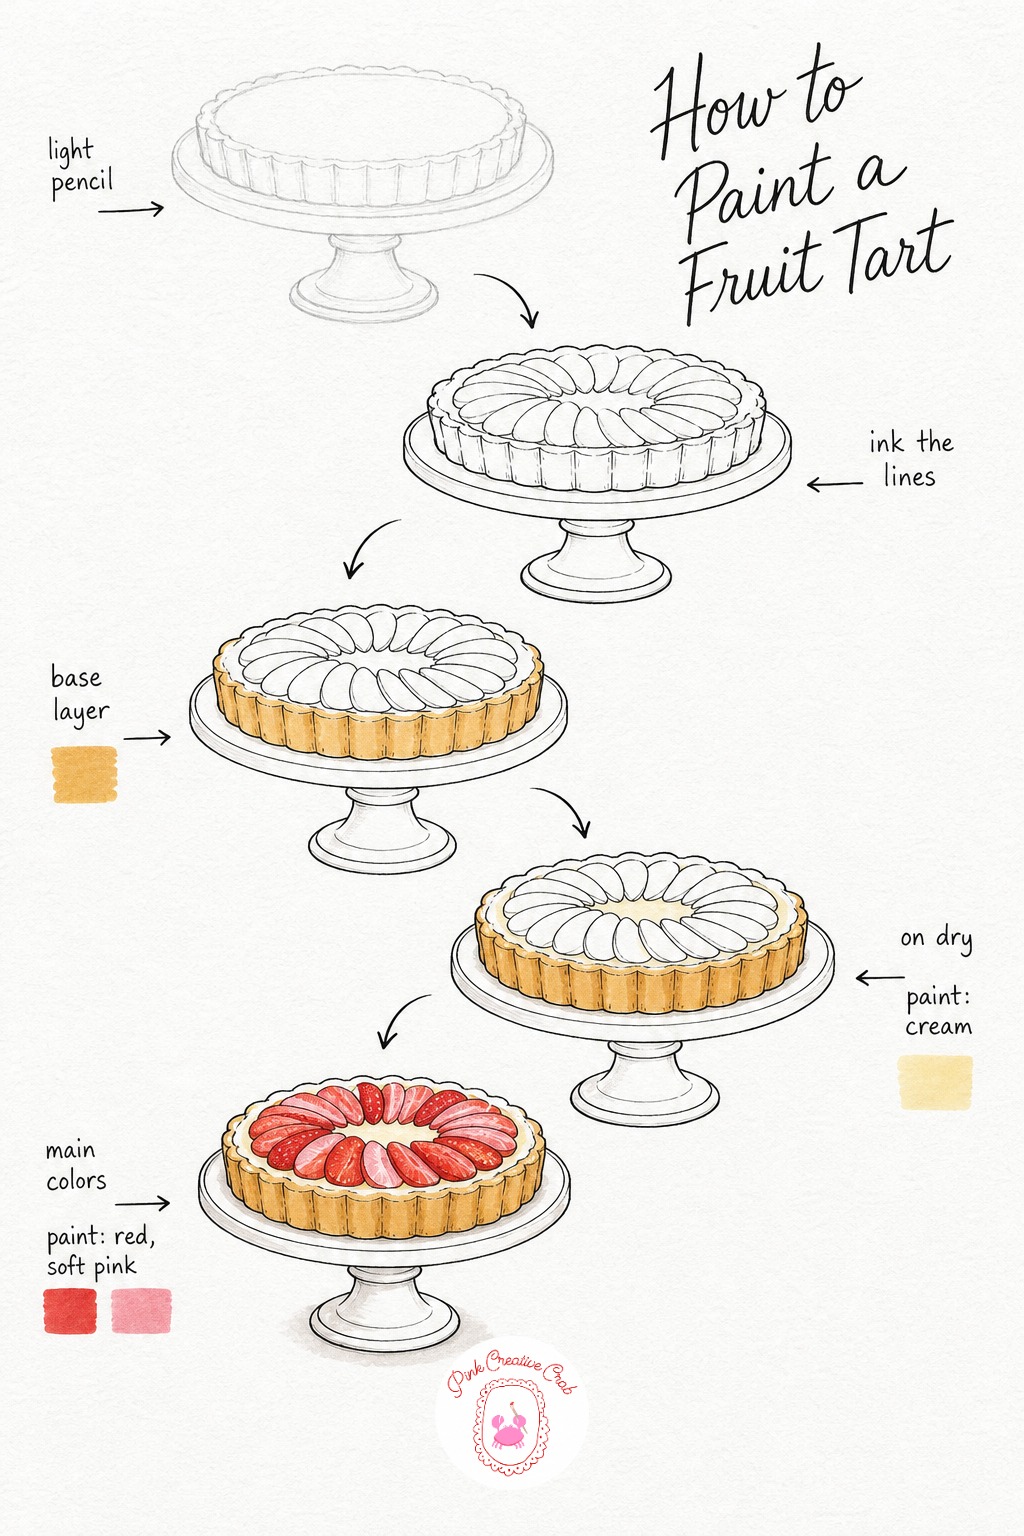
Sketch the tart as a round shape sitting on a simple pedestal stand, with fruit slices pencilled in a loose ring across the top. Ink the scalloped crust edge and the curve of the stand with a light steady hand.
Wash the crust golden tan and the custard filling cream, then build the fruit ring in red and soft pink, overlapping the slices slightly for a fuller look. Finish with crust shadow and a few gold highlight lines on the glass stand.
Tip: keep your fruit slices slightly irregular in shape, perfectly even ovals make the tart look printed rather than baked.
Woven Blanket Folded With Pillow
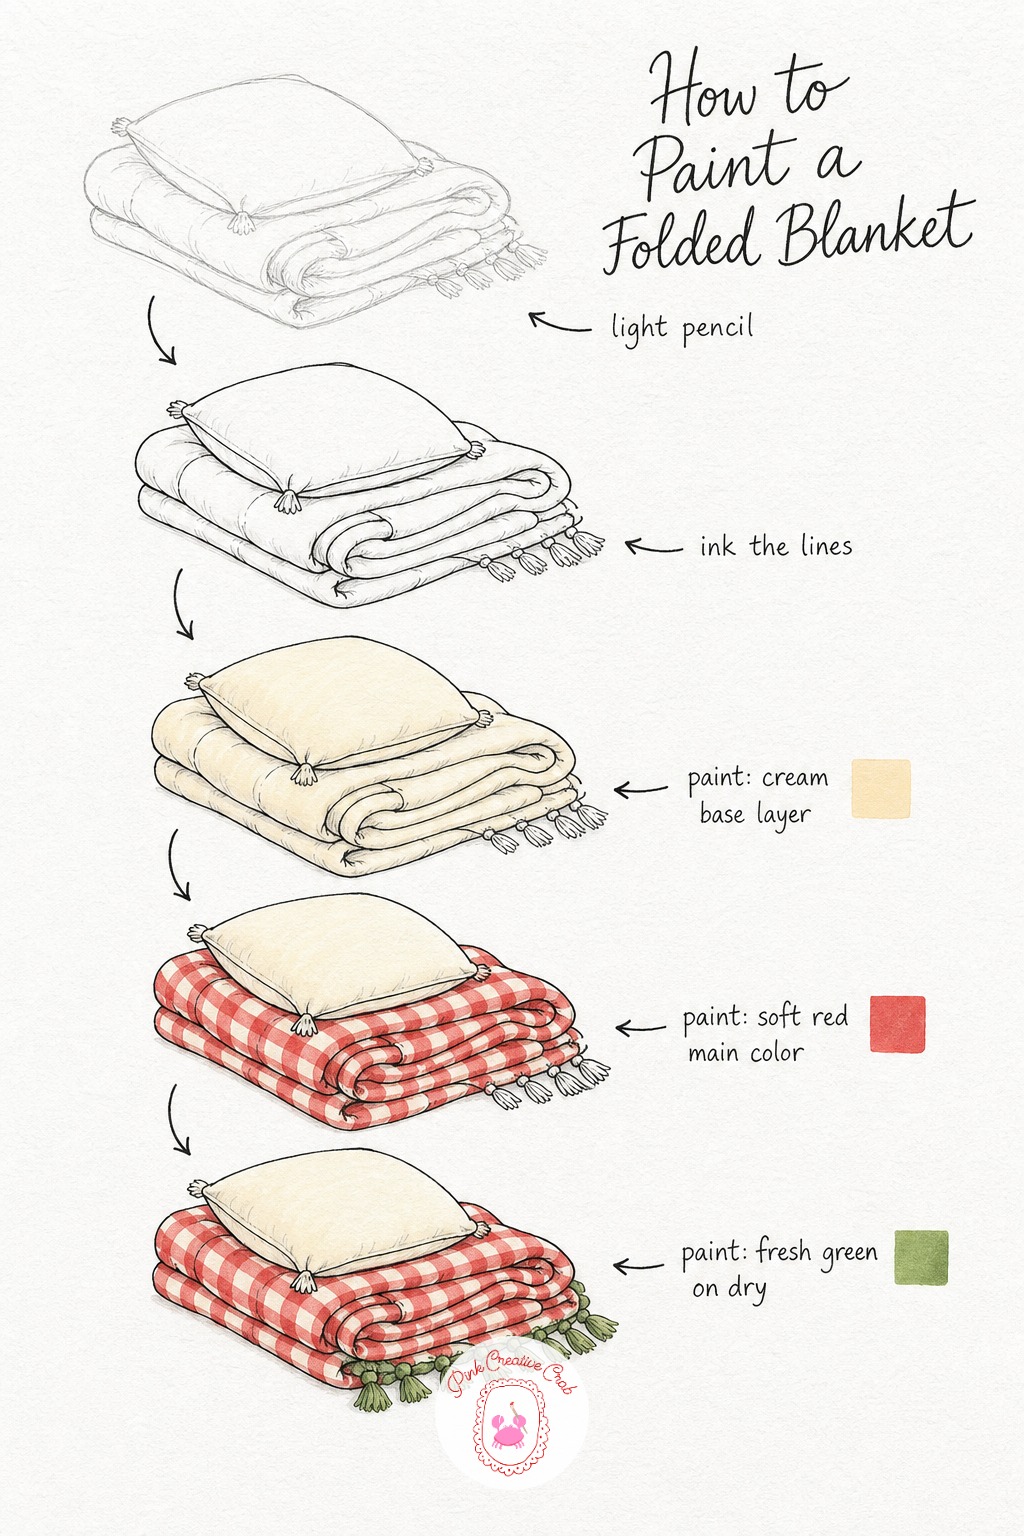
Draw the blanket in loose folds rather than flat, with a small pillow resting on top as if someone just stepped away. Ink every crease carefully since folds are what make fabric look soft instead of stiff.
Wash the lightest fold tops and pillow cream first, then bring the gingham pattern through the rest of the blanket, letting it curve and bend with each fold. Add a fresh green tassel trim along one edge before deepening the shadows inside every crease.
Tip: darken only the inside of each fold, the outer edge of a fold should stay close to your base wash for real softness.
Mason Jar Of Iced Tea
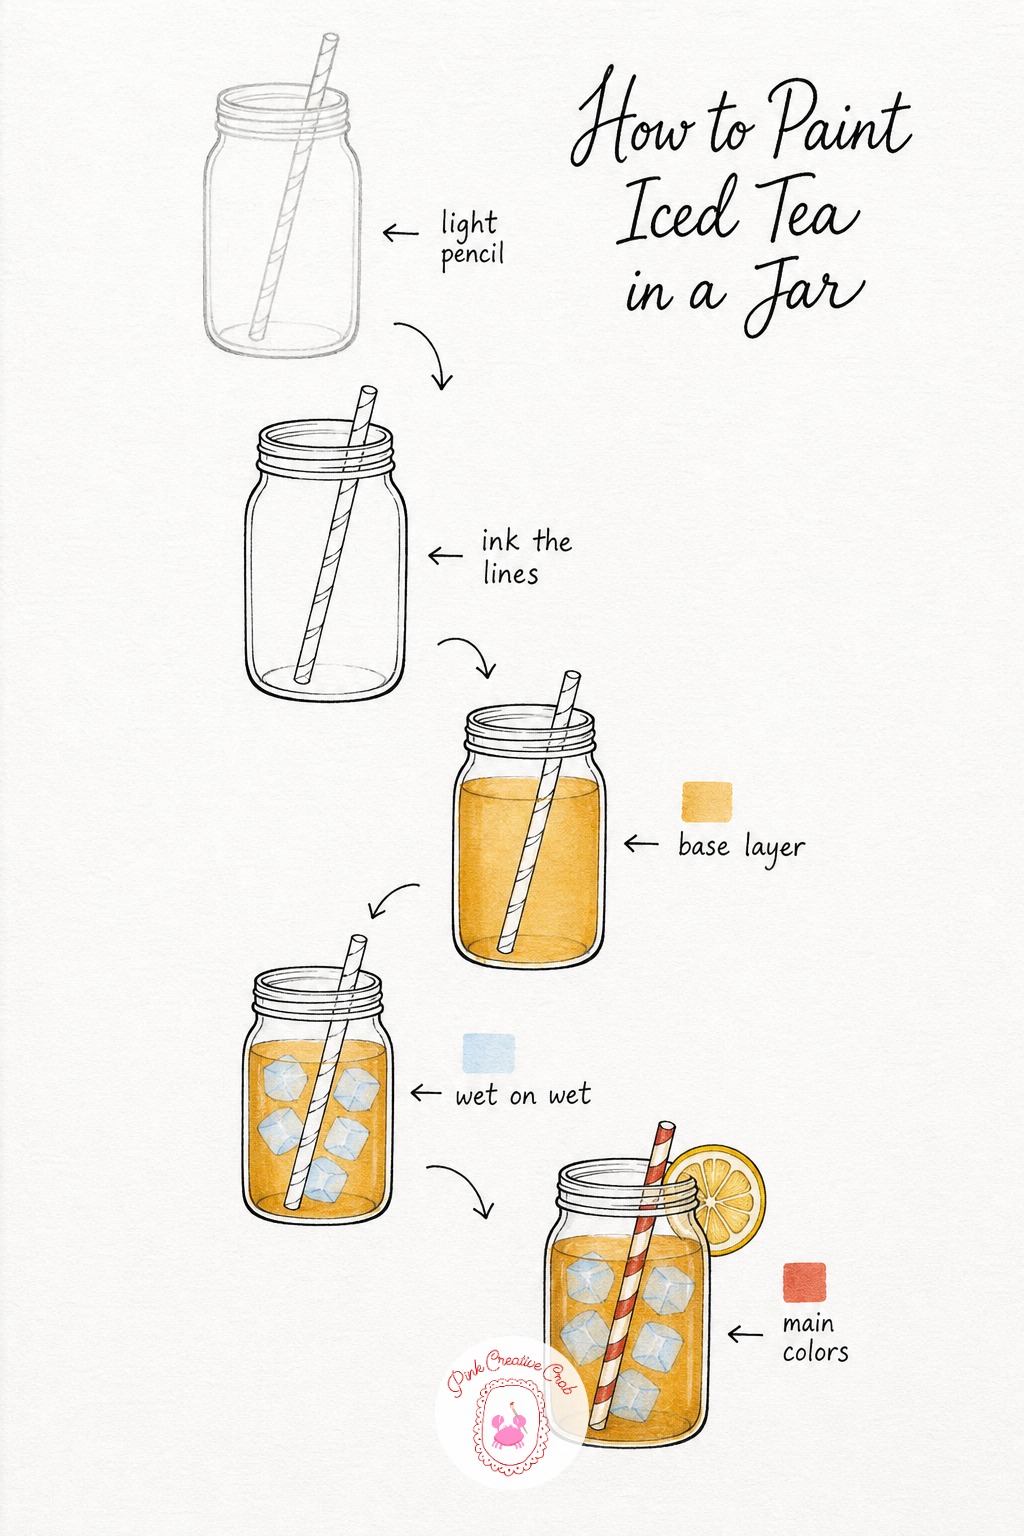
Sketch the mason jar with its signature ridged sides, a striped straw leaning out and a lemon slice perched on the rim. Ink the ridge lines and lid seam with short careful strokes so the glass texture stays visible under color.
Fill the jar with a pale amber wash for the tea, leaving a few pale blue ice cube shapes bare or barely touched. Stripe the straw in soft red and cream, color the lemon slice, then deepen the glass edge with a darker amber shadow.
Tip: leave a thin vertical strip of white paper down one side of the jar, that single highlight makes the whole glass look wet and cold.
Cheese Board With Grapes
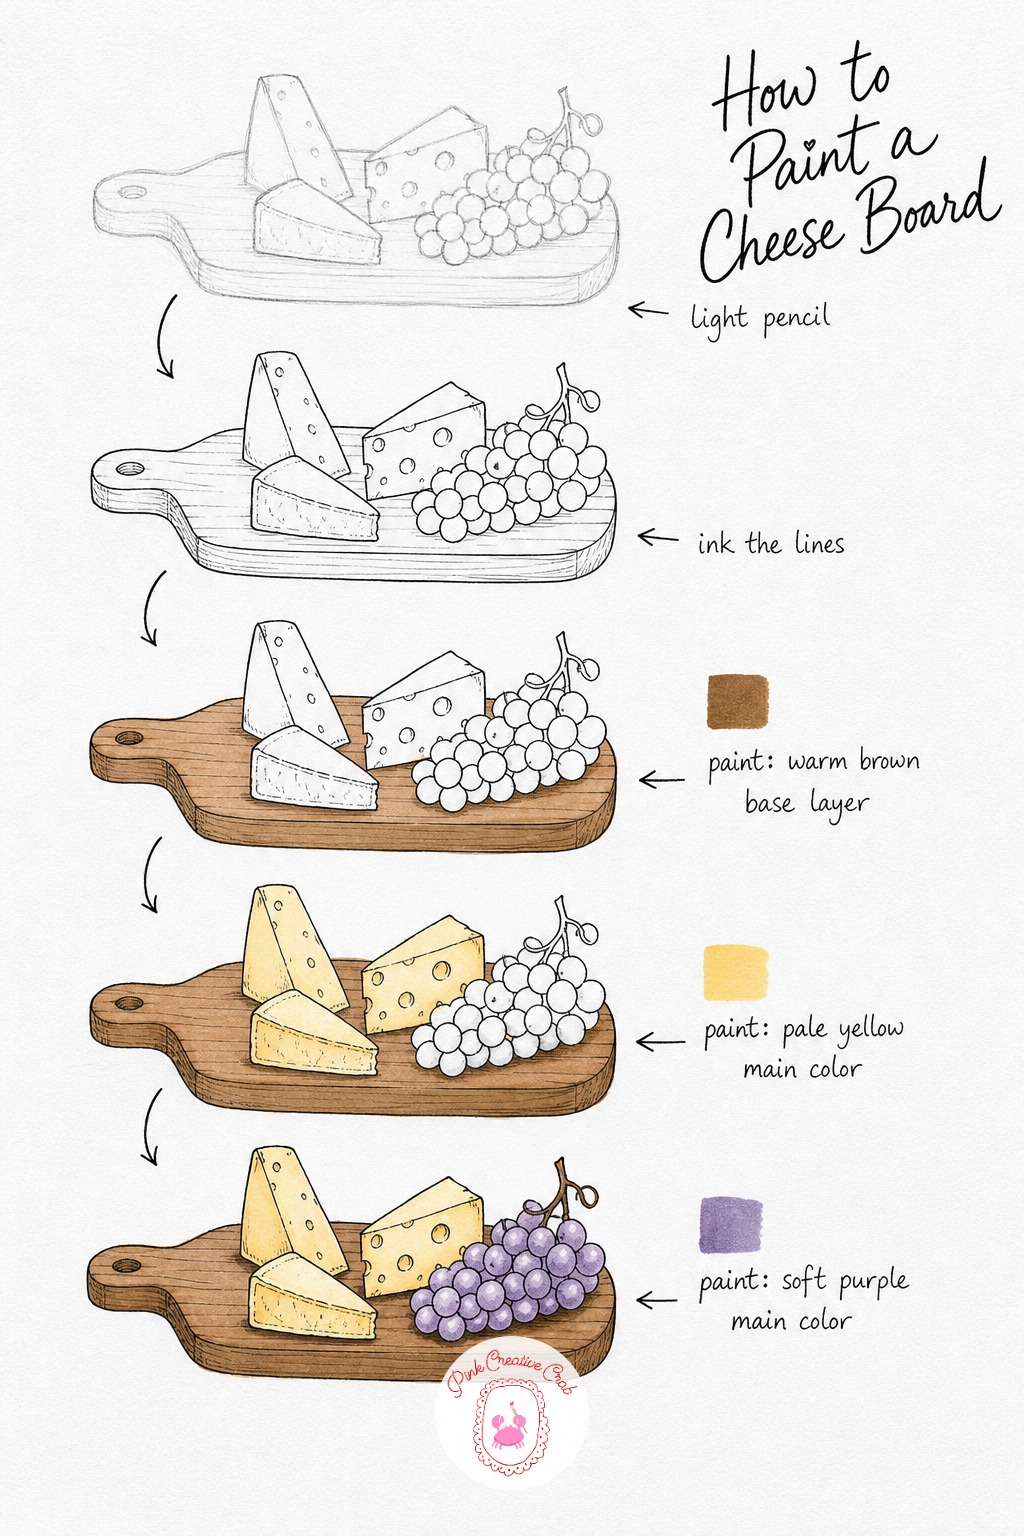
Lay out a simple wooden board with two or three cheese wedges and a loose cluster of grapes tucked beside them. Ink the board grain lightly and keep the grape cluster overlapping so it reads as one bunch rather than scattered circles.
Wash the board warm brown first, then color the cheese pale yellow and the grapes soft purple. Add wood grain texture lines across the board and a touch of dark purple shadow where each grape meets its neighbor.
Tip: leave a small white highlight dot on each grape, it is the quickest way to make a cluster look glossy and fresh.
Butterflies Over The Picnic
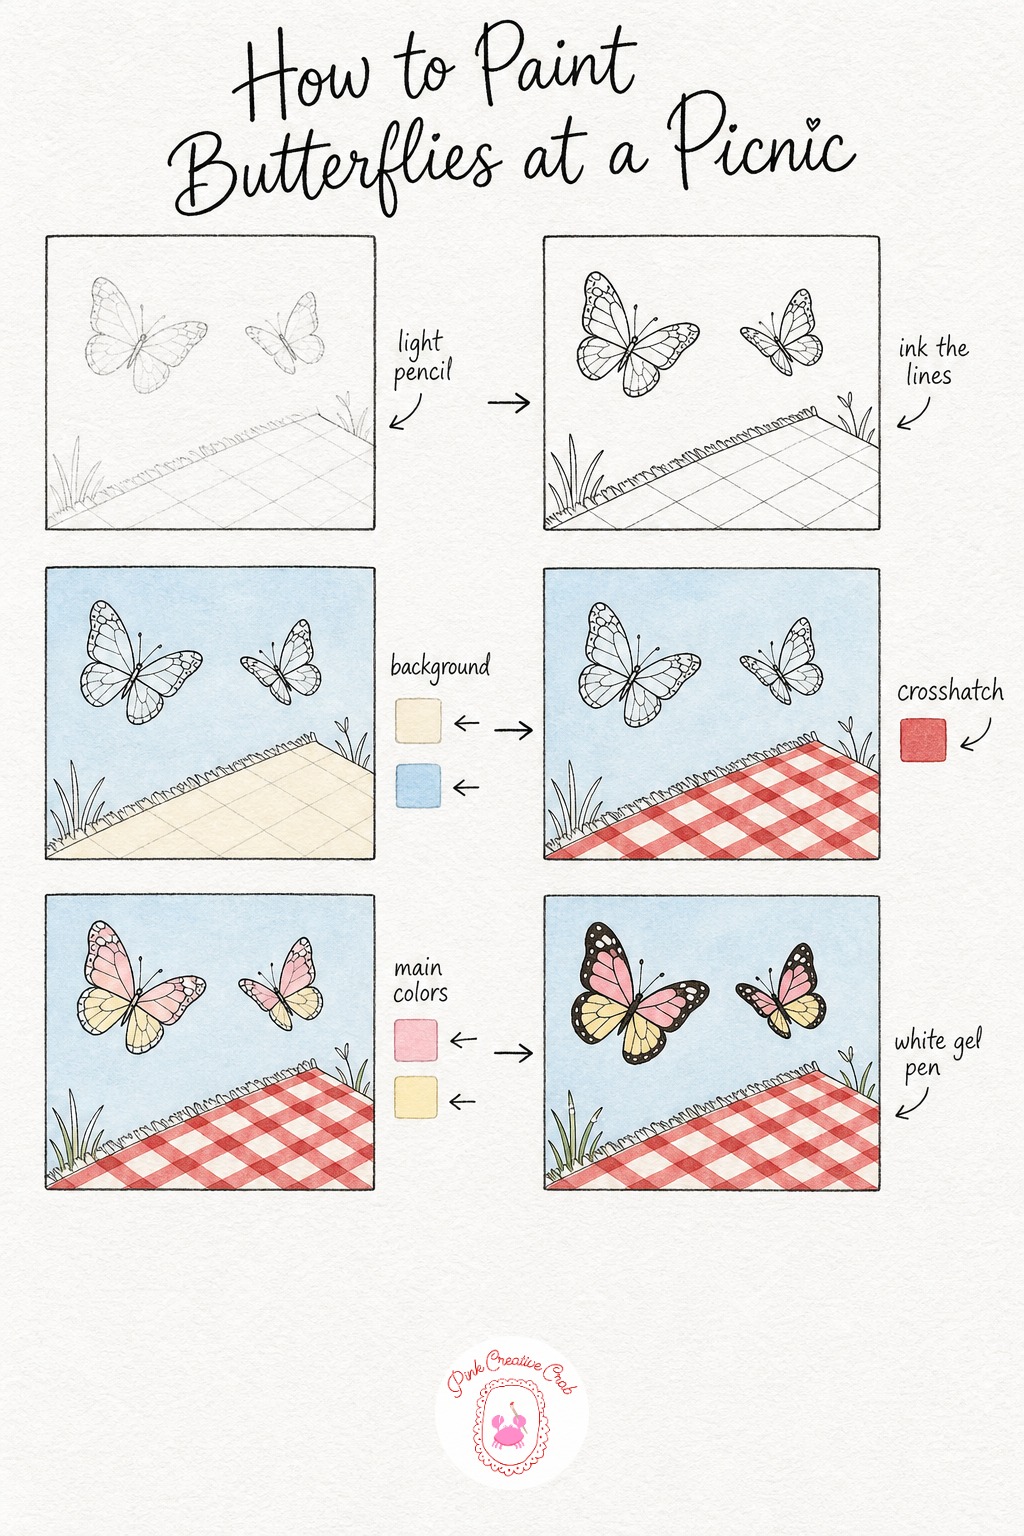
Sketch just the corner of a gingham blanket in the lower part of the page, then let two butterflies drift upward across the open sky above it. Ink the wing shapes with delicate curved lines so they feel light rather than heavy.
Wash the sky pale blue and the blanket corner cream, then finish the gingham pattern before coloring the wings in soft pink and pale yellow. Add dark wing edges and fine antennae last to bring the butterflies into focus.
For more winged subjects to sketch between picnics, the butterfly drawing pencil ideas collection has plenty of gentle poses.
Vintage Bicycle With Flower Basket
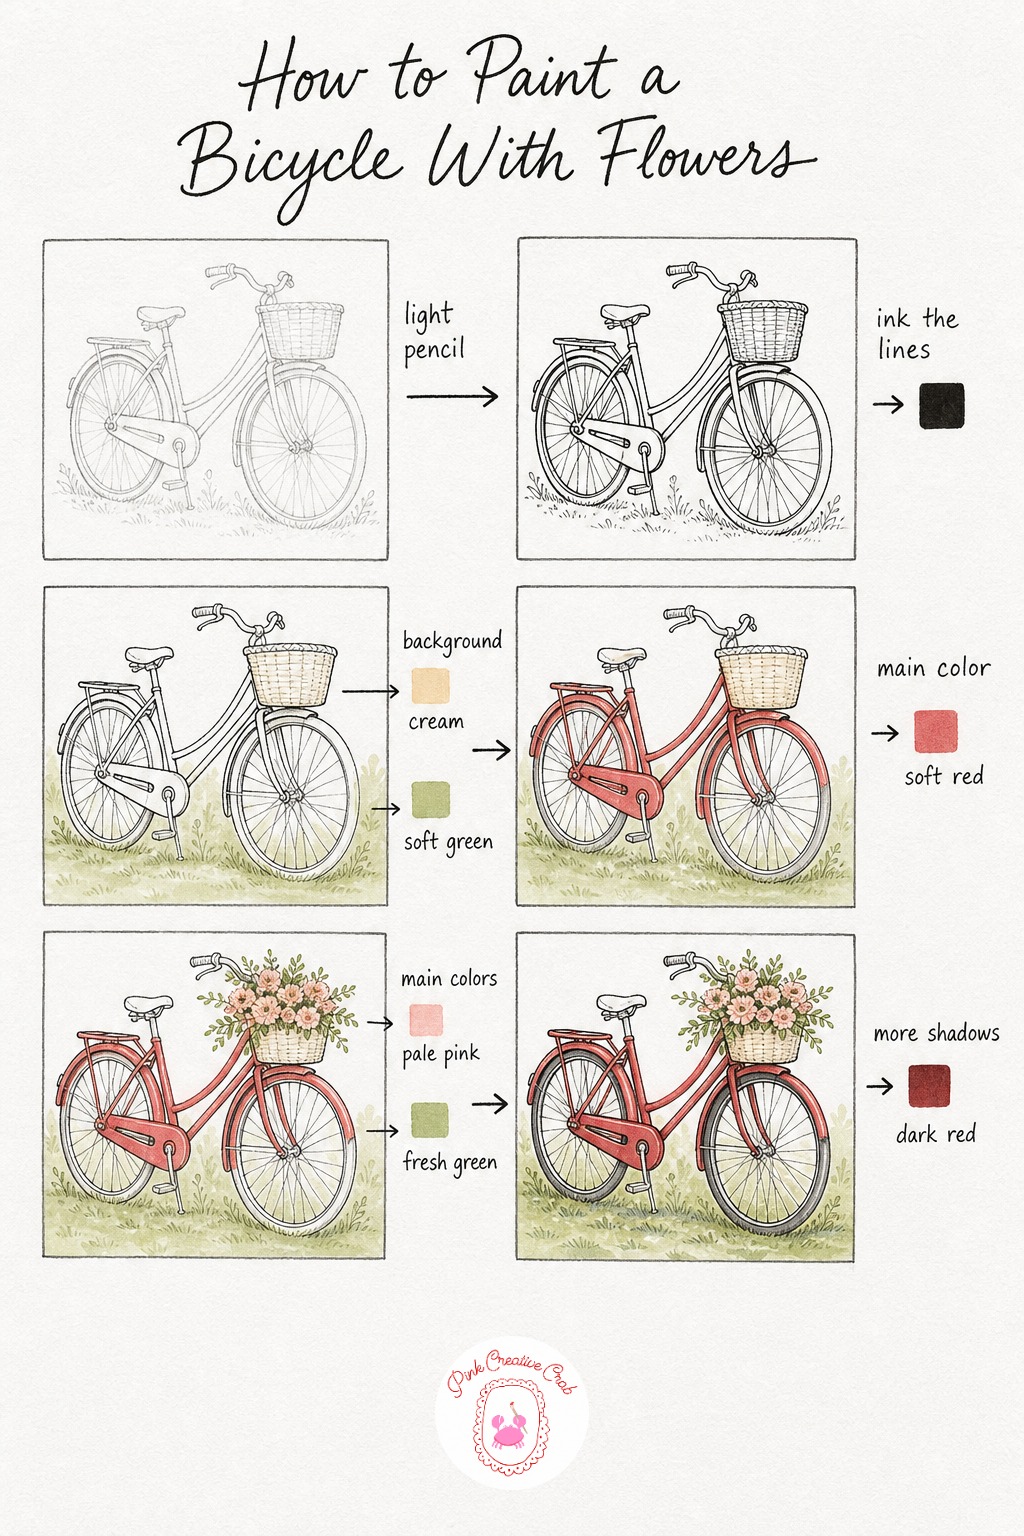
Draw a simple vintage bicycle leaning gently to one side, with a round woven basket mounted on the front filled loosely with flowers. Ink the frame curves and basket weave with light confident lines, keeping the wheels simple circles.
Wash the background grass soft green and the basket cream, then bring soft red into the whole bicycle frame. Fill the basket with pale pink and fresh green flowers before shading the frame edges and tires for depth.
Tip: tilt the bicycle slightly off its kickstand rather than perfectly upright, it adds a relaxed sense of motion to the scene.
Lakeside Dock With Dangling Feet
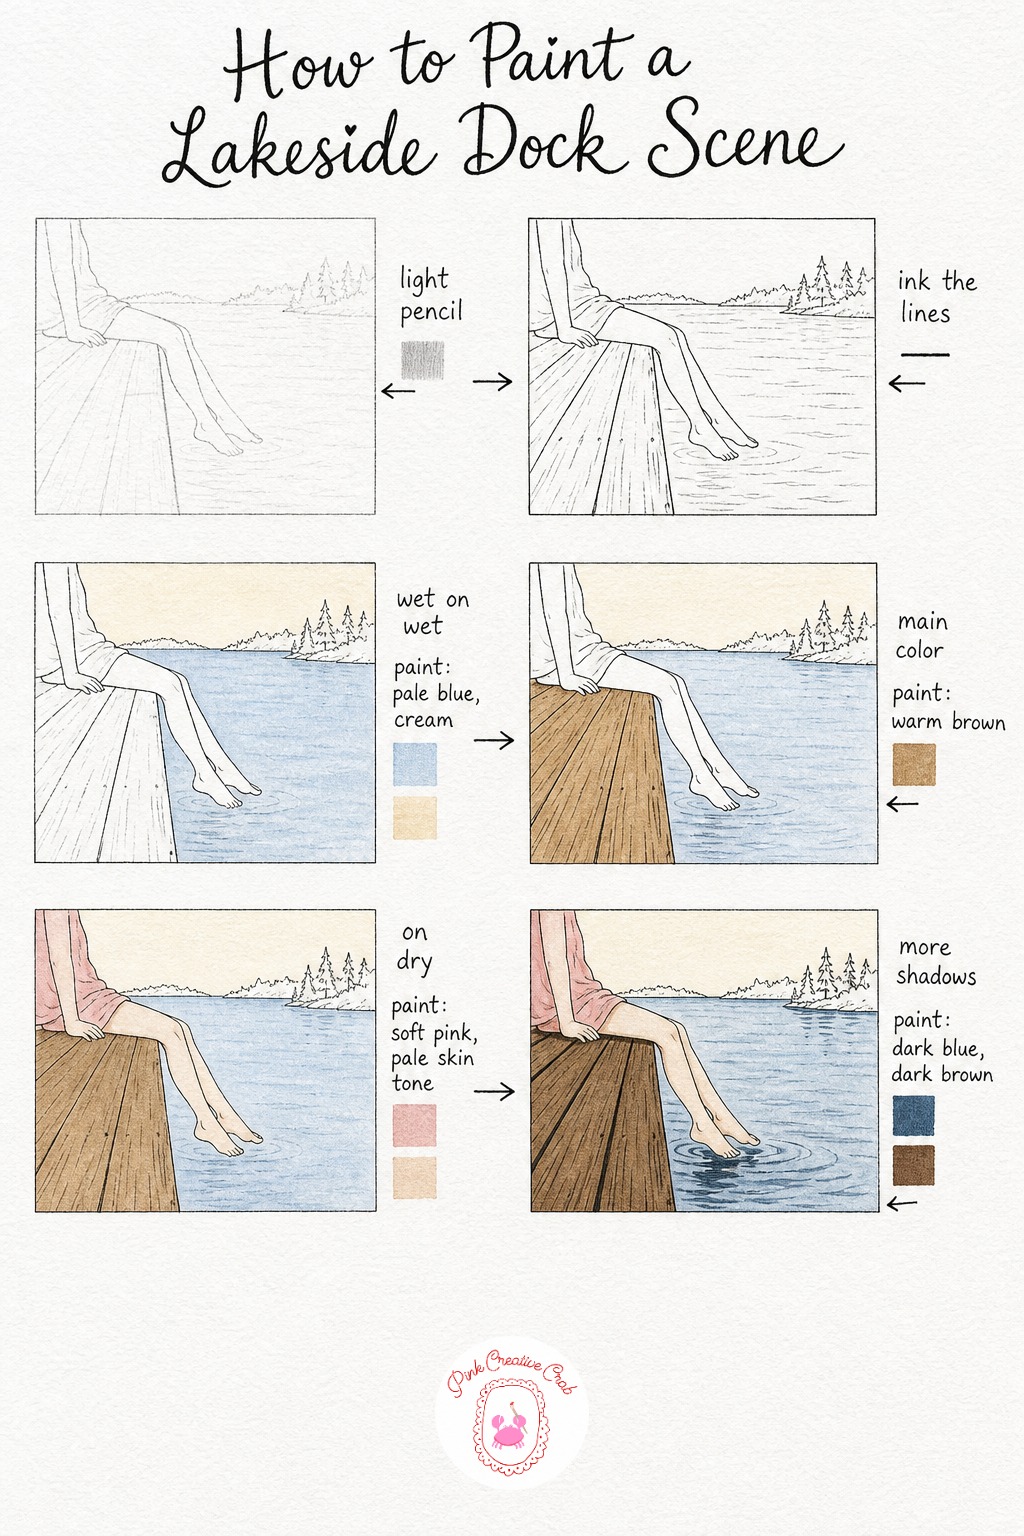
Lay out a simple wooden dock stretching into a calm lake, with a pair of legs dangling off the edge just above the waterline. Ink the plank gaps and the soft curve of the water’s edge so the scene feels still and quiet.
Wash the sky and lake pale together first, then bring warm brown through every dock plank. Color the clothing and skin tone before adding small ripple lines around the feet where they almost touch the water.
Tip: keep the ripples small and close together near the feet only, too many ripples across the whole lake makes the water look choppy instead of calm.
What to Do Next
Pick one lesson, gather your markers and fineliner, and work through the stages in order rather than jumping ahead to color. Once you finish a few, try mixing pieces together, a gingham blanket under your lakeside cake or wildflowers beside your reading girl, for a full picnic page of your own.
Frequently Asked Questions
What paper works best for alcohol marker picnic drawing?
Use a marker friendly pad made for alcohol inks, since regular sketch paper lets color bleed and feather at the edges. A smooth heavier stock holds your washes cleanly and keeps fine ink lines crisp underneath the color.
Do I need to ink every picnic scene before coloring?
Yes, ink first and let it dry fully before any marker touches the page. The fine black line is what keeps your gingham, baskets and glasses looking clean once alcohol marker starts to spread and layer on top.
How do I get gingham to look soft instead of like a printed grid?
Paint a pale wash across every square first, then only darken where two lines actually cross on the fabric. Keep your squares slightly uneven rather than ruler straight, real fabric folds and bends instead of lying perfectly flat.
Can I draw these picnic scenes without alcohol markers?
Absolutely, the same pencil and ink stages work beautifully with colored pencils or watercolor, just swap your blending technique. Keep the same order though: pale washes first, then main colors, then your darkest shadows and final details.
How long does one picnic drawing take to finish?
Most of these scenes take under an hour once you include ink drying time between stages. Objects like the thermos or hat go faster, while full scenes with a figure or lake background take a little longer to layer.
Have any thoughts?
Share your reaction or leave a quick response — we’d love to hear what you think!
-
 0
-
0
-
0
-
0
-
0
-
0


