

Table of Contents
- Cherries in a Bowl
- Halved Peach With Leaves
- Lemons on a Branch
- Pear and Knife on a Cutting Board
- Grapes in a Basket
- Sliced Watermelon on a Plate
- Orange Half With Zest
- Strawberries in a Bowl
- Pineapple on a Towel
- Figs Cut in Half
- Apple on a Wooden Table
- Blueberries in a Jar
- Plums on a Linen Cloth
- Pomegranate Split Open
- Kiwi Slices on a Plate
- Mango Half With Pit
- Bunch of Bananas
- Apricots on a Branch
- Frequently Asked Questions
A watercolor fruit tutorial is one of the best ways to practice color and shine at the same time, because fruit is round, glossy and forgiving if your brush wobbles a little. I love painting these scenes precisely because they reward loose wet on wet washes first, then let you sharpen everything up once the paper dries, which is the whole rhythm of watercolor in one bite sized subject.
Below you will find eighteen fruit scenes, each one built in four clear stages with labeled swatches so you always know which color goes where. Pick whichever one makes you hungry today, cherries in a bowl or lemons on a branch, and paint along from the first pencil lines to the last drop of shine.
Using these images: free for personal projects such as printing, coloring, cards, journals and gifts. Handmade items that include them may be sold up to 30 pieces per design. More than that is commercial use and is not permitted, and neither is selling or sharing the images themselves or passing them off as your own. Please ask before any other use.
Cherries in a Bowl
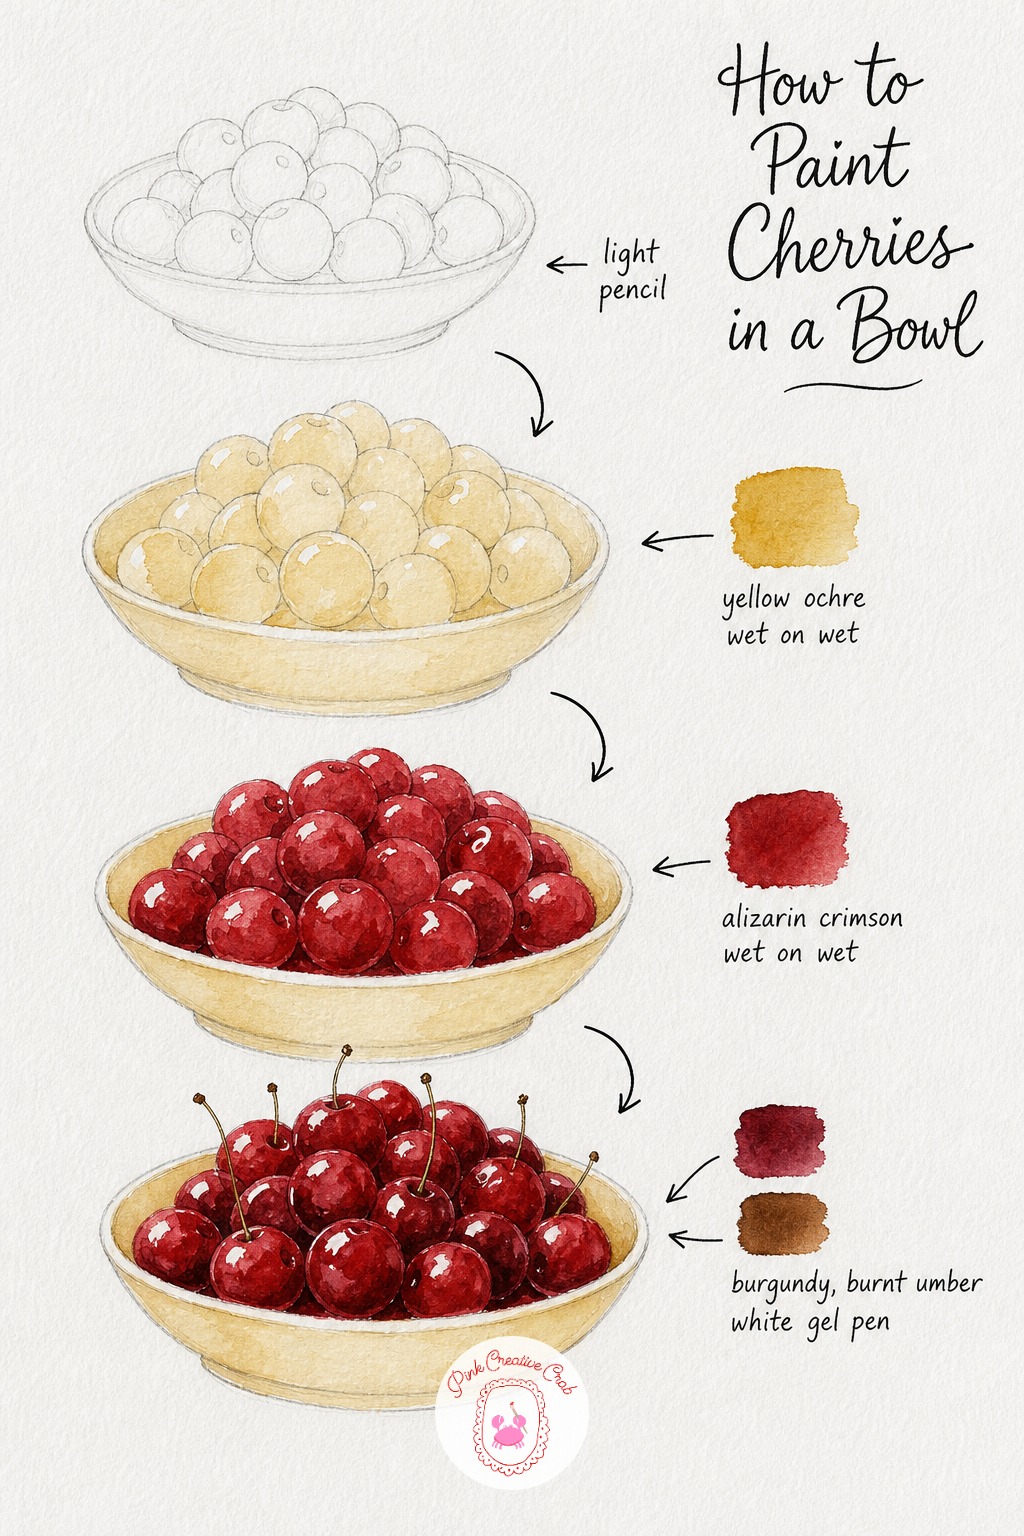
Start with a soft pencil bowl heaped with round cherries, keeping the shapes loose and overlapping so the pile feels full. Wet the bowl and cherries together and drop in a pale ochre wash so the whole page glows underneath, letting the color pool unevenly for texture.
While still damp, load your brush with crimson and touch it onto each cherry, letting the pigment bloom outward on its own. Once dry, paint burgundy shadows where cherries overlap and add curling brown stems, then dot a white gel pen highlight on each cherry for the shine.
Tip: leave a tiny uncolored circle on each cherry before you even reach for the gel pen, it keeps the shine looking wet rather than painted on.
Halved Peach With Leaves
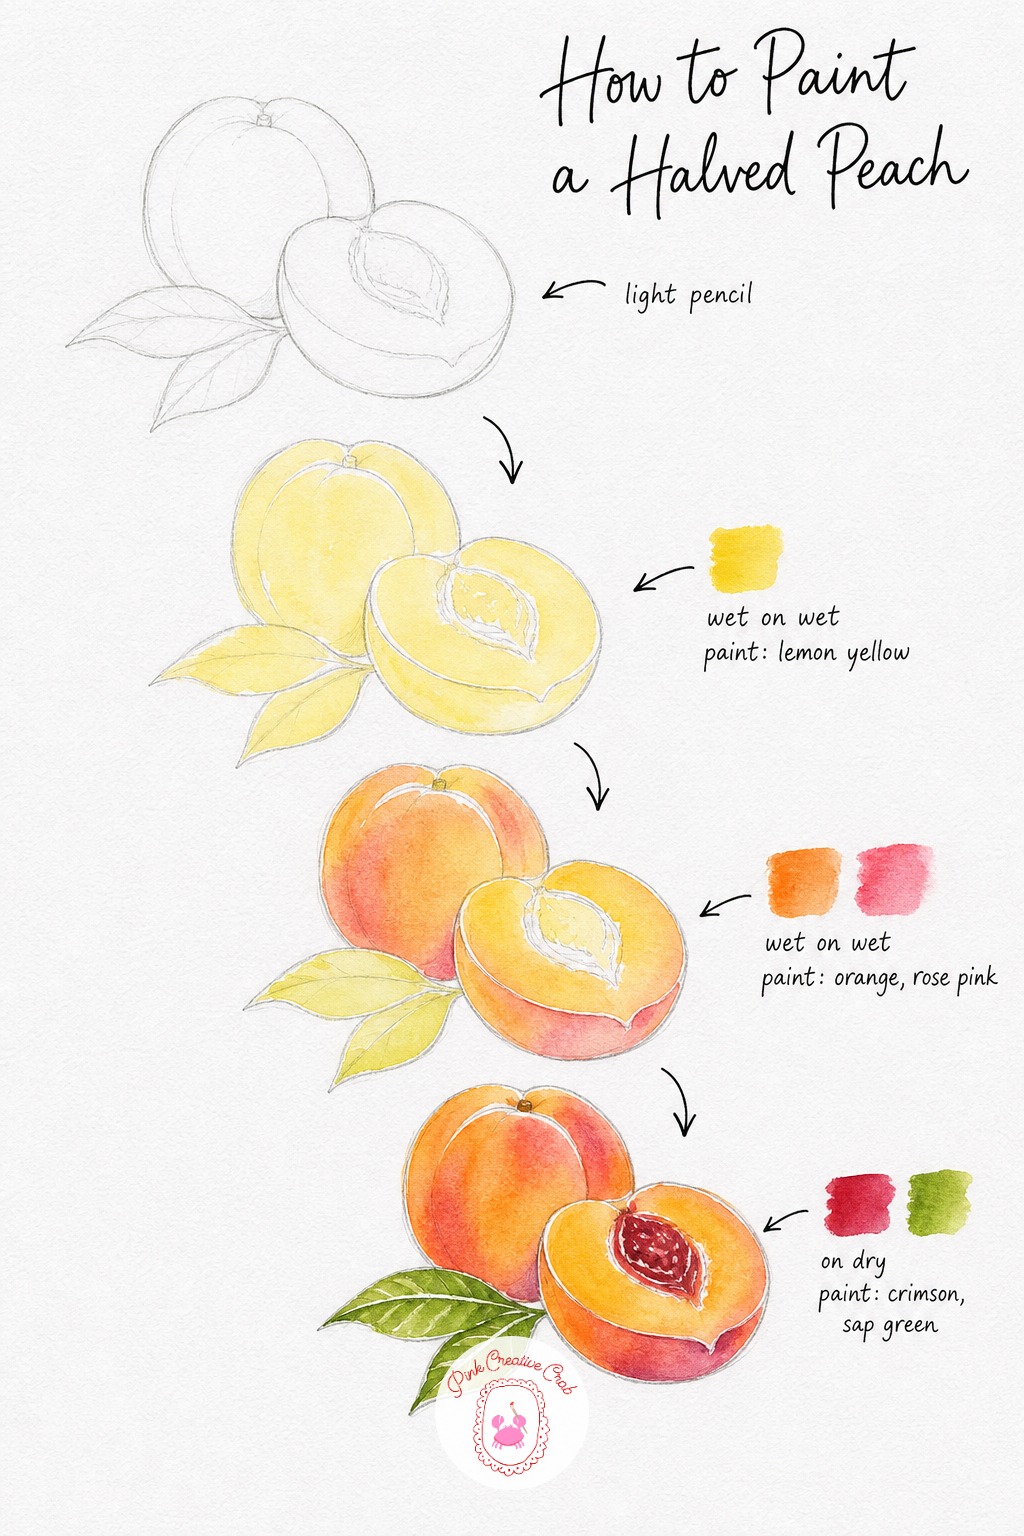
Sketch a whole peach next to its halved twin, with the pit visible and two leaves tucked behind. Wet the fruit shapes and lay down a pale lemon yellow wash first, letting it spread softly into every curve of the peach.
While the paper is still wet, touch orange along the rounded edges and rose pink where the peach blushes, letting the colors melt into each other. Once dry, paint the wrinkled pit in deep crimson, add fine green veins to the leaves, and lift a thin white highlight along the curved rim of each half.
Tip: keep the blush soft by touching the pink in with just the tip of the brush, never a full loaded stroke.
Lemons on a Branch
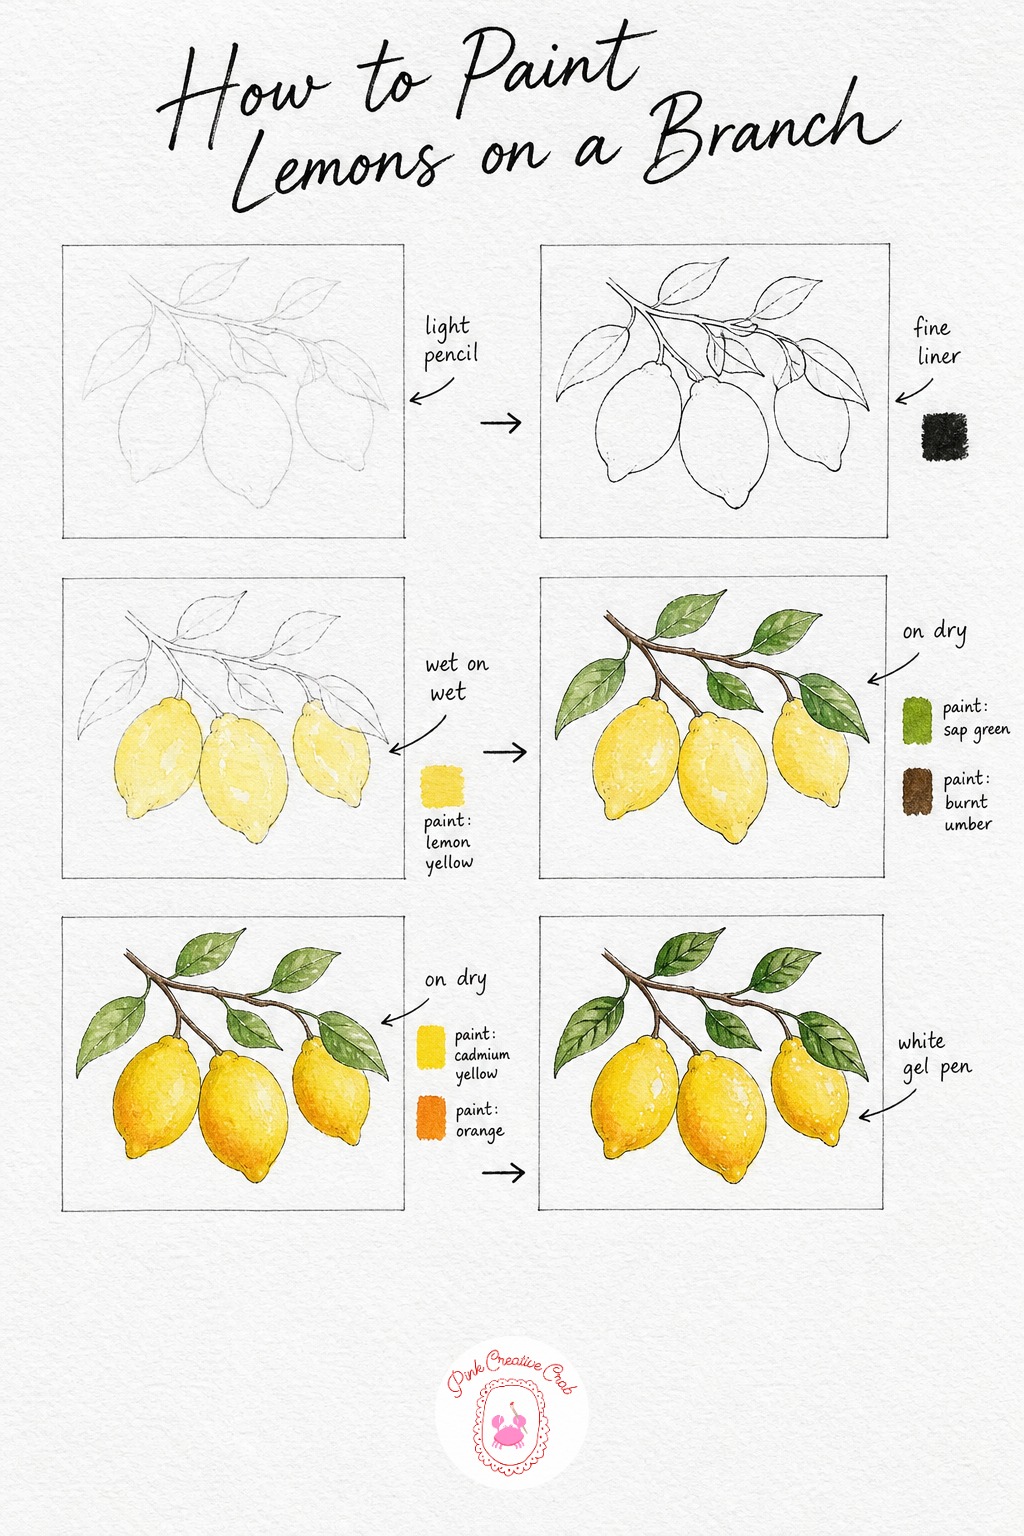
Pencil a gently curving branch carrying three lemons tucked among pointed leaves, then trace the whole thing in fine ink once you are happy with the shapes. Wet each lemon and flood in a pale lemon yellow wash, letting it pool unevenly so no two lemons look identical.
Once dry, paint the leaves in sap green and the branch in burnt umber, working carefully around the lemon shapes. Add a stronger yellow and orange shadow down one side of each lemon to build their roundness, then finish with white gel pen highlights and a few dark leaf veins.
Tip: keep one edge of every lemon almost bare paper, that strip of white sells the shine better than any paint can.
Pear and Knife on a Cutting Board
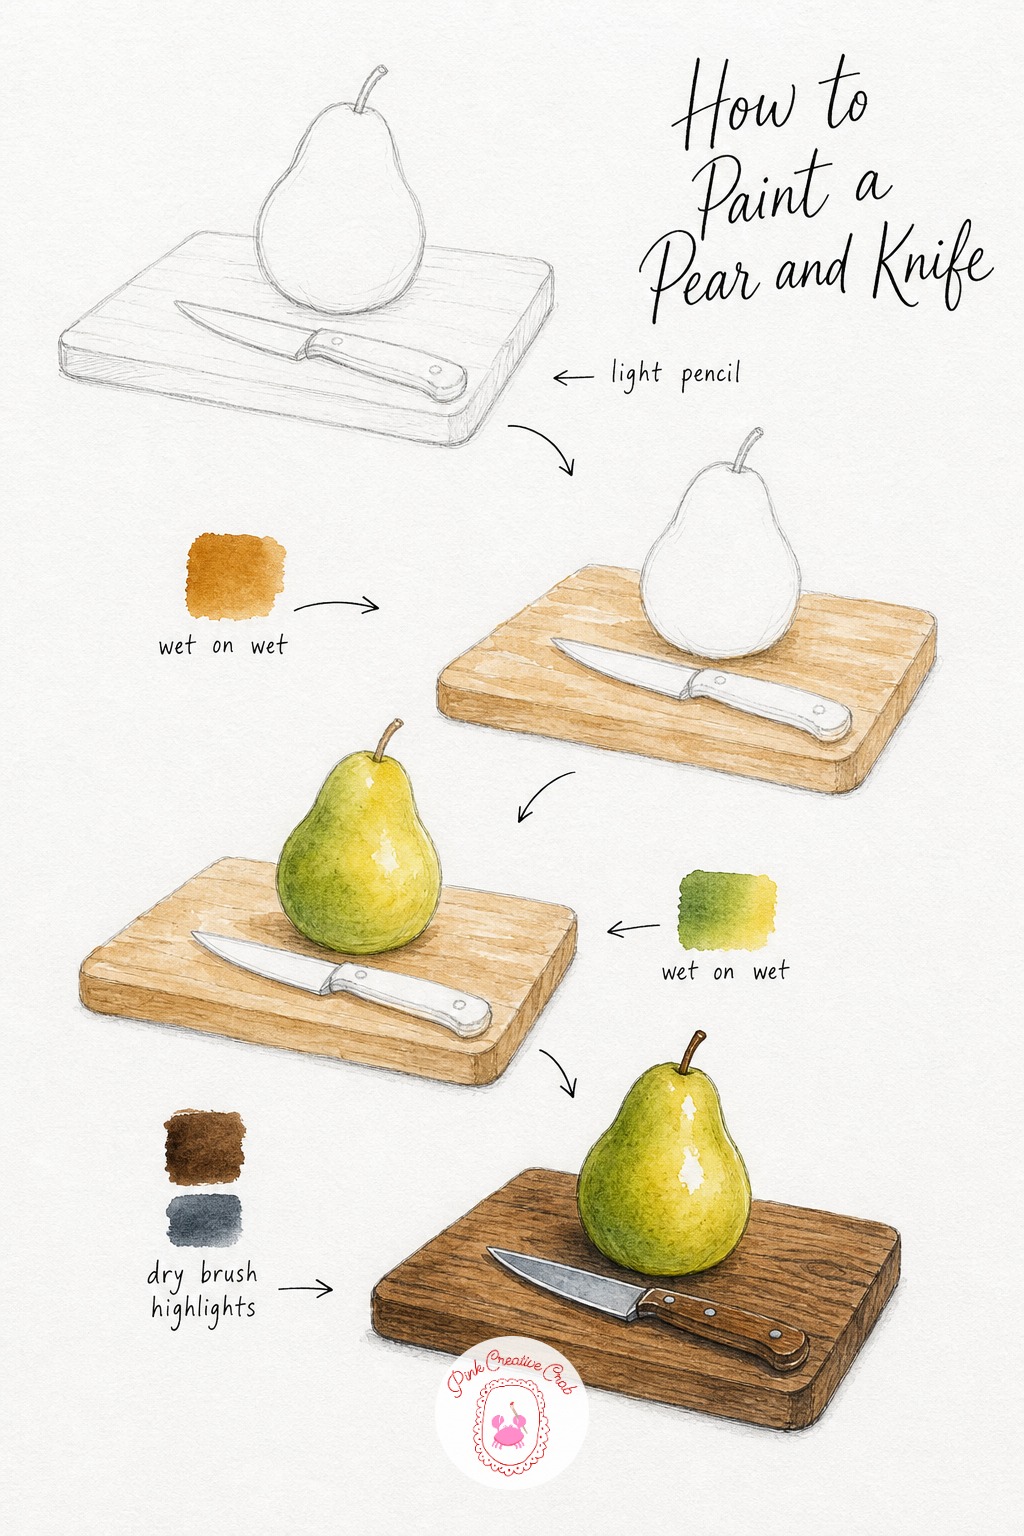
Sketch a plump pear standing beside a small paring knife on a plank of wood, keeping the board wide enough to ground the scene. Wet the board and brush on a streaky raw sienna wash, letting some lighter patches show through for wood texture.
Once that dries, wet the pear and blend sap green at the top fading into lemon yellow lower down, letting the two colors mix on the paper. Finish by painting thin dark grain lines into the board, a cool grey blade and handle for the knife, and a dry brushed white streak down the pear for shine.
Tip: angle the knife blade across the board rather than straight, it makes the whole composition feel less stiff.
Grapes in a Basket
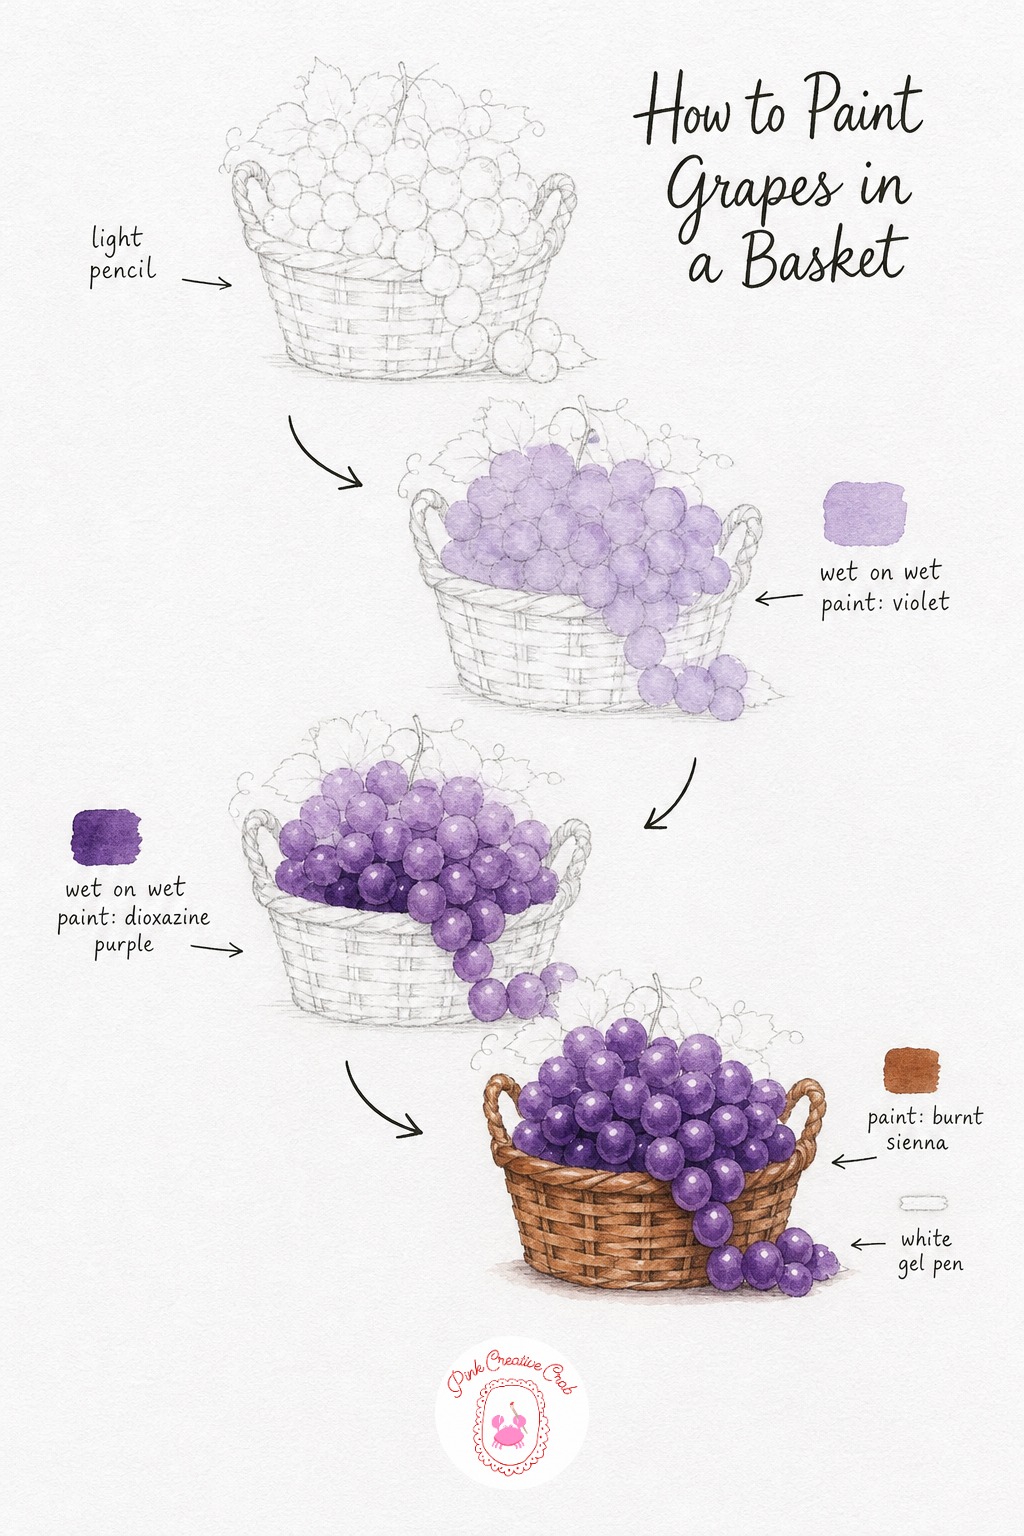
Draw a woven basket spilling over with tightly packed round grapes, letting a few tumble over the rim for interest. Wet the whole grape cluster and lay a pale violet wash across it, letting the color settle unevenly between the grape shapes.
While still a little damp, deepen the lower half of the cluster with dioxazine purple so the grapes read as rounded and heavy. Once everything dries, paint the basket weave in warm brown strokes and dot a white gel pen highlight onto each grape for that glassy shine.
Tip: vary the size of the highlight dots slightly, perfectly matching dots make the grapes look flat instead of plump.
Sliced Watermelon on a Plate
Sketch one watermelon wedge standing up and one flat round slice resting beside it on a simple plate. Wet both flesh shapes together and wash in pale rose pink, letting it bloom unevenly so the fruit does not look like flat color.
While still wet, deepen the center of each piece with crimson so the middle glows richer than the edges. Once dry, paint a thin green rind along the curved edge, scatter a few dark seed marks, and finish with a white gel pen line along the rind for a wet shine.
Tip: keep the rind band thin, a wide green edge makes the slice look more like a cucumber than a watermelon.
Orange Half With Zest
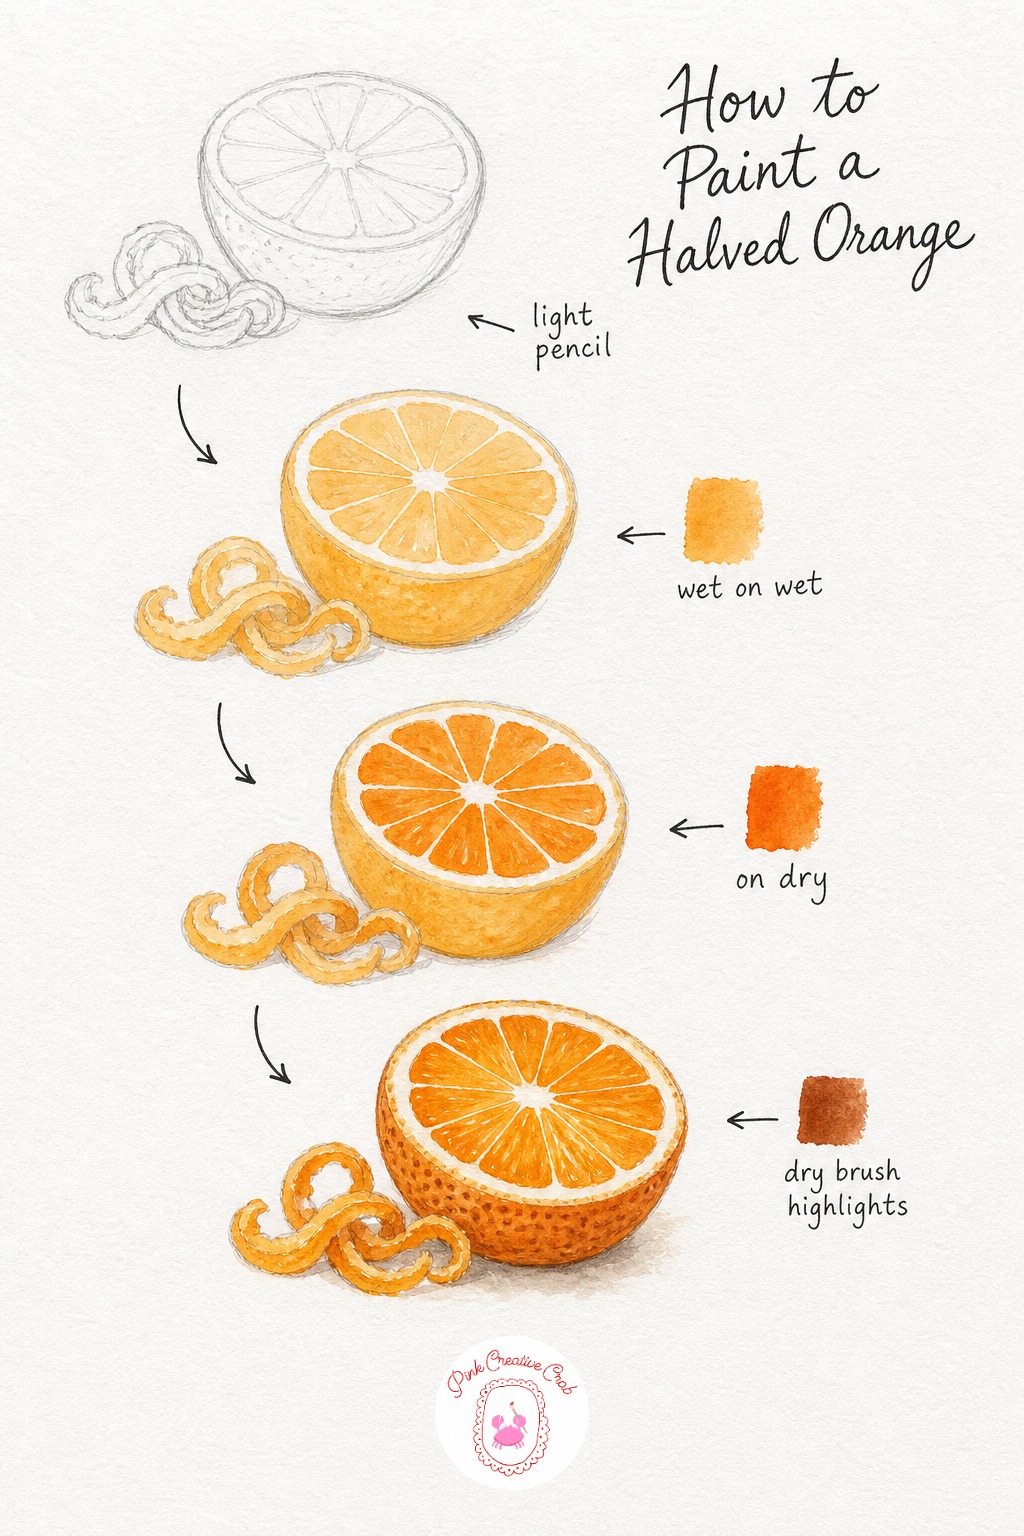
Sketch a halved orange with its segments faintly marked, plus a few loose curls of zest beside it. Wet the whole shape and lay in a soft orange wash, letting the color settle thinner near the center where the pith will stay pale.
Once dry, paint the individual segments as thin wedges fanning out from the middle in a slightly deeper orange. Finish by leaving a ring of bare paper for the pith, stippling tiny dots of burnt sienna onto the peel for texture, and dry brushing one bright highlight across the cut face.
Tip: do not outline every segment the same width, real orange wedges are slightly uneven and that is what makes the painting feel alive.
Strawberries in a Bowl
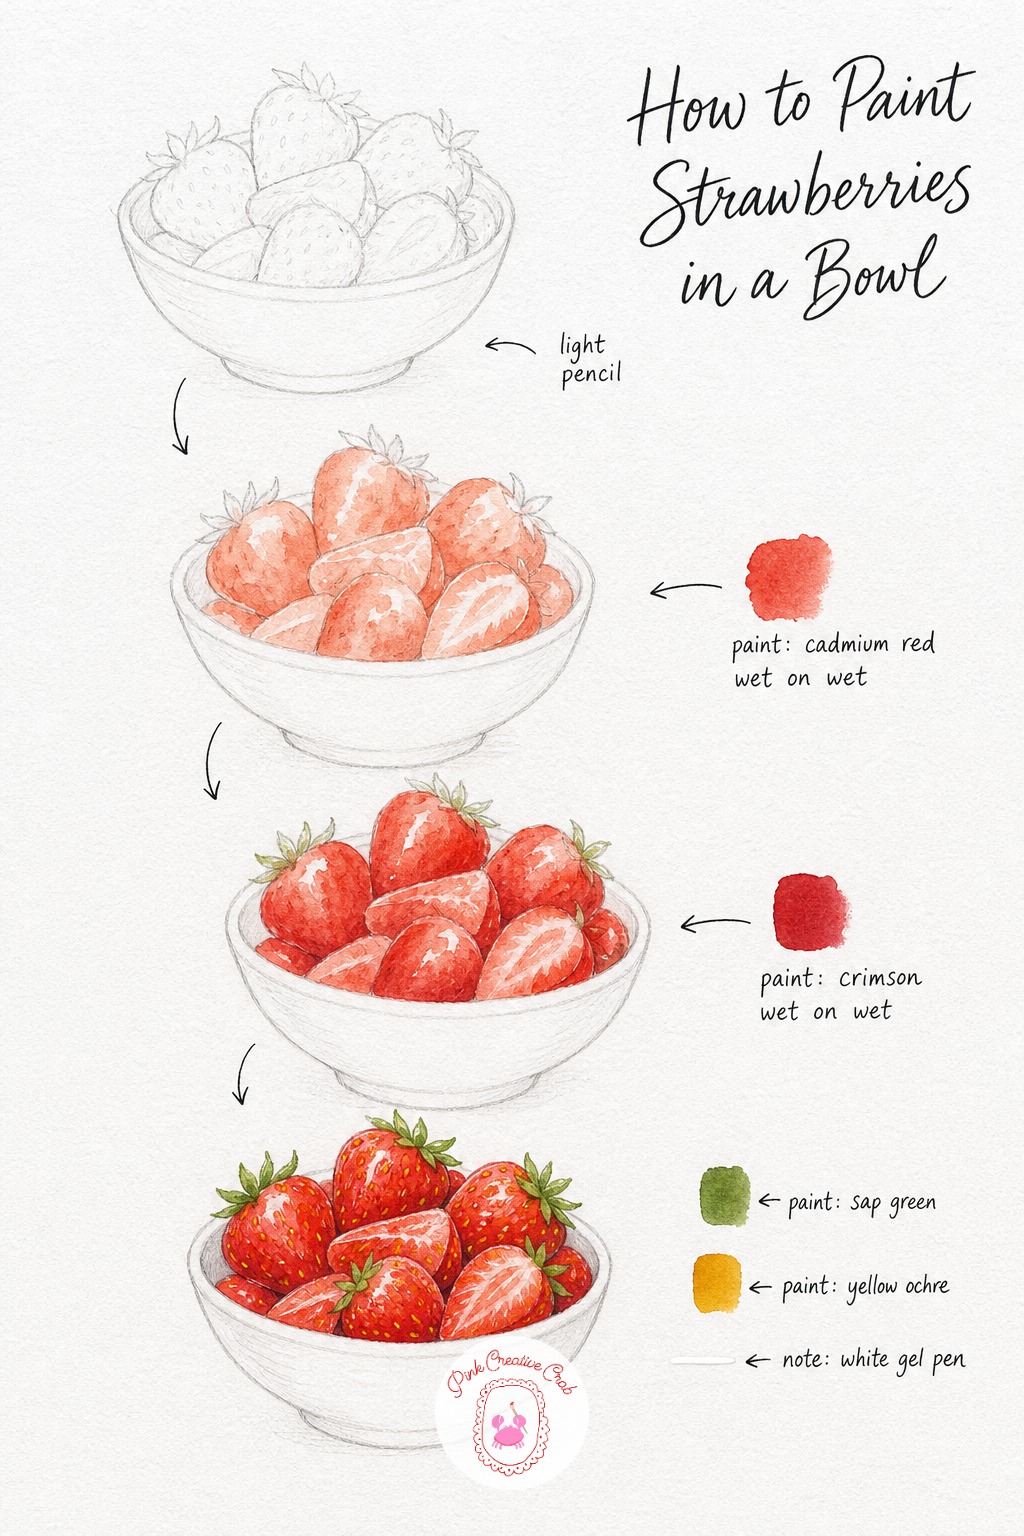
Draw a small bowl heaped with strawberries, some whole and one or two sliced in half to show the pale core. Wet each berry and wash in cadmium red, letting it settle thinner near the stem end and thicker toward the pointed tip.
While still damp, deepen the tip of every berry with crimson so the color fades naturally from pale to rich. Once dry, paint small green leafy caps, dot tiny yellow ochre seeds across the surface, and add a white gel pen streak for shine on each berry.
Tip: paint the seed dots in a loose scatter rather than neat rows, strawberries never grow their seeds in straight lines.
Pineapple on a Towel
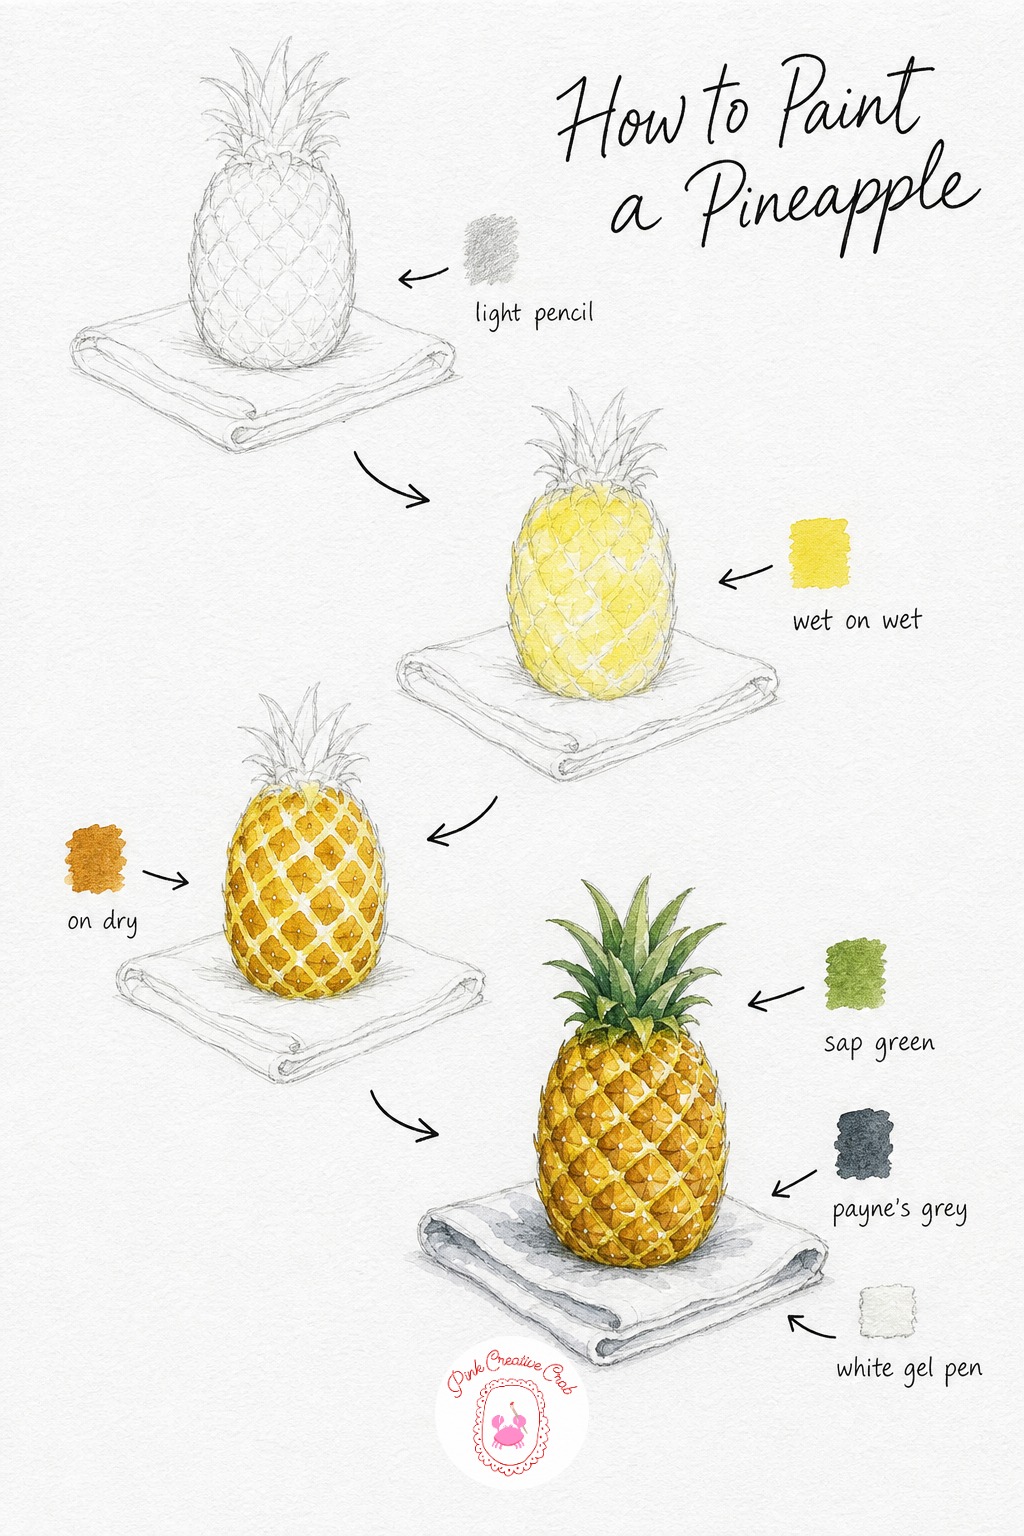
Sketch a tall pineapple standing on a loosely folded cloth, marking just a few guide lines for the diamond pattern. Wet the whole body and wash in lemon yellow, letting the color dry a little streaky since that texture reads as pineapple skin later.
Once dry, paint the diamond pattern in burnt sienna, keeping each shape slightly different so the texture looks natural rather than stamped. Finish with a spiky green crown, soft grey shadow folds in the cloth, and one tiny highlight dot on each diamond for shine.
Tip: angle the diamond rows slightly so they wrap around the curve of the fruit instead of sitting flat like a grid.
Figs Cut in Half
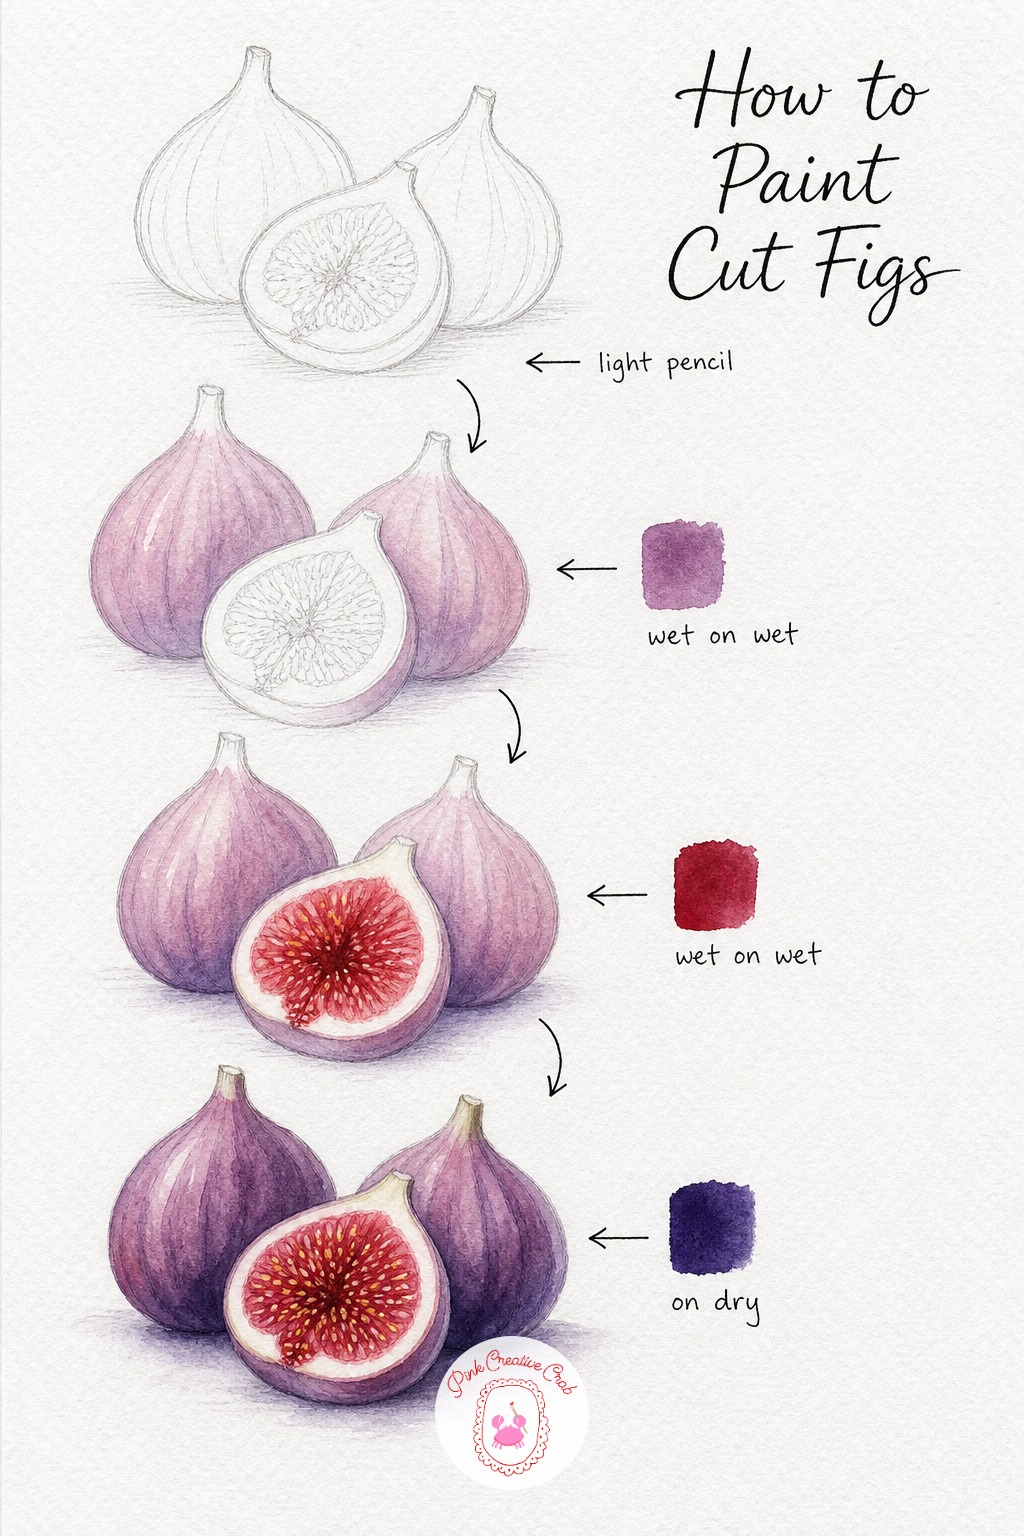
Sketch two whole figs with their pointed stem ends and one fig sliced open to reveal the star shaped center. Wet the skins of all three and wash in a soft violet, keeping the color light enough to glow through later layers.
While still wet, flood a rich alizarin crimson into the cut center and let it bloom outward toward the edges on its own. Once everything dries, stipple tiny seed marks into the fig center and deepen the whole figs with dark purple shadow along their rounded sides.
Tip: let the crimson stay a little uneven in the center, a perfectly flat wash makes the fig look like candy instead of fruit.
Apple on a Wooden Table
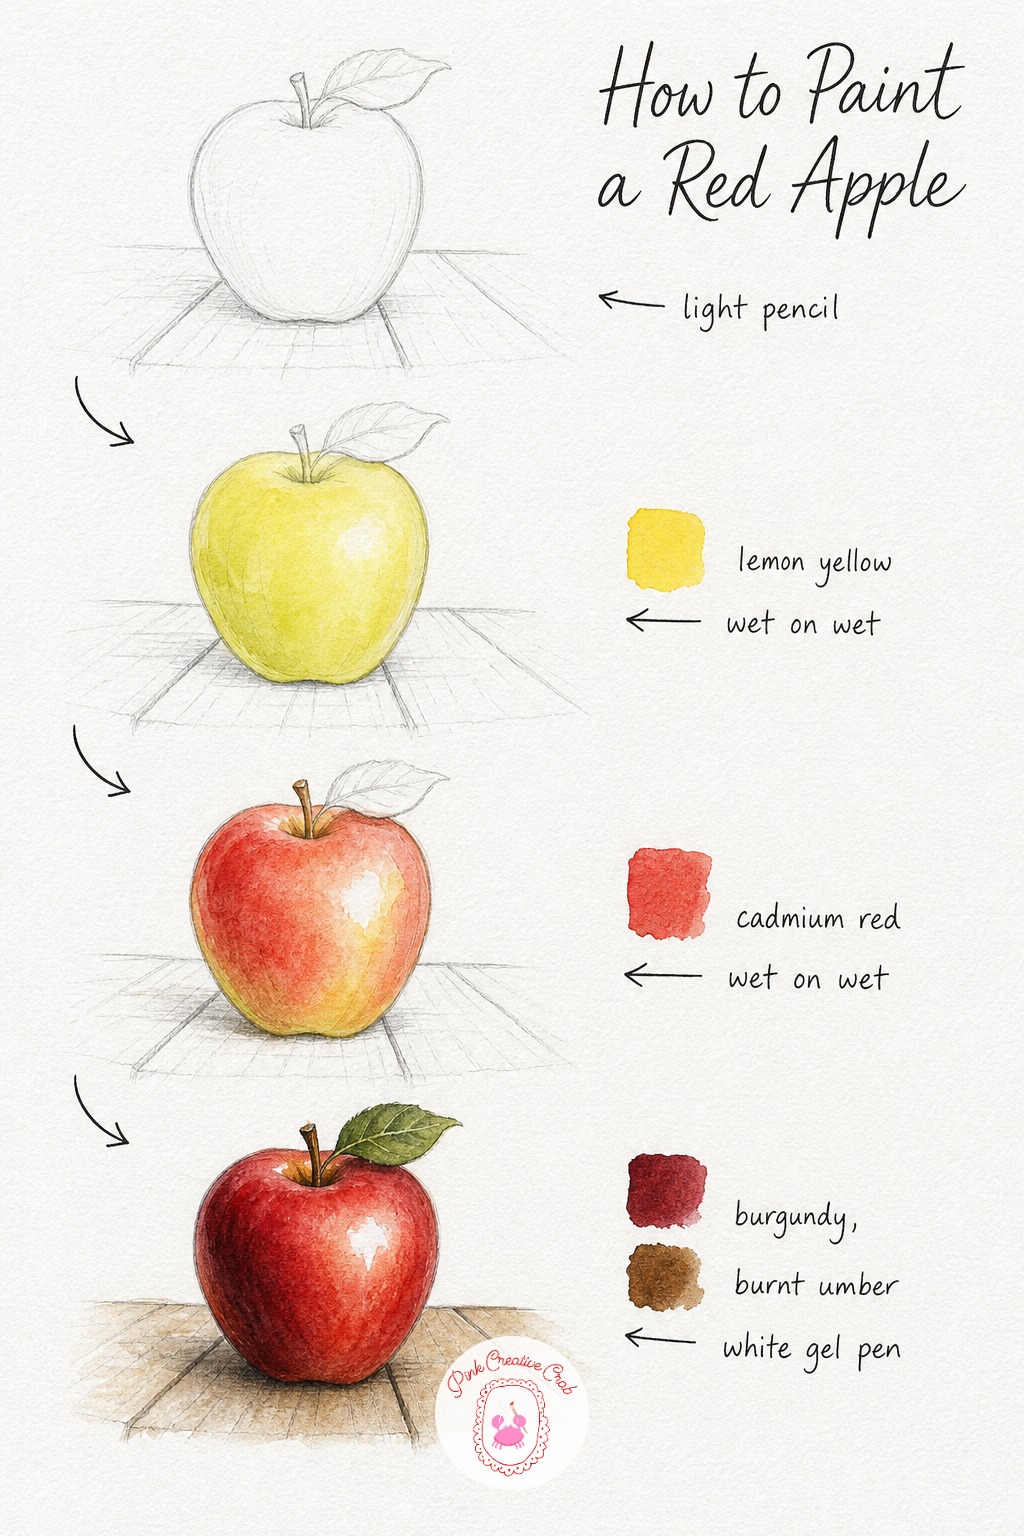
Sketch a single apple with its small stem and one curling leaf, sitting on a simply drawn plank table. Wet the whole apple and lay a pale yellow green wash first, keeping one patch near the top untouched for the eventual highlight.
While still damp, blend cadmium red in over most of the surface so it melts into the yellow green underneath. Once dry, darken one side with burgundy for shadow, paint the stem and leaf in brown and green, and leave the original pale patch bare for the shine, touched with white gel pen at its edge.
Tip: plan the highlight patch before you ever wet the paper, it is much easier to paint around white than to lift it back out later.
Blueberries in a Jar
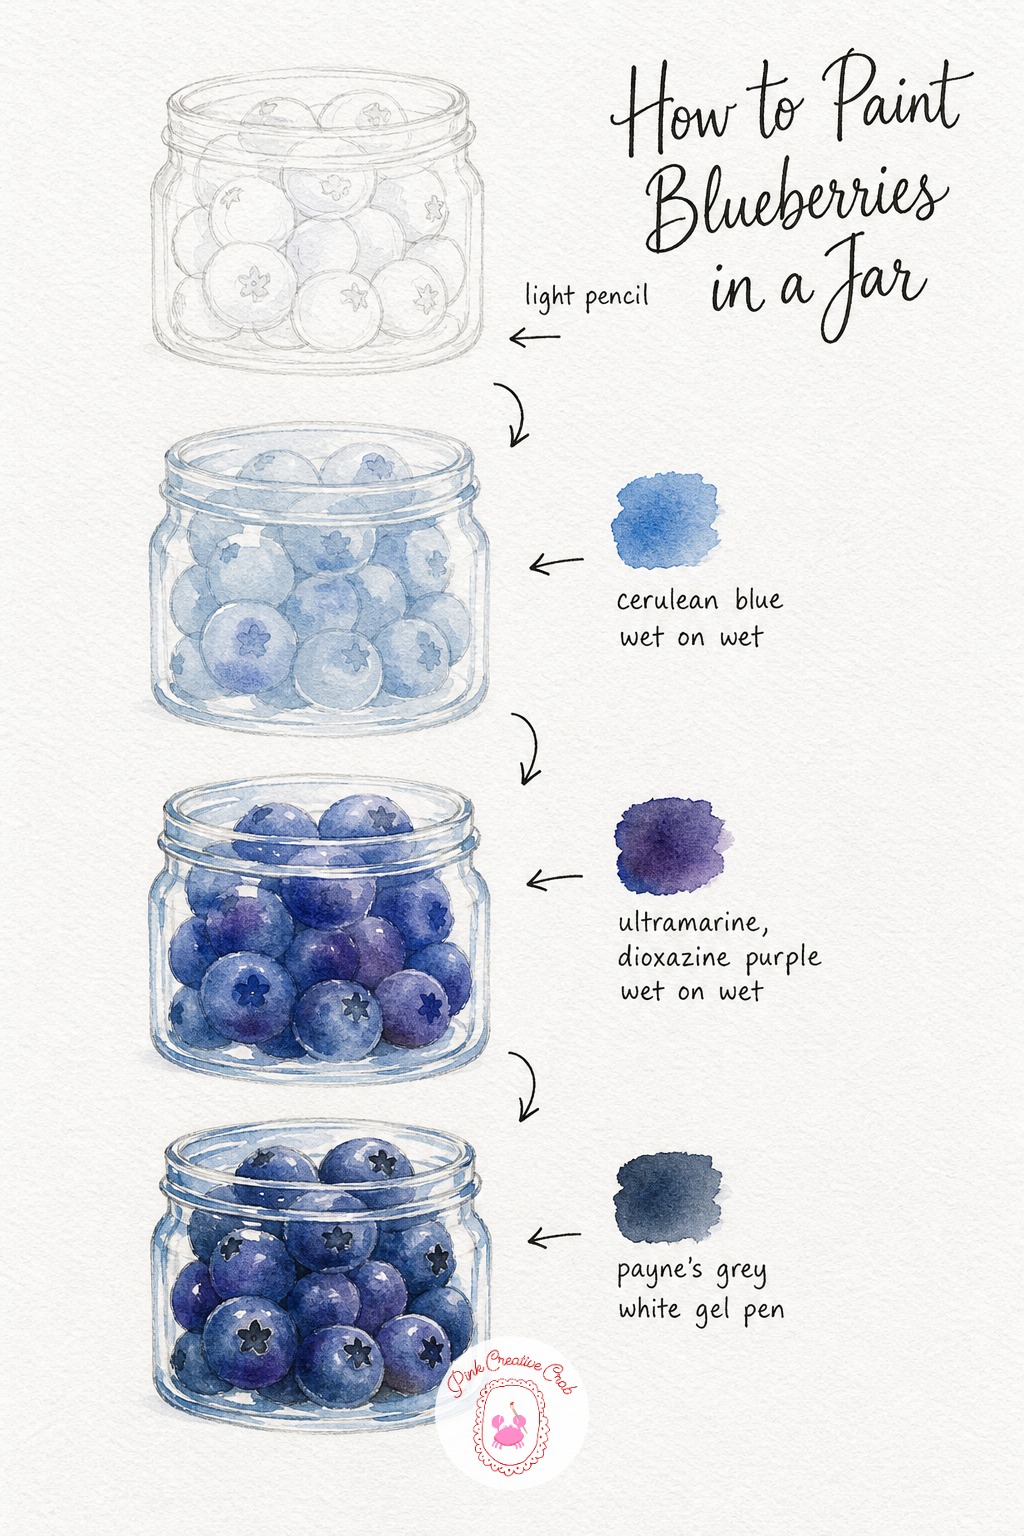
Sketch a small glass jar packed with round blueberries, letting the jar shape stay simple so the berries stay the focus. Wet the jar and berries together and wash in a pale cerulean blue, letting it settle thin on the glass and thicker on the fruit.
While still wet, deepen the berries with a mix of ultramarine and dioxazine purple, letting them blend into one rich mass with only hints of individual shapes. Once dry, add a tiny dark star mark on top of a few berries for the blossom scar and a crisp white highlight along the jar rim.
Tip: do not separate every single berry with an outline, overlapping blue shapes read as a jar full of fruit far better than neat circles.
Plums on a Linen Cloth
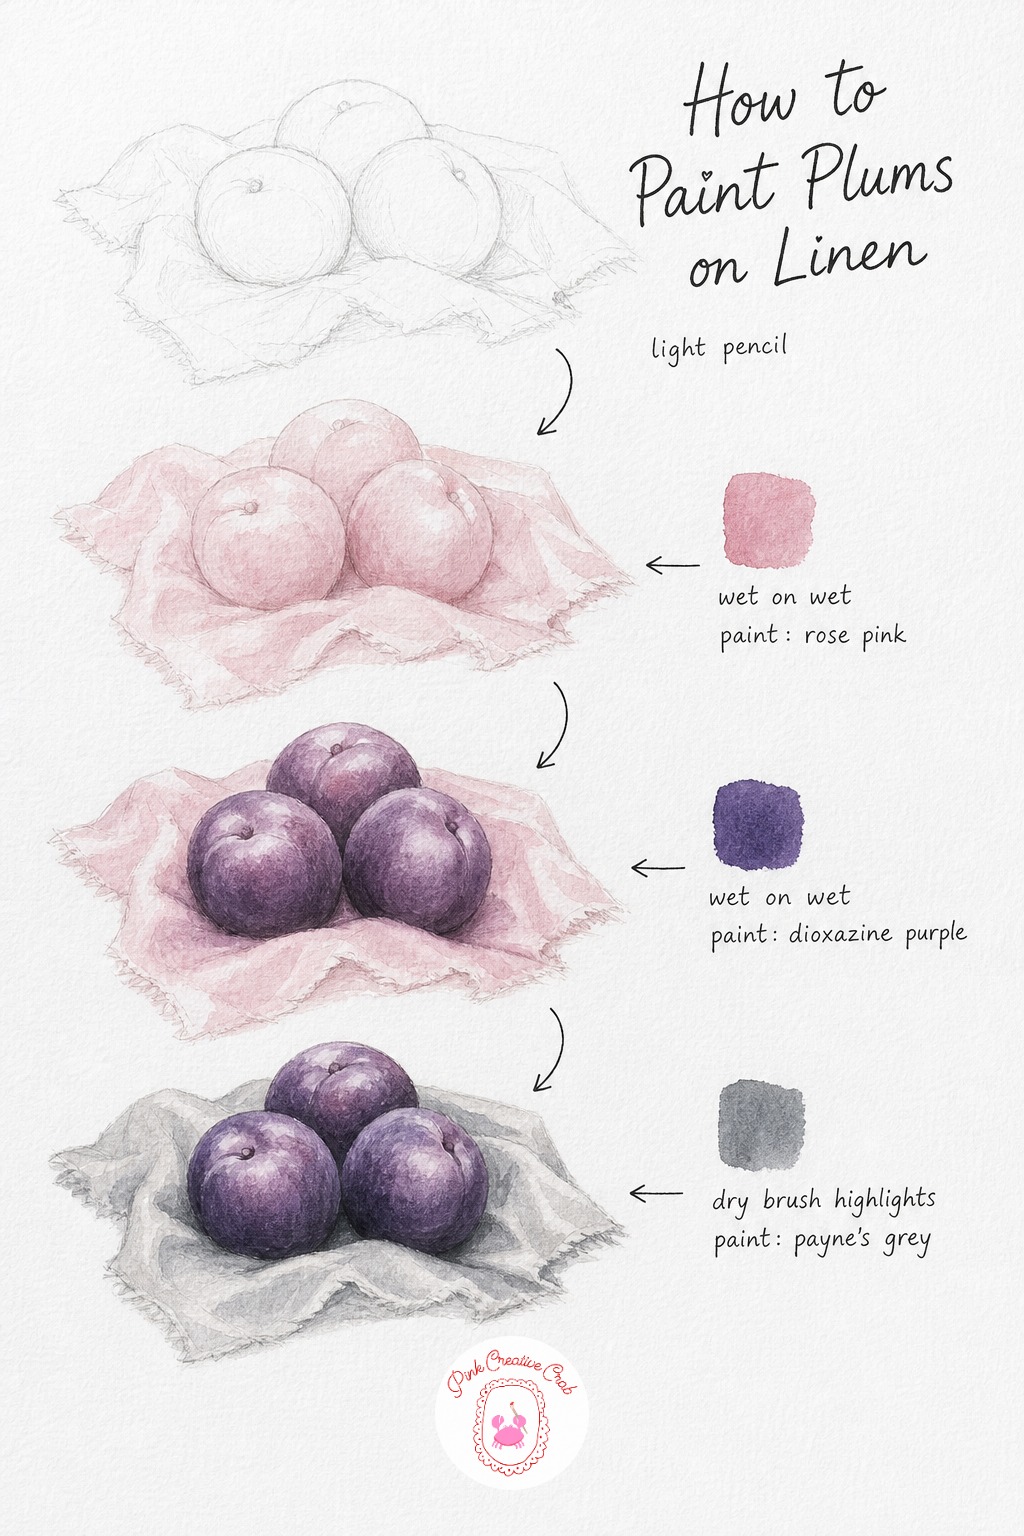
Sketch three plums nestled together on a softly draped linen cloth, letting the fabric fall in loose curved lines. Wet the cloth and plums at once and wash in a pale rose pink so the whole scene starts from one warm base tone.
While still damp, deepen each plum with dioxazine purple, letting the color pool heavier near the base where the fruit touches the cloth. Once dry, shade the fabric folds in soft grey and dry brush a pale dusty streak across each plum to suggest that powdery bloom real plums have.
Tip: that dry brushed pale streak is what makes a plum look fresh off the tree, do not skip it even if it feels like a strange extra step.
Pomegranate Split Open
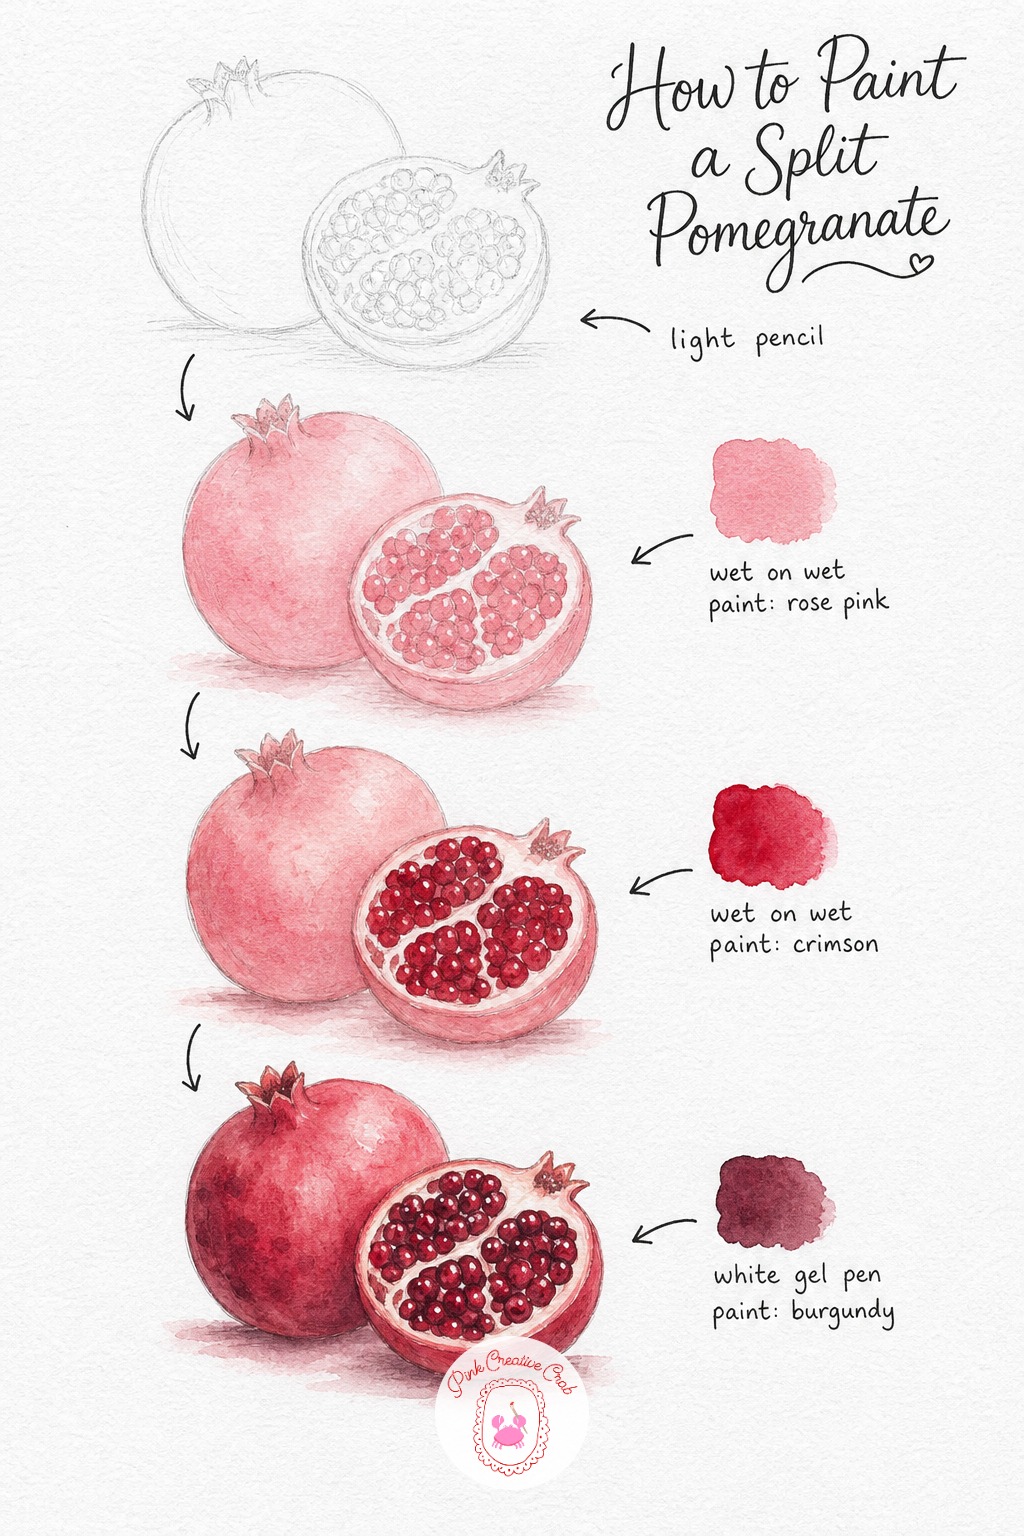
Sketch a whole pomegranate beside its cracked open half, with the inside drawn as a loose cluster of small seed shapes rather than anything too exact. Wet the skin and seeds together and wash in a pale rose red across everything first.
While still wet, flood a deeper crimson into the seed cluster and let it bloom unevenly so each seed area varies slightly in tone. Once dry, shadow the leathery skin in burgundy and scatter tiny white gel pen dots across the seeds for their glassy shine.
Tip: resist painting every seed as a perfect circle, a loose cluster of small overlapping shapes looks far more convincing than a tidy grid.
Kiwi Slices on a Plate
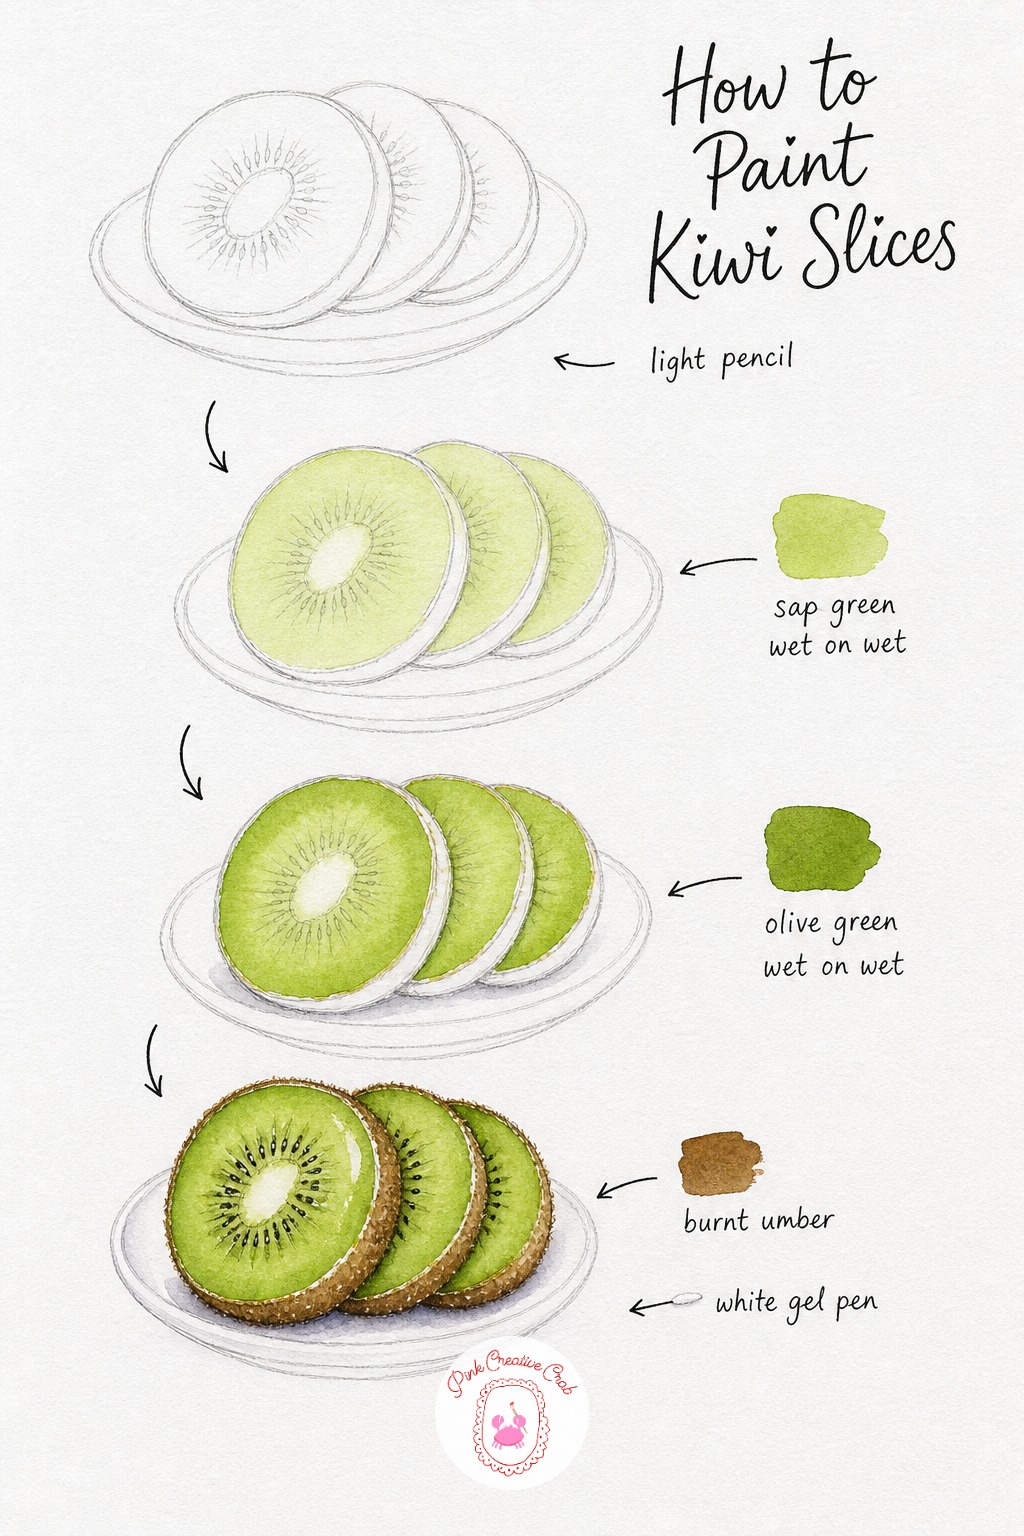
Sketch three kiwi slices fanned across a small plate, keeping the pale center circle of each slice marked lightly. Wet the flesh of every slice and wash in sap green, letting the very center stay the palest part of the wash.
While still damp, deepen a ring just inside the skin with olive green so each slice reads with a visible middle band. Once dry, paint the thin fuzzy brown skin edge, stipple a neat ring of tiny black seeds, and add one crisp white highlight where the plate catches light under a slice.
Tip: keep the center circle of each slice almost white, that pale core is what makes a kiwi slice instantly recognizable.
Mango Half With Pit
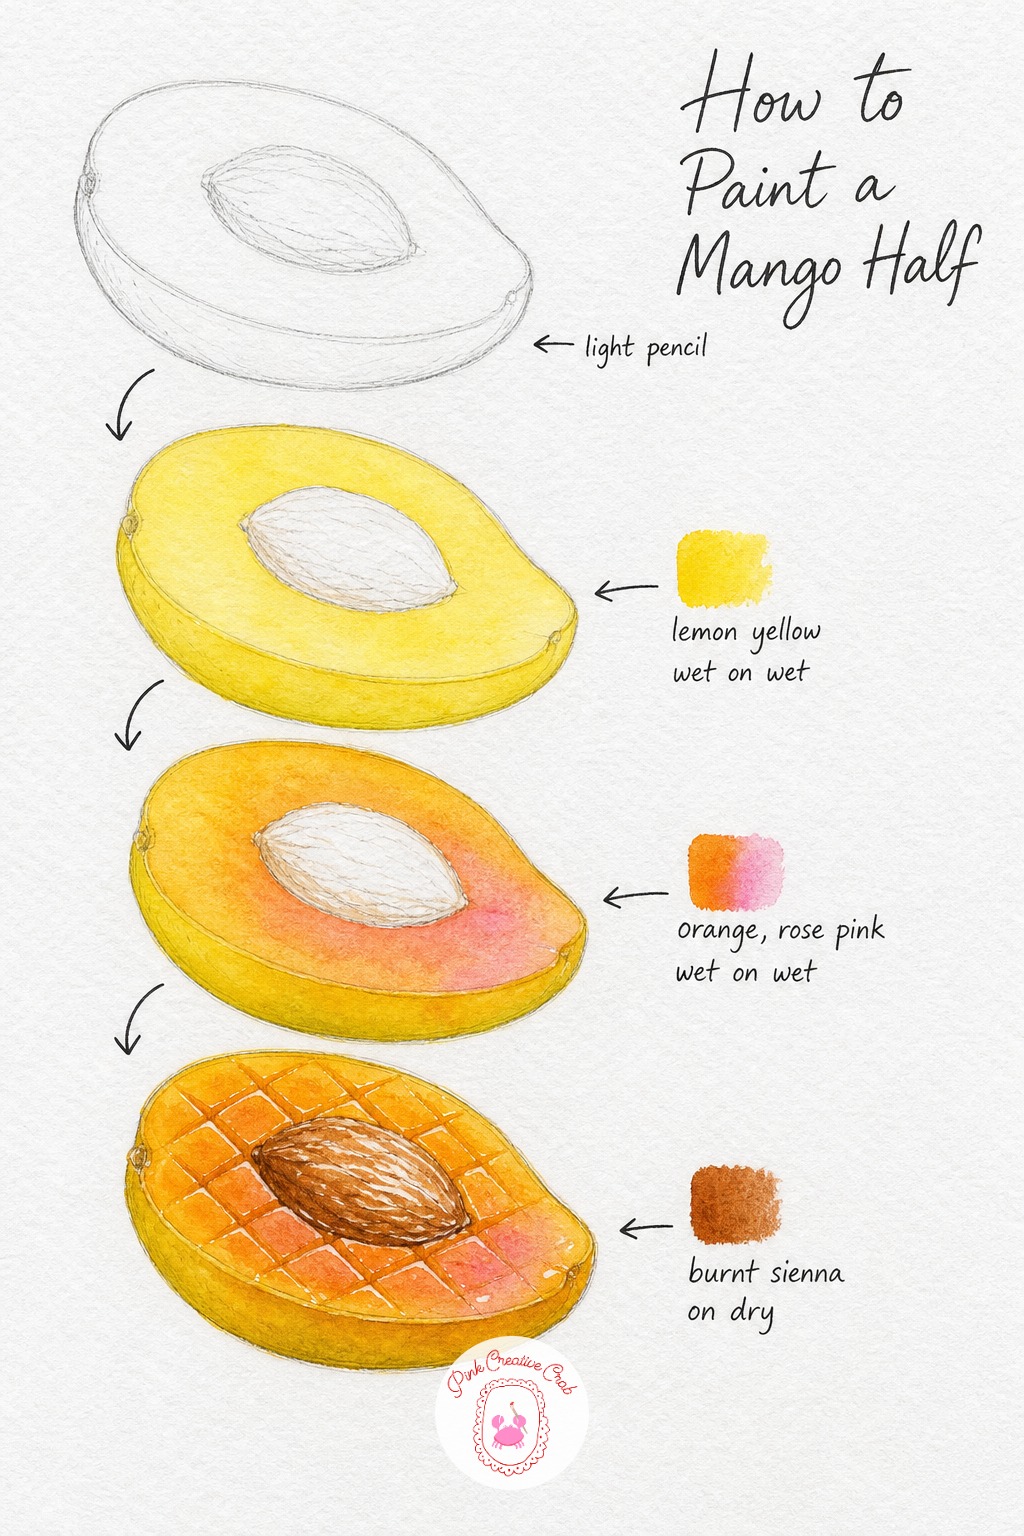
Sketch a mango half with the flat oval pit resting beside it, and lightly mark a few guide lines for the crosshatched grid cut often served in the flesh. Wet the whole shape and wash in pale lemon yellow as the base glow under everything else.
While still wet, blend orange through the middle of the flesh and rose pink near the skin edge, letting the two melt together softly. Once dry, paint the pit with rough fibrous texture lines in burnt sienna and trace the crosshatched grid across the flesh, leaving thin white lines between each cut for shine.
Tip: keep those grid lines slightly curved rather than ruler straight, it follows the natural curve of the fruit far better.
Bunch of Bananas
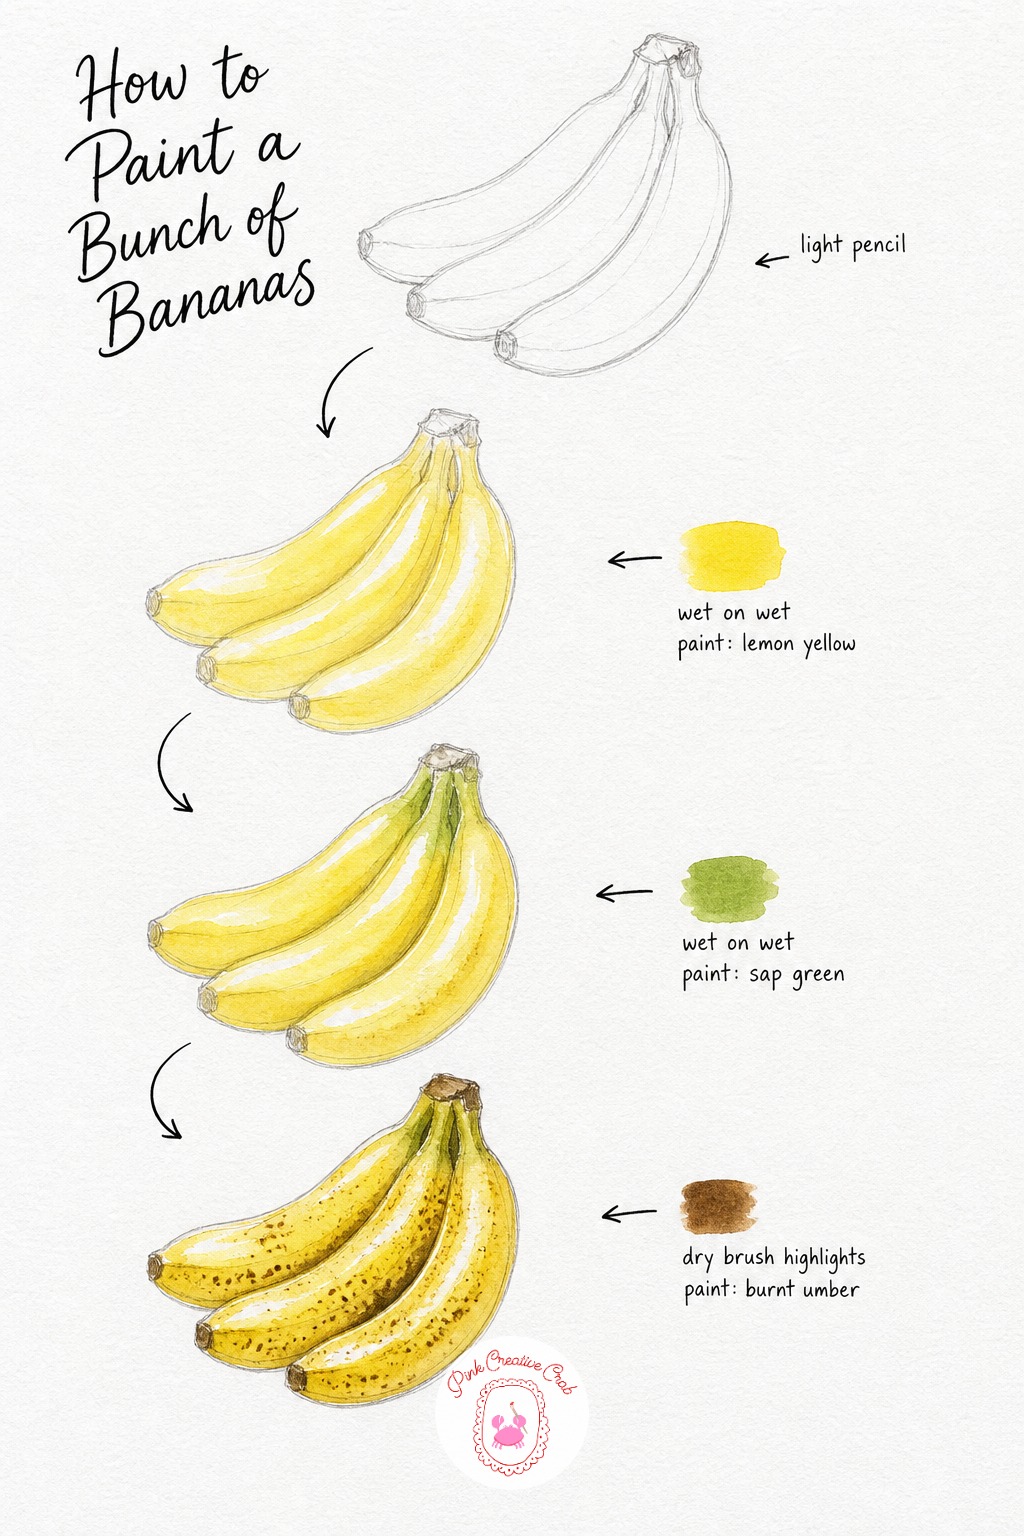
Sketch three bananas joined together at a single stem, curving them slightly differently so the bunch does not look stiff. Wet the whole bunch and wash in lemon yellow, letting it dry a little streaky along the natural ridges of each banana.
While still damp, touch soft sap green near the stem end so it fades gently into the yellow. Once dry, scatter small brown speckles across the skin, deepen the shadow where the bananas touch each other, and dry brush a pale highlight along the top curve of the front banana.
Tip: leave the ridge line running down each banana slightly paler than the rest, it reads instantly as the characteristic curve of the fruit.
Apricots on a Branch
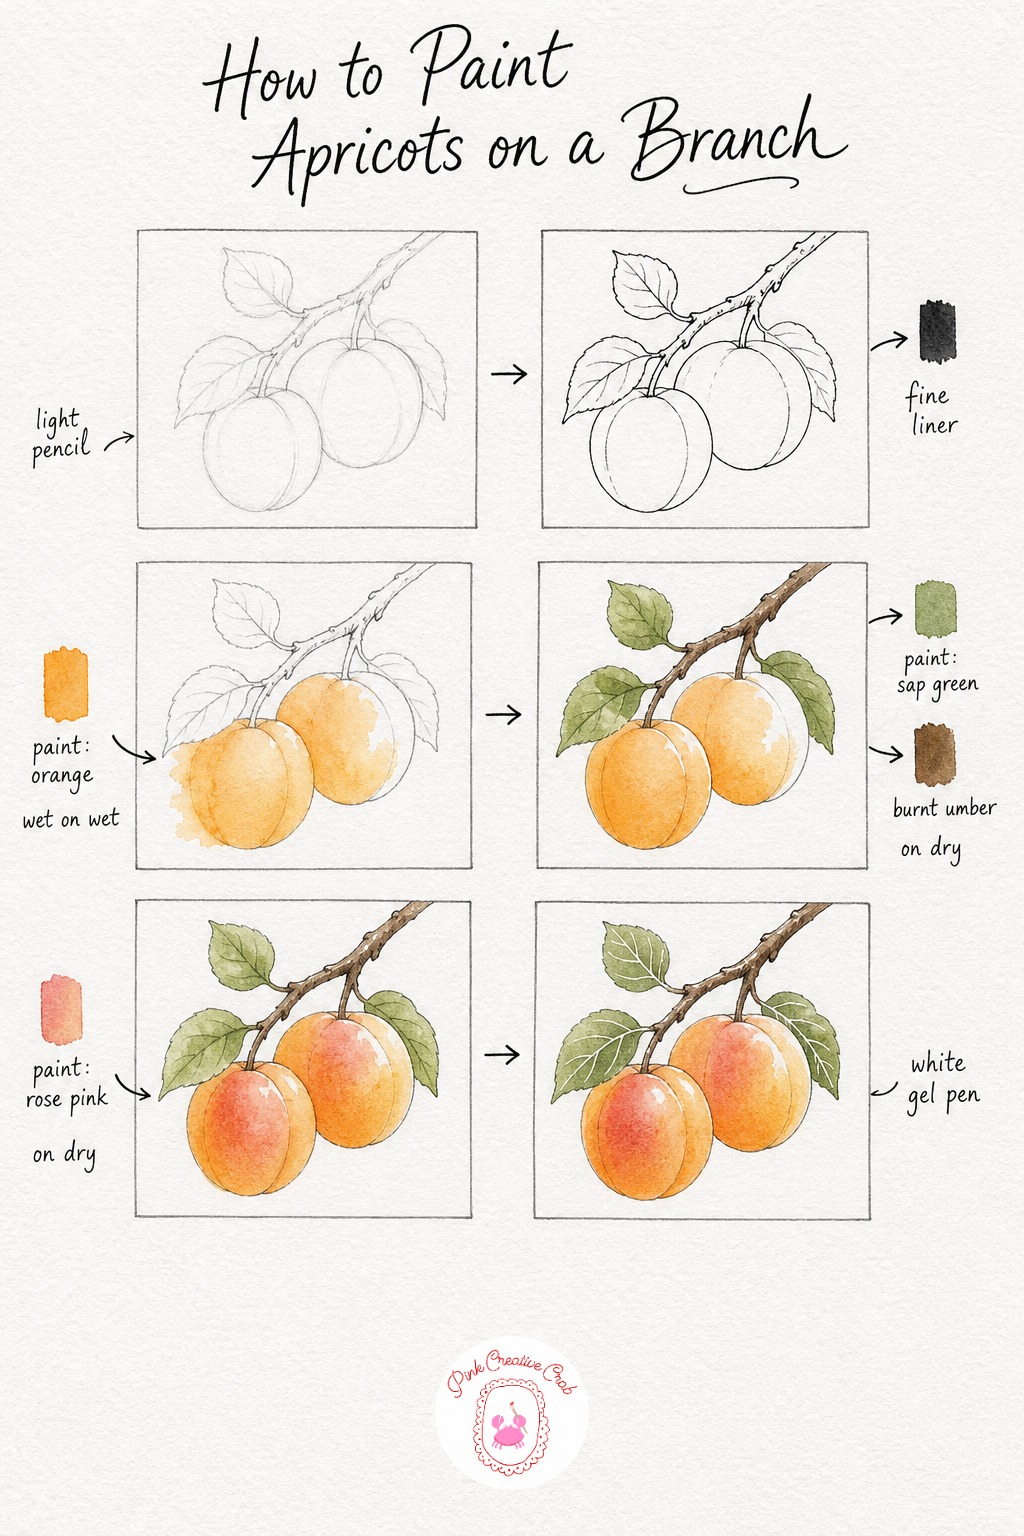
Sketch a short branch holding two apricots nestled among a few pointed leaves, then trace it all in fine ink once the pencil feels right. Wet each apricot and wash in a soft orange, letting it pool unevenly so the two fruits do not look identical.
Once dry, paint the leaves in sap green and the branch in burnt umber, working carefully around every fruit shape. Add a soft rose blush to the sunlit side of each apricot, then finish with a white gel pen highlight and a few fine veins drawn into the leaves.
Tip: blush only one side of each apricot, fruit lit from a single direction always reads more convincingly round. For more juicy subjects in this vein, the easy watercolor fruit paintings collection pairs nicely with this one.
What to Do Next
Pick one fruit that sounds fun to paint today, gather your paints and a scrap sheet for test strokes, and work through its four stages in order without rushing the drying time between them. Once you have a few of these under your belt, come back and try one of the small scenes, they use the exact same skills with a little more composition to enjoy.
Frequently Asked Questions
Why do these fruit tutorials use wet on wet before wet on dry?
Wet on wet lets the first color bloom and blend softly, which mimics the smooth gradient of real fruit skin. Switching to wet on dry for the later stages gives you crisp control for seeds, stems and highlights, so the painting moves from soft to sharp exactly the way fruit looks in life.
How do I keep the white highlights looking natural instead of painted on?
Plan the highlight shape before you wet the paper and simply paint around it, leaving bare white. A white gel pen works well for tiny final touches, but the biggest shine spots should stay untouched paper from the very first wash rather than added back in later.
What if my colors look muddy instead of saturated?
Muddy color usually means too many pigments mixed on the paper rather than on the palette, or a brush that was not rinsed between colors. Keep your water clean, mix test strokes on scrap paper first, and let each wash dry fully before adding a second layer on top.
Do I need expensive paint for a watercolor fruit tutorial?
No, a basic artist grade set with a true red, a true blue, a few yellows and a earthy brown covers every fruit in this collection. What matters more than price is using enough water and pigment together so the washes stay rich rather than pale and thin.
How long should I let each stage dry before starting the next one?
Most washes dry within ten to fifteen minutes at room temperature, and you can speed this along with a hair dryer on a low cool setting. Touching wet on dry details onto paper that is still even slightly damp causes the new color to bloom where you do not want it.
Have any thoughts?
Share your reaction or leave a quick response — we’d love to hear what you think!
-
 0
-
0
-
0
-
0
-
0
-
0


