

Things to draw in your sketchbook do not get more alive than a zoo or aquarium day: glass tanks glowing blue, kids pressed up against them, animals doing something odd the second you open your pencil case. You do not need a studio or a tidy still life for any of this, just a bench, a cream page and whatever is in front of you right now.
Below are 29 moments from exactly that kind of outing, ordered from the quickest five minute gesture to the fuller scene worth a proper sit down. Pick whichever one matches your mood and the time you have left before the cafe closes, and work straight from the page, not a memory of it.
Using these images: free for personal projects such as printing, coloring, cards, journals and gifts. Handmade items that include them may be sold up to 30 pieces per design. More than that is commercial use and is not permitted, and neither is selling or sharing the images themselves or passing them off as your own. Please ask before any other use.
Start with the giraffe since its shapes are so simple once you break them down: a long rectangle for the neck, a small block head, and a few straight lines for the legs. Sketch the neck first, tilted toward the fence, then add the head reaching for the hat and the surprised visitor underneath with just a few quick lines for her body.
Work in fineliner from the top down so the neck and head go in before you crowd the page with the person below. The patches are the fun part: draw rough blotchy shapes rather than neat circles, leaving thin cream gaps between them so the pattern reads from a distance.
If the neck ends up too short, add a bit more rectangle below the head rather than erasing, giraffes forgive an extra few centimeters. A yellow and warm brown marker over the patches, with a quick wash of pale blue for the sky, finishes it fast.
One measuring trick saves this every time: hold your pencil up and compare the neck length to the head size, a giraffe’s neck is roughly seven heads long, so keep that ratio even in a loose sketch or the proportions will feel off before you have added a single patch.
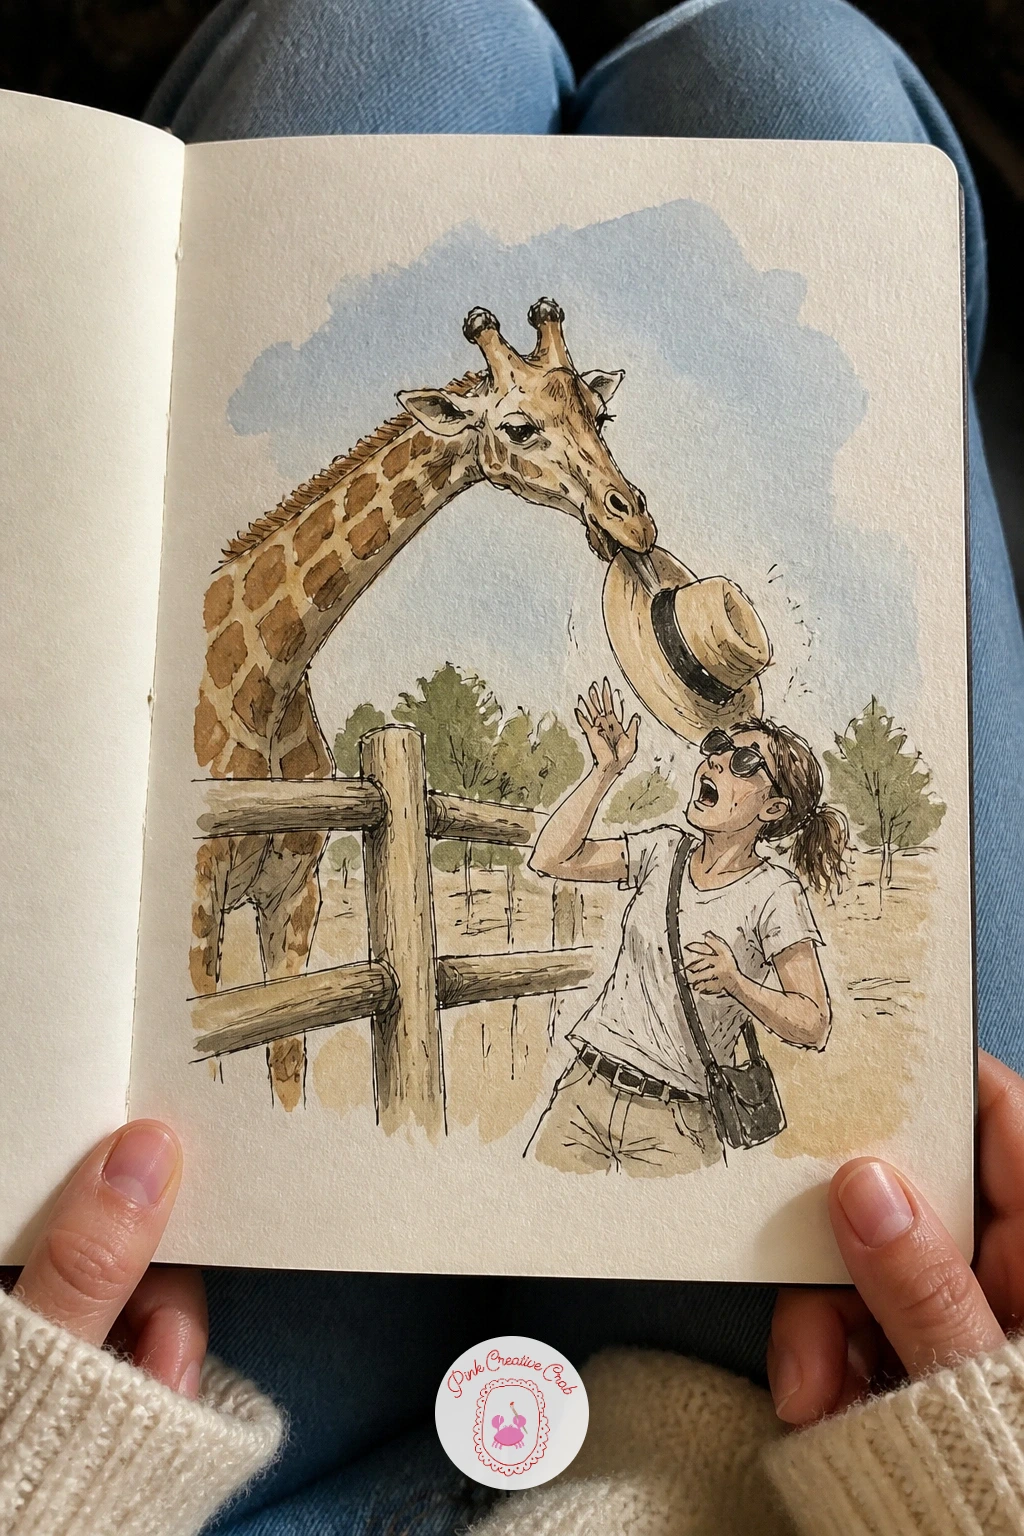
Palette: Raw Sienna,Burnt Umber,Cerulean Blue,Straw Yellow
Penguins are next because their bodies are just two ovals, a small one for the head stacked on a bigger one for the body, which makes a whole waddling line of them manageable on one page. Draw three or four at slightly different angles, some leaning forward mid stride, so the group feels like it is actually moving toward the keeper.
Block in the ovals lightly in pencil first, then ink the outlines, leaving the white belly shapes untouched and filling only the back and flippers with your fineliner’s crosshatching or a flat black marker. Add tiny orange feet and beak dashes last, since they carry most of the personality.
The flippers are where this goes wrong most often, draw them too stiff and the penguin looks frozen rather than waddling. Angle each flipper slightly out from the body and the whole row suddenly feels like it is in motion.
Done in ten minutes this is just the row of penguins and a bucket. Given forty, add the keeper’s legs and splashing water at the pool edge behind them for a proper little scene.
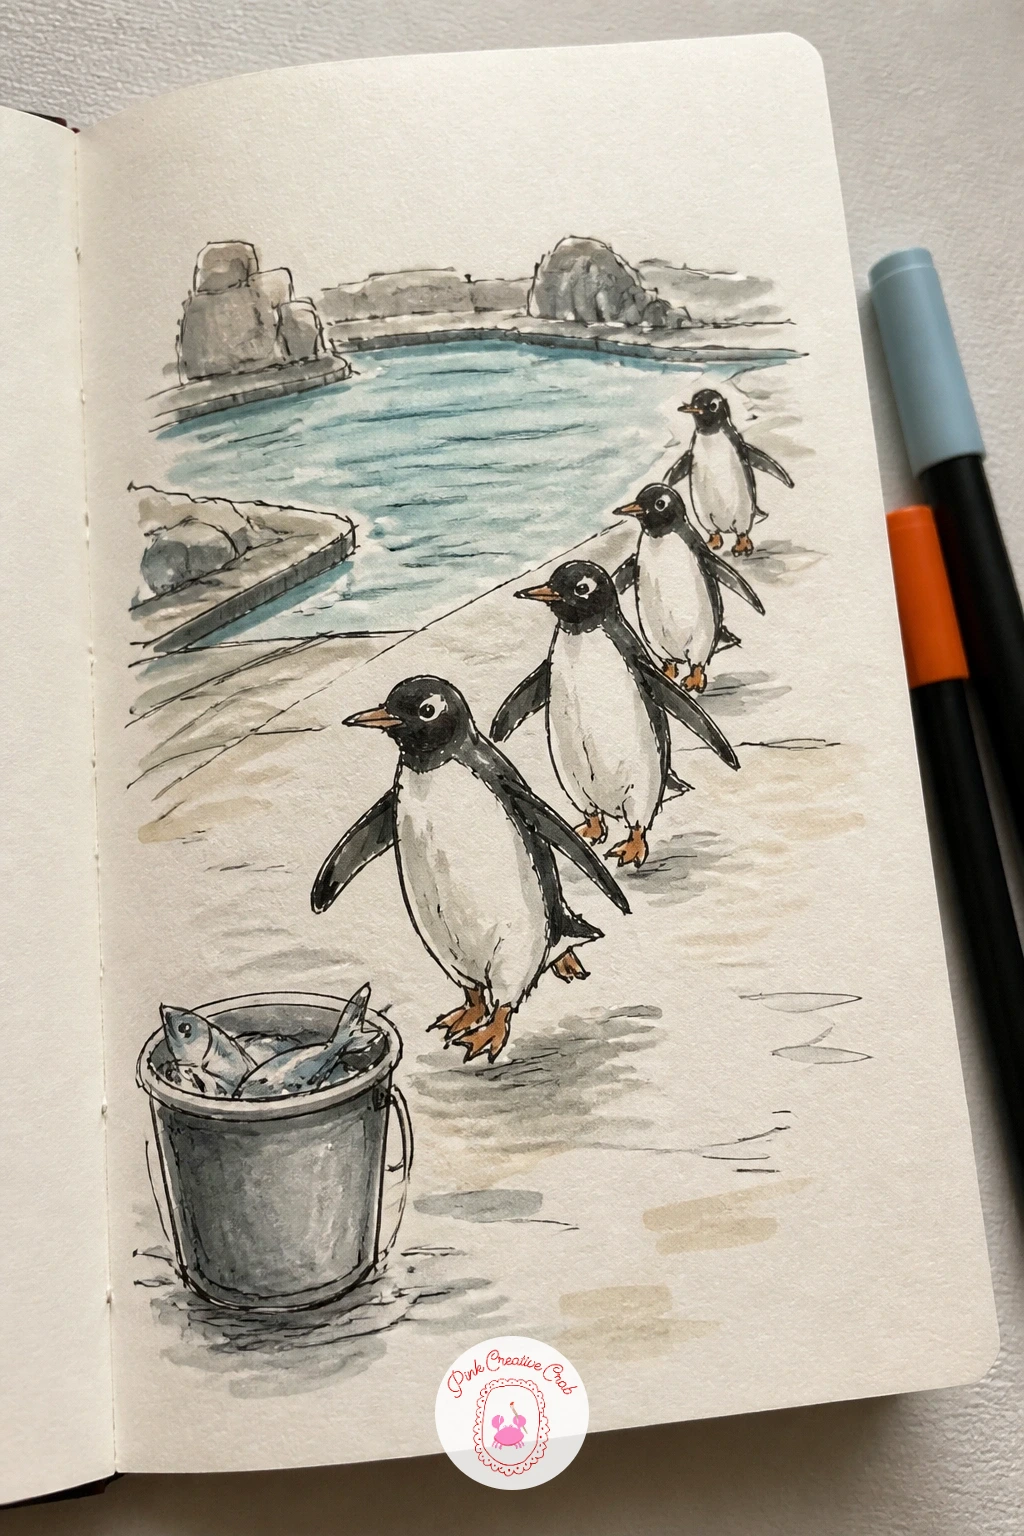
Palette: Ivory Black,Cadmium Orange,Pale Blue Grey
Look at real penguin photos for the way they lean forward from the hips when they walk, it is a subtler tilt than most people draw and makes the waddle far more convincing.
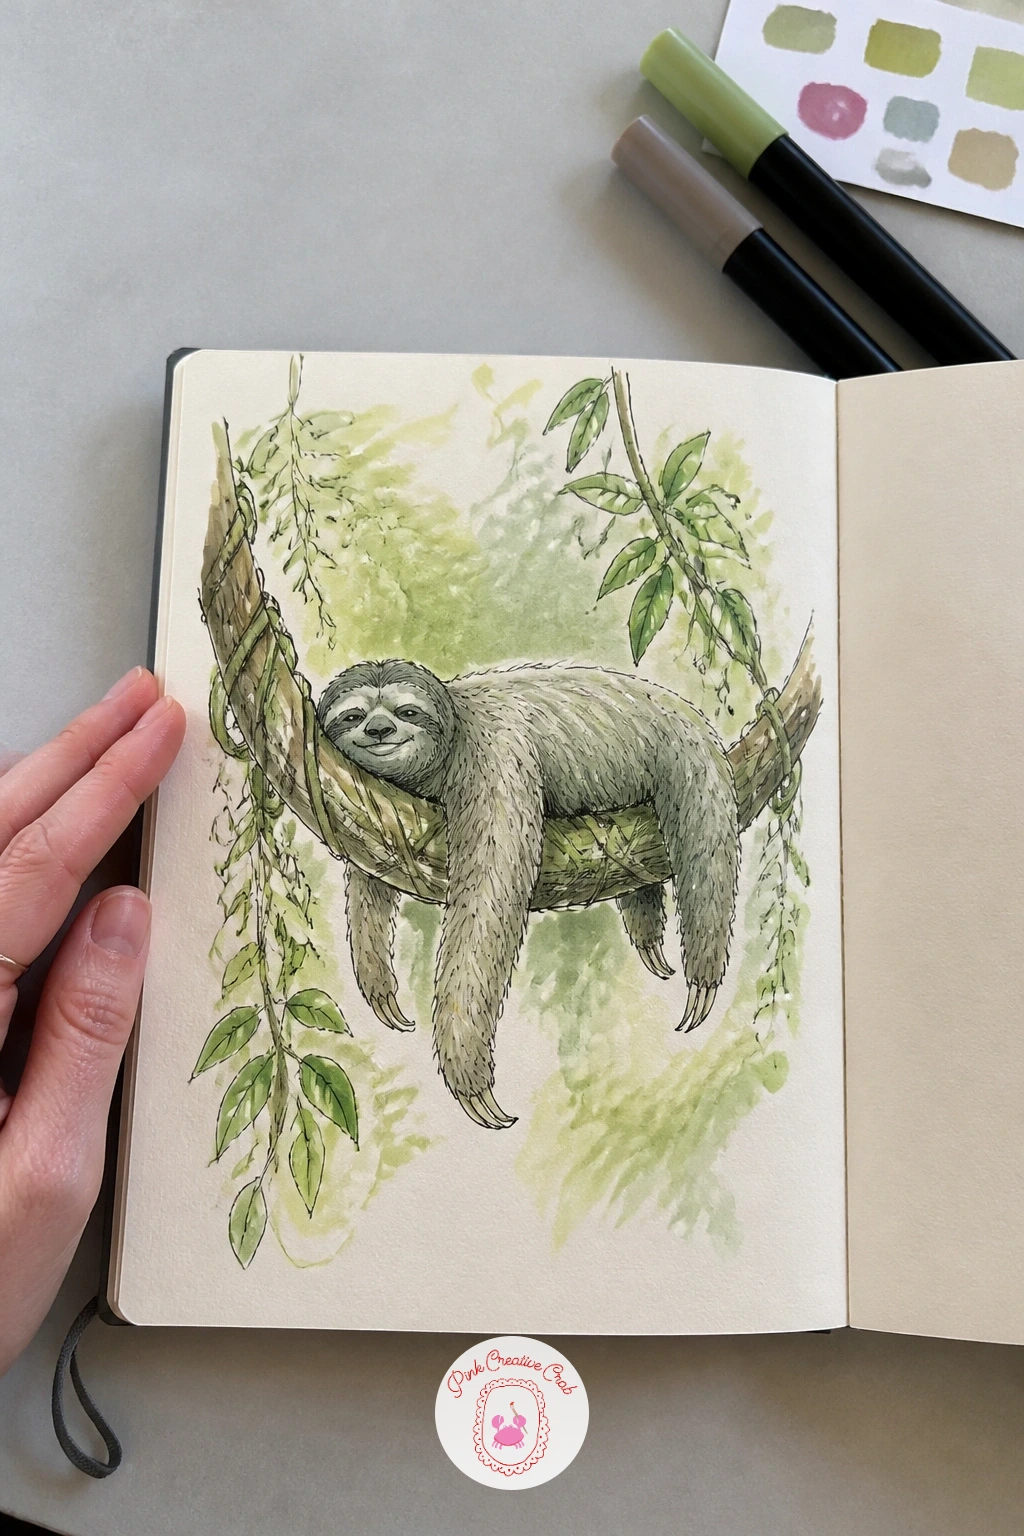
After all that movement, slow right down for the sloth, draped over a thick vine with its long arms hanging either side. Sketch the vine first as a simple curved line across the page, then hang the sloth’s body over it like a sack, limbs drooping down rather than reaching anywhere.
Keep your pencil underdrawing loose and rounded, no sharp joints anywhere on a sloth. Ink the outline, then use a dry, mostly empty brush loaded with just a touch of grey green watercolor to drag texture into the fur, letting the bristles separate so pale cream paper shows through in streaks.
If the fur ends up looking too smooth and toy like, go back in with a few quick dry brush strokes along the direction the fur would fall, gravity always pulls it downward on a hanging sloth. A kneaded eraser can lift back a highlight along the top of the back if the wash goes on too dark.
No watercolor on hand is fine, a grey marker scribbled loosely and left unblended gives nearly the same shaggy effect.
You Will Need
- kneaded eraser
Palette: Payne’s Grey,Olive Green,Raw Umber
Move to the red panda perched on its branch, a subject that rewards a bit of eye level thinking. If the enclosure has the branch up high, you are looking up at the belly and the underside of the tail, so tilt your whole drawing slightly to show that angle rather than a flat side view.
Pencil in the branch running diagonally across the page first, then build the panda’s rounded body sitting on top, with the bamboo stalk held between its front paws and one bite already missing. Ink the face markings carefully, the white patches around the eyes are what make this read as a red panda rather than any other fuzzy animal.
Layer burnt orange marker over the back and a ringed tail, leaving the white belly and face patches as bare paper. If the proportions feel off, check that the tail is nearly as long as the body, it usually gets drawn too short.
One concrete tip: draw the bamboo stalk in last, over the top of the finished paws, so it reads as something held rather than stuck on afterward.
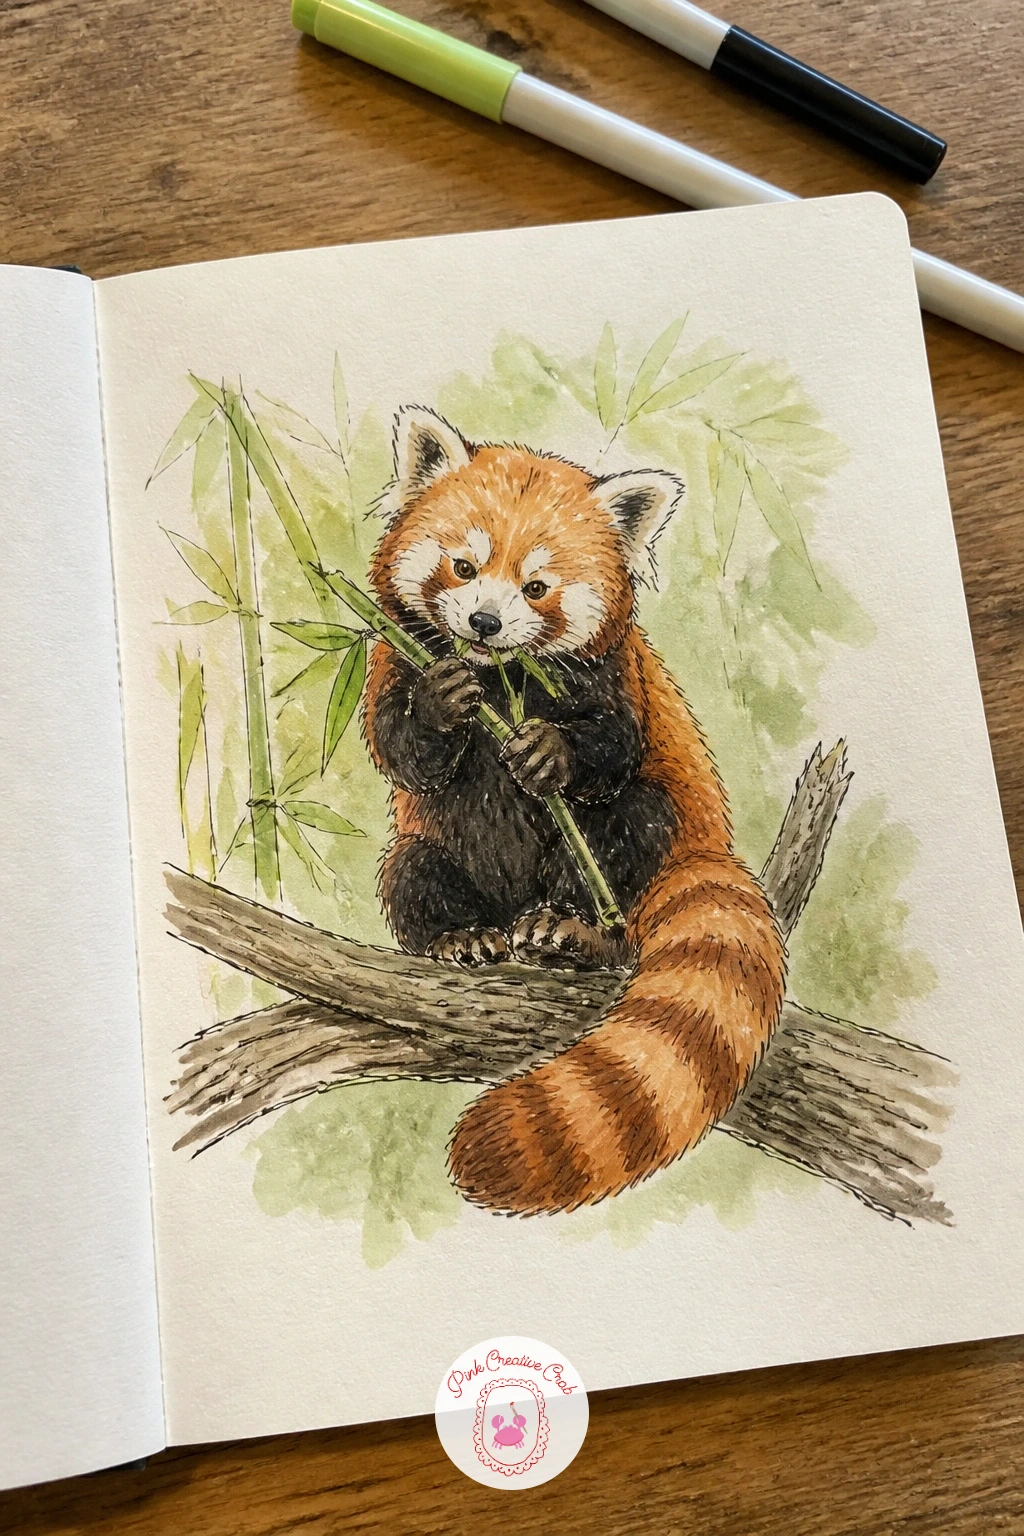
Palette: Burnt Orange,Titanium White,Ivory Black,Sap Green
From a branch to the water, sketch an otter floating on its back with a shell balanced on its chest. The body is one long curved oval, paws tucked up near the shell, head tipped back slightly against the water.
Draw the floating pose first since everything else hangs off it, then add the shell as a small simple triangle shape right in the center of the chest. Ink the whiskers with quick confident flicks rather than careful lines, otters never look relaxed with stiff whiskers.
For the water, use the dry brush trick: load a flat brush lightly with pale blue, wipe most of it off on scrap paper, then drag it in loose horizontal strokes around the otter’s body so the ripples look broken and light rather than one solid wash. This also helps if your first wash goes on too dark, since the dry strokes on top break it up.
Swap watercolor for a light blue marker scribbled in loose horizontal lines if you left your paints at home, the effect holds up surprisingly well.
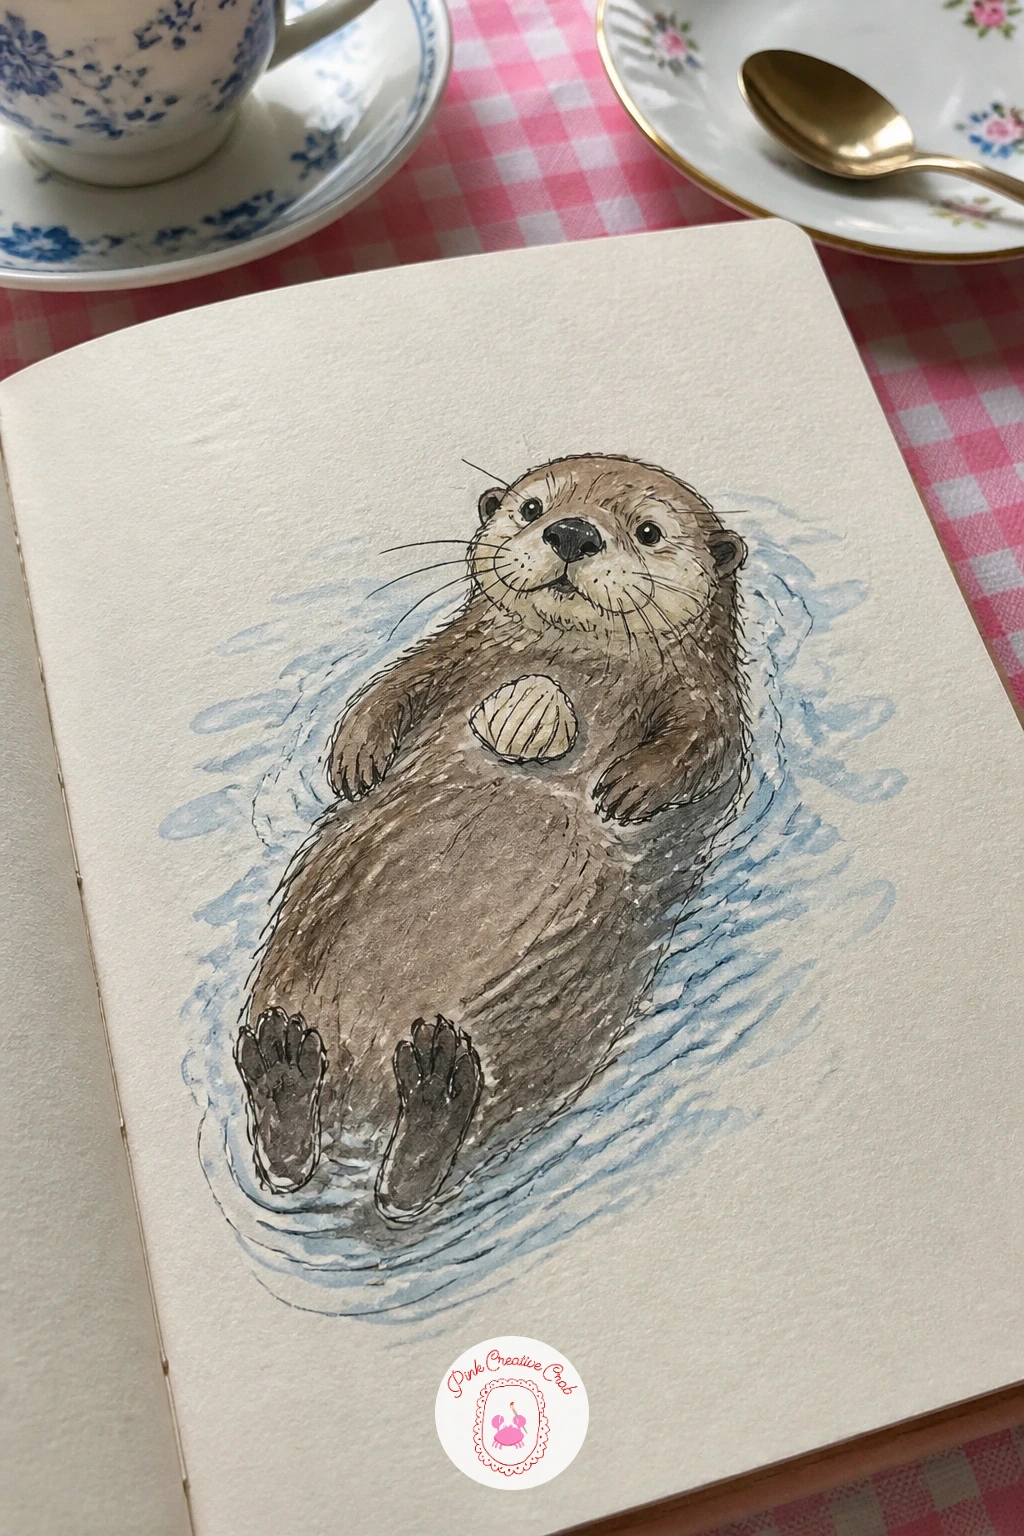
Palette: Raw Sienna,Cerulean Blue,Payne’s Grey
Head indoors now for the shark tunnel, where the real subject is the small figure against the huge curved glass, not the shark itself. Draw the tunnel as a gentle arching line first so the glass curve is established, then place the child small and dark against it, nose and both hands pressed flat.
Sketch the shark gliding above and slightly distorted by the glass, longer and flatter than a shark actually is, that stretch is part of what sells the illusion of looking up through a tank. Ink the child’s silhouette solidly dark since she reads better as a simple shape than a detailed figure at this distance.
The scene goes wrong when the shark ends up too small and friendly looking, keep it large enough to fill most of the tunnel’s width so the scale feels believable. A grey marker swept in one direction gives the shark’s body a believable sheen without much effort.
Ten minutes gets you the tunnel and the shark alone. With more time, add the blue wash glow across the whole page, stronger near the top, to suggest the tank’s light falling down over everyone standing in it.
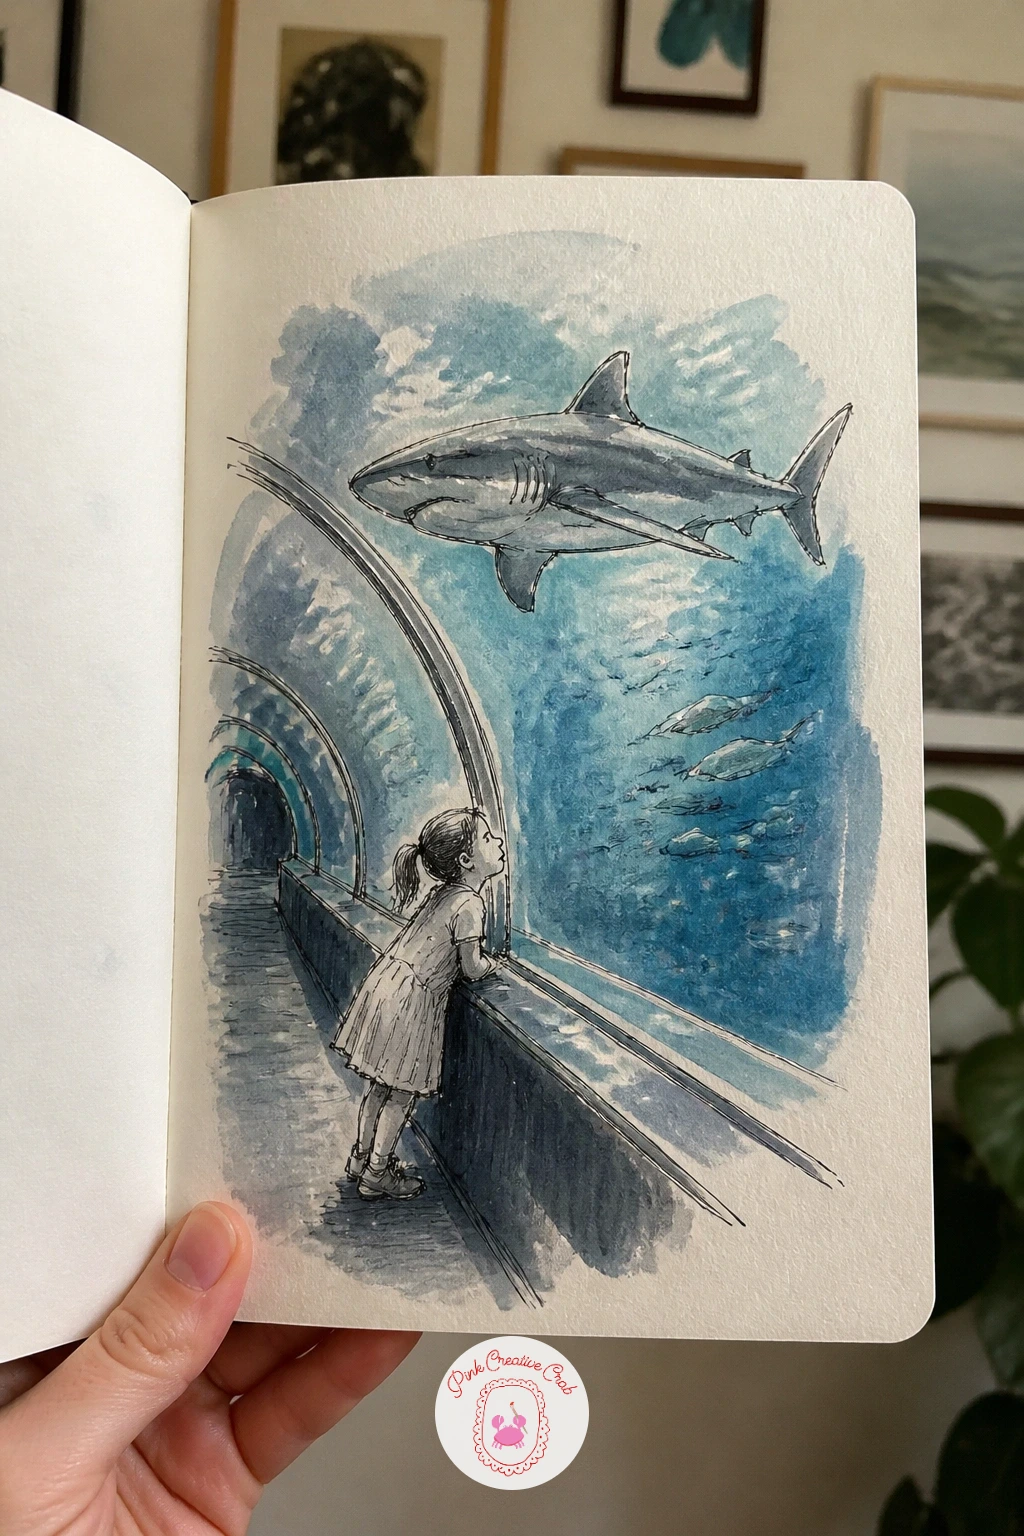
Palette: Prussian Blue,Payne’s Grey,Ivory Black
Jellyfish are a welcome breather after the shark tunnel, since the whole subject is soft curves and trailing lines. Draw the round tank outline first as a simple circle filling most of the page, then place two or three jellyfish bells floating at different heights inside it.
Ink only the bell shapes and leave the tentacles for watercolor, a wet brush loaded with pale pink or lilac dragged downward in long loose strokes reads as trailing tentacles far better than careful ink lines ever will. Let the color bleed a little into the blue background wash while it is still wet, that soft edge is exactly the glow you want.
If the tentacles end up too stiff and straight, flick the brush gently side to side as you pull it down rather than dragging in one straight line. Keep the background wash dark enough that the pale jellyfish shapes glow against it by contrast.
No watercolor to hand, a pale pink highlighter over dark blue marker gives a similar neon glow in a pinch.
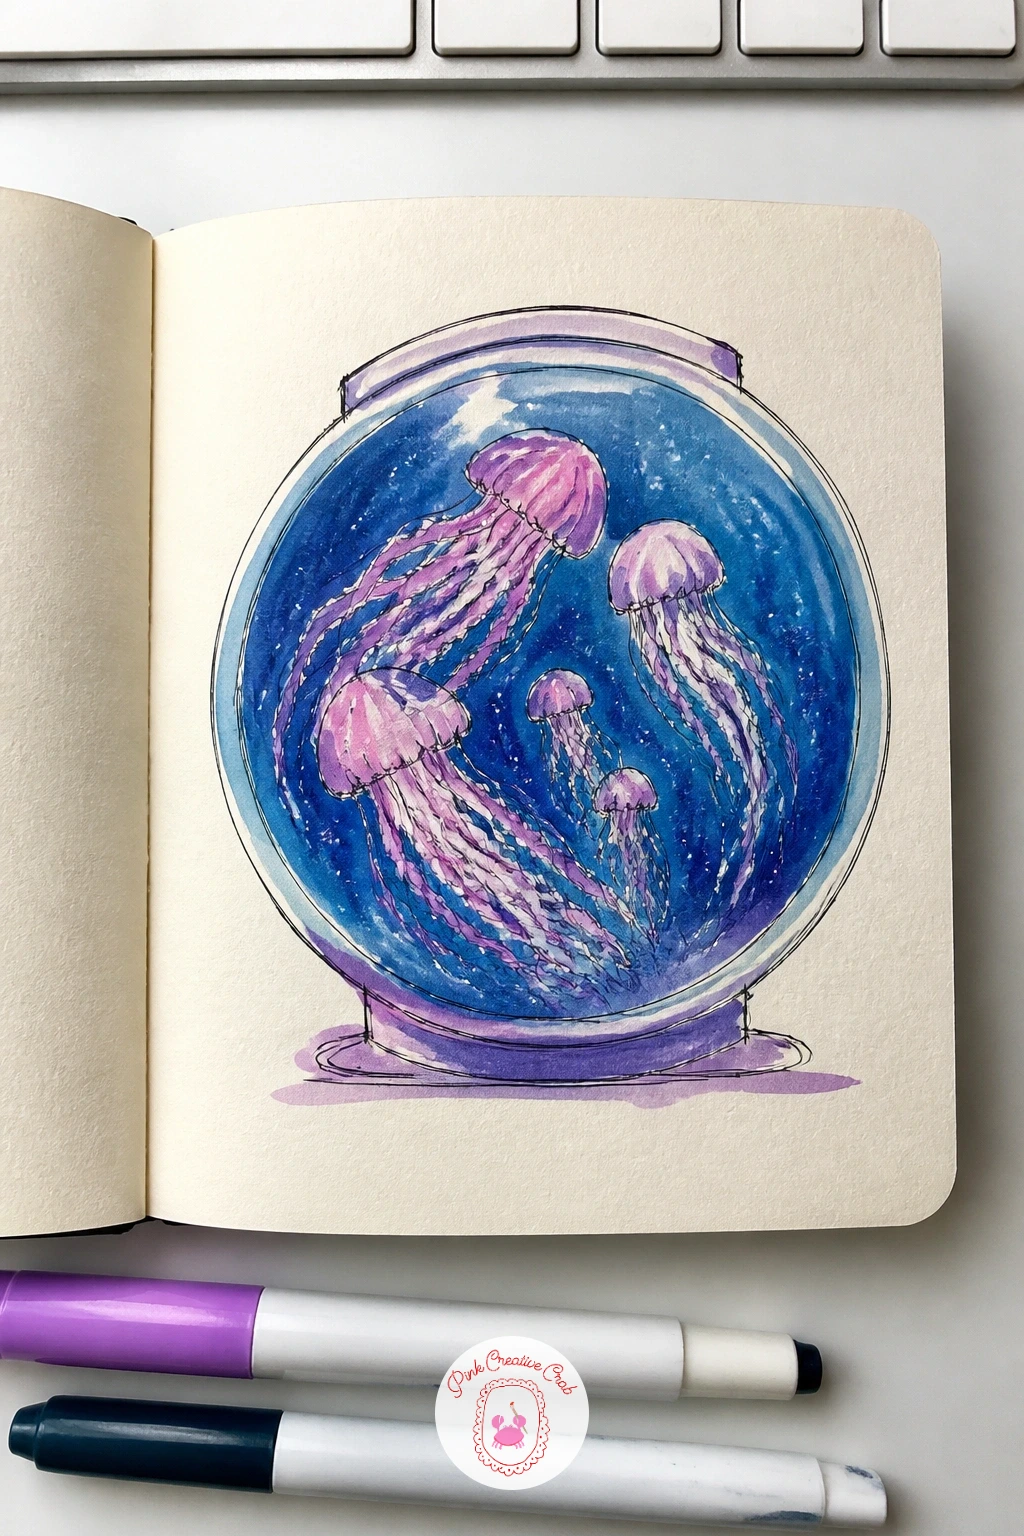
Palette: Prussian Blue,Quinacridone Pink,Lilac
Bring some comedy back with a sea lion balanced on its flippers, nose tipped up with a ball resting right on the tip. The body is a smooth teardrop shape tapering from the head down to the tail, propped up on two front flippers planted like little pillars.
Sketch the balancing pose first, checking that the body leans slightly back for weight, then add the ball as a small circle at the very top, almost floating above the nose. Ink the sleek body in one continuous confident line rather than lots of short strokes, sea lions are all smooth curves with no sharp edges anywhere.
A dry brush dipped in grey and dragged once or twice along the back suggests the wet shine of its skin without needing a full wash. If the ball keeps looking stuck to the nose rather than balanced, leave a tiny sliver of white paper between the nose and the ball, that small gap is what makes it read as balance rather than contact.
Try the same pose next time with the ball mid air, just tossed rather than balanced, for a livelier variation.
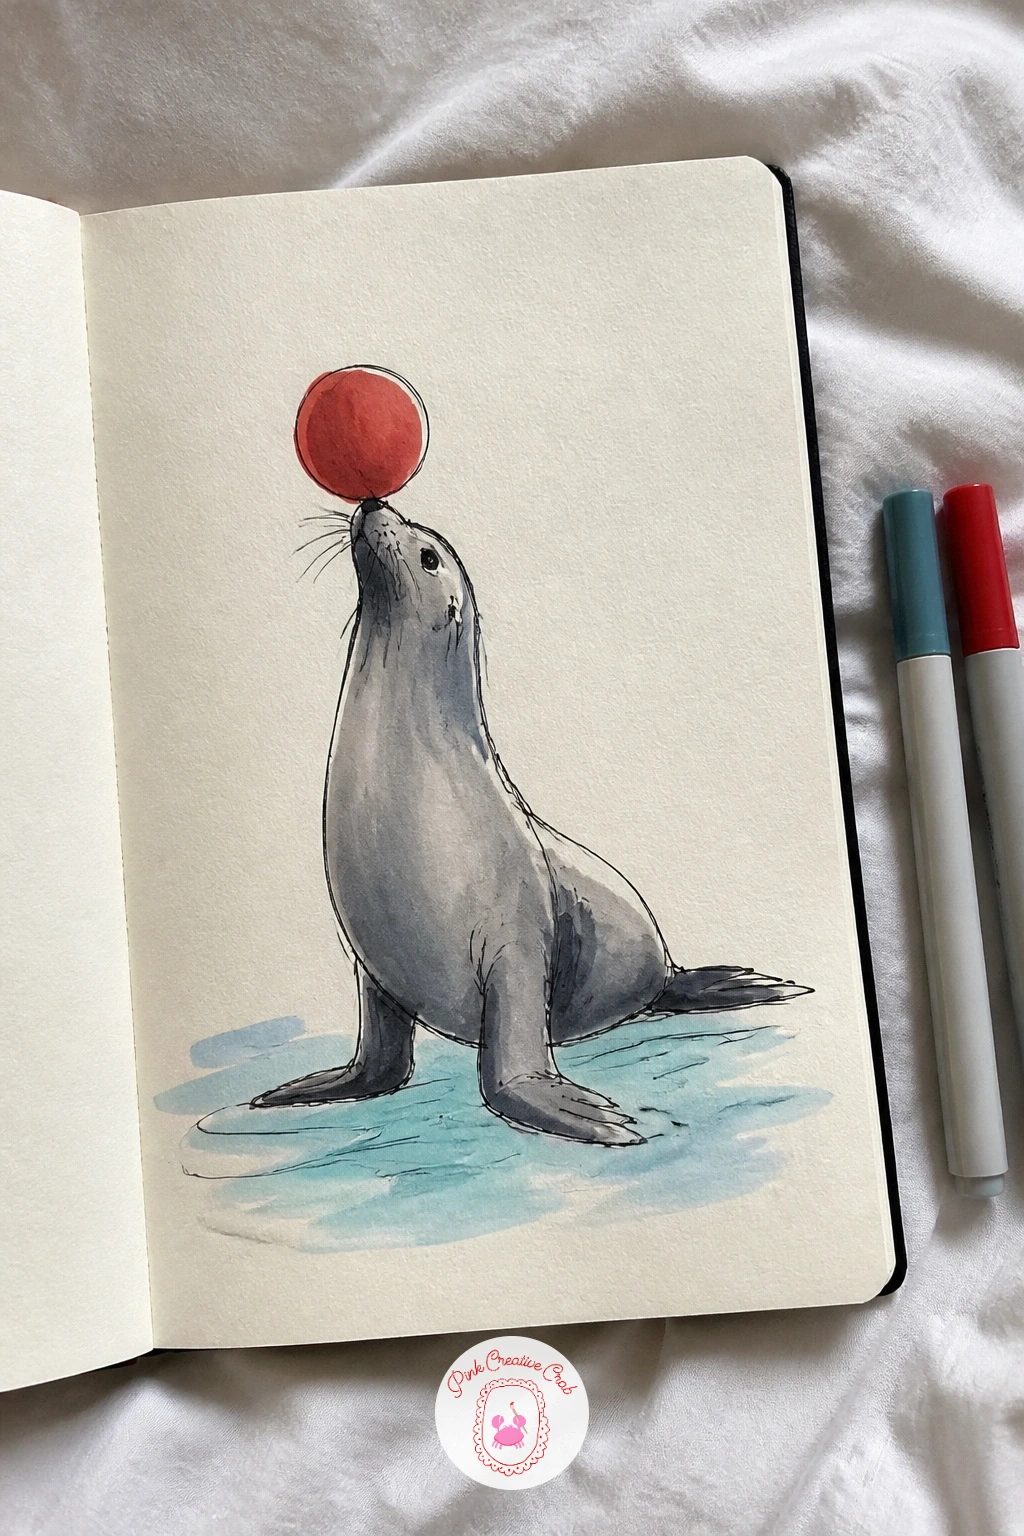
Palette: Payne’s Grey,Cadmium Red,Ivory Black
The lion gets its own warm rock and a wide open yawn, which means the mane is doing most of the work here. Start with the head tipped back and the mouth drawn as a generous open oval, teeth just a few quick triangular marks rather than anything anatomical.
Build the mane around the head in overlapping scribbled curves, working outward from the face so the longest tufts end up at the back and top, never neat and combed. Ink the rock underneath as a few flat horizontal strokes, lions always look most at home sprawled across something solid and sun warmed.
A warm orange marker over the mane with darker brown added only at the roots near the face gives it real depth fast, since the roots are always the darkest part. If the yawn ends up looking more like a roar, soften the eyes to half closed, a roaring lion has wide alert eyes and a yawning one does not.
One tip for today: draw the mane slightly larger than feels right, a timid mane is the single most common mistake with this subject.
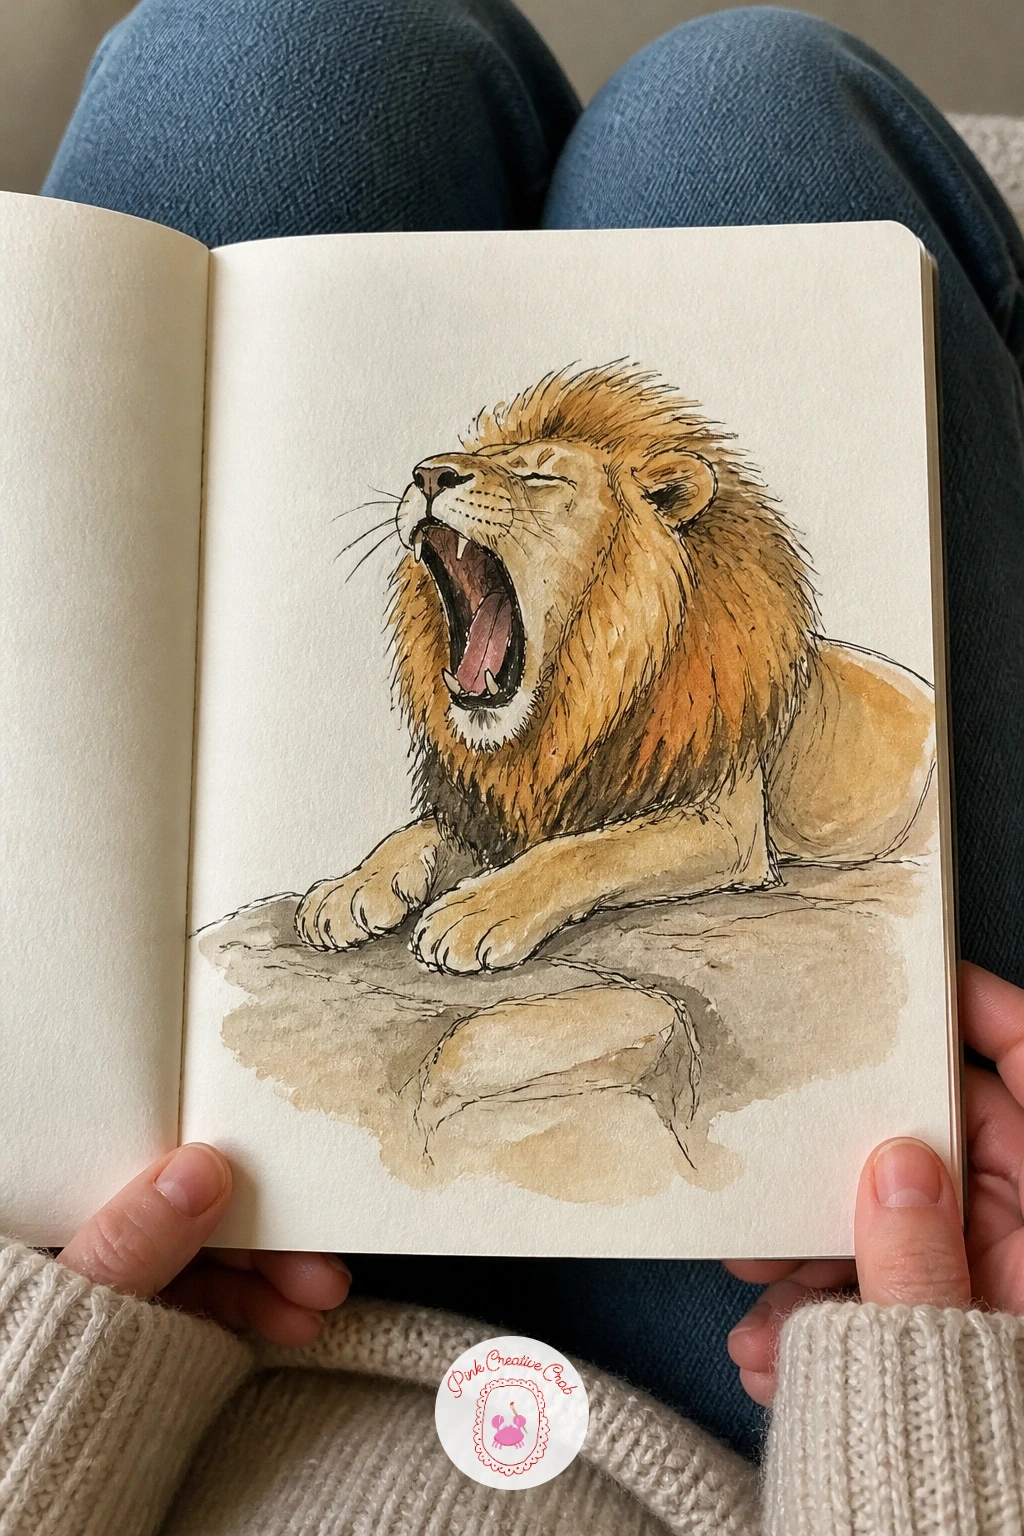
Palette: Burnt Orange,Burnt Umber,Raw Sienna
Pair up a zebra foal with its mother for a proportion exercise worth doing properly. Draw the mother first, full sized with her legs planted, then measure the foal against her: a newborn foal’s body sits at roughly half her height at the shoulder, with legs that already look almost adult length and slightly too long for the small body above them.
Sketch both bodies loosely before any stripes go on, checking that comparison holds, then ink the outlines and add the stripe pattern last. Stripes follow the curve of the body rather than running straight across it, so let them bend gently over the rump and legs.
If the foal ends up looking like a small adult rather than a baby, lengthen the legs slightly and shrink the body, that imbalance is exactly what reads as young. Warm sandy washes behind both animals, with the stripes left as crisp black ink, keeps the pair feeling bright rather than heavy.
A grey marker swapped in for black softens the stripes nicely if full black feels too harsh against a light page.
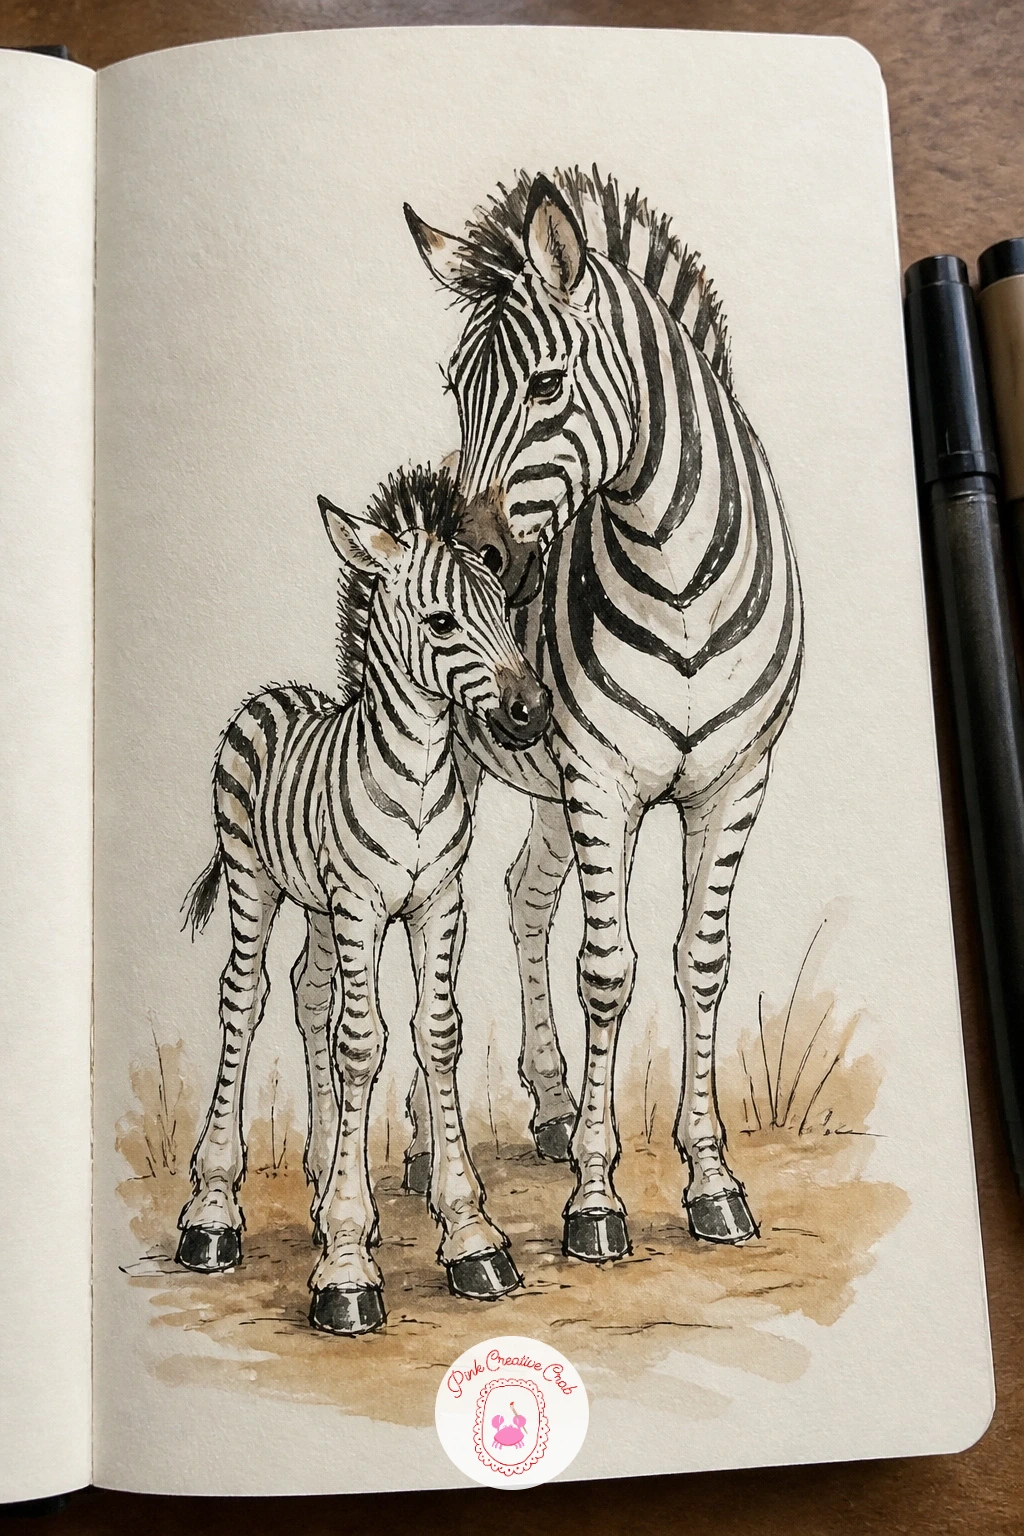
Palette: Ivory Black,Raw Sienna,Titanium White
Turn the page toward someone else doing exactly what you are doing, a girl sitting on a bench with her own sketchbook open on her lap. Block in the bench as a simple horizontal shape first, then seat the figure on it with shoulders curved slightly forward over the page, the universal posture of anyone absorbed in drawing.
Keep the figure loose, a rounded head, simple sloped shoulders, no need for detailed hands beyond a suggestion of fingers holding a pencil. Ink the bench and figure in solid confident lines, then let a soft blue marker wash fill the glass wall behind her so she sits against a glow rather than a blank background.
Hands are where this usually stalls, if they look wrong just simplify further into a soft fist shape around the pencil rather than trying to draw individual fingers. A grey wash for her shadow under the bench grounds the whole figure instantly.
For more ideas on sketching people and quiet corners like this one, the watercolor and ink tutorials page has gentle figure and scene pairings worth trying next.
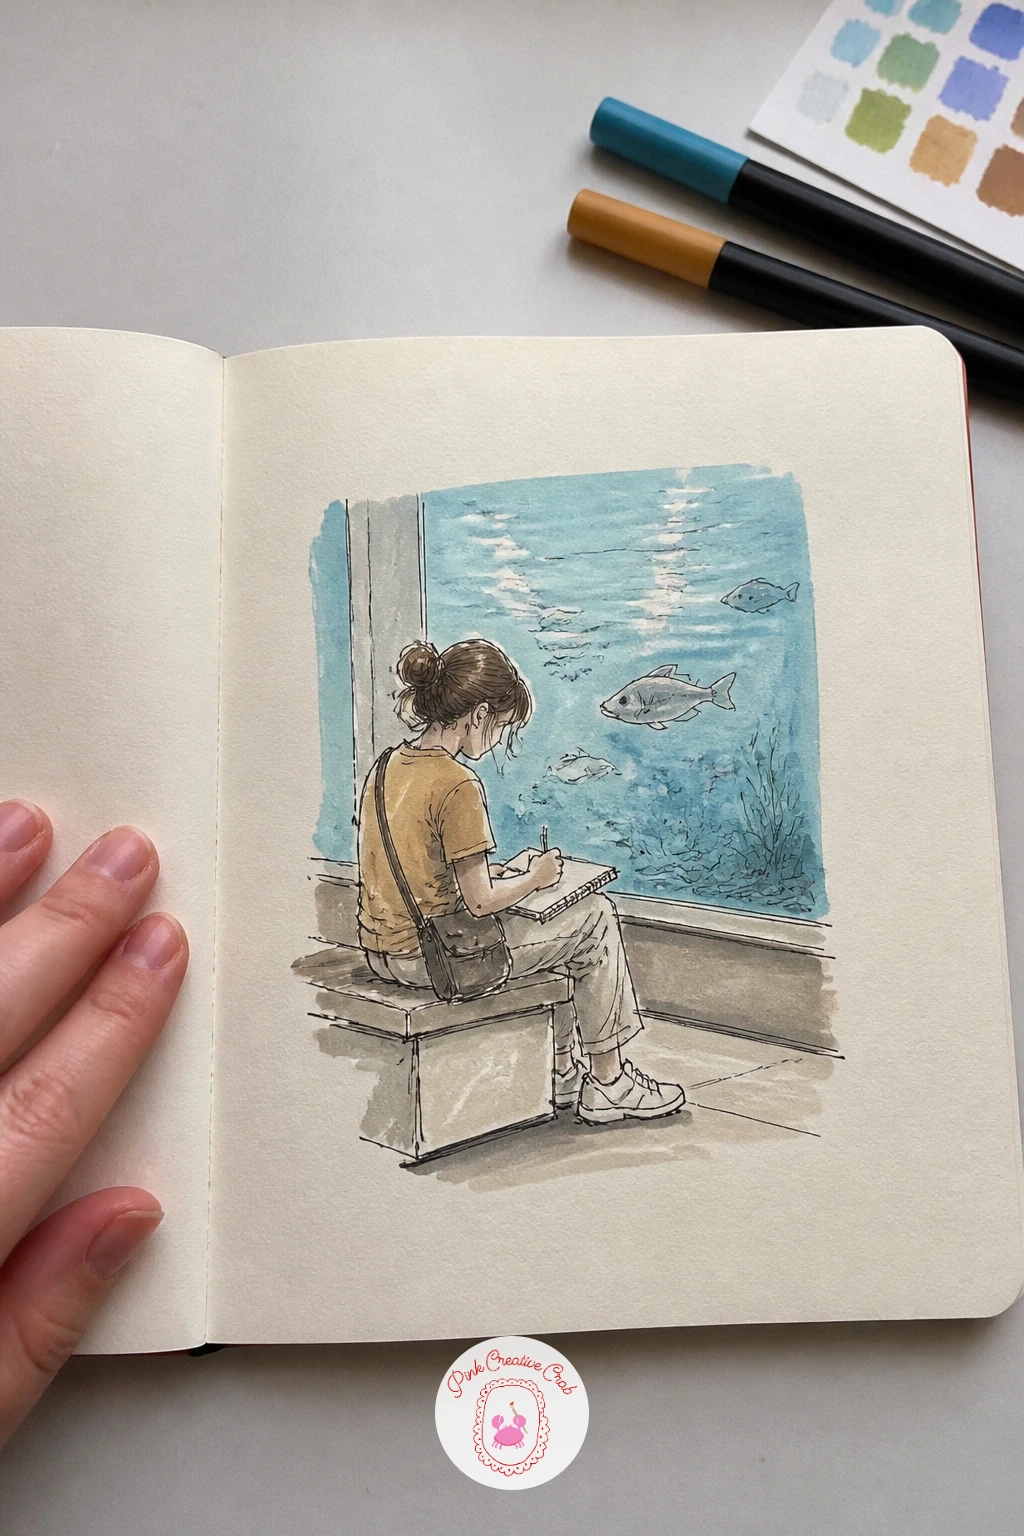
Palette: Payne’s Grey,Cerulean Blue,Raw Umber
Drop the pace right down for a tortoise halfway across a path, shell taking up most of the drawing and legs barely visible underneath. Draw the shell dome first as a simple rounded shape, then divide it into the plate pattern with curved lines radiating gently outward rather than a rigid grid.
Add the small head and stubby legs peeking out from underneath last, keeping them tiny compared to the shell, that size contrast is most of what makes a tortoise read correctly. Ink the plate divisions, then use a dry brush loaded with olive and brown to add mottled texture across the shell, letting colors overlap slightly rather than staying in separate neat sections.
If the shell ends up looking flat, add a touch of darker shading along one side only, wherever the light is coming from in the scene, to give the dome some real volume. A warm sandy wash for the path keeps the whole thing feeling outdoors and sunny.
A fine point marker works just as well as a dry brush for the mottling if you want to keep this one entirely in ink.
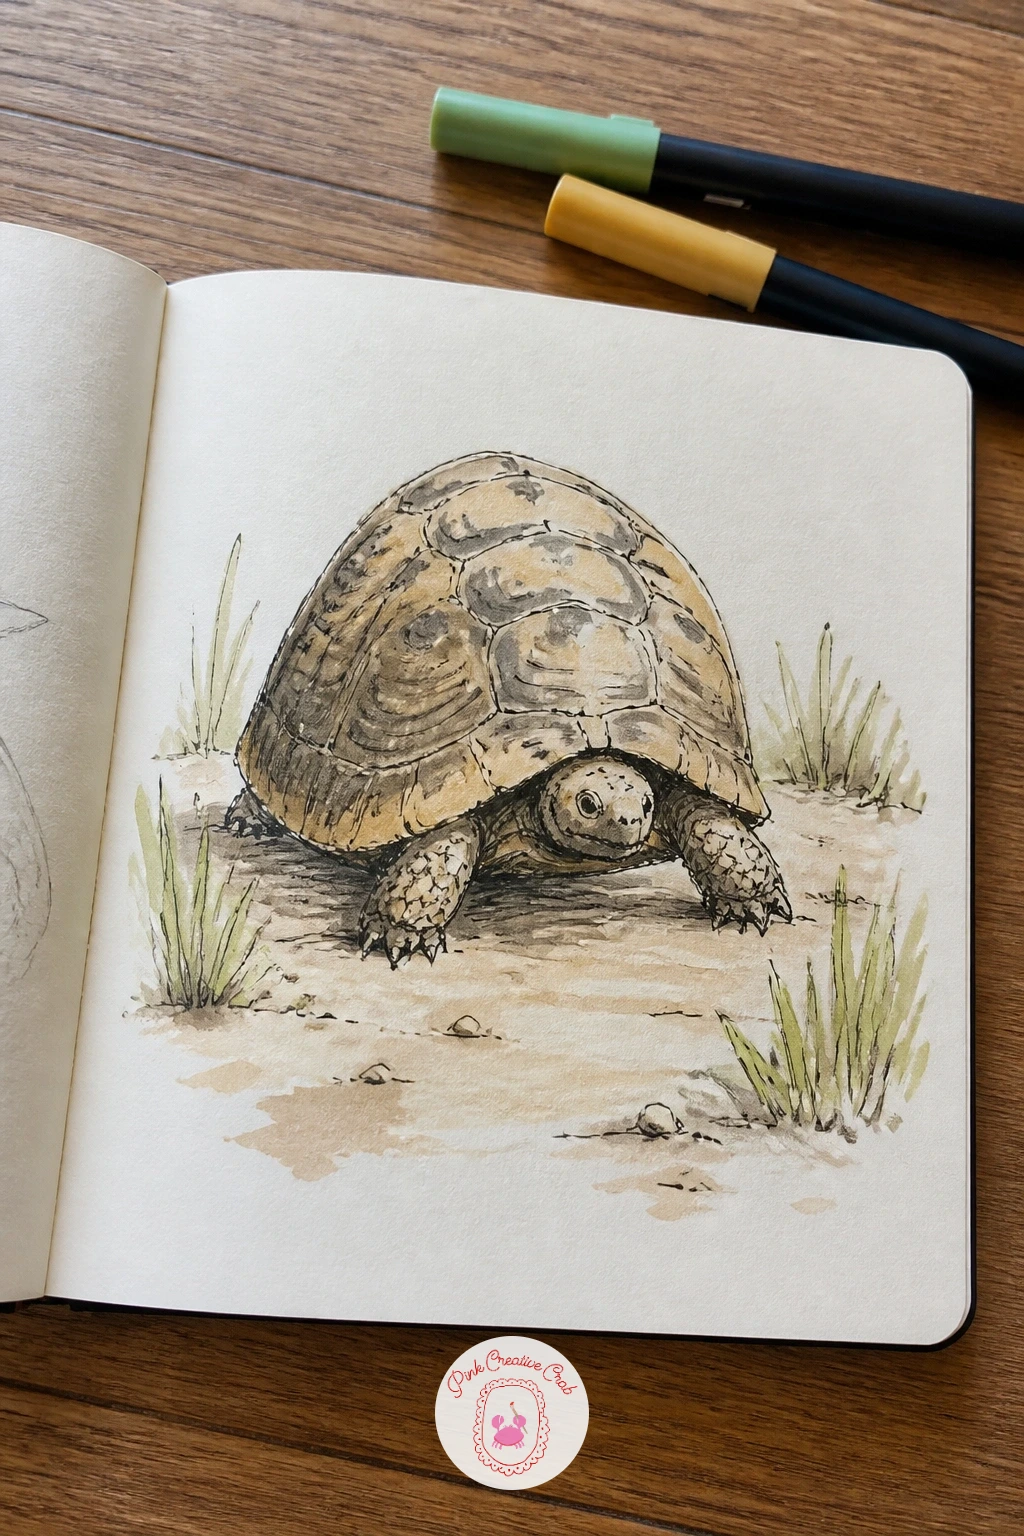
Palette: Olive Green,Raw Umber,Raw Sienna
Give the peacock its fanned tail and a small family watching nearby, a chance to play with perspective since the tail reads completely differently depending on the angle. Decide first whether you are looking at it straight on, which means the tail fans out symmetrically, or from the side, where it becomes a tall curved wall of feathers with fewer eye spots visible.
Sketch the tail shape first as a wide fan of overlapping curved lines, then add the small body and neck low in the center. Ink each feather eye as a simple oval within an oval, repeated loosely rather than counted out precisely, peacocks have far too many feathers to draw individually.
Watercolor the tail in teal and blue first, then drop tiny gold dots into the still damp eye spots so the color blurs softly at the edges rather than sitting as a hard circle. The family watching can stay as simple dark silhouettes in the foreground, which also helps the bright tail pop by contrast.
Try the side view next time once the front on fan feels comfortable, it is a nice variation with a very different silhouette.
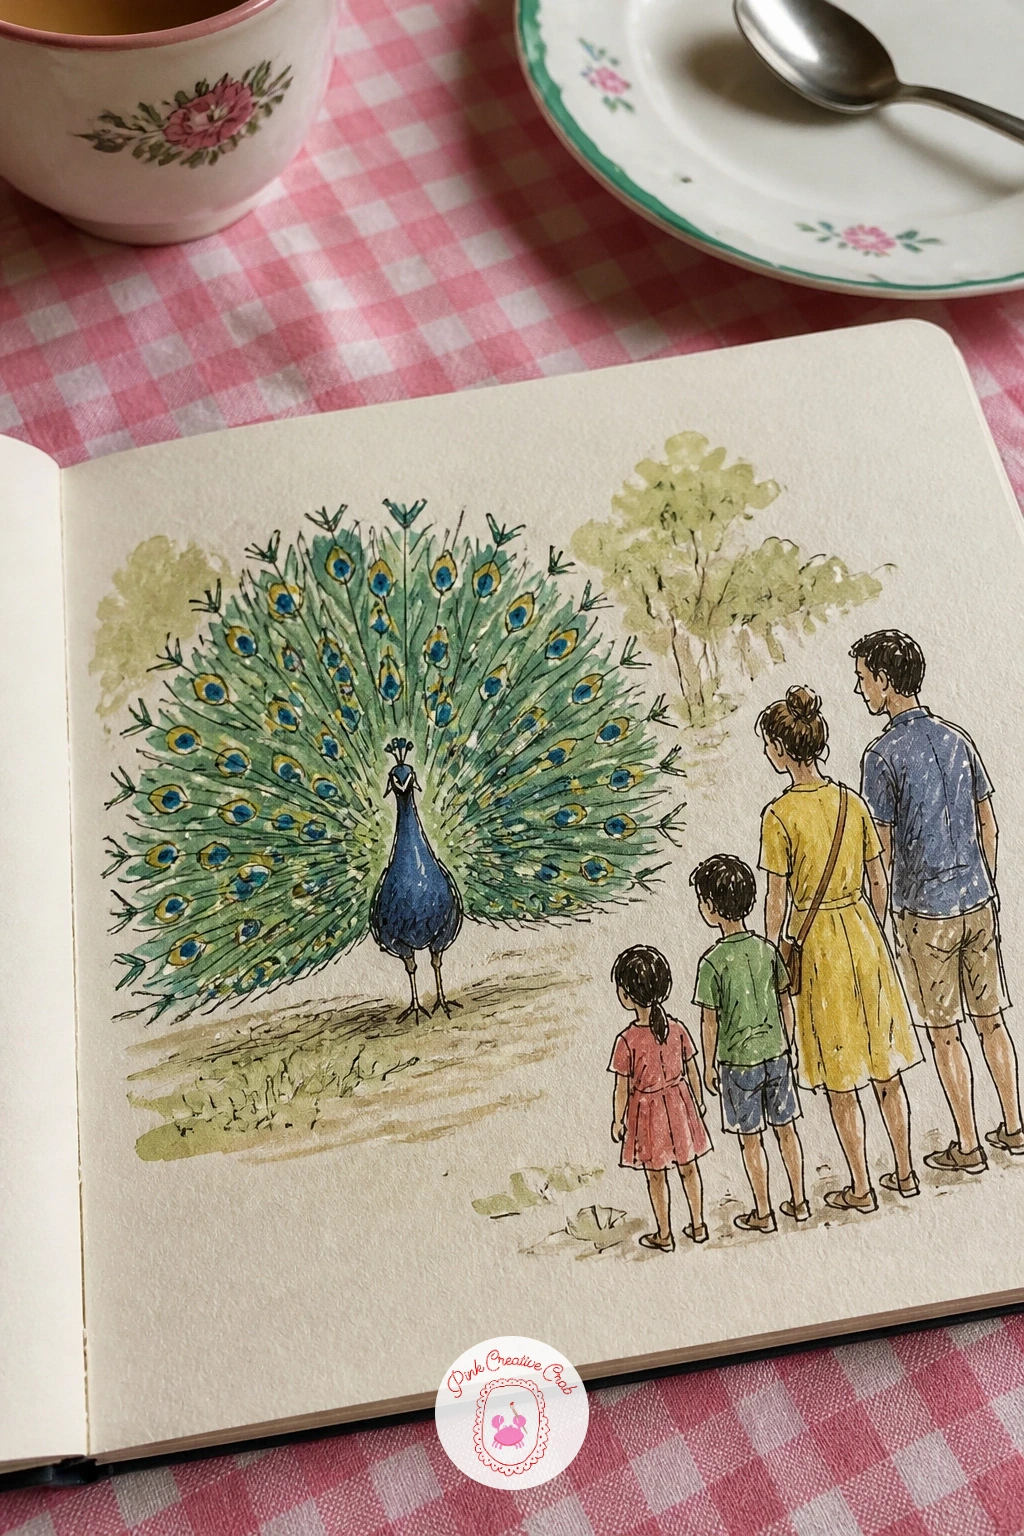
Palette: Teal,Cerulean Blue,Gold Ochre
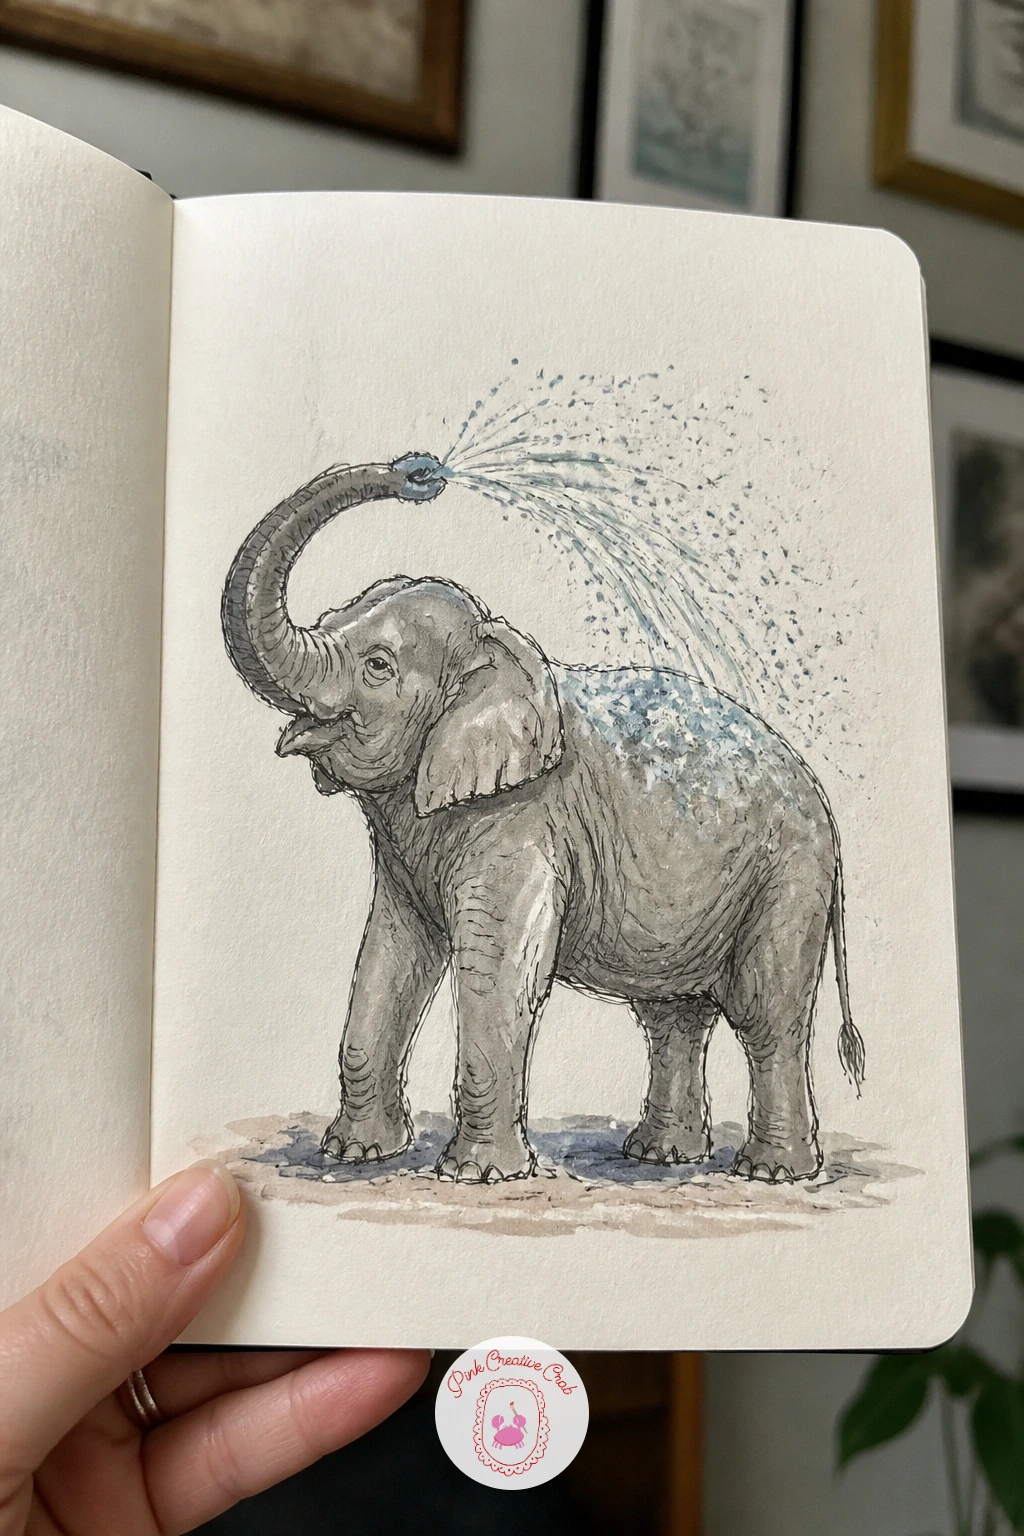
Scale back up for an elephant mid spray, trunk curled over its back with a fine arc of water droplets falling. Build the body first as one large rounded mass, legs thick and simple, then curl the trunk upward and back over the body in one smooth continuous line, the trunk is really just a long tapering S shape.
Ink the wrinkled texture on the trunk and legs with short curved strokes rather than straight lines, wrinkles on an elephant always follow the curve of the limb beneath them. For the water, flick a loaded wet brush against your finger over the page, or dip an old toothbrush in pale blue watercolor and flick the bristles with your thumb, scattering a fine spray of droplets exactly where the trunk points.
If the spray ends up too heavy and solid looking, go back with a clean damp brush and lift a few droplets back out, flicking leaves plenty of uneven gaps naturally. Grey washes over the body with slightly darker shading in the folds finishes it off.
A spare toothbrush from a travel kit works fine for the splatter if you do not want to pack a dedicated one.
You Will Need
- old toothbrush for splatter
Palette: Payne’s Grey,Cerulean Blue,Ivory Black
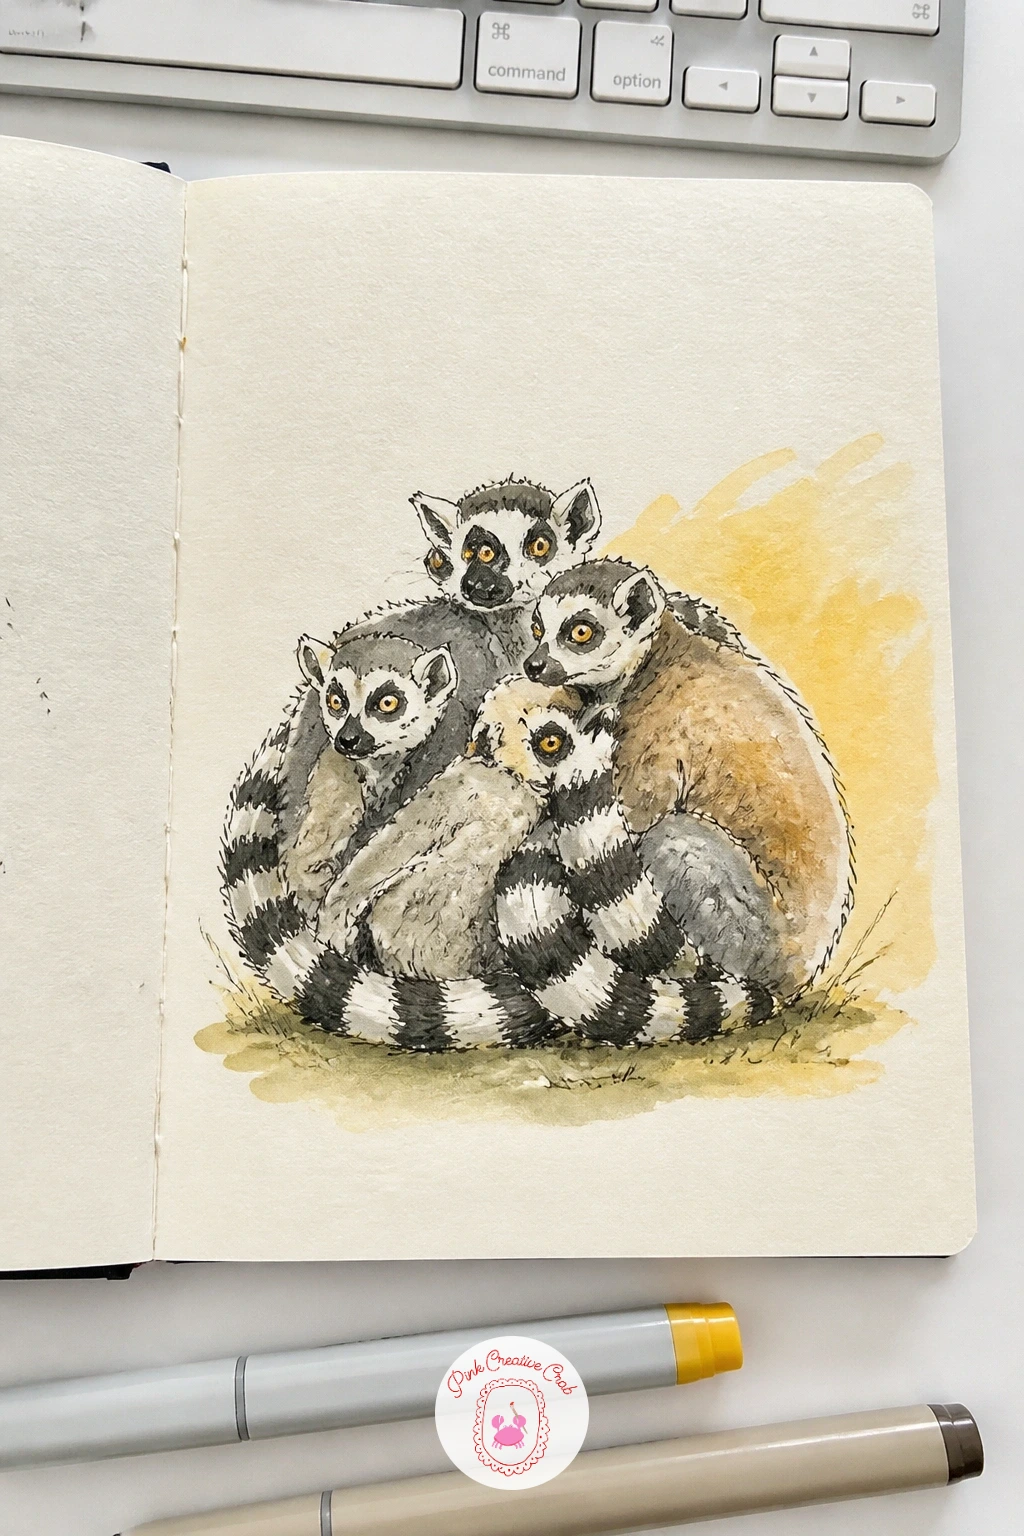
After all that splashing, settle into a quiet huddle of lemurs stacked together in a patch of sun. Draw the group as one overlapping cluster rather than separate figures, starting with the lemur at the back and layering each one slightly in front, tails wrapped around and over each other’s bodies.
Keep the ringed tails simple, alternating black and white bands drawn in confident short strokes, and the eyes large and round since that is most of a lemur’s charm. Ink the whole huddle first, then wash a warm yellow glow across just the side catching the sun, leaving the shaded side of the group a cooler grey to show the light direction clearly.
If the group starts to look like one confused blob, give each lemur at least one clearly readable ear or tail tip poking out from the pile so the eye can separate them. A single stray tail trailing off the edge of the group adds a nice bit of movement.
Swap the warm yellow wash for a warm orange marker if your watercolor has dried out mid sketch, the glow effect holds up just as well.
Palette: Lemon Yellow,Payne’s Grey,Ivory Black
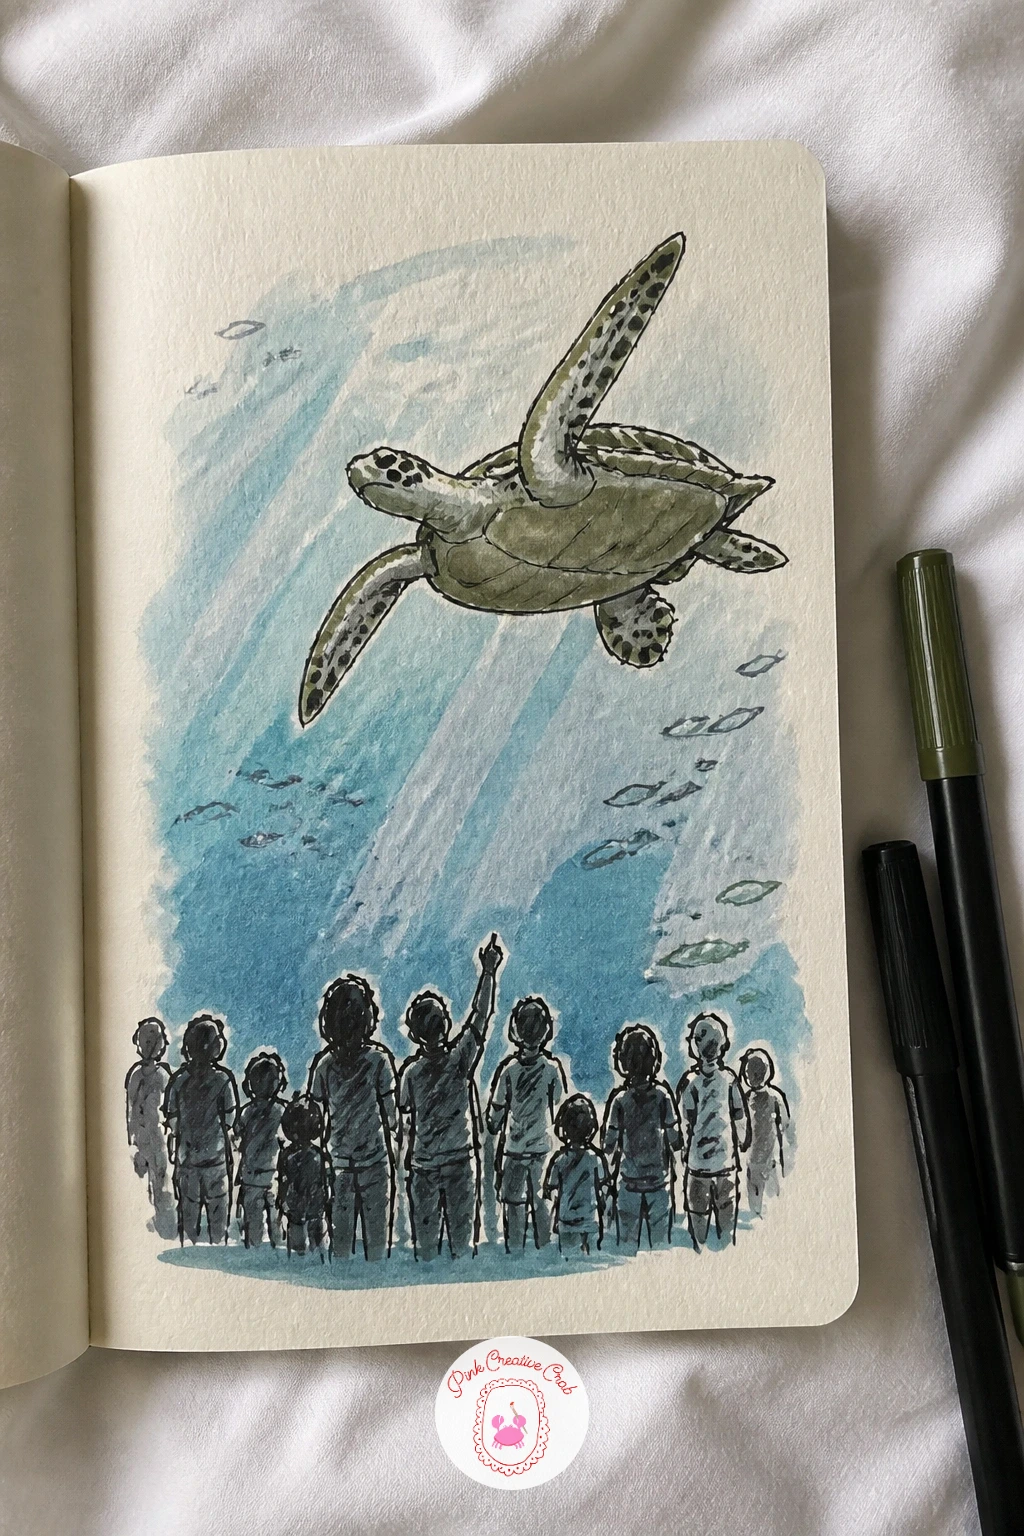
Back underwater for a sea turtle gliding high in a big tank, visitors gathered below looking up at it. Sketch the shell first as a wide rounded oval, flippers extended out to the sides mid stroke, one reaching forward and one trailing back for a sense of gentle movement through water.
Place the crowd of visitors small and dark along the bottom edge of the page, simple silhouette shapes looking upward, which immediately sets the turtle’s scale and the viewer’s position looking up through the tank. Ink the shell pattern as a honeycomb of loose hexagon shapes, then wash olive green over the shell and pale blue over the whole water area behind it.
If the turtle looks static rather than gliding, angle the back flippers slightly differently from the front ones, turtles rarely paddle both pairs in sync and that small offset reads as motion immediately. Let the blue wash go a touch darker near the top of the page to suggest the tank’s depth.
For more underwater subjects in this loose style, the easy watercolor ocean scenes page has several gentle ideas worth trying alongside this one.
Palette: Olive Green,Cerulean Blue,Ivory Black
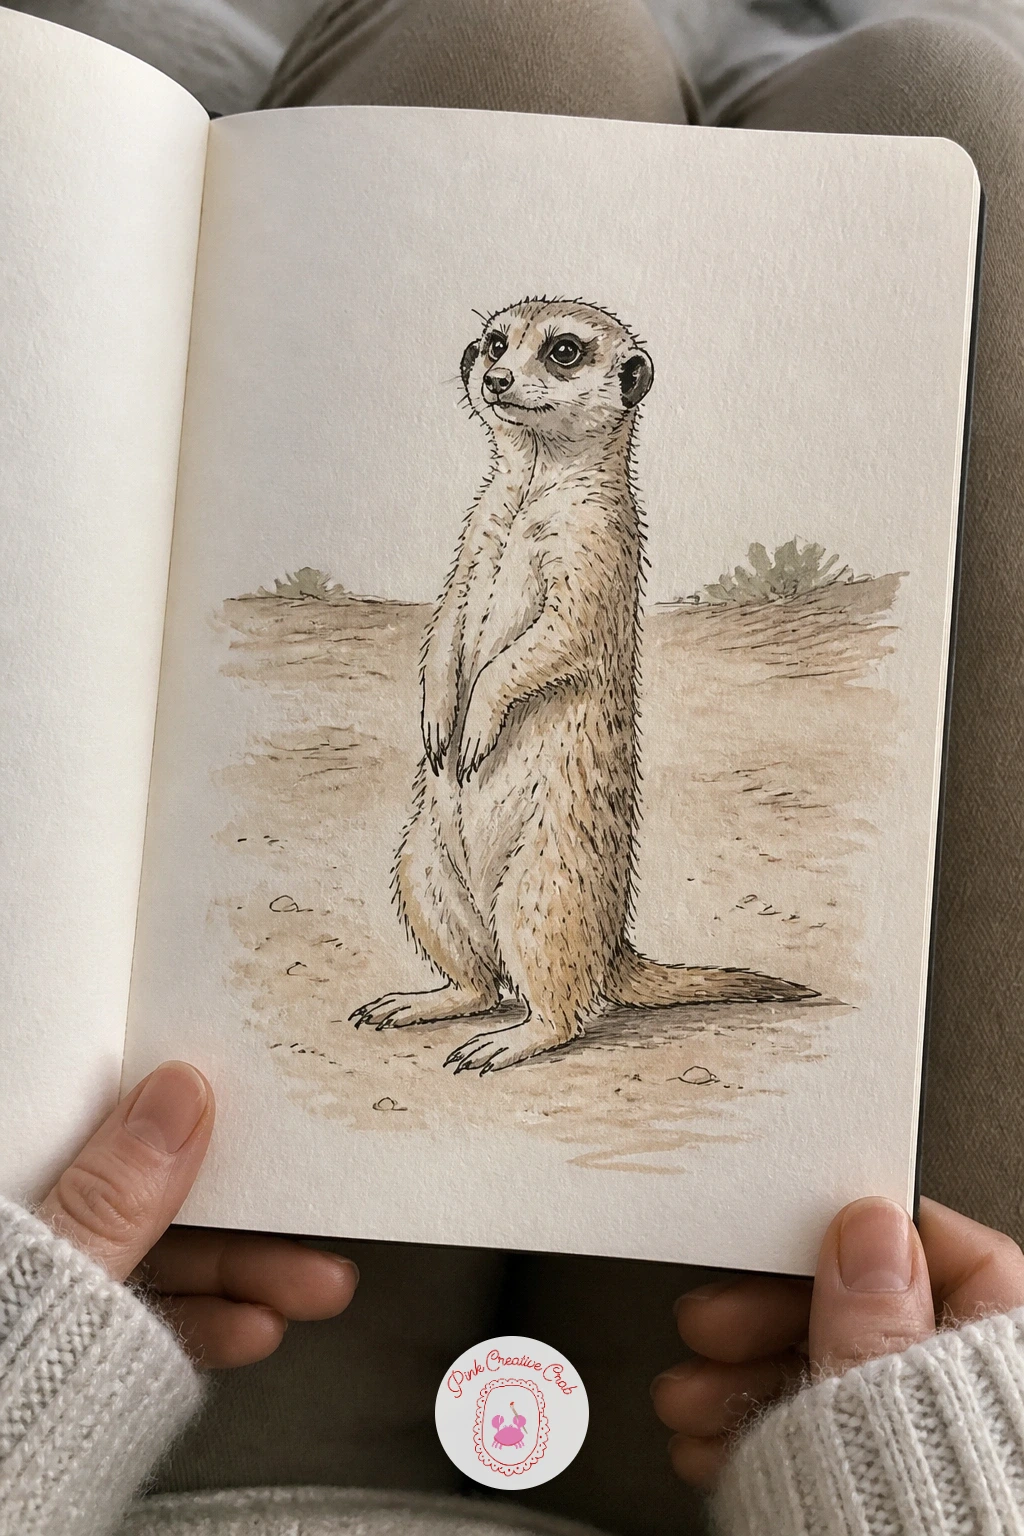
Bring the energy back up with a single meerkat standing bolt upright on lookout, tail planted for balance. The body is a long narrow oval standing on end, with small front paws tucked against the chest and the head tilted slightly, scanning rather than facing straight forward.
Sketch the standing pose first, checking the tail reaches almost to the ground behind for balance, then ink the dark mask around the eyes, the single most recognizable mark on this animal. Build the sandy fur with quick short upward strokes rather than a flat wash, meerkat fur always looks slightly windblown and never smooth.
If the pose ends up looking like it is falling rather than standing alert, check the tail and both back feet form a stable triangle on the ground, that base is what keeps the upright pose believable. A warm sandy background wash with a hint of horizon line keeps it feeling like open ground rather than a blank page.
One tip for today: draw the ears small and close to the head, oversized ears are the fastest way to lose the alert meerkat silhouette.
Palette: Raw Sienna,Burnt Umber,Ivory Black
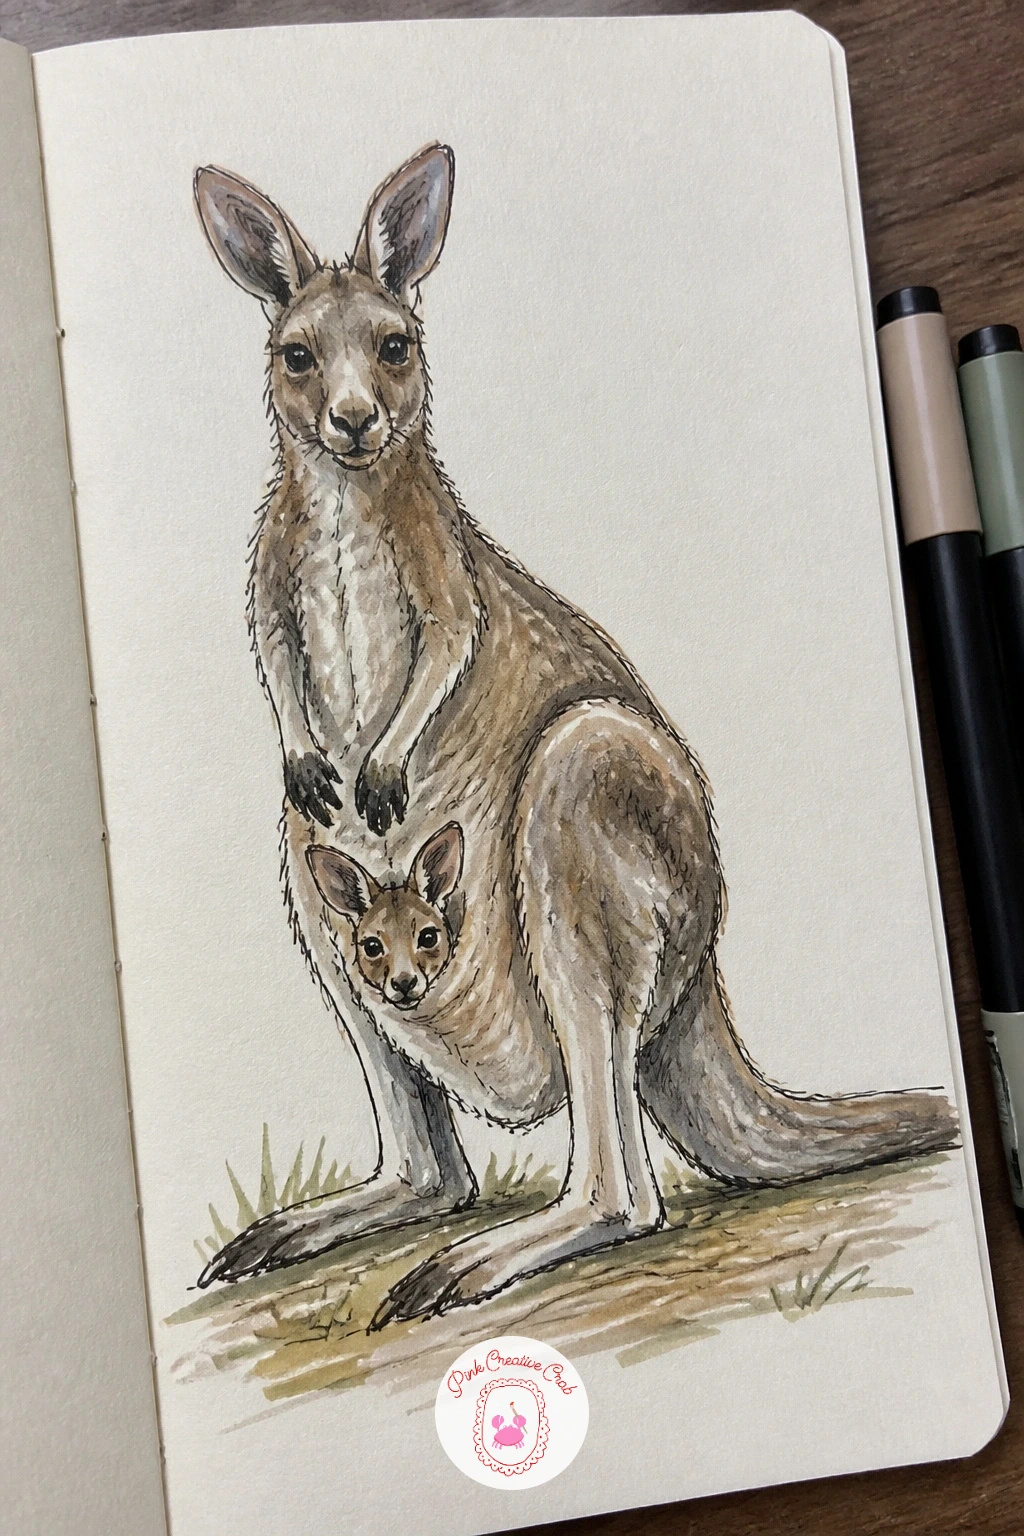
Draw a kangaroo standing with a joey’s small head just visible poking out of the pouch, a nice chance to practice overlap. Build the mother’s body first, weight resting back on the thick tail which acts almost like a third leg, then add the pouch as a simple curved fold low on the belly.
Tuck the joey’s head in at the top edge of the pouch opening, just the ears and eyes showing, everything else hidden behind the mother’s body. Ink the strong back legs and tail first since they carry the whole pose, then the smaller front paws held up near the chest.
If the joey ends up looking stuck on rather than nestled in, make sure the pouch fold overlaps slightly in front of its head and chin, that small overlap is what sells the tucked in feeling. Warm grey brown washes over both figures, slightly lighter on the joey’s peeking face, finishes the pair.
Try drawing the joey fully out and hopping alongside next time, a nice variation once the tucked in version feels easy.
Palette: Raw Umber,Payne’s Grey,Raw Sienna
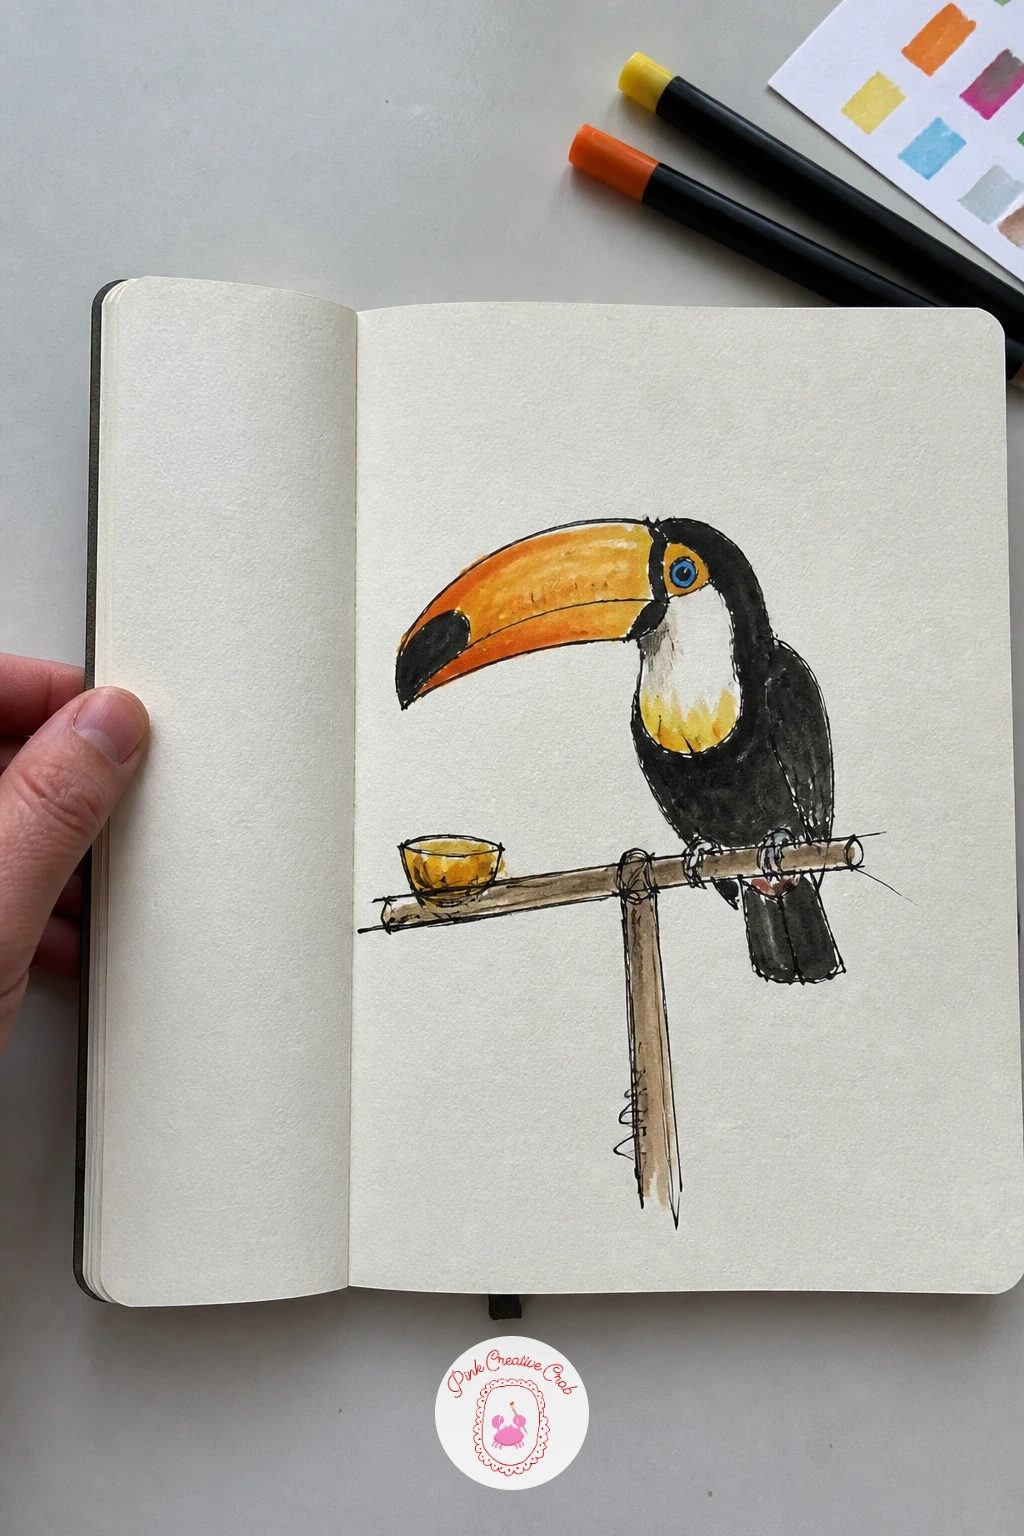
Perch a toucan on a feeding stick next, a subject that lives or dies on that oversized bill. Draw the bill first as one long curved shape, a good third of the whole bird, then build the small round body and perched feet around it afterward so the proportions stay bold rather than timid.
Ink the bill outline in one confident sweep, then watercolor it in bands of orange, yellow and a touch of red, letting the colors sit wet into wet at the edges rather than keeping them in strict separate blocks. The body stays mostly solid black with a bright patch of color at the chest, which gives your eye somewhere to land besides the bill.
If the bill shrinks on the page and starts looking like an ordinary beak, measure it against the head again before inking, a toucan’s bill is genuinely close to the size of its whole body and should feel almost too big. A piece of fruit speared on the stick beside it adds a nice small detail.
A simple orange marker swap works fine for the bill if watercolor is not with you today.
Palette: Cadmium Orange,Lemon Yellow,Ivory Black
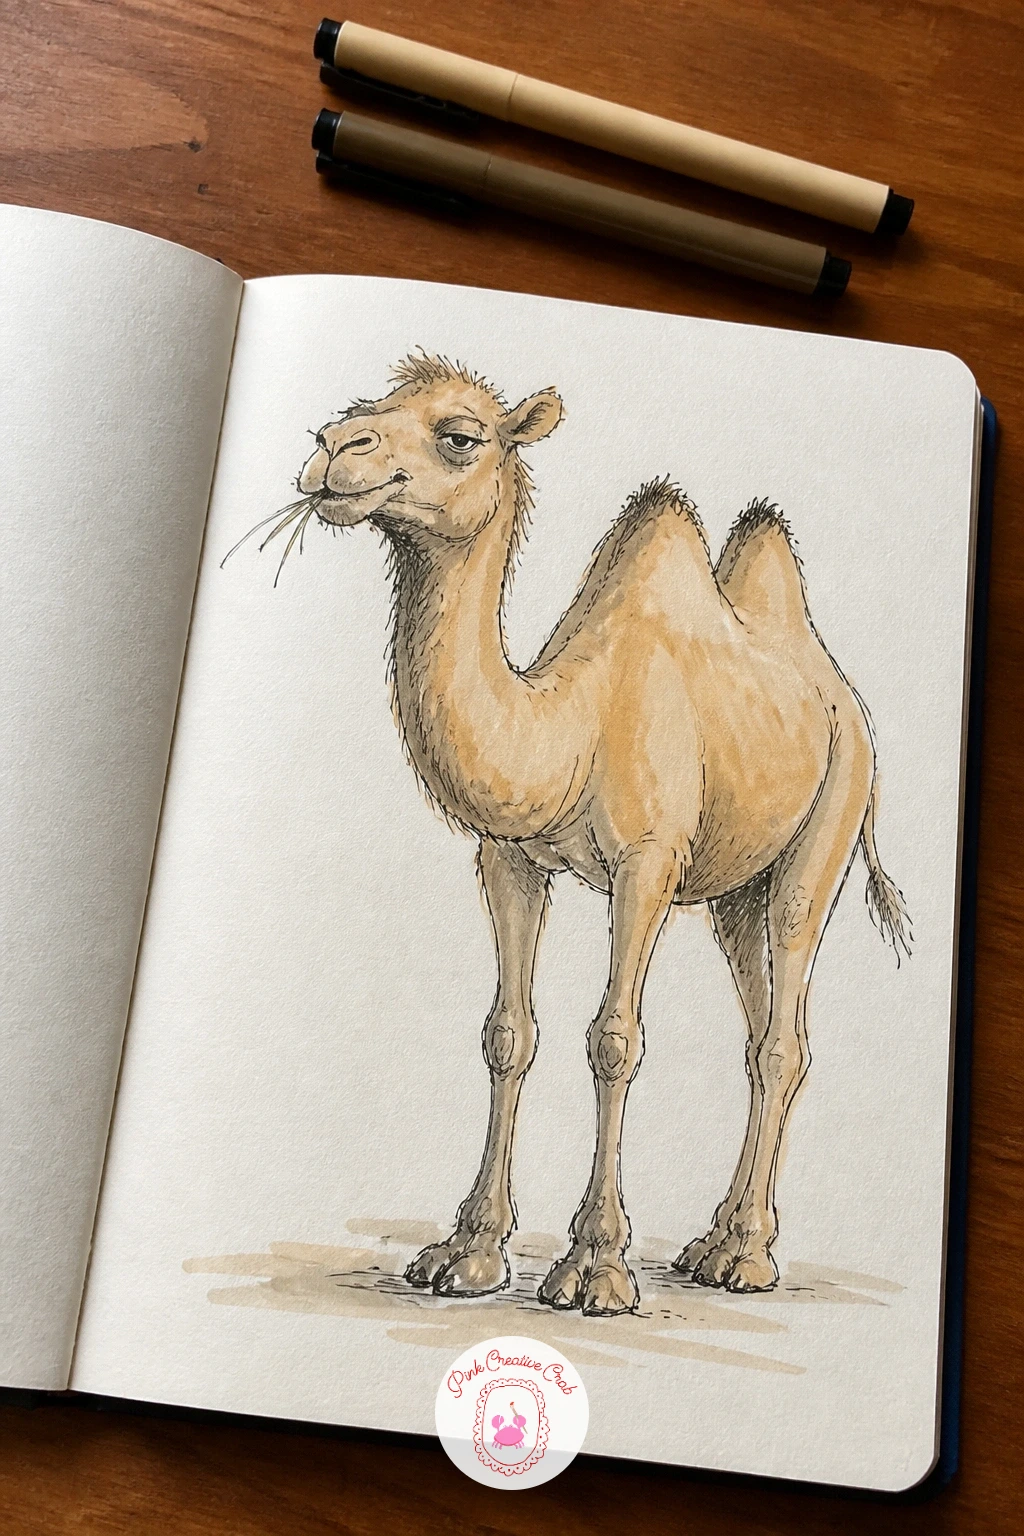
Give the camel a slow sideways chew and a deliberately smug expression, most of which comes from the eyes and mouth rather than the whole body. Draw the humped back first as two gentle curves, then the long neck and head held slightly tilted, half lidded eyes doing most of the work for that smug look.
Ink the jaw mid chew, slightly off to one side rather than centered, camels chew with an exaggerated sideways motion that reads instantly as comic once you exaggerate it a little further. Keep the legs long and a bit knock kneed, camels are built lanky rather than sturdy.
If the expression reads as sleepy rather than smug, raise the upper eyelid very slightly and add a faint curve at the corner of the mouth, tiny changes shift the whole mood of a simple line face. Warm sandy washes over the body with darker shading in the humps gives it enough form without much extra work.
A soft brown marker blended quickly before it dries gives a similar warm sandy tone if watercolor feels like too much setup right now.
Palette: Raw Sienna,Burnt Umber,Raw Umber
Draw a snow leopard curled on a rock with its thick tail wrapped right around its own body, a pose built almost entirely from one long continuous curve. Sketch that curve first, body and tail as a single flowing line, then build the head and legs tucked in afterward so nothing fights the overall roundness of the pose.
Ink the rosette spots in loose open rings rather than solid blobs, snow leopard markings are mostly open circles with just a darker edge, which is quite different from a leopard’s filled spots. Keep the fur pale, almost white in places, with the spots doing most of the contrast work against the cream paper.
If the spots end up too uniform and patterned, vary their size noticeably from the shoulder to the tail tip, irregular sizing is what keeps real fur markings from looking stamped on. A pale grey wash over the whole body first, left to dry before the spots go in, keeps the coat looking soft rather than stark white.
Leave the tail especially thick and fluffy compared to the body, that oversized tail is one of the most distinctive things about this animal.
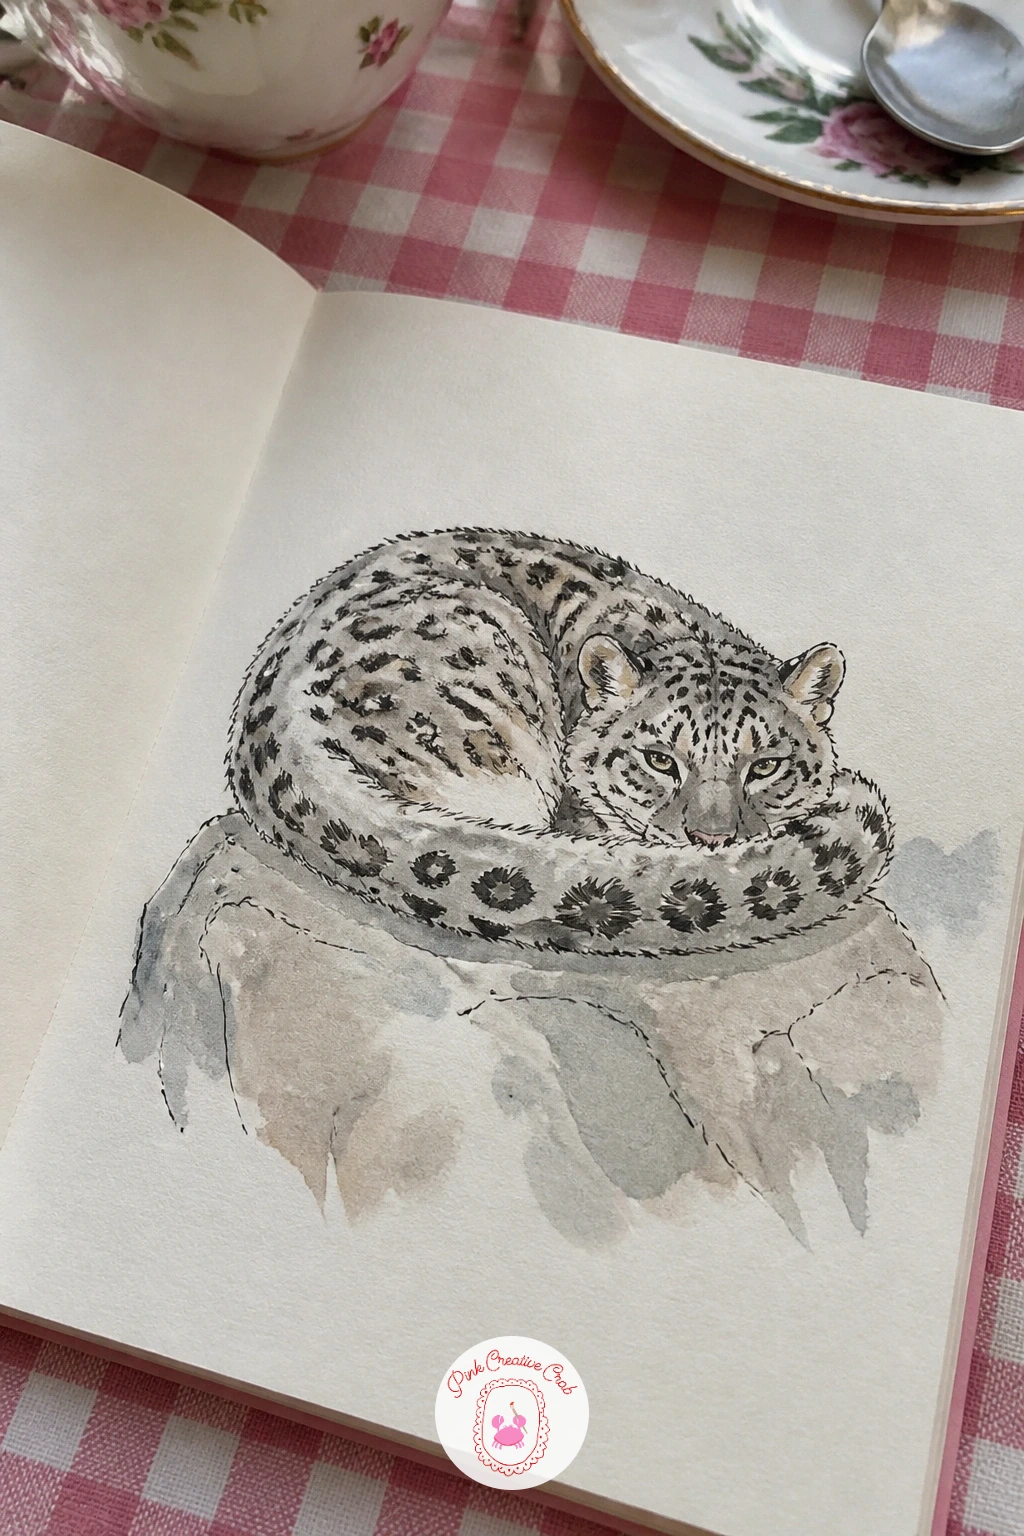
Palette: Titanium White,Payne’s Grey,Ivory Black
Step inside for a shelf of plush animals lined up in the gift shop, a nice change of pace that is really just an exercise in repeating a simple shape with small variations. Draw three or four rounded plush bodies sitting side by side at slightly different heights, each one a basic rounded shape with two small ears and simple stitched features rather than detailed fur.
Ink each plush outline with a slightly wobbly, soft edged line rather than anything crisp, stuffed toys always look a little lumpy and that looseness is exactly right here. Vary the colors across the row, a yellow lion, a grey elephant, an orange tiger, so the shelf reads as a cheerful mix rather than one repeated shape.
If the row starts to look too uniform, stagger the heights and tilt a couple of the plushes slightly to one side, as if they have been picked up and put back by other visitors. A simple shelf line beneath them is all the setting this needs.
Quick version in ten minutes is just the row of plush shapes, the forty minute version adds price tags and a bit of shelf clutter behind them for a fuller little scene.
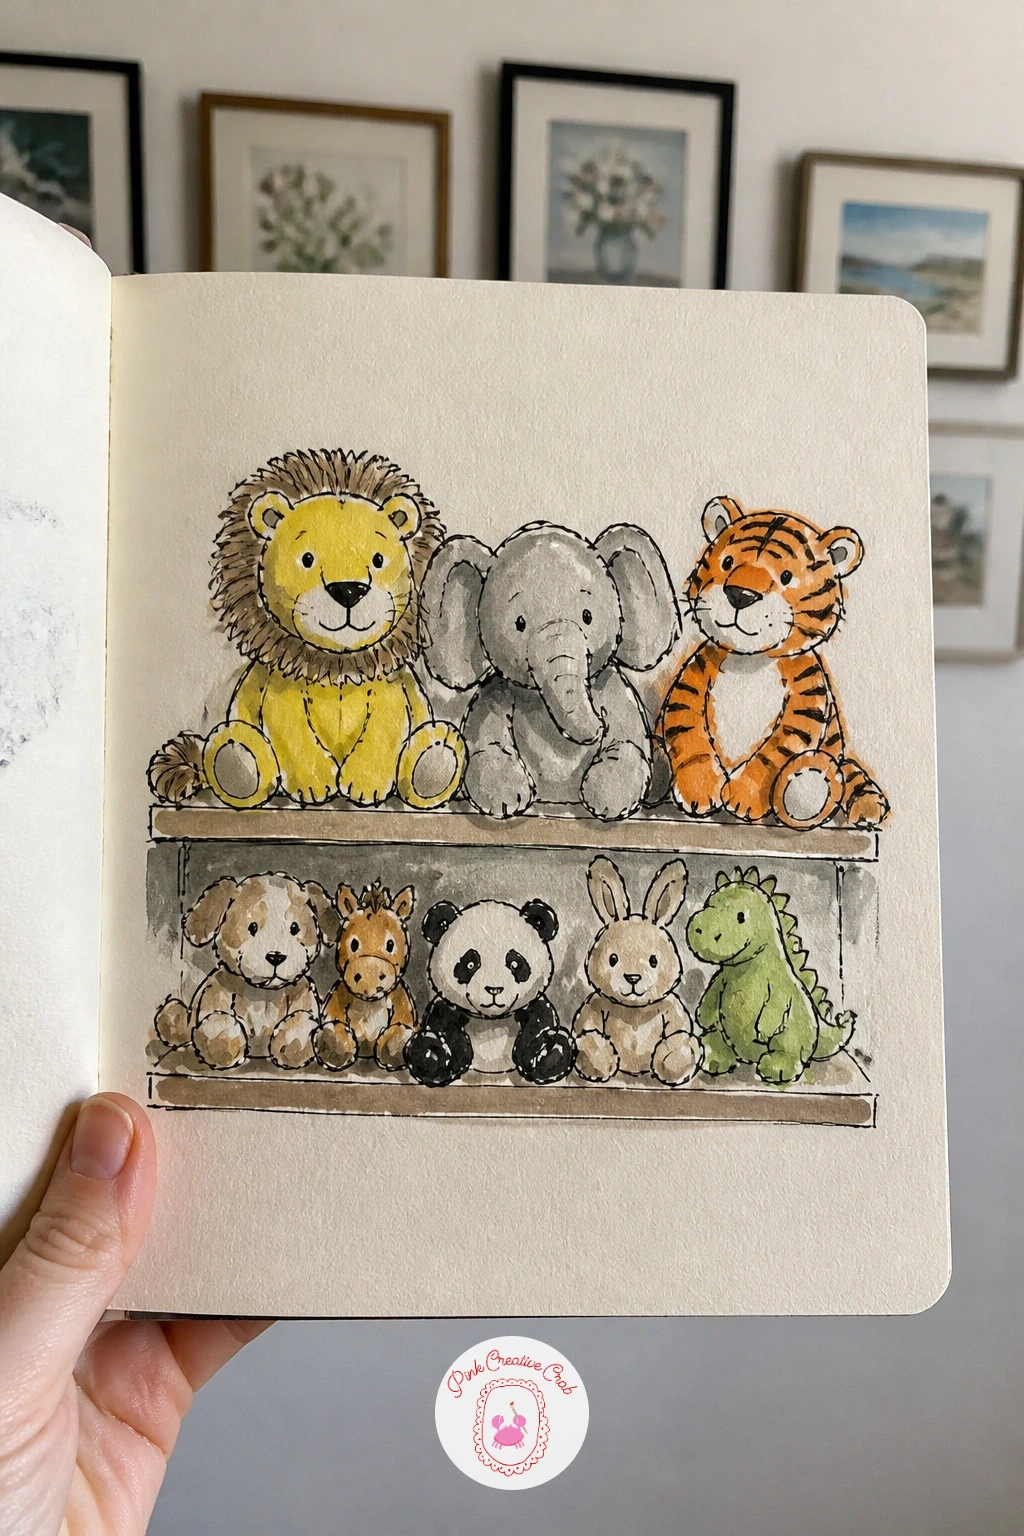
Palette: Lemon Yellow,Cadmium Orange,Payne’s Grey
Take a break yourself and draw someone else’s ice cream moment near the monkey house, cone in hand and a monkey visible through the glass behind them. Sketch the figure first, simple and loose, hand raised with the cone at an angle, then place the monkey enclosure as a soft blurred shape behind, kept simple so it does not compete with the figure in front.
Ink the cone and melting scoop with a slightly uneven wobbly edge, ice cream never looks right with a perfectly smooth outline. Drip a small line or two down the side of the cone before it sets, a tiny detail that instantly reads as a hot day.
If the background monkeys pull too much focus, soften them further with a lighter wash or even leave them as rough pencil shapes rather than inking them fully, the ice cream and figure should stay the sharpest thing on the page. A warm pink or brown wash for the scoop depending on flavor finishes it quickly.
Swap the monkey house for whatever enclosure is actually behind the bench you are sitting on, the pairing works with any animal visible through glass or mesh.
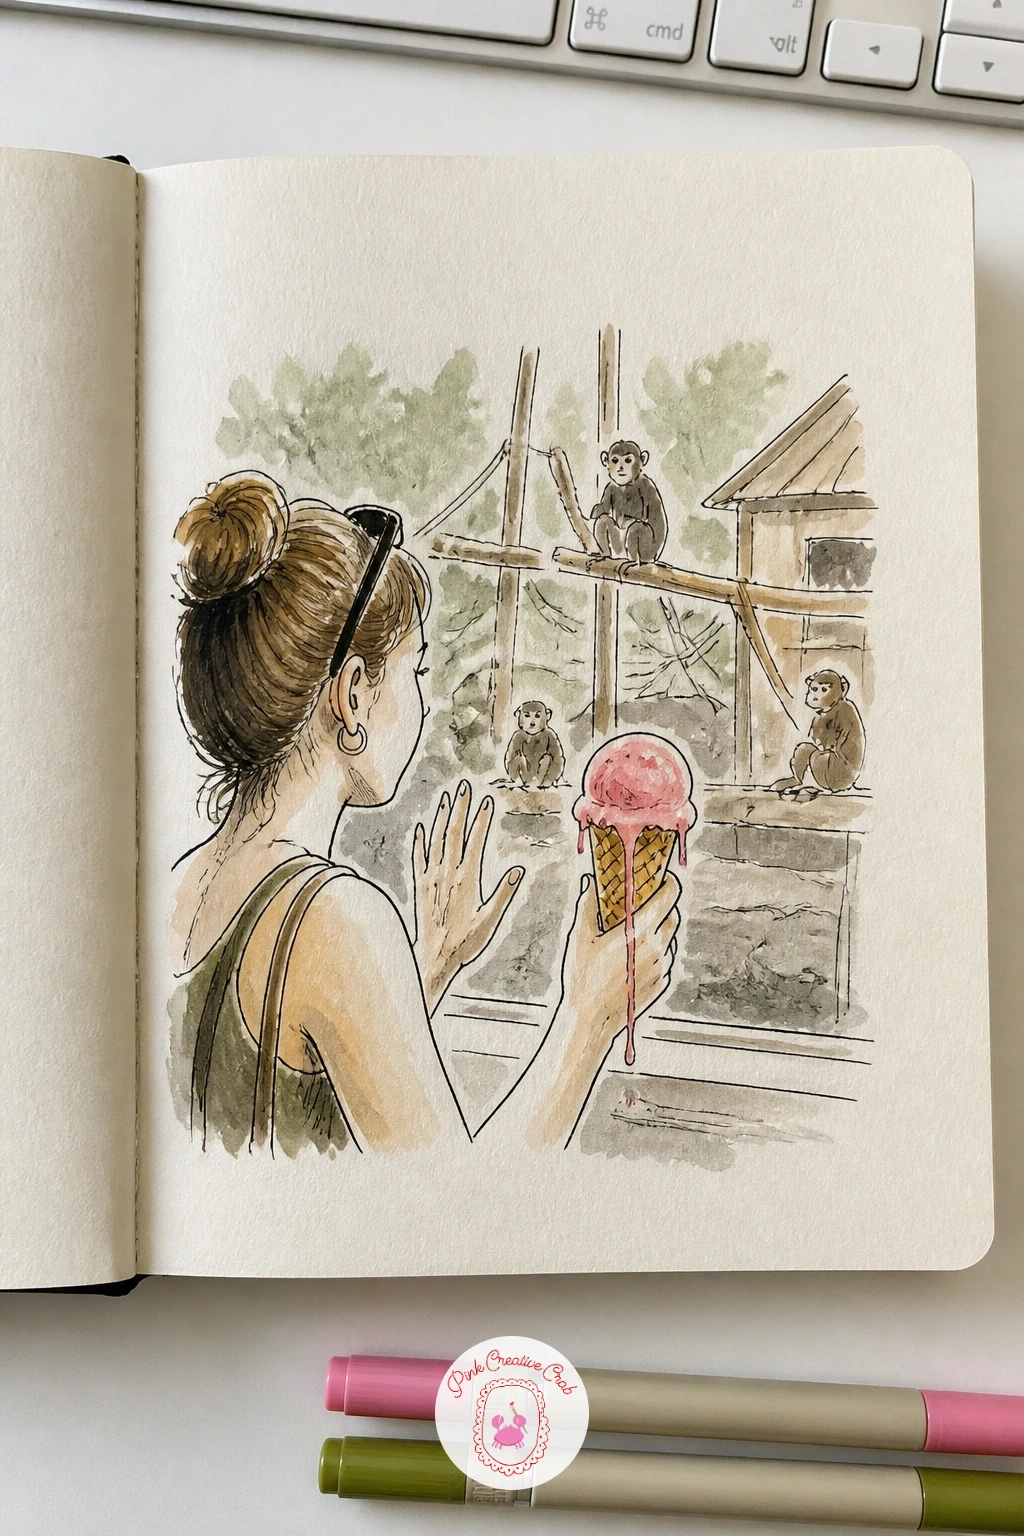
Palette: Quinacridone Pink,Raw Umber,Payne’s Grey
Draw a zookeeper crouched low, bottle tipped up for a baby goat drinking eagerly, a pose built around that strong diagonal line between the two figures. Sketch the keeper’s crouching body first, weight low and balanced, then angle the bottle down toward the goat’s raised head so the whole composition reads along one clear line.
Keep the goat small and gangly, legs slightly too long for its body the way all young animals tend to be drawn, with ears flopped forward rather than upright. Ink the keeper’s uniform in simple flat shapes, solid color blocks rather than folds and creases, so the goat stays the more detailed and interesting part of the pair.
If the bottle feeding moment looks static, tilt the goat’s head and front legs slightly forward, eager feeding always involves a bit of forward lean and a raised front hoof. A warm straw colored wash for the ground beneath them keeps the setting readable without extra drawing.
For more gentle animal and small figure pairings in this spirit, the cute sketchbook ideas page is worth a look.
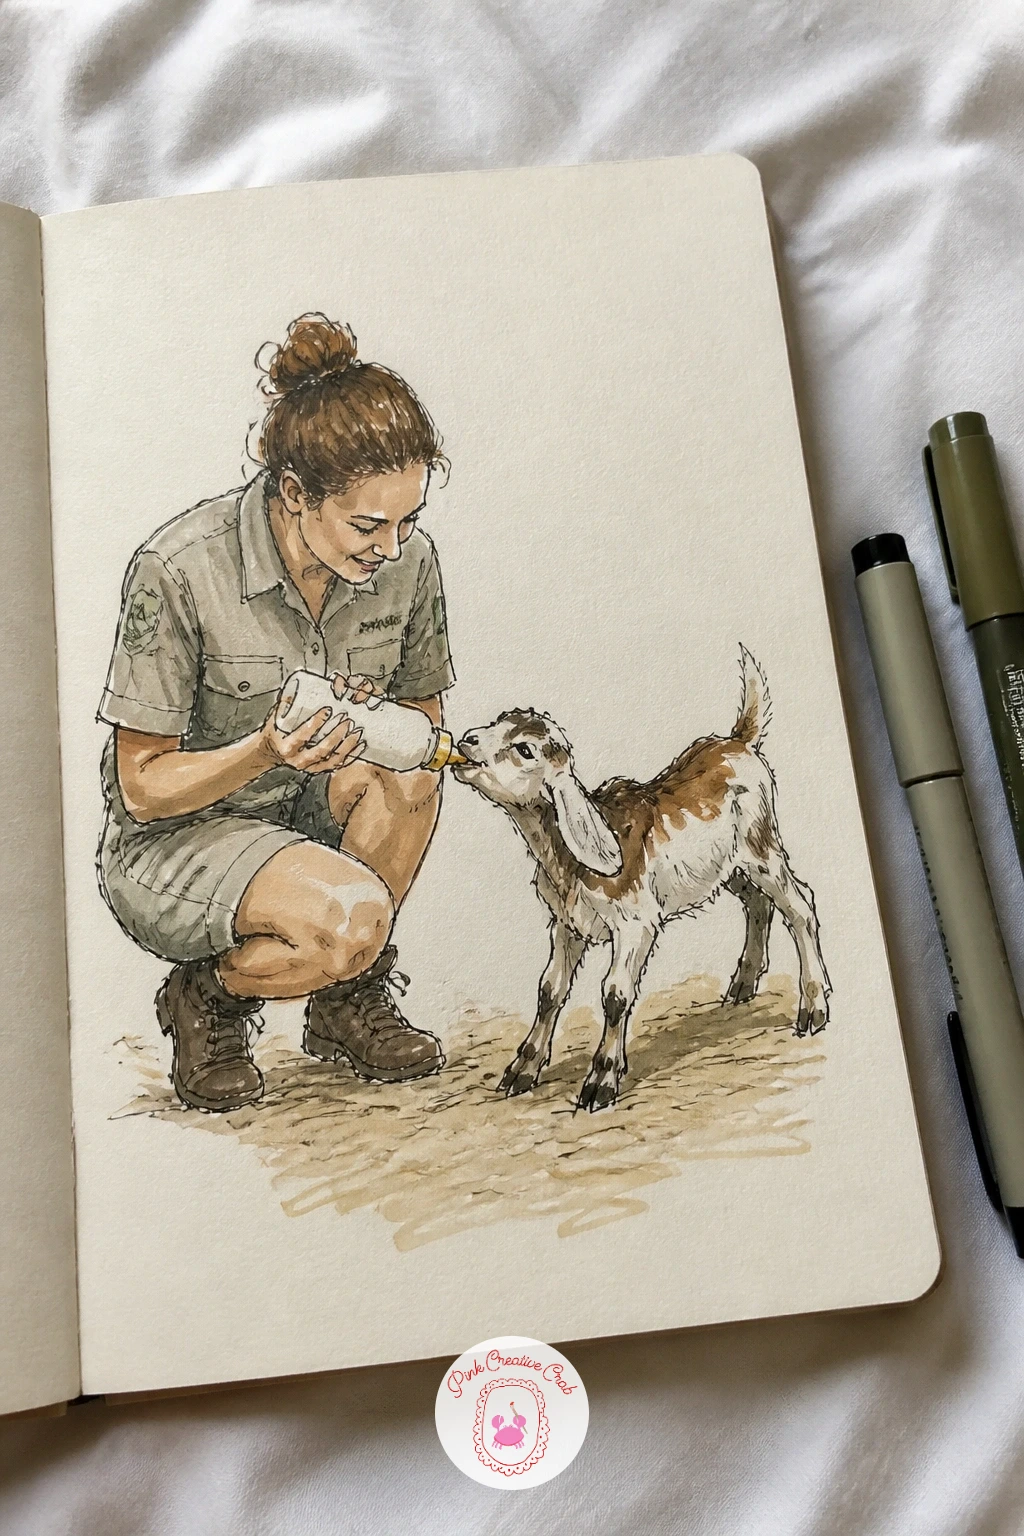
Palette: Straw Yellow,Payne’s Grey,Titanium White
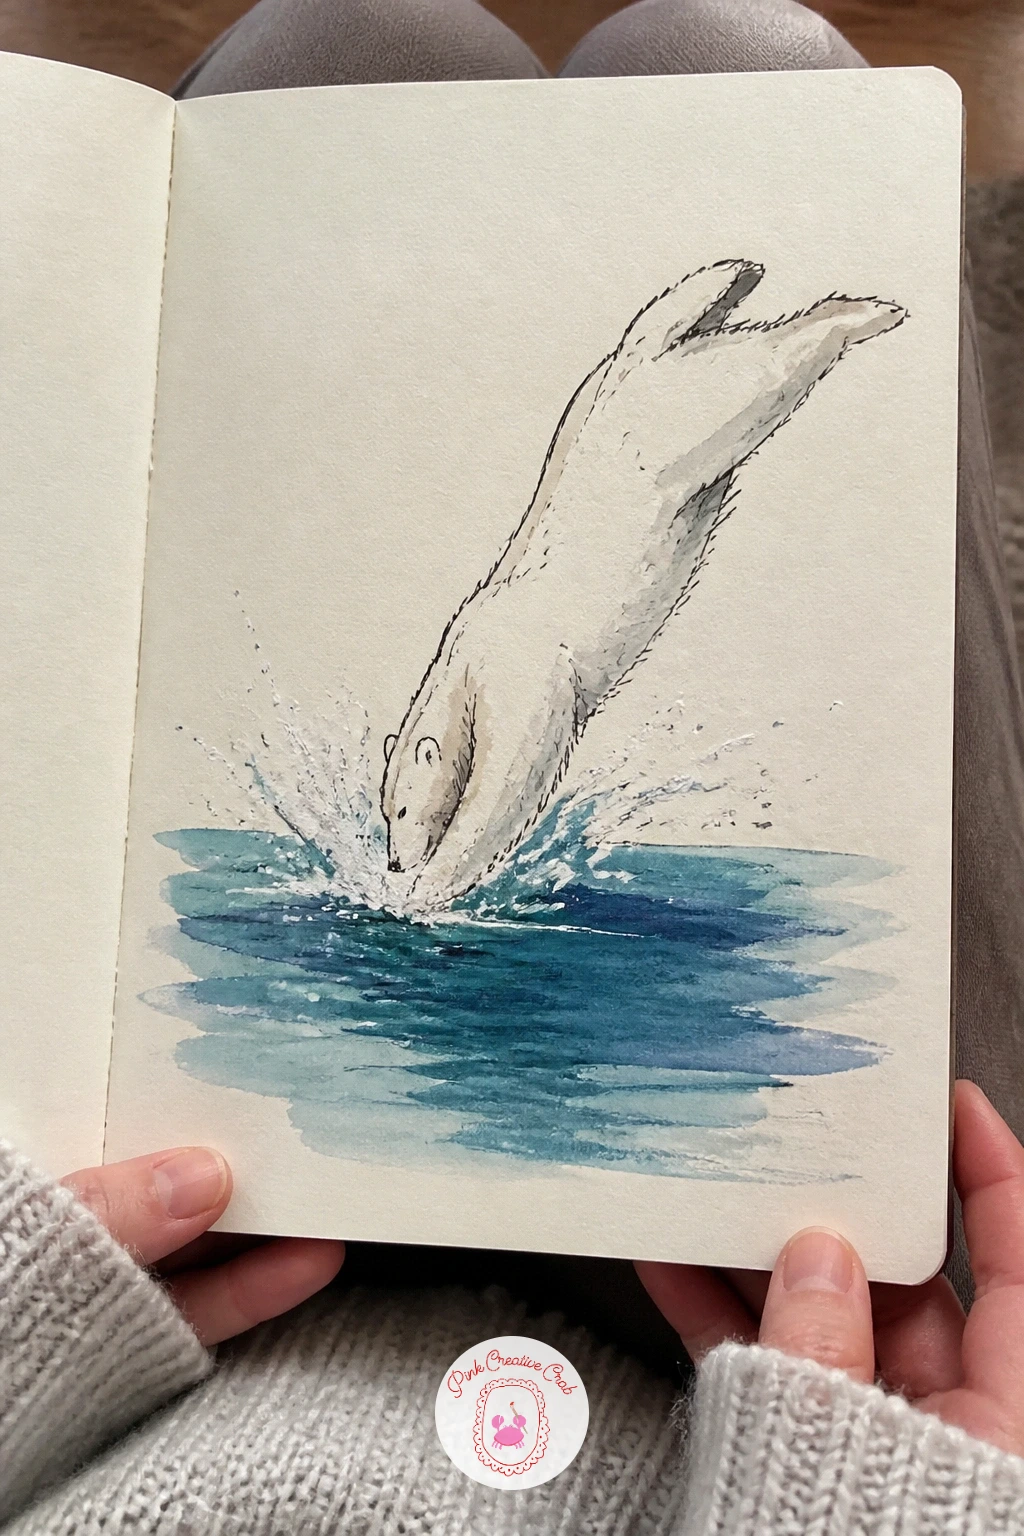
Catch a polar bear mid dive into blue water, a dynamic pose that depends on getting the splash and the body angle working together. Sketch the body first in a stretched diagonal, front paws leading and back legs trailing, as though it has just left the rock above and not yet hit the surface fully.
Ink the outline keeping the silhouette lean rather than round, a swimming polar bear stretches out far more than its usual hunched walking shape. For the splash, flick a loaded brush against your thumb over the entry point, or dip a toothbrush in white gouache and flick it across the blue wash once it has dried, scattering bright droplets that sit crisp on top of the color.
If the dive looks flat rather than plunging, add a few curved motion lines trailing behind the back legs and a ring of lighter splash color right where the body meets the water. A deep blue wash graduating darker toward the bottom of the page sells the depth of the water instantly.
White gel pen flicked across a dried blue wash gives the same bright splash effect as gouache if that is what you have in your kit today.
You Will Need
- white gel pen or white gouache for splash
Palette: Cerulean Blue,Prussian Blue,Titanium White
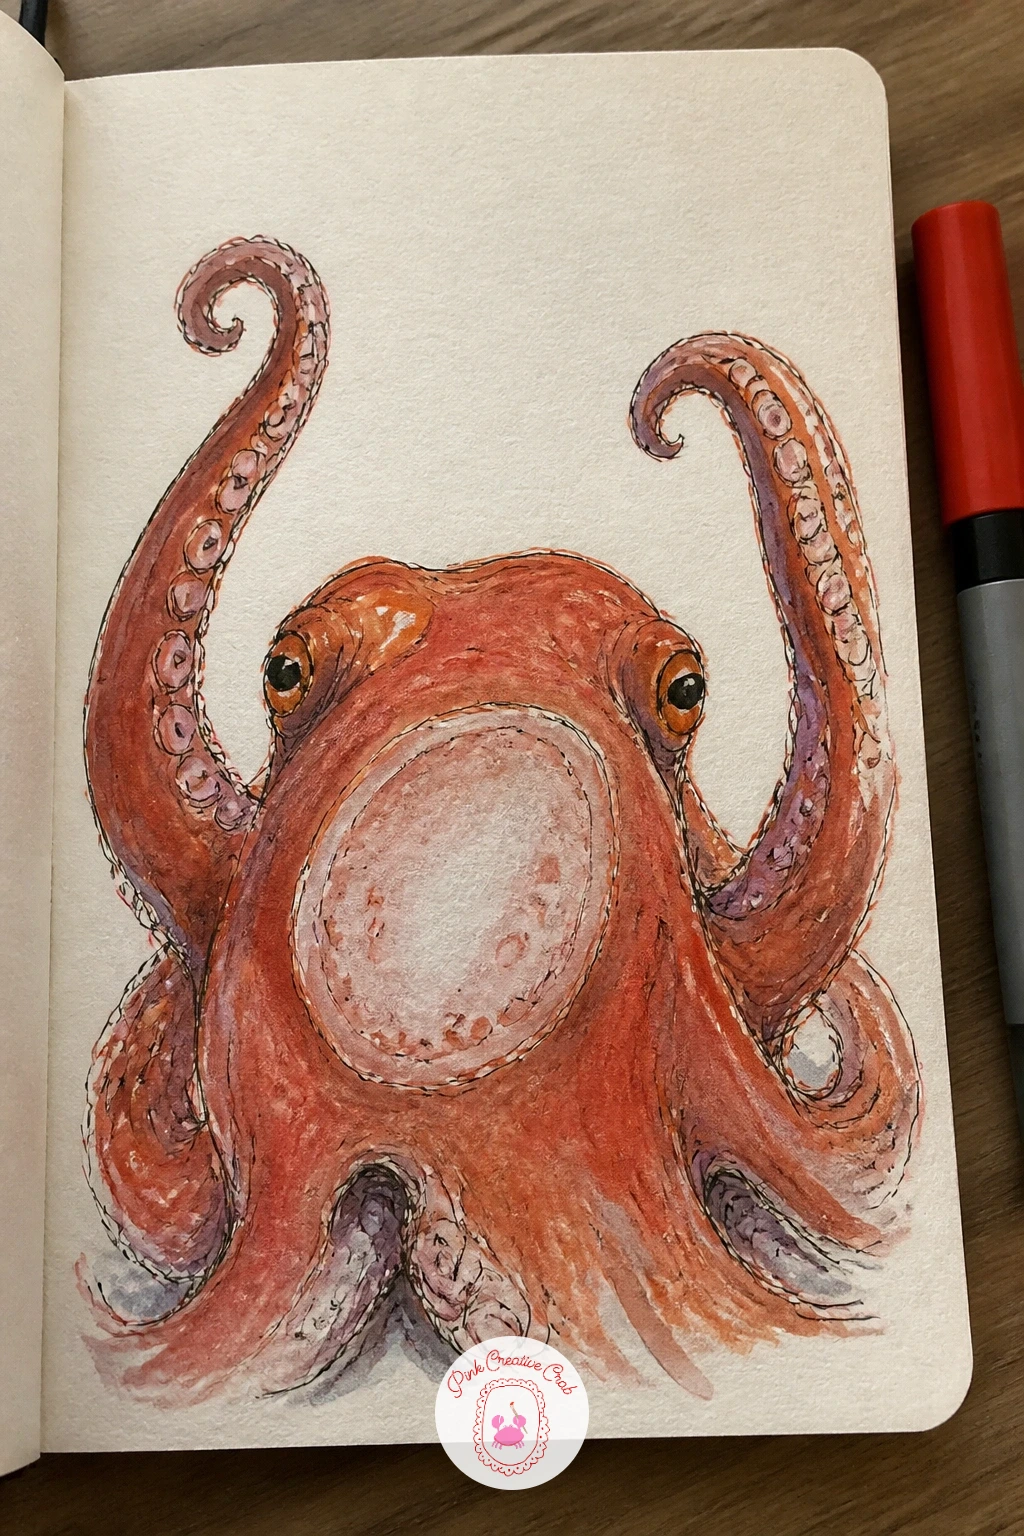
Draw an octopus pressed against the tank glass with a couple of arms raised as though waving, a subject almost entirely about curling lines. Sketch the bulbous head first, then let each arm curl out from it in a different direction, no two arms the same shape or length, which is exactly how an octopus actually looks.
Ink the suckers as small ovals running down the underside of just one or two visible arms rather than every single one, suggesting the pattern reads as clearly as drawing it in full and saves a lot of fiddly repetition. Keep the body soft and rounded with no hard edges anywhere, this is a boneless animal and every line should curve.
Watercolor in a deep reddish orange with the arms slightly paler where they press flat against the glass, that flattened pale patch is a nice detail that sells the glass contact. If the arms start looking like tentacles tangled into confusion, leave more white space between them so each curl stays readable on its own.
Try a fully curled up resting pose next time rather than the waving one, a good variation once this spread out version feels comfortable.
Palette: Cadmium Red,Burnt Orange,Titanium White
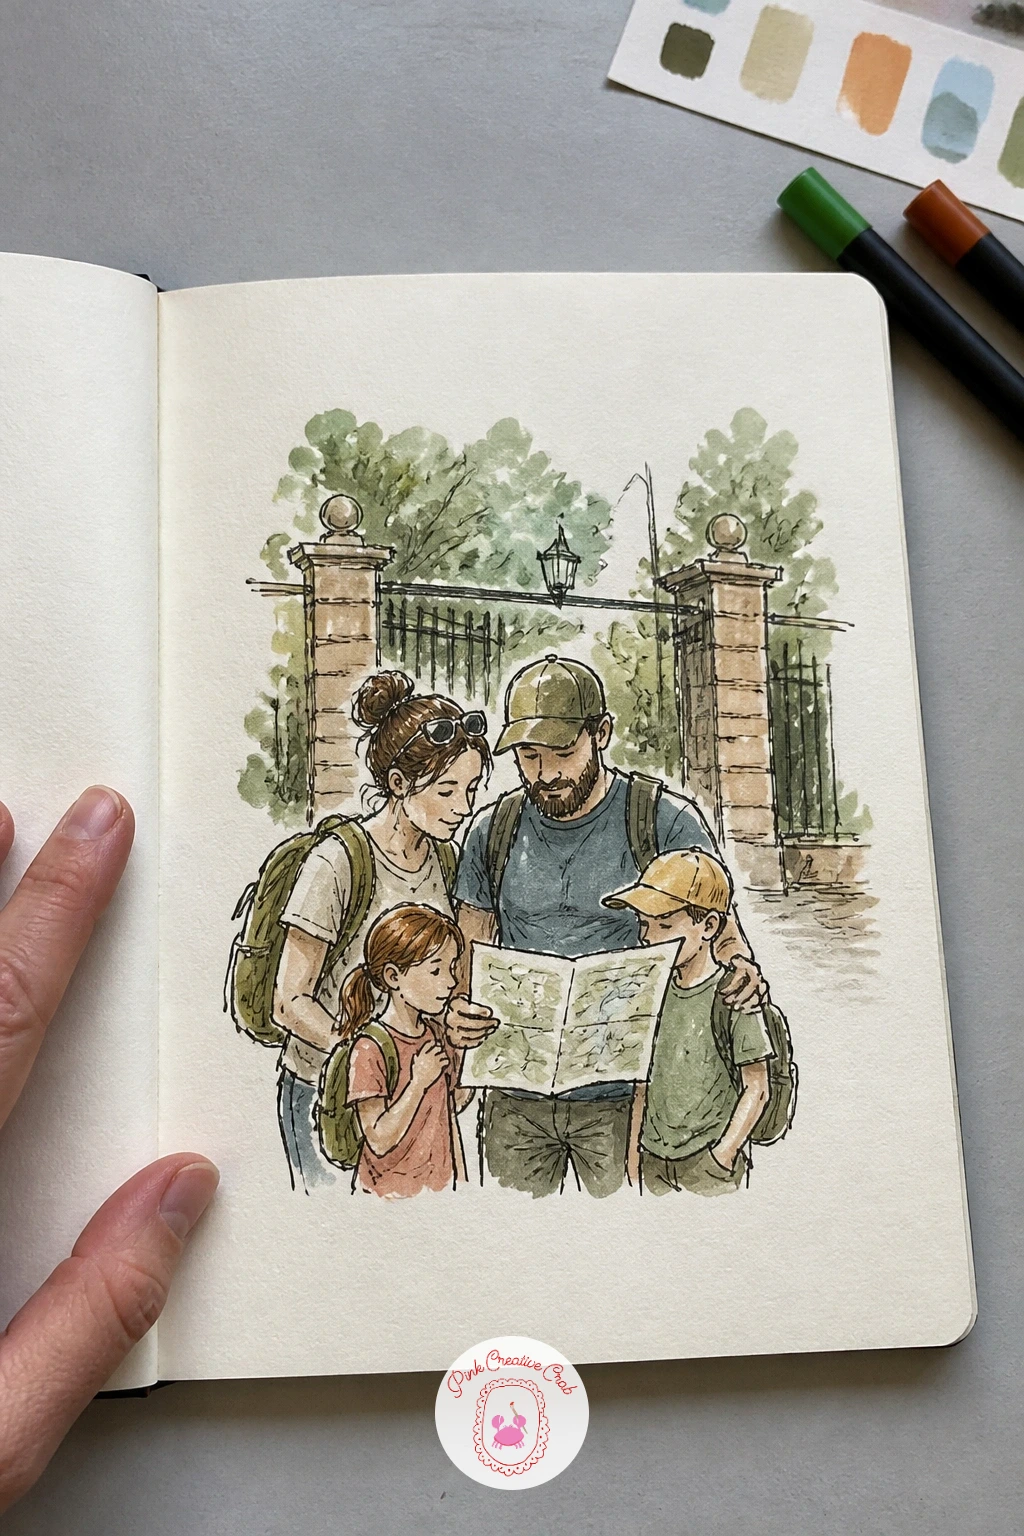
Pause at the entrance for a family gathered around a paper map at the gate, a good chance to practice a small group without drawing any single figure in much detail. Sketch three or four simple standing shapes clustered together, heads all tilted down toward the map held between two of them, which instantly reads as a group deciding where to go.
Keep every figure loose, rounded heads, simple sloped shoulders, no individual faces needed beyond maybe one turned slightly toward the others. Ink the map itself as a simple rectangle with a few wavy lines suggesting paths rather than any readable detail, it only needs to be recognizable as a map, not legible.
If the group starts to feel stiff and lined up, overlap two of the figures slightly and vary their heights, families rarely stand in a perfectly even row. A warm wash for the entrance gate behind them, kept simple and a bit blurred, sets the scene without pulling focus from the little huddle.
This same small group arrangement works for the autumn sketchbook page’s market and orchard scenes too, worth a look if you enjoy sketching people on the move.
Palette: Raw Sienna,Payne’s Grey,Straw Yellow
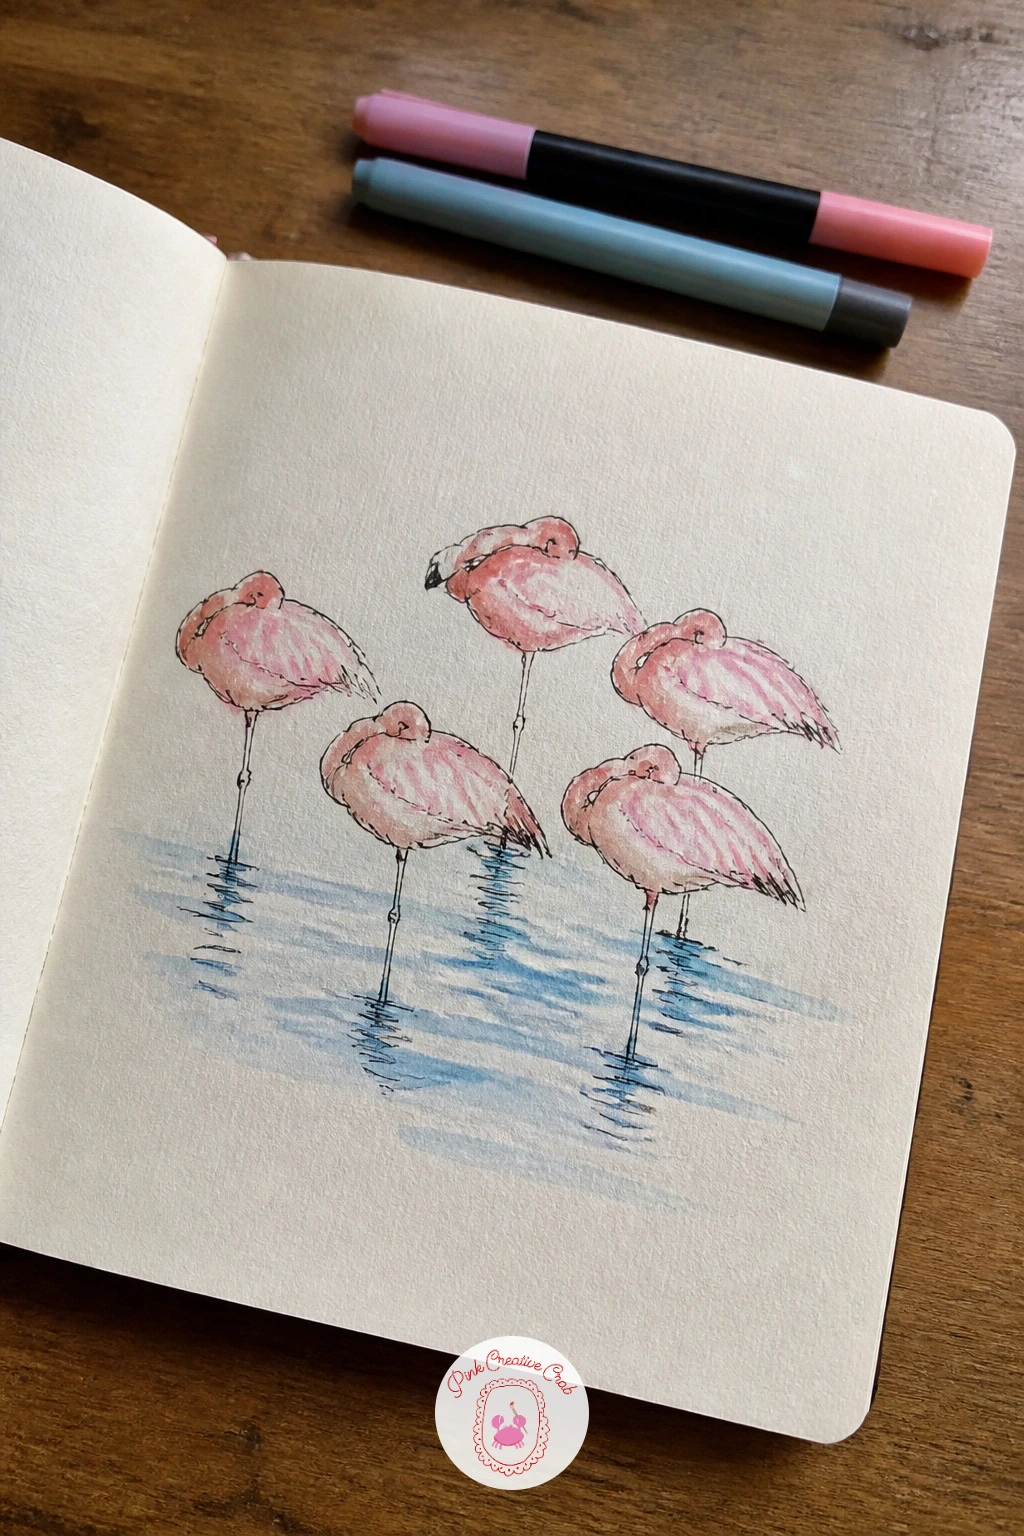
Draw a cluster of flamingos sleeping on one leg, a pose that leans heavily on getting that single supporting leg balanced correctly under the body’s weight. Sketch the body first as a soft rounded oval, then the long neck curled back and tucked into the feathers rather than extended, since a sleeping flamingo hides its head entirely.
Place the one visible leg directly beneath the center of the body’s weight, not off to one side, or the whole pose will look like it is about to topple. Ink the leg thin and knobbly at the joint, then the body in soft pink, deepening the wash slightly toward the wing tips where the color is naturally more saturated.
If several flamingos together start to look identical, vary the angle of each tucked head and the exact bend of each leg slightly, no two birds should be perfect mirrors of each other. A pale blue wash for still water beneath them, with a soft pink reflection, finishes the group quickly.
One tip for today: leave the tucked head paler than the body, flamingo necks are often a touch lighter than the deep pink of the wings.
Palette: Quinacridone Pink,Cerulean Blue,Payne’s Grey
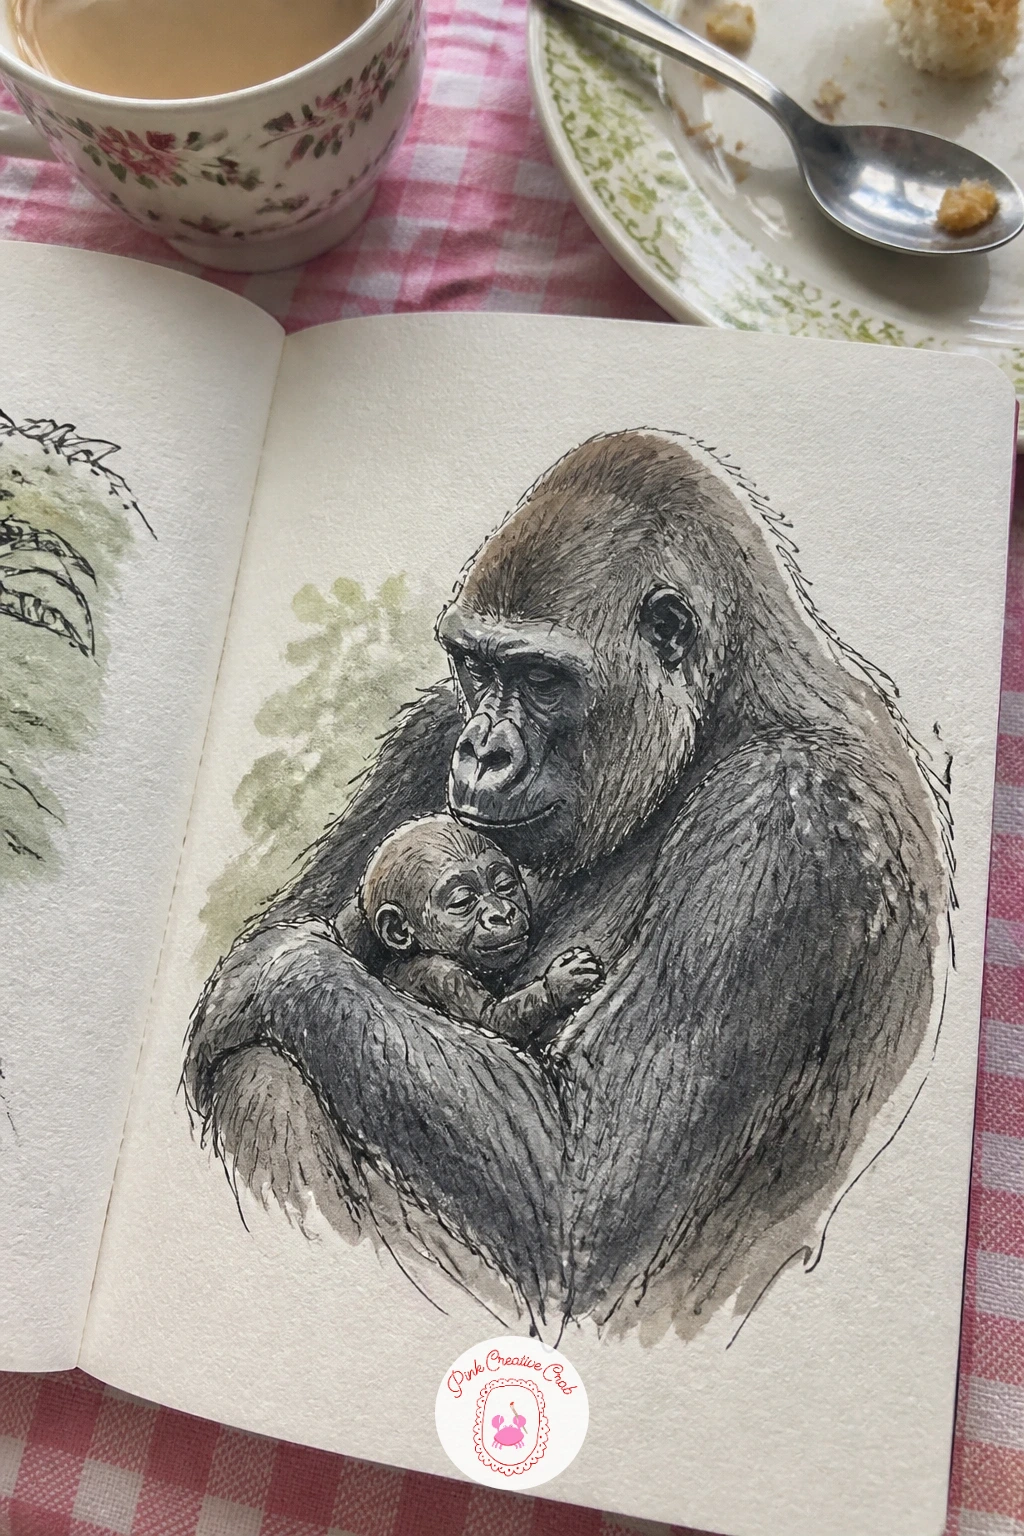
Close with a gorilla mother holding her baby against her chest, a quieter moment worth the extra time if you have it left. Build the mother’s body first as one large solid mass, shoulders broad and rounded, then nestle the much smaller baby’s shape into the curve of her arm, head resting against her chest rather than held away from it.
Ink the mother’s face with heavy brow lines and a calm, slightly lowered gaze down toward the baby, that downward look is what carries most of the tenderness in this pose. Keep the baby simple, round head, tiny limbs, far less detail than the mother so the size contrast stays obvious at a glance.
Work the fur in dark washes with a dry brush dragged in short strokes following the curve of the shoulders and arms, leaving a little cream paper showing through at the highlighted edges facing whatever light source you have chosen. If the baby disappears too much into the mother’s dark fur, lighten the wash slightly just around the baby’s outline so it stays readable.
A soft brown wash instead of full black softens the whole mood nicely if you want something gentler than high contrast ink.
Palette: Ivory Black,Burnt Umber,Raw Sienna
What to Do Next
Pick whichever one of these 29 matches the bench you are sitting on right now, open to a clean page and start with the gesture before any detail. A small travel sketchbook and a fineliner are really all this needs, the color can always wait until you are home with your paints.
Frequently Asked Questions
What is the best pencil for sketching animals at a zoo or aquarium?
A mechanical pencil or a soft 2B graphite pencil works best for quick zoo sketches, since both keep a point without stopping to sharpen. Follow with a fineliner once the gesture is right, then add color later at home or on a bench if the animal has already moved on.
How do you sketch a moving animal before it walks away?
Capture the gesture first with a few fast lines for the body’s main angle, not the details, since most zoo animals shift position within seconds. Add ears, patterns and texture afterward from memory or from a quick reference photo taken on your phone.
Do I need watercolor for these sketchbook ideas or is ink enough?
Ink alone finishes every idea here perfectly well, since the fineliner carries the drawing and the wash is a bonus layer of color. Markers make a quick stand in for watercolor if you want color without carrying a full palette on an outing.
How do I draw animal fur or feathers without it looking flat?
Use short strokes that follow the direction the fur or feathers actually grow, never a flat outline filled in evenly. A dry, barely loaded brush dragged once or twice across the shape adds broken texture fast without extra detailed linework.
What size sketchbook works best for drawing at a zoo or aquarium?
A4 or smaller sketchbooks travel easiest and balance well on a knee or bench, letting one subject fill the page without feeling cramped. Spiral bound pages fold back flat, which helps when you are sketching standing up near an enclosure.
Have any thoughts?
Share your reaction or leave a quick response — we’d love to hear what you think!
-
 0
-
0
-
0
-
0
-
0
-
0


