

Table of Contents
- Before You Start
- Robin On A Snowy Branch
- Blue Tits At A Feeder
- Wren On A Mossy Fence
- Goldfinch On A Thistle
- Cardinal Among Red Berries
- Chickadee On A Pinecone
- Sparrow In A Puddle
- Blue Jay On A Fence Post
- Nuthatch On Tree Bark
- Hummingbird At A Trumpet Flower
- Barn Swallow In Flight
- Mourning Dove On A Wire
- Woodpecker On A Tree Trunk
- Owl In An Oak Hollow
- Starling With Iridescent Feathers
- Robin’s Nest With Blue Eggs
- Kingfisher On A Reed
- Tufted Titmouse On A Branch
- House Finch At A Feeder
- Frequently Asked Questions
I could paint garden birds every day of the week and never get bored of them, which is exactly why this watercolor birds tutorial turned into a whole collection instead of one lonely page. Each bird gets caught in a tiny moment, a robin puffed up on a snowy branch, a wren tucked into mossy fence wood, and every single one walks you from the first pencil marks to the last feather fleck.
Below you will find nineteen worksheets, one bird per sheet, each broken into stages with its paint swatches labeled right beside the picture so you always know what color goes down next. Pick whichever bird is singing to you today and paint along at your own pace.
Using these images: free for personal projects such as printing, coloring, cards, journals and gifts. Handmade items that include them may be sold up to 30 pieces per design. More than that is commercial use and is not permitted, and neither is selling or sharing the images themselves or passing them off as your own. Please ask before any other use.
Before You Start
- Use cold press watercolor paper of at least 140 lb, because soft wet backgrounds will buckle thin paper and ruin your edges.
- Keep your pencil sketch light and loose, just enough to see the bird’s shape, so graphite never muddies your washes later.
- Test every mixed color on a scrap strip first, since garden birds depend on getting warm browns and soft grays just right.
- Wet your background area with clean water before dropping in color, so skies and branches bloom soft while the bird stays crisp.
- Let each layer dry fully before adding feather details on top, and check by touching a corner lightly with a clean finger.
- Keep a small round brush, a size 2 or 4, just for the fine feather lines and the tiny dark eye at the end.
Robin On A Snowy Branch
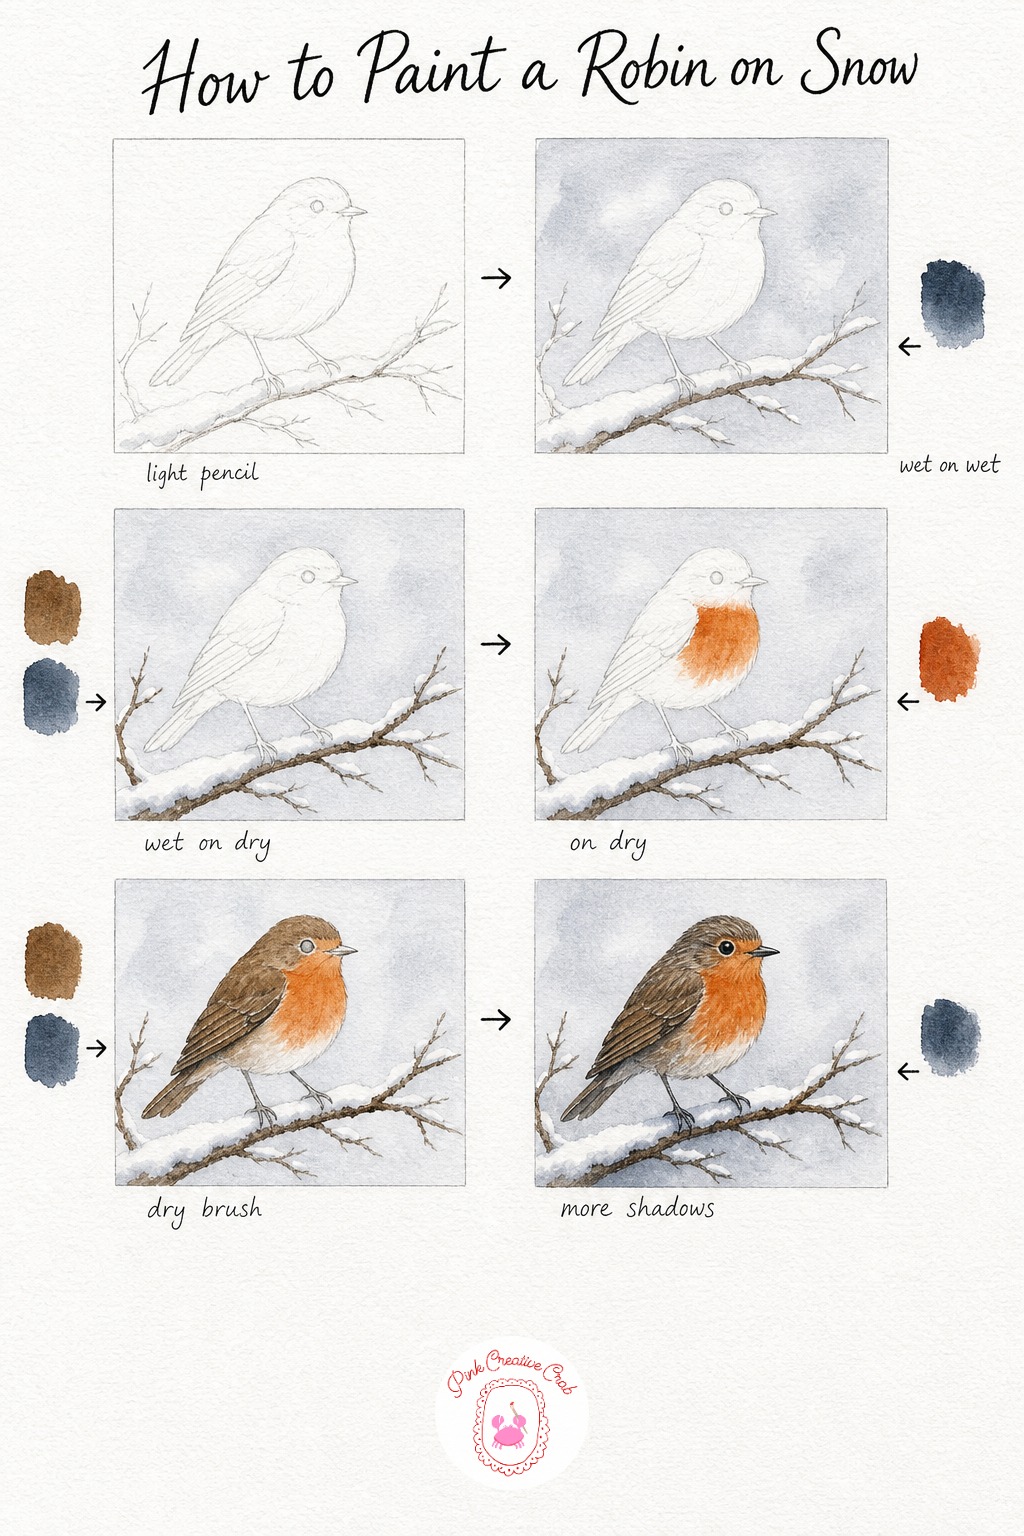
Start with a light pencil robin sitting low on a bare branch, round and puffed up the way they get in the cold. Keep the branch simple, just a diagonal line with a little snow sitting along its top edge.
Wet the sky area first and drop in a pale gray wash, letting it bloom soft at the edges so it reads as winter haze rather than a hard shape. Once that’s dry, paint the branch in soft brown with a cool gray shadow tucked under the snow line, keeping the white paper bare for the snow itself.
Now the fun part: paint the breast in warm burnt sienna while the rest of the bird stays untouched, then once dry, layer deep brown over the wings and tail with a dry brush so the texture shows. Beginners often paint the breast too orange and too flat, so leave tiny white gaps for highlight as you go.
Finish with fine dark feather lines over the wings, a tiny round eye, and a soft gray shadow stretching from the bird onto the branch. My tip: paint that shadow a little bluer than you think, it is what makes snow look cold.
Blue Tits At A Feeder
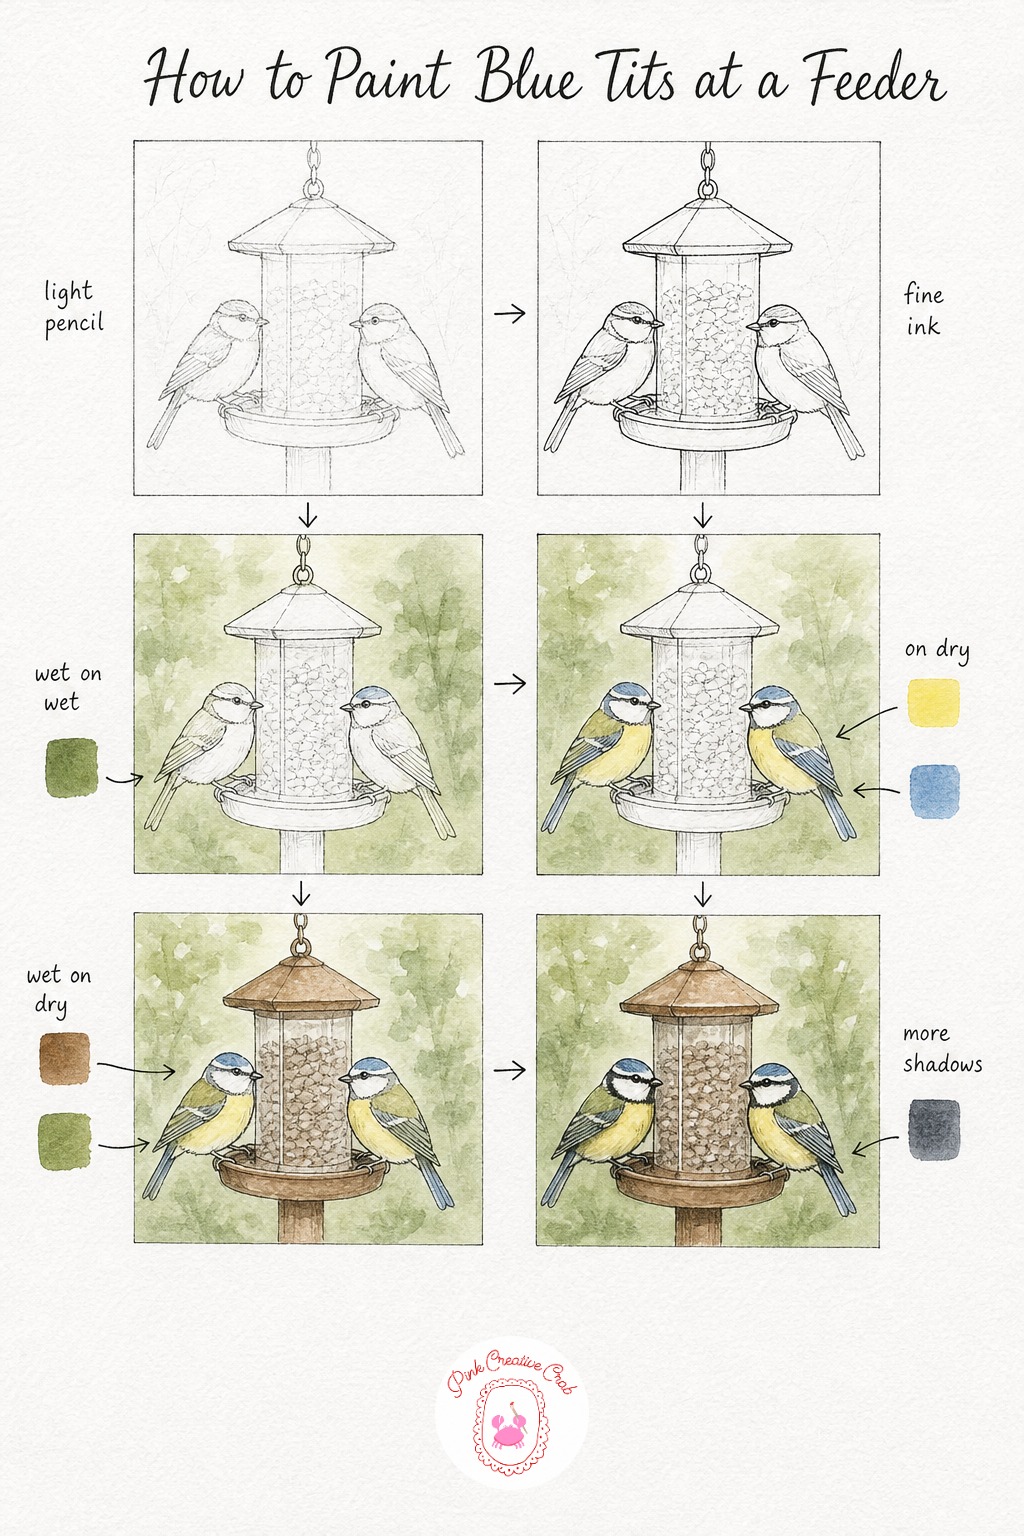
Sketch two small round blue tits side by side on a simple wooden feeder, one leaning down toward the seed. Keep the proportions chunky and round, blue tits are tiny but their heads look big against their bodies.
Go over your pencil lines with a fine ink pen once you are happy with the shapes, then erase the pencil so the ink stays crisp under your washes. Wet the background loosely and float in a pale green wash so the garden behind the birds stays soft and out of focus.
Paint the yellow bellies and pale blue caps next, keeping the white cheeks of the birds bare paper, this is where beginners often overpaint and lose that bright white patch. Let it dry, then add the warm brown feeder and olive green wing patches with a flatter brush for cleaner edges.
Finish with fine black lines through the wings and the little black eye stripe that gives blue tits their expression, plus a soft shadow where each bird’s feet meet the feeder. Tip: keep your blue and yellow separate on the palette, mixing them even slightly turns the birds green instead of bright.
Wren On A Mossy Fence
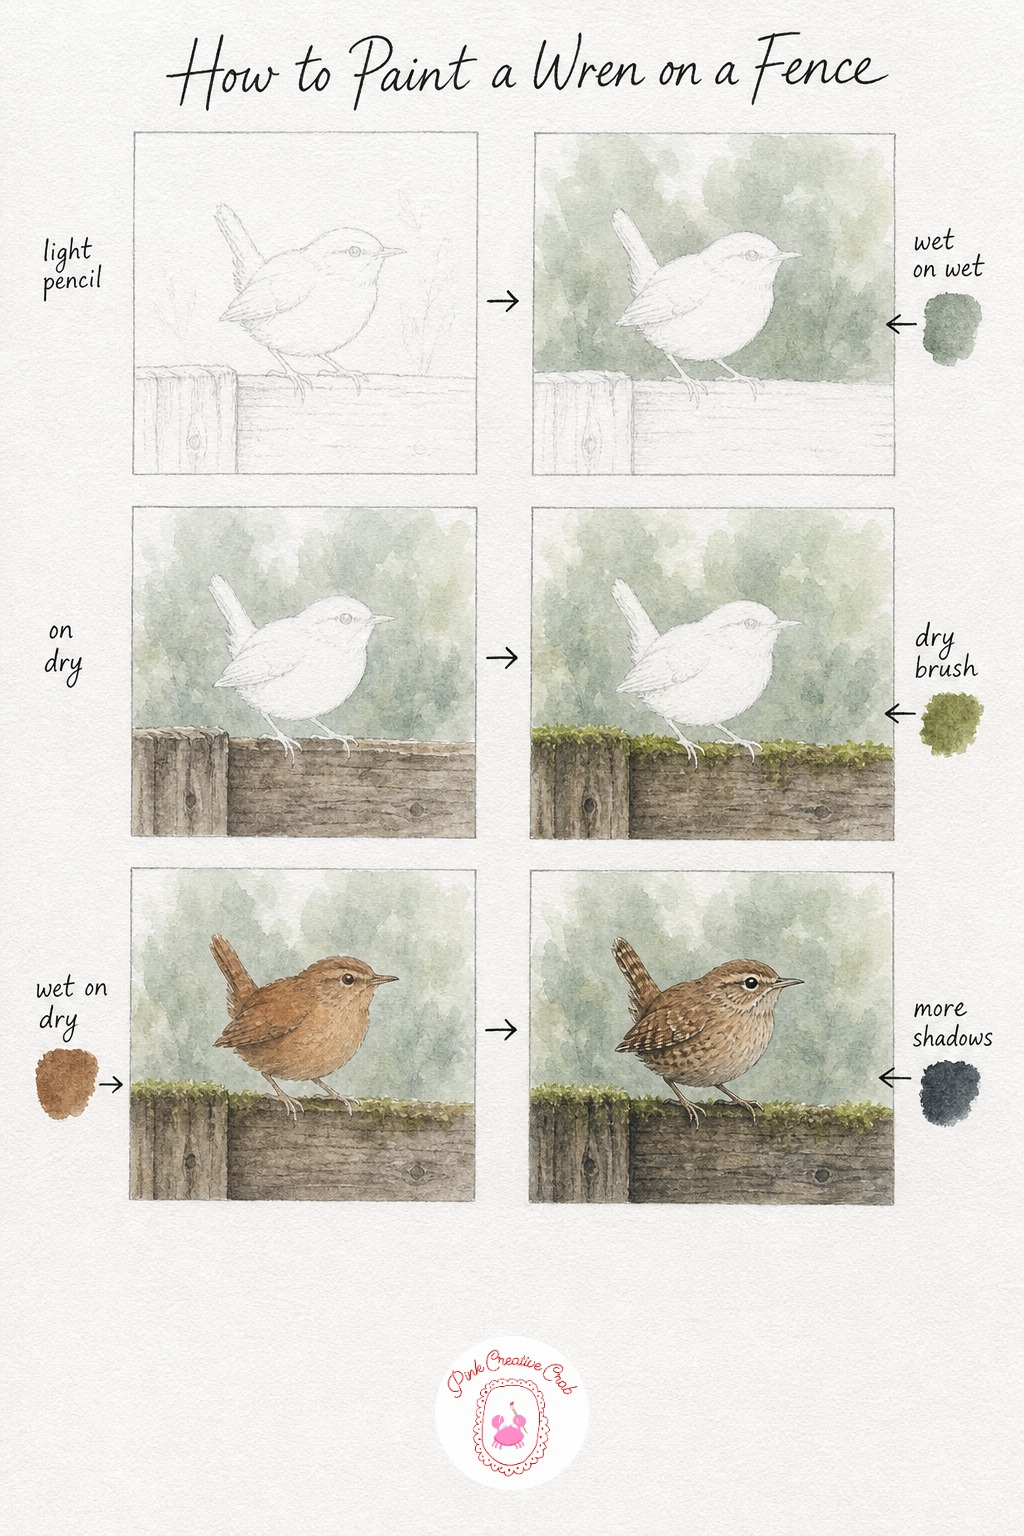
Draw a small round wren with its signature tail cocked straight up, perched on a simple horizontal fence rail. Wrens are tiny and energetic looking, so keep the body compact and the tail the most expressive part of the sketch.
Wet the area behind the fence and drop in a soft green gray for a blurred hedge, letting colors bleed into each other for that out of focus feel. Once dry, paint the fence itself in warm grayish brown, varying the tone slightly along its length so it reads as old weathered wood rather than one flat plank.
Dab soft moss green along the top of the rail with a dry brush, just dotting it on rather than painting a smooth line, this is where real moss texture comes from. Then paint the wren’s whole body in warm brown, letting the tail pick up a touch more burnt umber since wrens often look darker there.
Finish with fine curved lines across the wings and tail to suggest barring, a tiny dark eye, and a soft shadow pooling where the bird’s feet grip the rail. Tip: a dry, barely loaded brush gives you that mottled moss texture far better than a wet one.
Goldfinch On A Thistle
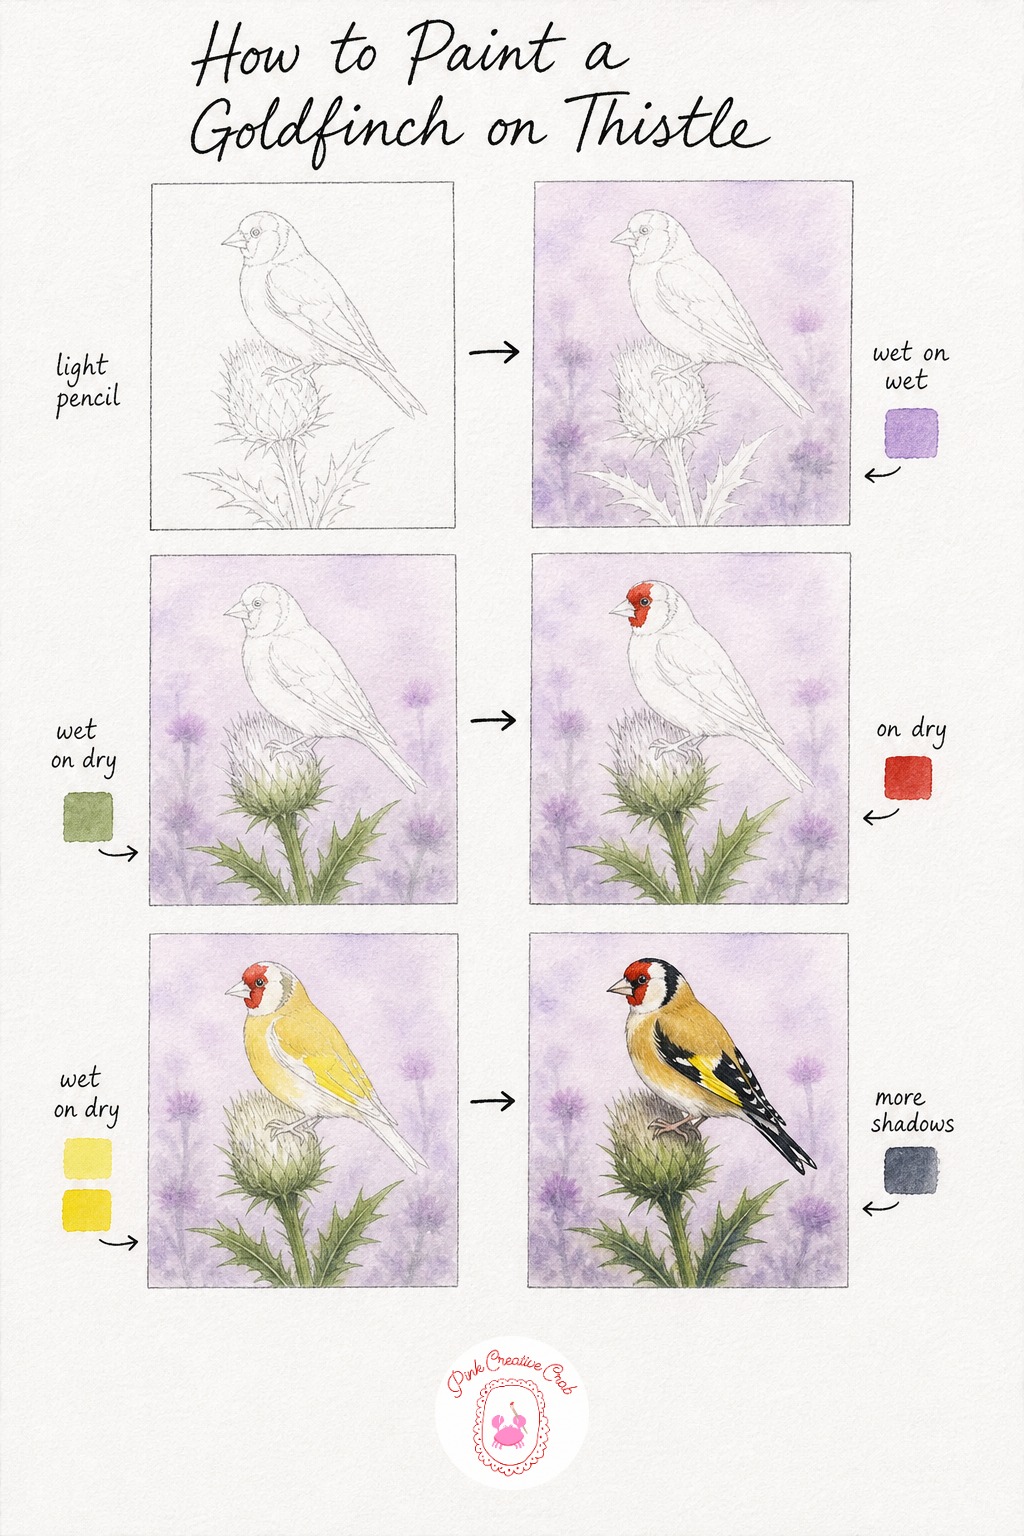
Sketch a goldfinch gripping the spiky seed head of a thistle, its body turned slightly so you can see both the red face patch and the wing. Keep the thistle simple, a tall stem with a few spiky leaf shapes and a fluffy round head.
Wet the background and float in a soft lavender haze, letting it stay loose and dreamy behind the sharper thistle and bird. Once that’s dry, paint the stem and leaves in sap green, keeping the brush fairly dry on the spiky bits so the edges stay pointed rather than soft.
Paint the bright red face patch first on the bird itself, since goldfinches are known for that flash of color, then once dry layer warm yellow over the wings and body. Beginners often make the yellow too pale, so do not be shy, goldfinch yellow is genuinely bold and warm.
Finish with crisp black wing tips, fine feather lines through the yellow, and a soft gray shadow under the bird’s feet on the thistle head. Tip: paint the black wing tips with a smaller brush than you think you need, it keeps the pattern sharp instead of blobby.
Cardinal Among Red Berries
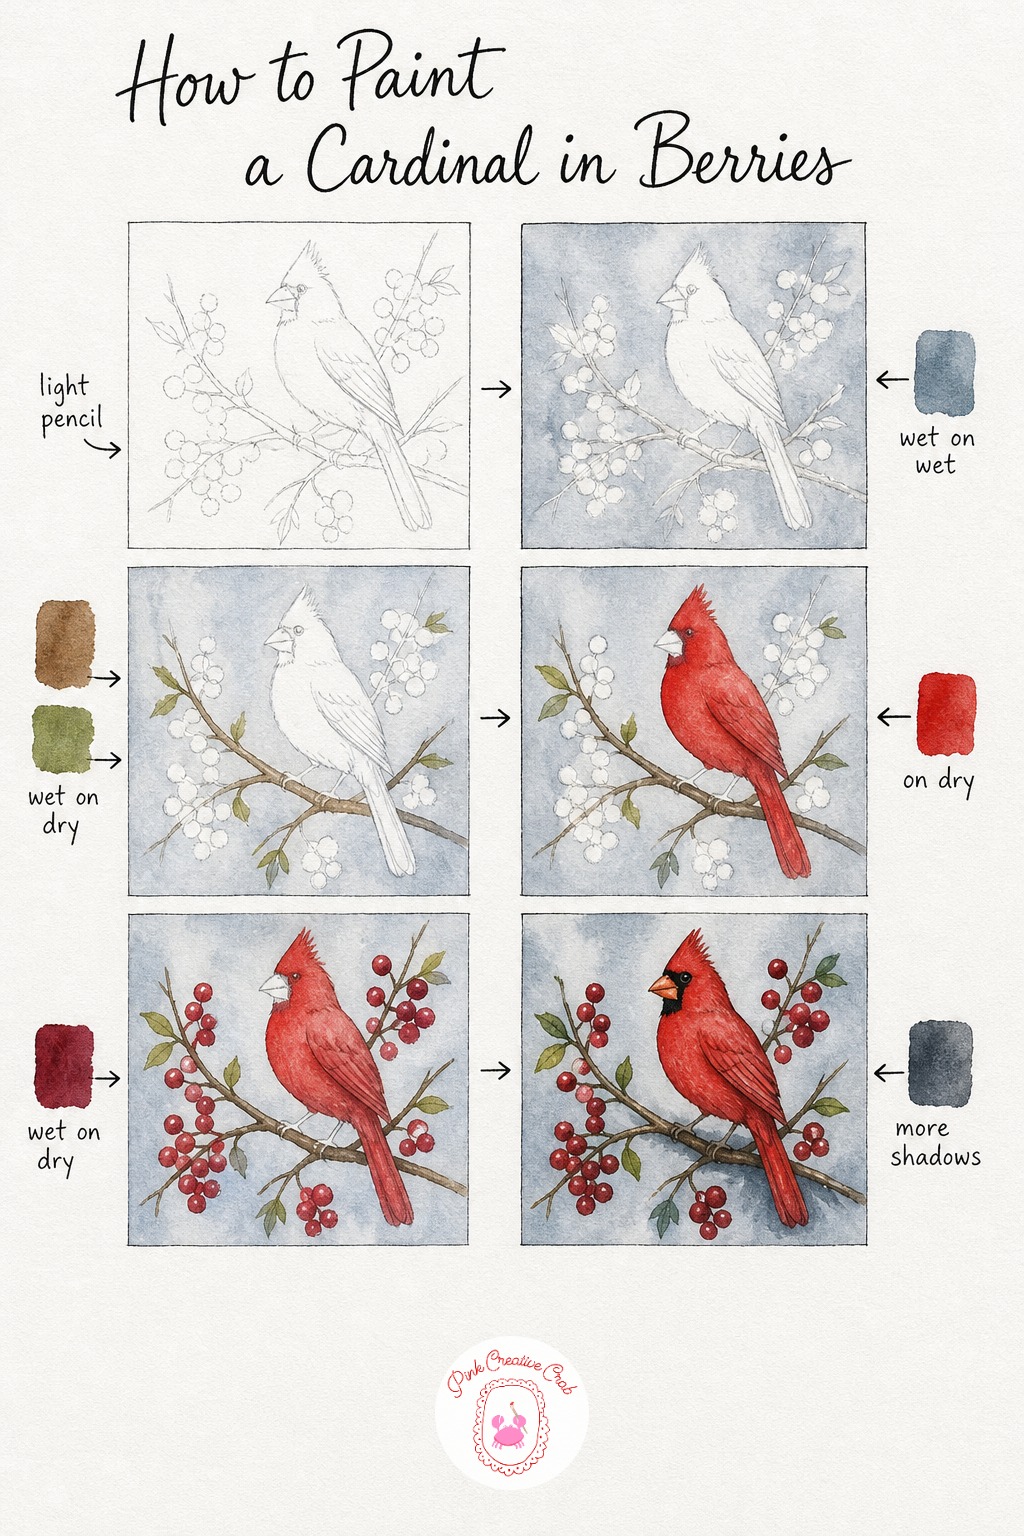
Sketch a cardinal with its tall crest raised, sitting among a small cluster of round berries on a thin branch. Keep the body shape rounded and the crest pointed, that silhouette alone makes a cardinal recognizable before any color goes down.
Wet the background and drop in a pale blue gray wash for a soft winter sky, letting it bloom around the branch without touching the bird shape itself. Once dry, paint the branch in soft brown and add a few dark green leaf shapes tucked among the berries.
Paint the cardinal’s entire body in bright cadmium red next, this is the stage people rush, so take your time keeping the edges clean around the crest and tail. Let that dry completely before painting the berries in a deeper alizarin red so they read as a separate, darker red from the bird.
Finish with the cardinal’s black face mask around the beak and eye, fine dark lines through the wing and tail feathers, and a soft shadow where the bird’s feet grip the branch. Tip: that black mask is what sells the whole bird, so paint it last with a steady small brush.
Chickadee On A Pinecone
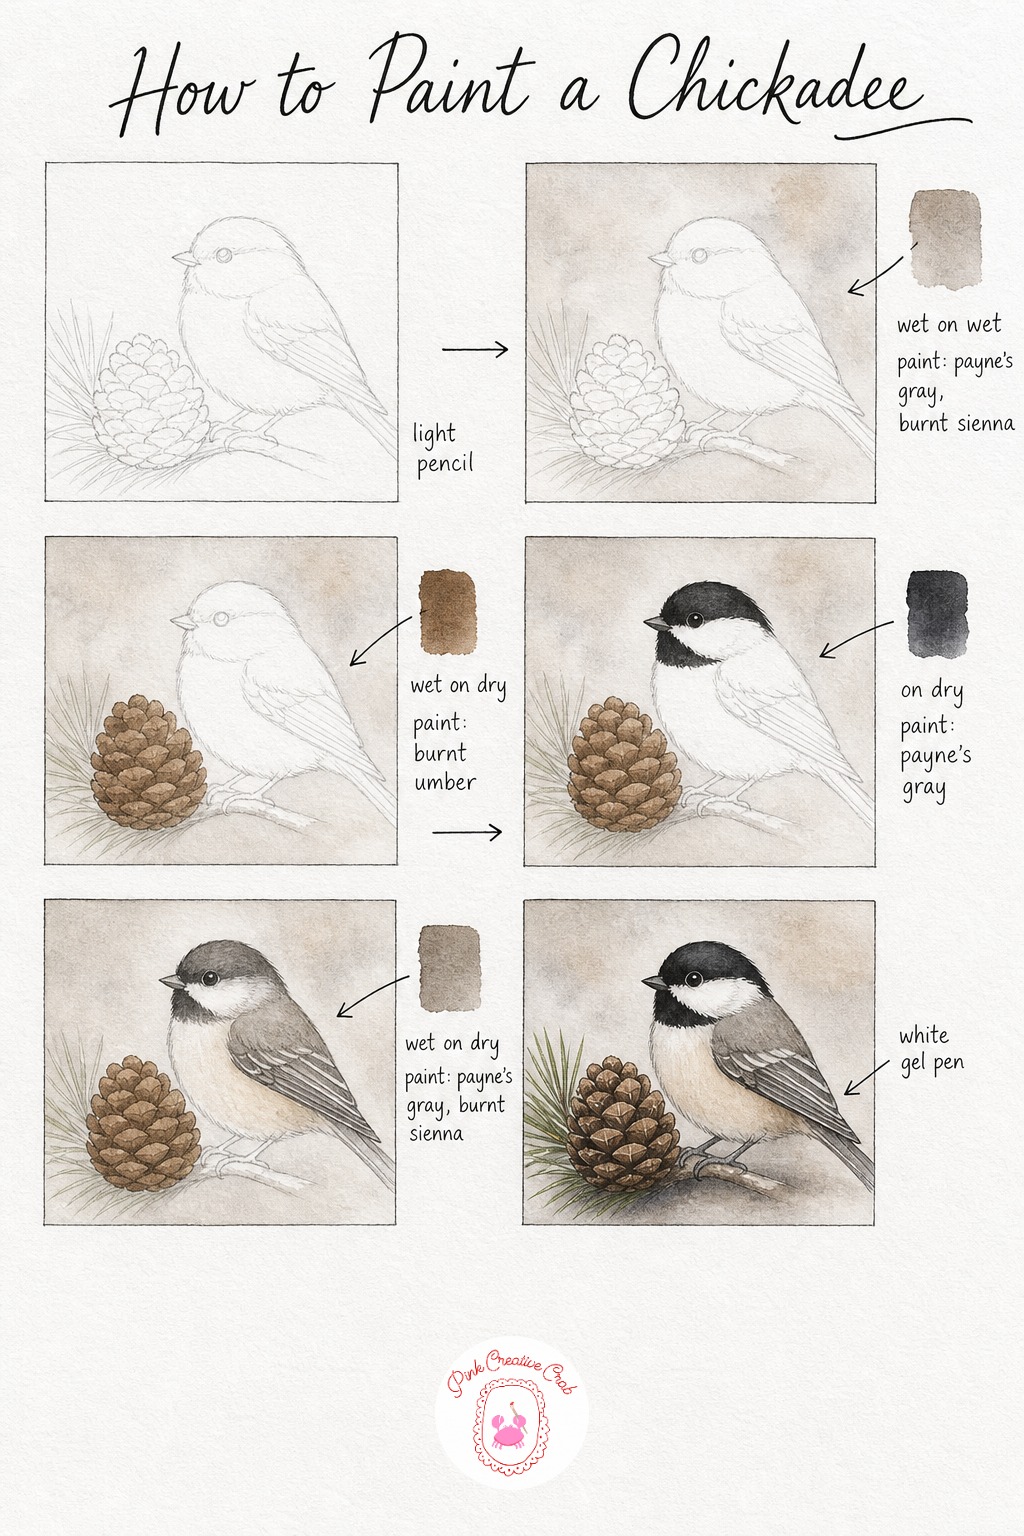
Draw a small round chickadee perched right beside a pinecone, keeping both shapes simple and chunky since chickadees are mostly a soft gray ball with a sharp black cap. Place the pinecone slightly behind or beside the bird so the two shapes don’t compete.
Wet a loose area around both shapes and drop in a warm pale gray wash so the background feels soft without any hard edges. Once dry, paint the pinecone a solid soft brown, you will add its scale texture later once this base layer is fully dry.
Paint the chickadee’s black cap and throat bib first, since that sharp dark shape is the key feature, then once dry wash a warm gray over the back and wings leaving the cheeks and belly bare white. Beginners often paint the whole bird gray at once and lose that crisp black and white pattern, so keep these stages separate.
Finish with fine curved lines across the pinecone to suggest its scales, a crisp white gel pen highlight on the cheek if your paper wasn’t left bare enough, and a soft shadow under the bird’s feet. Tip: a slightly damp brush dragged sideways gives the pinecone’s scale texture more naturally than drawn lines.
Sparrow In A Puddle
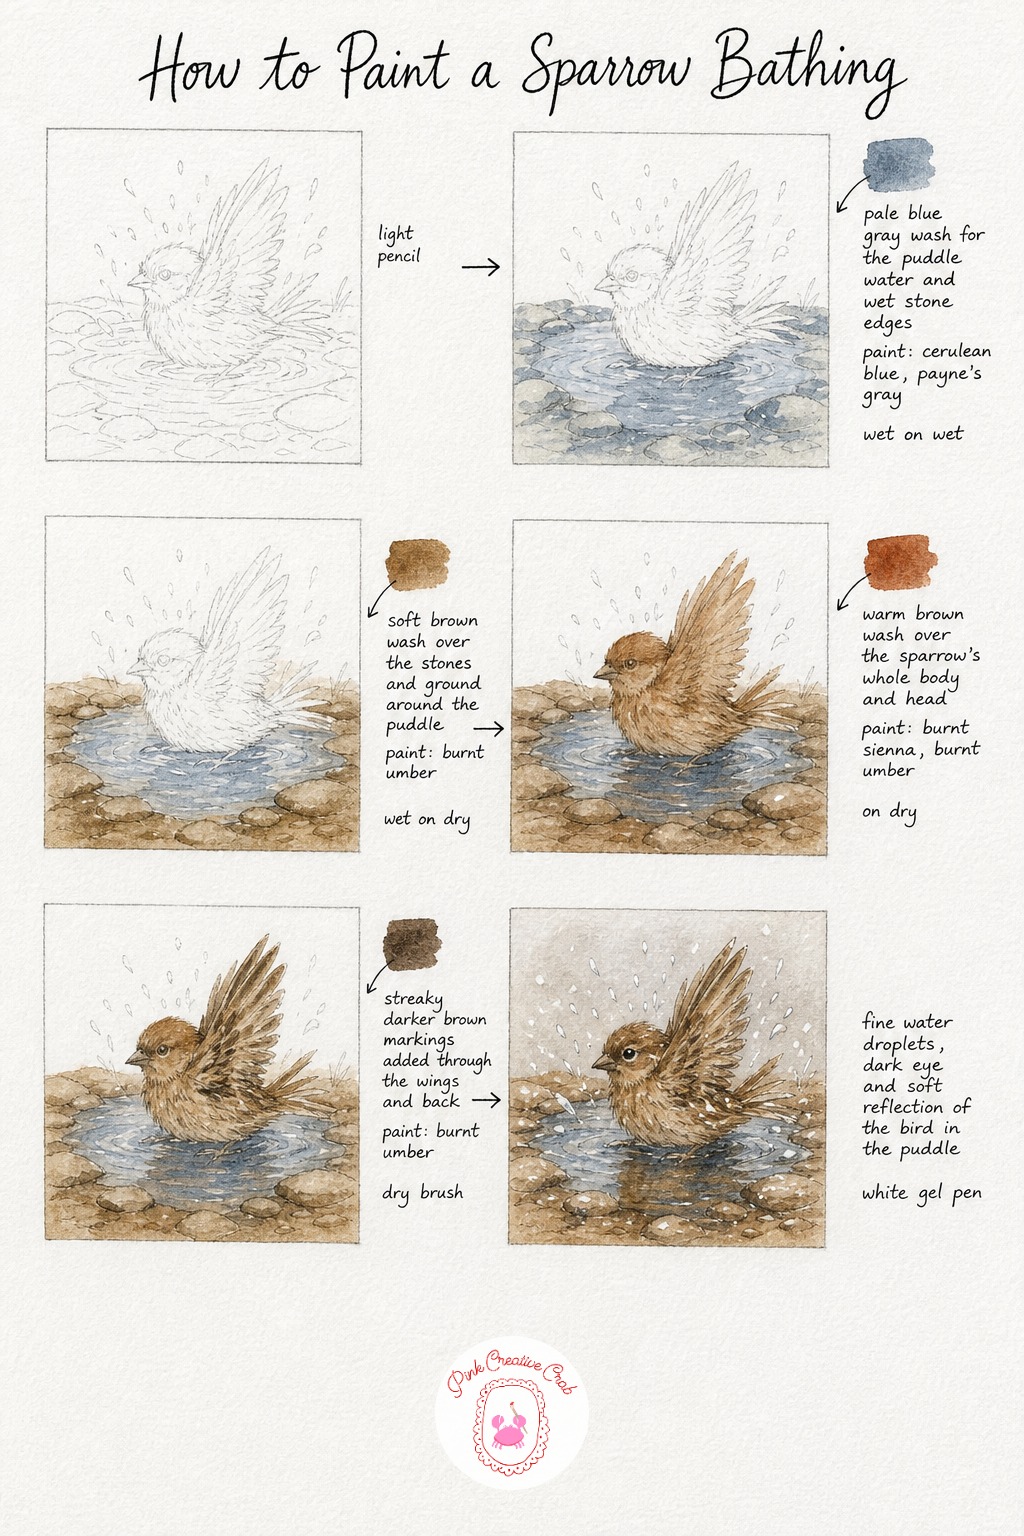
Sketch a sparrow mid splash, wings slightly lifted, standing in a shallow puddle among a few flat stones. This is a livelier pose than most garden bird pictures, so let the wings tilt and the feet show just at the water’s edge.
Wet the puddle area and float in a pale blue gray wash, letting it pool a little darker at the puddle’s edges for depth. Once that’s dry, paint the stones and ground around it in soft brown, keeping some stones lighter than others for variety.
Paint the sparrow’s whole body in warm brown next, sparrows are famously plain but that warmth is what makes them read as alive rather than gray and dull. Once dry, dry brush darker streaky marks through the wing and back feathers, sparrows have a lot of fine mottled pattern there worth the extra stage.
Finish with a scatter of tiny white gel pen droplets flying off the splash, a dark eye, and a faint soft reflection of the bird’s shape in the puddle. Tip: keep the reflection much paler and blurrier than the bird itself, or it competes for attention.
Blue Jay On A Fence Post
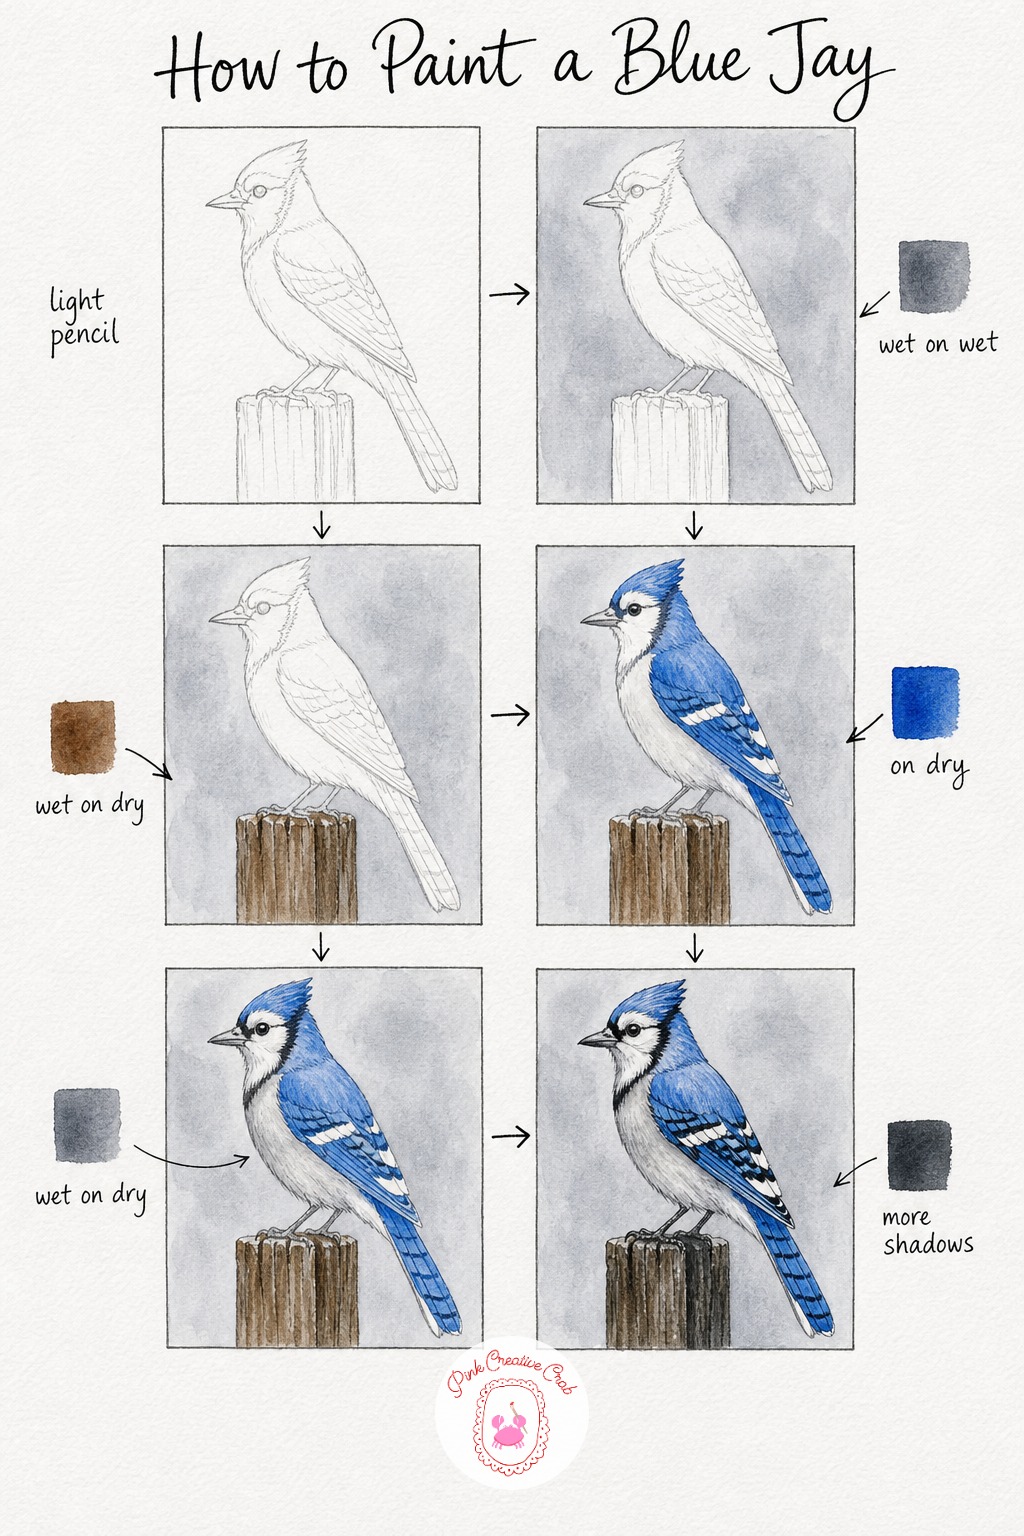
Sketch a blue jay standing tall and alert on a fence post, crest raised, since that upright confident posture is very much their personality. Keep the body proportions a little larger and sleeker than a chickadee or sparrow, jays are a bigger bird.
Wet the background loosely and drop in a pale gray wash so it recedes softly behind the post and bird. Once dry, paint the post a warm weathered brown, adding a slightly darker line down one side for the wood grain.
Paint the jay’s crest, back and wings in bright blue next, mixing cerulean with a touch of ultramarine for depth rather than one flat blue. Let that dry fully, then wash a soft gray over the chest and belly, this two tone body is what beginners often skip, painting the whole bird solid blue by mistake.
Finish with crisp black and white bars through the wings and tail, the blue jay’s most distinctive pattern, plus a soft shadow where the feet grip the post. Tip: paint the white wing bars as bare paper left untouched rather than added later, it keeps them cleaner.
Nuthatch On Tree Bark
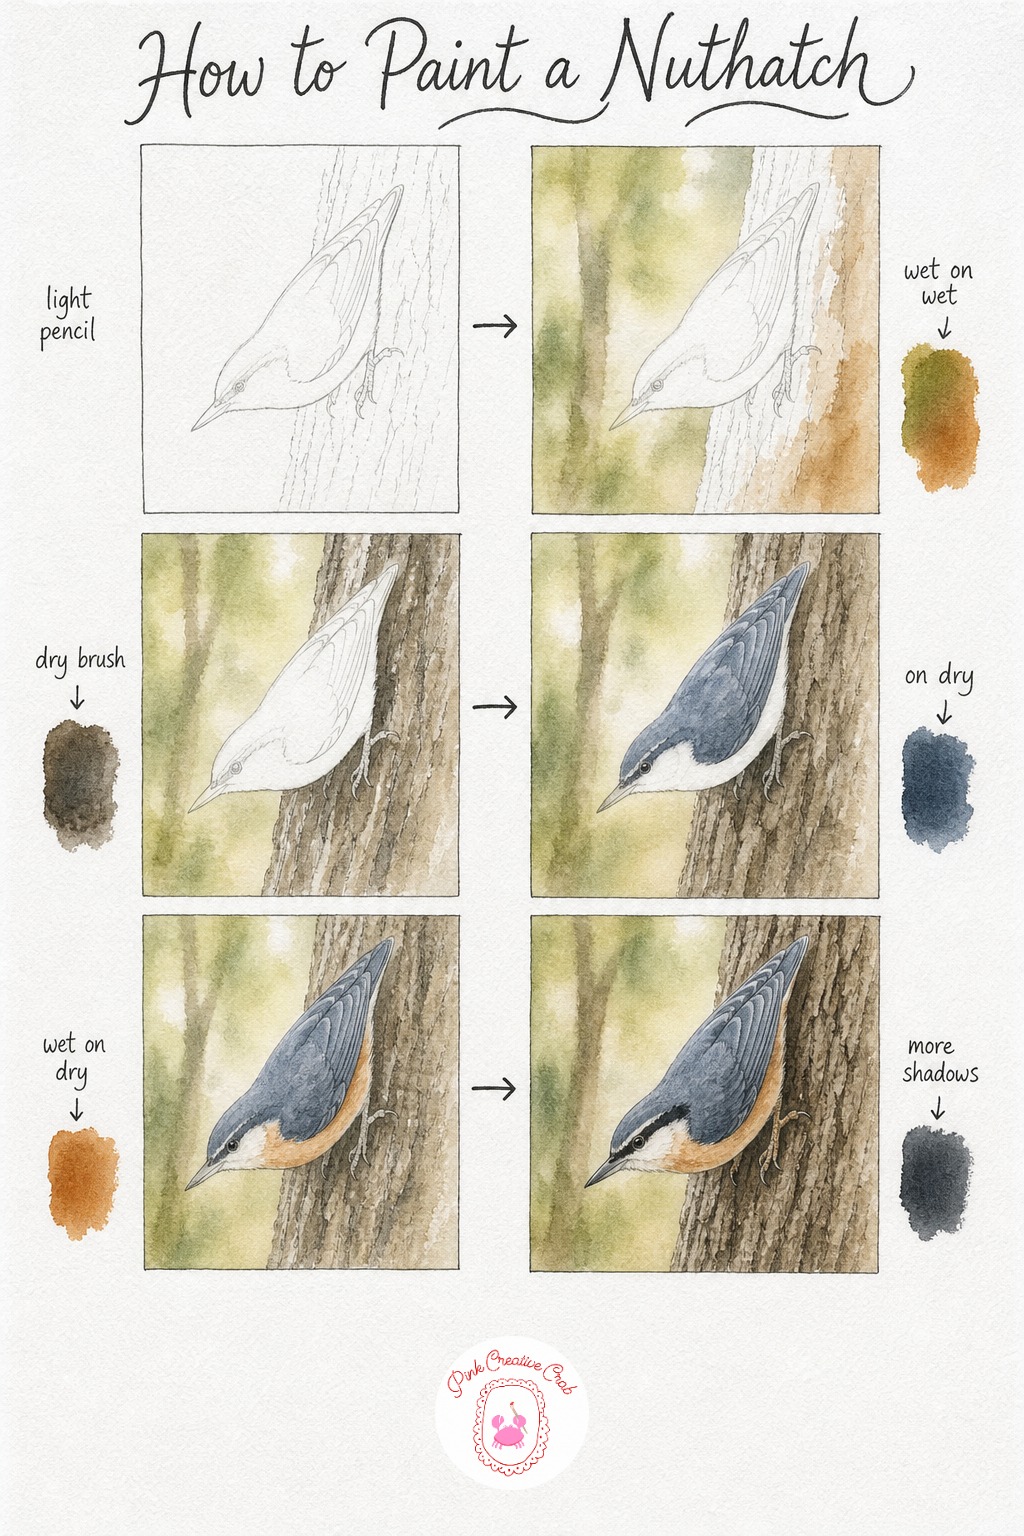
Sketch a nuthatch in its signature head down pose, clinging to bark the way only they do among garden birds. Keep the body compact and the tail short, nuthatches look almost neckless compared to other small birds.
Wet the background loosely for a soft woodland blur, then once dry paint the bark in greenish brown using a dry, scratchy brush stroke so the rough texture of real bark starts showing immediately. This dry brush technique matters more here than on any other bird in this set.
Paint the nuthatch’s back and wings in soft blue gray, then once dry add a warm peachy wash to the belly, this two tone coloring is the bird’s defining feature. Beginners sometimes blend these two colors together, so wait for full dryness between them to keep the edge crisp.
Finish with a bold black eye stripe running through the face, a few extra dark grooves scratched into the bark with a fine brush, and a soft shadow beneath the bird’s clinging feet. Tip: turn your paper sideways while painting the bark strokes, it makes the dry brush drag more naturally along the trunk.
Hummingbird At A Trumpet Flower
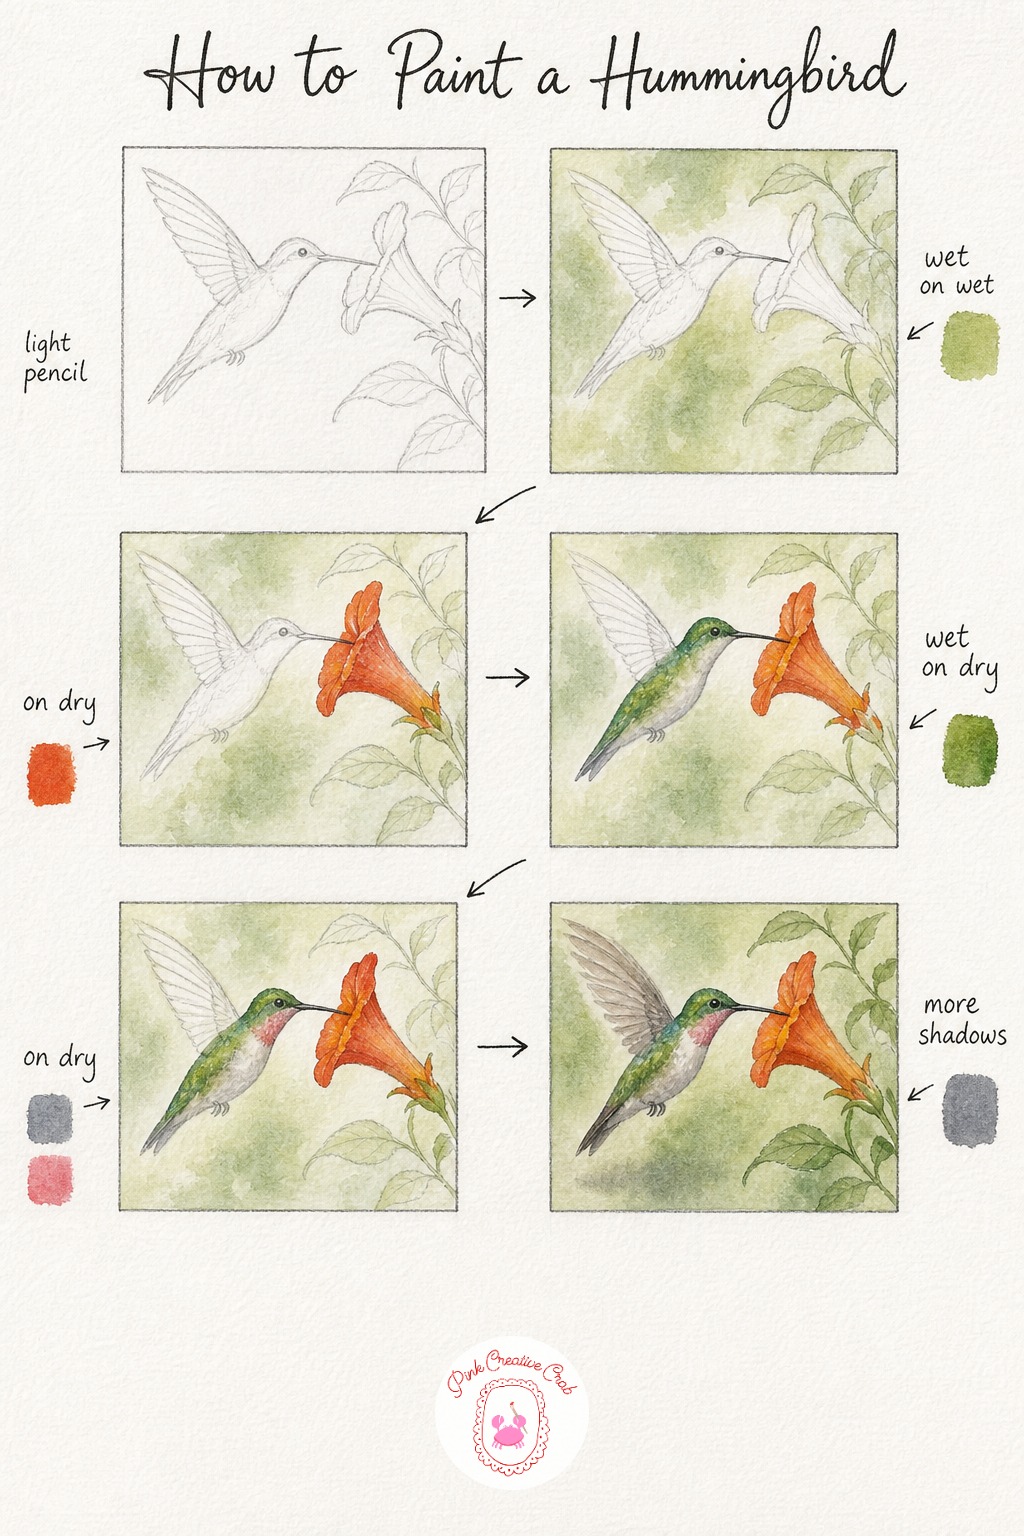
Sketch a hummingbird hovering beside a long trumpet shaped flower, wings slightly blurred to suggest motion rather than drawn as sharp solid shapes. Keep the beak long and thin, it is the bird’s most defining feature alongside its tiny body.
Wet the background and drop in a soft green wash for a garden blur, then once dry paint the trumpet flower in bold orange red, these flowers are usually bright and worth painting boldly rather than timidly.
Paint the hummingbird’s back and head in a shimmering green, mixing emerald with a touch of sap green for that iridescent quality, even though watercolor can’t truly shimmer this gets you close. Once dry, wash soft gray over the belly and a touch of pink at the throat if your bird is a male type.
Finish with soft blurred lines for the fast moving wings, rather than crisp feather details, since that blur is what reads as flight. Add the long fine beak and a tiny shadow beneath the hovering body. Tip: paint the wings with a half dry brush and a light touch so they stay soft and ghostly rather than solid.
Barn Swallow In Flight
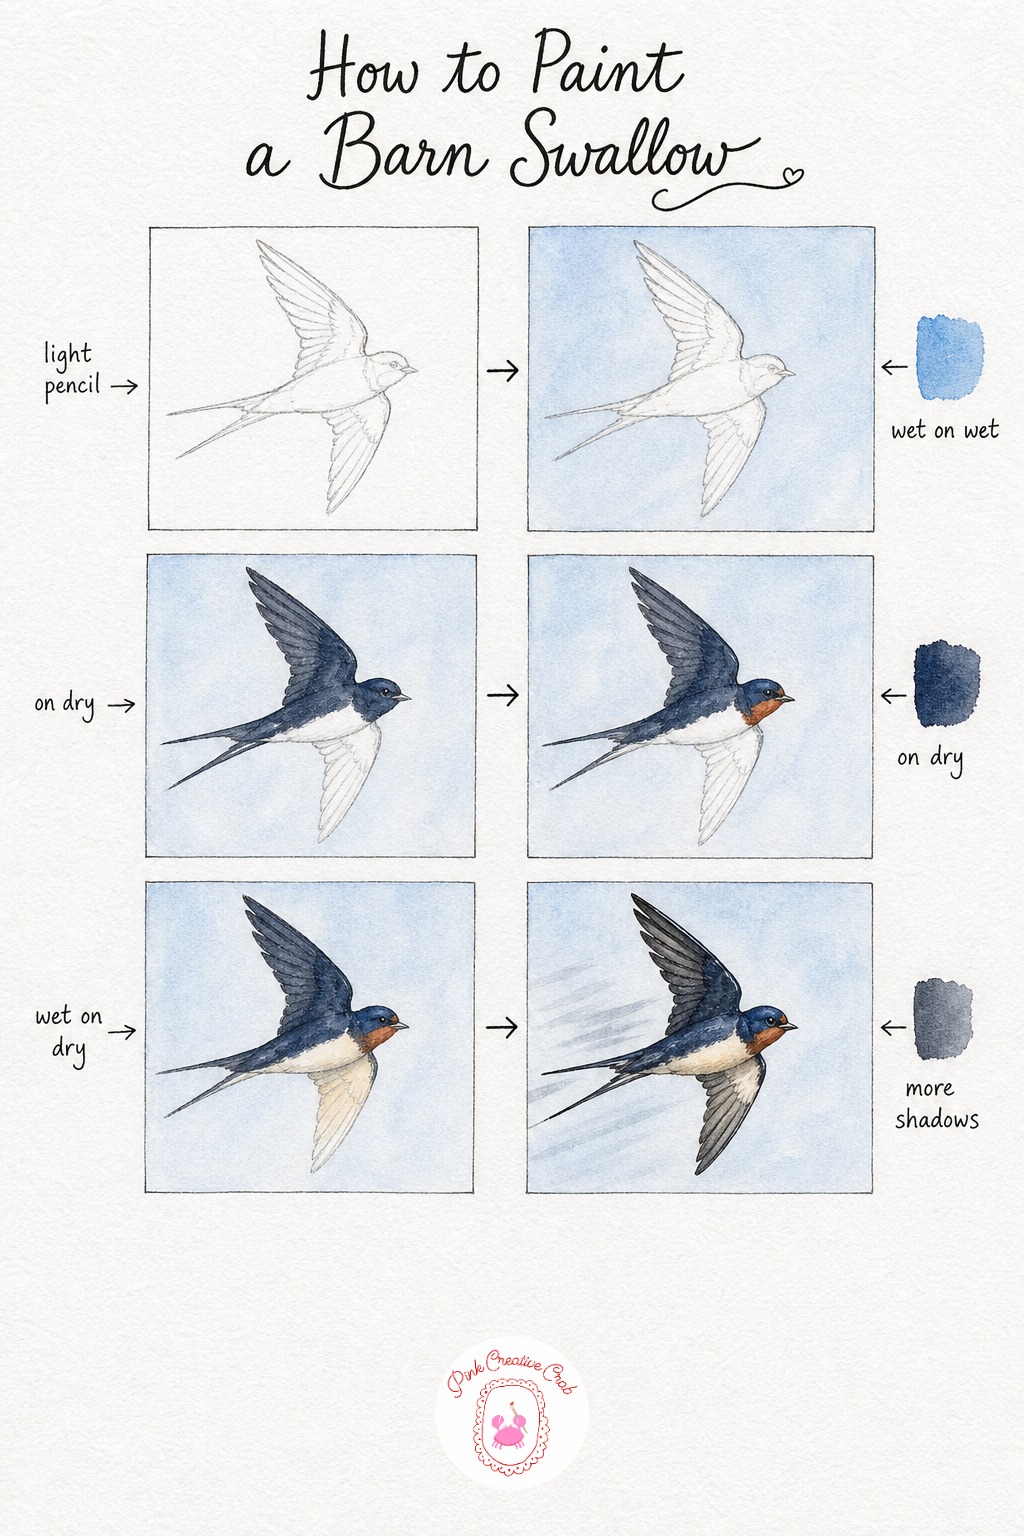
Sketch a swallow in full flight, wings swept back and that signature deeply forked tail spread wide behind it. This pose is more dynamic than a perched bird, so sketch lightly and adjust the wing angles until the motion feels believable.
Wet the sky area and float in a pale clear blue, swallows are often painted against open summer sky rather than garden foliage, so keep this wash clean and simple. Once dry, paint the back, head and wings in a deep blue black, swallows have a glossy almost iridescent dark coloring.
Add the warm rust throat patch next, a small but important detail that beginners often forget, then once dry wash soft cream over the belly. Keep the white areas near the tail bare paper rather than painted.
Finish with the thin forked tail streamers painted as fine confident lines rather than filled shapes, sharp pointed wing tips, and a few soft motion lines trailing behind the bird to suggest speed. Tip: paint the tail streamers in one single confident stroke each, hesitant lines make them look broken rather than fast.
Mourning Dove On A Wire
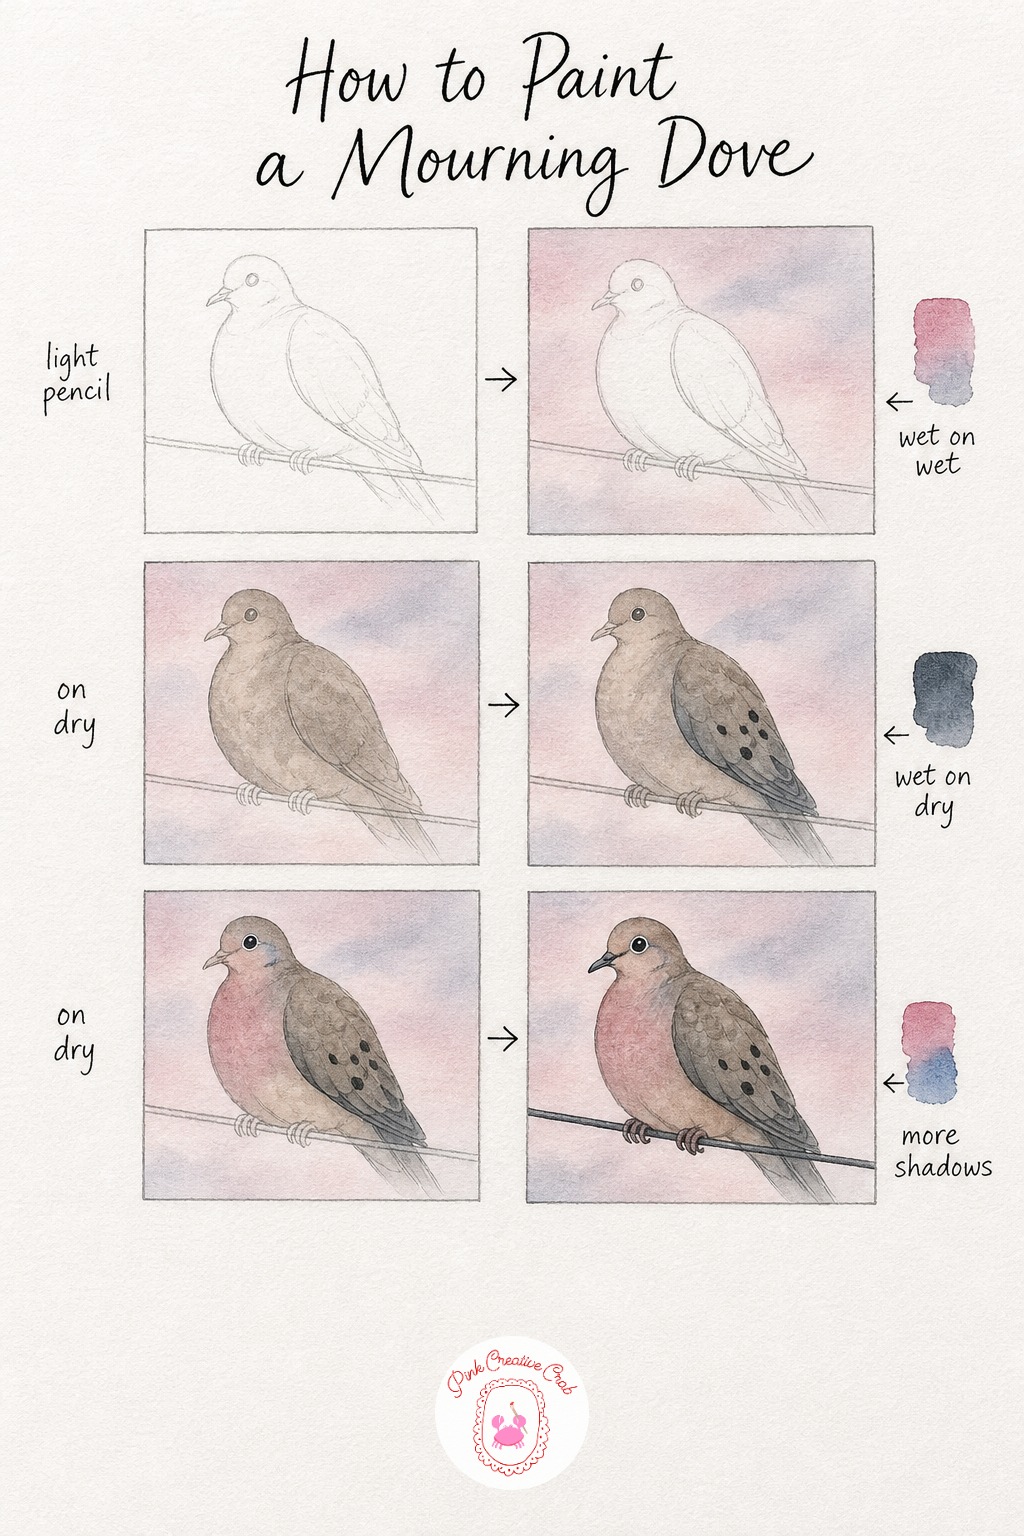
Sketch a plump, round bodied mourning dove perched on a simple thin wire, keeping the silhouette smooth and soft since doves have very few sharp edges anywhere on their body. The small head and long tail are the two shapes to get right.
Wet the sky and drop in a soft pink gray wash, mourning doves are often seen at dusk so a warm evening sky suits them beautifully and sets a gentle mood. Once dry, wash the whole dove body in warm gray, keeping it soft and even.
Once that layer is fully dry, paint a deeper gray over just the wings and dot in a few small dark spots, doves have this quiet spotted wing pattern that is easy to miss if you rush. Add a soft pink blush to the chest and a touch of blue near the eye for that subtle dove coloring.
Finish with a fine confident line for the wire itself, a small dark ring around the eye, and a soft shadow where the feet curl around the perch. Tip: keep every color on this bird muted, mourning doves are a study in soft grays, not bright contrast.
Woodpecker On A Tree Trunk
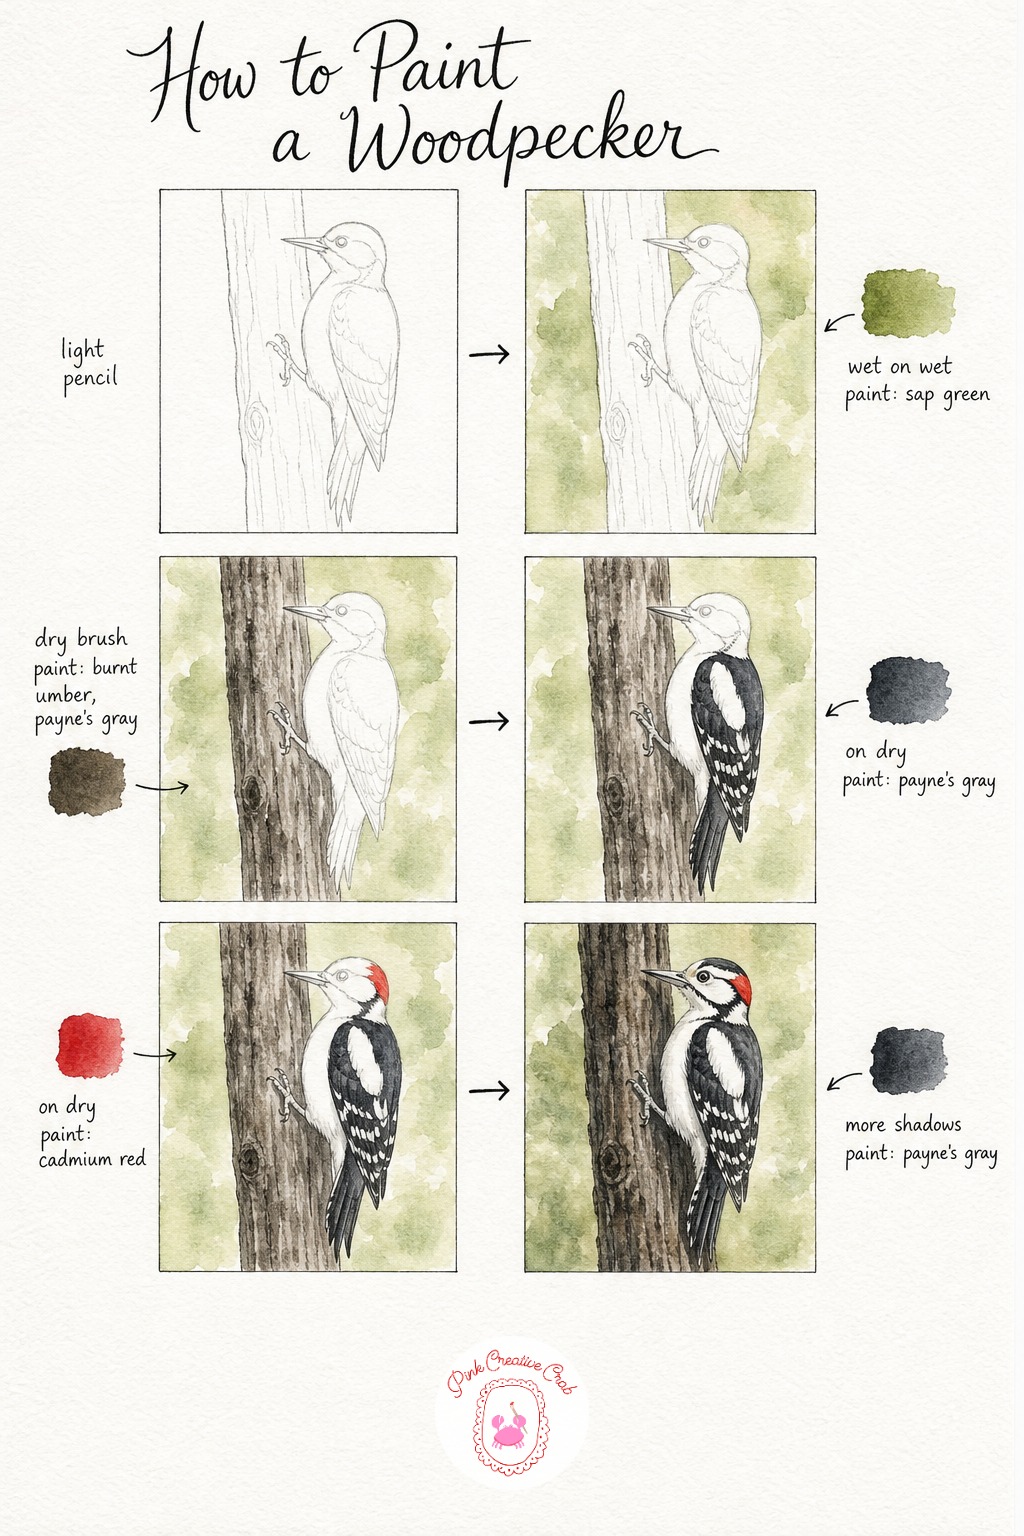
Sketch a woodpecker gripping a vertical trunk, body angled upward and tail braced stiffly against the bark for support, that triangular tail against trunk shape is very characteristic of the pose.
Wet the background for a soft green woodland blur, then once dry paint the trunk in dry brushed gray brown so the bark texture shows from the very first stroke. This rough dry brush stage matters as much here as it did for the nuthatch.
Paint the woodpecker’s back and wings in bold black and white patterns, leaving the white sections as bare untouched paper rather than painting them. Once fully dry, add the bright red patch on the back of the head, this small flash of color is the single most important detail on the whole bird.
Finish with the stiff pointed tail feathers pressed against the trunk, a long sharp beak, and a soft shadow where the bird’s body meets the bark. Tip: paint the beak as one long confident triangle in a single stroke, woodpeckers look wrong with a short stubby beak.
Owl In An Oak Hollow
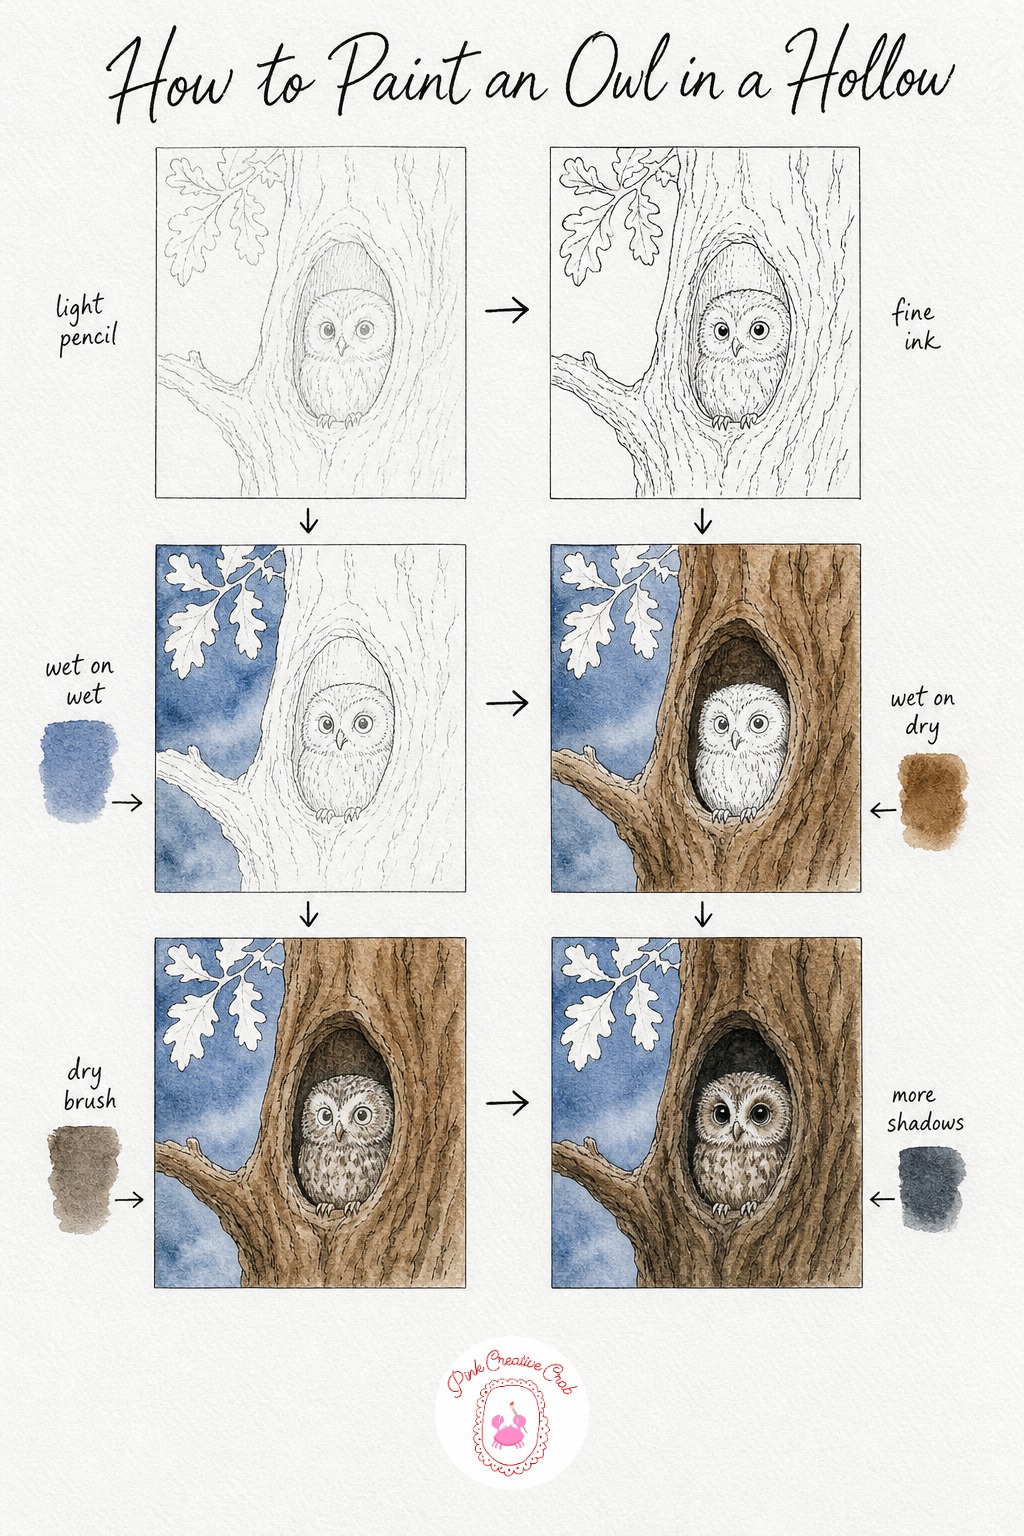
Sketch a small owl just peeking out of a round hollow in a tree trunk, only its head and shoulders showing, which keeps this a manageable scene for one sitting. Ink over your pencil lines once you are happy, since the hollow’s dark opening benefits from a crisp edge.
Wet the sky area and float in a soft dusky blue for an evening feel, owls suit twilight scenes far more than bright daylight ones. Once dry, paint the tree bark in warm brown, painting the inside of the hollow a touch darker so it reads as a real opening rather than a flat shape.
Paint the owl’s body in a mottled gray brown using a dry brush dabbed rather than stroked, this gives that soft speckled owl feather texture naturally. Beginners often paint owls too smooth, so embrace the dabbing technique here.
Finish with the owl’s large round eyes, the single most important feature, fine radiating lines around the facial disc, and a soft dark shadow pooling inside the hollow behind the bird. Tip: paint the eyes last and biggest, slightly too big even, owls always look better a little wide eyed.
Starling With Iridescent Feathers
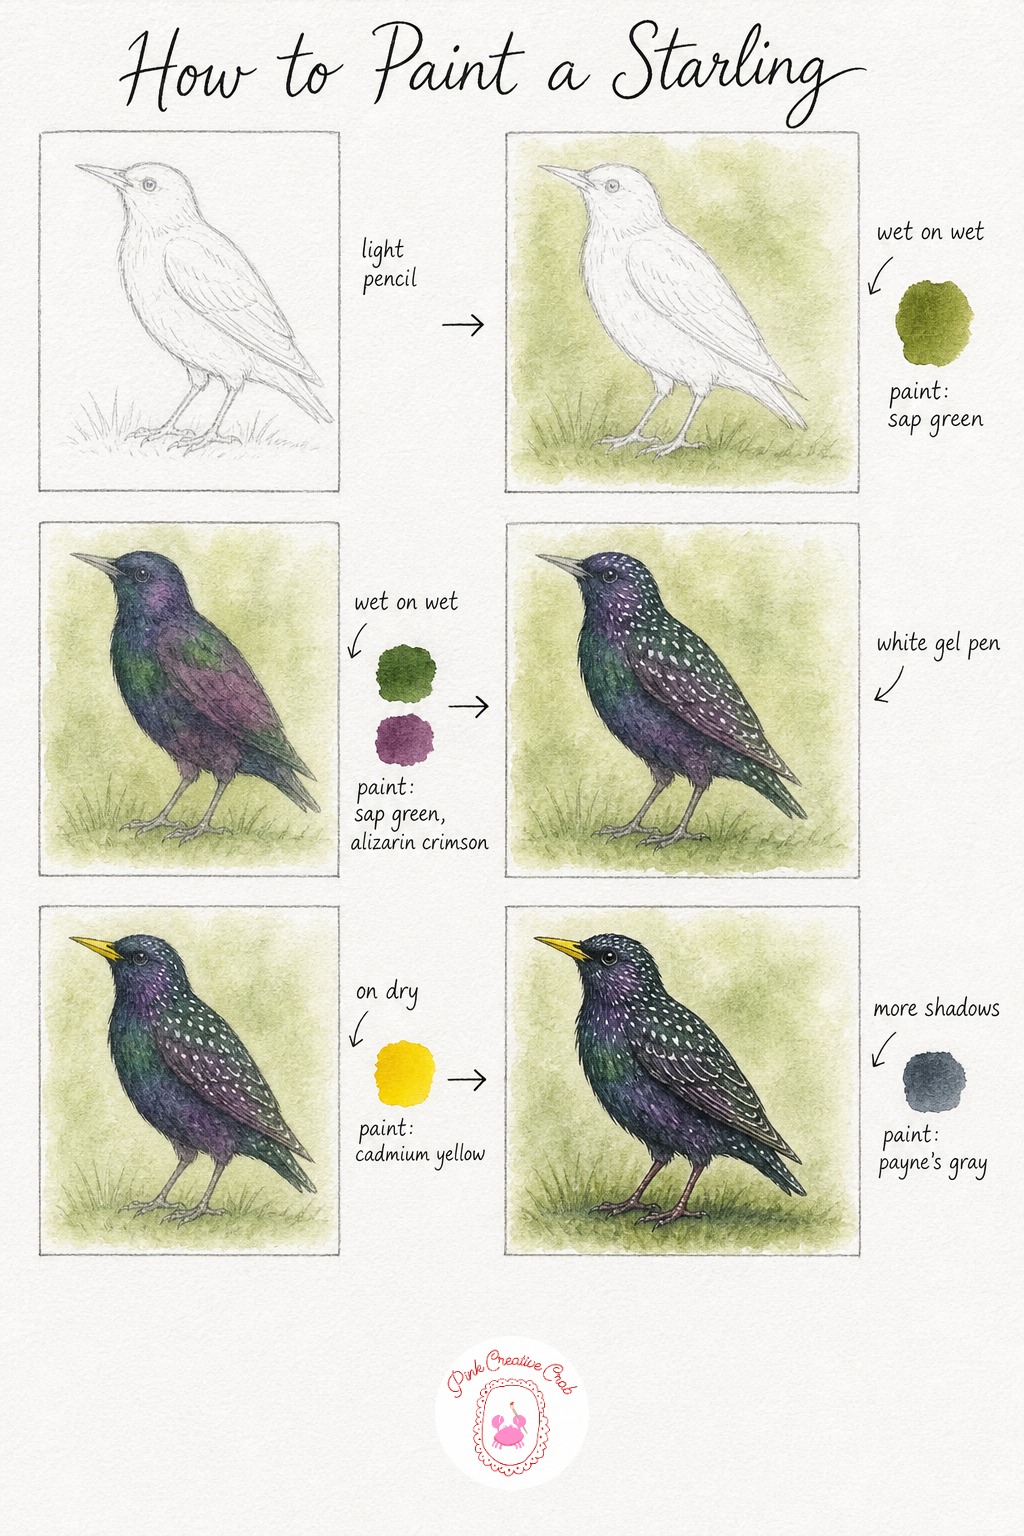
Sketch a starling standing upright on short grass, body compact and beak pointed slightly downward, a simple everyday pose that suits this bird’s plain silhouette perfectly.
Wet the background and float in soft green for the grass, letting it stay loose behind the more detailed bird. Then, while the bird’s paper is still slightly damp, blend green, purple red and dark gray together directly on the body, this wet on wet mixing is exactly how a starling’s iridescent sheen reads in watercolor, blotchy and shifting rather than one flat color.
Once that layer dries fully, dab small pale speckles across the back and wings with a white gel pen, starlings in non breeding plumage are covered in these pale dots and they make the bird instantly recognizable. Paint the bright yellow beak once the body is dry so the colors stay separate and clean.
Finish with a few fine dark lines defining the wing edges, a small sharp eye, and a soft shadow on the grass beneath the feet. Tip: do not overblend the body colors, some patchiness there is exactly what makes a starling look like a starling.
Robin’s Nest With Blue Eggs
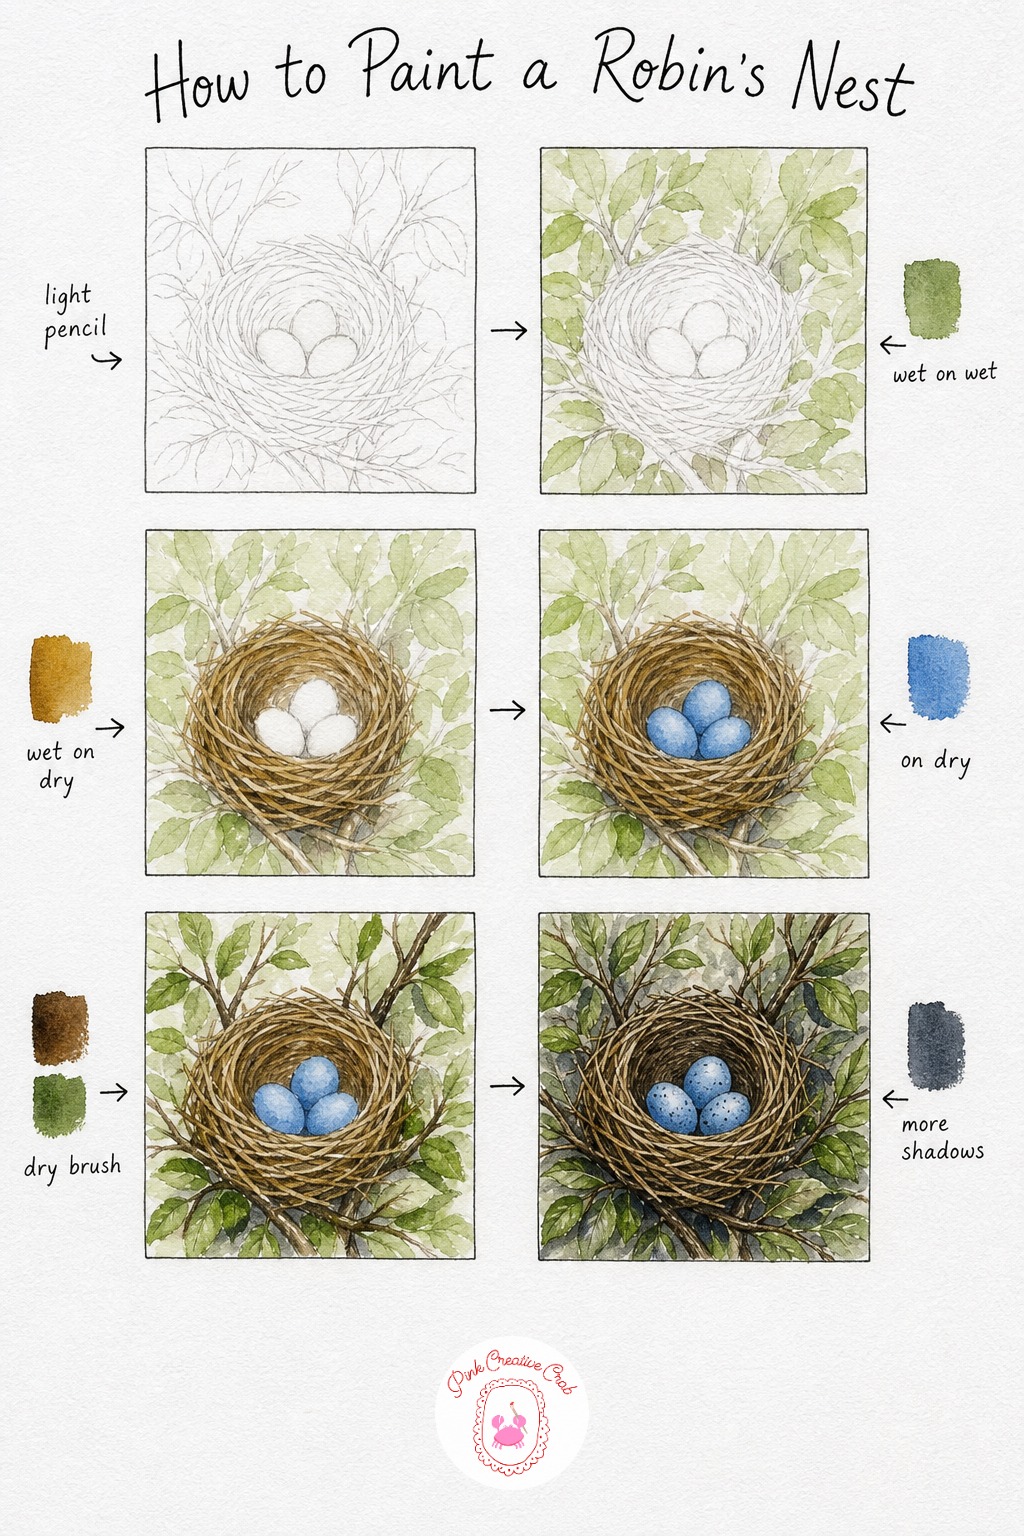
Sketch a round woven nest tucked among a few leafy branches, with three small oval eggs resting inside, keeping the nest shape slightly irregular since real nests are never perfectly round. If nests and eggs are your favorite part of spring painting, this is a lovely companion piece to keep practicing that theme.
Wet the background loosely and drop in soft green for a leafy blur around the nest, then once dry paint the nest itself in warm brown, varying the tone slightly to suggest individual woven twigs without drawing each one yet.
Paint the eggs in a pale soft blue, leaving a small bare highlight on each one so they read as smooth and rounded rather than flat. Once dry, dry brush in a few darker twigs and extra leaves around the rim of the nest for texture and depth.
Finish with fine curved lines across the nest to suggest individual woven strands, a few tiny speckles on the eggs if you like a speckled variety, and a soft shadow pooling beneath the nest. Tip: keep the egg blue pale, real robin eggs are a soft color, not a bright saturated one.
Kingfisher On A Reed
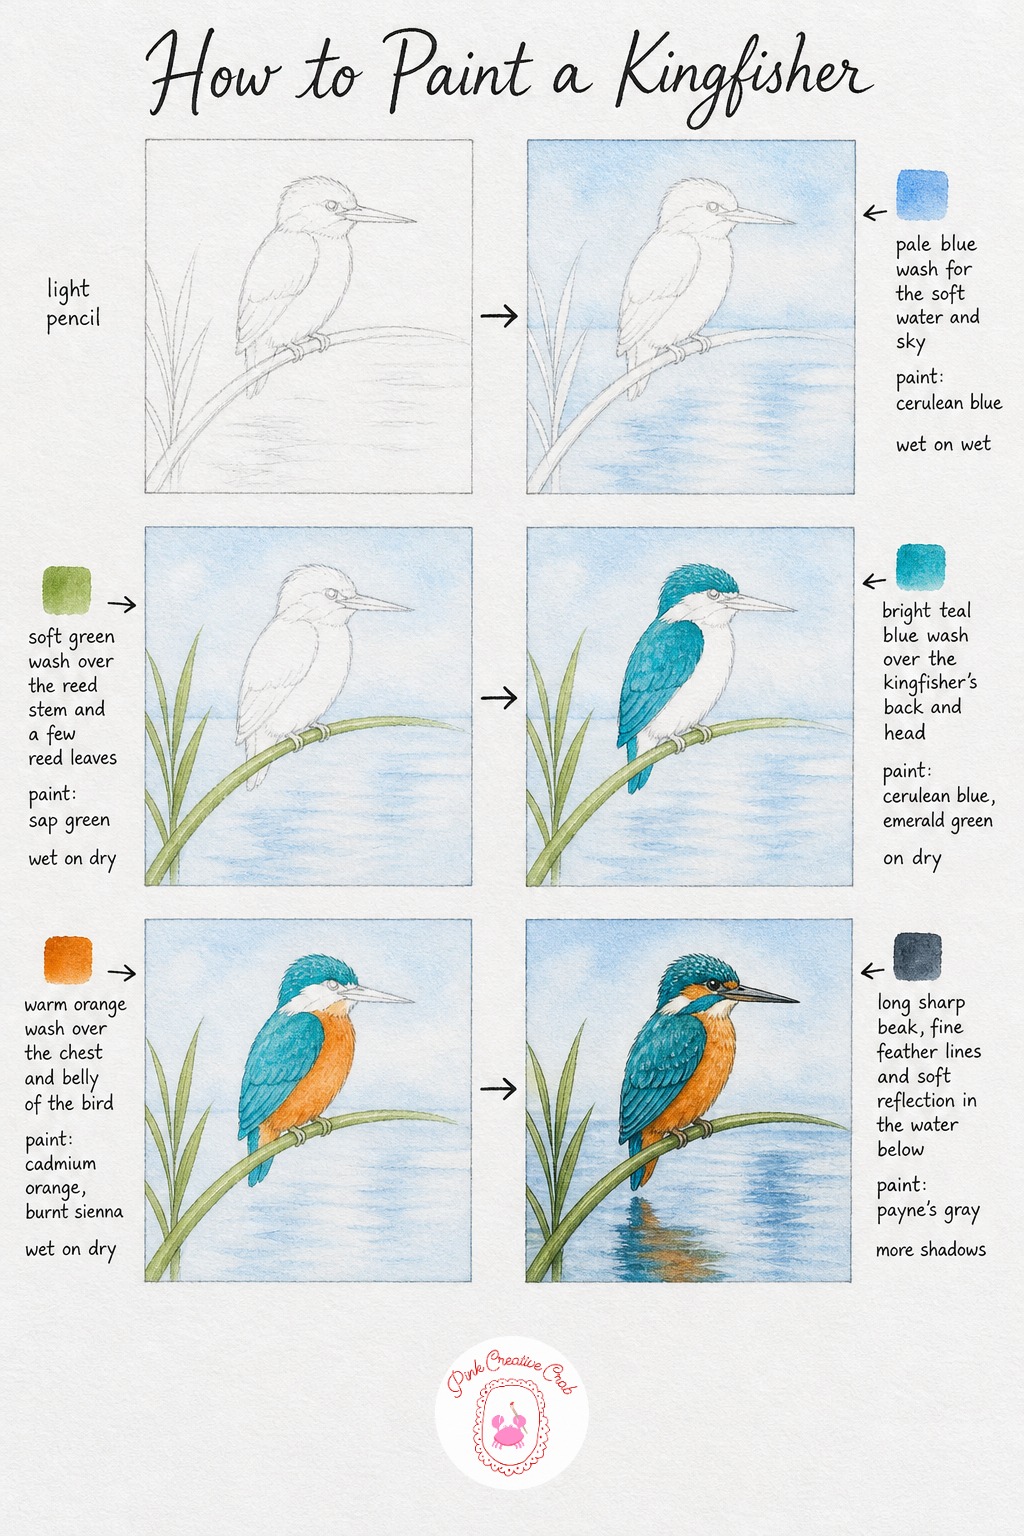
Sketch a kingfisher perched on a slightly bent reed over water, body compact and beak long and dagger like, that sharp beak is the single most recognizable feature to get right early in your sketch.
Wet the background and float in a pale blue for soft water and sky together, letting the two blend without a hard horizon line. Once dry, paint the reed stem and a couple of leaf blades in simple green.
Paint the kingfisher’s back and head in a bright teal blue, this color should feel almost electric compared to the softer washes around it, kingfishers are genuinely this vivid in life. Once dry, wash warm orange over the chest and belly, the contrast between these two bright colors is what makes this bird such a rewarding one to paint.
Finish with the long sharp beak painted in one confident stroke, fine feather lines through the back, and a soft blurred reflection of the bird in the water below. Tip: keep the reflection colors muted and the edges soft, a crisp reflection competes with the real bird for attention.
Tufted Titmouse On A Branch
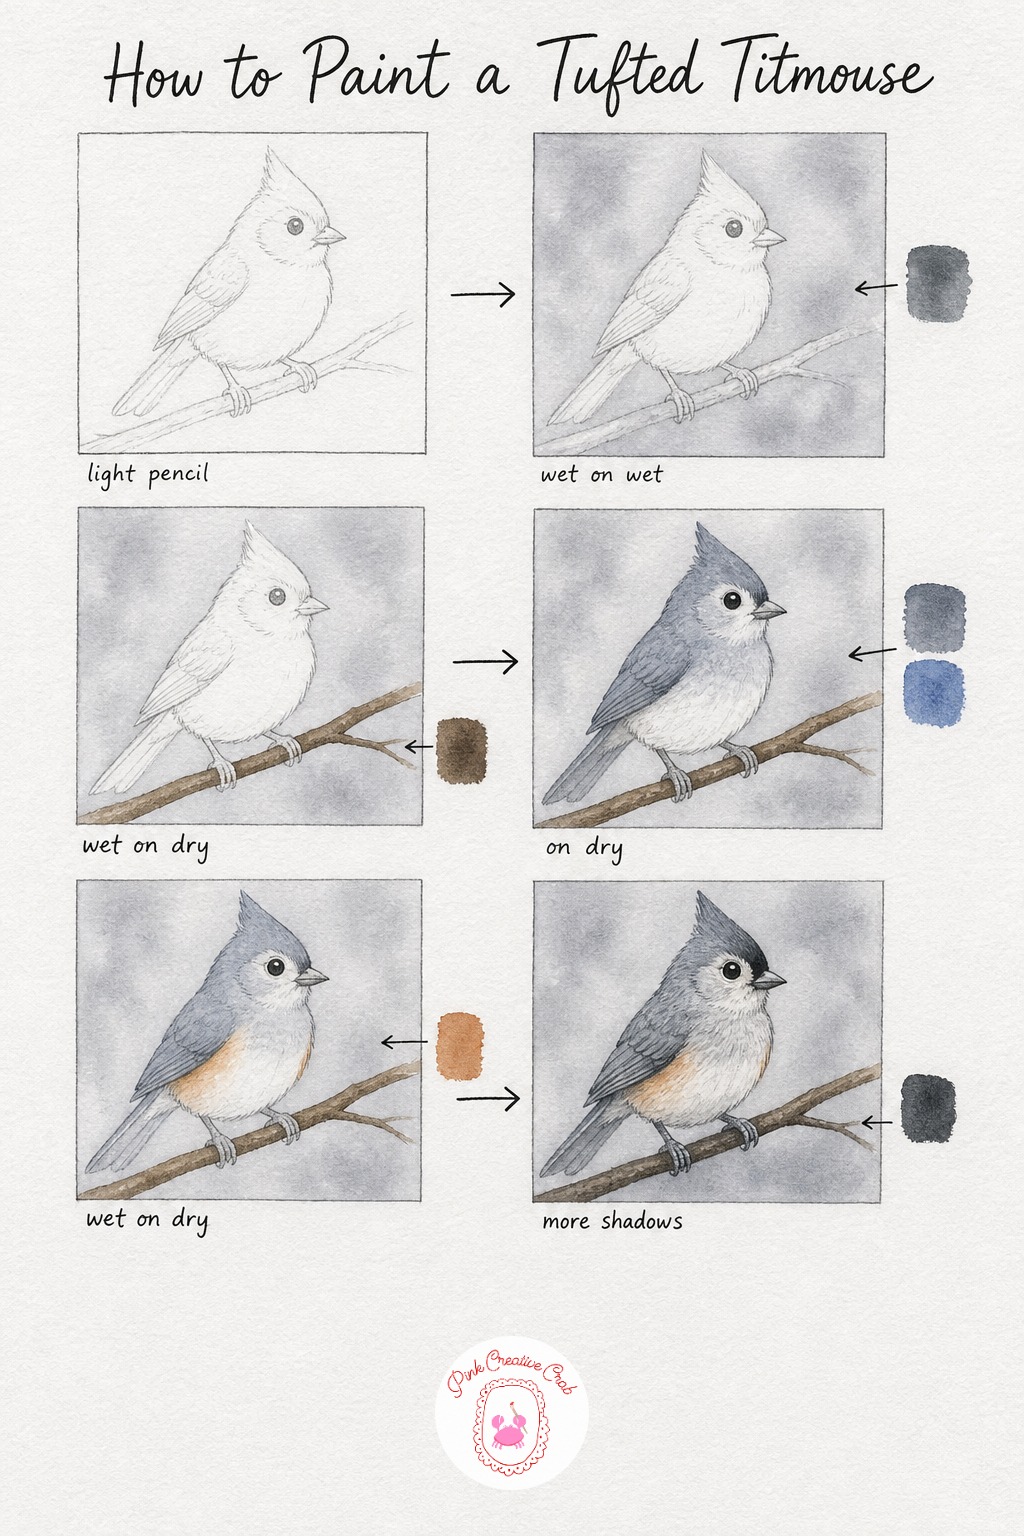
Sketch a titmouse with its distinctive pointed crest raised, perched simply on a thin branch, a quiet everyday pose that lets the crest and soft gray coloring take center stage.
Wet the background for a soft gray wash, then once dry paint the branch in simple warm brown. Paint the titmouse’s whole body, including that pointed crest, in a soft blue gray next, keeping the wash even and smooth since this bird has very little pattern compared to others in this set.
Once dry, add a warm peachy wash along the sides under the wings, a subtle but lovely detail real titmice have that beginners often miss entirely. This soft blush of color is what separates a flat gray bird from a convincing one.
Finish with a small black patch right above the beak, fine feather lines through the crest and wings, and a soft shadow where the feet grip the branch. Tip: keep your brush strokes short and layered on the crest so it looks textured and pointed rather than smoothly rounded.
House Finch At A Feeder
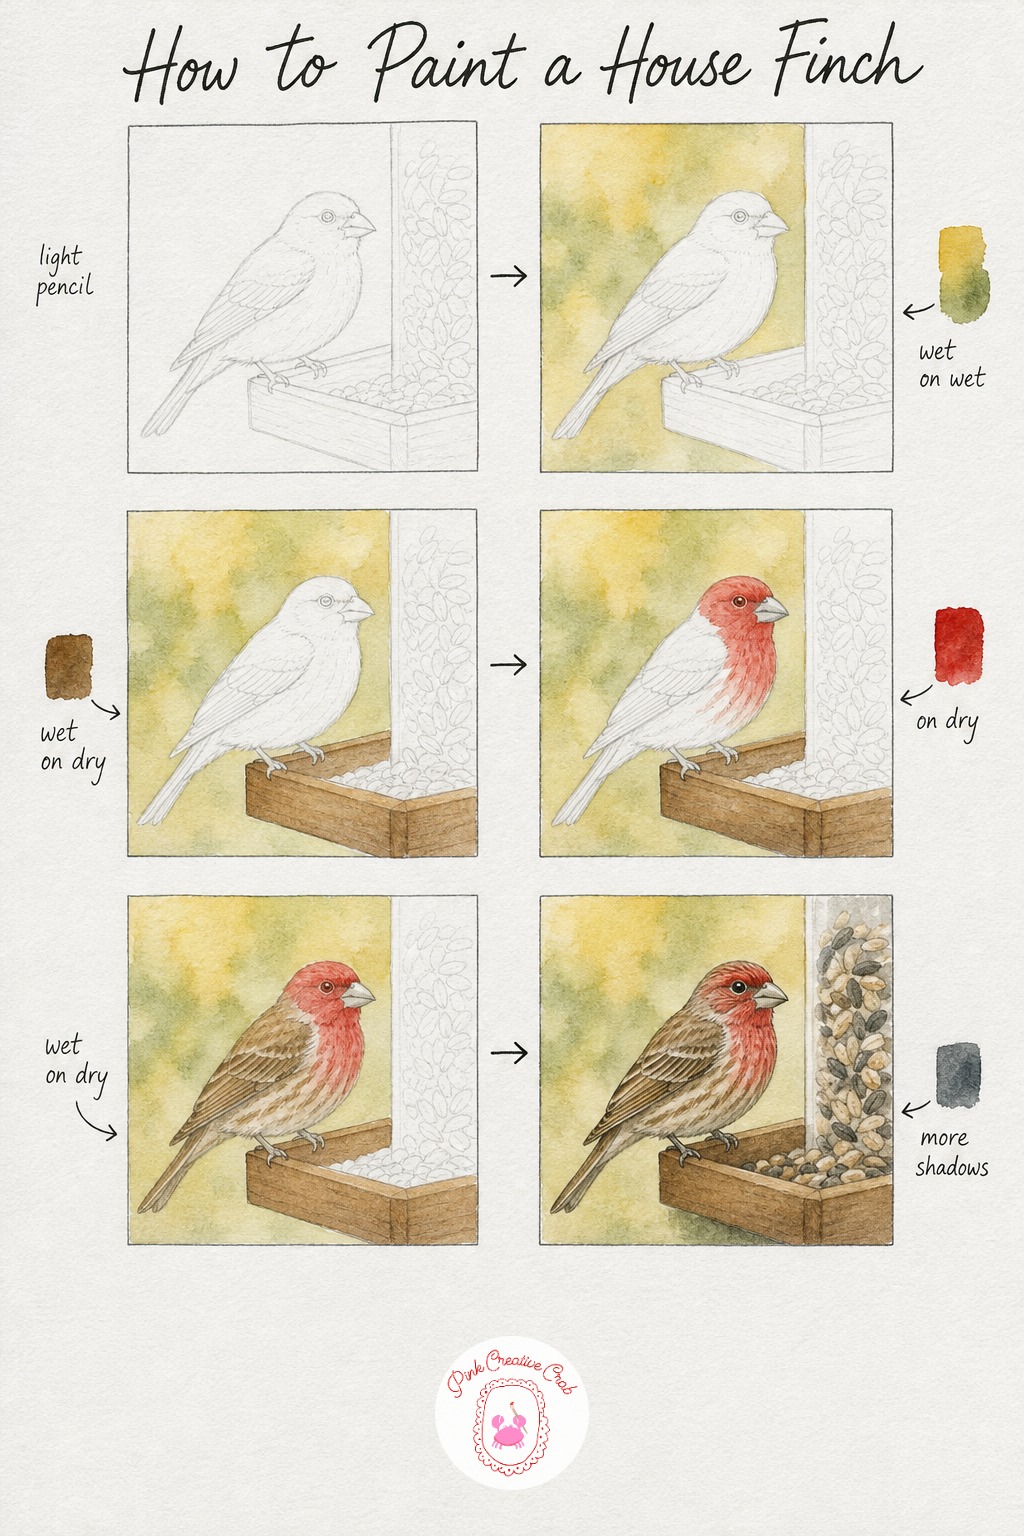
Sketch a house finch perched casually on the edge of a seed feeder, body compact and head slightly tilted as if checking the seed below. Keep the feeder simple, a small wooden tray or tube shape is enough.
Wet the background and drop in a soft warm wash, then once dry paint the wooden feeder tray in brown. Paint the finch’s head and chest in red next, house finch red varies a lot from bird to bird so feel free to make yours deep or pale.
Once dry, wash a streaky brown over the wings, back and belly, dragging the brush in short strokes rather than one flat sweep since finches are quite streaky all over. Beginners often paint finches as solid red birds and miss this brown streaked body entirely, so take the extra stage here seriously.
Finish with fine dark streak lines reinforcing the pattern, a small dark eye, and a soft shadow where the feet grip the feeder’s edge. Tip: vary your red mix slightly across the head and chest, real house finch color is rarely perfectly even.
What to Do Next
Print out whichever bird caught your eye first, set your paints beside it, and work through the stages one at a time rather than rushing to the finish. There are eighteen more garden birds waiting here whenever you are ready for the next one.
Frequently Asked Questions
What paper works best for a watercolor birds tutorial like this one?
Cold press watercolor paper at 140 lb or heavier works best, since it holds up to the soft wet backgrounds used behind every bird in this collection. Its slight texture also helps feather details catch and sit nicely once your brush gets drier.
How do I keep the bird sharp while the background stays soft?
Paint the background wash first while the bird’s area stays completely dry, then let it dry fully before painting the bird with a less wet brush. This contrast in wetness is exactly what keeps edges soft behind the bird and crisp on it.
What is the easiest bird to start with as a true beginner?
The robin on a snowy branch or the chickadee on a pinecone are the gentlest starting points, since both rely on simple rounded shapes and only two or three main colors. Save the magpie or kingfisher for once you feel steadier.
How many colors do I really need to paint these garden birds?
A basic set of eight to ten colors covers every bird in this collection comfortably, including a warm and cool of each primary plus payne’s gray and an earth brown. You can mix nearly every feather color shown from that small palette.
My feather details keep looking blobby instead of fine, what helps?
Switch to a smaller round brush, a size 2 or smaller, and make sure your paint is not overloaded with water for this final stage. Resting your hand on the table while painting these fine lines also steadies the stroke considerably.
Have any thoughts?
Share your reaction or leave a quick response — we’d love to hear what you think!
-
 0
-
0
-
0
-
0
-
0
-
0


