

Table of Contents
- Before You Start
- Pumpkin Patch With Red Wagon
- Forest Path Under Golden Trees
- Barn With Hay Bales
- Apple Tree With Ladder
- Cozy Porch With Mums and Lanterns
- Scarecrow in a Cornfield
- Covered Bridge Over a Creek
- Rustic Fence With Pumpkins
- Maple Tree in Full Color
- Orchard Crate of Apples
- Window Box With Fall Flowers
- Frequently Asked Questions
A step by step fall painting is the best kind of weekend project: warm colors, no pressure, and a finished scene by the time your coffee goes cold. I love this season because the whole palette is already forgiving, rust and orange and mustard sit together no matter how you mix them, and a few dabbed leaves can save almost any shaky tree trunk.
Below you will find eleven full scenes, each one broken into clear acrylic stages with its own little color swatch, so you always know what to pick up and where it goes. Pick the one that pulls at you first, pumpkin patch or barn or porch, and paint along from the first pencil lines to the last leaf.
Using these images: free for personal projects such as printing, coloring, cards, journals and gifts. Handmade items that include them may be sold up to 30 pieces per design. More than that is commercial use and is not permitted, and neither is selling or sharing the images themselves or passing them off as your own. Please ask before any other use.
Before You Start
- Work on a sturdy surface like canvas paper or a primed board, acrylic paint can warp thin sketch paper once it goes on wet and heavy.
- Keep a few flat and round brushes on hand, a flat brush blocks in skies and fields fast while a small round handles trunks and fence lines.
- Mix your rust, orange and mustard tones on a palette first and dab each one onto scrap paper, autumn colors shift a lot depending on how much water or white you add.
- Sketch every scene in light pencil before any paint touches the page, acrylic covers pencil easily but heavy lines can still show through pale washes.
- Keep a separate stiff or old brush just for dabbing leaf texture, a soft fresh brush will not give you that broken, clustered leaf look.
- Let each layer dry to a matte, no longer shiny, surface before adding the next one, acrylic dries fast but darker details still need a dry base underneath.
Pumpkin Patch With Red Wagon
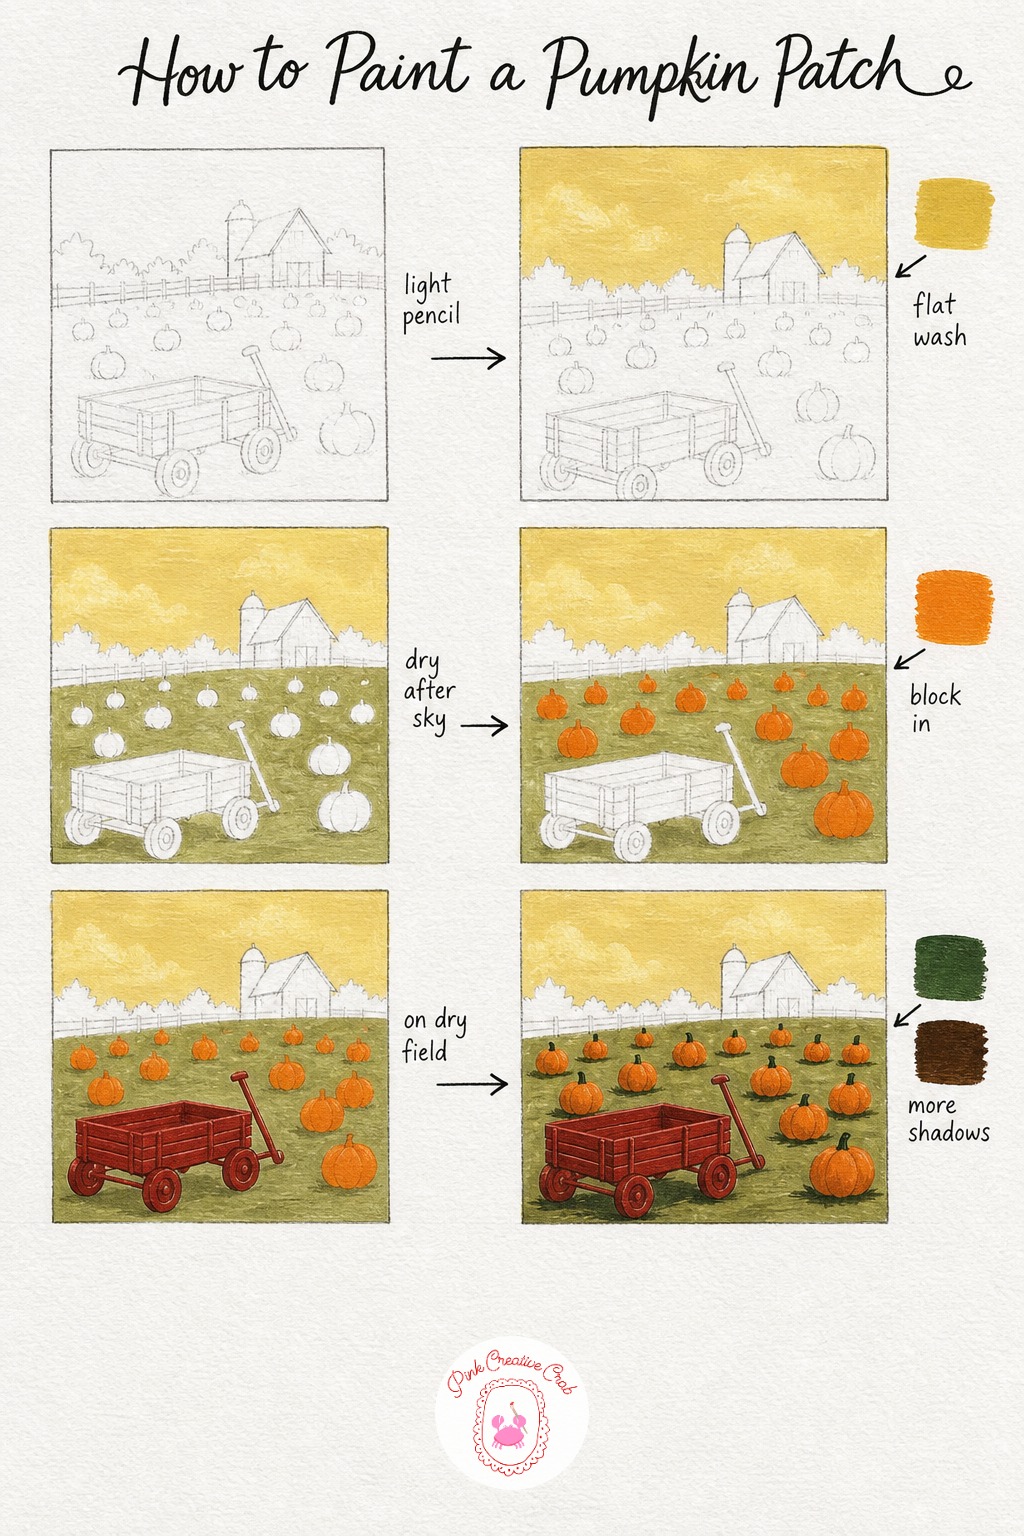
Start this one with a light pencil sketch, just the horizon line, a rough wagon box with two wheels, and a scatter of circles for pumpkins across the lower field. Keep the circles different sizes, that is what makes the patch feel real instead of stamped.
Brush a flat mustard wash across the whole sky with a wide flat brush, working quickly so it stays even, then let that dry fully before the olive field goes in underneath. A hairdryer on low helps if you are impatient, just keep it moving so the paint does not pool.
Block in solid pumpkin orange for every circle, two coats if the olive shows through the first one, then paint the red wagon once the field is dry to the touch. Beginners often paint the wagon too early and drag orange into the red, so wait for that full dry before it goes in.
Finish with deep green stems on each pumpkin and a touch of burnt umber shadow tucked under the pumpkins and wagon wheels, this single step is what grounds the whole scene. If you only have one green, mix a touch of burnt umber into it for the stems instead of buying a second tube.
Forest Path Under Golden Trees
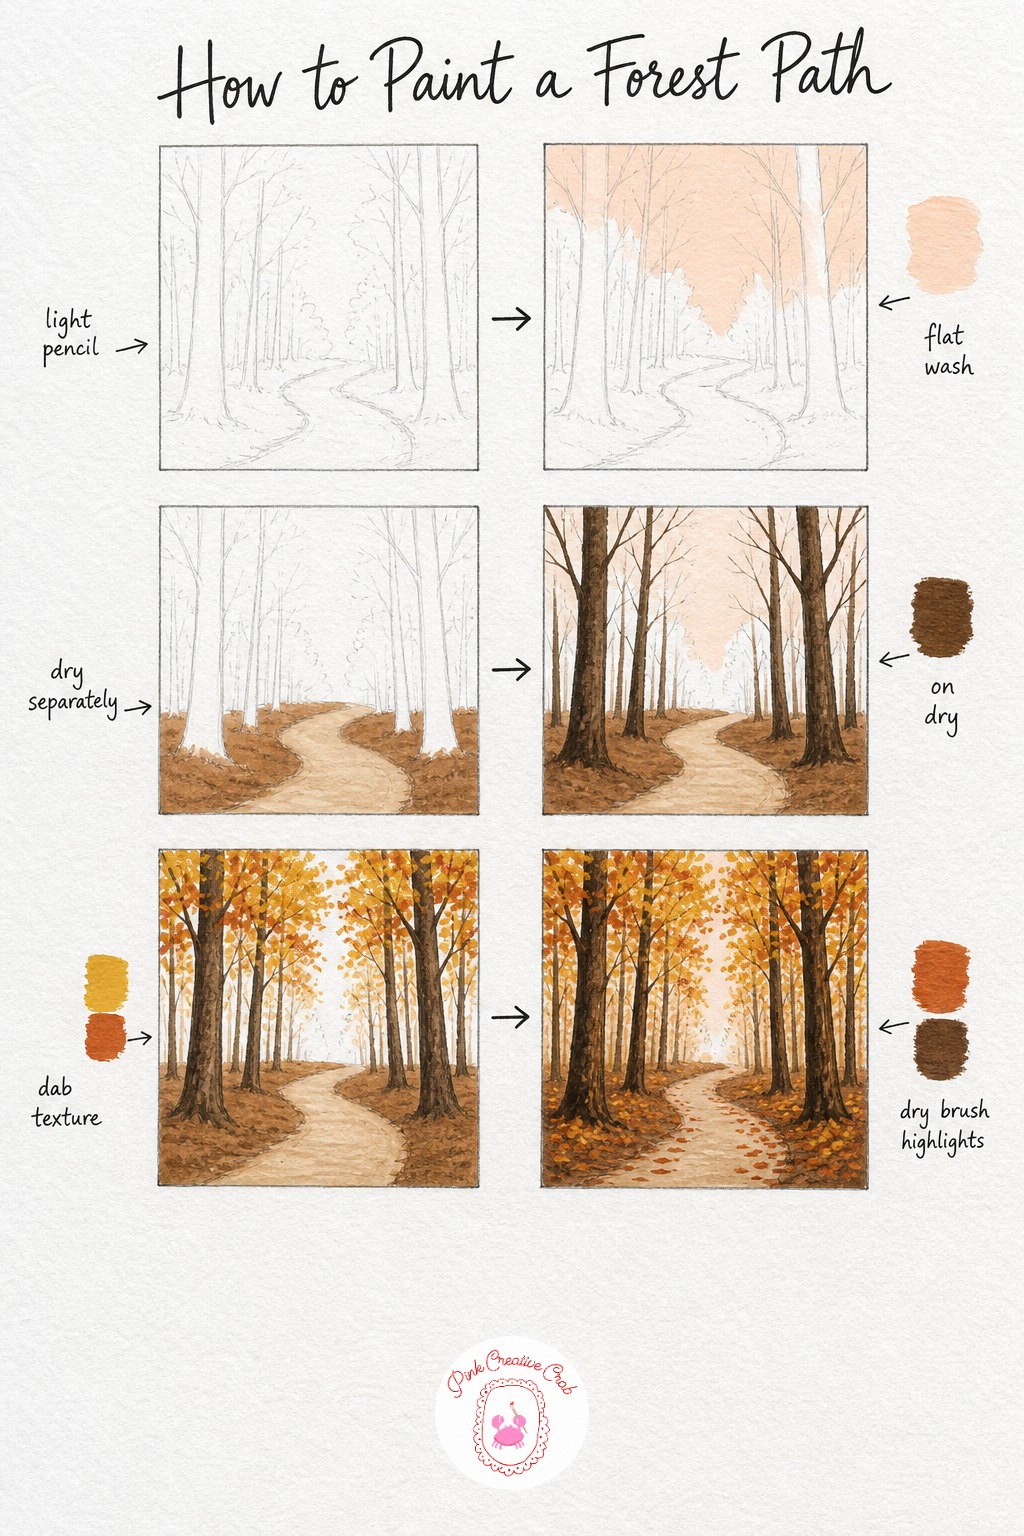
Sketch a path that curves away into the distance with a few tall trunks leaning in from both sides, keep the trunks simple, just slightly tapered vertical shapes. This is the scene where perspective does most of the work, so let the path narrow as it goes back.
Wash a pale peach sky in the gaps between the treetops, then once that is dry lay a soft tan down the path itself and a warm brown either side for the forest floor. Paint these two ground tones as separate dry stages, not wet into wet, or they muddy together fast.
Paint the trunks in dark brown with a small round brush, thin at the top, then dab gold and rust leaf clusters above each trunk with a stiff, almost dry brush loaded lightly. Twist your wrist slightly with each dab so the clusters look broken rather than one solid blob.
Scatter a few more dabbed leaves along the path itself and add a thin shadow line down one side of each trunk with burnt umber, that shadow is what gives the trunks their roundness. If your readers enjoy this cozy look, the fall junk journal pages make a nice companion project with the same warm palette.
Barn With Hay Bales
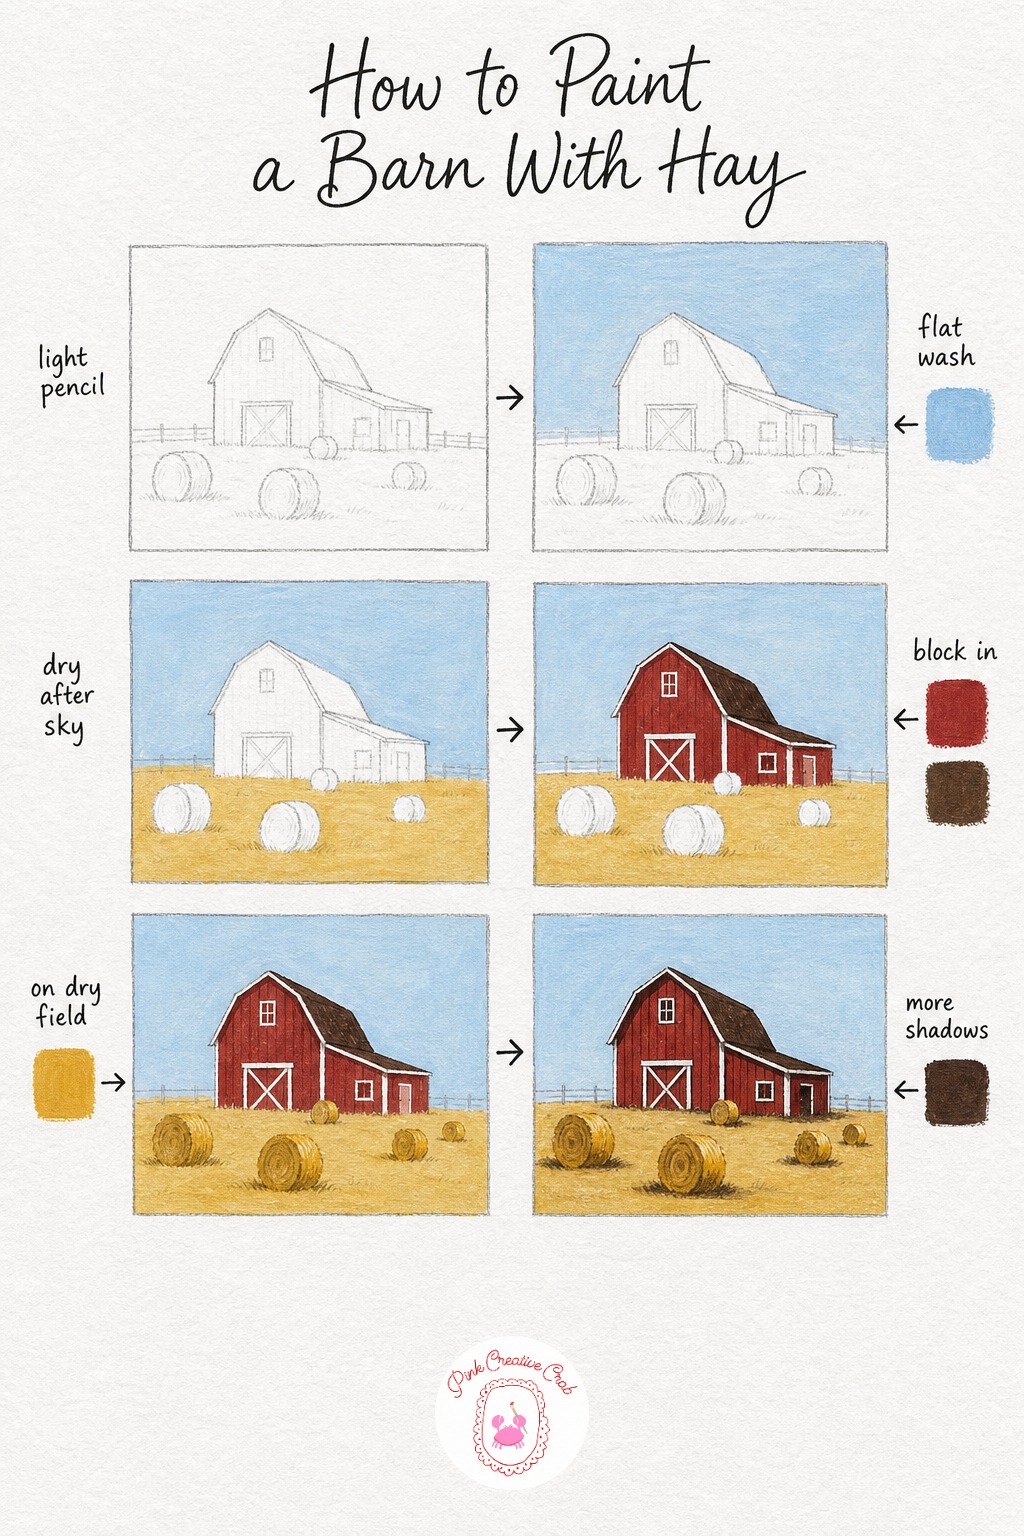
Keep the pencil sketch simple here, a boxy barn shape with a triangle roof, a door, and a few overlapping circles in front for hay bales. Overlap at least two of the bales, that small detail makes the field read as a real pile instead of floating shapes.
Wash a pale blue sky behind the roofline first, then once dry, brush a soft mustard field wash across the whole lower area in front of the barn. Let that field wash dry completely, it needs to sit under the red walls without bleeding.
Block in the barn red solid across the walls and a dark brown roof above it, two coats if the mustard shows through. Paint the hay bales next in gold ochre, working in a circular motion with the brush so each one keeps its round edge.
Finish with burnt umber shadows tucked under the barn eaves, along the base of the walls, and under each hay bale, this is what lifts the barn and bales off the flat field. A common beginner mistake is skipping shadows under the bales entirely, so do not rush past this last stage.
Apple Tree With Ladder
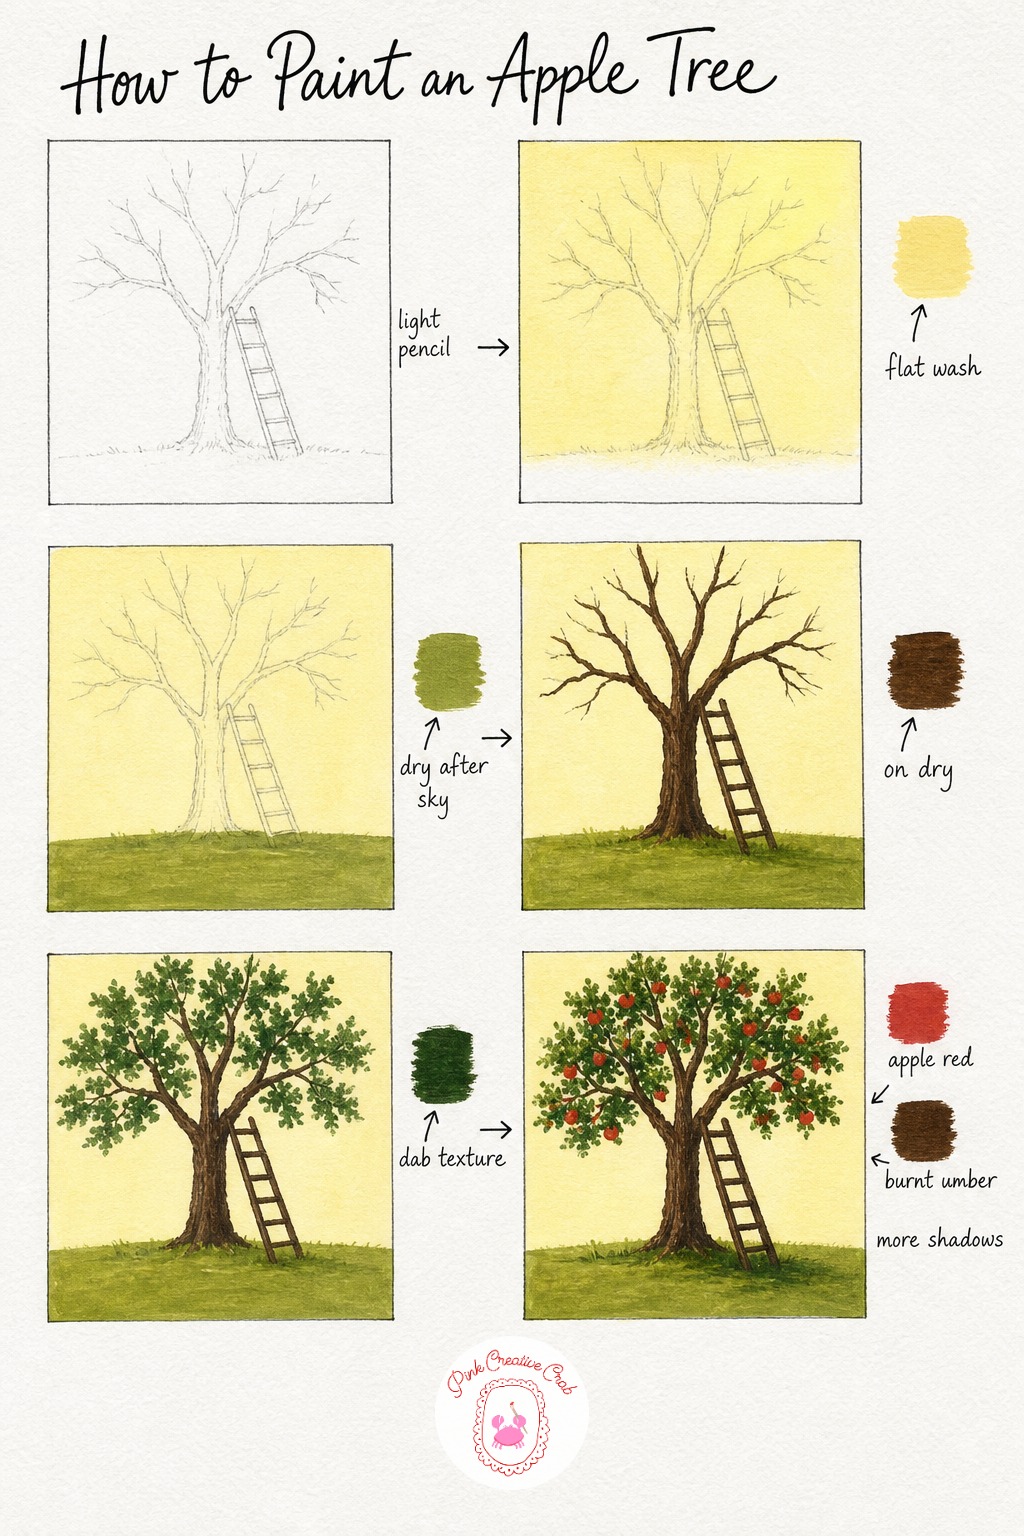
Sketch the trunk with a slight lean and a few main branches splitting off, then draw a simple ladder resting against one side of the trunk at an angle. Keep the ladder rungs light in pencil so they stay easy to paint over cleanly later.
Wash a pale yellow sky behind the whole tree, then once that is dry lay an olive green grass wash across the ground. Paint the trunk and branches in dark brown next, along with the ladder, using a small round brush for the thin branch tips.
Dab deep green leaf clusters all across the branches with a stiff dry brush, building the canopy up gradually rather than filling it in one pass. Leave small gaps between dabs so bits of sky peek through, that is what keeps the canopy from looking like a solid blob.
Add small red apple dabs scattered through the green, a few on the ground too, then finish with a burnt umber shadow under the ladder feet and along the base of the trunk. If you want more leaf practice first, the fall doodles for beginners are a gentle warm up for this kind of dabbed texture.
Cozy Porch With Mums and Lanterns
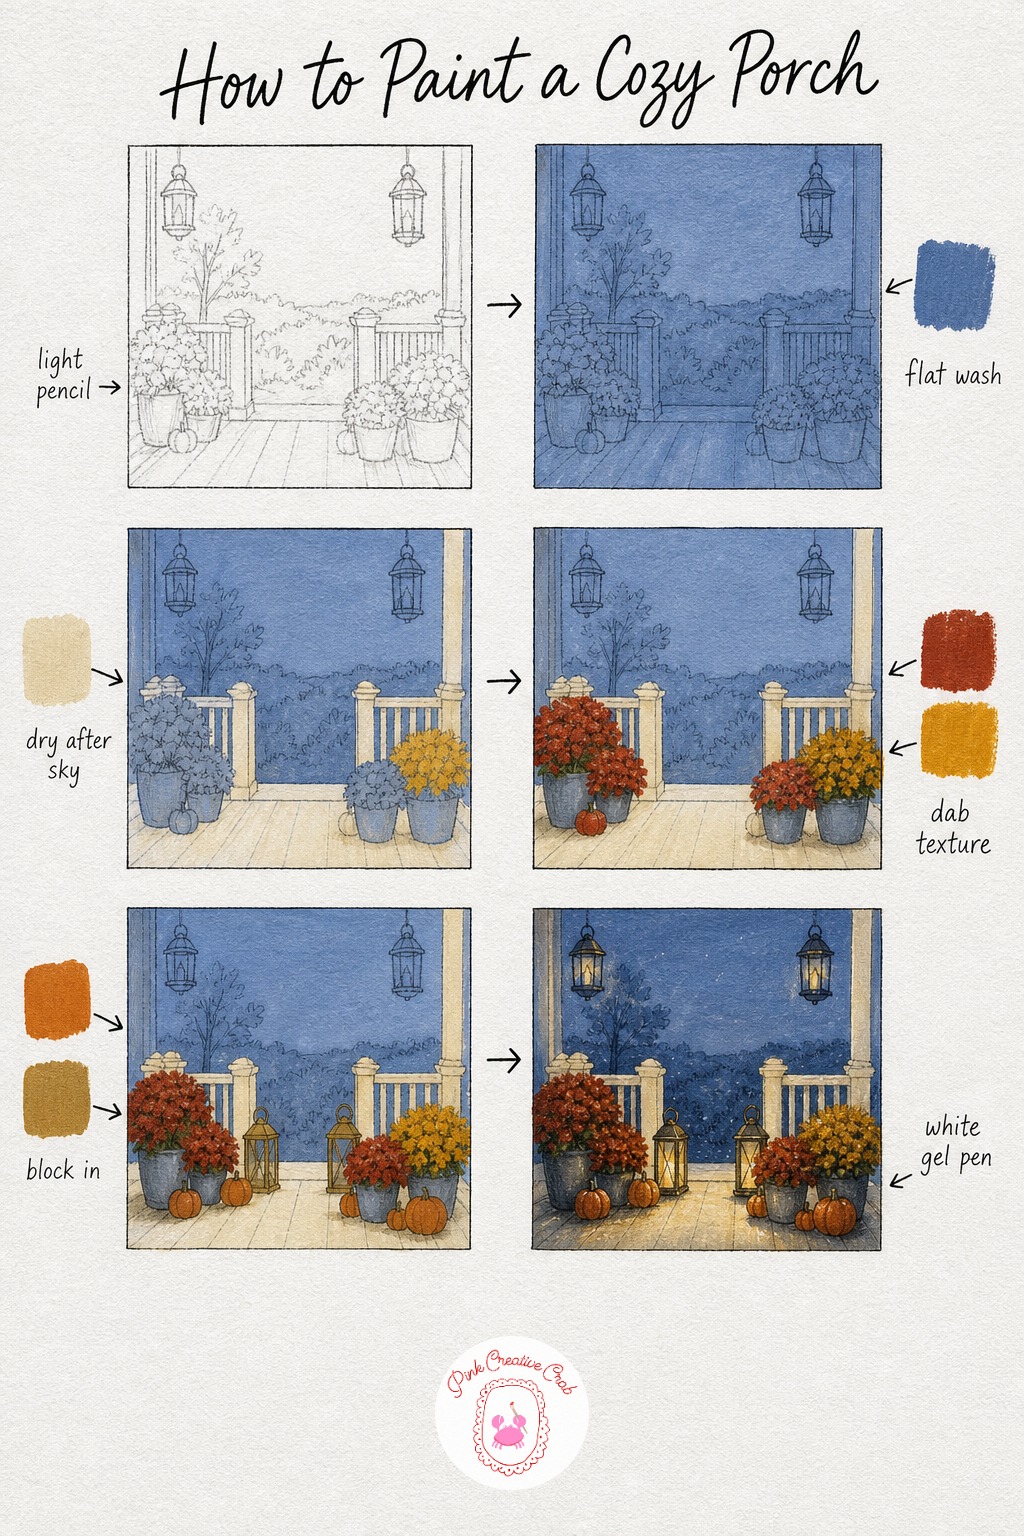
Sketch a simple porch corner, a railing with a few posts, a step or two, and some round pots along the edge, then add hanging lantern shapes above and a pumpkin or two on the step. This scene has more small shapes than the others, so keep every pencil line light and loose.
Wash a soft dusk blue across the whole background to set that evening mood, then once dry, paint a warm cream wash over the porch floor and railing. Let the cream dry fully before touching it again, porch wood needs a clean flat base for the posts to read well.
Dab rust and mustard mum flowers into each pot using small circular dabs, clustering them tightly so each pot looks full. Paint the pumpkins and lantern bodies solid next in pumpkin orange and gold ochre, keeping the lantern shapes simple boxes or ovals.
Finish by dabbing a touch of pale yellow glow inside each lantern and adding burnt umber shadows along the porch floor under the pots and steps. A fine white gel pen can add a tiny highlight dot inside each lantern once everything else is dry, it makes the whole porch feel lit from within.
Scarecrow in a Cornfield
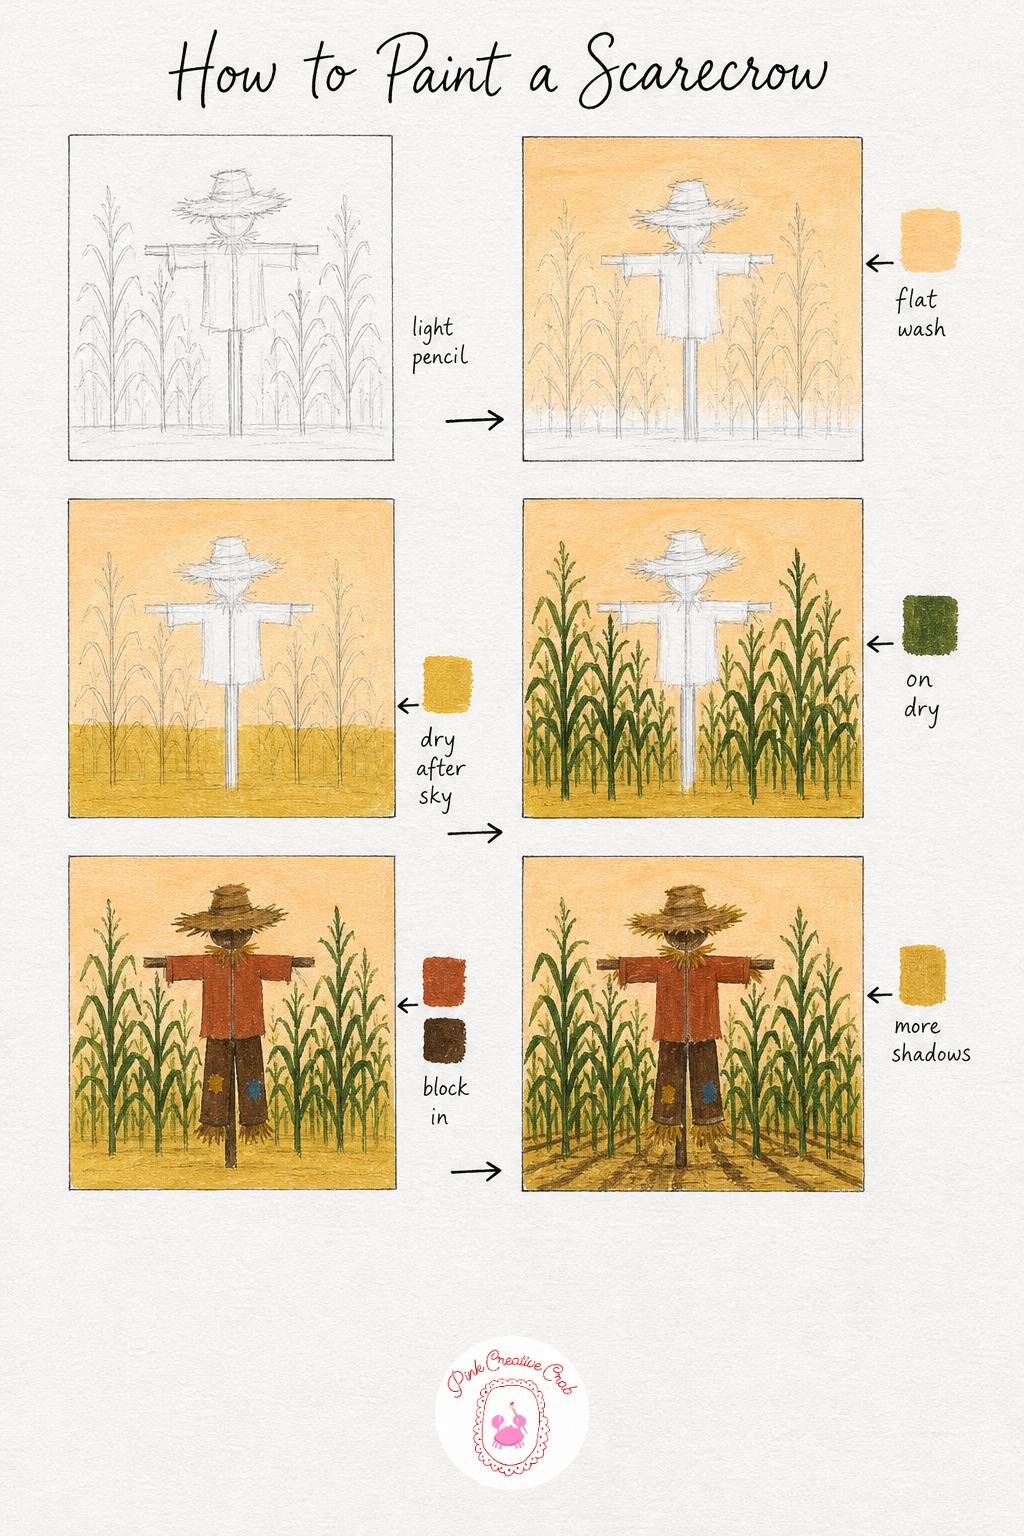
Sketch a central post with the scarecrow’s arms spread wide, a simple shirt and patched pants shape, a round head with a hat, and a scatter of tall cornstalks behind. Keep the stalks loose and slightly uneven in height, a perfectly even row looks stiff.
Wash a pale orange sky across the background, then once dry, lay a soft mustard wash over the ground beneath the stalks. Paint the cornstalks in deep green next with a small round brush, pulling thin upward strokes for the leaves.
Block in the scarecrow’s rust shirt, burnt umber patched pants and gold ochre straw hat solid, this is the part where the scene gets its personality so take your time with the shapes. Let the stalks dry before painting the scarecrow over them so the edges stay crisp.
Dab a little extra gold ochre at the cuffs and collar for straw poking out, then add burnt umber shadow across the field at the base of the post and stalks. A light shadow stretching to one side also helps place the sun and makes the whole field feel grounded.
Covered Bridge Over a Creek
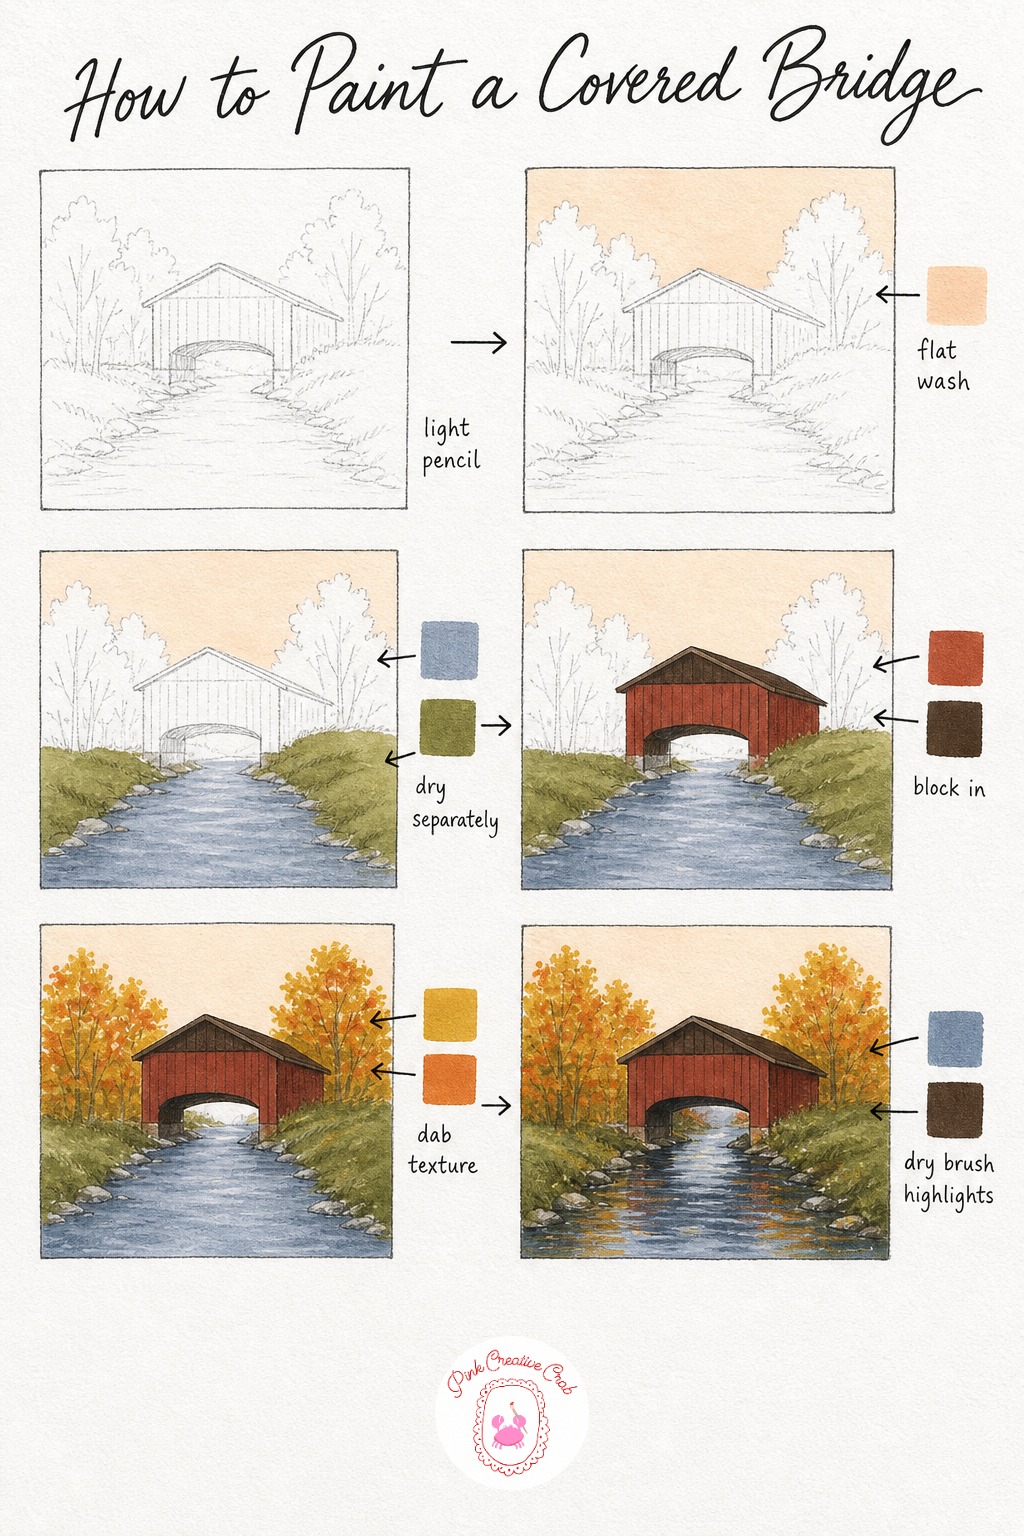
Sketch the bridge as a simple box with a peaked roof sitting over the creek, with two banks sloping down on either side and a loose tree line behind. A straight horizon under the bridge keeps the water reading flat and calm.
Wash a pale peach sky behind the trees, then once dry, paint the creek in blue grey and the banks in olive green as two separate dry stages so the water edge stays clean. Block in the bridge next in rust red walls with a dark brown roof, keeping the lines straight with a ruler if your hand wobbles.
Dab gold and orange leaf clusters along both banks with a stiff brush, letting some dabs overlap the water edge slightly for a natural, untidy tree line. This dabbing step is quick, do not overthink the leaf shapes, texture reads better loose than careful.
Finish with a few horizontal blue grey strokes under the bridge for the reflection and a burnt umber shadow tucked under the bridge arch itself. That shadow under the arch is what makes the bridge feel like it is actually standing over the water rather than floating beside it.
Rustic Fence With Pumpkins
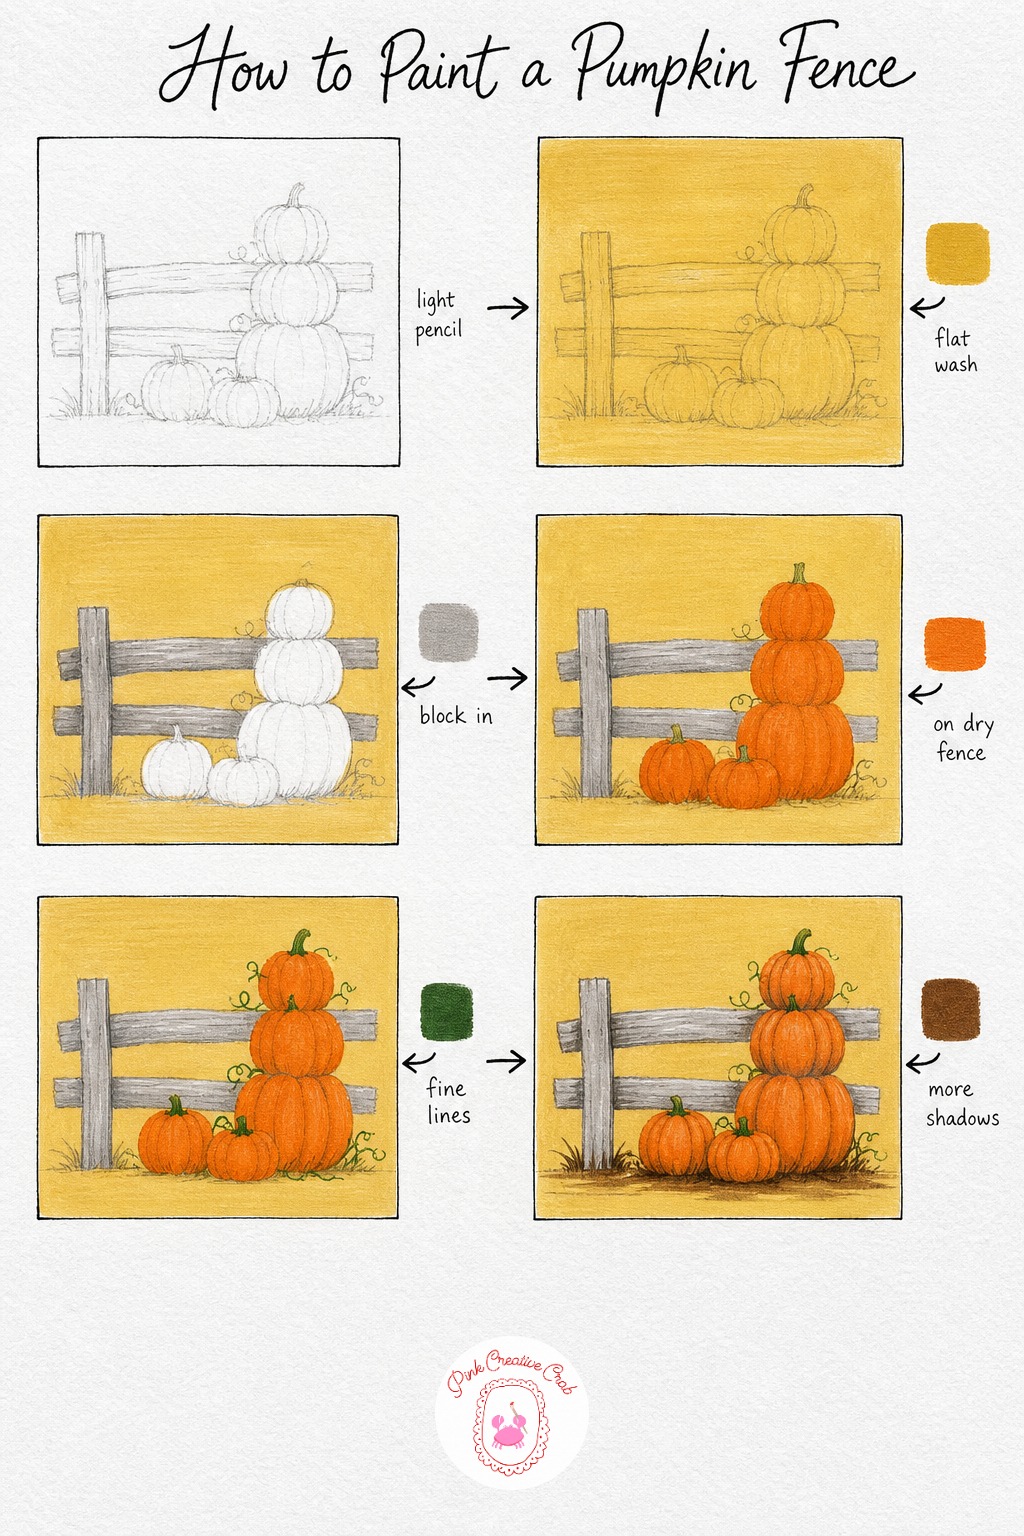
This one is a cozy object scene rather than a wide landscape, so keep the composition tight, just a split rail fence crossing the page with a few pumpkins stacked and leaning along it. Sketch the rails first, then draw the pumpkins overlapping the lower rail so they look settled in place.
Wash a soft mustard background behind the fence, then once dry, paint the rails and posts in a weathered grey, dragging the brush a little dry for a rough wood texture. That slightly streaky grey is exactly what you want here, do not smooth it out too much.
Block in the pumpkins in solid orange once the fence is dry, letting a couple of them overlap the rail itself for depth. Add deep green stems and a thin curled vine line or two reaching off one pumpkin, a fine round brush keeps these lines crisp.
Finish with burnt umber shadows tucked under each pumpkin and along the base of the fence posts, this single shadow pass is what separates a flat sketch from a scene that feels real. If fence texture gives you trouble, a dry, almost empty brush dragged once over the grey is often enough, resist the urge to keep going back over it.
Maple Tree in Full Color
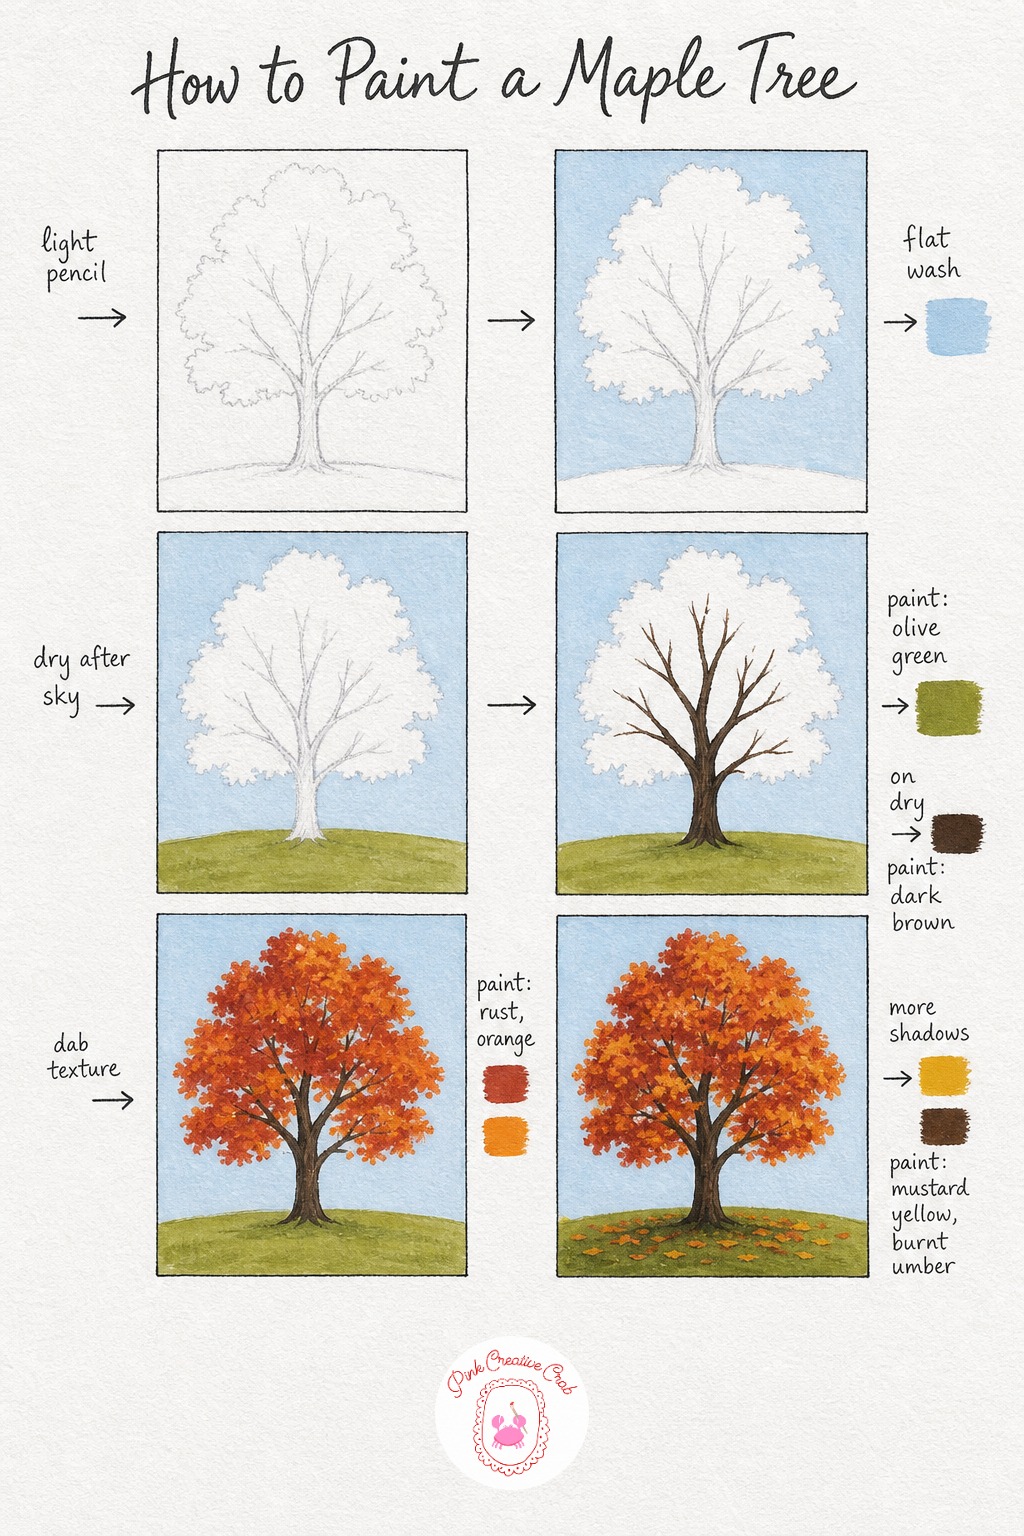
Sketch just the trunk, a handful of main branches, and a rough cloud like outline for where the canopy will sit, nothing needs to be exact since the leaf dabbing covers most of it. One single tree as the whole subject is a great way to practice the dabbed leaf technique before tackling a full forest scene.
Wash a pale blue sky behind the canopy outline, then once dry, paint a soft olive green across the ground. Paint the trunk and branches in dark brown next, letting a few branch tips poke just past where the canopy will be.
Build the canopy with rust and orange dabs using a stiff, mostly dry brush, working in loose clusters rather than one even coat. Vary the pressure as you dab, heavier in the center of the canopy and lighter near the edges, so the shape stays soft rather than hard edged.
Scatter a few mustard yellow leaf dabs on the grass below and finish with a burnt umber shadow pooling at the base of the trunk. If your canopy ends up too solid looking, dab a touch more sky blue back into a few gaps once it is dry, it opens the shape right back up.
Orchard Crate of Apples
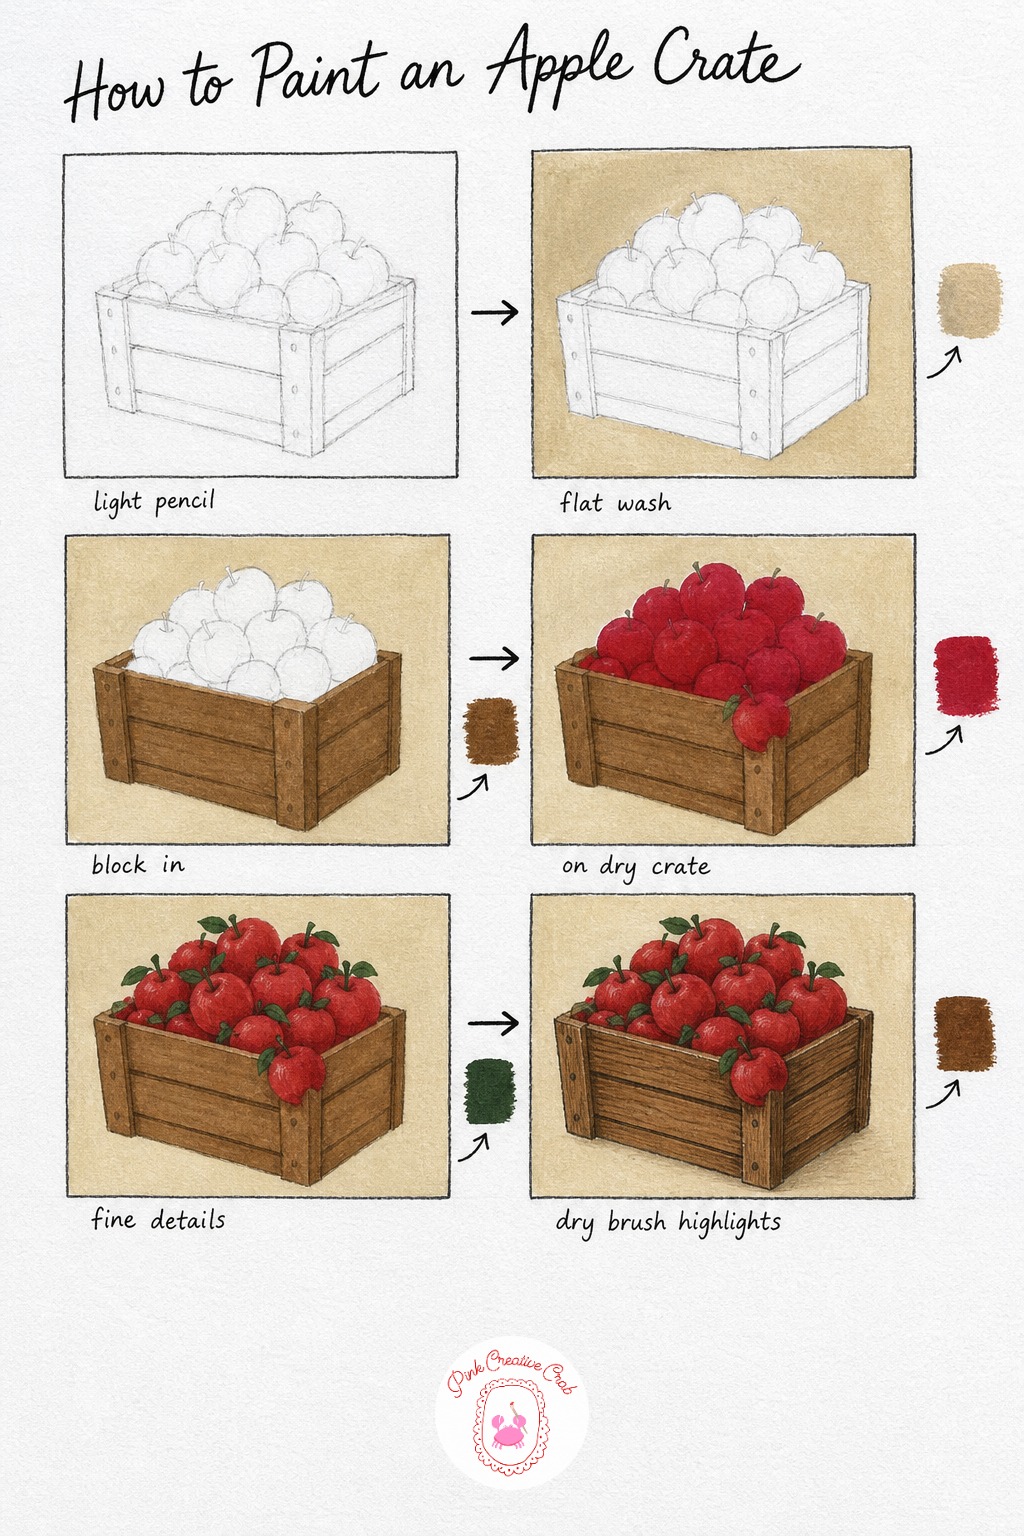
Keep this object tight and simple, a wooden crate drawn as a box shape with slatted sides, filled with a pile of overlapping circles for apples, a few spilling just over the front edge. Overlapping circles at different sizes is what sells the pile, so avoid lining them up evenly.
Wash a soft tan background behind the crate, then once dry, paint the crate itself in warm brown, letting the brush follow the direction of each plank. Block in the apples next in solid red once the crate is fully dry, two coats if the brown shows through.
Add small deep green stems and a tiny leaf or two tucked among the apples with a fine round brush, these small details are quick but they make the pile feel fresh picked rather than painted flat. This kind of still life object pairs nicely with the still life ideas in the easy acrylic painting ideas for beginners if you want more single object practice.
Finish with a few thin burnt umber lines for wood grain across the crate and soft shadows tucked under each apple where it meets another or the crate floor. That shadow pass under the apples is what gives the whole pile its roundness, do not skip it even if you are tempted to stop early.
Window Box With Fall Flowers
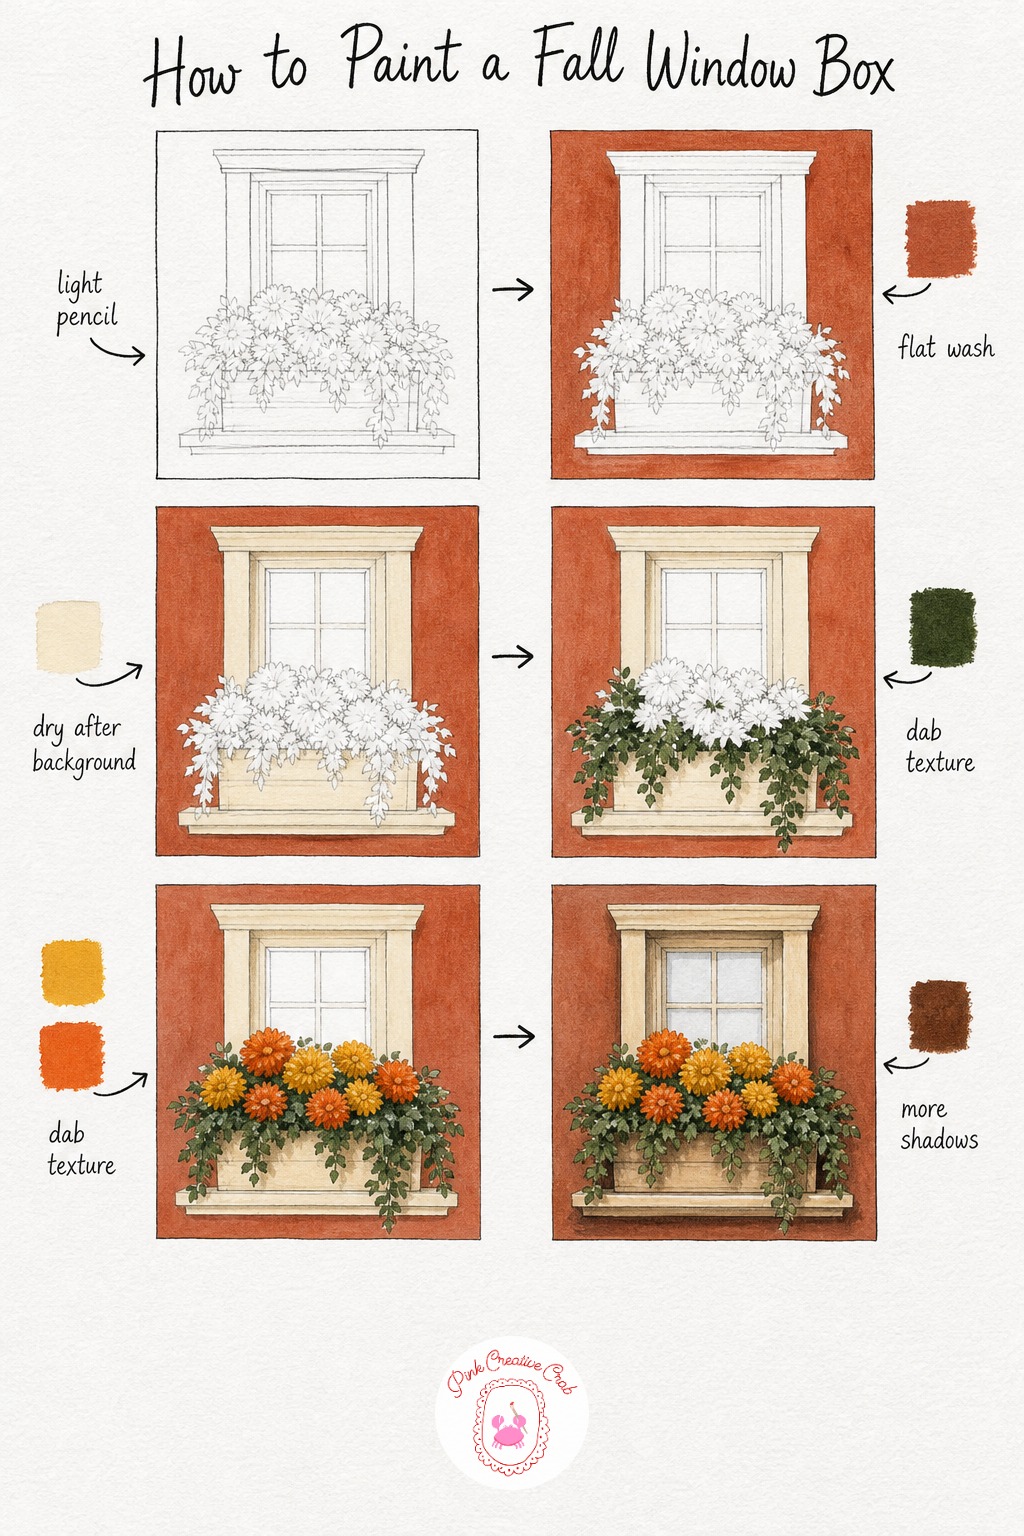
Sketch a simple window frame with a sill below it and a long rectangular flower box sitting on the sill, then add loose overflowing lines spilling down from the box for trailing greenery. This object works well as a smaller, quicker project if you want something that paints up fast.
Wash a soft rust background behind the frame, then once dry, paint the frame and sill in a warm cream, keeping the lines fairly straight since a window benefits from tidy edges. Let the cream dry completely before the greenery goes in over the box.
Dab deep green trailing leaves spilling down from the box edge with a stiff dry brush, pulling some dabs downward in short strokes rather than round dots so they read as trailing stems. Dab mustard and orange mum blooms in clusters among the greenery next, packing them a little tighter near the center of the box.
Finish with burnt umber shadow lines under the sill and along the lower edge of the box where it meets the wall. That shadow is small but it makes the whole box sit forward off the wall instead of looking pasted flat against it.
What to Do Next
Pick whichever scene is calling to you most, set out your mustard, rust and deep green mixes, and paint along one stage at a time, the whole thing comes together faster than it looks on the sheet.
Frequently Asked Questions
What kind of paint works best for a step by step fall painting?
Acrylic paint works best because it dries fast between layers and gives rich, opaque rust and orange tones without the colors turning muddy or sinking into the paper.
How do I paint realistic looking fall leaves without drawing each one?
Use a stiff, almost dry brush and dab color in small clusters rather than brushing it smooth. Varying the pressure and letting bits of the background peek through reads as leaves far better than careful outlines.
Do I need to mix my own autumn colors or can I buy them premixed?
Either works, but mixing your own rust, mustard and deep green from a basic set gives you more control and lets every scene share one consistent, cohesive palette across the page.
How long should I wait between layers in an acrylic fall scene?
Most acrylic layers dry to the touch within fifteen to twenty minutes at room temperature. Check that the surface looks fully matte with no shine before adding darker details on top.
My pumpkins or leaves keep looking flat, what am I missing?
Flat shapes almost always mean the final shadow stage got skipped. A thin burnt umber shadow tucked under every rounded object is what gives it volume, so never stop before that last step.
Have any thoughts?
Share your reaction or leave a quick response — we’d love to hear what you think!
-
 0
-
0
-
0
-
0
-
0
-
0


