

Table of Contents
- Before You Start
- Bookshop Window at Dusk
- Narrow Street With Paper Lanterns
- Rainy Night Cafe
- Train Station Platform
- Tiny House With Lit Attic Window
- Harbor at Night
- Lit Attic Window From the Street
- Food Truck Glowing at Dusk
- Umbrella Under a Streetlamp
- Bakery Window After Hours
- Lighthouse at Night
- Carousel at Dusk
- Night Market Stall
- Ferris Wheel Silhouette
- Cottage Porch Light
- City Rooftops at Night
- Frequently Asked Questions
A gouache painting tutorial step by step collection like this one is my favorite kind of rabbit hole, because every single scene below ends the same satisfying way: a few flat dark shapes slowly catching one small patch of warm light until the whole page glows. I love how gouache handles these night subjects, the matte blocks of deep blue and purple feel almost like paper cutouts until that one window or lantern goes in and suddenly the picture breathes.
Below you get sixteen full scenes, each one broken into four to six stages with its own little color swatch, so you always know exactly which pot of paint to reach for next. Pick whichever window, street or platform calls to you tonight and paint it start to finish in one sitting.
Using these images: free for personal projects such as printing, coloring, cards, journals and gifts. Handmade items that include them may be sold up to 30 pieces per design. More than that is commercial use and is not permitted, and neither is selling or sharing the images themselves or passing them off as your own. Please ask before any other use.
Before You Start
- Work on paper with some weight to it, at least 200gsm, so flat washes of gouache dry without the page curling or buckling.
- Mix your darkest blues and purples first and mix more than you think you need, since matching a flat color twice rarely looks exactly the same.
- Keep your gouache the consistency of thin cream, not watery and not toothpaste thick, so each layer sits flat and opaque instead of streaky.
- Test every new mix on a scrap corner before it touches the sky or the walls, gouache dries slightly lighter than it looks wet.
- Let each dark layer go fully matte and dry before adding a lit window or lantern on top, or the warm yellow will drag and turn muddy.
- Save your brightest yellow and white for the very last stage only, that restraint is what makes the glow read as light instead of just paint.
Bookshop Window at Dusk
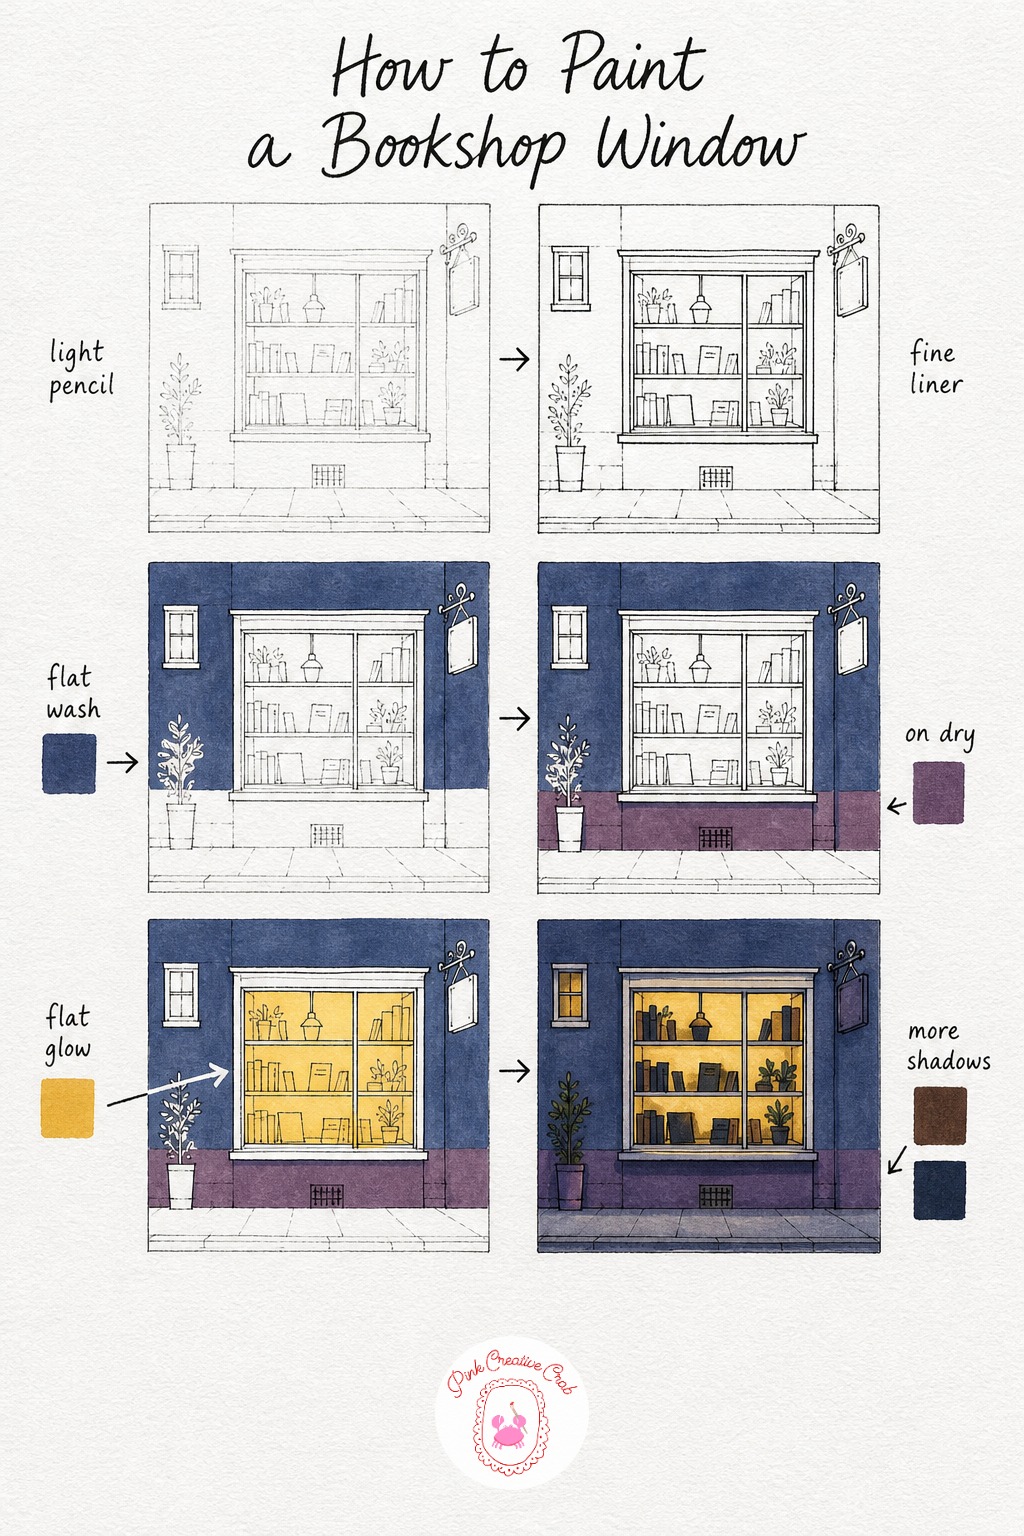
Start this one with a light pencil box for the window frame, the shelf lines inside it and the edge of the street where the shop wall meets the pavement. Keep the pencil soft, you will cover most of it with ink and paint in the next two stages anyway.
Go over the window frame, the shelf and the door with a fine liner, this gives the whole scene a clean graphic edge once the gouache goes on top. Let the ink dry fully, a minute or two is usually enough, before the first wash touches it.
Paint the sky and upper wall in one flat indigo wash, then once that is matte dry, bring in a plum purple for the lower wall and door so the building reads as two simple blocks of cool color. The window itself gets a flat pool of golden yellow, this is the stage beginners rush, so load your brush generously and lay it in one even pass rather than scrubbing back over wet paint.
Finish with small dark book silhouettes on the shelf and a soft shadow under the windowsill to ground the glow. My tip: paint the yellow window slightly larger than your pencil line, a little overflow of light looks more convincing than a perfectly neat rectangle.
Narrow Street With Paper Lanterns
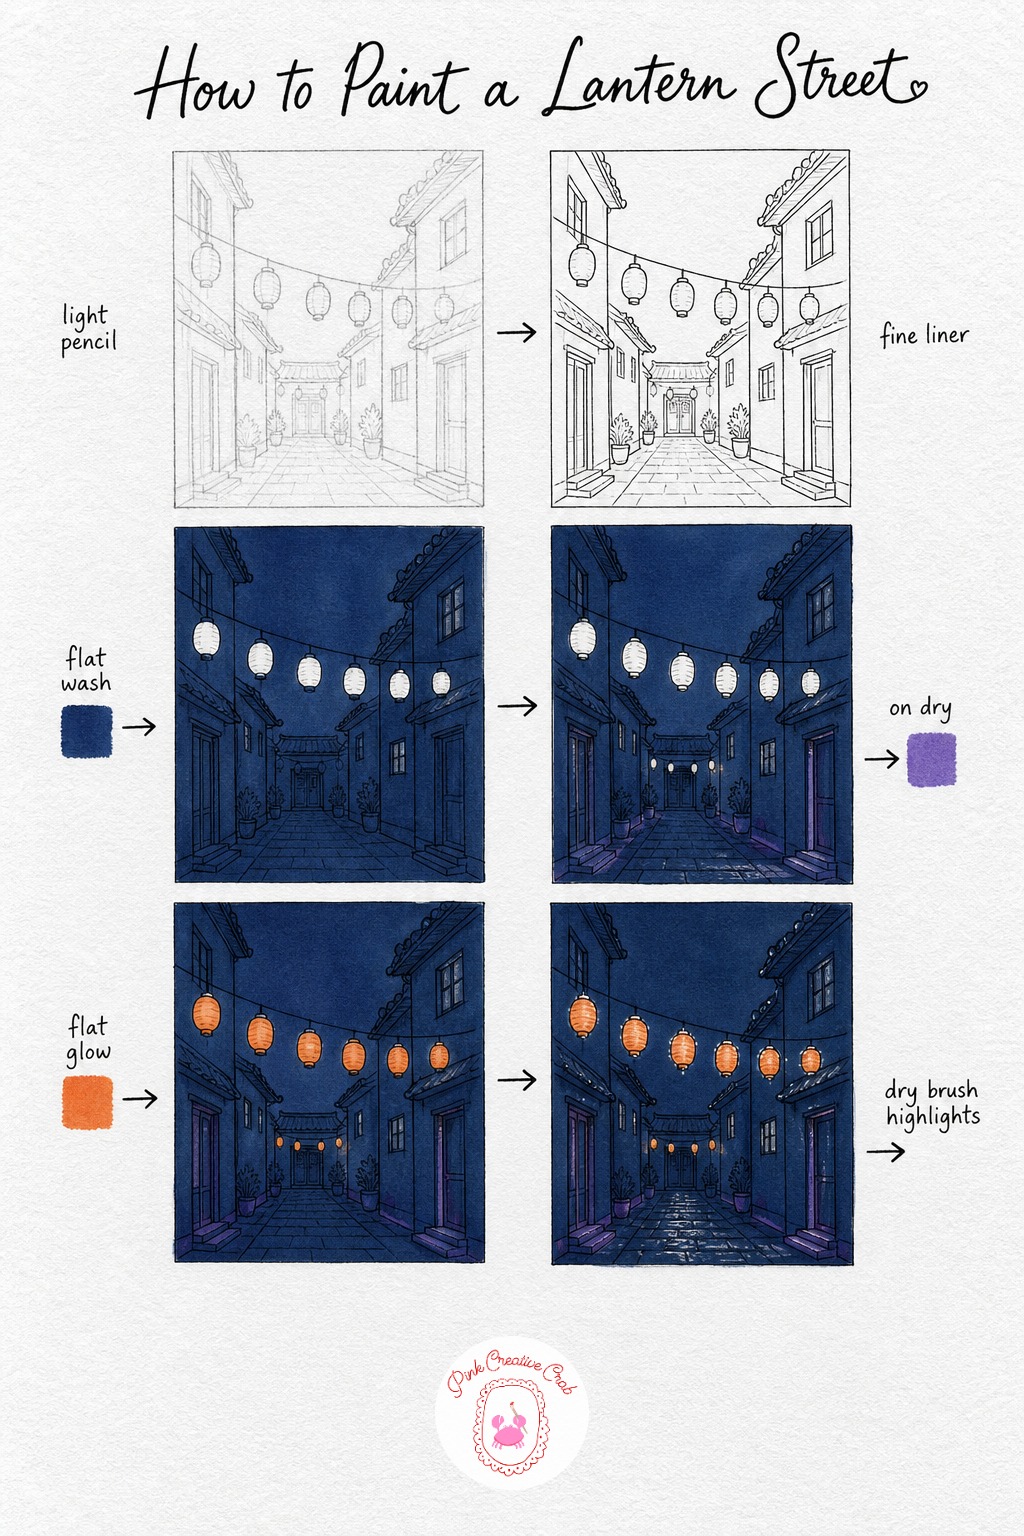
Sketch two buildings angled toward each other so the street narrows toward the top of the page, then add a loose curved line for the string of lanterns between them. Keep the lanterns as simple rounded shapes, you will build their glow later.
Outline the buildings, windows and lantern edges in fine liner so every shape stays crisp once the dark wash goes over it. This scene relies on that ink line a lot, since the buildings themselves stay quite flat and simple.
Wash the sky and both facades in one flat navy, letting it pool slightly darker near the top of the page. Once matte dry, add violet shadow low along the street and in doorway recesses, then paint each lantern a flat warm orange, working one lantern at a time so the paint stays opaque rather than thin.
Finish with tiny dots of white gouache on lantern rims and a few flecks along the ground to suggest damp stone catching light. If you enjoy this street-at-night mood, the lantern streets in this Japan sketchbook collection make a lovely companion study. My tip: stagger the lanterns at slightly different heights, a perfectly even row looks stiff.
Rainy Night Cafe
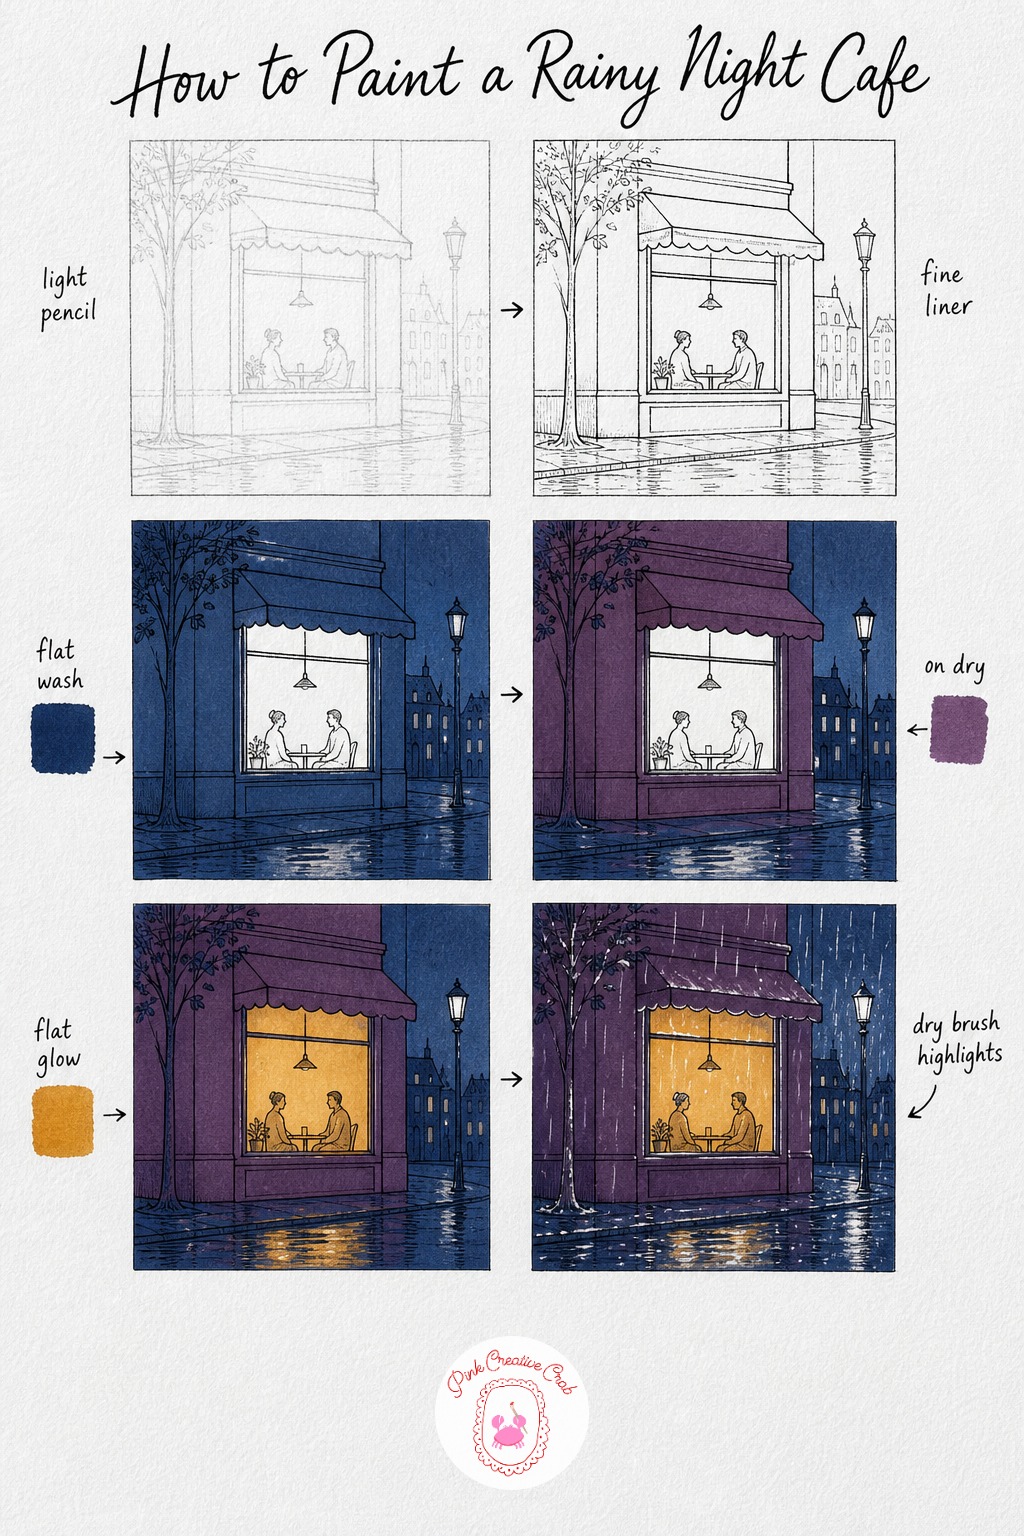
Pencil in the cafe window as a wide rectangle, add a simple awning line above it and two loose seated figures inside, kept as soft rounded shapes rather than detailed people. Sketch the pavement line low on the page to leave room for reflections later.
Ink the window frame, awning edge and the outlines of the figures, keeping the line light inside the window itself since warm paint will sit over it soon. Let this dry completely, ink smudges easily under a wet wash.
Flood the sky and pavement with one flat Prussian blue wash, this is your coldest, darkest layer and it should cover most of the page. Once dry, paint the cafe wall and awning in plum purple, then fill the window with amber yellow, letting it wrap softly around the seated figures so they feel lit from inside rather than painted over.
Finish with thin diagonal streaks of white gouache for rain and a few soft smears along the pavement for reflected light. My tip: keep the rain streaks few and slanted the same direction, too many straight lines flatten the mood instead of adding atmosphere.
Train Station Platform
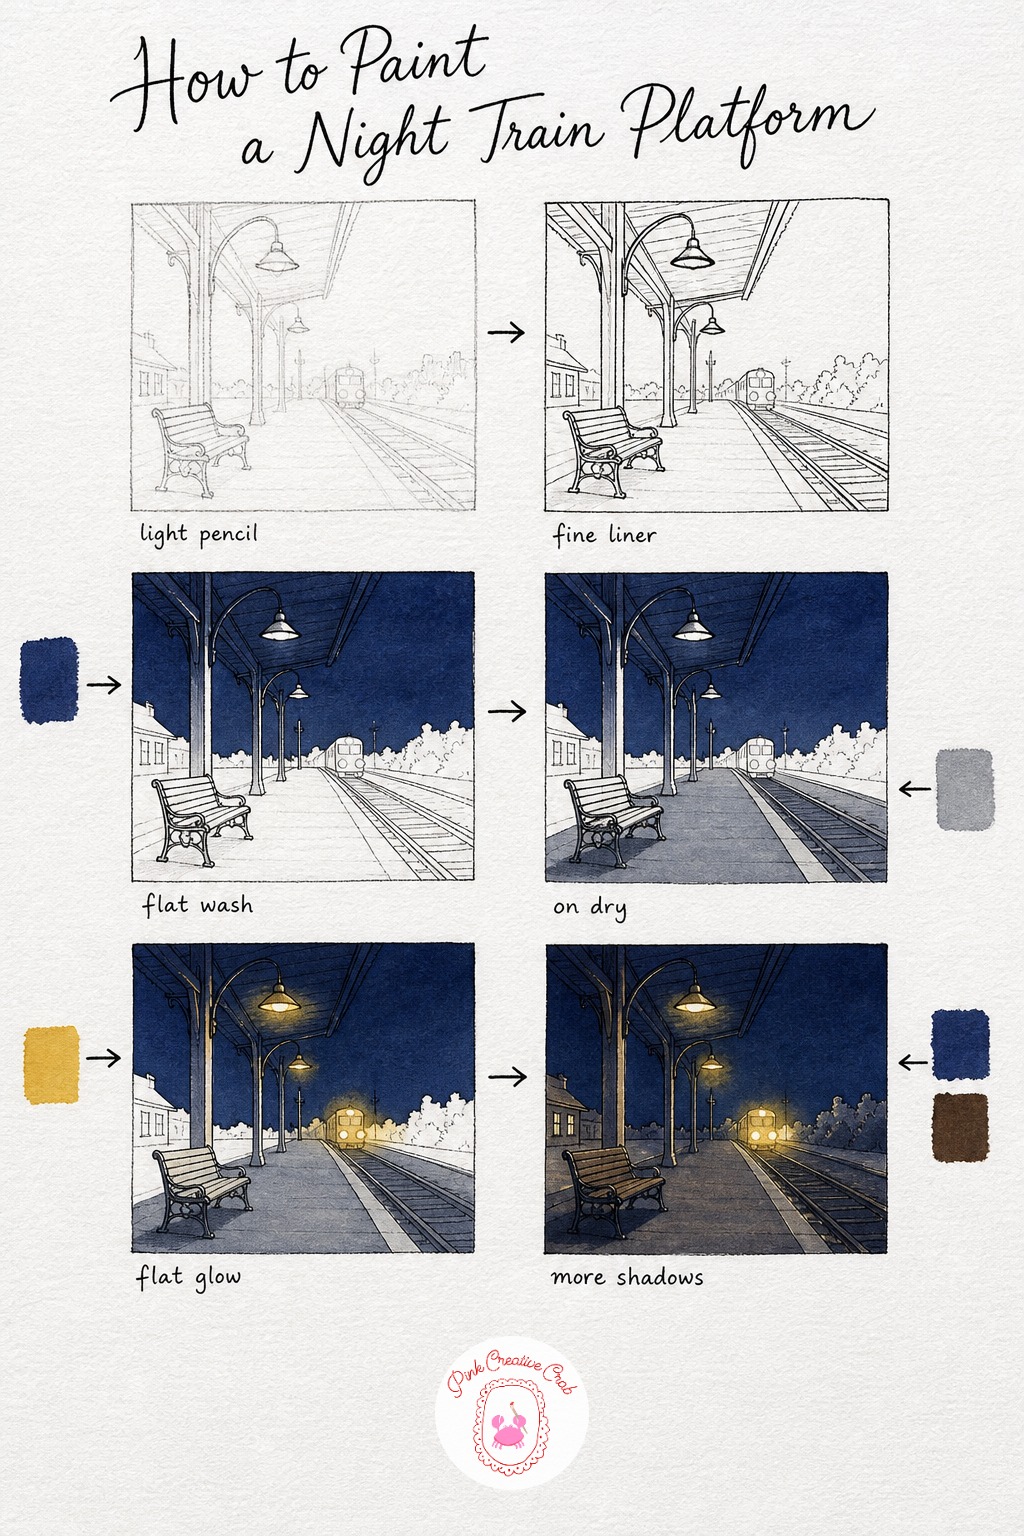
Sketch a simple platform receding into the distance, two or three lamp posts along it, a bench and a small train shape with round headlights far off. Keep perspective loose here, this is about mood more than precise lines.
Ink the lamp posts, bench and the edge where platform meets track, this gives the structure enough definition to survive the dark wash coming next. Let it dry fully before moving on.
Wash the sky and roof overhang in flat indigo, then once matte, lay a cooler grey wash over the platform floor and track to separate it from the sky. Paint a soft yellow glow around the top of each lamp and around the train’s headlights, letting the color feather slightly into the surrounding indigo while still wet for a gentle halo.
Finish with shadow under the bench and lamp bases using a mix of indigo and burnt umber, this is what grounds everything in the scene. My tip: make the lamp closest to you brightest and the furthest one dimmer, that single contrast creates real depth.
Tiny House With Lit Attic Window
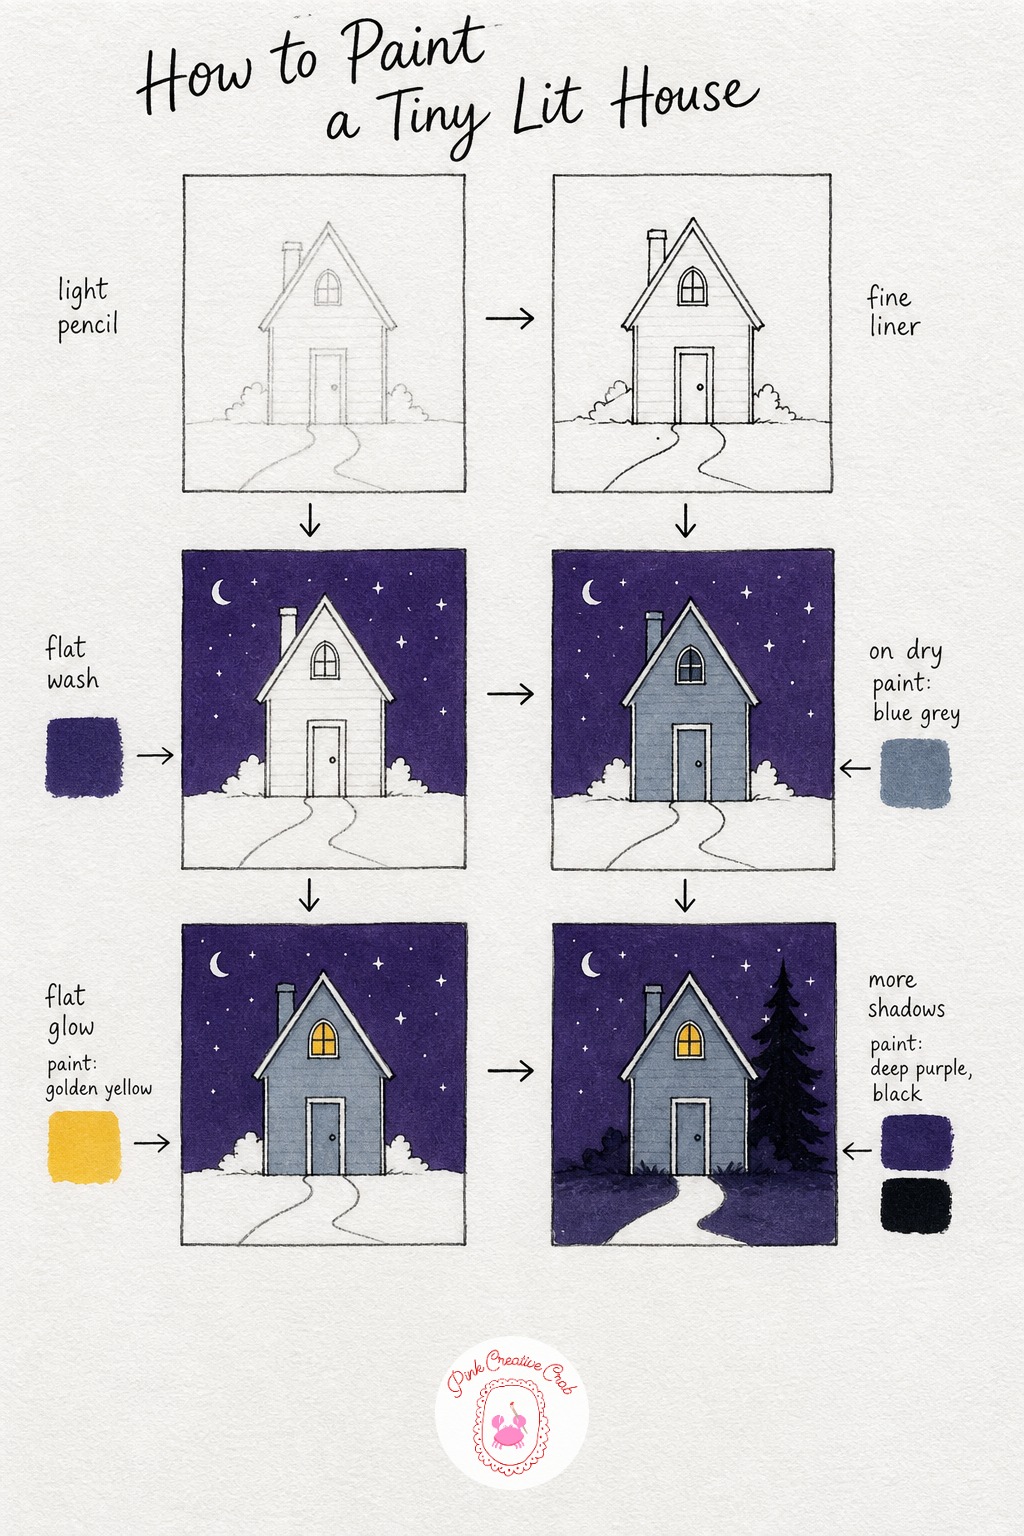
Keep the house simple, a square body, a triangle roof, one small attic window near the peak and a short path leading to the door. This is a forgiving subject for a first attempt at a full night scene, since there is only one light source to manage.
Ink the roofline, window frame and door so these stay crisp once the dark sky wash goes in around them. A steady hand here matters more than perfect symmetry, slightly wobbly roof lines still read as charming.
Wash the whole sky in deep purple first, right up to the roof edge, then once dry paint the house walls and roof in a softer blue grey so the building reads as a separate, slightly lighter shape against the night. Fill only the attic window with golden yellow, this single warm note against so much cool color is the whole point of the piece.
Finish with shadow along the base of the house and a simple dark tree silhouette beside it for scale. My tip: keep every other window on the house unlit or very dim, one glowing window tells a better story than three.
Harbor at Night
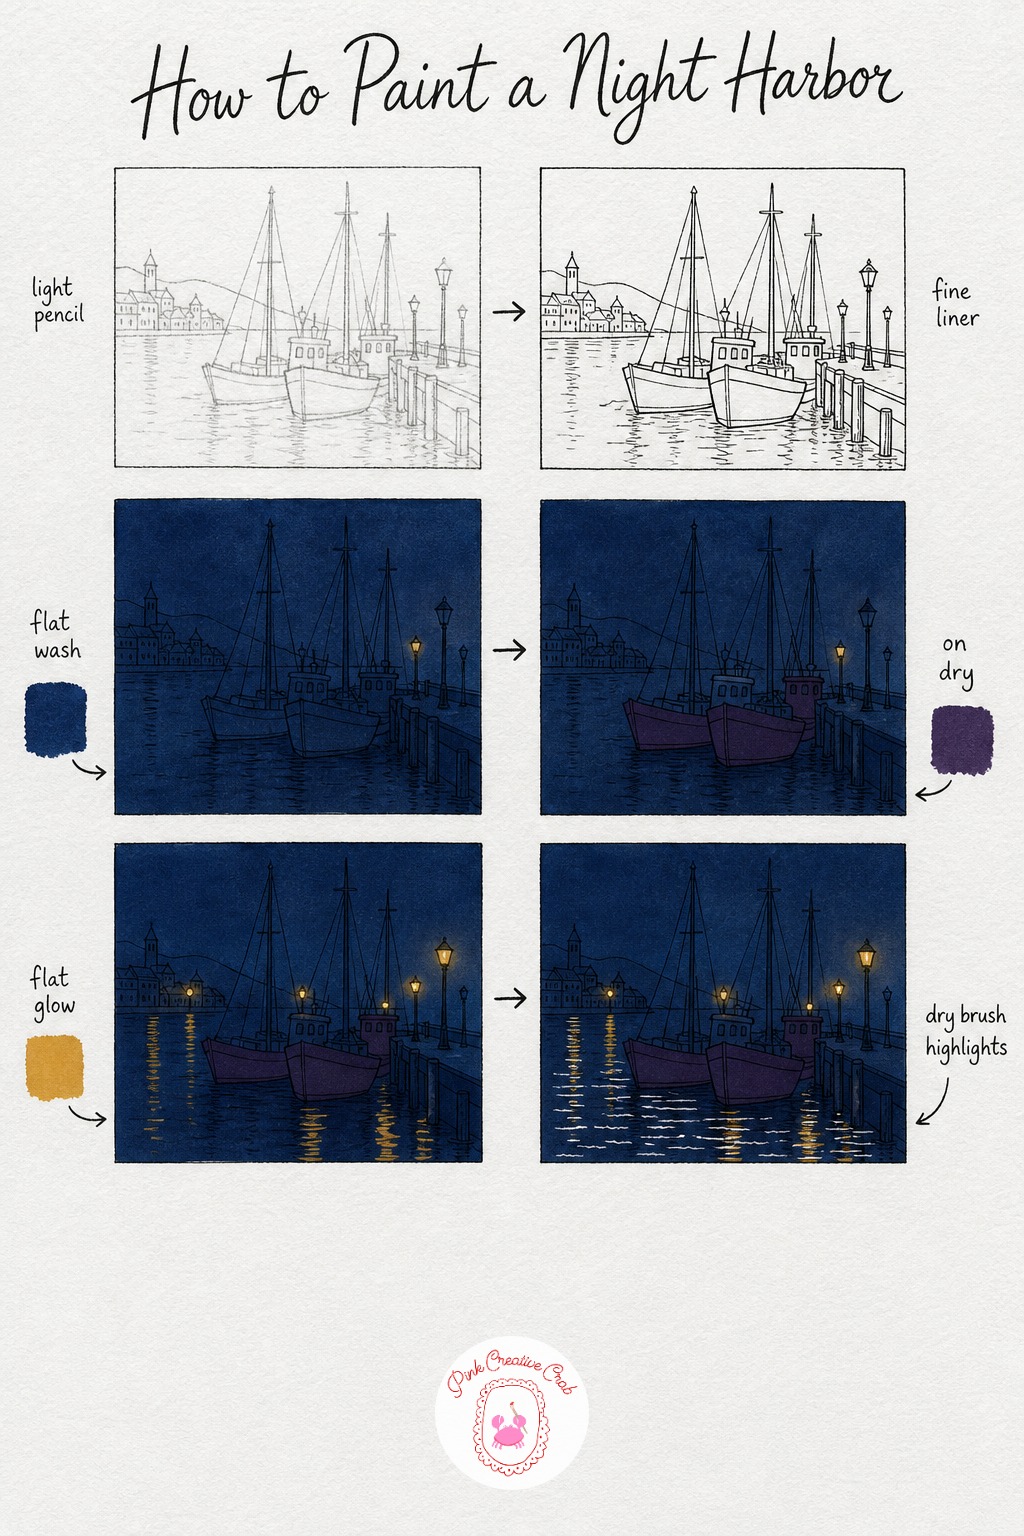
Sketch two or three simple boat shapes along a short pier, with a lamp post or two standing above the water line. Leave the water as a plain horizontal band, the reflections come later and do most of the work.
Ink the boat hulls, masts and pier edge so they hold their shape under the dark wash. Keep lines loose rather than fussy, boats at night read fine as simple silhouettes.
Wash the sky and water in one continuous flat navy, this unifies the whole scene before anything else happens. Once dry, paint the boat hulls a touch darker in plum purple so they separate from the water behind them, then add small amber glows at the harbor lamps and let a matching soft smear of the same yellow sit directly below each one on the water.
Finish with a few wavy white gouache lines under the lights to suggest gentle ripples catching the glow. If you like painting water scenes generally, the ideas in this gouache sea painting collection pair nicely with this one. My tip: keep reflections shorter and thinner than the lights above them, long reflections can overpower the scene.
Lit Attic Window From the Street
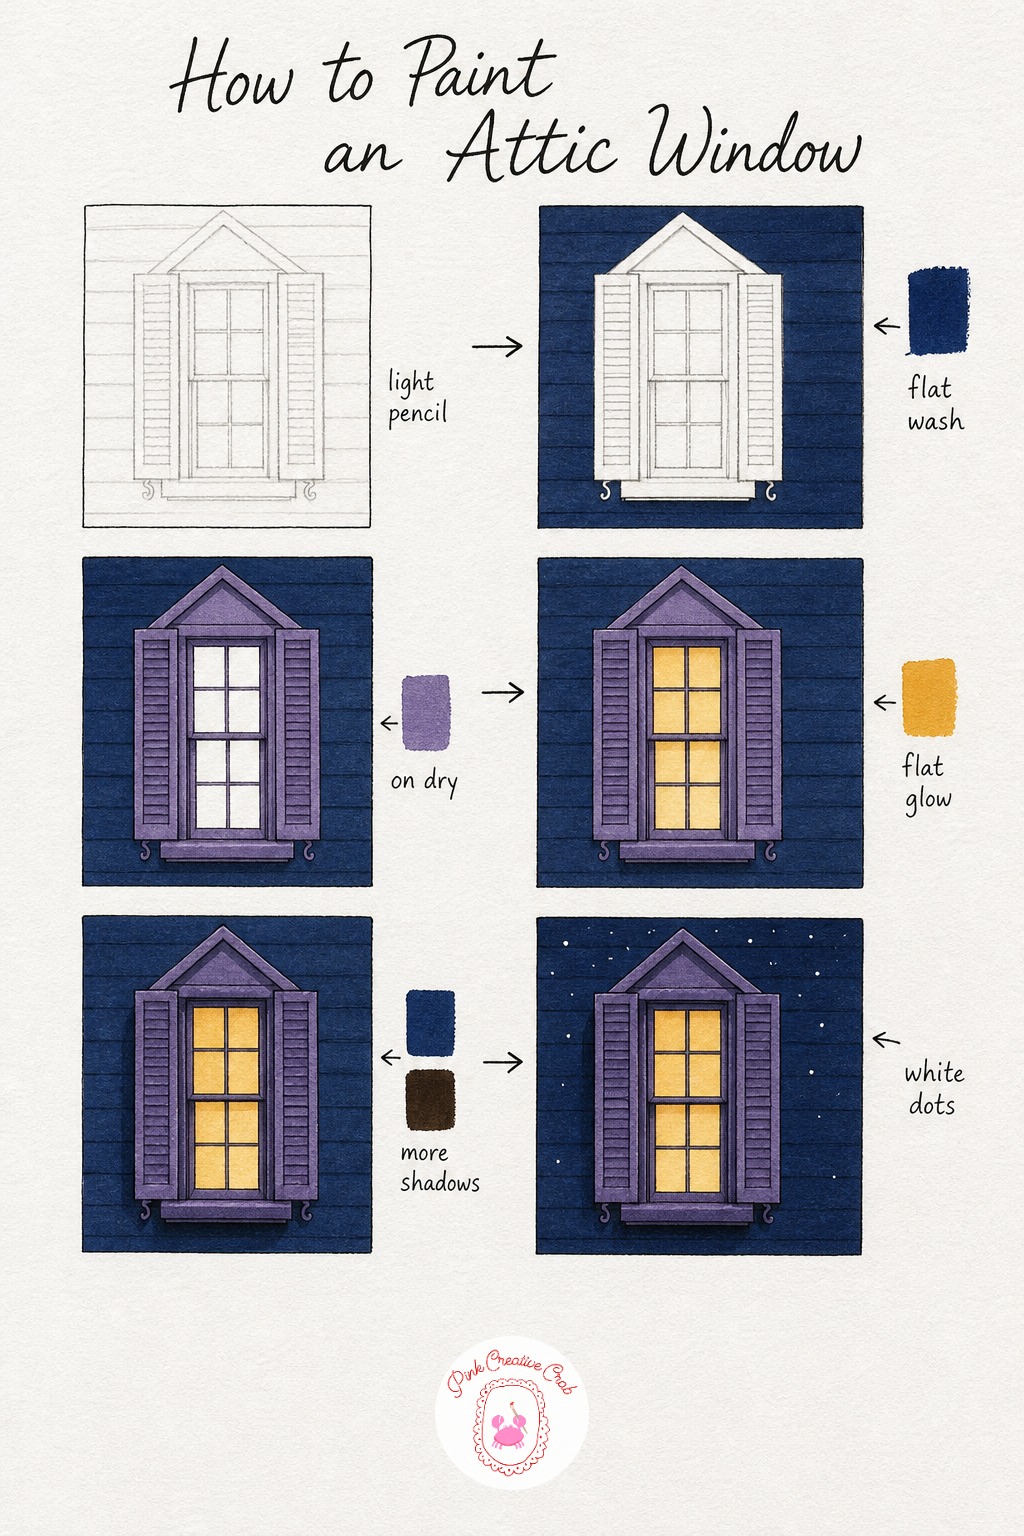
This one is just the window, no full building, so sketch a tall frame with two shutters and a simple sill, filling most of the page. It is a great subject if you want to focus purely on the glow without worrying about a whole scene.
Paint the wall around the window in a flat indigo wash first, covering everything except the glass and frame. Let this dry until it feels completely matte to the touch before adding the next layer.
Paint the shutters and frame a muted violet, keeping the edges clean against the indigo wall. Then fill the glass with a flat golden yellow, working in one confident pass since gouache shows every stroke if you go back into it while still wet.
Add shadow under the sill and along one side of the shutters to give the window some depth, then finish with a scatter of tiny white gouache dots across the dark wall for stars. My tip: keep the star dots irregular in spacing, a grid pattern looks mechanical rather than like a night sky.
Food Truck Glowing at Dusk
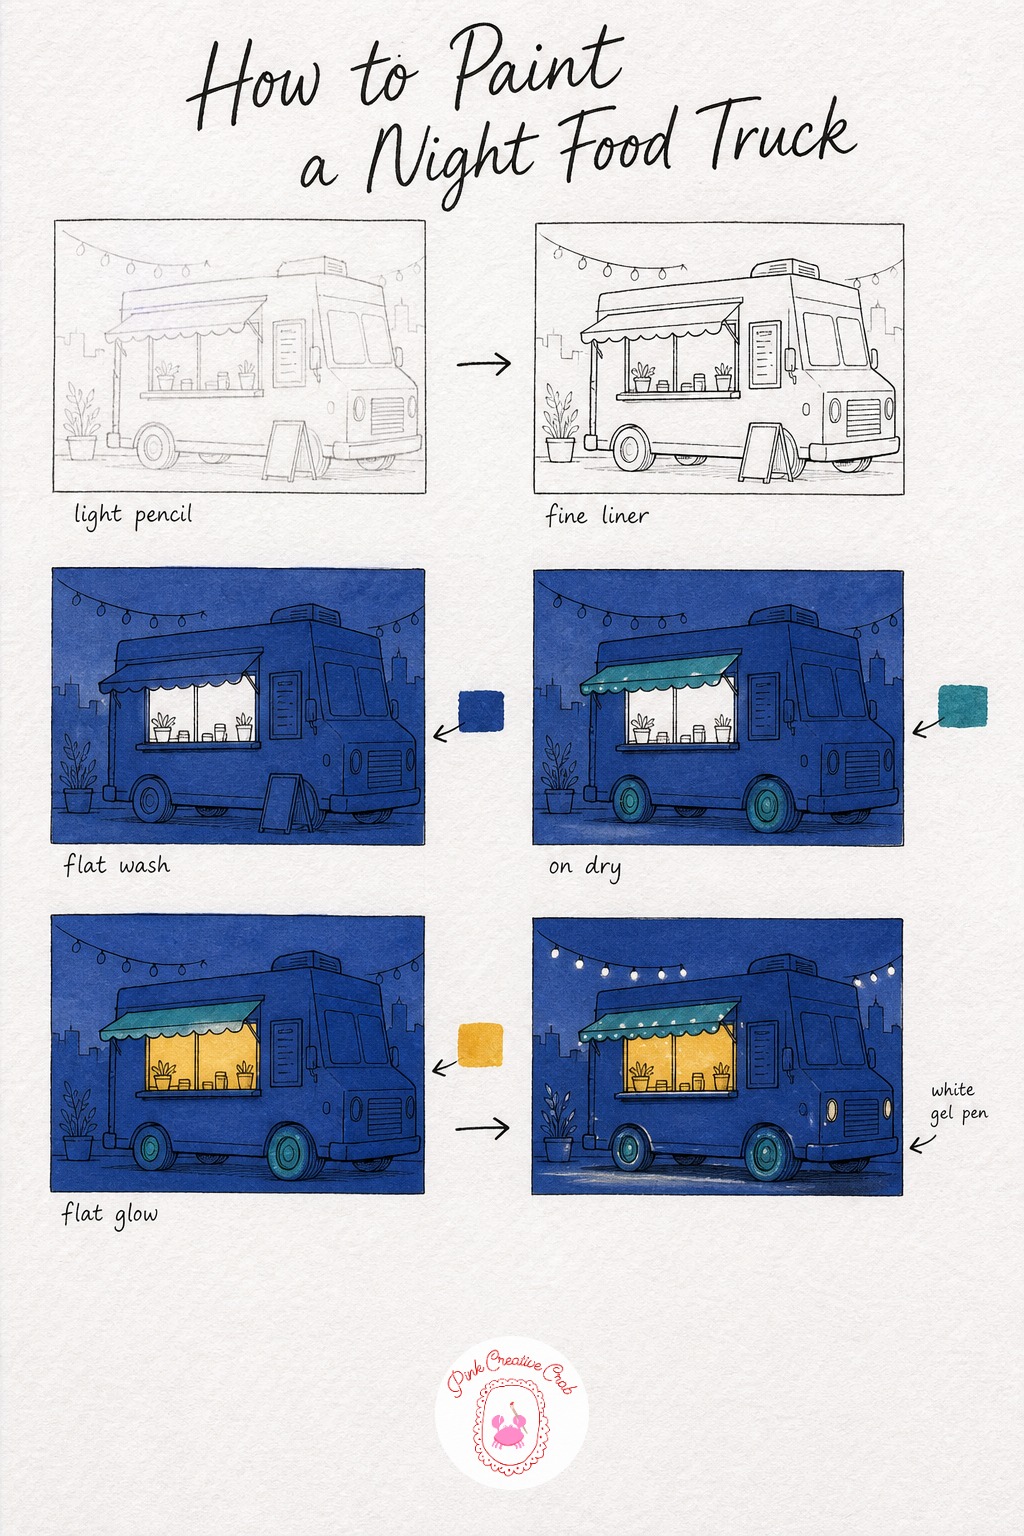
Sketch a simple boxy food truck shape with a serving hatch cut into the side and a small awning above it. Keep proportions a bit playful and rounded, this subject does not need to be technically accurate to feel charming.
Ink the truck body, the serving window and the awning edge so these shapes hold firm once the dark wash goes on around them. This stage is quick, there is not much detail to outline here.
Wash the truck body and the sky behind it in one flat deep blue, then once dry paint the awning and wheels in a muted teal so the truck reads as a distinct object against the sky. Fill the serving window with golden yellow, this is the warm focal point of the whole piece.
Finish with a soft shadow pooling under the truck and a line of tiny white dots along the awning edge for string lights. My tip: let the golden window light spill very slightly past its pencil edges onto the truck body, it reads as light bouncing rather than a mistake.
Umbrella Under a Streetlamp
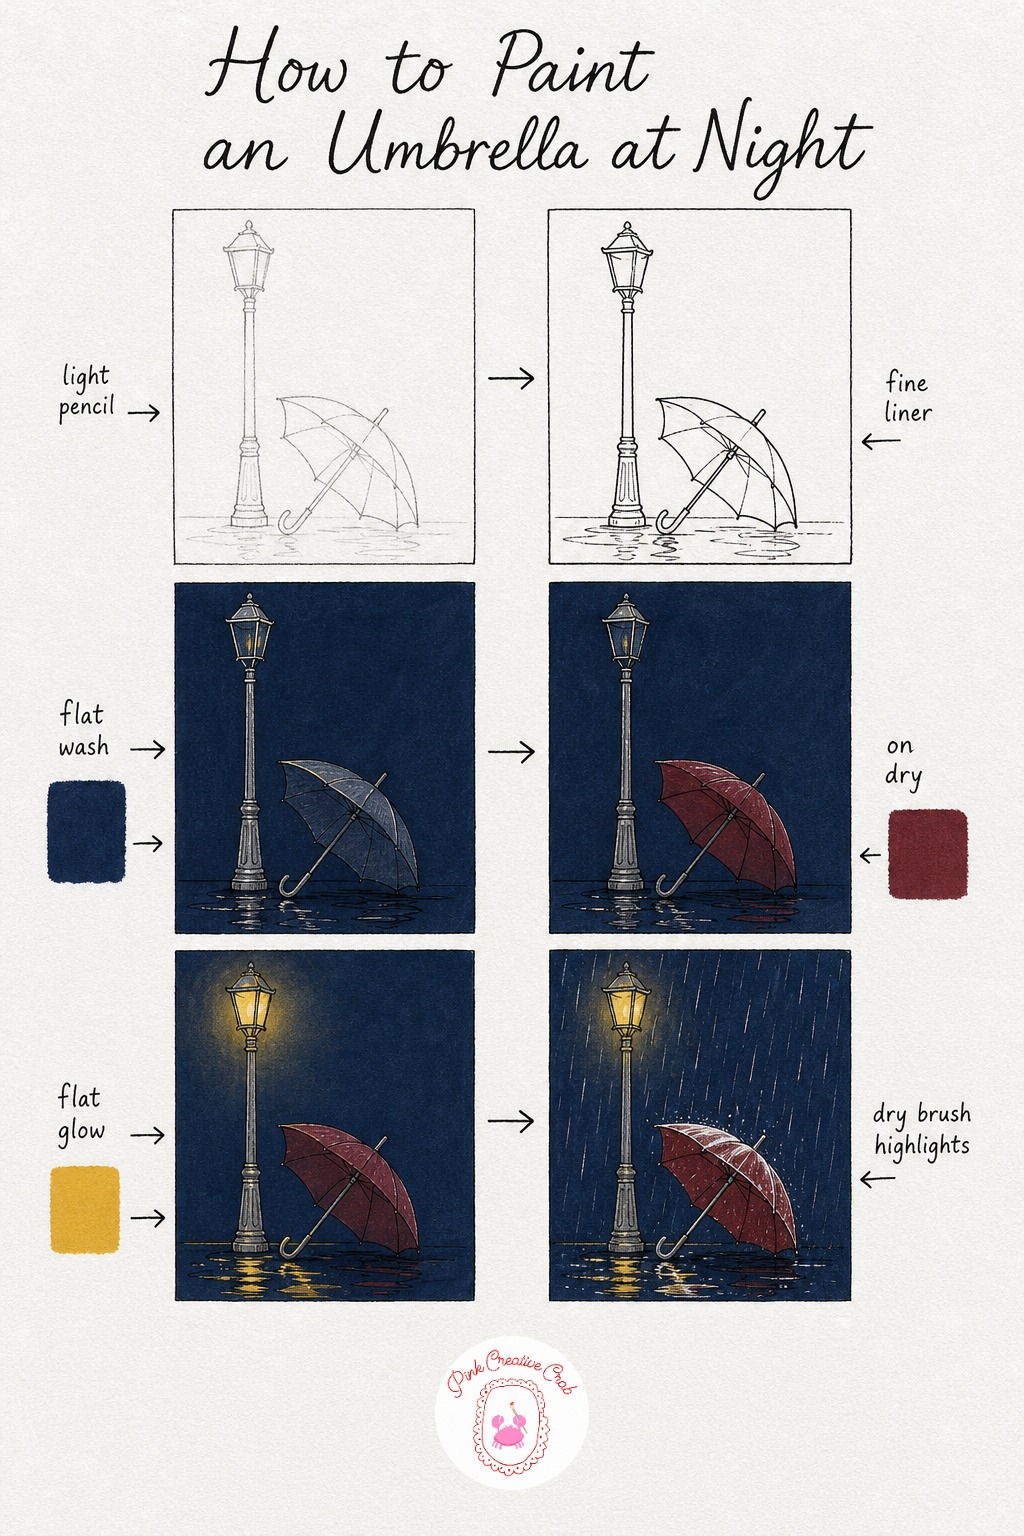
Sketch an open umbrella seen from slightly below, with a tall slim lamp post rising just beside it. This close, simple composition is a nice change of pace from the full street and building scenes in this set.
Ink the umbrella ribs, canopy edge and the lamp post so the shapes stay clean once the dark navy wash surrounds them. Keep the ink light on the canopy itself, since a darker color sits over it next.
Wash the whole background in flat navy, covering right up to the umbrella and lamp outlines. Once matte dry, paint the umbrella canopy a muted burgundy, then add a warm yellow glow around the lamp bulb and let a softer version of that same yellow pool on the ground directly beneath it.
Finish with a few thin white gouache rain streaks falling past the lamp and a small dry brush highlight along the top curve of the umbrella. My tip: angle the rain streaks slightly so they match the direction the umbrella tilts, it keeps the whole scene feeling like one consistent gust of wind.
Bakery Window After Hours
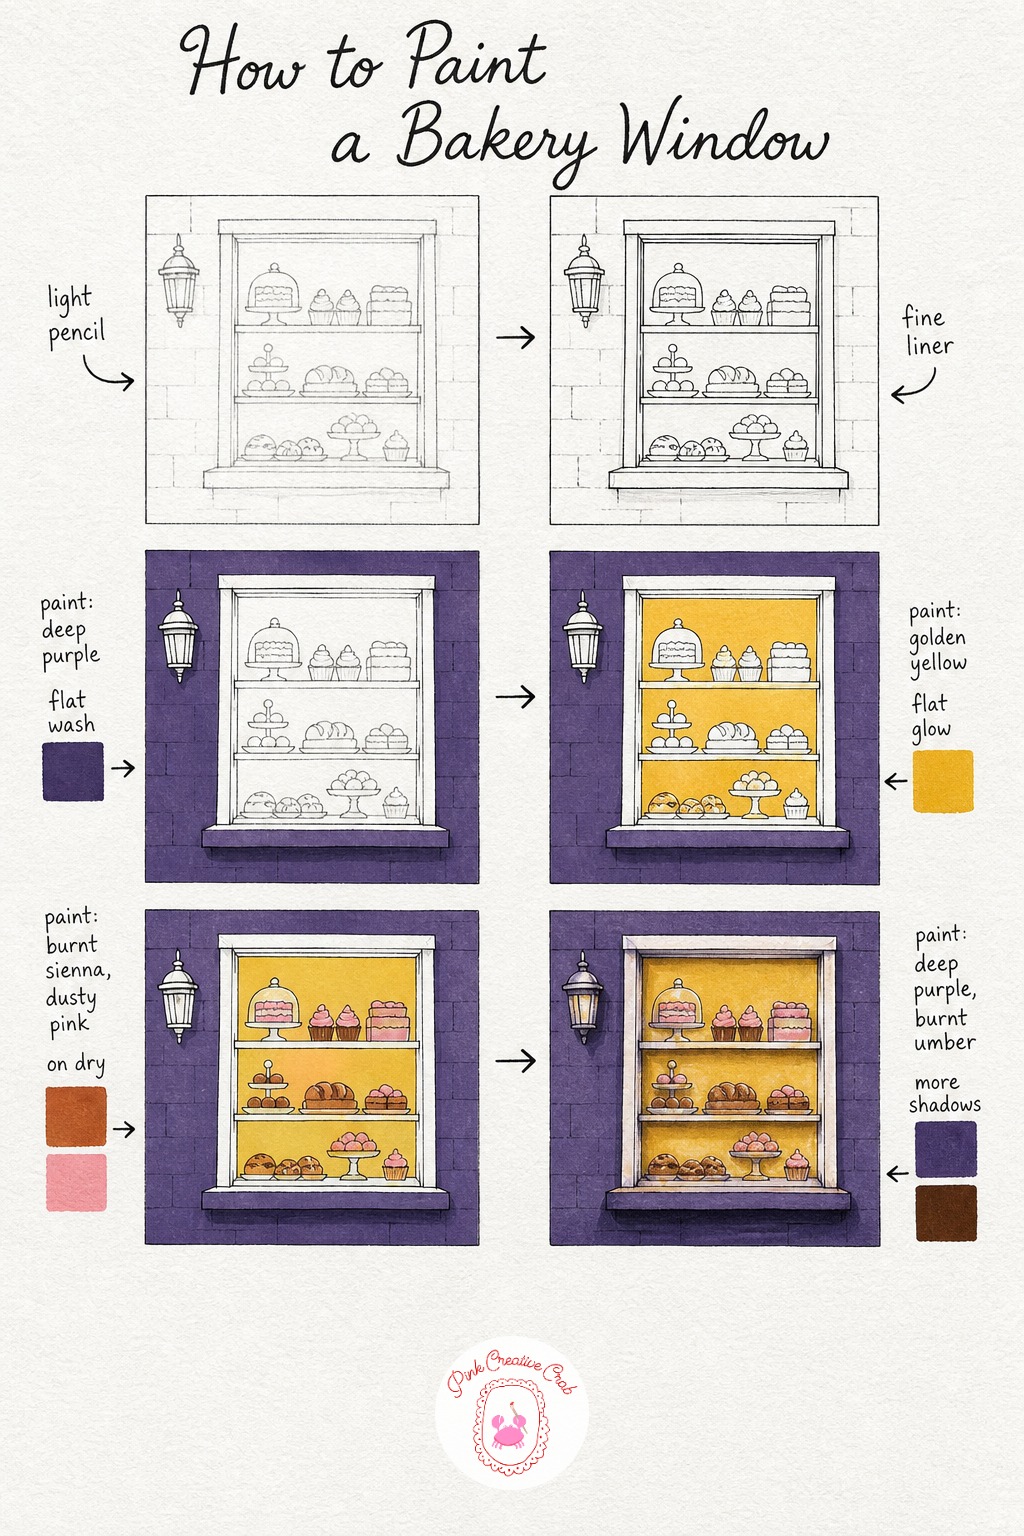
Sketch a wide window with two or three shelf lines inside it, then add simple rounded pastry shapes, think loaves and buns rather than anything fussy. This is a nice warm-toned break from the very blue scenes elsewhere in this set.
Ink the window frame, shelves and pastry outlines so they stay defined once the color stages begin. Keep the pastry shapes simple, soft ovals and domes read perfectly well at this scale.
Wash the wall around the window in deep purple, leaving the glass itself untouched for now. Once dry, fill the window and shelf background with golden yellow, then once that layer is matte, paint the pastries themselves in burnt sienna and a soft dusty pink, working one shelf at a time.
Finish with shadow under the window ledge and along each shelf edge to seat the pastries firmly in place. My tip: keep the pastries slightly darker than the golden background behind them, or they disappear into the glow instead of sitting in front of it.
Lighthouse at Night
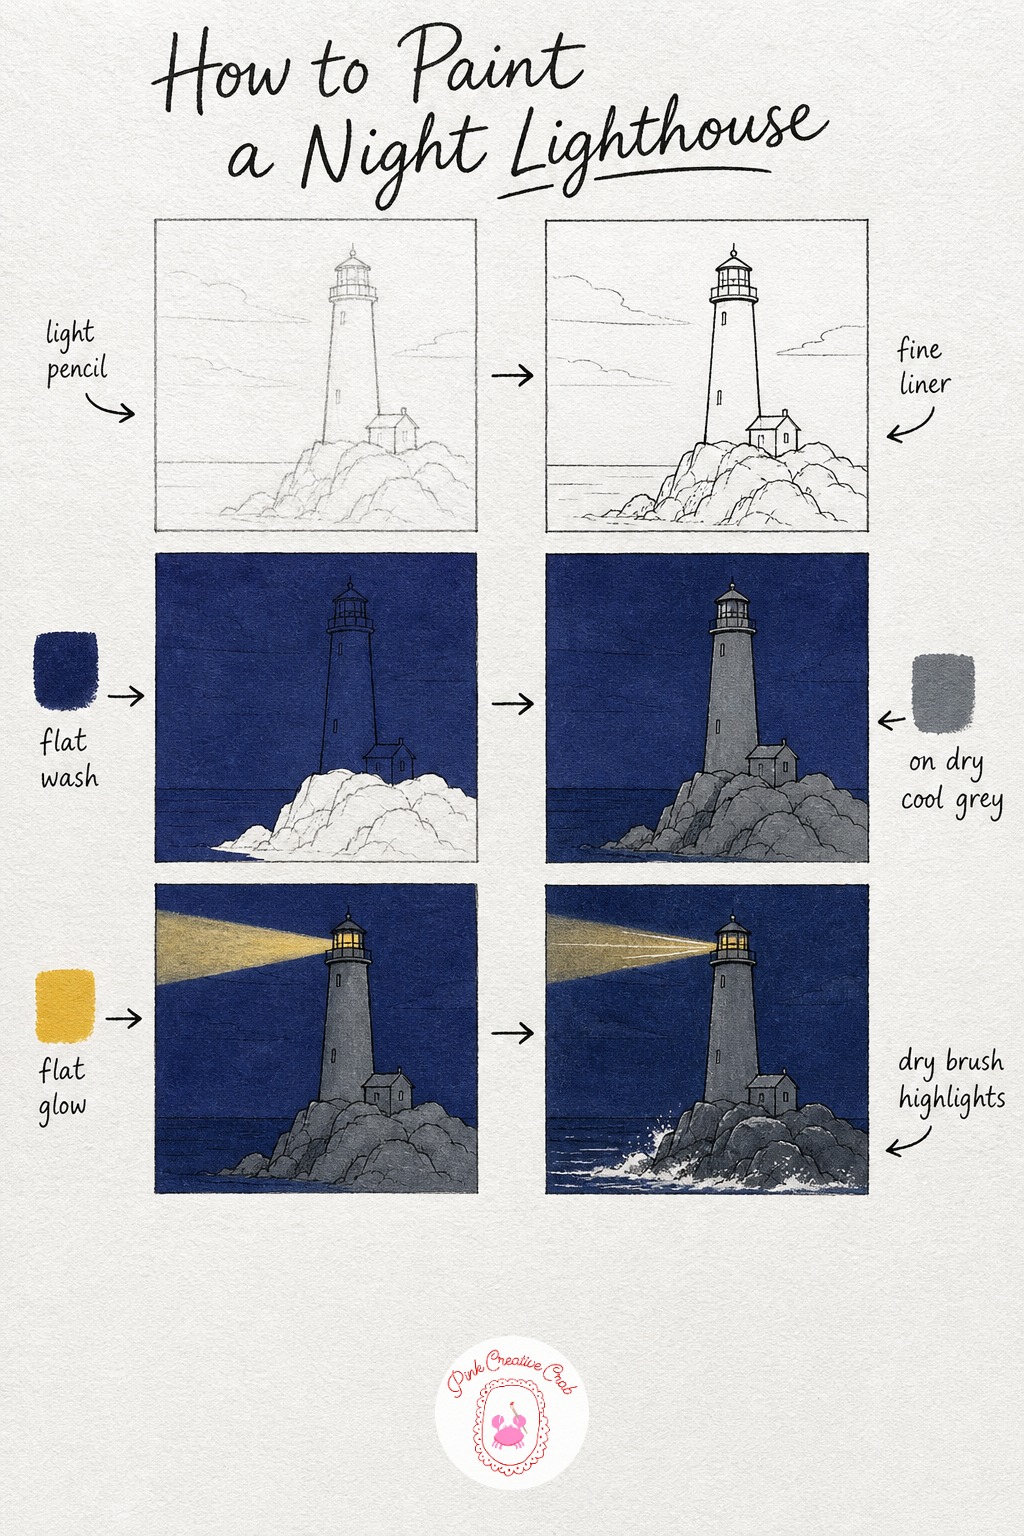
Sketch a simple tall tower on a rocky outcrop, with a small lamp room near the top and the sea stretching flat below it. Keep the tower’s lines straight, a steady vertical shape reads as sturdy and calm against the busy sky around it.
Ink the tower, lamp room and rocks so they hold their edges once the dark wash covers the background. This stage is short on this subject, most of the detail lives in the color later.
Wash the sky and sea in one continuous flat indigo, letting the horizon line disappear slightly so sky and water feel like one dark expanse. Once dry, paint the tower and rocks in cool grey, then add a warm yellow glow in the lamp room, letting a thin triangle of that same yellow sweep out across the dark sky as the beam.
Finish with soft dashes of white gouache for sea foam at the rocks and a faint dry brush pass along the light beam for extra glow. My tip: keep the beam narrow and soft edged, a sharp hard triangle looks more like a flashlight than a lighthouse.
Carousel at Dusk
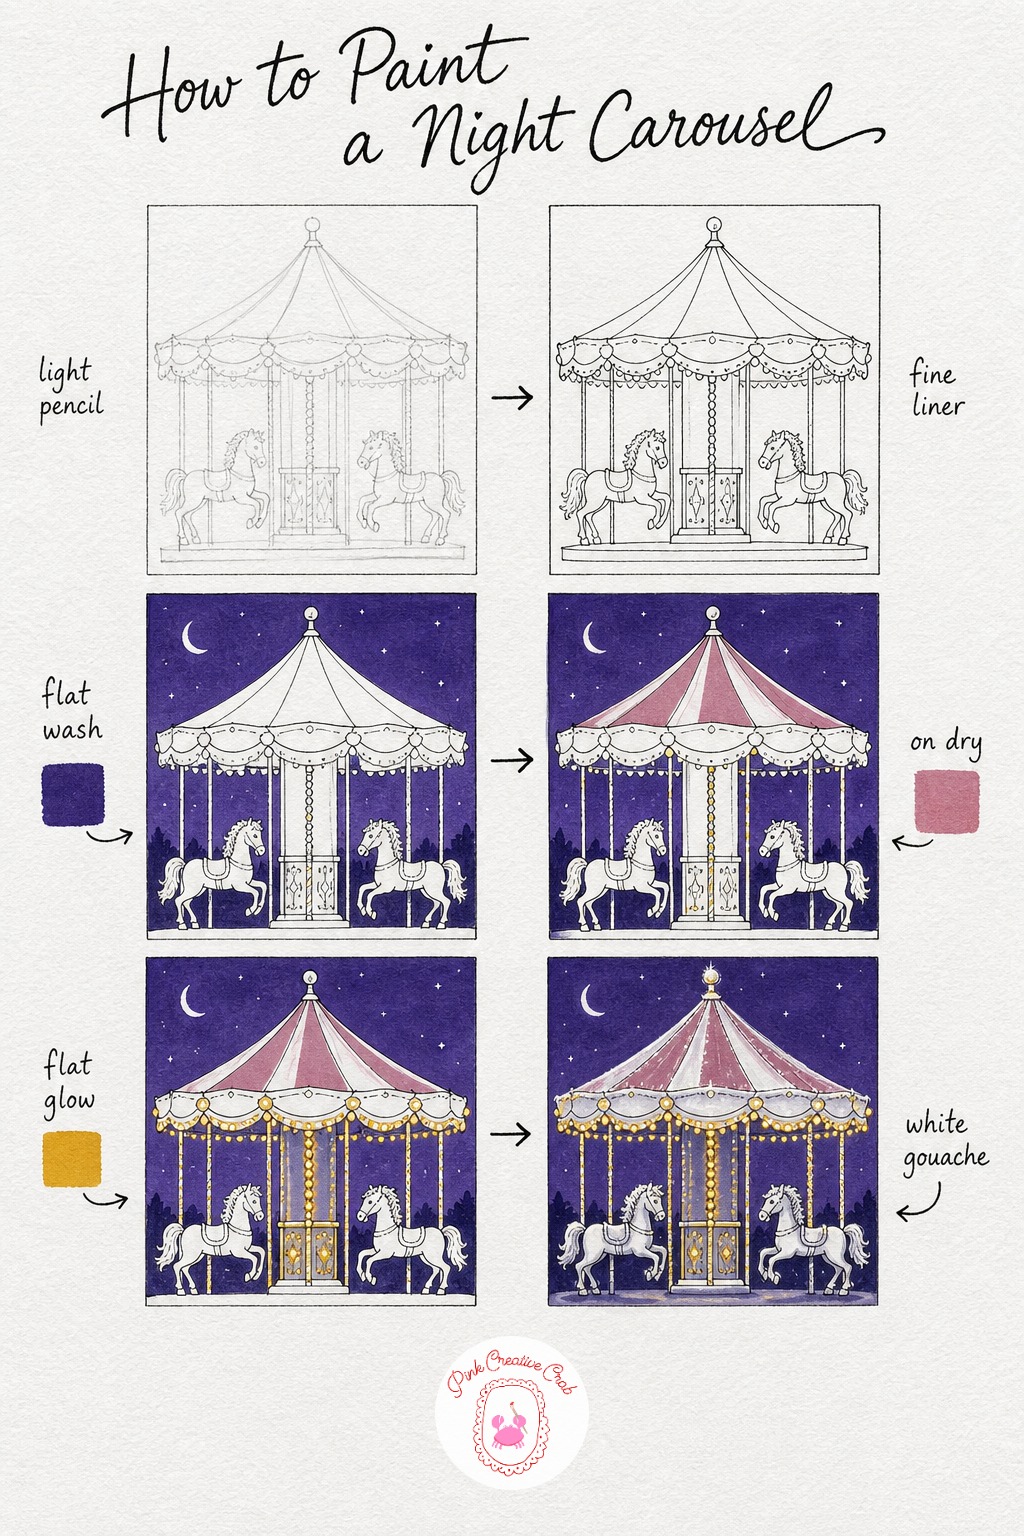
Sketch a simple scalloped carousel roof, a center pole and one or two horse silhouettes beneath it, keeping the whole structure fairly small and centered on the page. This subject brings a little whimsy into the set without needing a full fairground scene.
Ink the roof scallops, pole and horse outlines so the shapes stay crisp once the dark background goes in around them. Keep the horse shapes simple, a curved neck and leaning legs are enough to read clearly.
Wash the whole background in flat deep purple, then once matte dry, paint the roof panels a muted dusty rose for a softer contrast against all that purple and indigo elsewhere in the set. Dot small golden bulbs along the roof edge and down the center pole, keeping each one a tidy small circle rather than a smear.
Finish with shadow under the horses and a light dry brush pass of white along the roof scallops for a little extra shimmer. My tip: space the golden bulbs slightly unevenly, real string lights never sit perfectly symmetrical and the picture feels livelier for it.
Night Market Stall
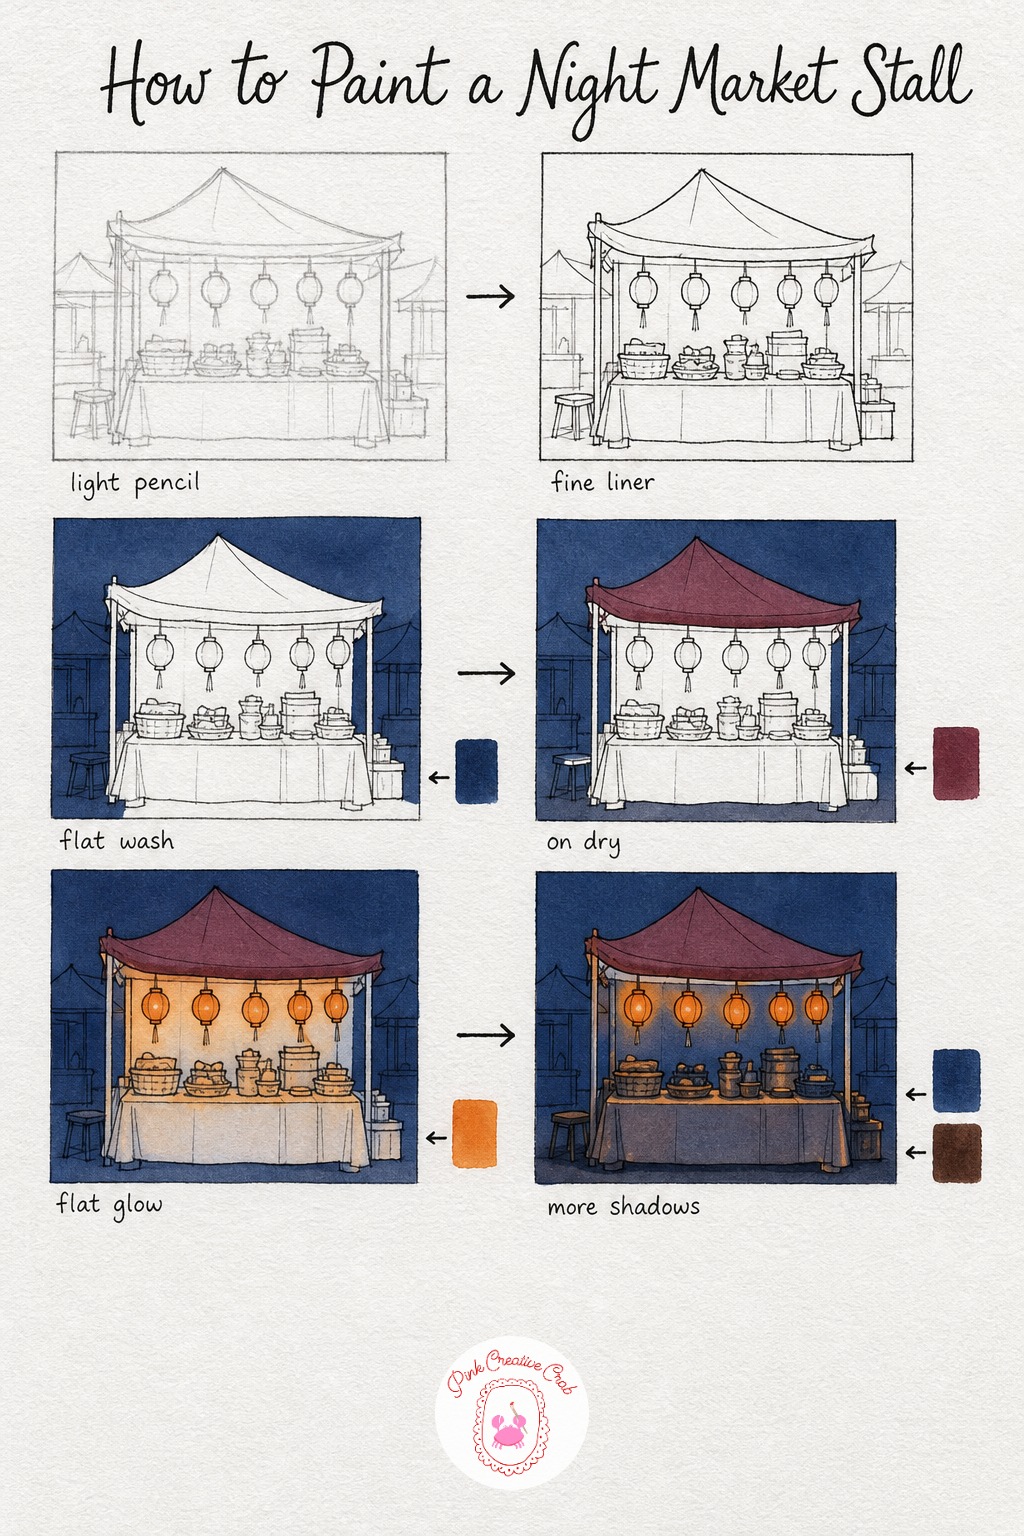
Sketch a simple stall, a canopy roof, a table below it and two or three hanging lantern shapes along the canopy edge. Keep the background stalls behind it as loose simple shapes, this scene is really about the one lit stall in front.
Ink the canopy, table and lantern outlines so they stay sharp once the busy dark background wash covers everything behind them. A slightly wobbly canopy line still feels right for a market setting.
Wash the sky and background stalls in flat deep blue, keeping it loose and slightly uneven to suggest a crowded space beyond the main stall. Once dry, paint the canopy fabric a muted maroon, then fill each lantern with warm orange and let a soft version of that glow spill onto the table goods just beneath them.
Finish with shadow under the table and a few small dark shapes suggesting jars or baskets on display. My tip: let the warmest, brightest orange sit only on the lanterns themselves, everything it touches should be a slightly cooler, softer version of that same color.
Ferris Wheel Silhouette
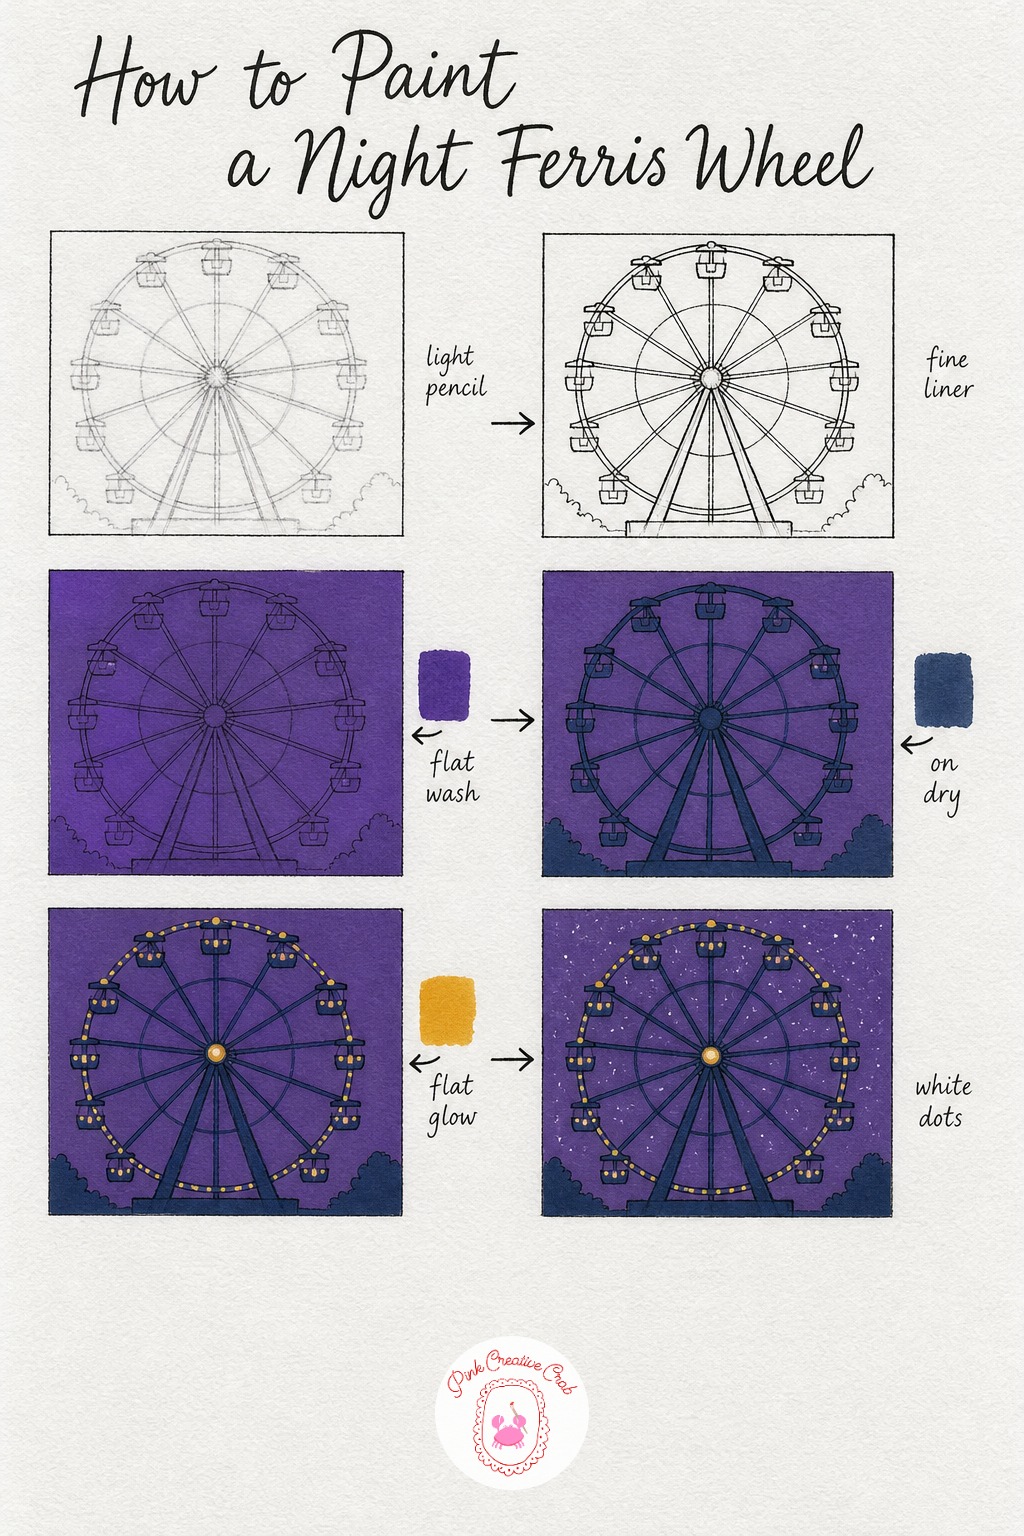
Sketch a large circle for the wheel, add straight spoke lines to the center hub and small cabin shapes evenly spaced around the rim. A compass or a round object to trace helps here if circles are not your strong suit.
Ink the rim, spokes and cabins carefully, this is the most line-heavy subject in the collection so take your time and let it dry fully before any paint touches it.
Wash the whole sky in flat deep purple, right up to the wheel’s outer edge. Once matte, paint the wheel structure itself in a slightly darker navy so it reads as solid metal against the sky, then dot small golden lights around the rim and a soft fill of the same yellow inside each cabin.
Finish with a scatter of tiny white gouache dots across the sky for stars, keeping them well away from the wheel so they do not compete with its own lights. My tip: make the golden dots slightly larger at the bottom of the wheel and smaller near the top, it adds a subtle sense of the structure curving away from you.
Cottage Porch Light
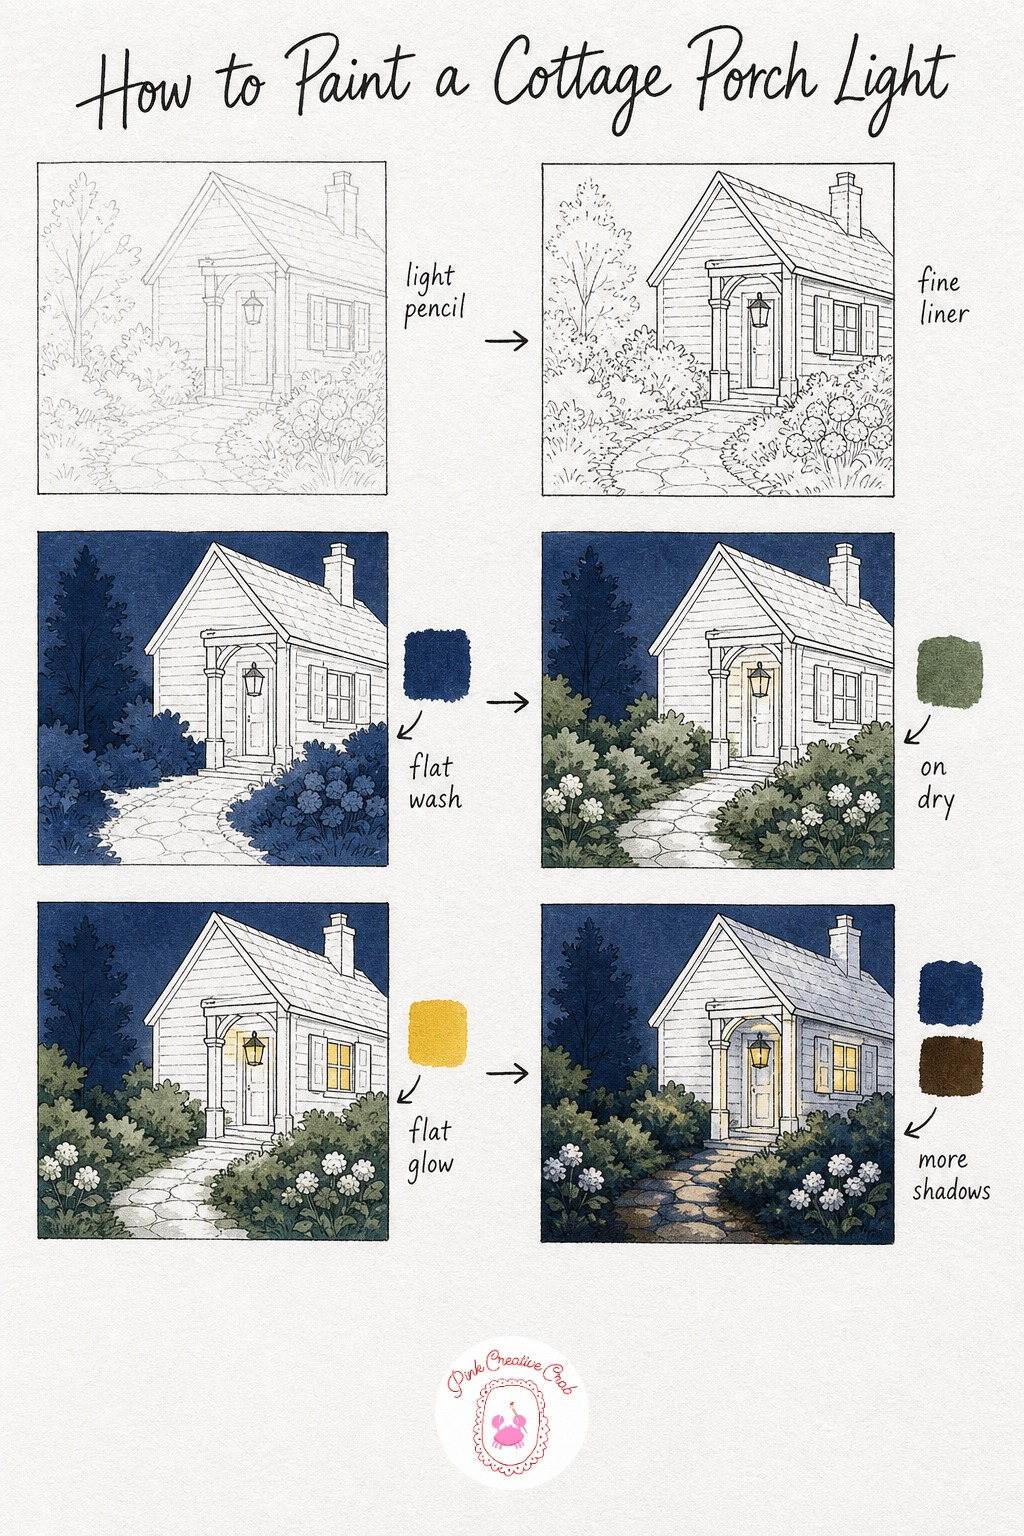
Sketch a small cottage with a porch lamp hanging beside the door and a front window, then add a simple winding path with low hedges on either side. This is a gentle, cozy scene that works well if you want something a little softer than the city subjects in this set.
Ink the cottage outline, porch post, lamp and window so these shapes hold steady through the dark wash coming next. Keep the hedges as loose scribbled shapes rather than crisp lines, they read better that way.
Wash the sky and the whole garden area in flat deep indigo, letting it cover right up to the cottage walls. Once matte dry, paint the hedges and path edges in a muted sage green, then light up the porch lamp and front window with flat golden yellow, keeping the window slightly softer in tone than the lamp itself.
Finish with shadow along the path and under the hedges to settle everything onto the ground. If cozy cottage scenes are your favorite subject generally, the ideas in this gouache landscape collection are worth a look too. My tip: curve the path slightly rather than keeping it straight, it leads the eye naturally toward the lit door.
City Rooftops at Night
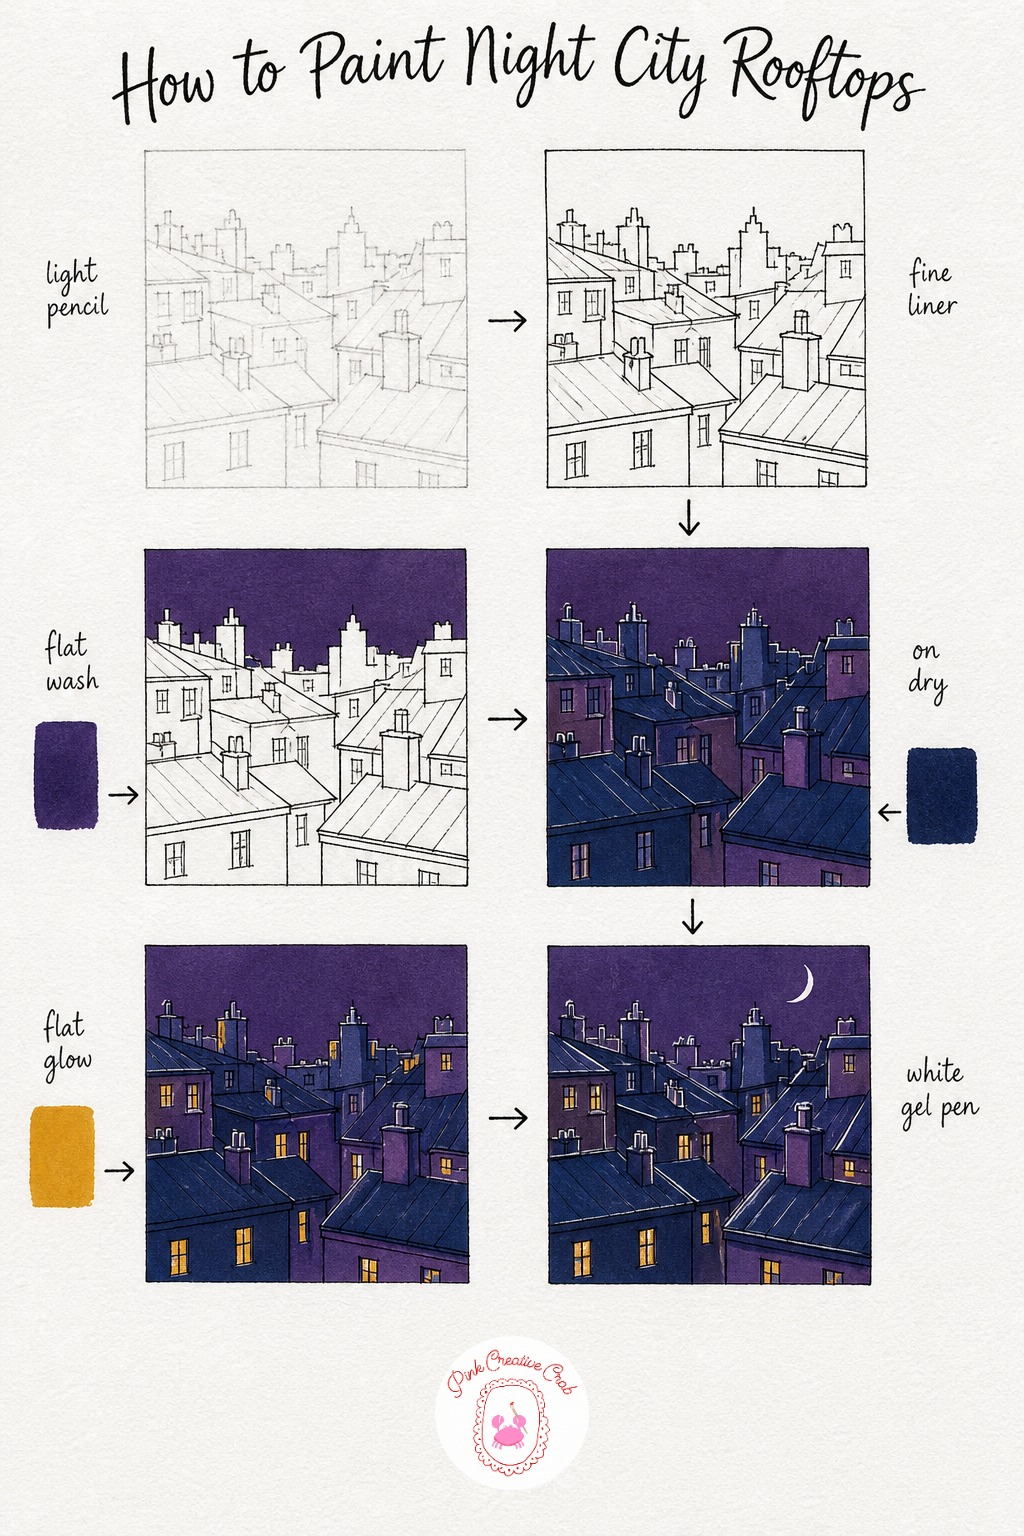
Sketch several overlapping rooftop shapes at slightly different heights, a chimney or two poking up, and scatter a few small square windows across the buildings. Overlapping shapes like this are an easy way to suggest a whole city without drawing anything in detail.
Ink every roofline, chimney and window frame so each building stays distinct once the color stages blend them visually with similar dark tones. This stage takes patience but makes the final picture read clearly.
Wash the sky in flat deep purple first, then once dry, paint the rooftops themselves in a mix of navy and plum, varying which color goes where so neighboring buildings feel slightly different from each other. Choose just a handful of windows to light with golden yellow, leaving most windows dark, this restraint makes the lit ones feel special.
Finish with a soft shadow along each roofline and a thin crescent moon in white gouache tucked into the sky. My tip: light the windows in no obvious pattern, scattered and uneven feels far more like a real sleeping city than a tidy grid of glowing squares.
What to Do Next
Pick one scene, mix your darkest blue first, and let the whole sheet guide you stage by stage from that dark base to its one small glowing light.
Frequently Asked Questions
What gouache colors do I need for cozy night scenes like these?
A small palette works well: one deep indigo or navy, a plum or violet purple, a warm golden yellow, burnt umber for shadow, and white. These five mix into nearly every tone used across this whole collection.
How do I stop my dark gouache washes from drying patchy?
Mix more paint than you think you need and work in one continuous pass rather than going back into a half dry area. Gouache rewets easily, so streaky patches almost always come from stopping and restarting mid wash.
Should the window or lantern glow be painted before or after the dark background?
Always after. Paint the dark sky or wall first, let it dry fully to a matte finish, then add the warm glow on top so the yellow stays clean and bright instead of mixing into a muddy green.
Why does my yellow light look dull instead of glowing?
Dull light usually means the yellow went down while the dark layer beneath was still slightly damp, or too little paint was loaded onto the brush. Use a thicker, more opaque mix and always confirm the base layer is bone dry first.
Can I use watercolor paper for a gouache painting tutorial step by step project like this?
Yes, watercolor paper with some weight, around 200gsm or more, handles flat gouache washes very well and resists buckling under several layers of paint.
Have any thoughts?
Share your reaction or leave a quick response — we’d love to hear what you think!
-
 0
-
0
-
0
-
0
-
0
-
0


