

Table of Contents
- Before You Start
- Ginger Cat On A Windowsill
- Tabby In A Yarn Basket
- Black Cat In A Teacup Bed
- White Cat Watching Rain
- Kitten Peeking From A Gift Box
- Siamese Stretching On A Rug
- Maine Coon By The Fireplace
- Sphynx Wrapped In A Blanket
- Calico Curled On A Cushion
- Tuxedo Cat Watching A Fish Bowl
- Persian Cat On A Velvet Pillow
- Scottish Fold Kitten With A Ball
- Gray Cat In A Knitted Sweater
- Cat Peeking From Under A Blanket Fort
- Orange Tabby Chasing A Sunbeam
- Cat Curled In A Knit Hat
- Russian Blue Watching Birds
- Frequently Asked Questions
I could draw cats every single day and never get bored of them, and that is really the idea behind how to draw cats in this collection: seventeen small, cozy scenes, each one a cat caught mid nap, mid stretch or mid mischief. Every sheet walks you from loose pencil shapes to soft layered colored pencil fur, so you can sit down after you pin this and finish a whole drawing in one go.
Below you will find a ginger cat dozing on a windowsill, a tabby buried in a yarn basket, a black cat curled in a teacup bed and plenty more breeds and colors in between. Pick whichever cat feels most like yours tonight and follow the sheet stage by stage.
Using these images: free for personal projects such as printing, coloring, cards, journals and gifts. Handmade items that include them may be sold up to 30 pieces per design. More than that is commercial use and is not permitted, and neither is selling or sharing the images themselves or passing them off as your own. Please ask before any other use.
Before You Start
- Use a smooth drawing paper or a light bristol sheet, since rough watercolor paper will fight your pencil layers and blur the fur lines.
- Keep your first sketch so light you could lift it with a kneaded eraser, because dark pencil lines will show through every later layer of color.
- Build fur in thin layers of colored pencil rather than one heavy pass, laying pale tones first and darker strokes on top only where the fur actually darkens.
- Test your fur colors on a scrap of the same paper before touching the drawing, since pencil colors often look stronger or warmer on the page than in the box.
- Sharpen your pencils often and use short flicking strokes that follow the direction the fur grows, never one long straight line across a whole patch.
- If you do not own a color you need, layer two lighter pencils you already have instead of buying a new one, since colored pencils blend well on top of each other.
Ginger Cat On A Windowsill
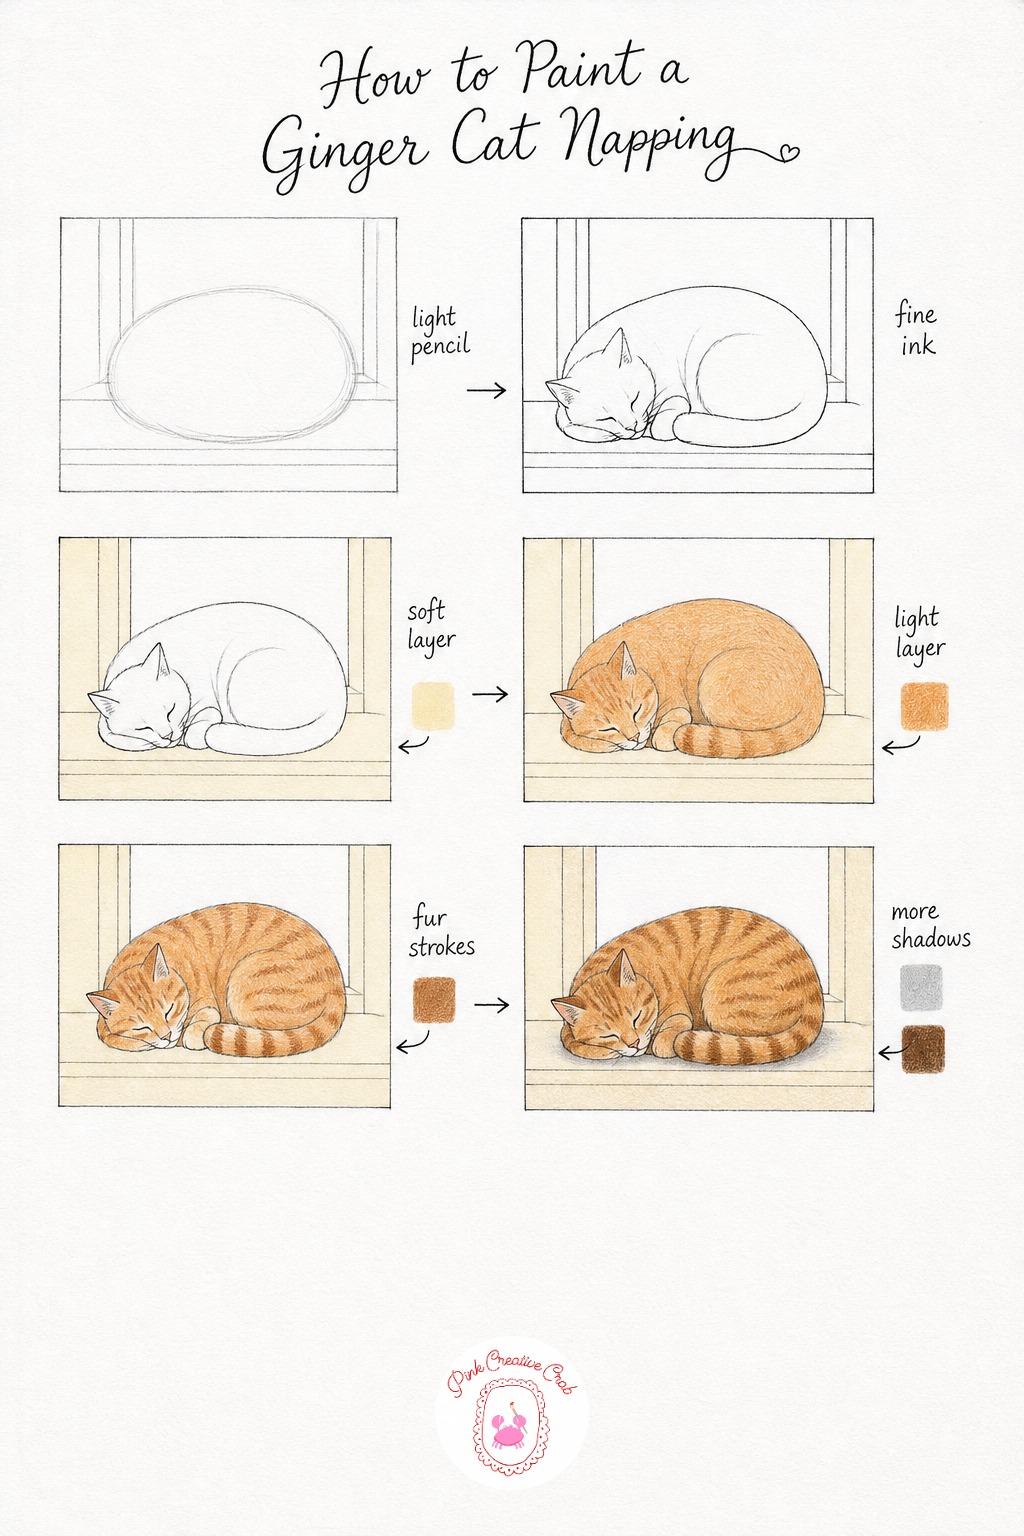
Start this one with light pencil, just a soft curled oval for the sleeping body and a simple flat shape beneath for the windowsill. Keep the whole sketch loose, since a napping cat is mostly rounded curves with no sharp corners anywhere.
Once the shapes feel right, go over the outline in fine black ink, letting the pencil lines disappear underneath. Let the ink dry fully before any color touches the paper, or it can smear under your pencil strokes.
Lay a pale cream wash over the windowsill and frame first, then build the ginger coat in thin orange layers rather than one heavy pass. Add warm brown stripes with short strokes that follow the curve of the body, always working from the spine outward.
Beginners often press too hard too early and flatten the fur texture, so keep early layers light and build darkness slowly. Finish with soft gray shadow beneath the curled body to ground the cat on the sill, and a touch of dark brown around the ears for depth. Try layering orange and brown together rather than mixing them beforehand, it keeps the fur looking soft instead of muddy.
Tabby In A Yarn Basket
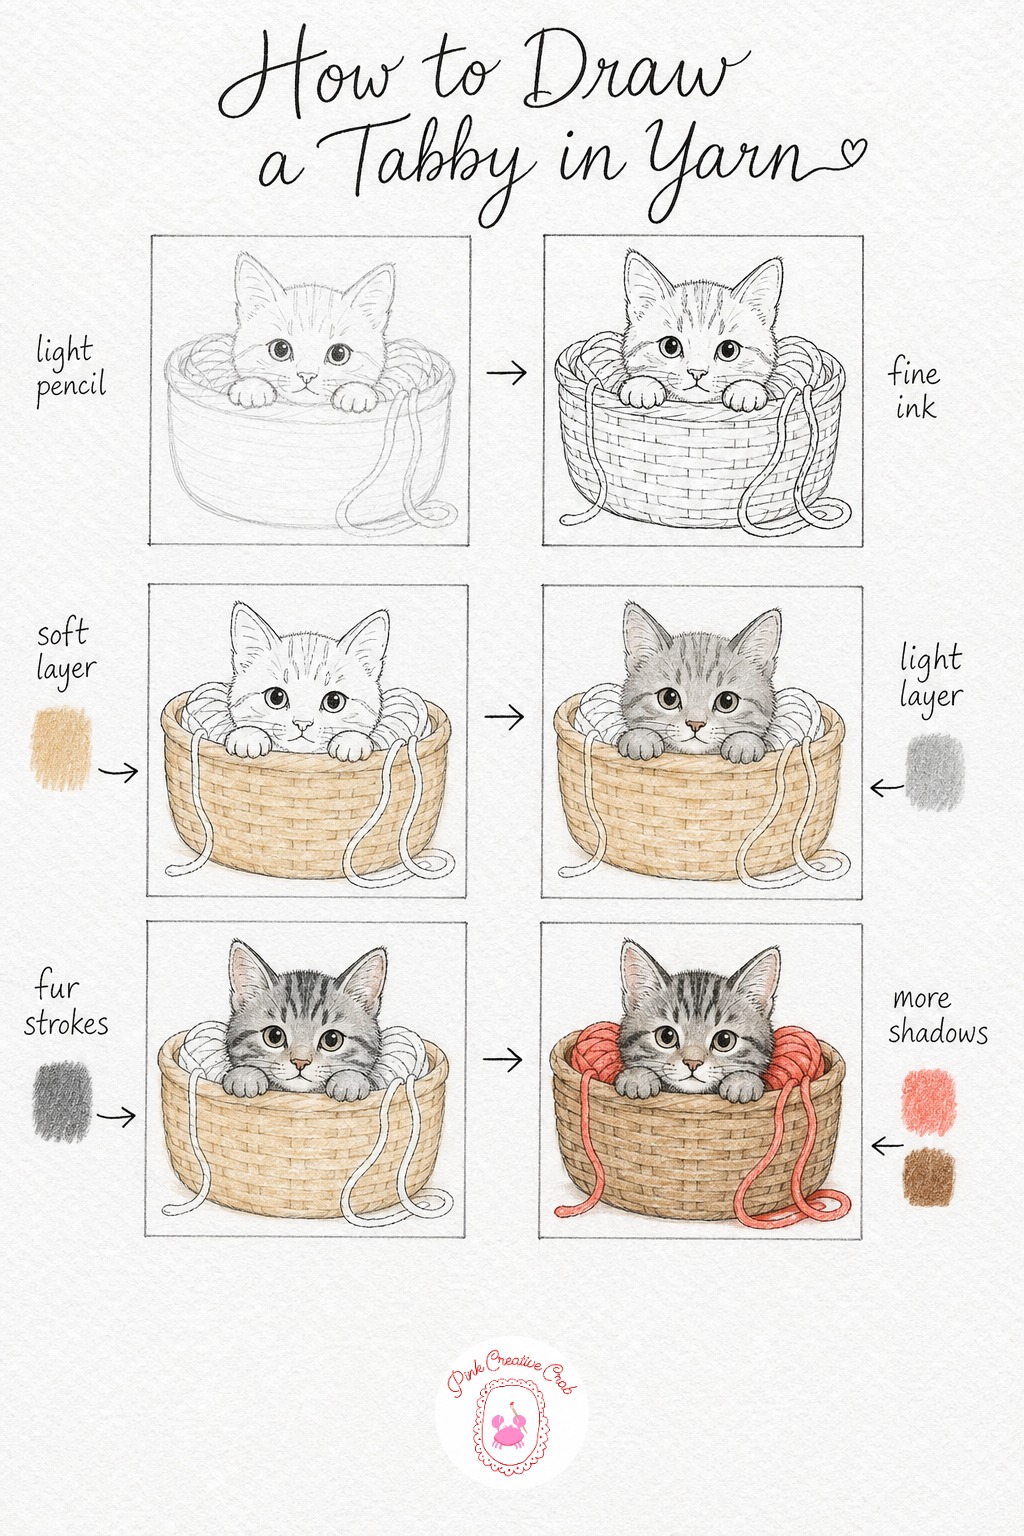
Sketch a simple round basket first, then build the cat as a soft rounded head and shoulder shape resting on the rim, with two small paws hanging over the edge. Keep the yarn as loose curling lines you can refine later, no need to get them perfect in pencil.
Trace the whole thing in fine ink, including the basket weave texture as short overlapping curves. Let it dry completely, then wash a pale tan over the basket so the weave pattern still shows through underneath.
Build the tabby coat in soft gray first, then layer darker gray stripes on top in short strokes that curve with the shape of the head and shoulders. This is where beginners rush and draw straight lines instead of following the body’s curve, so slow down and let each stroke bend slightly.
Finish with coral for the tangled yarn strands and a warm brown shadow pooling inside the basket under the cat. If you do not have coral, mix a light layer of red under a layer of orange instead. A nice detail to add last is one loose strand trailing out over the basket’s edge, it makes the whole scene feel caught mid play.
Black Cat In A Teacup Bed
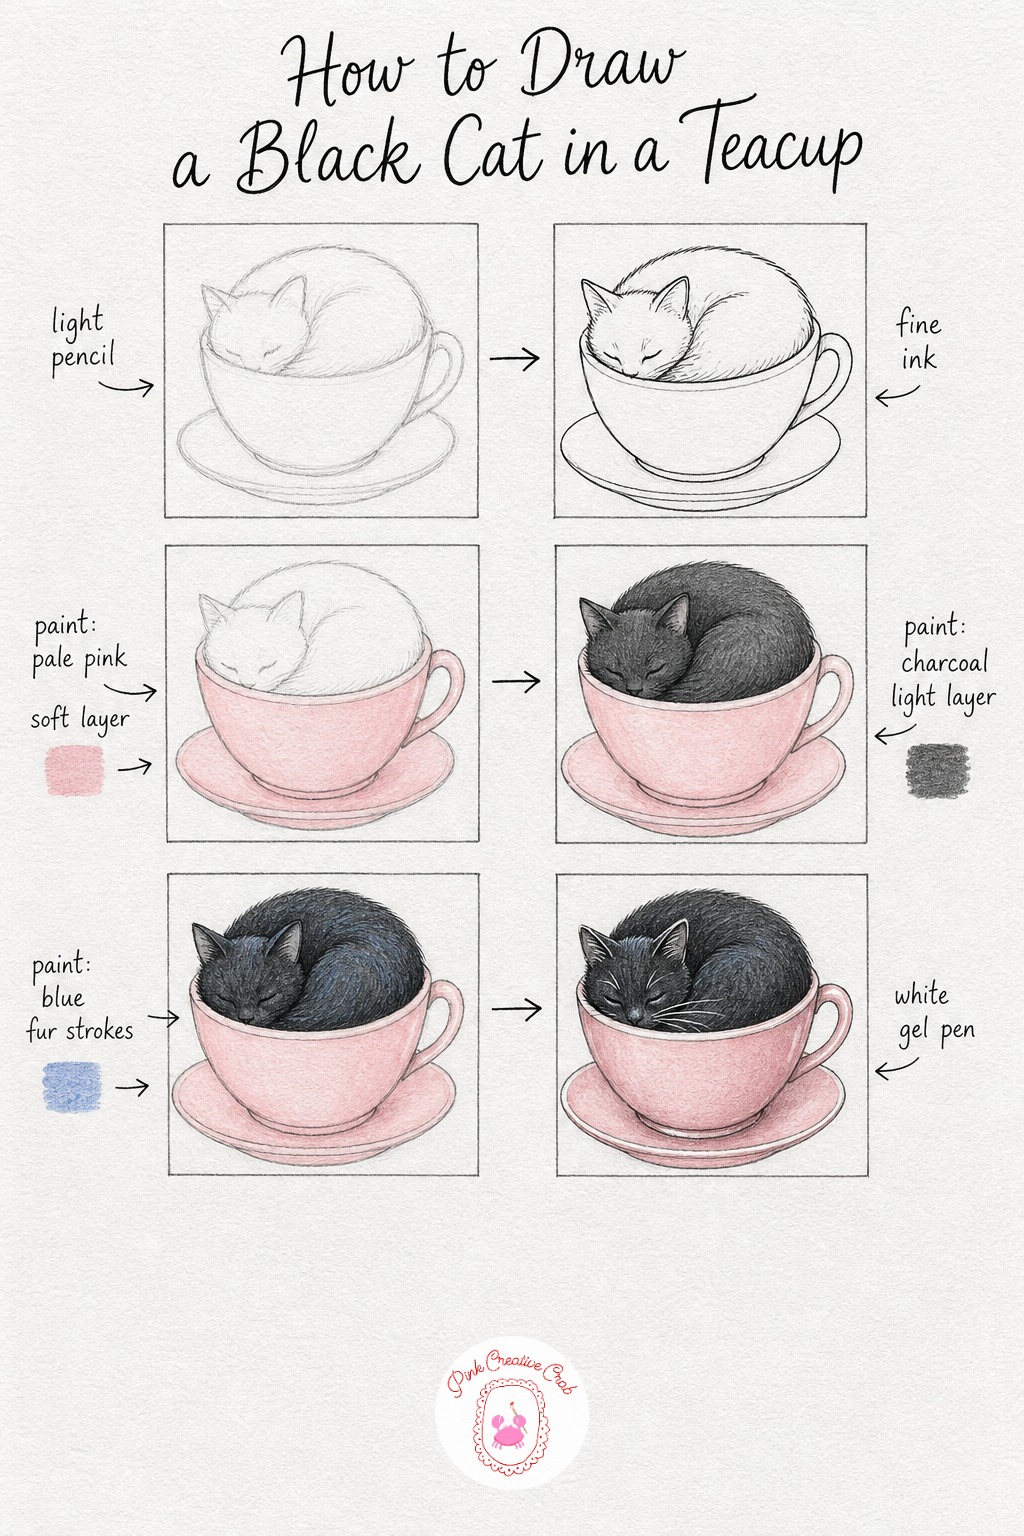
Draw a simple teacup and saucer in light pencil first, then curl a soft rounded cat body to fit snugly inside the cup like it was made for napping there. Keep the cup’s handle small and simple so it does not compete with the cat.
Ink the whole scene in fine black line, including the teacup’s painted rim pattern if you want one. Once dry, wash a pale pink over the cup and saucer, keeping the cat shape untouched for now.
Black fur is never just black, so layer charcoal gray first across the whole body rather than reaching for a true black pencil right away. Add soft blue into the shadowed curves of the back and tail, it keeps the coat looking rich instead of flat.
A common mistake is pressing solid black everywhere, which hides all the shape of the cat, so always leave your charcoal layer visible at the lightest points. Finish with a white gel pen for the whisker lines, a glint in the ear fur and a soft highlight along the teacup’s rim. Readers who enjoy this kind of cozy pairing might like browsing more ideas over in the cat sketchbook collection too.
White Cat Watching Rain
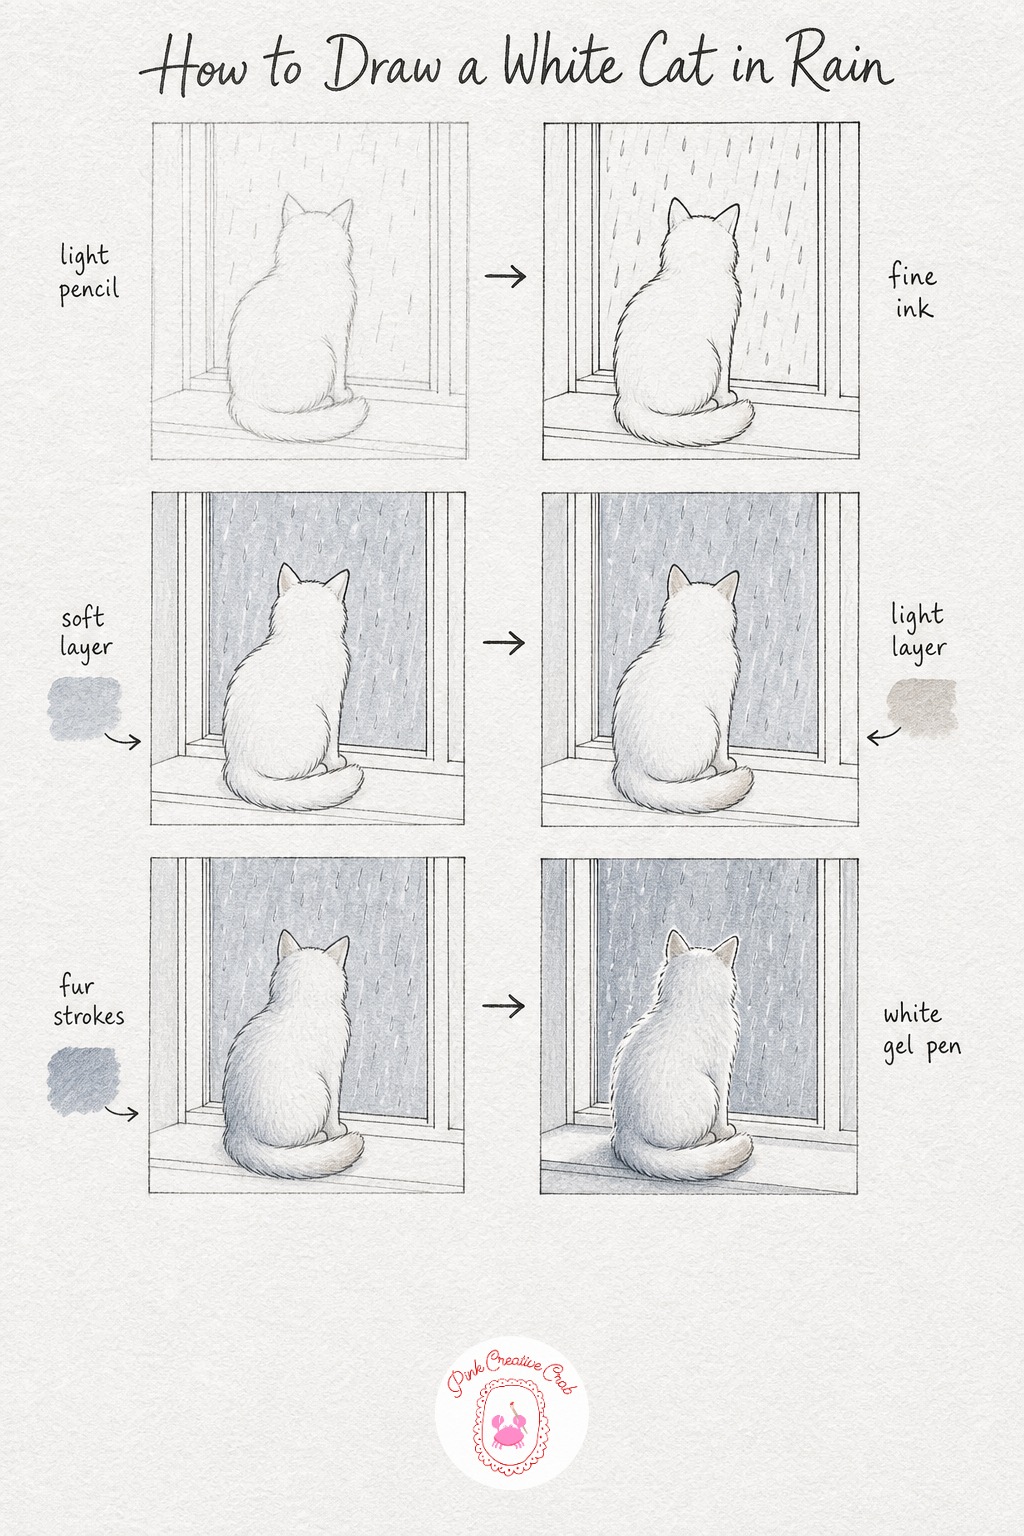
Sketch a cat sitting upright facing a tall window, keeping the body mostly a soft triangle shape with a rounded head on top. Add simple diagonal lines outside the glass for falling rain, nothing complicated, just a few repeated marks.
Ink the whole scene, then wash a pale gray blue across the window and rain so the room feels cool and quiet. Let that dry fully before touching the cat itself, or the colors will bleed together at the edges.
White cats are mostly about shadow, not color, so keep your pencil work light and only shade the ears, paw edges and tail tip where fur naturally darkens. Layer a soft blue gray along the back and belly curve to suggest the roundness of the body without ever using true black.
Beginners often overwork white fur trying to make it look finished, but less is more here, let the white paper do most of the work. Finish with a white gel pen along the outer edge of the fur for that soft glowing outline, and a gray cast shadow beneath the paws to settle the cat onto the floor. Keep your pencil strokes very light on this one, white fur reads best with the fewest marks possible.
Kitten Peeking From A Gift Box
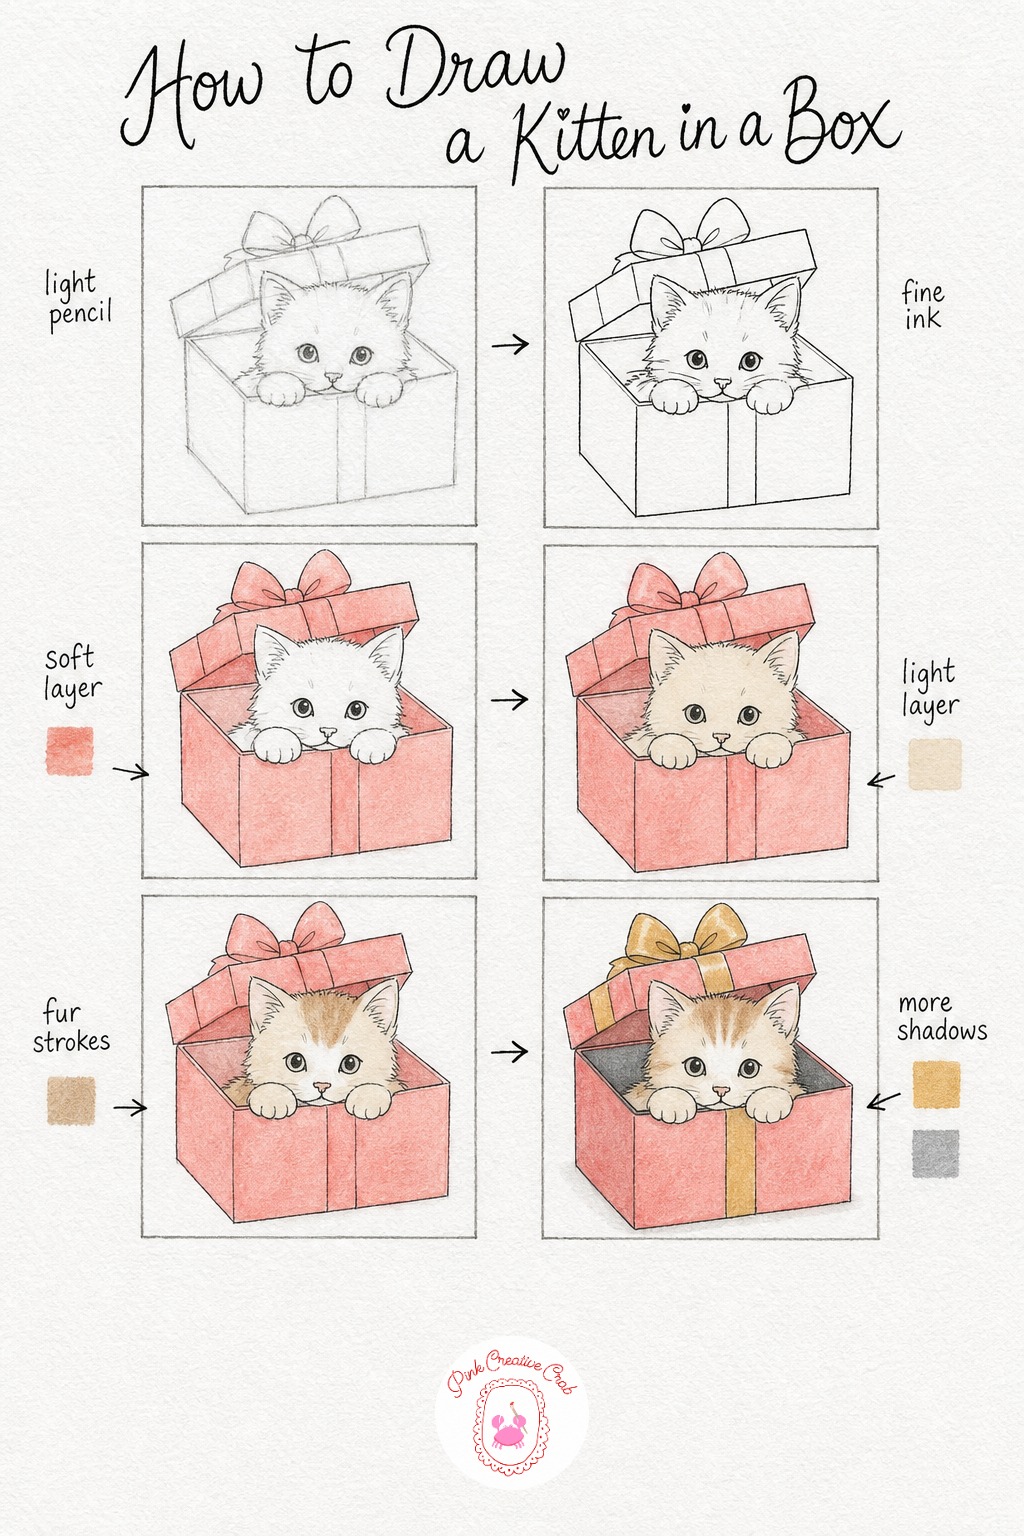
Start with a simple open box shape, square and slightly tilted, then draw a round kitten head peeking over the front edge with two small paws resting on the rim. Keep the kitten proportions soft and round, since kittens have much bigger heads than bodies compared to adult cats.
Ink the box, ribbon and kitten outline, keeping your ribbon lines loose and slightly curved so the bow feels light rather than stiff. Wash a pale red over the whole box once the ink is dry, letting it pool a little softer near the shadowed inside edge.
Build the kitten’s coat in cream first, then add small patches of light brown over the ears and the back of the head, since many kittens have just a little color concentrated there. Keep your strokes tiny and soft, kitten fur is shorter and fluffier than an adult cat’s.
A common slip here is making the kitten’s eyes too small, so keep them large and round for that young, curious look. Finish with gold on the ribbon and a soft gray shadow curling around the inside of the box near the paws. For more gift wrapped drawing ideas in this same cozy spirit, the cute Christmas doodles page is worth a look.
Siamese Stretching On A Rug
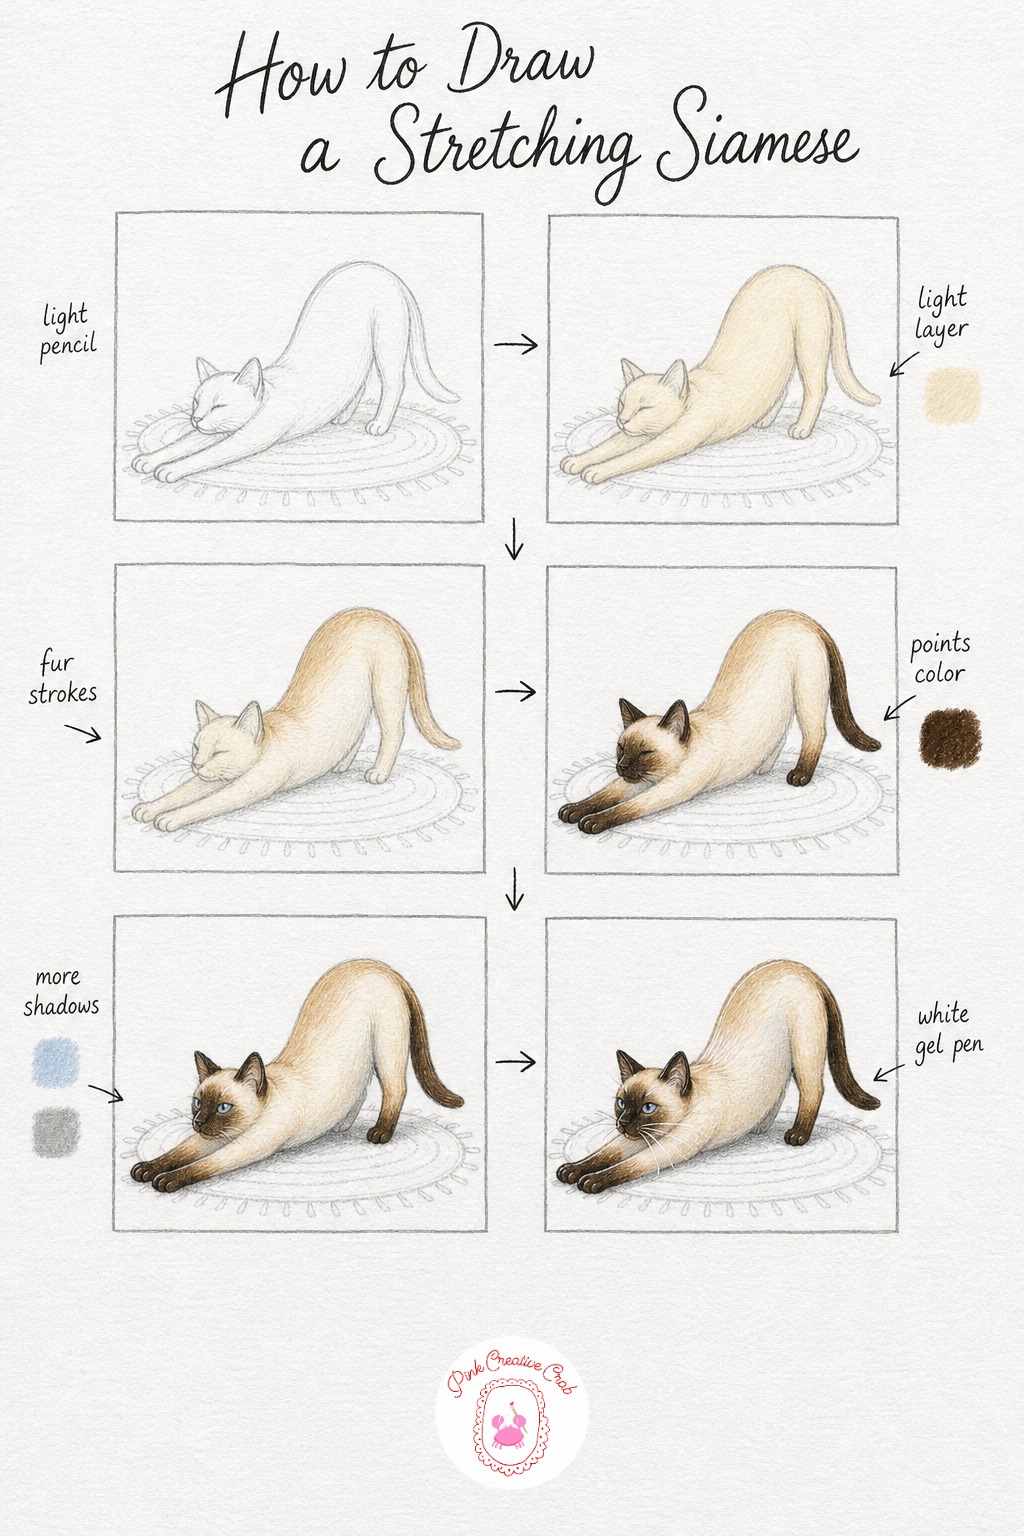
Siamese cats are all long lines, so sketch the body stretched out fully, front paws reaching forward and the spine arched high in the middle. Keep the legs slim and the tail long and tapered, this breed reads instantly through its shape alone.
Since this is a single stretching cat without a background scene, you can move straight from pencil into color, no ink step needed here. Lay a pale cream wash over the whole body first, it is the base tone under all that famous Siamese coloring.
Shade soft tan along the back and spine curve where the stretch pulls the fur tight, then add the signature dark brown points over the ears, face mask, paws and tail tip. Beginners often make the points too small, but Siamese markings are bold and solid, so do not be shy with that dark brown.
Layer pale blue lightly into the eyes, since that bright blue gaze is part of what makes this breed so recognizable. Finish with a white gel pen for crisp whisker lines and one soft highlight along the stretched back to show the light catching the fur. Keep your points sharp edged rather than fading, that crisp line is what sells the Siamese look.
Maine Coon By The Fireplace
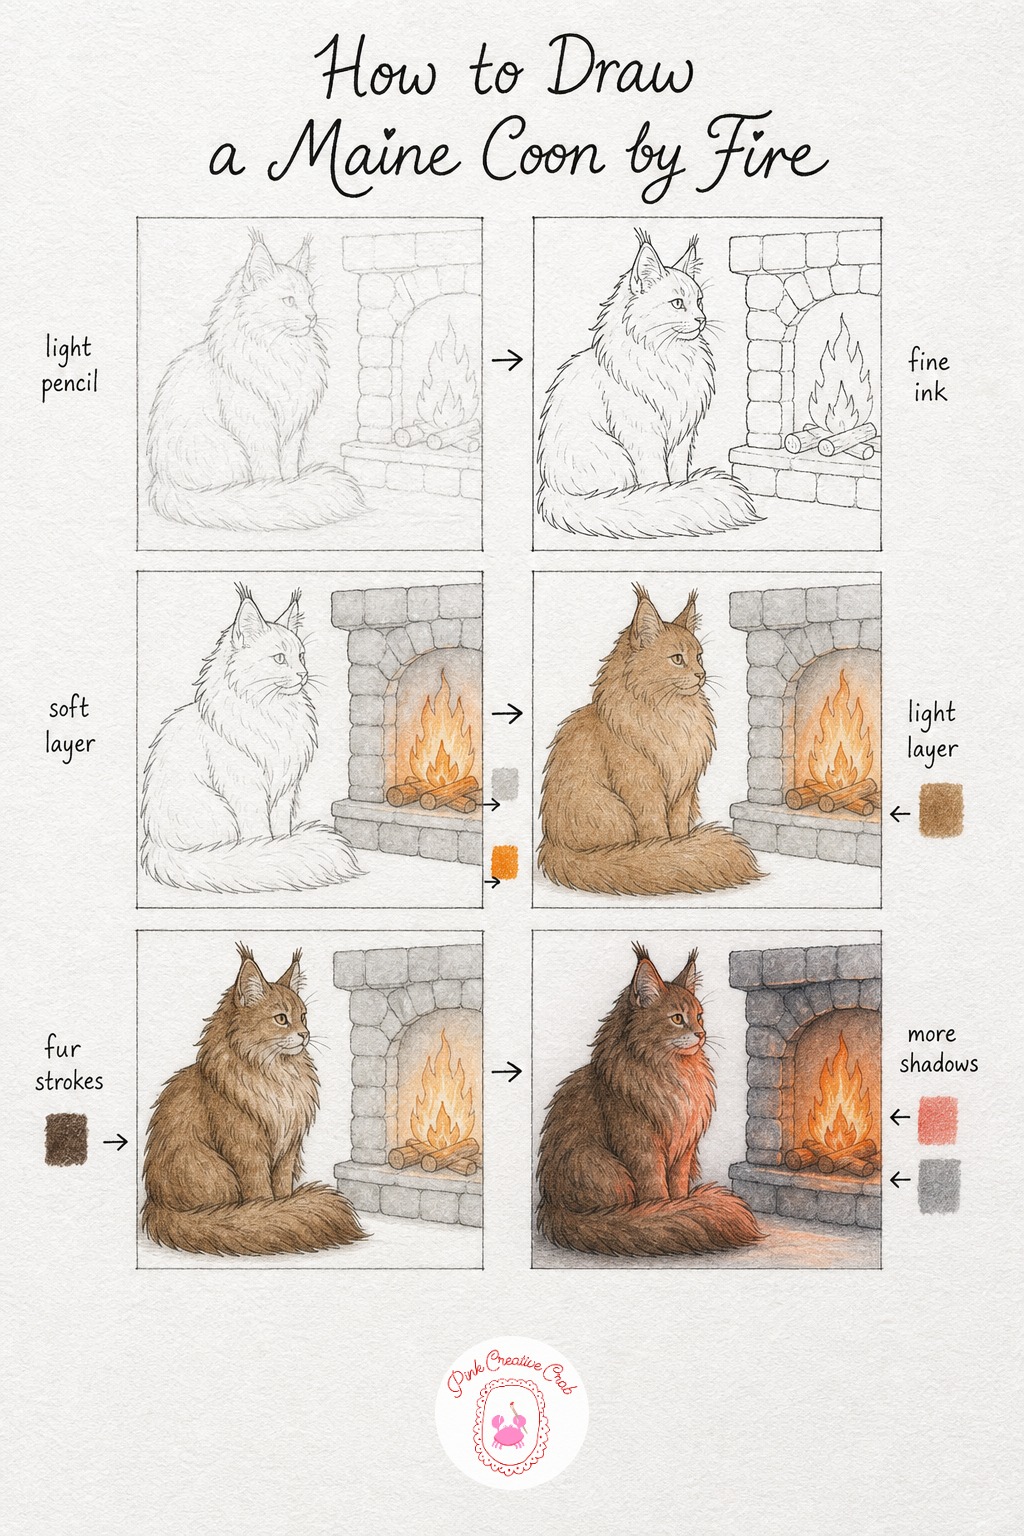
Maine Coons are big, fluffy cats, so sketch a generous rounded body with tufted ear tips and a long plume of a tail curled around the paws. Keep the fireplace simple, just a few stacked stone shapes and a soft flame shape beside the cat.
Ink the whole scene, giving the fur edge a slightly jagged, uneven line rather than a smooth outline, since this breed’s coat is famously shaggy. Once dry, wash pale gray over the stones and a warm orange glow into the fire shape itself.
Build the coat in warm brown first across the whole body, then layer darker brown strokes specifically along the ruff around the neck, the ear tufts and the tail, since that is where the longest fur lives. Keep your pencil strokes long and slightly wavy here rather than short and choppy.
A common mistake is treating all the fur the same length, but Maine Coons have much longer fur around the neck and tail than on the face. Finish by layering a soft red glow onto the side of the cat facing the fire, with cooler gray shadow on the far side to show the light source. Let the firelight warm the fur color rather than redrawing it a new shade.
Sphynx Wrapped In A Blanket
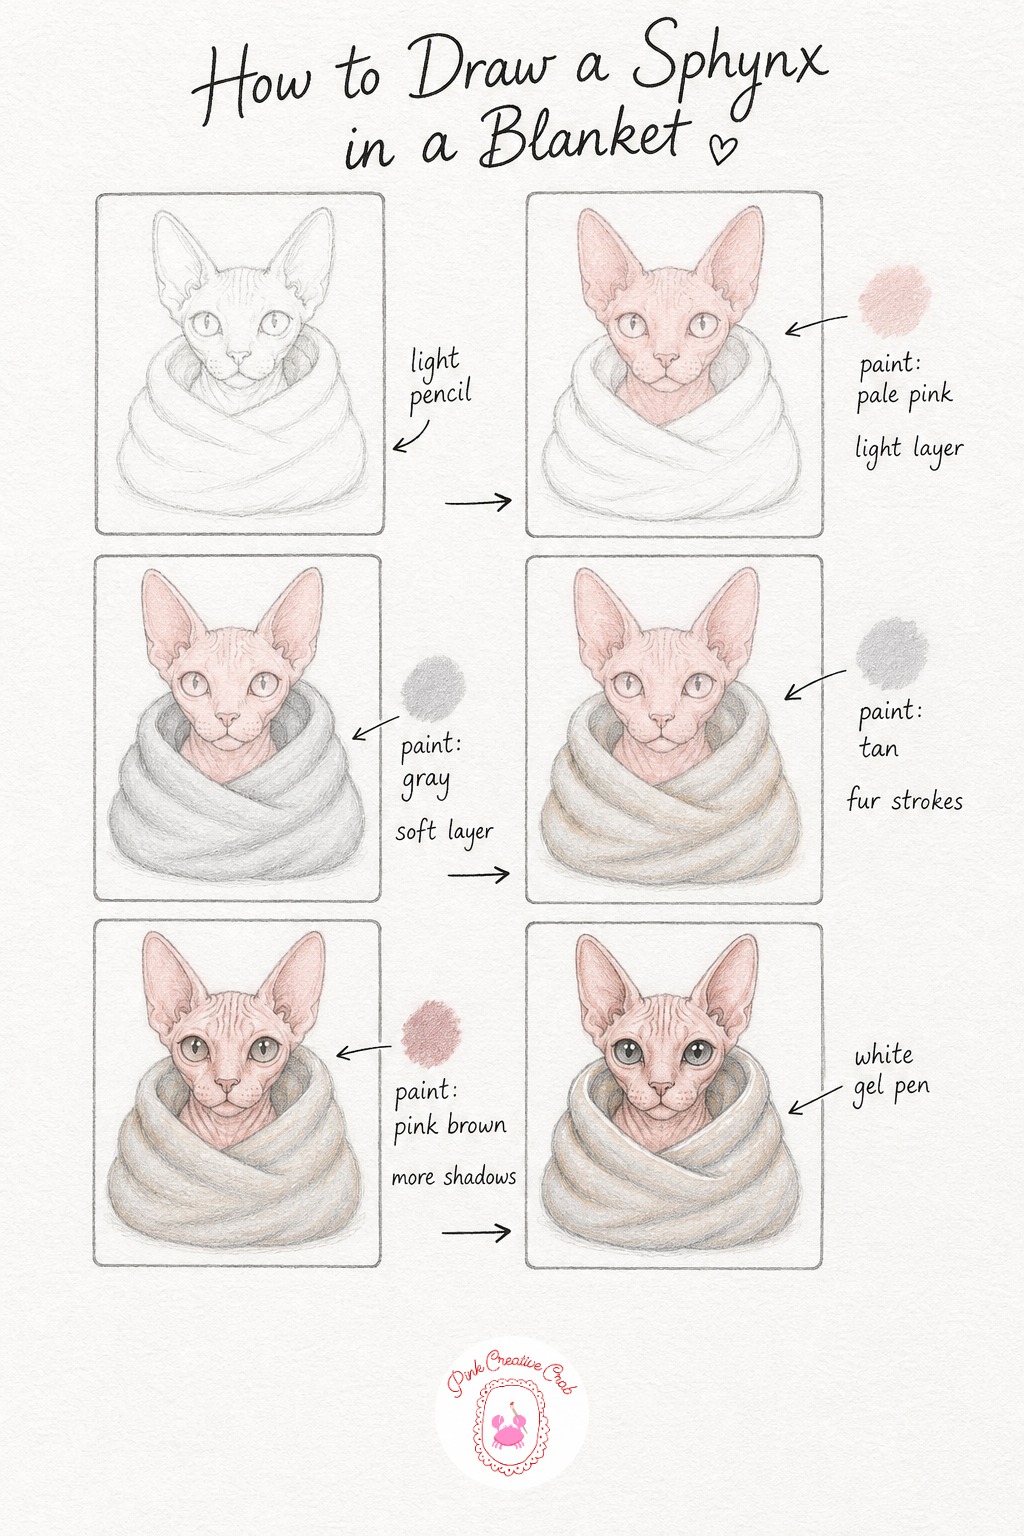
Start with a simple rounded head and a blanket shape wrapped up to the chin, since a Sphynx’s whole charm here is in that cozy bundled look. Keep the ears large, this breed’s ears are much bigger in proportion than most cats.
Since there is no fur texture to build here, move straight from pencil into a pale pink wash over the bare skin of the face and ears, this is the base tone for the whole cat. Wash a soft gray over the blanket next, keeping your strokes even and flat.
Shade warm tan into the folds where the blanket bunches and creases, since shadow in fabric folds reads very differently from shadow in fur. Add the Sphynx’s characteristic fine wrinkles across the forehead and neck using thin, soft strokes of pink brown, just a few lines is enough.
Beginners sometimes over draw the wrinkles until the face looks aged rather than soft, so keep these lines light and few. Finish with a white gel pen highlight along the top fold of the blanket and a small shine in each eye to bring the whole drawing to life. Since this cat has no fur layers to build, spend your extra time instead on getting the blanket folds soft and rounded.
Calico Curled On A Cushion
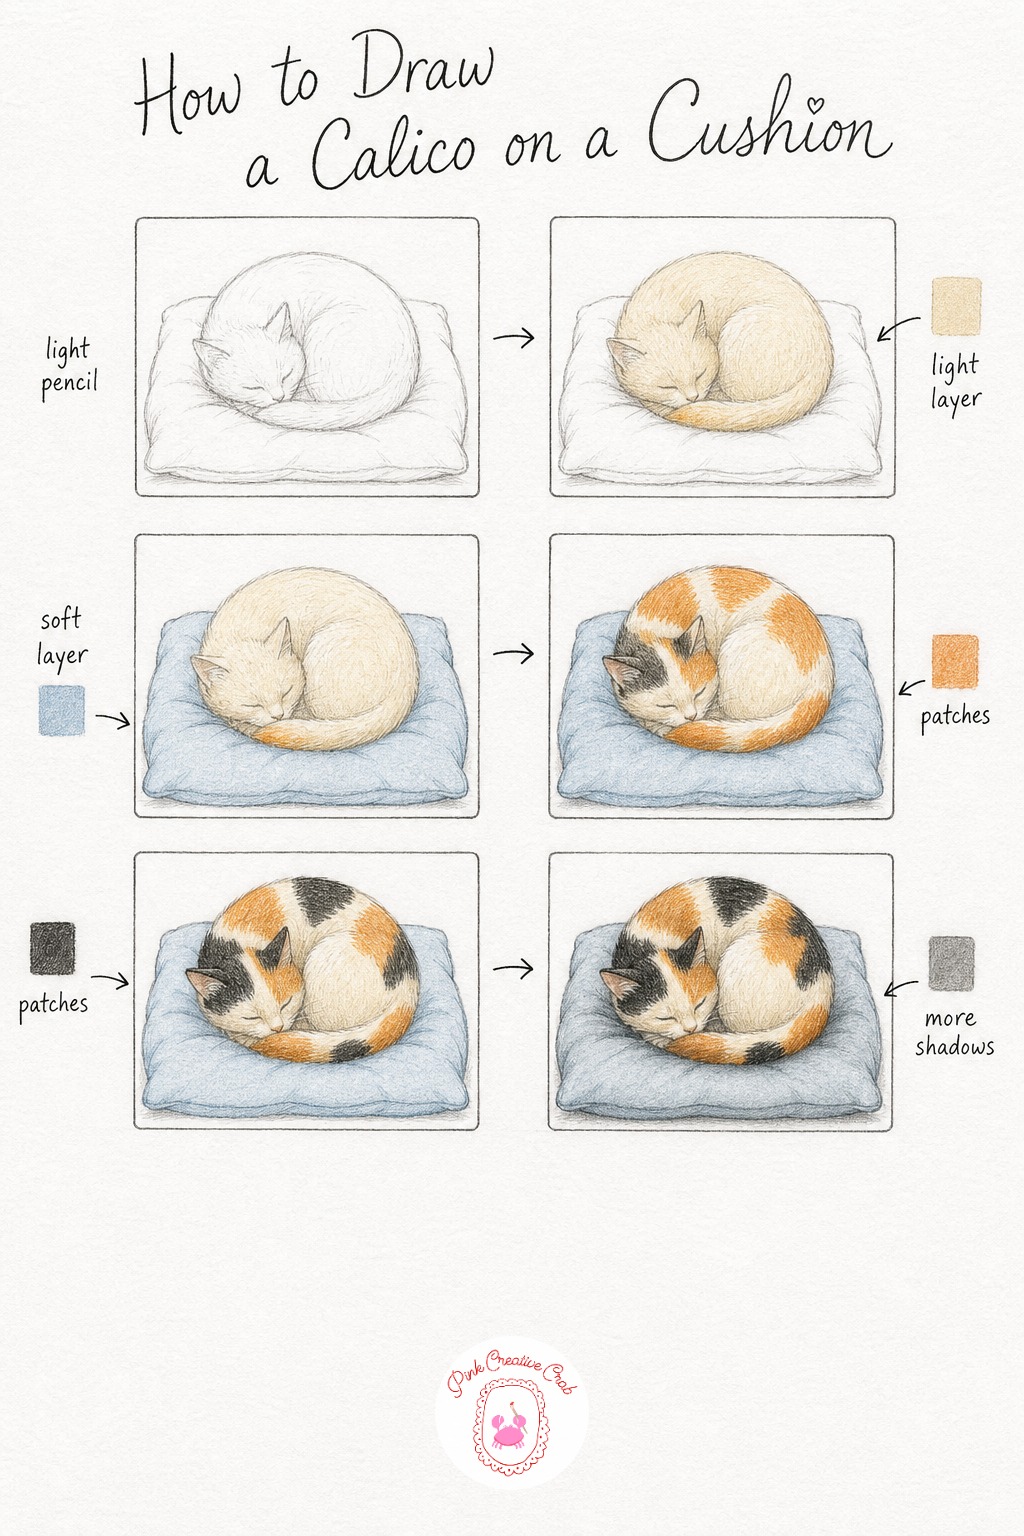
Sketch a simple curled ball shape for the body resting on a square cushion, with the cushion dipping slightly where the cat’s weight presses down. Keep the pencil loose here, since calico patches look more natural with an uneven, organic curled shape.
Move straight into color with a pale cream wash over the whole body first, that becomes the base peeking through between the darker patches. Wash a soft dusty blue over the cushion so it sits quietly behind the colorful coat.
Add orange patches in irregular shapes across the back and tail, then black patches nearby, letting them overlap the cream base rather than covering it completely. The trick with calico fur is embracing the randomness, so resist the urge to make the patches symmetrical or evenly spaced.
A common beginner mistake is blending the three colors together until they turn muddy brown, so keep each patch of color distinct with small gaps of cream between them. Finish with a soft gray shadow under the curled body and in the dip of the cushion where it compresses. Step back and check your patch placement looks random before adding the final shadow, it is easy to fix early and hard to fix late.
Tuxedo Cat Watching A Fish Bowl
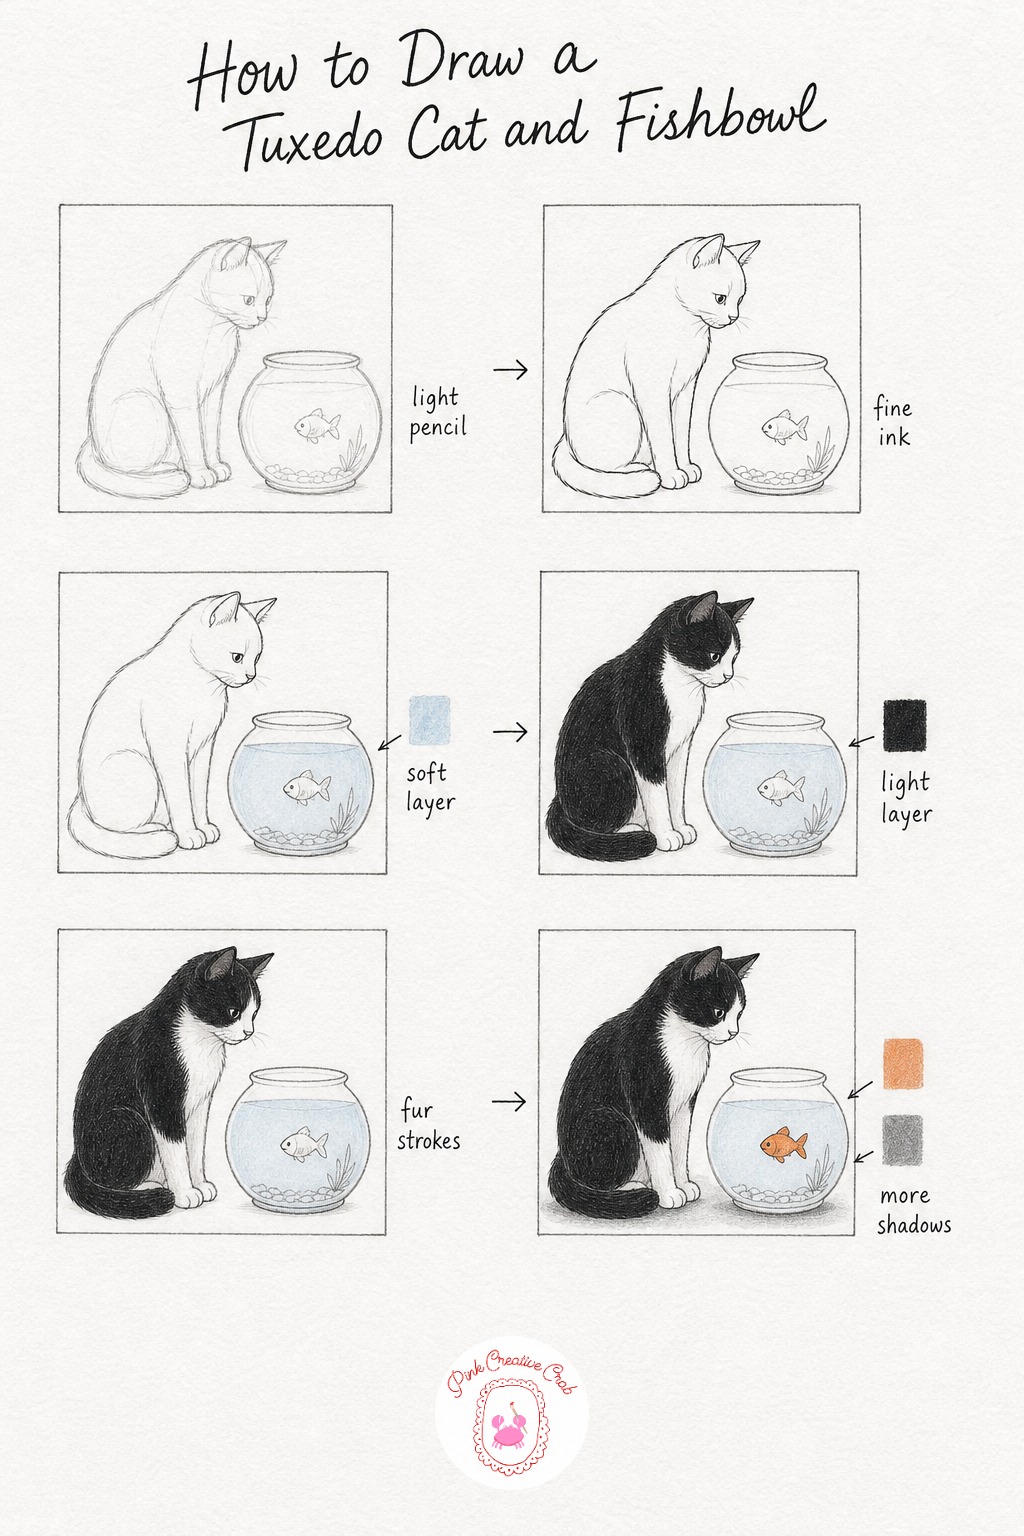
Sketch a cat sitting upright in profile, nose pointed toward a simple round fishbowl shape with a tiny fish inside. Keep the body proportions tall and alert, a cat watching a fish sits very differently from one curled up asleep.
Ink the whole scene, taking extra care along the line where the black and white fur meet, since that crisp boundary is the whole personality of a tuxedo cat. Wash a pale blue into the bowl’s water once dry, leaving a small white gap for the glass highlight.
Layer solid black over the back, ears and tail, then switch to white for the chest, paws and muzzle, keeping that edge between them clean and deliberate rather than soft and blended. This is the one cat in the whole set where you actually want a sharp line instead of a soft one.
Beginners often blend the black and white together trying to make it look natural, but tuxedo markings are bold and graphic, so trust the sharp edge. Finish with a touch of orange on the little fish and soft gray shadow beneath both the cat and the bowl. Leave a tiny uncolored dot on the fishbowl glass for the highlight, it sells the whole idea of glass instantly.
Persian Cat On A Velvet Pillow
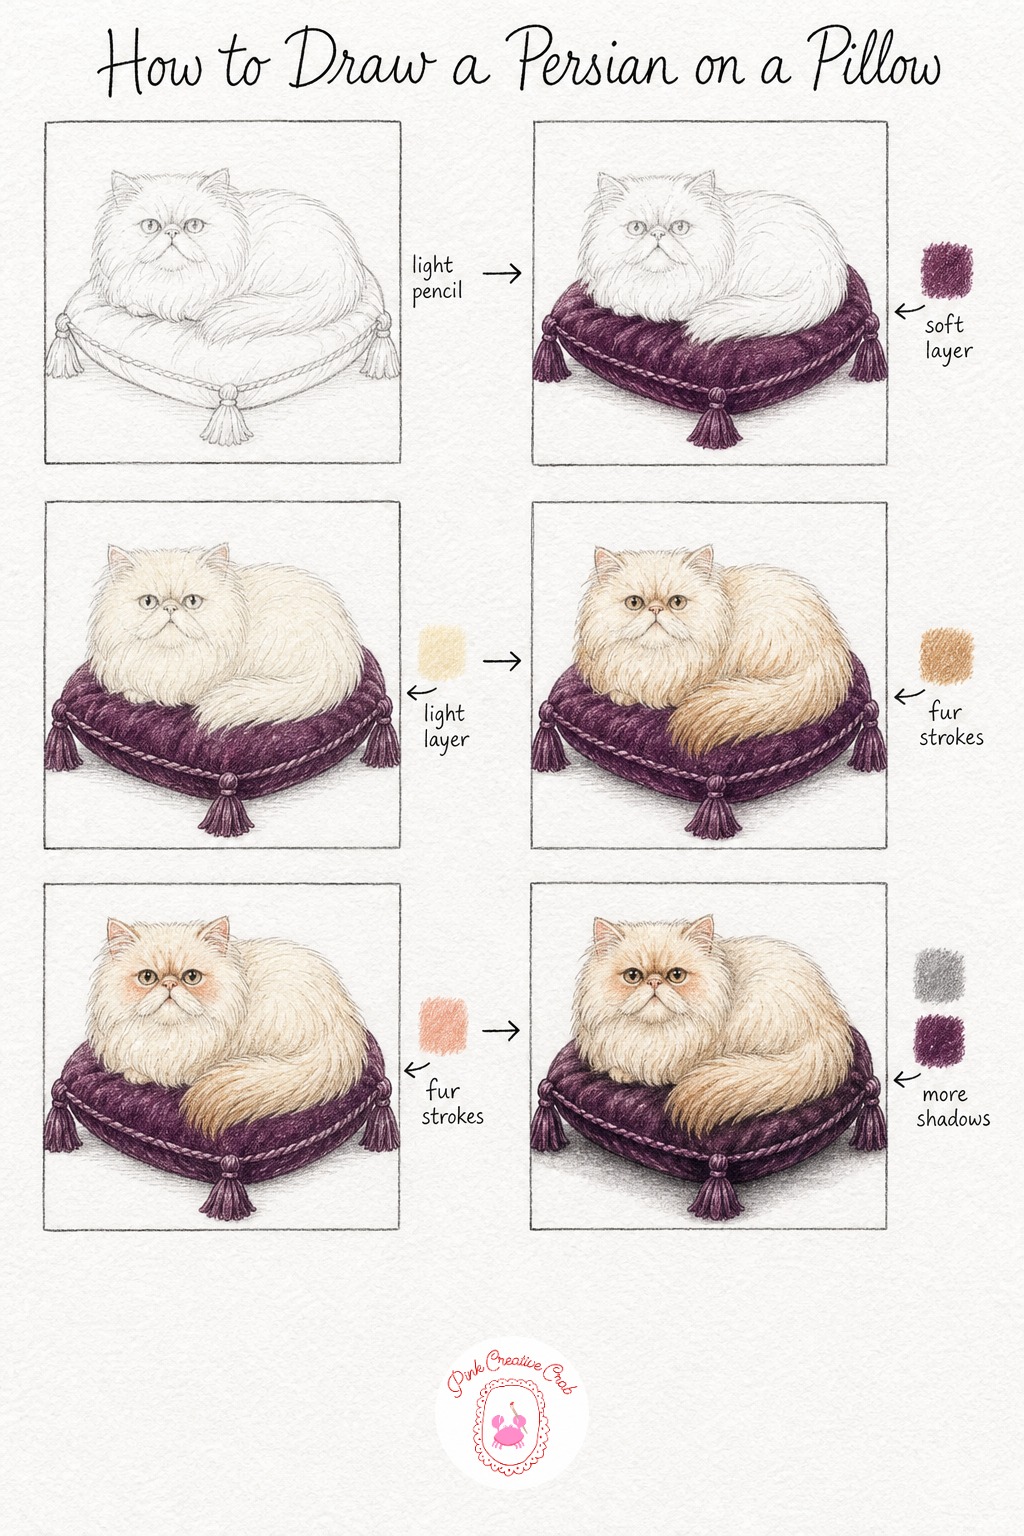
Persians have that signature flat, round face, so sketch the head as a wide circle with small ears and a short muzzle, then build a generously fluffy body settled onto a tasseled pillow. Keep the outline soft and fuzzy rather than crisp, long fur never has a clean edge.
Wash a deep plum over the velvet pillow first, including the little tassels at each corner, before touching the cat at all. Let that dry completely, since plum and cream will muddy together if layered while still wet.
Build the coat in cream, then add warm tan shading along the ruff around the neck, the cheeks and the long flowing tail, using long soft strokes that drift outward from the body. A touch of peach warms up the flat face and ears nicely.
The biggest beginner trap with Persians is drawing the face too narrow, so keep it wide and round even if it feels exaggerated at first. Finish with gray shadow beneath the body and a few folds of darker plum in the velvet fabric for richness. If plum feels tricky to mix, layer a light purple under a thin layer of red instead for a similar effect.
Scottish Fold Kitten With A Ball
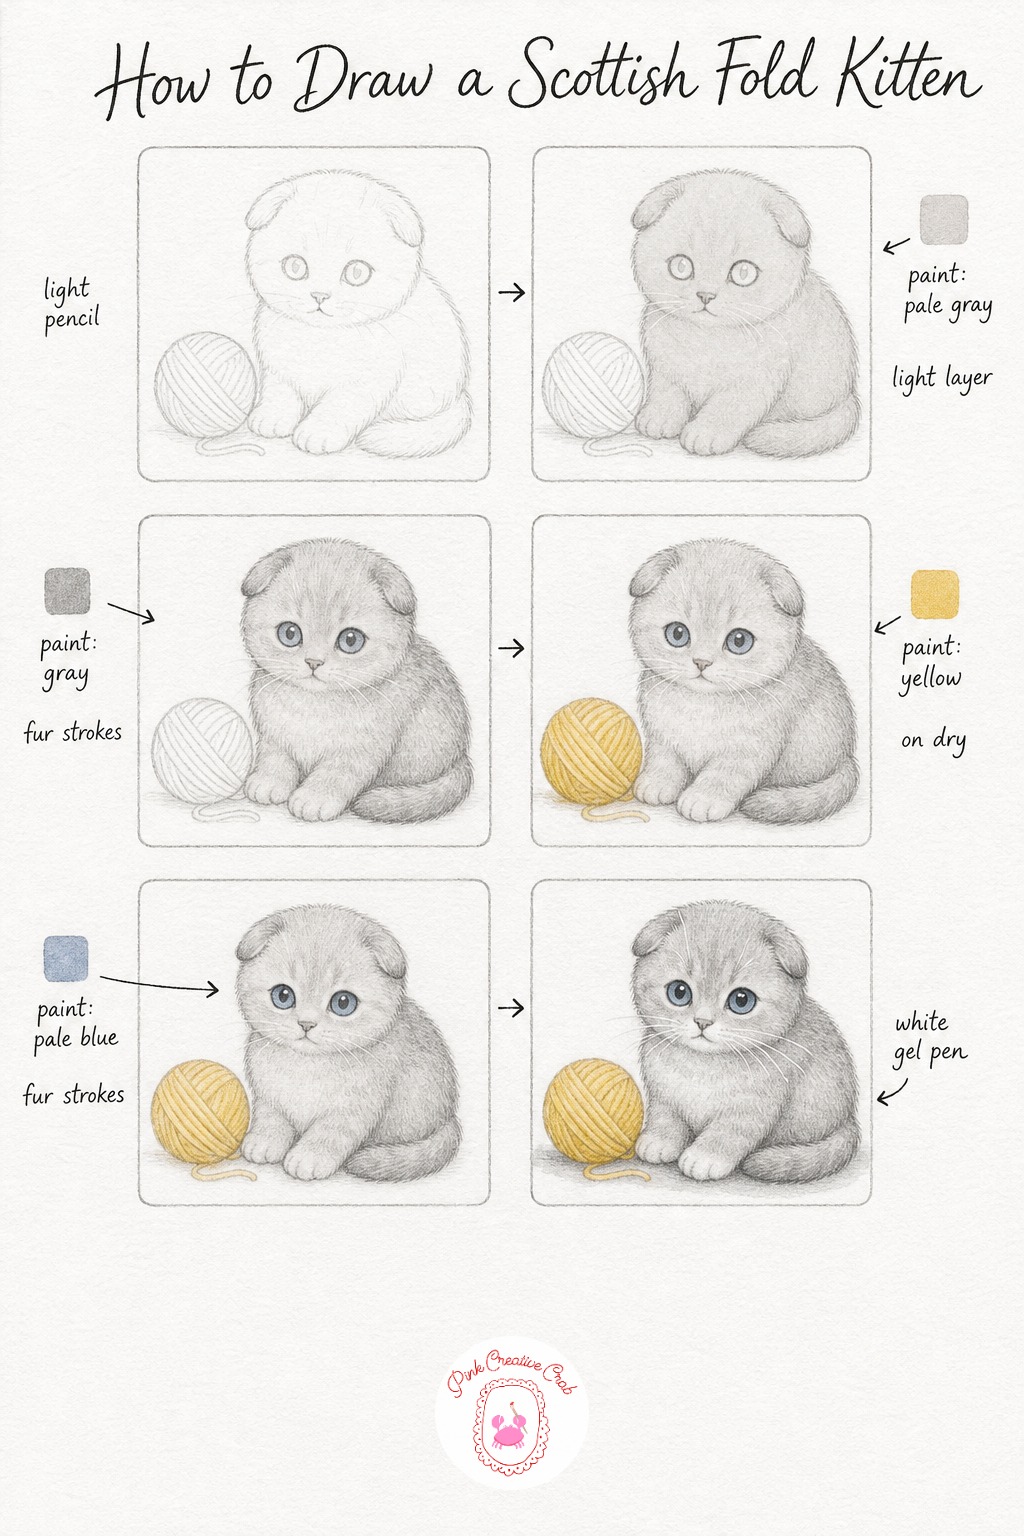
The whole character of a Scottish Fold lives in those small folded ears, so sketch them close to the head and slightly forward rather than upright. Keep the kitten’s body round and compact, with a simple yarn ball resting beside one paw.
Move straight from pencil into a pale gray wash over the whole body, since gray is a common and very recognizable color for this breed. Keep the wash thin and even at this stage, you will build the depth later.
Layer a slightly darker gray along the back, tail and gently around the base of the folded ears to give them some shape and dimension. Add warm yellow to the yarn ball once the kitten layers are dry enough not to smudge, testing with a light touch first.
Beginners often draw the ears too large or too pointed, forgetting this breed’s ears fold forward and down, so keep checking your shape against the plan. Layer pale blue into the round eyes for that classic wide eyed kitten look. Finish with a white gel pen for the whiskers and a soft gray shadow grounding both the kitten and the yarn ball. For more small cozy animal subjects at this same easy level, the cute animal sketching ideas page is a nice next stop.
Gray Cat In A Knitted Sweater
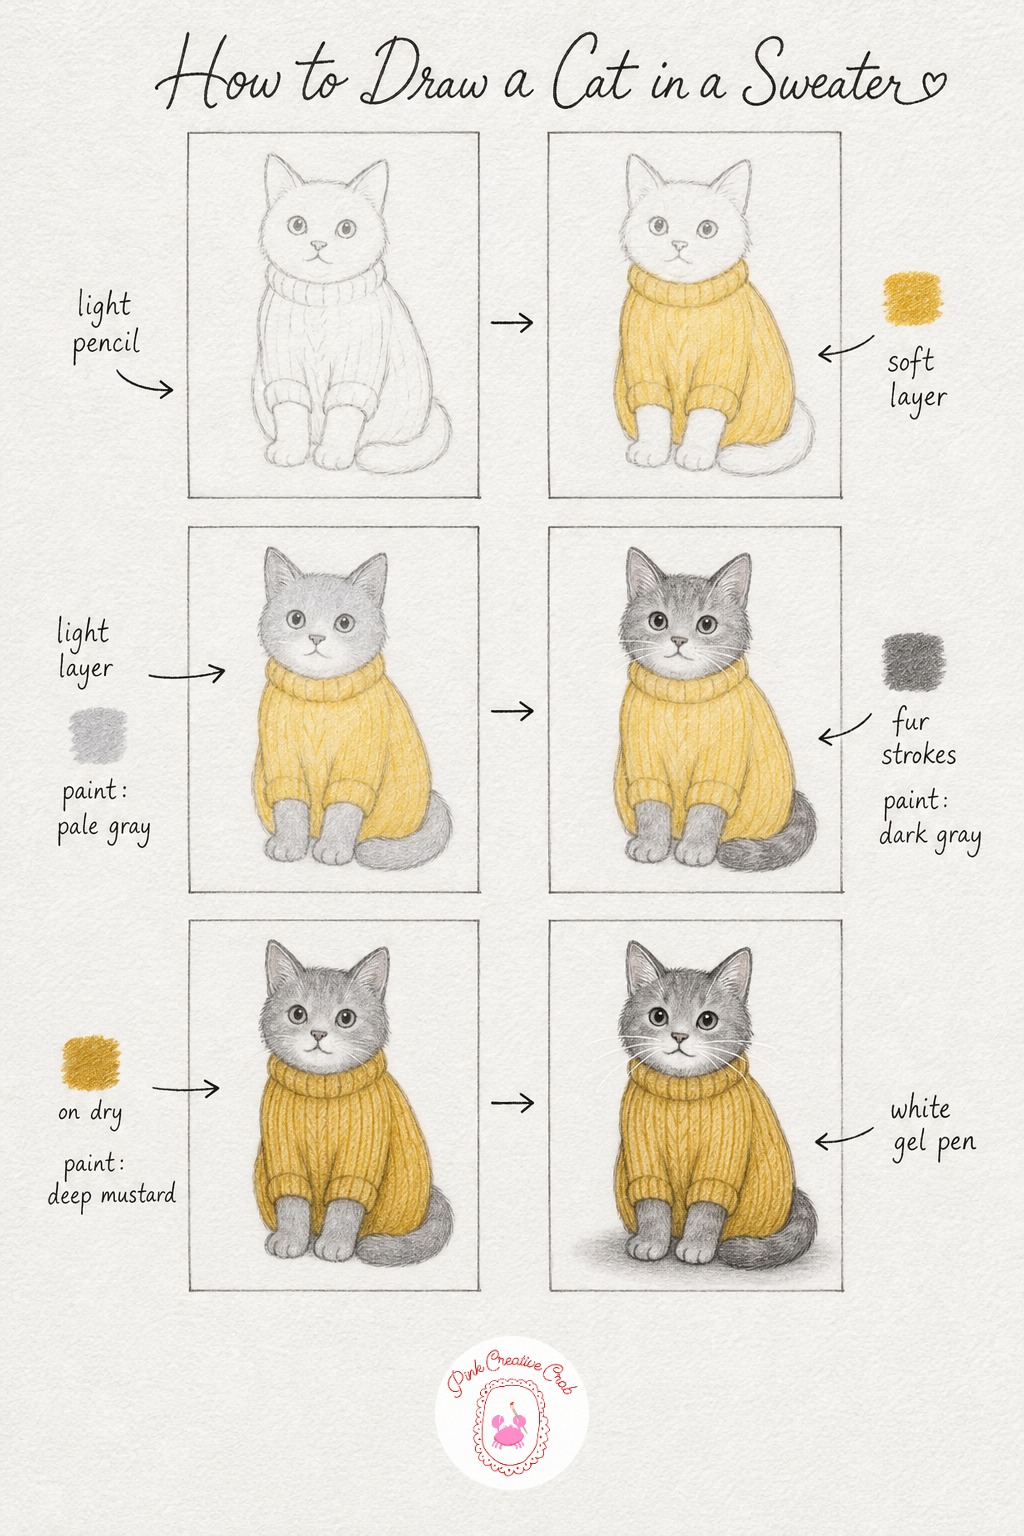
Sketch a cat sitting upright with a simple sweater shape wrapped around its middle, leaving the head, paws and tail free of fabric. Keep the sweater fairly loose and slightly bunched, like real knitwear rather than a tight printed pattern.
Wash a soft mustard yellow across the whole sweater first, letting it dry fully before any fur color goes down nearby, since the two will smear together otherwise. Build the exposed gray fur in a pale layer over the head, paws and tail.
Add darker gray strokes along the ears, the top of the head and the tail in short curved lines that follow the body’s natural curve. This is the stage where patience matters most, since rushing the direction of your strokes is what makes fur look scribbled instead of soft.
Once the mustard sweater layer is fully dry, add a few thin ribbed lines in a slightly deeper mustard to suggest the knit texture, just enough lines to read as fabric without overdoing it. Finish with a white gel pen for whiskers and a soft gray shadow beneath the seated cat. Keep the ribbed lines slightly irregular rather than perfectly straight, hand knitted texture is never perfectly even.
Cat Peeking From Under A Blanket Fort
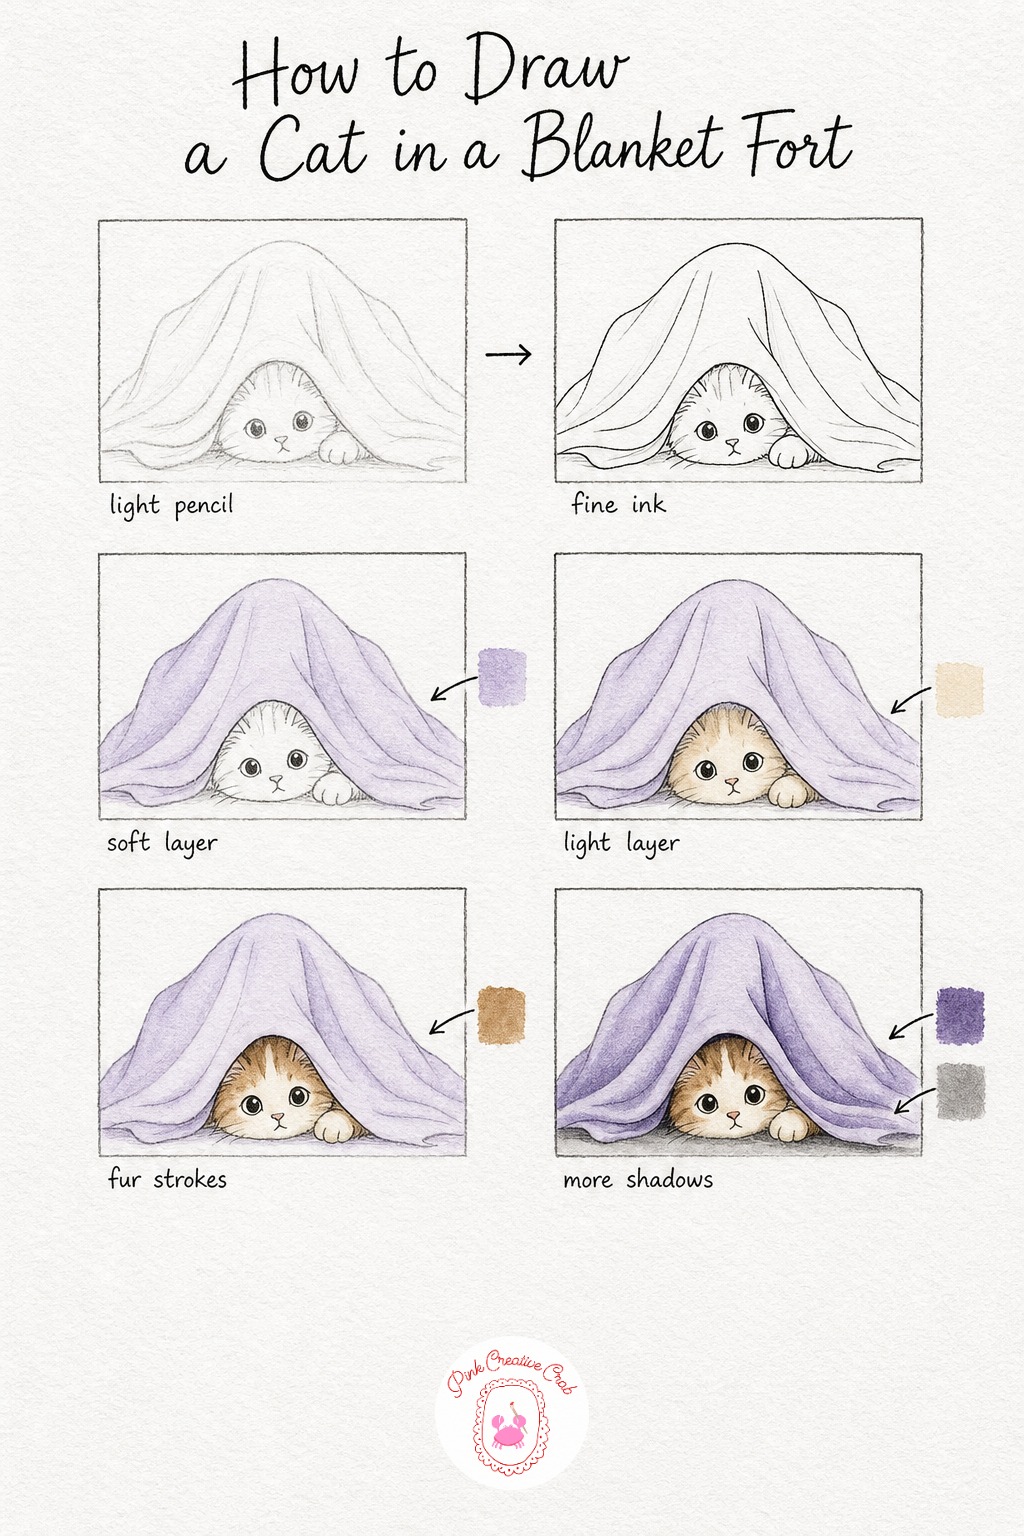
Draw a draped blanket shape first, like a small tent with soft folds, then tuck a simple round cat face peeking out from the gap underneath. Keep most of the body hidden here, it is the peeking face and one curious paw that carries the whole charm.
Ink the folds of the blanket with varied line weight, pressing slightly harder where the fabric overlaps itself, then outline the small visible cat face. Wash a pale lavender over the entire blanket shape once dry, keeping it light enough to still feel like soft cotton.
Build the visible fur in cream, then add warm brown patches over the ears and top of the head for a little color variation peeking through the gap. Since so little of the cat shows here, make sure the eyes are bright and expressive, that curious look is doing most of the storytelling.
A common mistake is making the blanket folds too stiff and geometric, so round every fold’s edge and let the fabric droop naturally. Finish with deeper purple shading tucked into the blanket’s inner folds and a soft gray shadow where the fabric meets the floor. Readers who like this kind of quiet cozy scene might also enjoy more ideas over at drawing ideas easy step by step.
Orange Tabby Chasing A Sunbeam
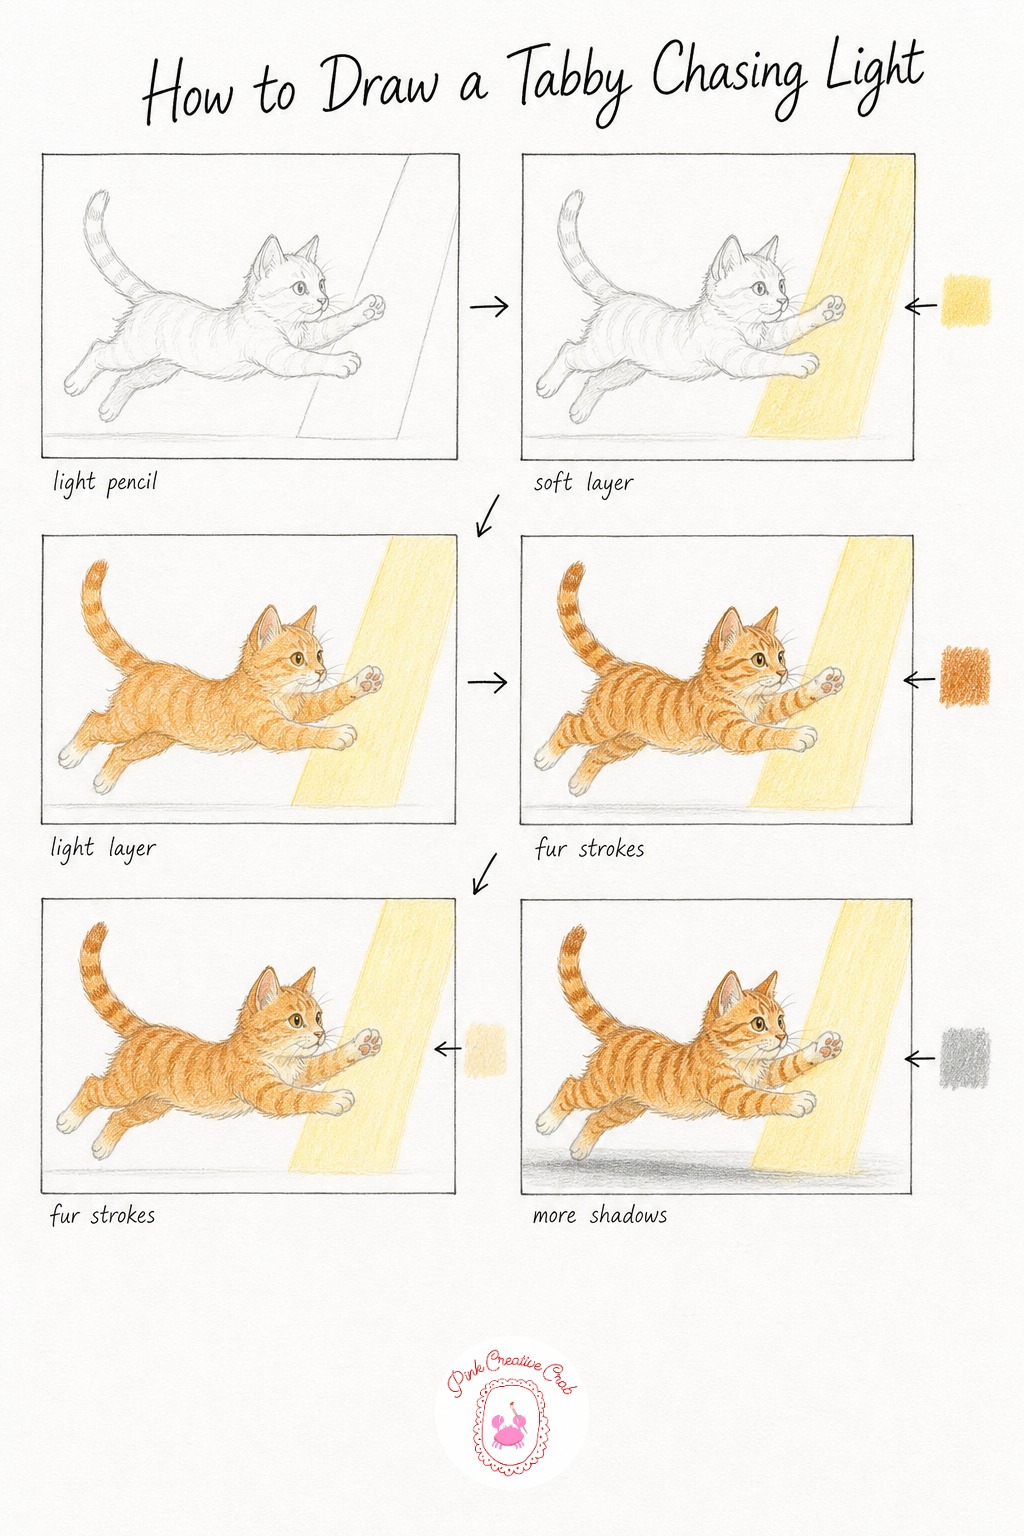
This cat is all motion, so sketch the body mid pounce, back legs pushed off the ground and front paws reaching forward toward a diagonal beam of light. Stretch the pose out more than feels natural at first, action poses almost always need extra exaggeration to read well.
Since there is no separate background scene here, wash a pale yellow directly onto the diagonal sunbeam shape first and let it dry. Build the cat’s body next in a soft orange base covering the whole stretched form.
Layer darker orange brown stripes along the back, legs and tail using curved, energetic strokes that follow the direction of the pounce rather than the resting curve of a sleeping cat. The stripes should feel like they are moving with the body.
Beginners often draw action poses too stiffly, with legs straight instead of bent mid motion, so double check your pencil stage before adding any color. Finish with cream on the chest and chin, then stretch a soft gray shadow along the floor beneath the pounce to anchor the motion. Keep your darkest stripe strokes concentrated along the back and tail, it keeps the eye moving the same direction as the leap.
Cat Curled In A Knit Hat
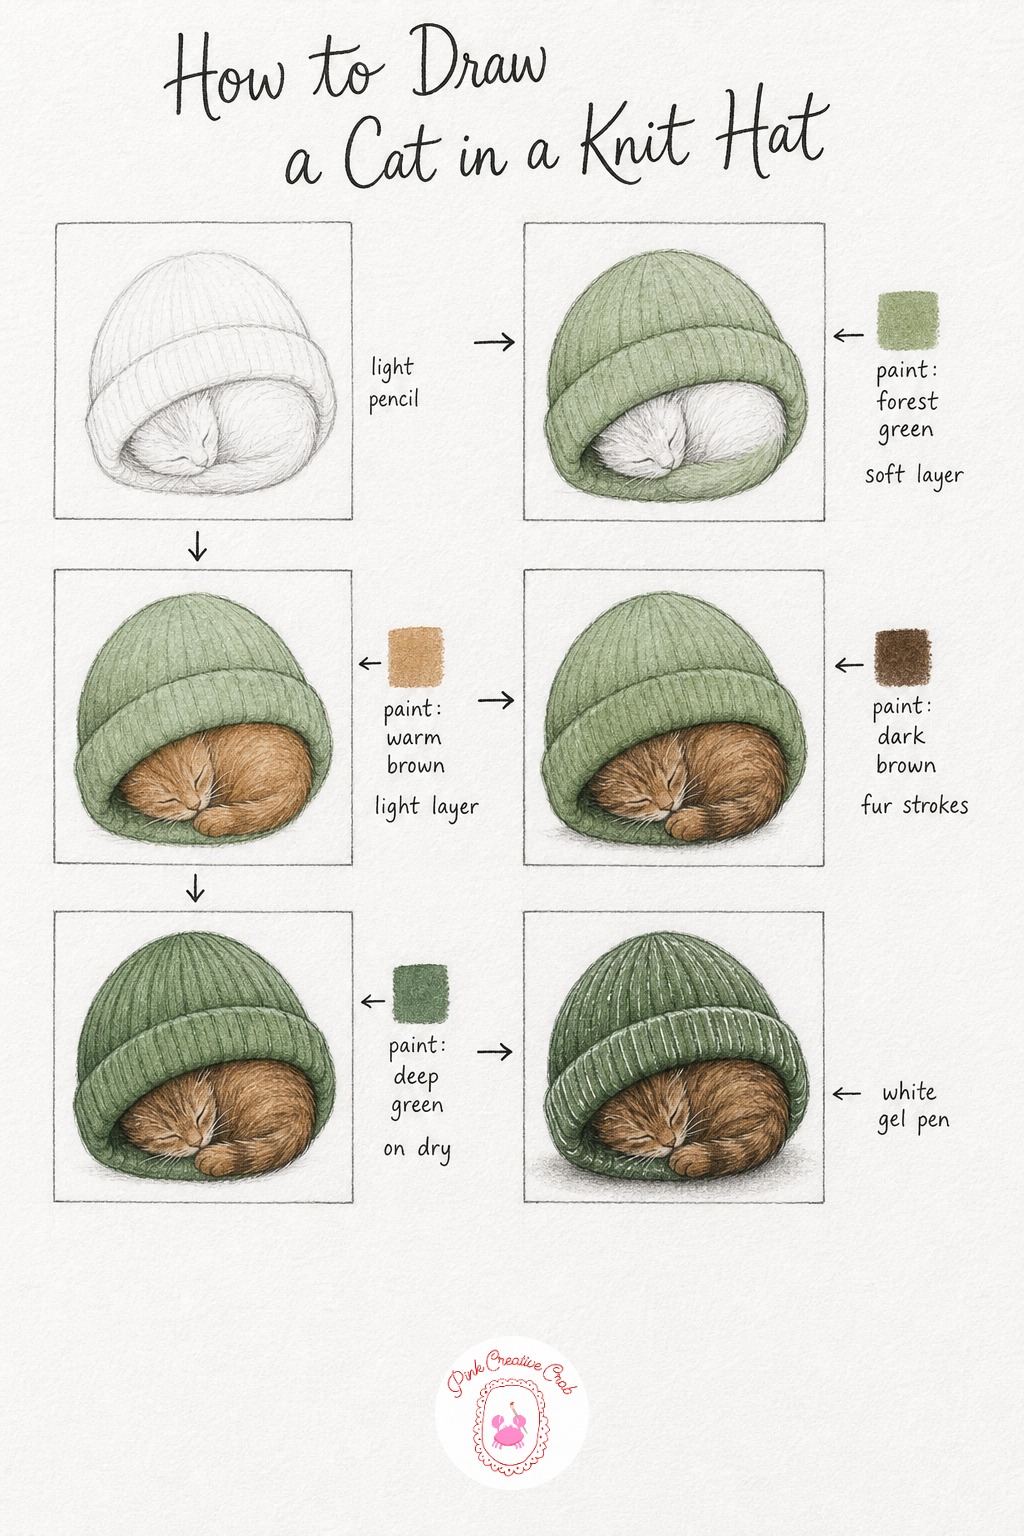
Sketch a small knit beanie shape first, wide enough to tuck an entire curled cat inside it, with just a sleepy face and maybe one paw peeking out. Keep the hat’s brim folded over in a simple cuff, it reads instantly as a knit hat even in rough pencil.
Wash a soft forest green across the whole hat shape and let it dry fully, since this becomes the main color of the piece with only small patches of visible fur. Layer warm brown onto whatever fur is showing, usually just the face and maybe a paw tip.
Add darker brown strokes around the eyes and ear edges for definition, keeping the amount of visible fur small and precise since there is not much of it on show here. This tutorial is a nice change of pace if you want a quick, quieter drawing session.
Once the green hat layer is completely dry, add a few thin ribbed lines in a slightly deeper green to suggest the knit texture along the folded cuff. Finish with a white gel pen highlight along the fold of the hat and a soft gray shadow beneath the whole curled shape. Keep the ribbing lines curved slightly to follow the round shape of the hat rather than drawing them flat and straight.
Russian Blue Watching Birds
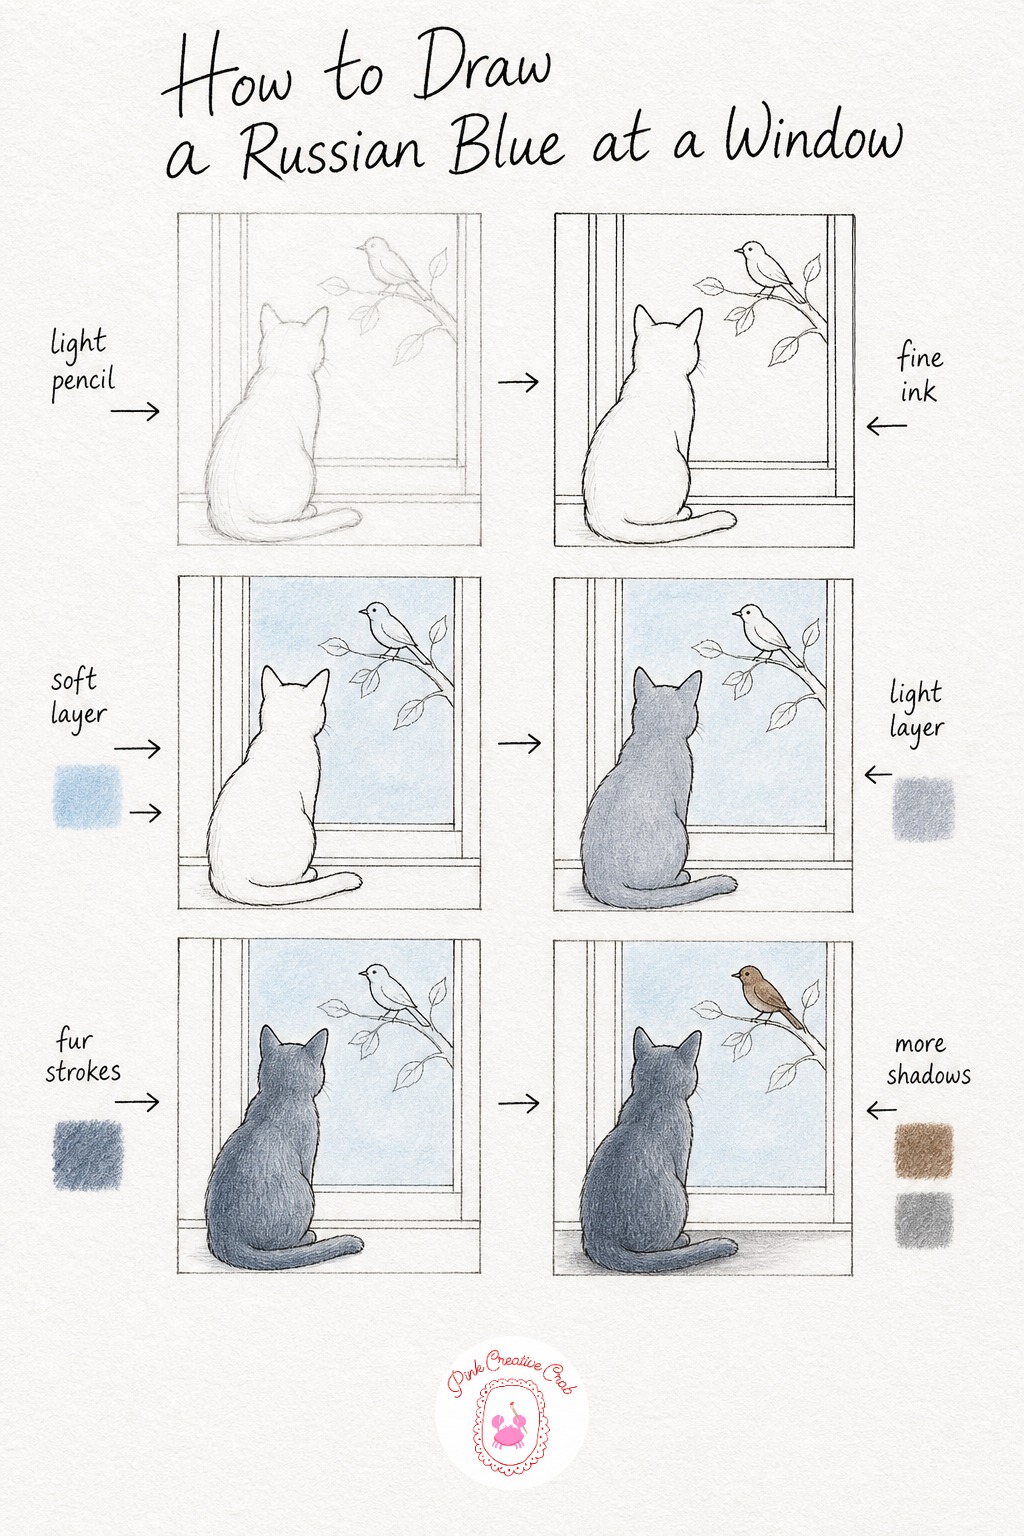
Sketch a cat sitting tall and alert in profile, facing a simple window with a small bird perched on a branch just outside. Keep the cat’s posture straight backed and ears forward, that upright attentive pose is very characteristic of this breed watching something outside.
Ink the whole scene including the window frame and branch, then wash a pale sky blue across the glass and background once dry. This cool blue background actually helps the cat’s own blue gray coat stand out nicely against it.
Build the coat in a soft silvery blue gray base across the entire body, this breed’s coat is famously an even, single color rather than patched or striped. Layer a slightly deeper blue gray along the back, ears and tail for gentle shape and dimension, keeping the strokes short and even.
Beginners sometimes add stripes or patches out of habit, but a Russian Blue’s coat should stay smooth and solid in tone throughout. Finish with soft brown on the little bird outside and a gray cast shadow beneath the cat to settle it onto the floor. For more perched bird details to borrow for the background, the bird pencil drawing guide pairs nicely with this one.
What to Do Next
Pick the cat that feels most like your own companion tonight, sharpen a few pencils, and work through the sheet one stage at a time rather than rushing to the fur. Save your favorite finished drawing and come back for another cozy scene whenever the mood strikes.
Frequently Asked Questions
What is the easiest way to draw a cat for a complete beginner?
Start with simple rounded shapes, an oval for the body and a circle for the head, before adding any fur or detail. Keep the first pencil sketch very light so it stays easy to erase or adjust as the proportions settle into place.
How do I make colored pencil fur look soft instead of scratchy?
Soft fur comes from thin layers and short strokes that follow the direction the fur actually grows, never one long hard line. Build color gradually in two or three light layers rather than pressing hard once, and let each layer settle before adding the next.
Do I need to ink my cat drawings before adding color?
Only the scene based tutorials need an ink step, since it keeps background elements like windows or baskets crisp under the color. Single cat subjects without a background, like a stretching Siamese, can move straight from pencil into colored pencil.
What colors do I need to draw different cat breeds and colors?
A warm set covering cream, orange, gray, brown and black handles most cats in this collection, plus a few brights like blue, pink and yellow for scene details. Layering two pencils together often creates a custom shade without needing to buy every color separately.
How long does one cat drawing from this collection usually take?
Most of these drawings fit comfortably into one relaxed sitting, roughly thirty minutes to an hour depending on how many fur layers you build. Scenes with extra background elements like a basket or window naturally take a little longer than a single cat alone.
Have any thoughts?
Share your reaction or leave a quick response — we’d love to hear what you think!
-
 0
-
0
-
0
-
0
-
0
-
0


