

Table of Contents
- Before You Start
- Fox Curled In Leaves
- Hare In A Meadow
- Hedgehog With An Apple
- Squirrel On A Stump
- Owl In A Tree Hollow
- Deer In Morning Mist
- Raccoon By A Stream
- Badger At A Burrow
- Woodpecker On A Branch
- Chipmunk With Acorns
- Barn Owl On A Fence Post
- Fawn Resting In Ferns
- Toad On A Mossy Log
- Mouse In A Pumpkin
- Beaver At A Pond
- Wolf Cub In Pine Needles
- Frequently Asked Questions
I keep coming back to woodland animals because every one of them gives you an excuse to paint soft fur, scattered leaves and a little patch of cozy scenery around them. This watercolor animals tutorial collection gathers sixteen small scenes, a fox curled in fallen leaves, a hare in a meadow, a hedgehog with an apple, and more, each one built from the same simple paint-along logic.
Below you will find a full sheet for each animal, pencil lines first, then washes, then the fur details that make the whole thing feel alive. Pick whichever creature is calling to you today and paint along at your own pace.
Using these images: free for personal projects such as printing, coloring, cards, journals and gifts. Handmade items that include them may be sold up to 30 pieces per design. More than that is commercial use and is not permitted, and neither is selling or sharing the images themselves or passing them off as your own. Please ask before any other use.
Before You Start
- Choose cold press watercolor paper of at least 140 lb so the fur washes can blend softly without the paper buckling or pilling under repeated layers.
- Keep your pencil lines very light at the sketch stage, since dark graphite will smudge into pale fur washes and muddy the color later.
- Test every mixed color on a scrap strip first, because warm browns and greens shift a lot depending on how much water you add.
- Use a round brush with a fine point, size six to eight, so you can switch between soft background washes and small fur strokes without changing tools.
- Let each wash dry fully before adding the next layer of fur or shadow, or the colors will bleed into one soft blur instead of staying layered.
- Keep a scrap of paper nearby to dab your brush dry before any dry brush fur texture stage, since too much water flattens the fine hair strokes.
Fox Curled In Leaves
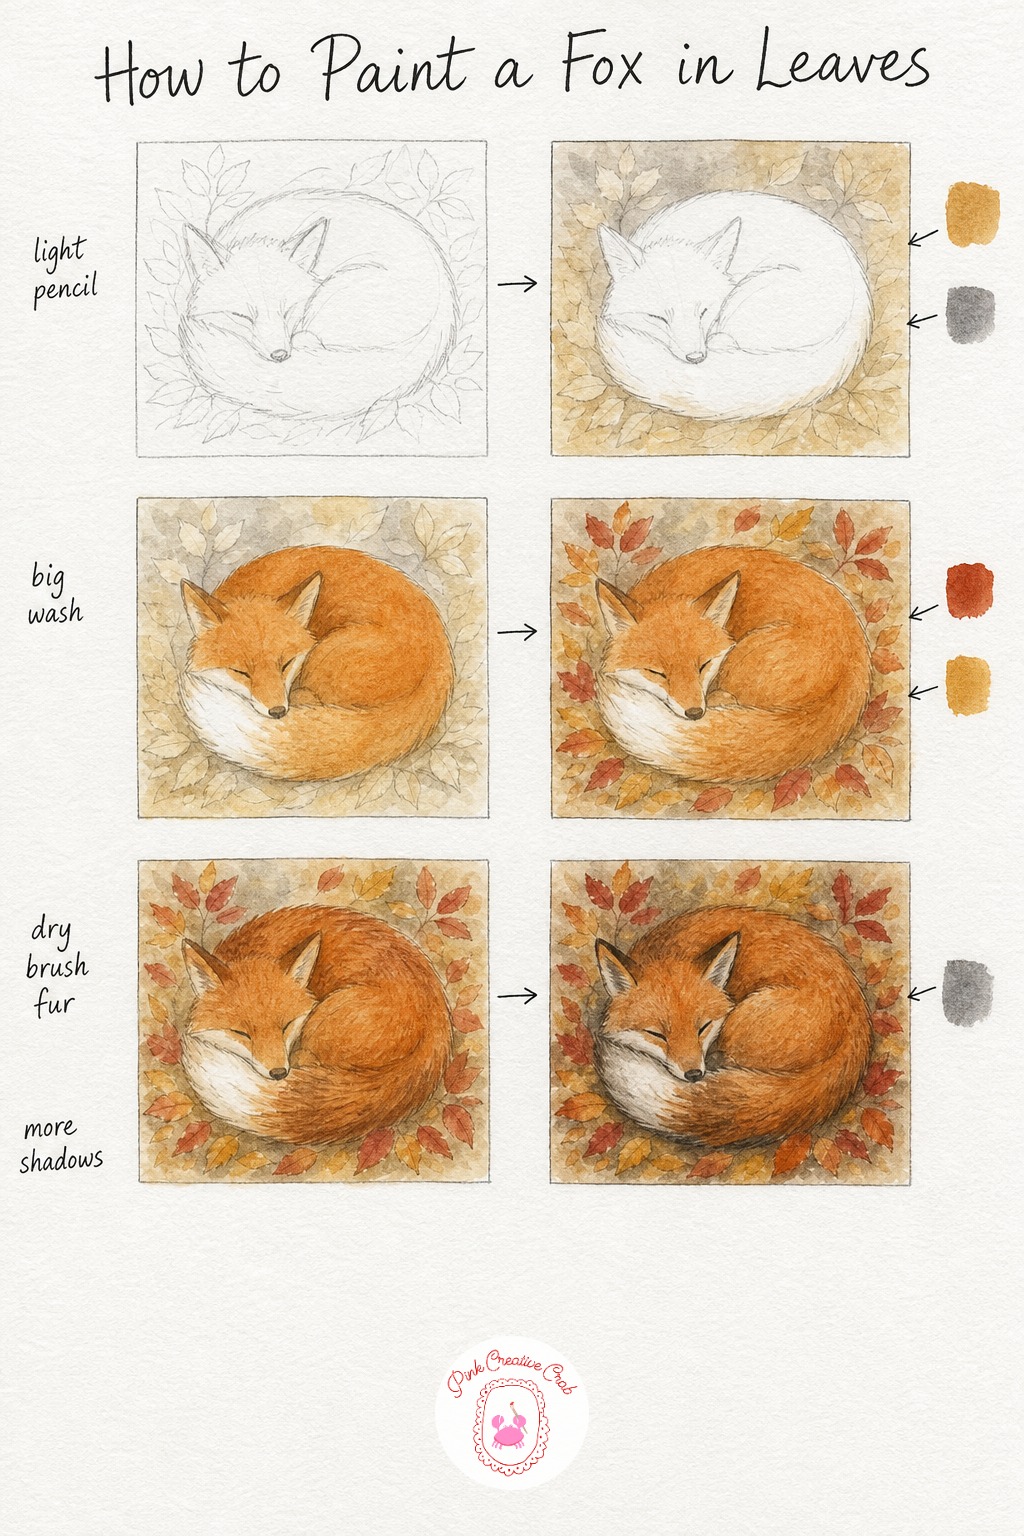
Start with a very light pencil outline of the fox curled into a comma shape, nose tucked near the tail, then scatter a few leaf outlines around the body so you know where the warm washes will sit later.
Lay a pale wash of raw sienna across the ground and a soft gray behind the fox while the paper is still damp, letting the two colors drift into each other for a misty backdrop. Once that is bone dry, paint burnt orange over the whole fox body, leaving the chest and tail tip unpainted so the white paper shows through as the palest fur.
Add the scattered leaves in burnt sienna and yellow ochre once the fox layer is dry, then go back in with a dry brush loaded with burnt sienna to pull short upward strokes along the back and tail for that soft fur edge. Beginners often paint the fur too wet here, which flattens the texture, so keep the brush nearly dry for this stage.
Finish with a gray shadow under the curled body and a few darker lines around the eyes, nose and paw tips to give the fox volume. The tip that saves this painting every time: always let the base fur color dry completely before dry brushing texture on top, or the strokes bleed into a blur instead of staying crisp.
Hare In A Meadow
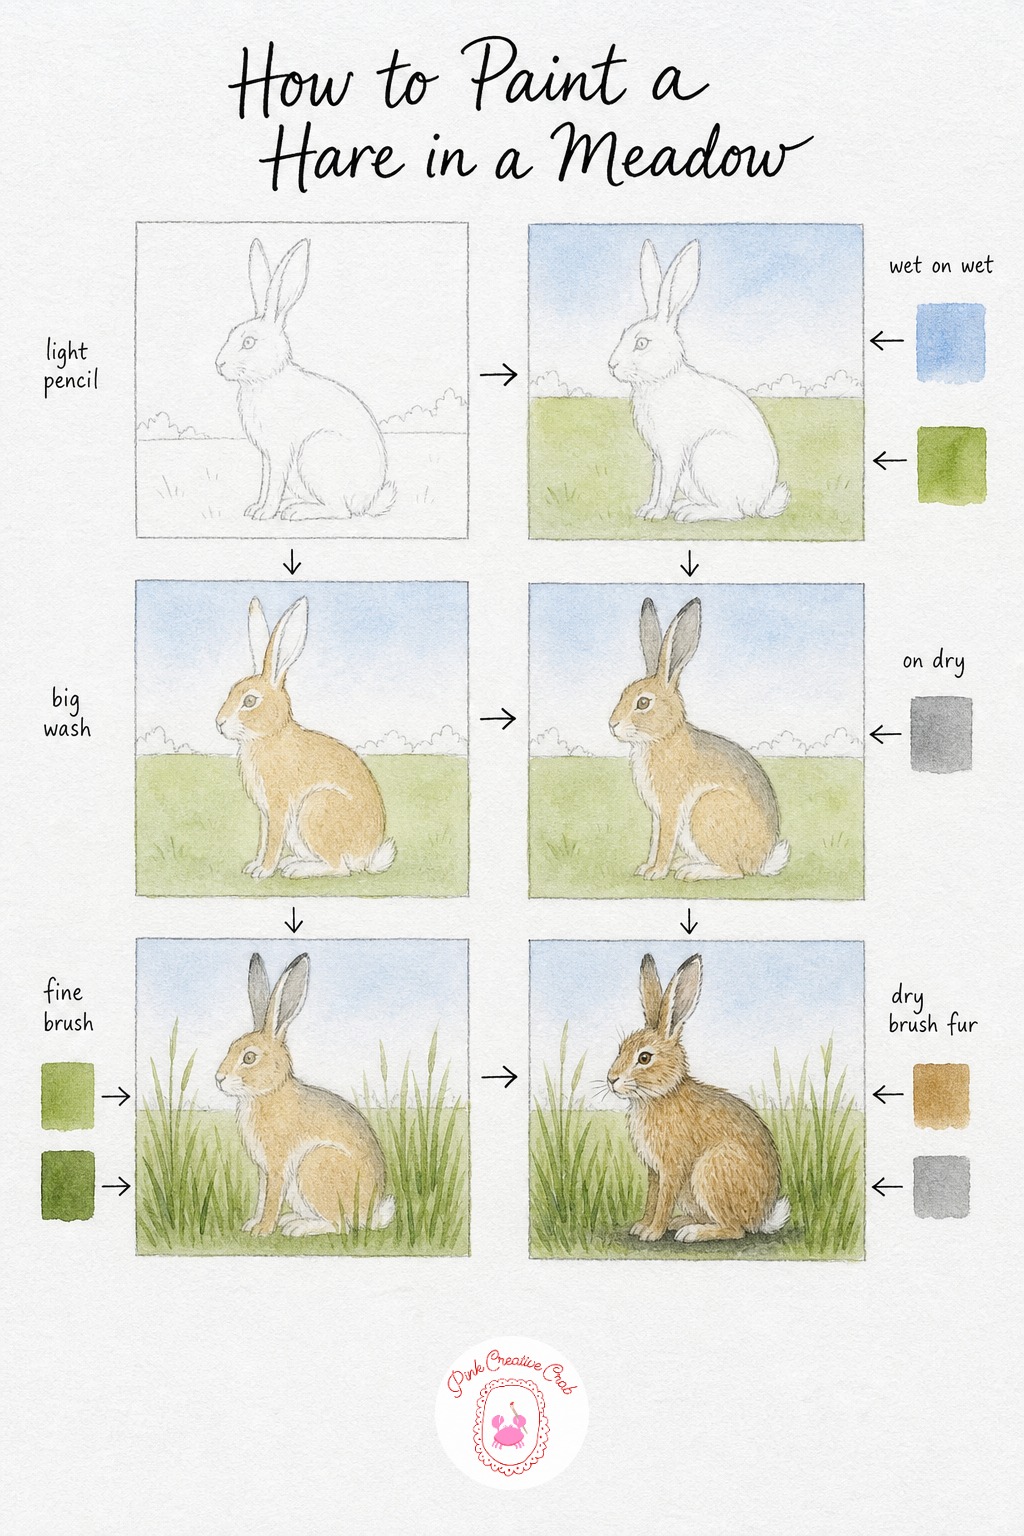
Sketch a sitting hare in profile with tall ears and simple haunches, then draw one gentle horizon line to separate meadow from sky. Keep the pencil faint since this whole piece stays pale and airy.
Wash pale green across the ground and a soft blue strip above it while the paper is wet, letting the two blur slightly at the horizon. Once dry, cover the hare’s body in a warm raw sienna wash, skipping the ear tips and belly so they stay light.
Add gray shading inside the ears and along the back curve once that first layer is dry, then paint tall grass blades around the hare using two greens so the meadow does not look flat. This is where beginners often crowd the grass too close to the hare’s body, so leave a little breathing room around the outline.
Finish with dry brush strokes of raw sienna along the hare’s back and haunches for soft fur texture, then drop in a gray shadow beneath the body to ground it in the grass. If your grass green turns muddy, mix it fresh on a scrap palette rather than overworking the same puddle.
Hedgehog With An Apple
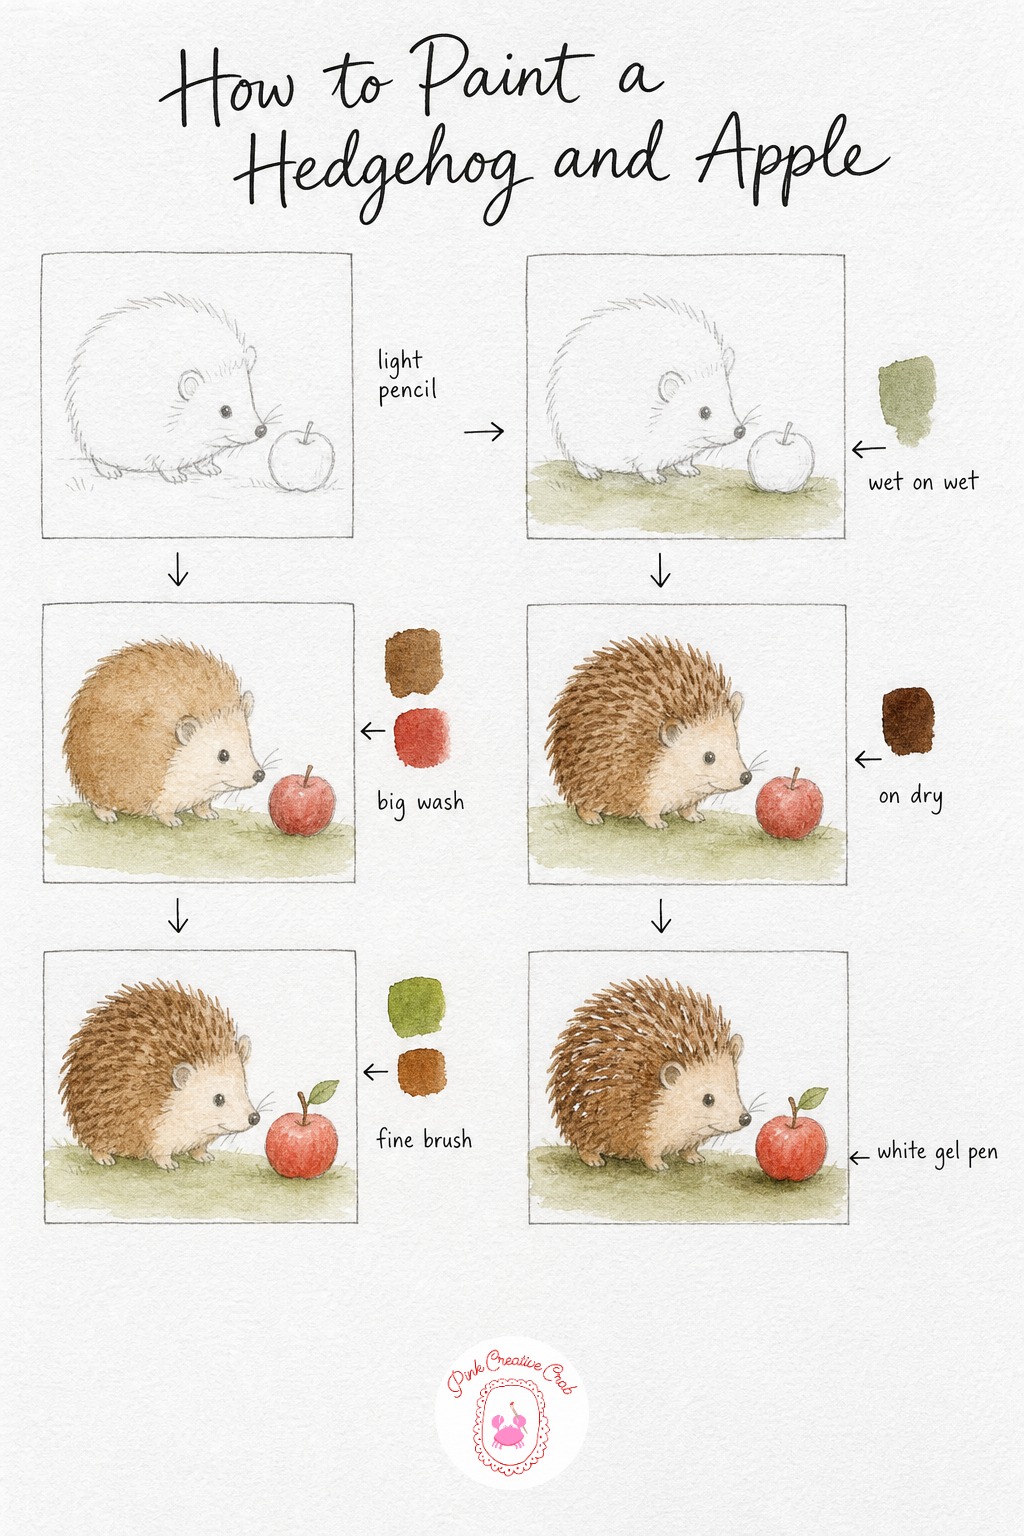
Draw the hedgehog as a simple rounded dome with a pointed snout, and place a small apple circle beside it, keeping both shapes loose and slightly overlapping in pencil.
Wash a pale green across the ground under both subjects while it is still damp, then once dry, paint the hedgehog’s body in raw umber and the apple in cadmium red, leaving a tiny white highlight dot untouched on the apple’s curve.
When the base brown is completely dry, add short diagonal strokes of burnt umber across the hedgehog’s back to suggest the spines, working from the center outward in small clusters rather than one solid mass. This layering is where most beginners rush and blur the spines into mud, so wait for full dryness between each cluster.
Paint the tiny leaf and stem on the apple, then finish with a soft gray shadow beneath both shapes and a few flicks of white gel pen along the spine tips for highlight. The tip worth remembering here: keep the hedgehog’s face area almost bare of spine strokes so the snout reads clearly against all that texture.
Squirrel On A Stump
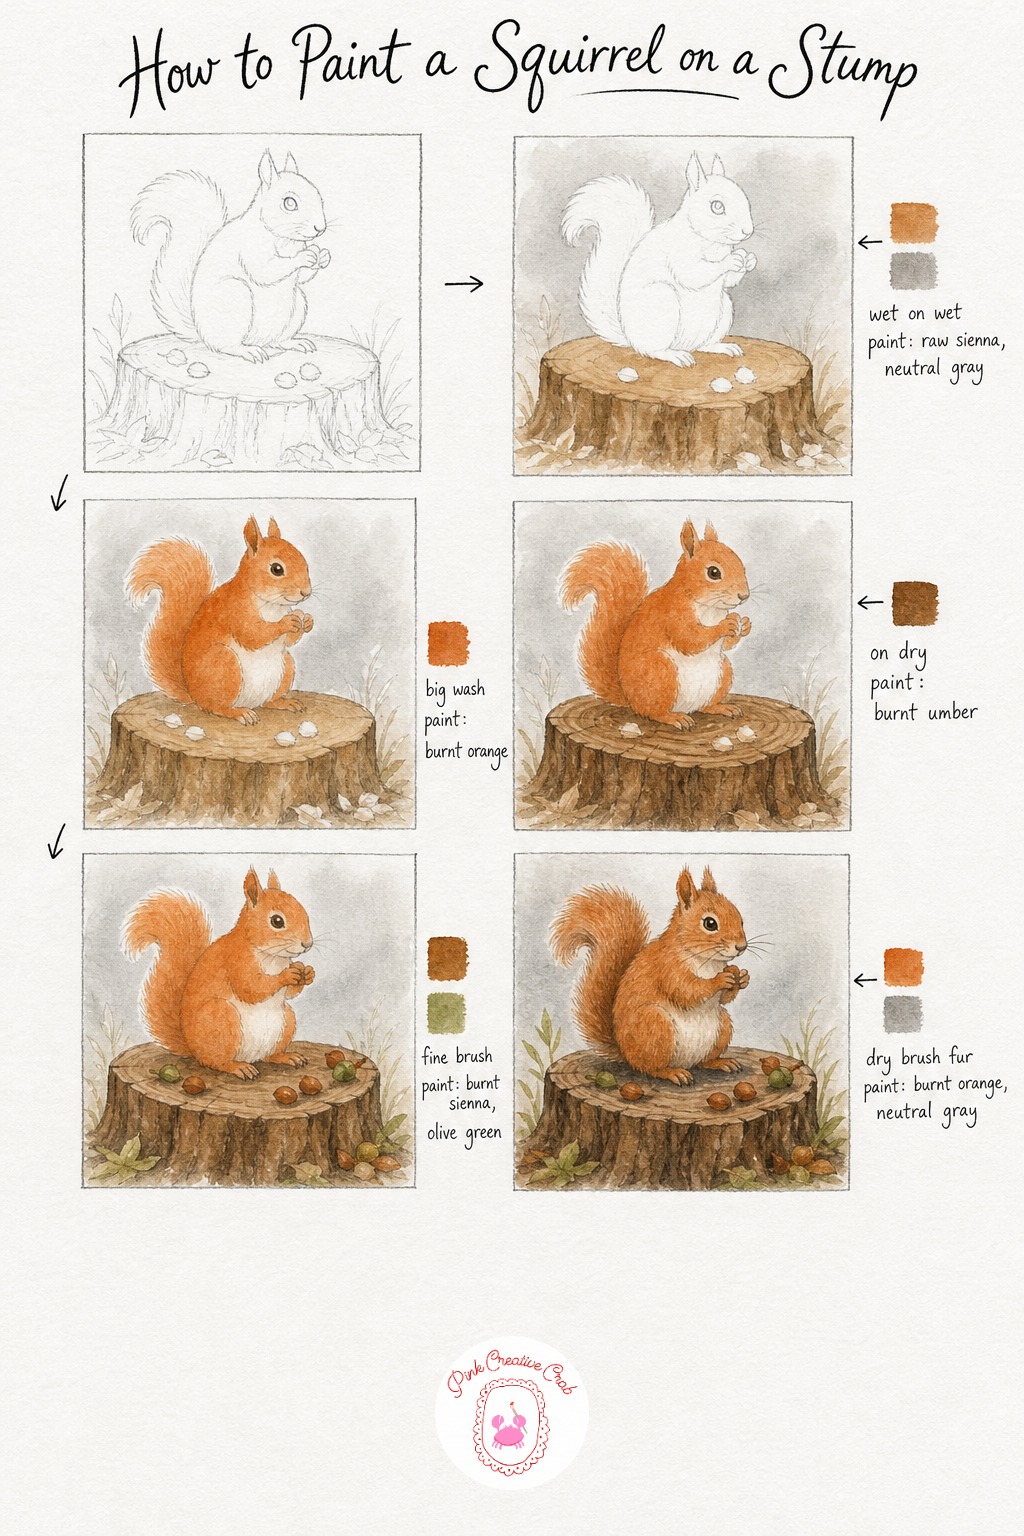
Sketch the stump as a wide oval with a flat top, then draw the squirrel sitting upright on it with its tail curling up behind. Scatter a few small nut shapes nearby in pencil before any paint touches the page.
Wash raw sienna across the stump top and a cool gray behind the whole scene while the paper is wet, letting the background stay soft and out of focus. Once dry, paint the squirrel’s body in burnt orange, skipping the chest and belly area to keep it pale.
Add burnt umber rings onto the dry stump surface to suggest wood grain, working in loose curved lines rather than perfect circles. Paint the scattered nuts in burnt sienna with small olive green acorn caps, which gives the ground around the stump some life.
Finish with dry brush strokes along the tail and back for fur texture, then a gray shadow under the squirrel’s body to seat it firmly on the stump. If your tail fur looks too stiff, soften a few strokes with a barely damp brush right after painting them, before they dry completely.
Owl In A Tree Hollow
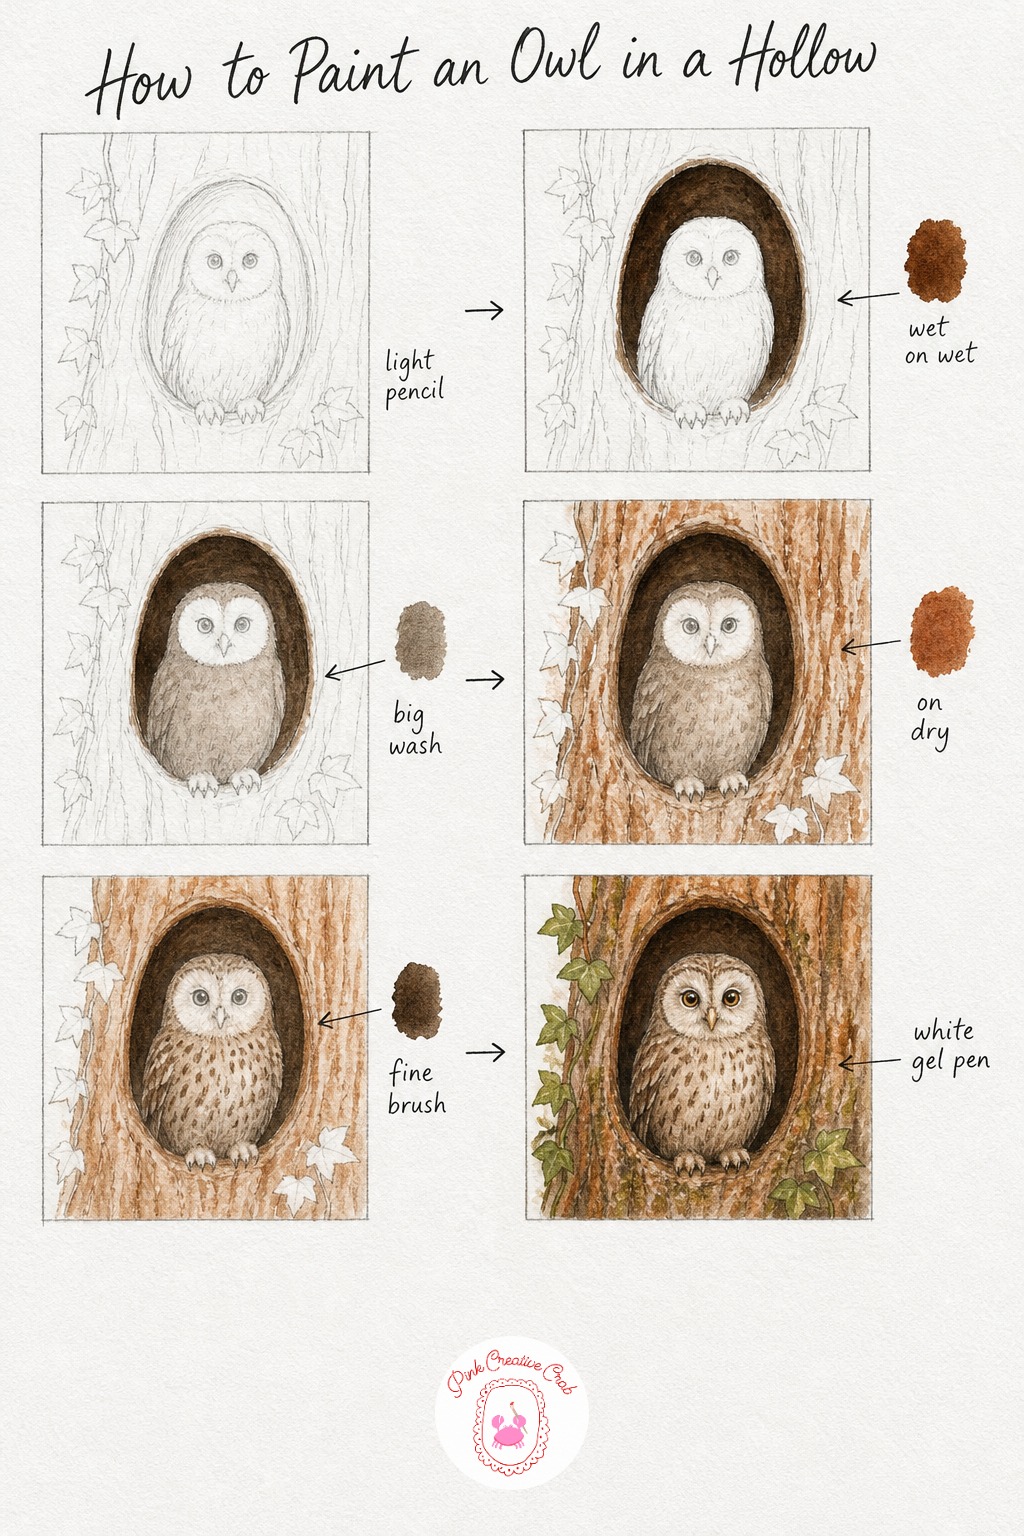
Draw a rounded hollow opening in a tree trunk, then sketch the owl sitting inside it with a round face disc and folded wings. Keep the hollow’s edge soft and uneven rather than a perfect circle.
Paint the inside of the hollow in dark burnt umber while leaving the owl’s outline untouched, letting the wash pool slightly darker at the edges for depth. Once dry, wash the owl’s body in a soft raw umber and gray mix, keeping the face disc pale so it glows against the dark hollow.
Add bark texture around the hollow opening with vertical burnt sienna strokes once everything is dry, varying the pressure so some lines are darker than others. This is the stage where beginners often paint bark too evenly, so vary your stroke width for a more believable trunk.
Dot small dark feather markings across the owl’s chest and wings with a fine brush, then finish with a gray shadow beneath the bird and tiny white gel pen dots on the eyes for that alert glassy look. A good swap if you lack burnt umber: mix raw sienna with a touch of black for a similar warm dark brown.
Deer In Morning Mist
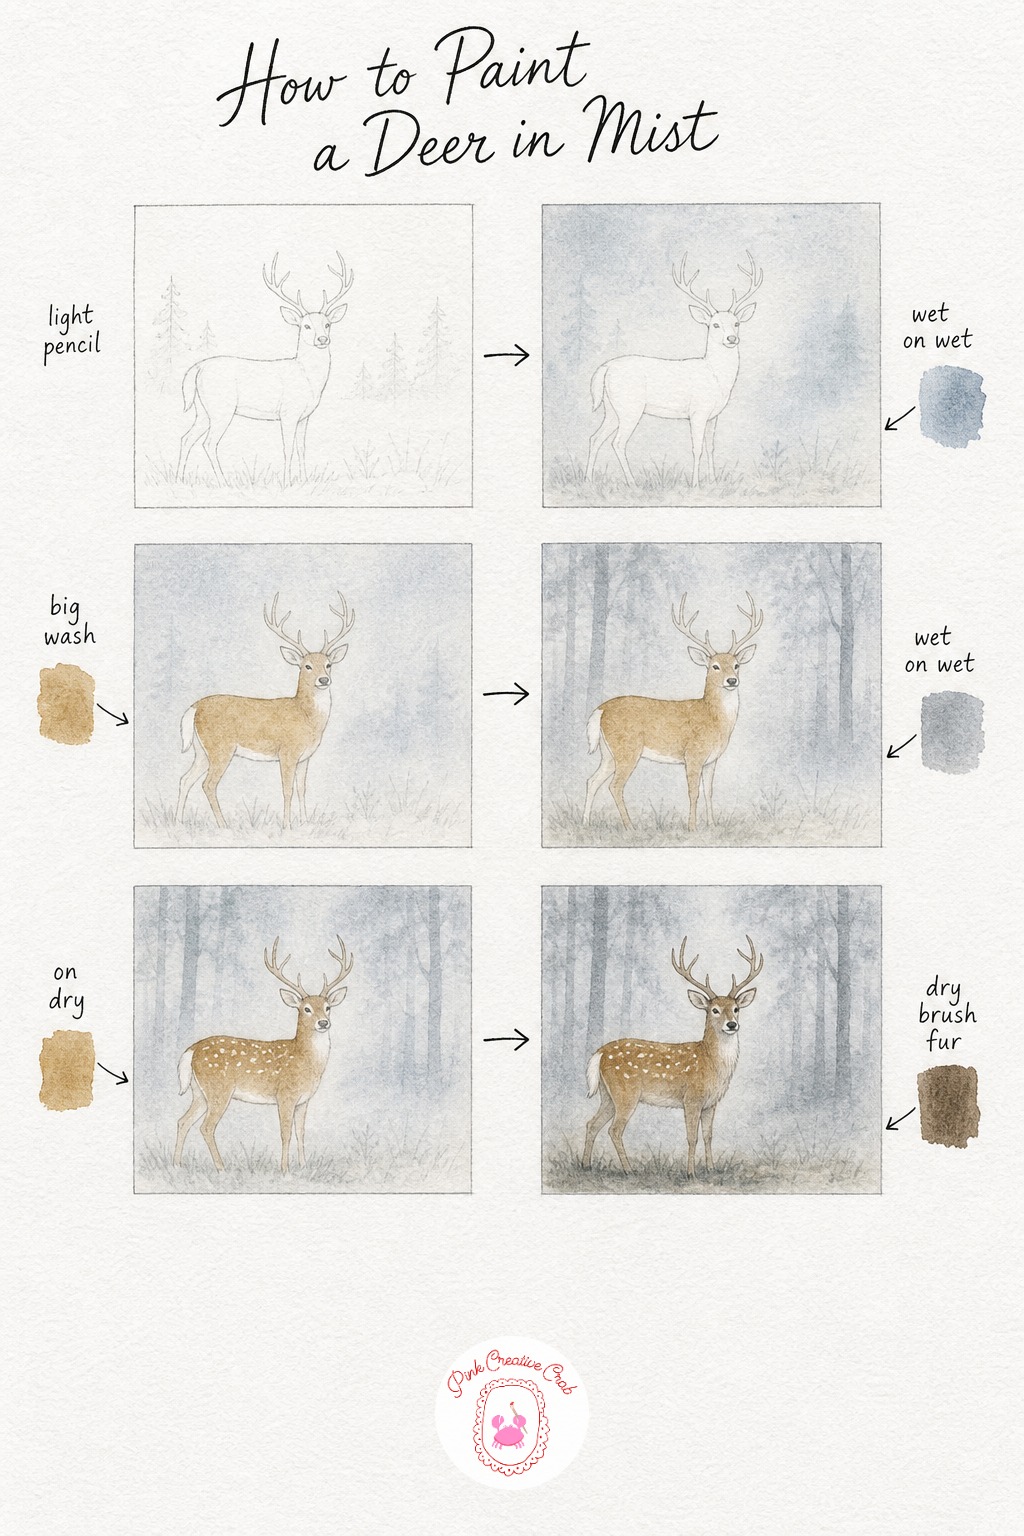
Sketch a standing deer in profile with slim legs and a raised head, then add a few simple tree trunk lines fading toward the back of the scene. Keep everything light since mist will soften most of these edges anyway.
Wash a pale gray blue across the whole background while the paper is wet, letting it pool unevenly so some patches feel thicker with mist than others. Once that dries, paint the deer’s body in a soft raw sienna wash, leaving the belly and tail area pale and untouched.
While the background is still slightly damp from an extra light rewetting, drop in faint gray tree trunk shapes so they blur softly into the mist rather than standing out sharply. This soft-edge trick is what makes mist scenes read as misty instead of just foggy gray, so resist the urge to paint trunks too crisply.
Once the deer’s coat is dry, leave small spot shapes bare as highlights and deepen the shading along the back with another raw sienna layer. Finish with a soft shadow under the legs and a few dry brush fur strokes along the neck for texture, which brings real warmth to this otherwise cool, hazy scene.
Raccoon By A Stream
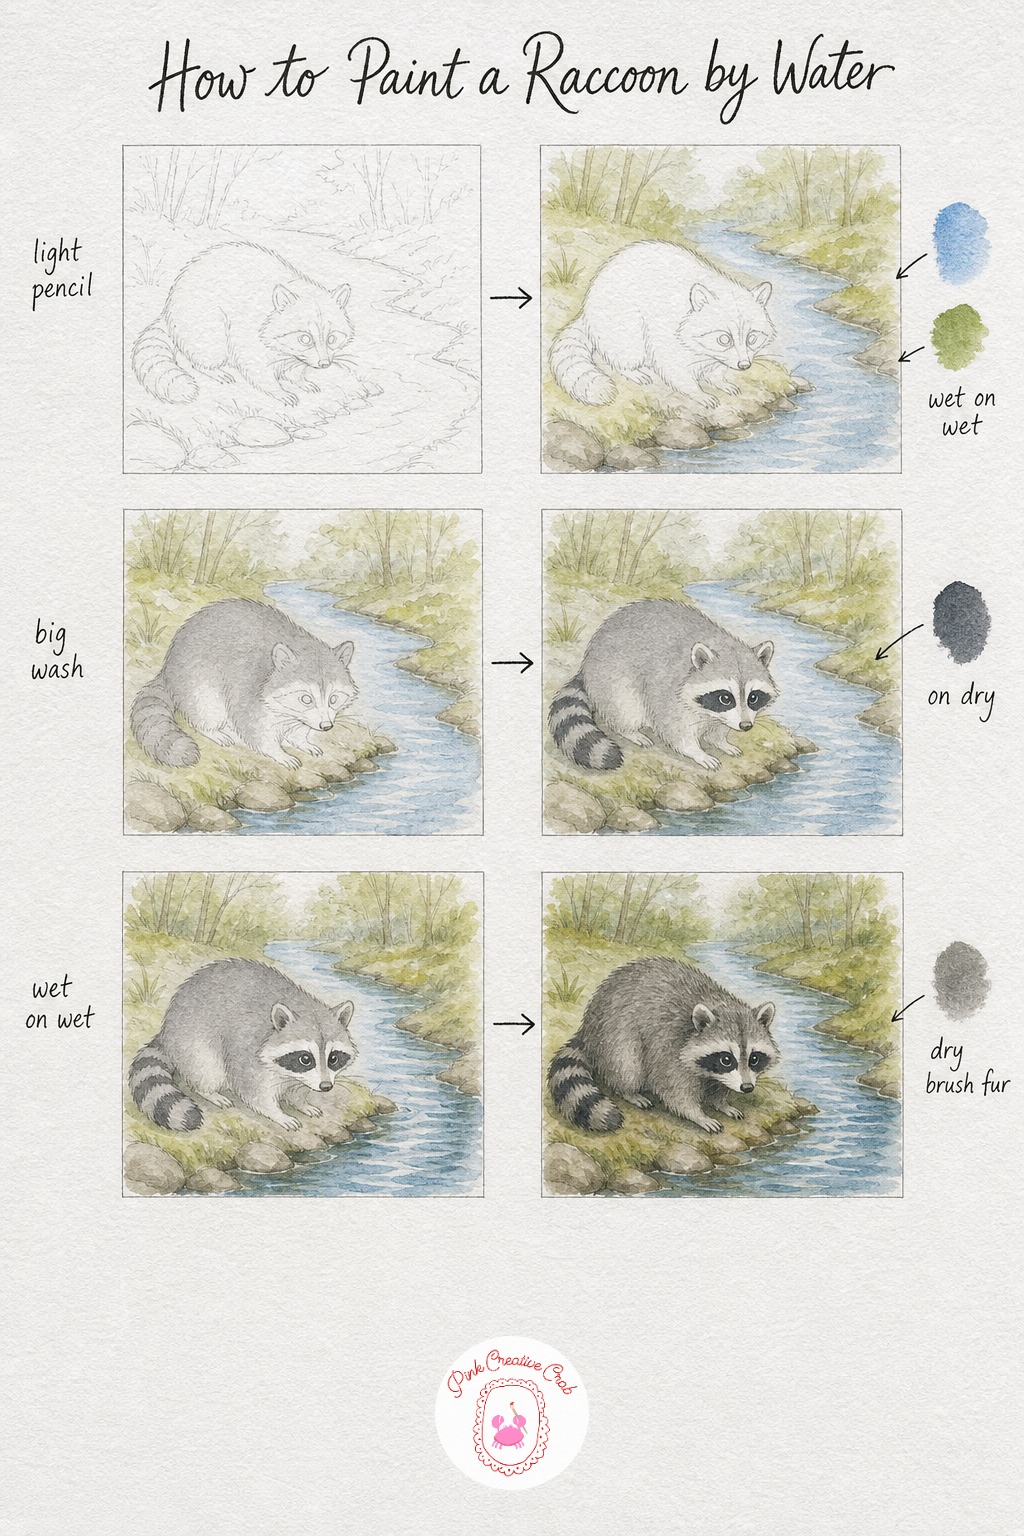
Sketch the raccoon crouched low with its front paws near the water’s edge, then draw a curving stream shape running past it with a soft grassy bank on either side.
Wash pale blue along the stream and a soft green along the banks while the paper is damp, letting the colors meet gently rather than forming a hard line. Once dry, paint the raccoon’s body in a light gray wash, keeping the belly and muzzle paper white for contrast.
Add the dark mask across the eyes and alternating stripes along the tail in payne’s gray once the base gray is fully dry, since wet in wet here would blur the distinctive mask shape beginners rely on to make this read as a raccoon. Drop a few curved ripple lines into the stream while it is still slightly damp for a natural reflective shimmer.
Finish with dry brush strokes across the back for coarse fur texture and a soft shadow where the raccoon’s paws meet the bank. If your stream color looks flat, add one more thin blue line along the far edge to suggest the opposite bank’s reflection.
Badger At A Burrow
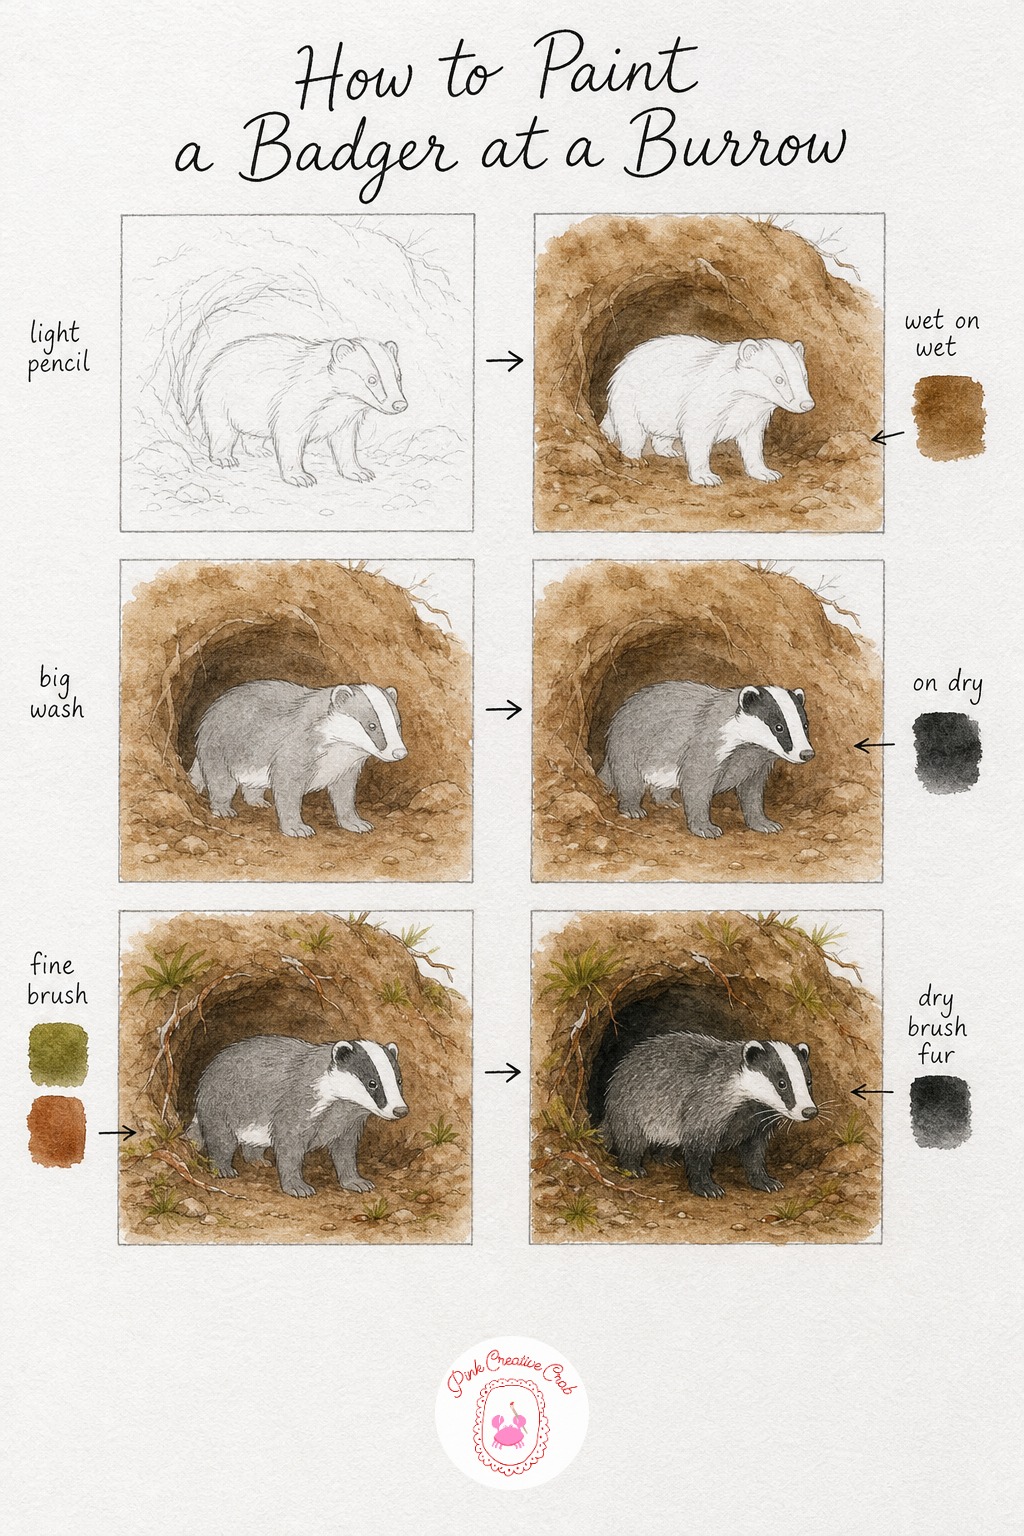
Draw the badger standing just outside a mounded burrow entrance, keeping its body low and sturdy with a pointed snout. Sketch the burrow as an uneven dark opening surrounded by a soft earthy mound.
Wash raw umber across the mound and soil while the paper is wet, letting the edges stay loose and uneven like real turned earth. Once dry, paint the badger’s body in a pale gray wash, leaving the belly and the famous white cheek stripes untouched.
Once that gray layer is completely dry, paint the bold black stripes down the face in payne’s gray with confident single strokes rather than many small ones, since badgers read clearly only when those stripes stay crisp and simple. Beginners often go back over them too many times, which softens the contrast that makes a badger recognizable.
Add small roots and grass tufts around the burrow entrance for a lived-in feel, then finish with a dark shadow pooling inside the burrow mouth and dry brush fur strokes along the badger’s back. A quick fix if the stripes bleed: dab them gently with a dry tissue the moment you see them spreading, before they fully dry.
Woodpecker On A Branch
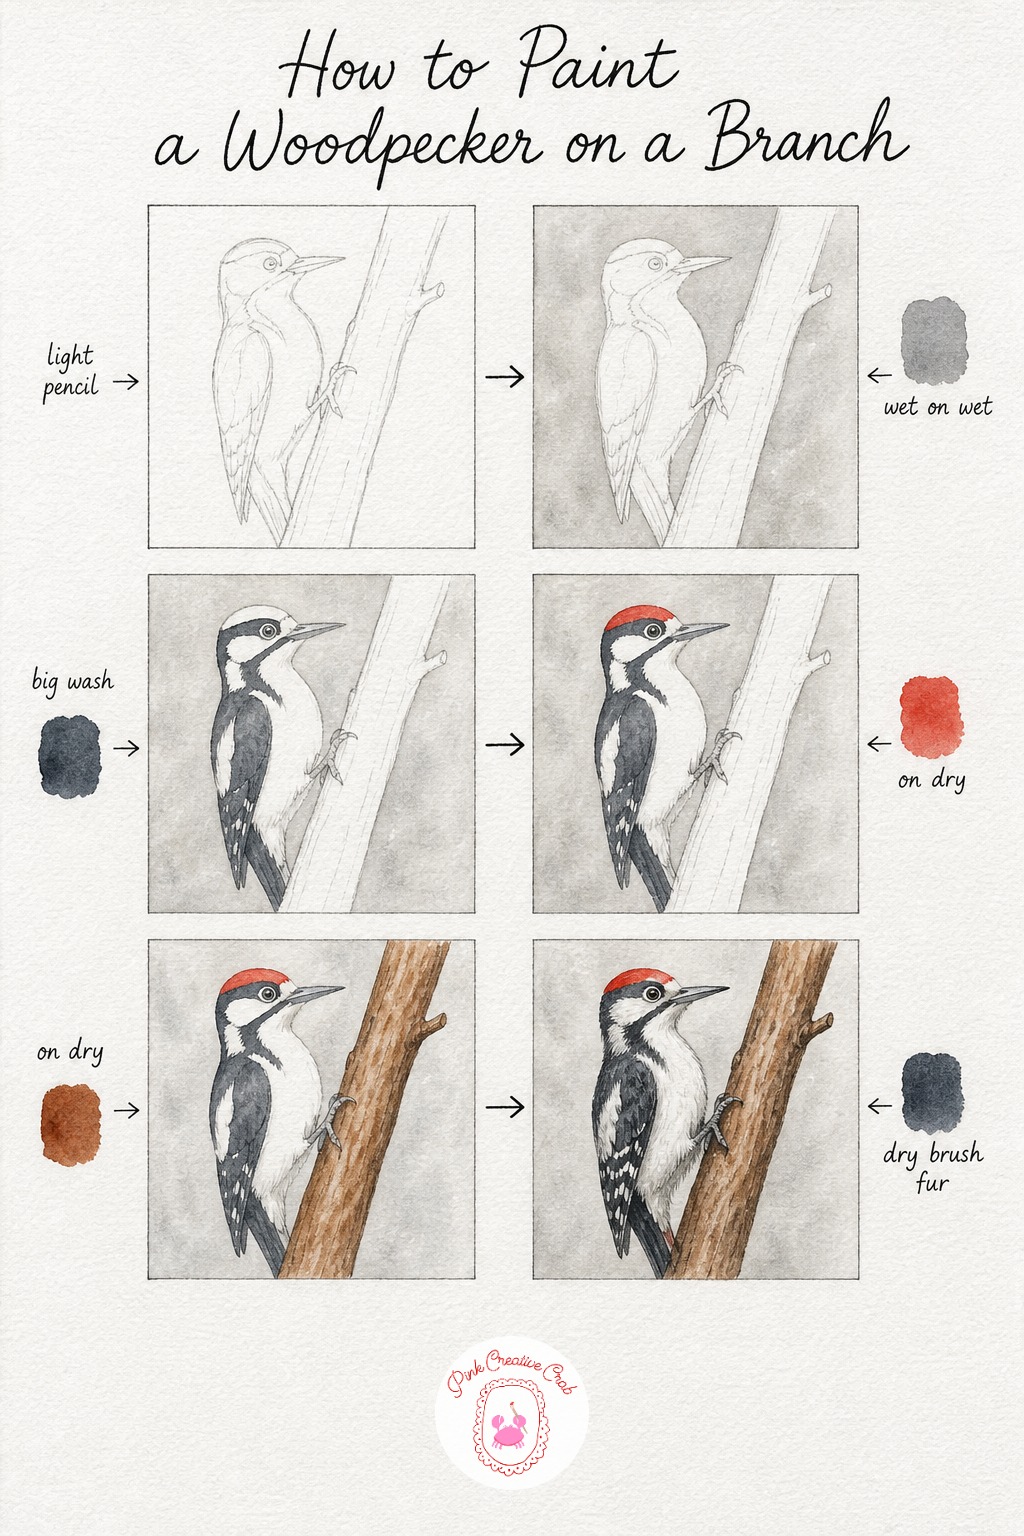
Sketch the woodpecker gripping a bare branch sideways, tail braced against the wood for balance, with a pointed beak angled toward the bark. Keep the body shape simple and upright.
Wash a pale gray behind the branch for a soft out of focus backdrop, then once dry, block in the black and white pattern across the body with payne’s gray, leaving a small circular patch bare at the top of the head for the signature red cap.
Paint that cap in bold cadmium red once the body wash is dry, keeping the edge clean rather than letting it bleed into the surrounding white. Paint the branch itself in burnt sienna with small texture strokes for bark once the bird is dry, working around the gripping feet carefully so they stay defined.
Finish with fine black feather strokes added with a nearly dry brush along the wings and tail, plus a small shadow where the feet meet the branch to anchor the bird. If the red cap looks too flat, drop one thin stroke of darker red along its lower edge while it is still slightly damp.
Chipmunk With Acorns
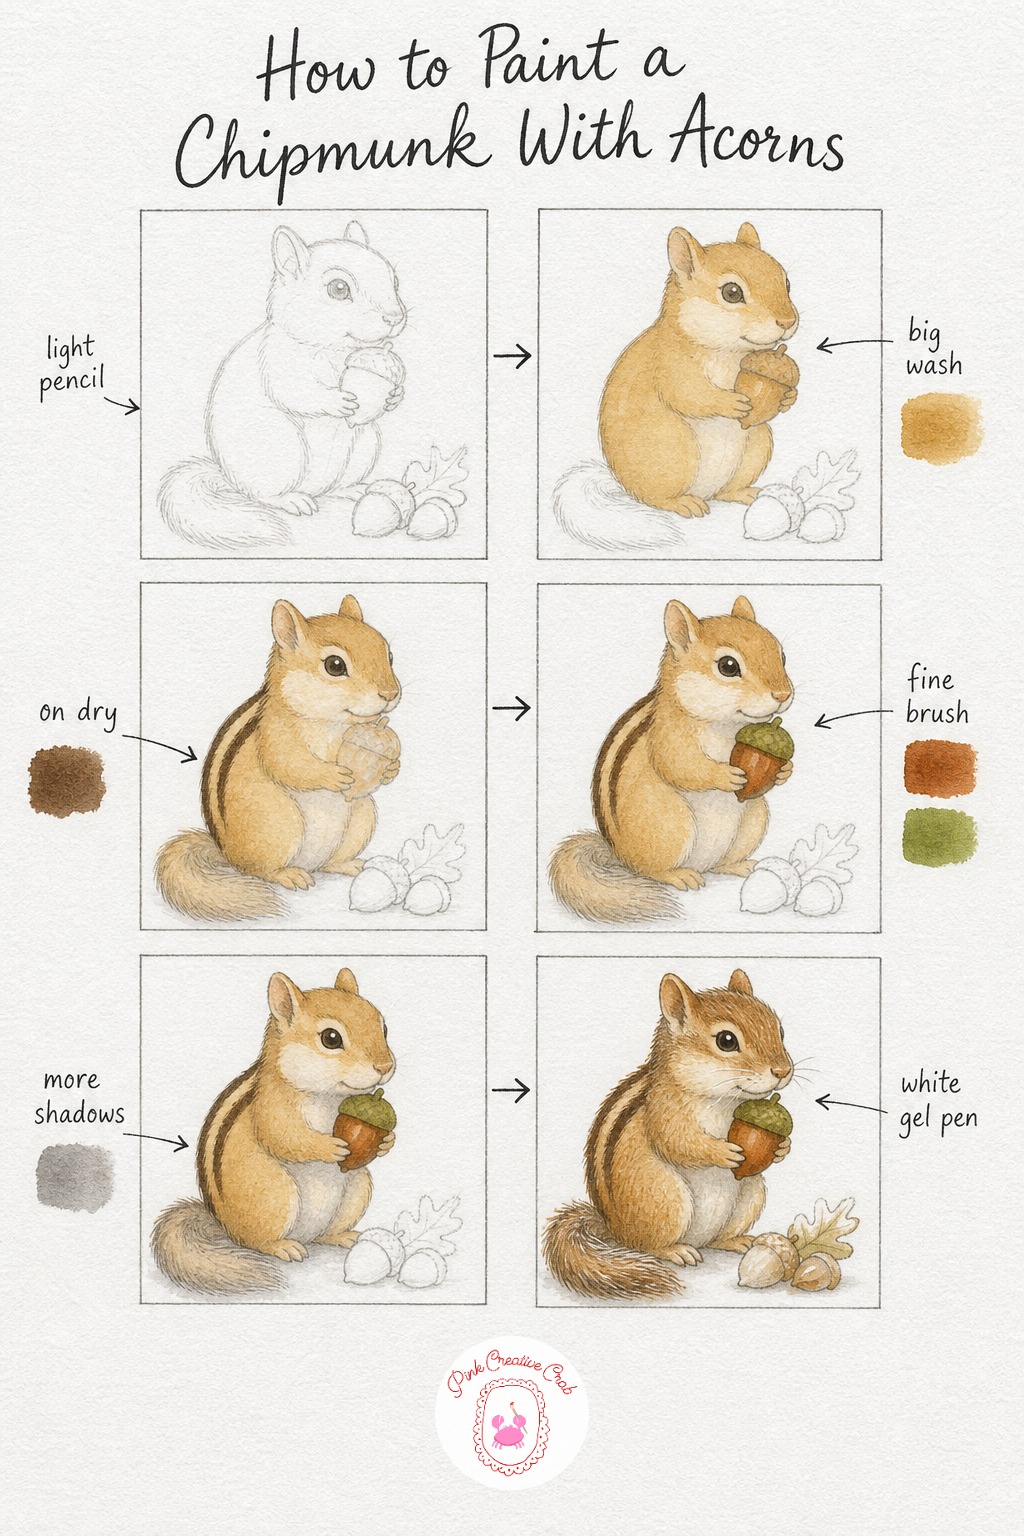
Sketch the chipmunk sitting upright on its haunches, paws held close together in front holding a small acorn. Keep the cheeks slightly rounded since chipmunks always look a touch puffed up.
Wash raw sienna across the whole body, skipping the cheek patches and belly so they stay paper white for now. Once that layer is bone dry, paint the signature dark stripes down the back with burnt umber, using one confident stroke per stripe rather than scrubbing back and forth.
Paint the small acorn held in the paws using burnt sienna for the nut and olive green for its little cap, which gives this otherwise simple object a clear focal point. Add soft gray shading under the chin and along the tail curve to build some roundness into the body.
Finish with dry brush strokes of burnt sienna along the tail for fur texture, then add fine white gel pen whiskers and a highlight on the acorn cap. The tip that matters most here: paint the stripes before any fur texture work, since texture strokes laid first will fight with the stripe lines instead of sitting cleanly beneath them.
Barn Owl On A Fence Post
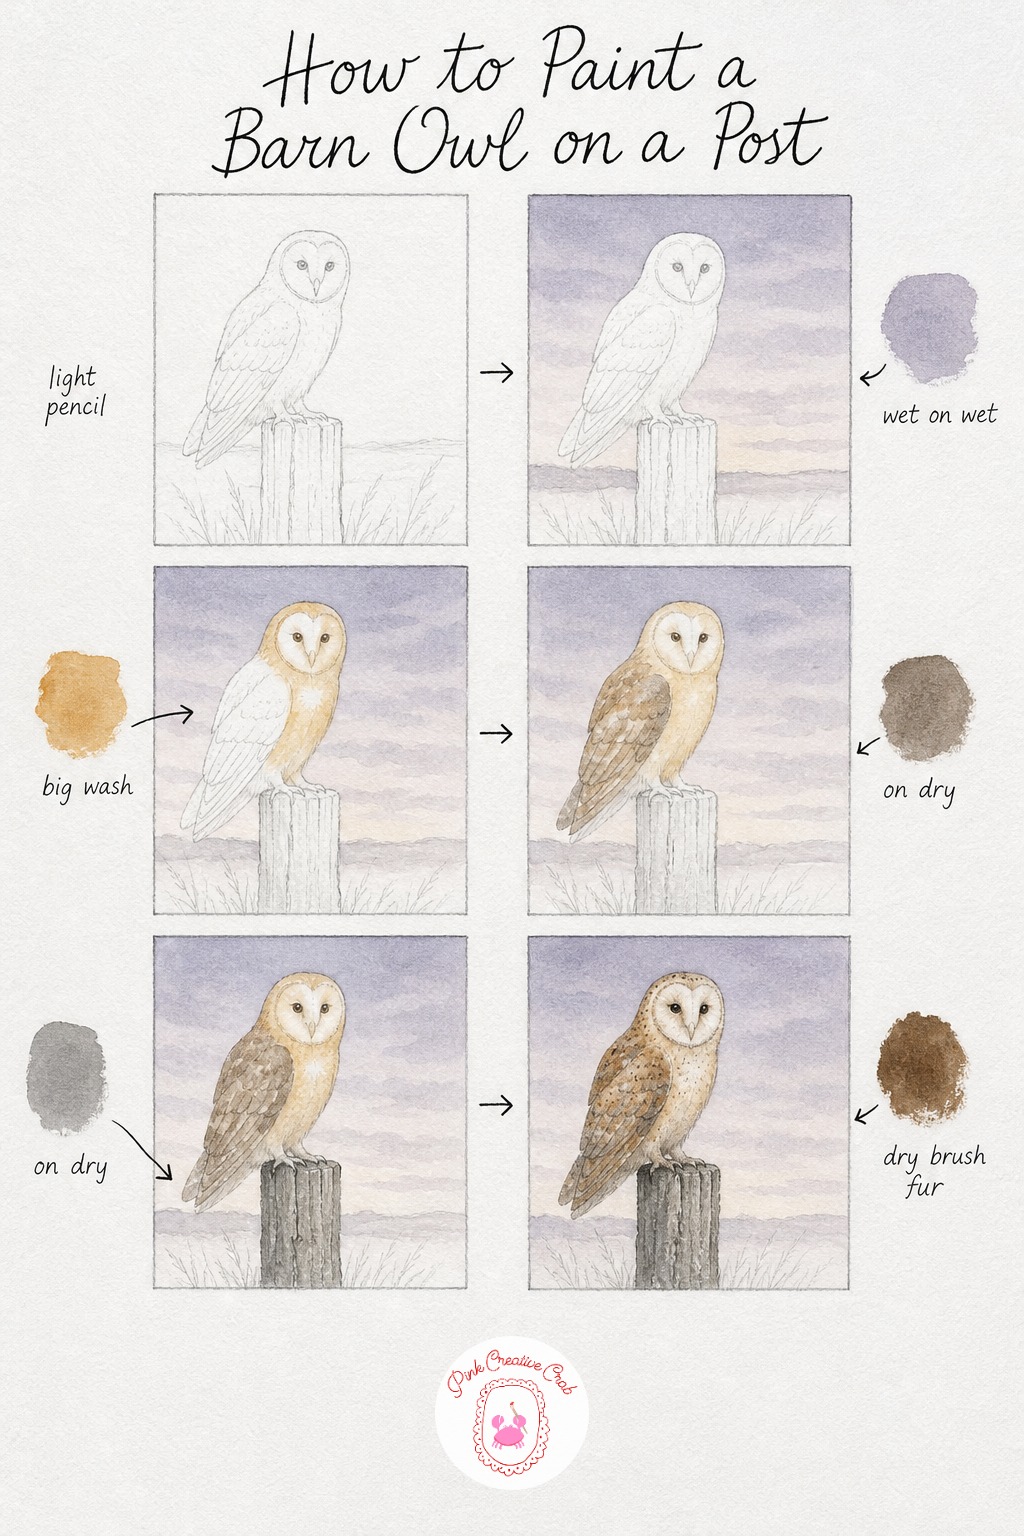
Draw the barn owl perched upright on a simple weathered post, heart shaped face turned toward the viewer, wings folded neatly along the sides. Sketch the post as a few rough rectangular planks.
Wash a soft lavender gray across the sky behind everything while the paper is wet, letting it fade lighter near the horizon for a dusk feel. Once dry, paint a pale golden wash over the owl’s heart shaped face and chest, keeping the very center brightest and almost untouched.
Add a soft gray brown over the wings and back once the face layer is dry, letting the two tones meet softly rather than with a hard edge. Paint the fence post in weathered gray with a few darker grain lines running along its length, which beginners often skip but which really sells the “old post” feeling.
Finish with tiny dark speckles dotted across the wings using the tip of a fine brush, then a soft shadow where the owl’s feet grip the post. For the heart shaped face to read clearly, keep that central patch the lightest value in the whole painting.
Fawn Resting In Ferns
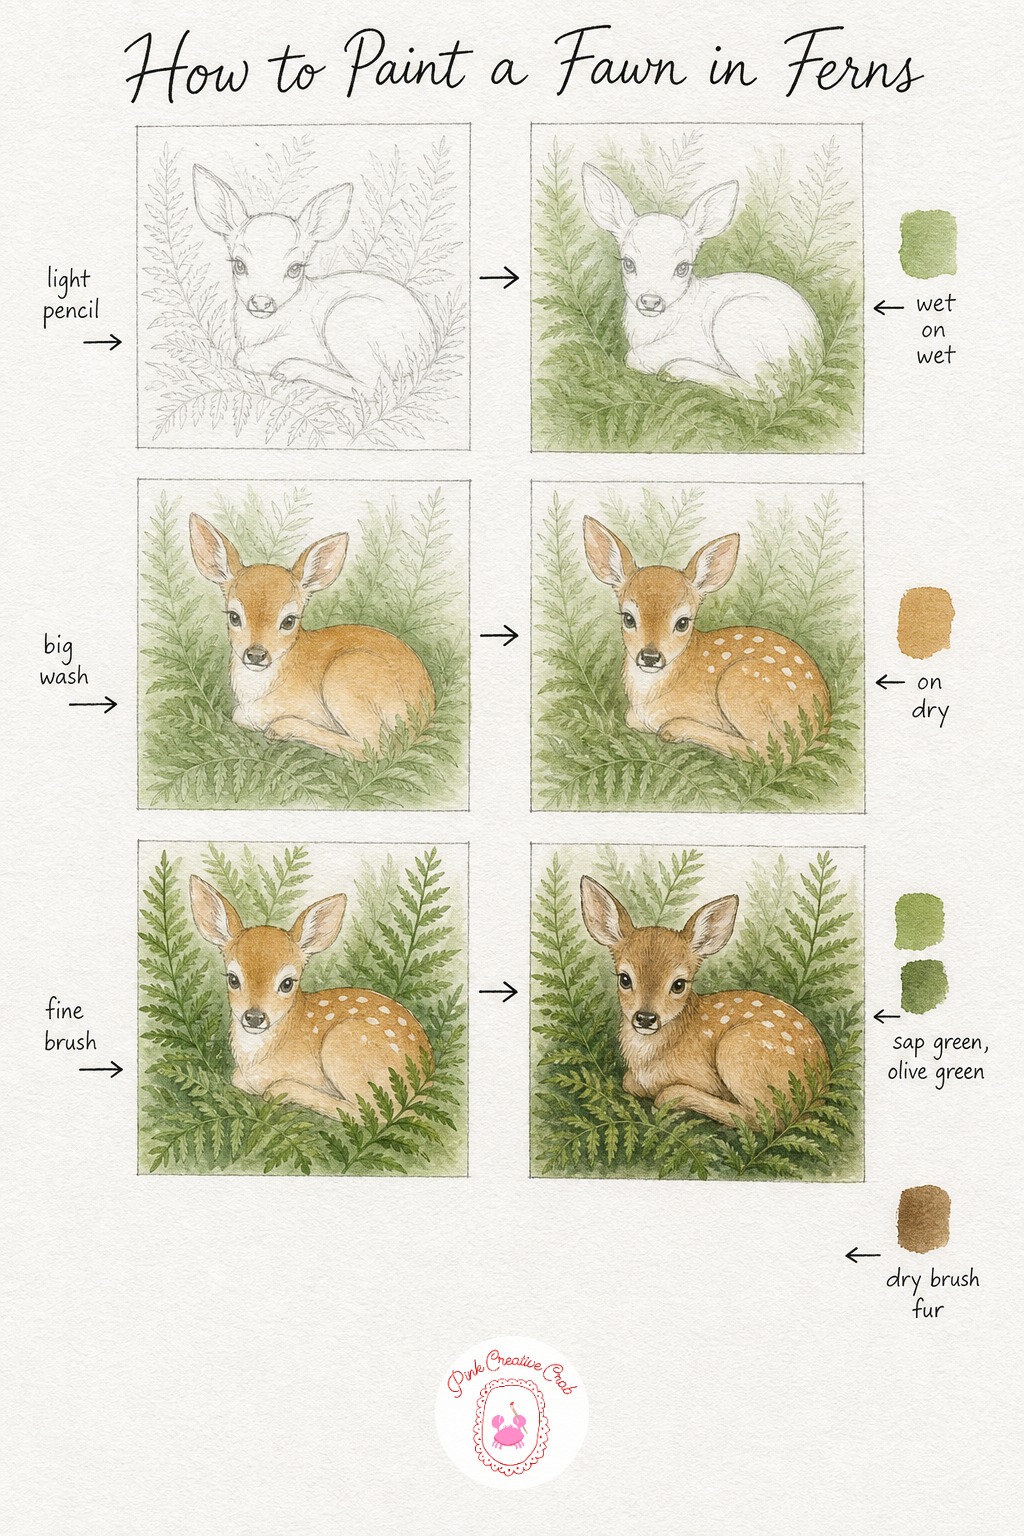
Sketch the fawn curled up with legs tucked beneath its body, surrounded by tall loose fern frond shapes sketched lightly so you know where the greens will go.
Wash sap green across the whole fern bed first while the paper is damp, letting it pool unevenly for natural variation in the foliage. Once that dries, paint the fawn’s body in warm raw sienna, leaving the belly and chest area paper white.
While that coat is drying, plan the spot pattern, then once fully dry, deepen the raw sienna slightly along the back and simply leave small circles untouched for the classic fawn spots rather than painting them in a separate color. Paint individual fern fronds around the body in two different greens so the foliage has some depth instead of one flat mass.
Finish with a soft shadow pooling beneath the curled body and fine fur strokes in burnt umber along the neck and ear edges. The trick for this one: plan your white spots before you start the body wash, since painting around them cleanly is much easier than trying to lift color out later.
Toad On A Mossy Log
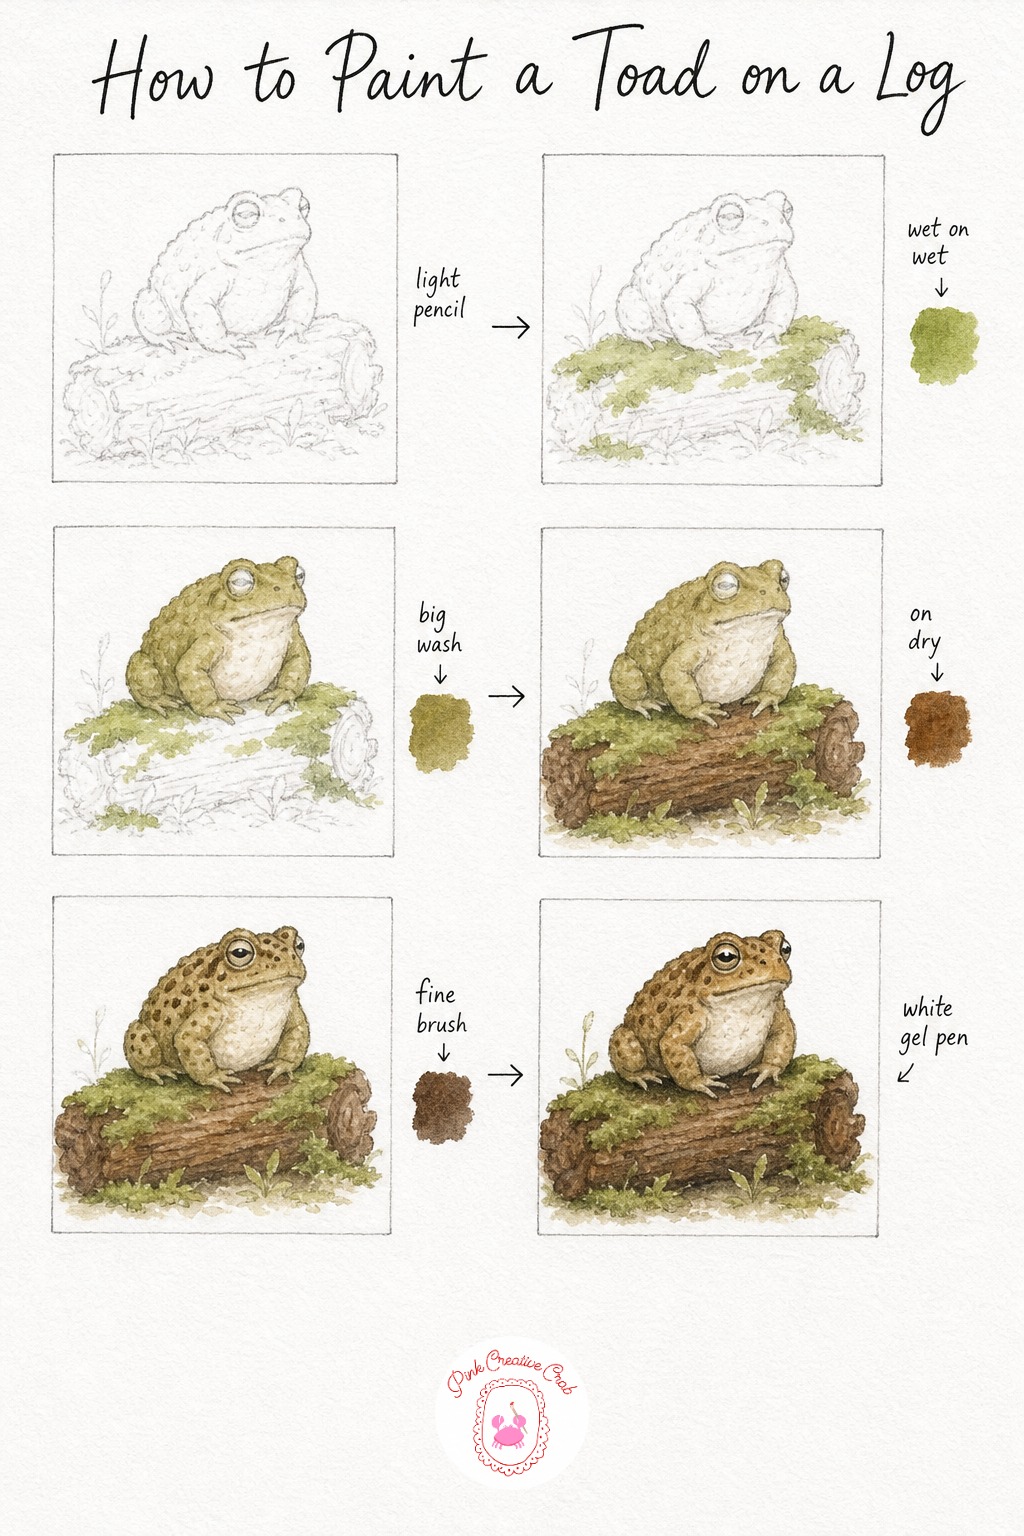
Sketch a plump rounded toad sitting on a short log, with bulging eyes drawn high on the head and short front legs tucked beneath the body. Keep the log simple, just a rounded cylinder shape.
Wash sap green onto patches of the log surface where moss would naturally cling, letting it bleed softly at the edges. Once dry, paint the toad’s whole body in olive green, leaving the belly area paper white or very pale for contrast.
Once the moss patches are dry, paint the rest of the log in burnt umber, working carefully around the green mossy patches rather than over them. Add small dark spots across the toad’s back with a fine brush once the body color is dry, spacing them unevenly since real toad markings are never symmetrical.
Finish with a soft gray shadow beneath the toad where it meets the log, then two tiny white gel pen dots on the eyes for that glassy, alert look. If your olive green looks too yellow, add the smallest touch of neutral gray to mute it before painting the body.
Mouse In A Pumpkin
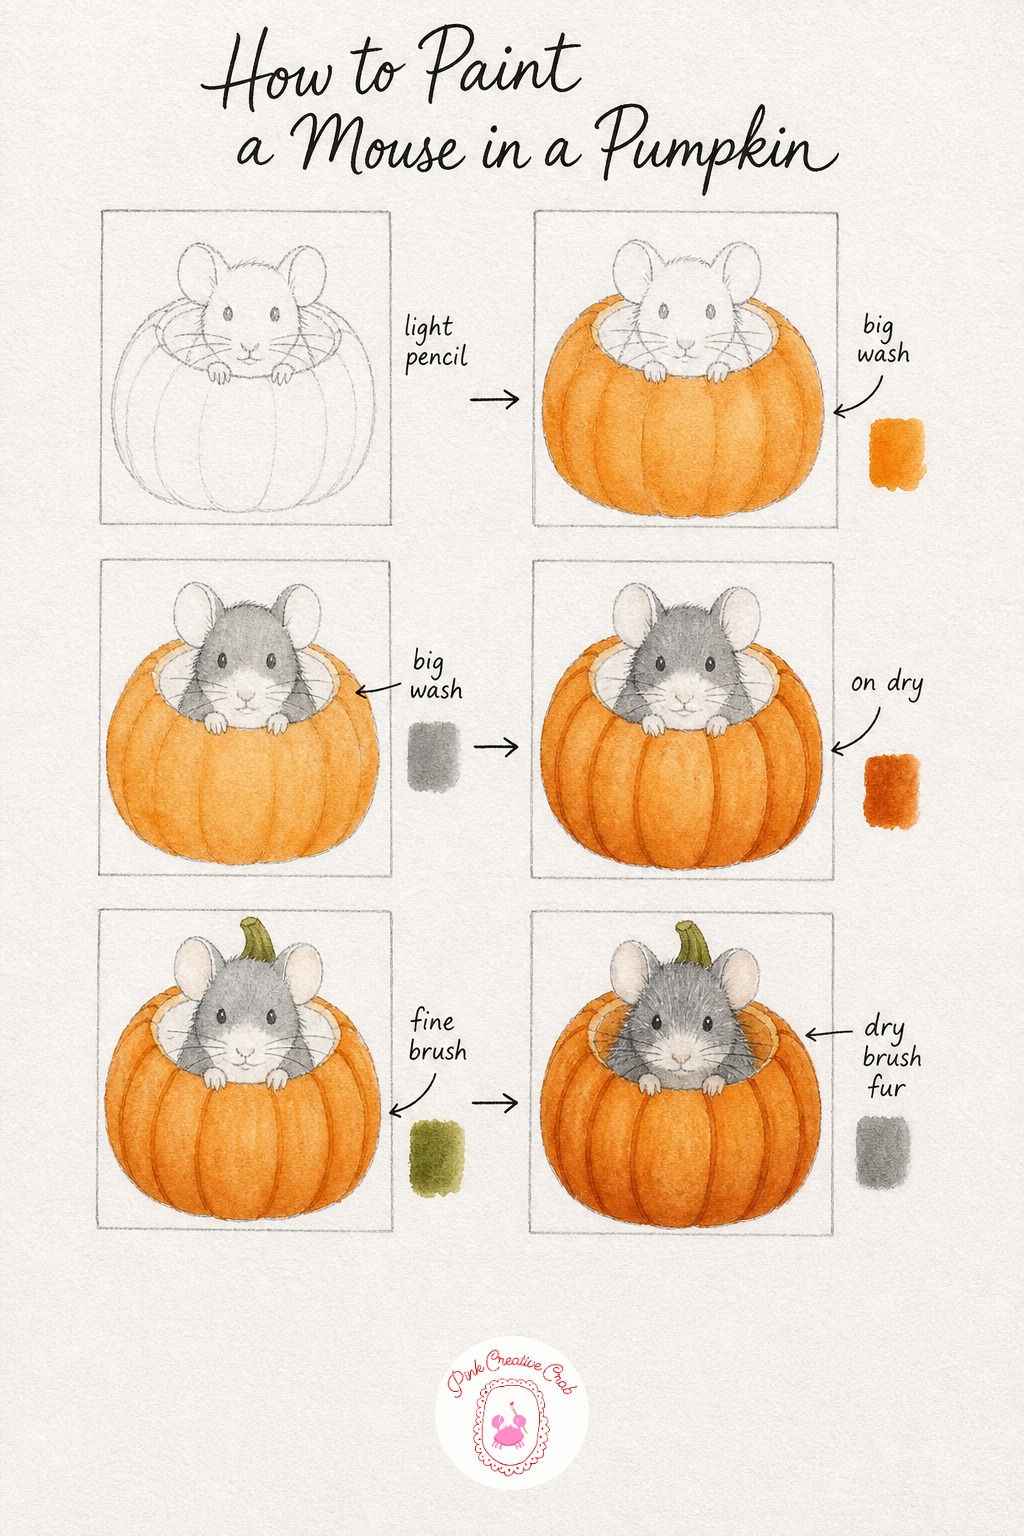
Draw a rounded pumpkin with a hollow opening at the front, then sketch a small mouse peeking out from inside it, paws resting on the carved rim.
Wash cadmium orange across the whole pumpkin shell first, keeping the inside of the hollow slightly paler than the rounded outer surface. Once that dries, paint the mouse’s body in a soft gray wash, leaving the ears and belly untouched paper white.
Once the pumpkin’s base coat is fully dry, add deeper burnt orange ridge lines curving down from the stem to the base, spacing them evenly to suggest the pumpkin’s natural grooves. Paint a small curling green stem at the top for the final color note on the pumpkin itself.
Finish with a soft shadow where the mouse’s body meets the carved rim, plus a few fine gray fur strokes along its back and tail for texture. A handy swap if cadmium orange is not in your set: mix cadmium yellow with a touch of red until you reach a warm pumpkin tone.
Beaver At A Pond
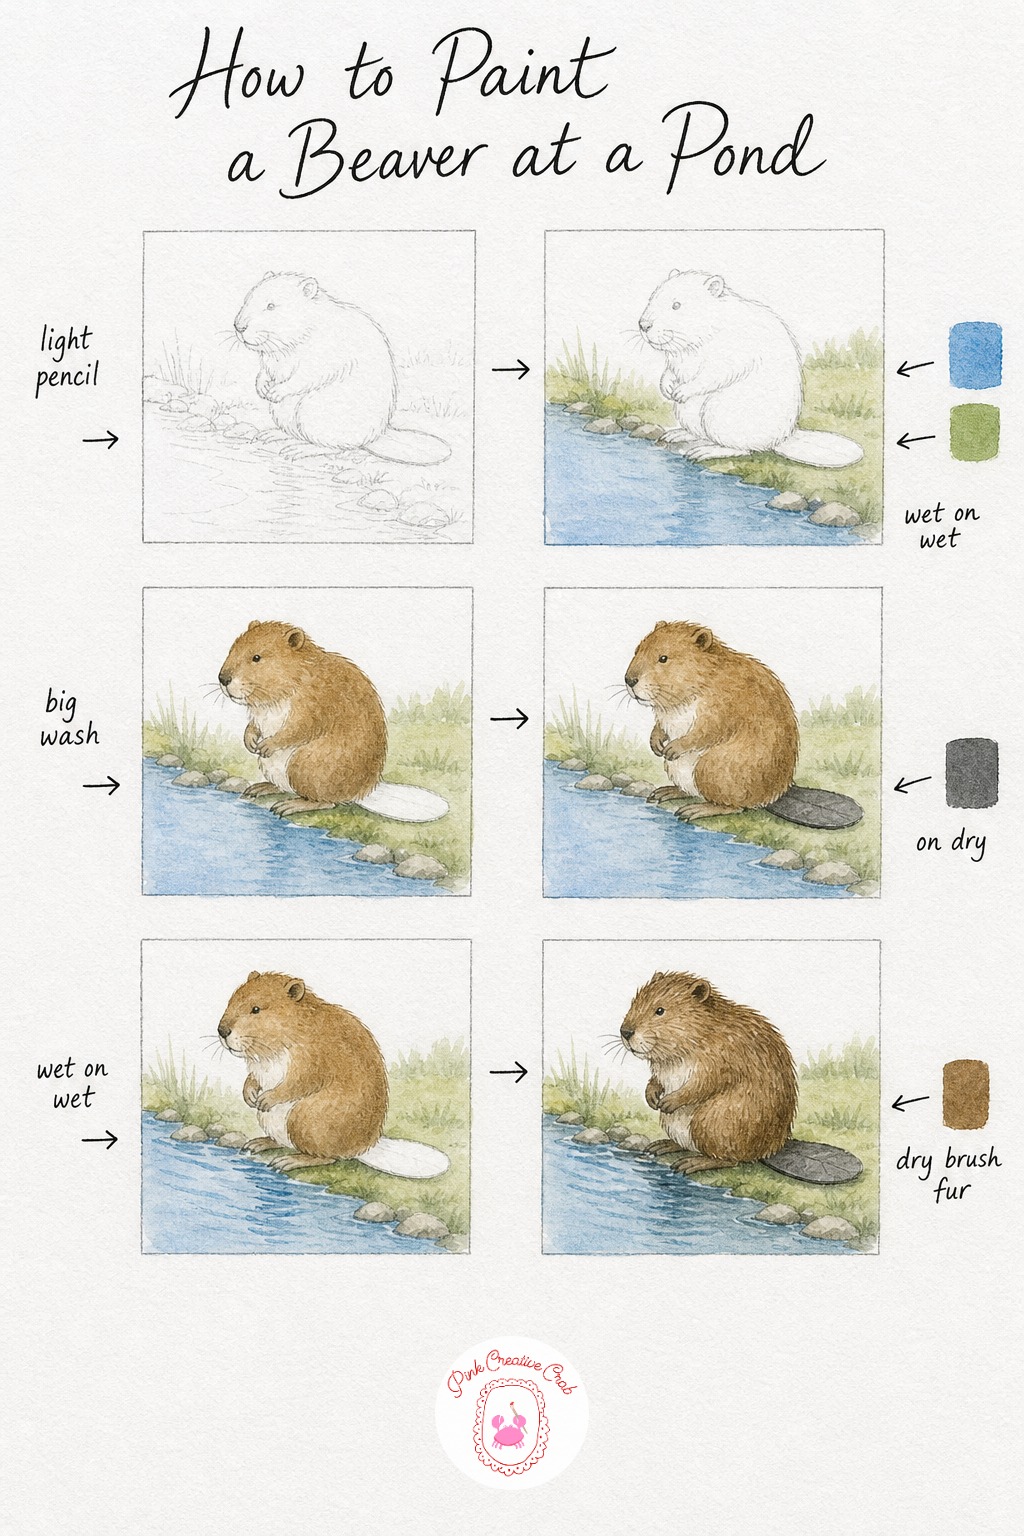
Sketch the beaver sitting upright at the pond’s edge, with its distinctive flat paddle tail resting behind it on the bank. Keep the body round and sturdy with small front paws.
Wash pale blue across the pond and soft green along the bank while the paper is wet, letting the colors blend gently where water meets land. Once dry, paint the beaver’s thick body in raw umber, leaving the belly pale for contrast against the darker back.
Once that coat is dry, paint the tail in flat payne’s gray with almost no texture, since the tail’s smoothness is what makes it visually different from the furry body around it. This contrast is often missed by beginners who texture the whole animal evenly.
Add a few ripple lines into the pond near the bank while it is still slightly damp, then finish with dry brush fur strokes along the beaver’s back and a soft shadow beneath its body. If the tail looks too flat and dull, add one thin highlight stroke of pale gray along its upper edge once it has dried.
Wolf Cub In Pine Needles
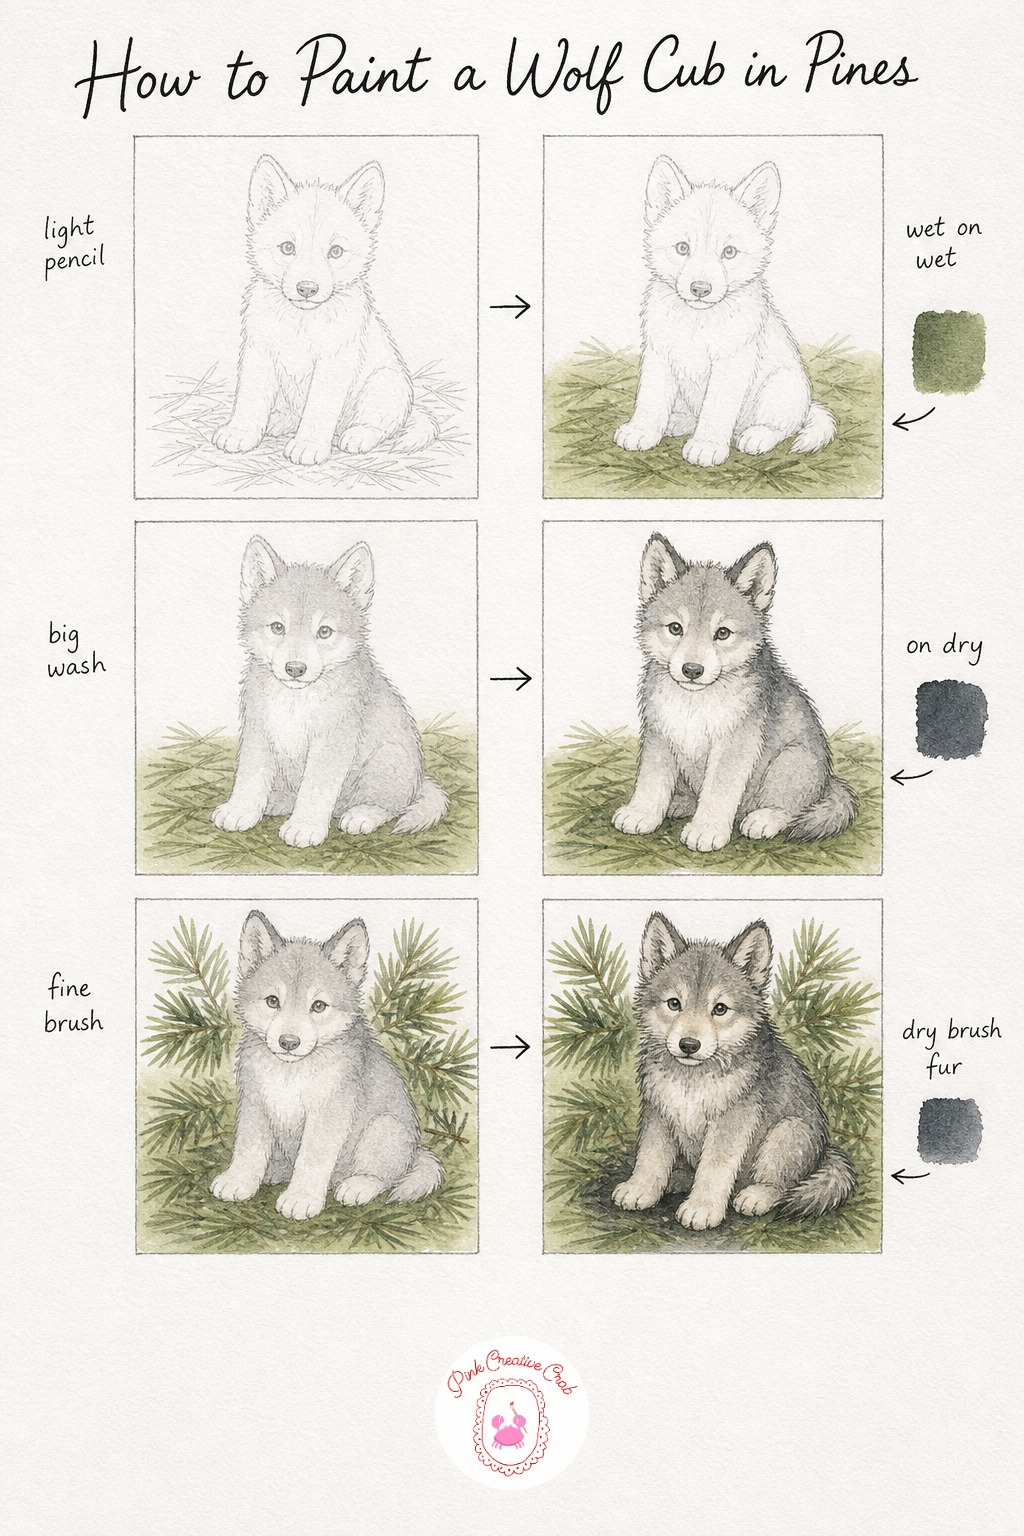
Sketch a young wolf cub sitting with oversized paws and ears, a feature that instantly reads as “young” rather than adult. Scatter loose pine needle lines across the ground beneath it.
Wash pine green across the needle bed while the paper is damp, letting it pool thicker in some spots for natural variation. Once dry, paint the cub’s body in pale neutral gray, keeping the muzzle and chest paper white.
Once that layer is dry, deepen the shading along the back and ear tips with payne’s gray, applied in soft patches rather than hard lines so the cub still reads as fluffy rather than sharply marked. Paint individual pine needle clusters around the body in two greens for a more textured forest floor.
Finish with a soft shadow beneath the cub and fine dry brush fur strokes along the neck ruff and tail. The trick that keeps a wolf cub looking young and soft: always keep the ears slightly rounded rather than pointed, and never let the gray shading turn too dark or crisp.
What to Do Next
Pick one animal from the sixteen above, set out your paper and paints, and paint along one stage at a time, letting each wash dry before you move to the next.
Frequently Asked Questions
What watercolor paper works best for a watercolor animals tutorial like this?
Cold press paper of at least 140 lb works best. Its slight texture holds soft fur washes well and resists buckling through the several wet layers these woodland scenes need.
How do I paint soft fur edges in watercolor without hard lines?
Paint the base fur color first, then once fully dry, use a nearly dry brush to pull short strokes outward from the body edge. This dry brush technique creates the broken, feathery line real fur needs.
Why does my animal painting look muddy instead of soft and warm?
Muddy color usually comes from layering wet paint onto a layer that is not fully dry yet. Always wait until the previous wash feels completely cool and matte before adding the next one.
What if I do not own every brown and green paint listed?
Mix close substitutes from your basic palette: raw sienna and a touch of red approximate burnt orange, while sap green with a little black gives a believable olive or pine tone.
How long does one of these woodland animal paintings usually take?
Most of these scenes take sixty to ninety minutes including drying time between stages. The drying pauses are a good moment to rinse brushes and mix your next color.
Have any thoughts?
Share your reaction or leave a quick response — we’d love to hear what you think!
-
 0
-
0
-
0
-
0
-
0
-
0


