

Table of Contents
This watercolor flowers tutorial collection is the one I reach for when my hand needs loosening up. There is something so satisfying about letting a petal bloom on wet paper and just watching the pigment find its own edges, no fussing allowed.
Below you get eleven small scenes, a jar of peonies, a lavender bunch tied with string, poppies leaning in a meadow breeze, each one broken into clear stages with its own swatches so you always know what color goes where. Pick one, wet your brush, and paint along with me today.
Using these images: free for personal projects such as printing, coloring, cards, journals and gifts. Handmade items that include them may be sold up to 30 pieces per design. More than that is commercial use and is not permitted, and neither is selling or sharing the images themselves or passing them off as your own. Please ask before any other use.
Before You Start
- Stretch or tape down a sheet of cold press paper at least 140 lb, thinner paper buckles badly once you start wet on wet petals.
- Keep your pencil lines barely visible, press lightly, because dark graphite will smear into pale washes and muddy your colors.
- Load your round brush generously for the first wash on each flower, a dry brush dragging across paper gives blotchy, broken petals.
- Test every new mix on a scrap corner before it touches the paper, watercolor always dries lighter than it looks when wet.
- Let each stage go fully matte and cool to the touch before adding the next layer, touching damp paper spreads color where you never wanted it.
- Leave the white paper alone where the plan calls for highlights, that bare white does more work than any white paint ever could.
Peonies in a Jar
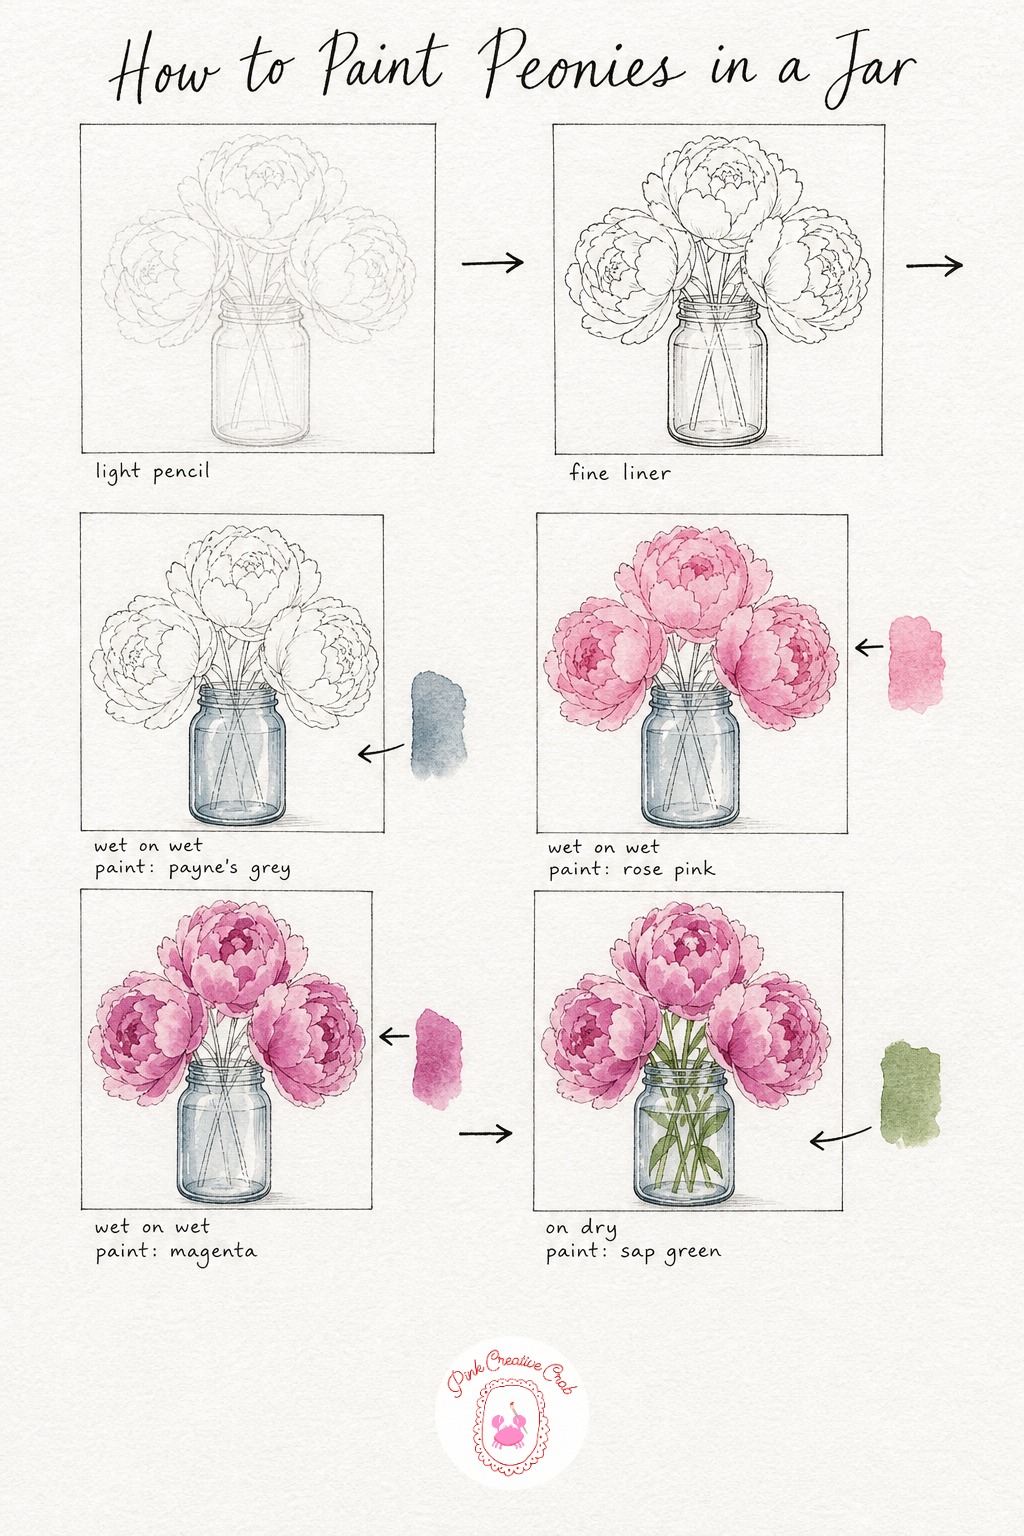
Start with a light pencil sketch, just three loose circles for the peony heads and a simple jar shape beneath them, nothing tight. Trace that sketch in fine black ink, because the ink line is what keeps this loose later, even when your washes wander outside it a little.
Wash the jar glass in pale blue grey first, skipping little patches of white paper for highlights, then while that dries mix your pink and drop it wet on wet across all three peony heads. Beginners often overwork the petals here, resist that, let the wet paper do the blending and only add deeper magenta while the first wash is still damp so the folds bleed softly instead of sitting as hard stripes.
Once the blooms are bone dry, paint sap green stems down into the jar water on dry paper for crisp lines. Finish with white gel pen flicks on the rim and petal tips, then a soft grey shadow under the jar to ground the whole thing. If your pink dries too flat, a second light glaze once the first is dry brings back the glow without muddying it.
Sprig of Lilac
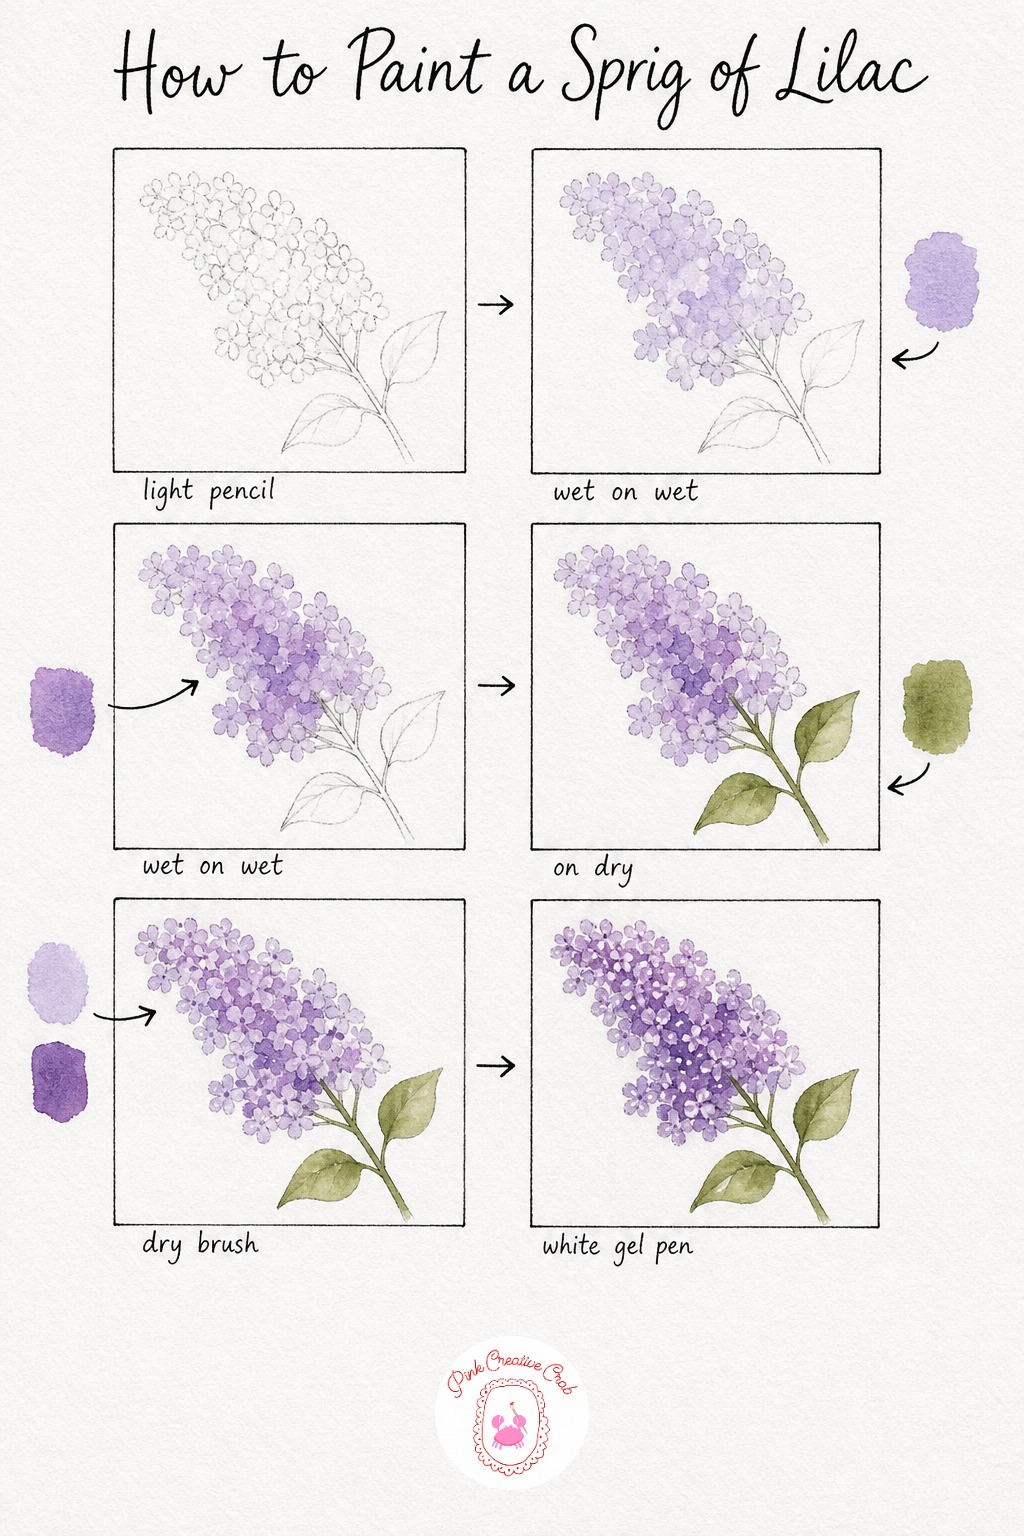
Sketch one gently arching branch with a cone shaped cluster of tiny blooms at the end, lightly, since lilac reads better loose than precise. Skip ink on this one and go straight to paint, wetting the whole cluster shape first and dropping in pale lavender so it blooms softly across the paper.
While that wash is still shiny wet, touch deeper violet into the center of the cluster and let it spread on its own, this is the wet on wet moment that gives lilac its hazy, clustered look. Let it dry completely, you will know it is ready when the sheen disappears and the paper feels cool but not damp.
Paint the stem and leaves in olive green on dry paper for a clean line against the soft bloom above. Then stipple tiny petal dots across the dried cluster with the tip of a fine round, alternating lavender and violet so no two dots match exactly. Finish with scattered white gel pen dots for sparkle and a little olive shadow along the stem. If your lavender mix looks too blue, warm it with a touch of pink before it touches the paper.
Poppies in a Meadow
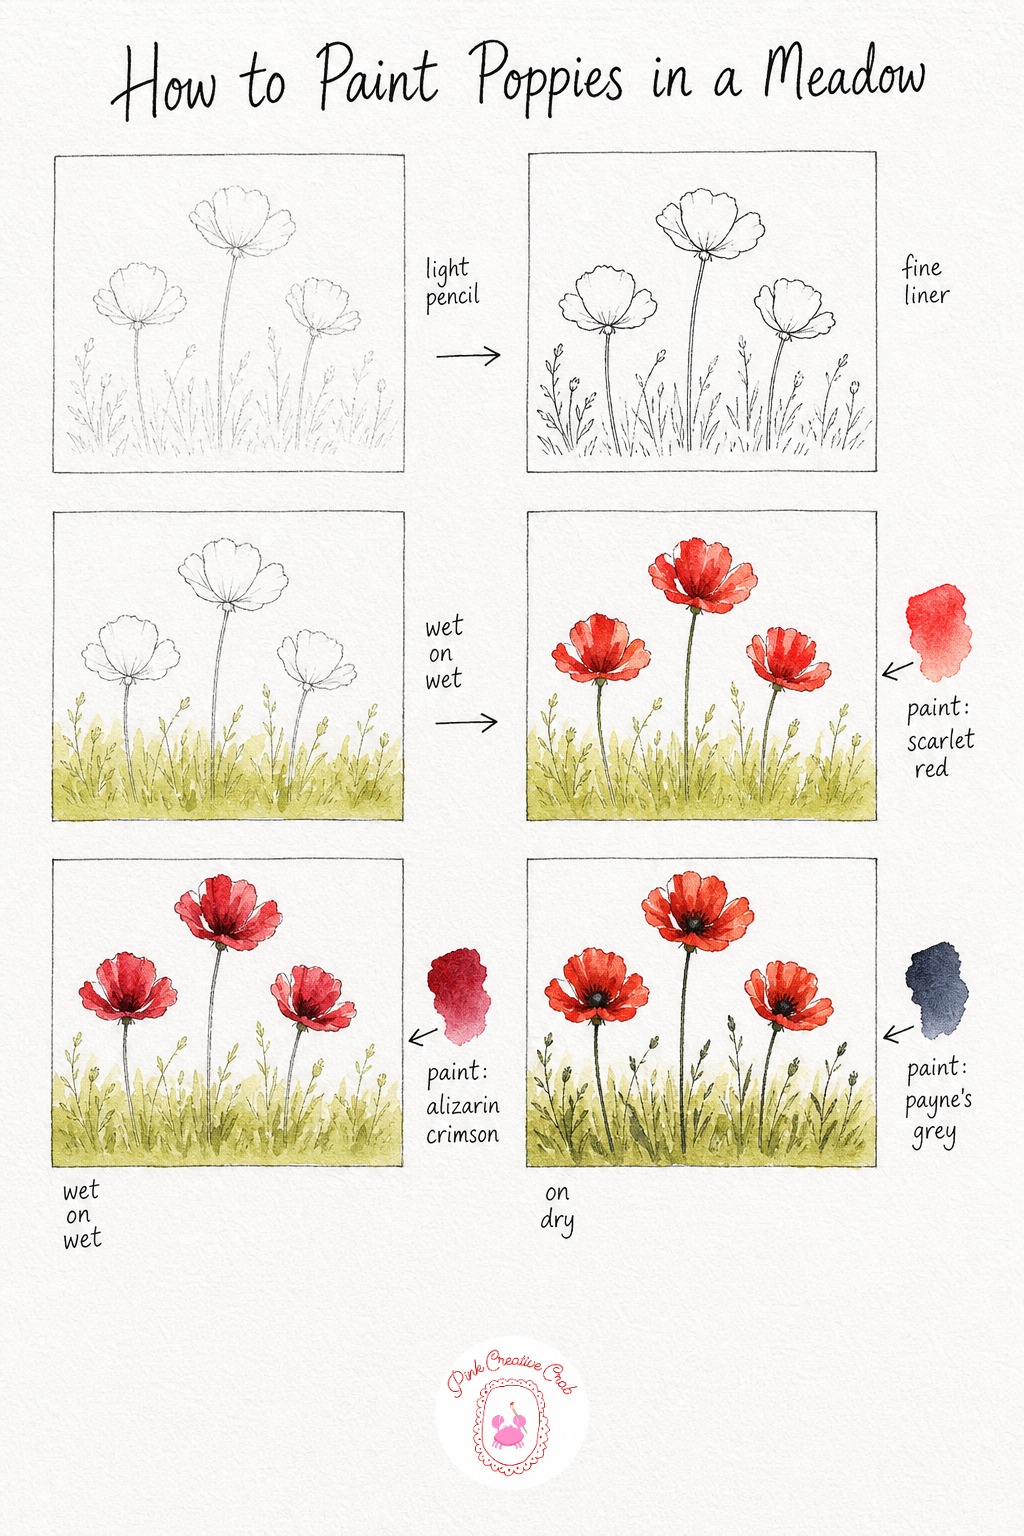
Sketch three poppy heads at different heights above one simple meadow line, keep it loose since poppies are forgiving flowers to paint. Ink only the poppy shapes and the ground line, this fine black edge is what holds the whole loose wash together later.
Wash the meadow in pale yellow green first and let it dry, then wet each poppy head and drop in bright red, leaving a few white gaps unpainted for the highlight. While the red is still shiny, touch in a darker alizarin crimson near the base of each petal so it bleeds into soft folds, this wet on wet step is where poppies get their crumpled tissue paper look.
Once fully dry, paint the dark centers and thin stems with a fine brush loaded with payne’s grey on dry paper for crisp detail. A beginner’s biggest poppy mistake is painting the petals too neat, so let the red wash spill a little past your ink line, it only helps. Flick up loose grass strokes with a half dry brush, then finish with white gel pen on the brightest edges and a touch of shadow at each stem base.
Lavender Bunch Tied With String
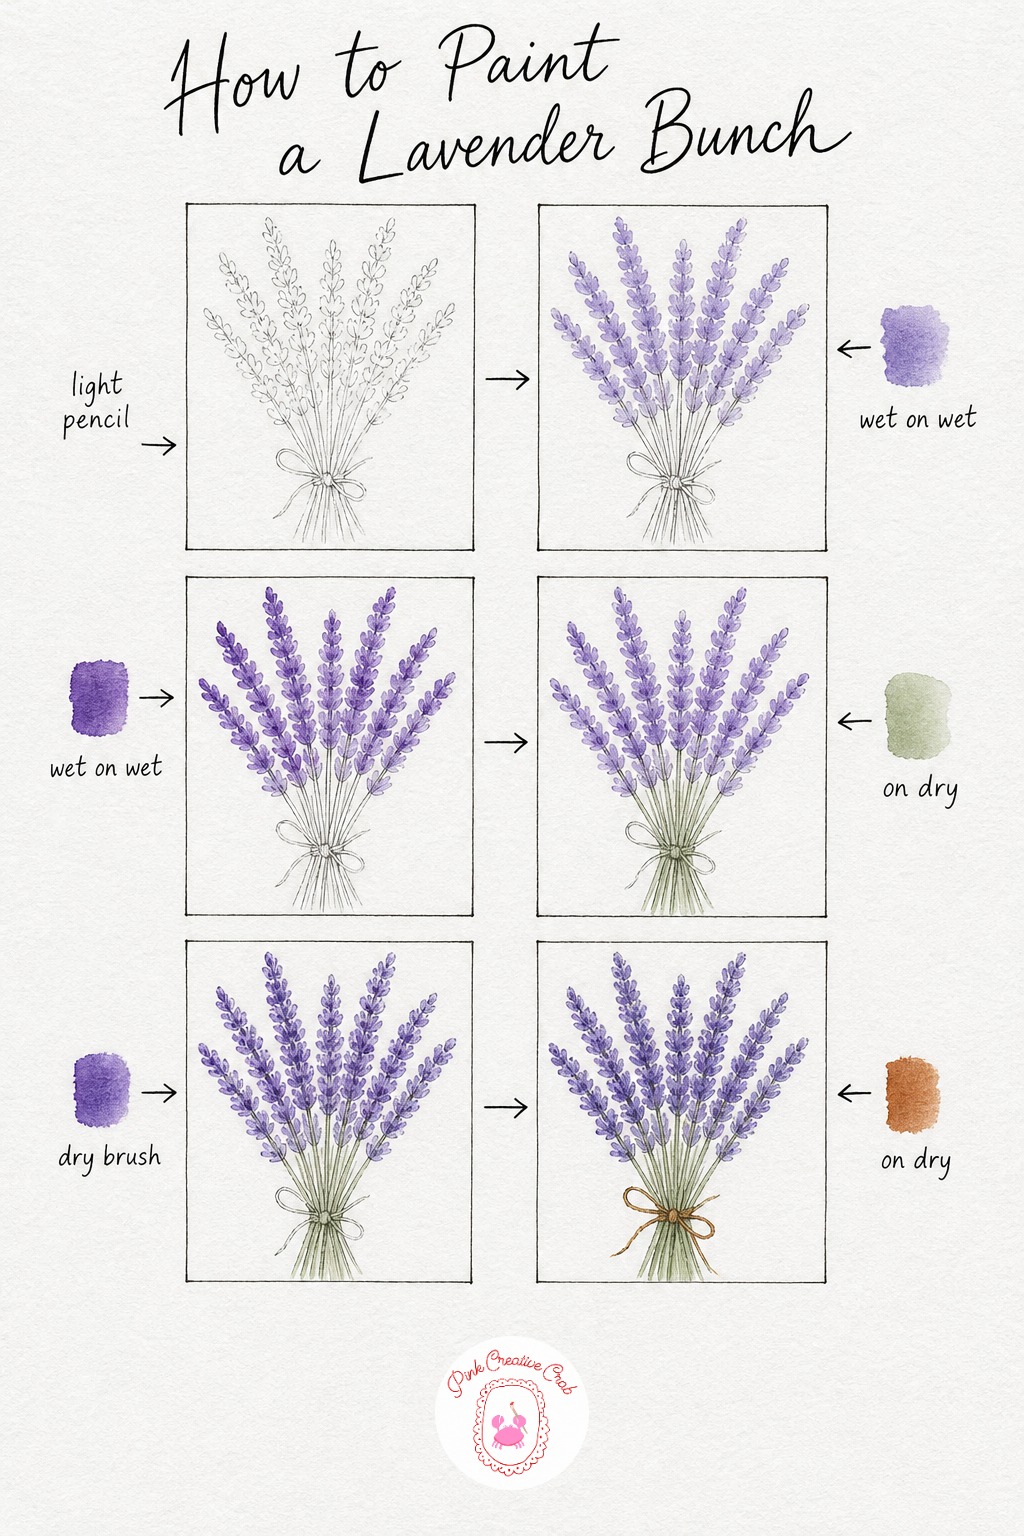
Sketch a loose gathered bunch, five or six spikes fanning slightly, with a simple string loop around the stems. Keep your pencil very light here since the stem bundle gets several layers and graphite under too many washes turns gray fast.
Wet each flower spike and drop in pale violet, letting it pool unevenly along the length, that unevenness is exactly what makes dried lavender look real. While still damp, touch deeper purple into the tips of each spike so the color pools heavier at the top, following how light lavender buds naturally look. Let this dry fully before touching the stems.
Paint the stems in sage green on dry paper for a clean bundle, then once dry, stipple short violet dashes up each spike with a half dry brush to suggest the tiny individual buds. Paint the tied string in burnt sienna last, a few confident strokes rather than one careful outline. Finish with soft green shadow where stems cross and a gentle shadow pooling beneath the bunch. If your violet keeps turning muddy, rinse your brush more often between the two purples.
Cherry Blossoms on a Branch
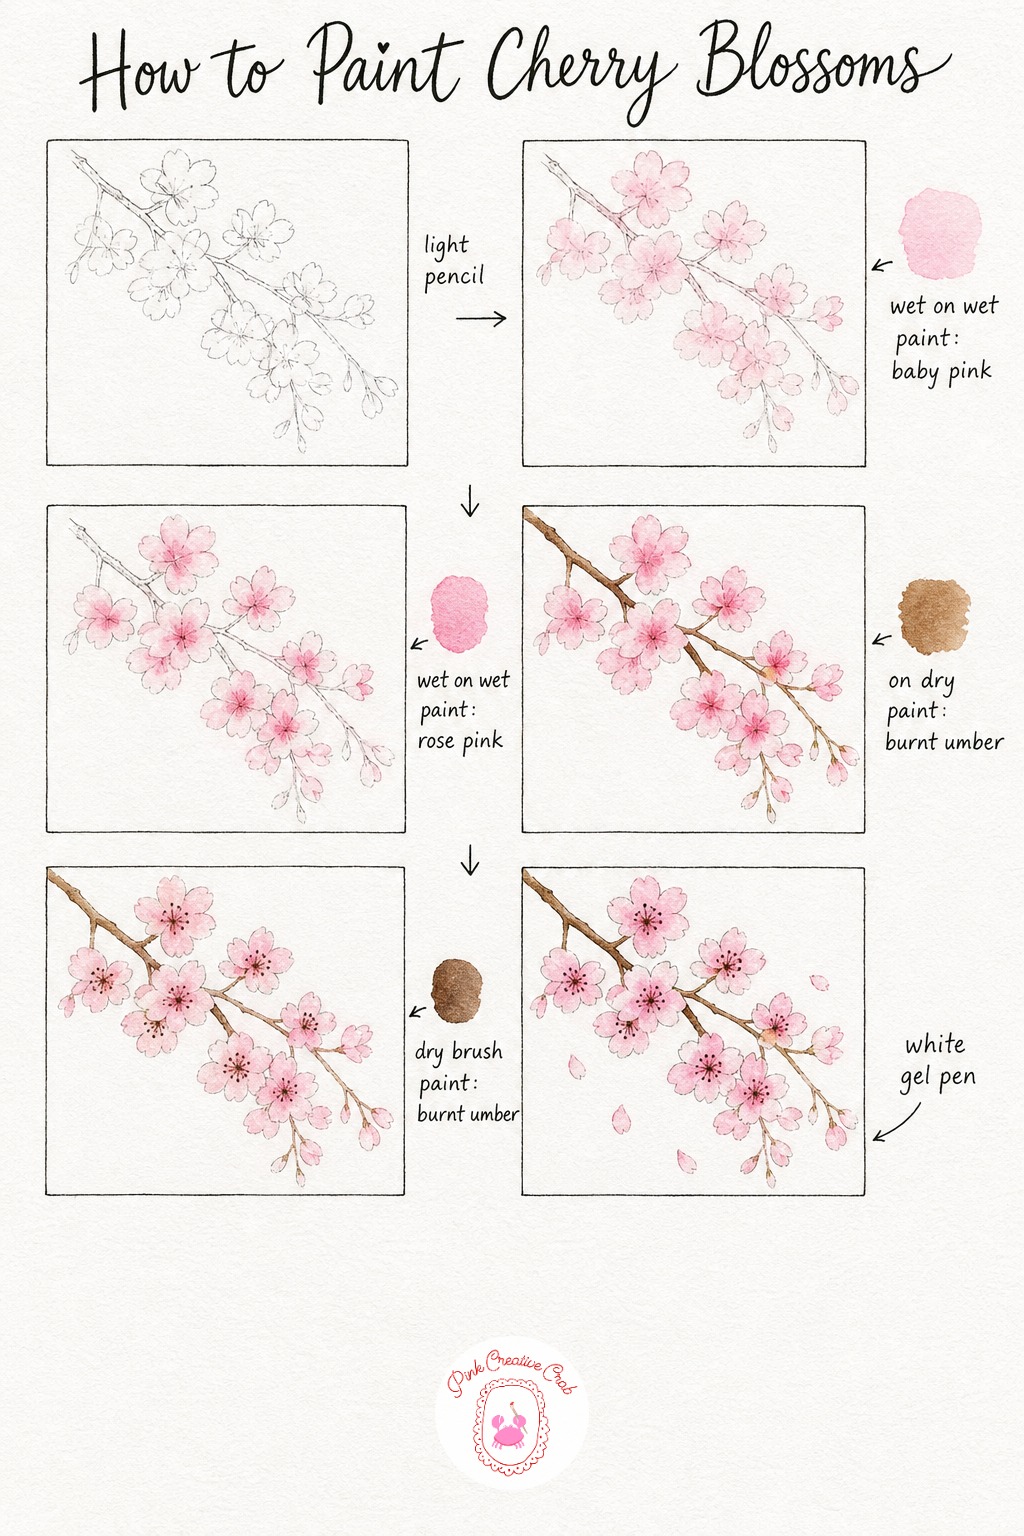
Sketch one curving branch lightly, with loose five petal clusters scattered along its length rather than evenly spaced, cherry blossom branches always look better a little random. There is no ink stage here, this one goes straight to paint for the softest possible edges, a nice link if you want more of this feel is in our watercolor Japanese street scenes full of falling petals.
Wet each blossom cluster and drop in pale pink, let it spread freely without chasing it with your brush. While it is still shiny, touch a stronger rose pink into the center of each cluster so the color concentrates where the real flower would be fullest, then leave it completely alone until dry.
Paint the branch in warm burnt umber on dry paper, letting the line wobble slightly rather than ruling it straight. Add tiny dark dots at each blossom center once everything is dry, these read as stamens from a distance even though they are just a flick of the brush. Finish with a few white gel pen petals drifting off the branch and soft brown shadow along its underside. Keep your pink mixes on the thin side all through, cherry blossoms lose their charm fast if the color goes too heavy.
Sunflowers by a Fence
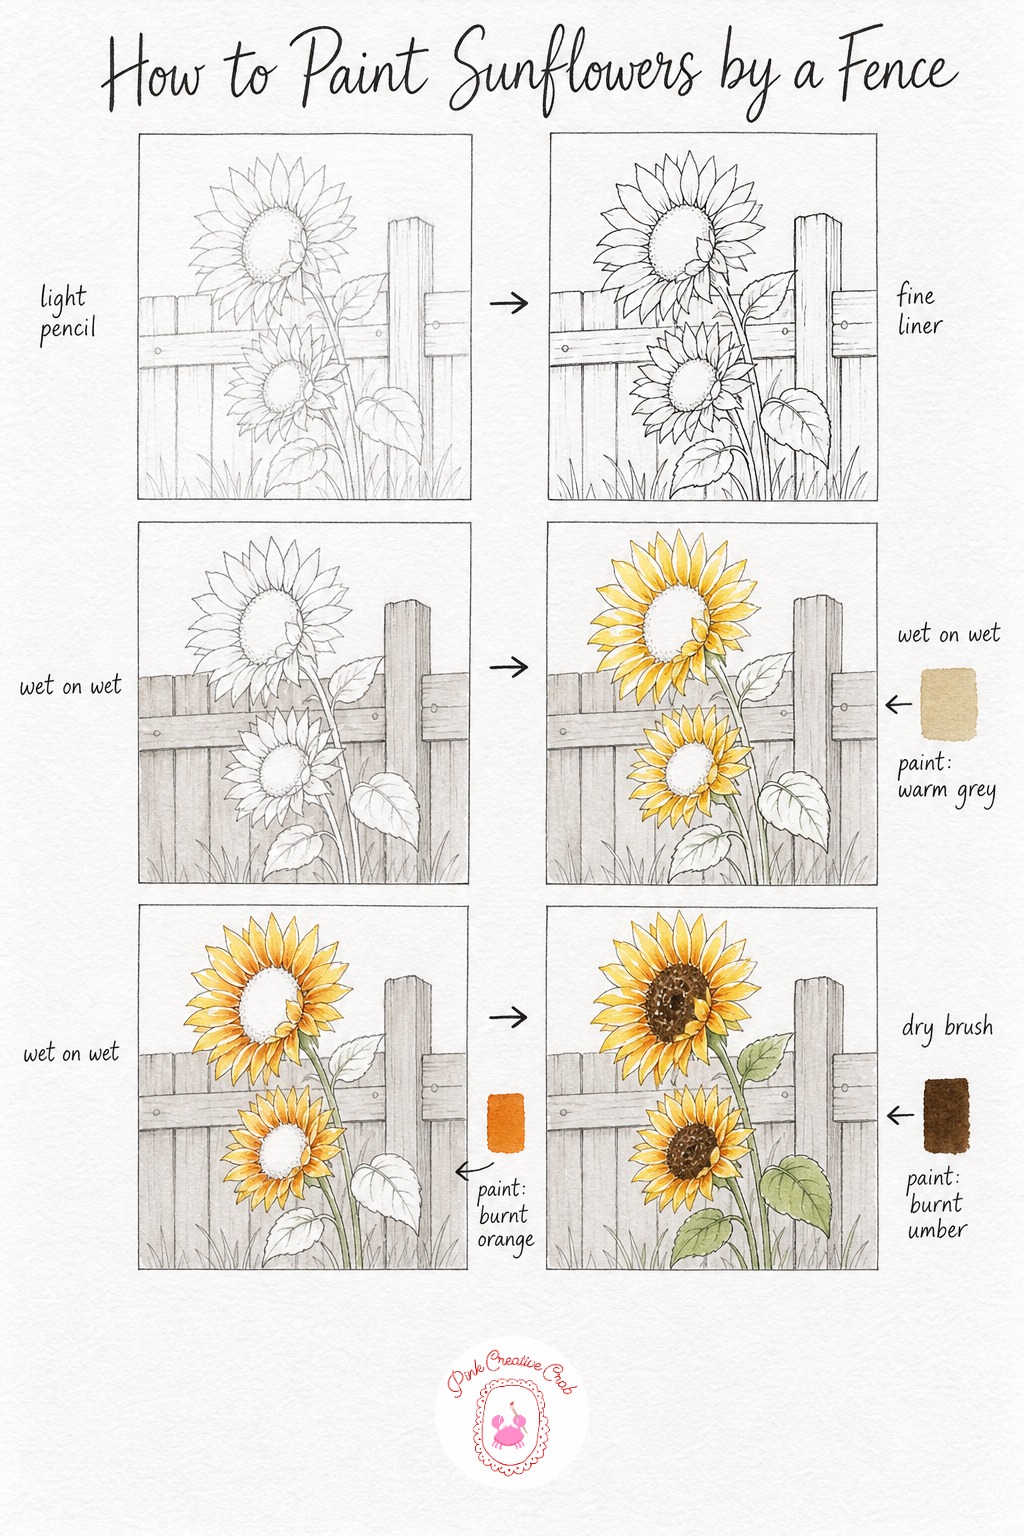
Sketch two sunflower heads leaning toward a few simple fence boards, keep the fence loose, just vertical planks with a horizontal rail. Ink the outlines so the loose petal washes to come have something sturdy to sit inside, a technique worth practicing more in this wet on wet watercolor guide before you start.
Wash the fence boards first in pale warm grey and set them aside to dry. Wet each sunflower head and drop in yellow ochre, leaving small gaps of bare paper between petals for highlights, then touch burnt orange into the base of the petals while still wet so warmth pools near the center.
Once the heads are dry, stipple dark brown seed centers with a half dry brush for a gritty, textured look rather than a flat circle. Paint stems and a few leaves in sap green behind the fence on dry paper. If your first yellow wash looks pale once dry, a second light glaze once it is bone dry deepens it without losing the petal gaps. Finish with soft grey shadow along the boards and beneath the leaves to ground the whole fence line.
Tulip in a Teacup
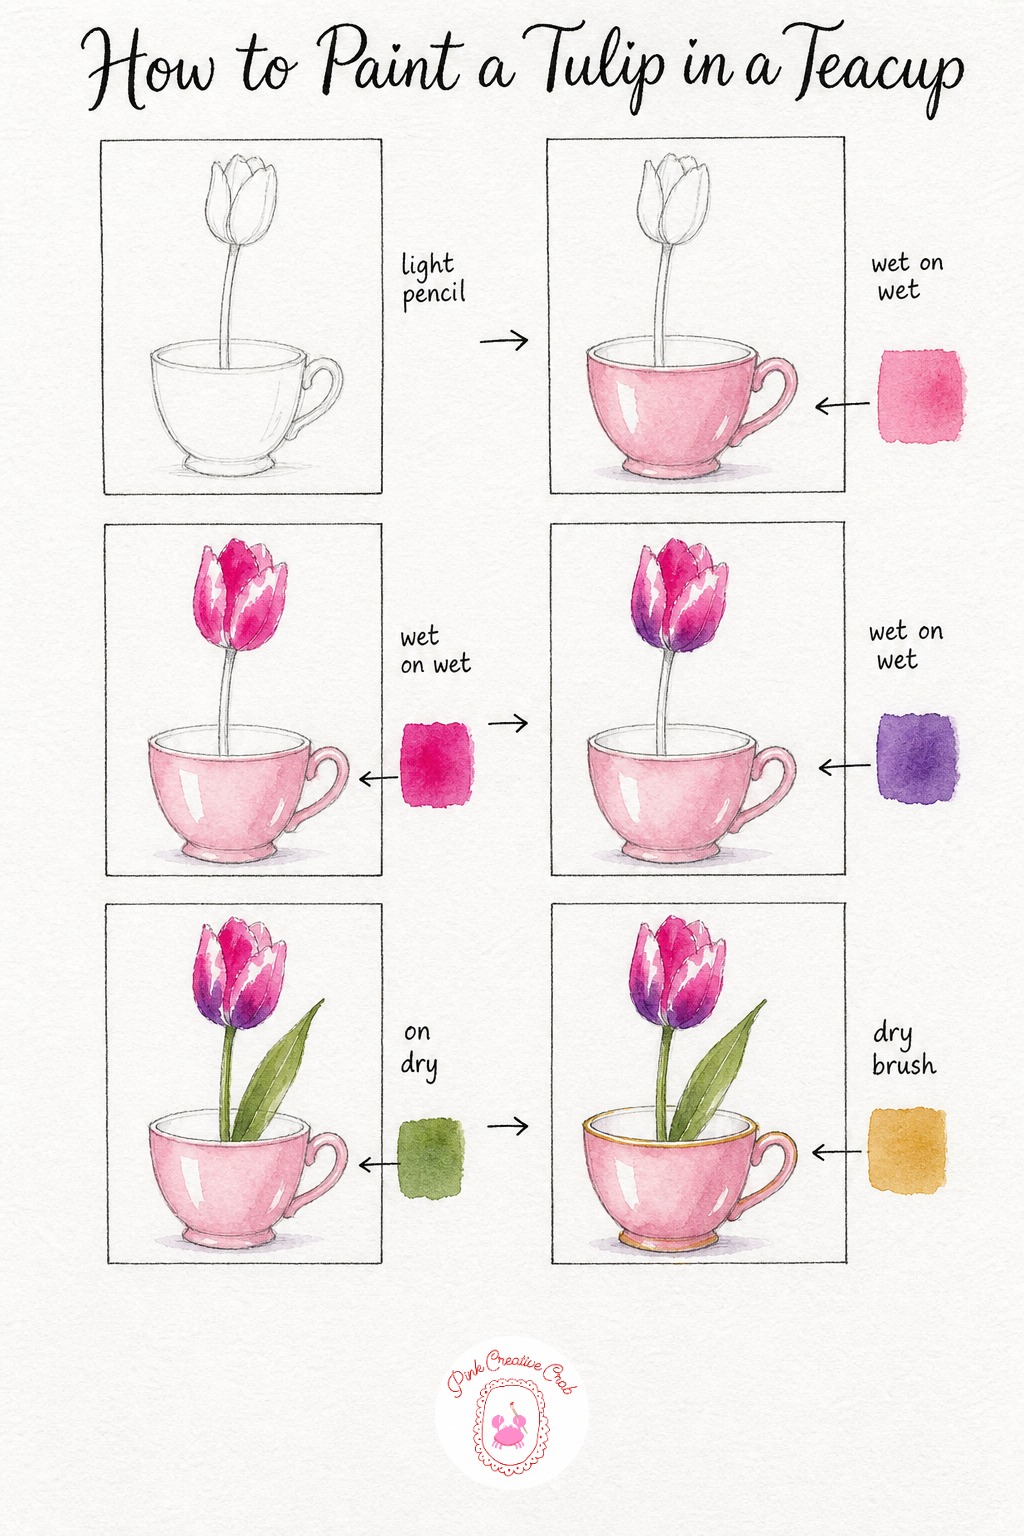
Sketch a single tulip, closed and upright, in a small rounded teacup, a nice tight subject for a quick sitting. Skip ink here, the soft edges of straight paint suit a single bloom better than a hard outline would.
Wash the teacup in pale pink first, leaving a bright highlight patch untouched, and let it dry. Then wet the tulip petals and drop in magenta, letting it pool unevenly since tulip petals are never perfectly even in color. While still damp, touch violet into the base where the petals meet, this wet on wet shading is what gives the bloom its folded, closed shape.
Once dry, paint the stem and single leaf in sap green with a clean dry paper line. Add a thin gold rim around the teacup edge with the tip of a fine brush, a steady hand here makes the whole piece look finished. For more single bloom ideas at this same gentle pace, our easy watercolor flowers for beginners collection is worth a look. Finish with violet shadow under the teacup and along the inner petal folds.
Daisies in a Basket
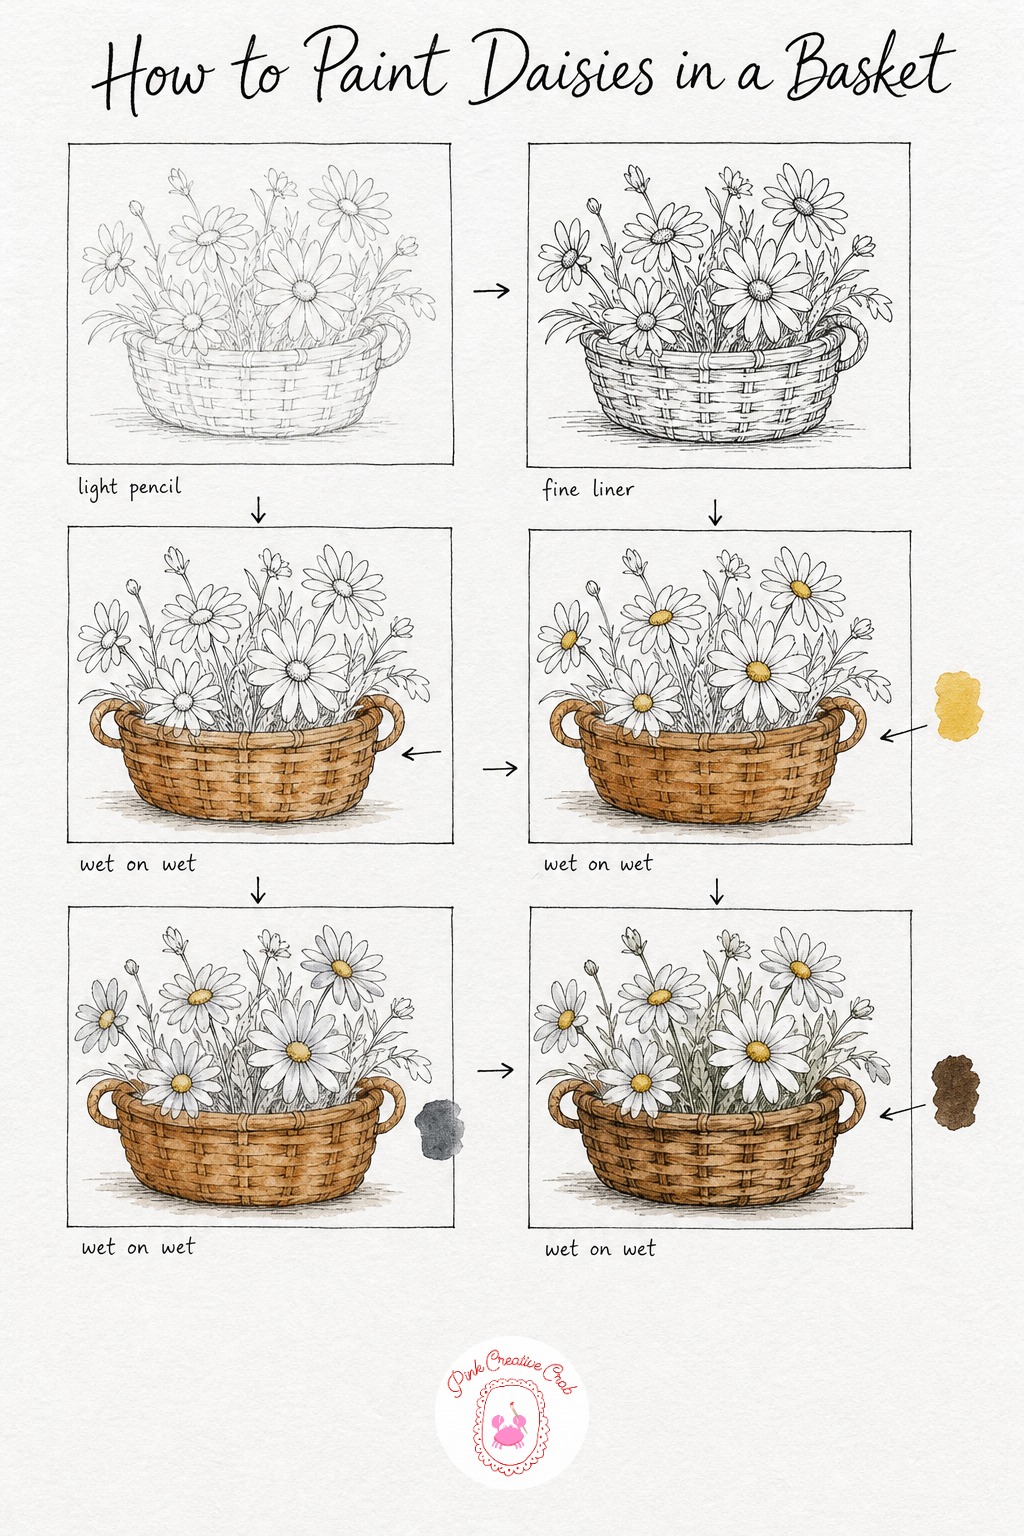
Sketch a simple woven basket shape with several daisy heads clustered above the rim, loosely overlapping. Ink the weave lines and daisy outlines, since the basket texture especially benefits from a steady ink line underneath the looser paint to come.
Wash the whole basket in warm burnt sienna, wet on wet, and let the color pool unevenly across the weave, this unevenness becomes texture once the darker lines go in later. While that dries, wet each daisy center and drop in pale yellow ochre, keeping the petals almost entirely untouched white paper, daisy petals need very little color to read correctly.
Touch the palest grey wash into a few petal folds for gentle shading, barely there. Once the basket wash is dry, add deeper brown lines following the weave direction for that woven look, then paint stems and a leaf or two in sap green on dry paper. A common beginner mistake is overpainting daisy petals until they lose their crispness, trust the white paper more than you think you should. Finish with shadow beneath the basket and deeper tone worked into the weave.
Wild Rose on a Trellis
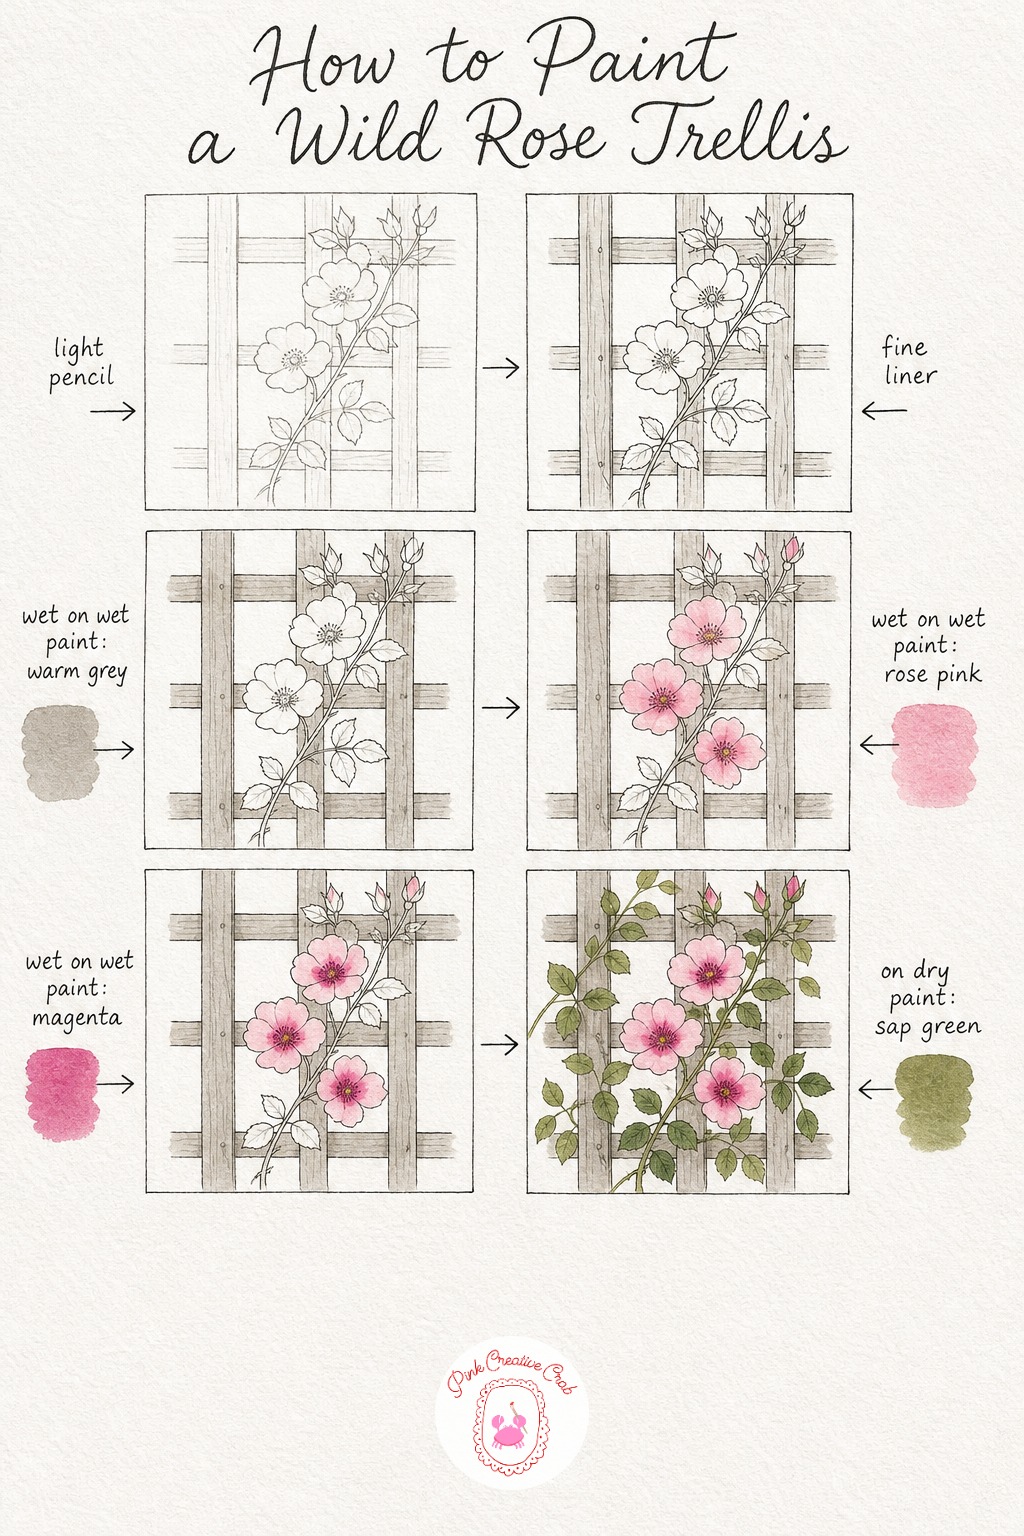
Sketch a simple crosshatched trellis with one rose vine climbing up one side, three or four open blooms scattered along it. Ink the trellis lines and rose outlines carefully, the crosshatch pattern is easiest to keep straight at the ink stage rather than fighting it later in paint.
Wash the trellis wood in pale grey brown and set it aside. Wet each rose bloom and drop in soft rose pink, letting the petals blend into each other at the edges, then touch deeper magenta into the center of each bloom while still damp for natural shading toward the middle.
Once everything is dry, paint the climbing vine and leaf clusters in sap green around the trellis boards on dry paper, weaving the vine naturally through the crosshatch. If your trellis wash dried patchy, a second thin grey glaze evens it out without losing the wood grain feel. Stipple tiny yellow dots into each rose center for stamens, then finish with soft grey shadow along the boards and under the leaves to settle the whole trellis into the page.
Hyacinth in a Pot
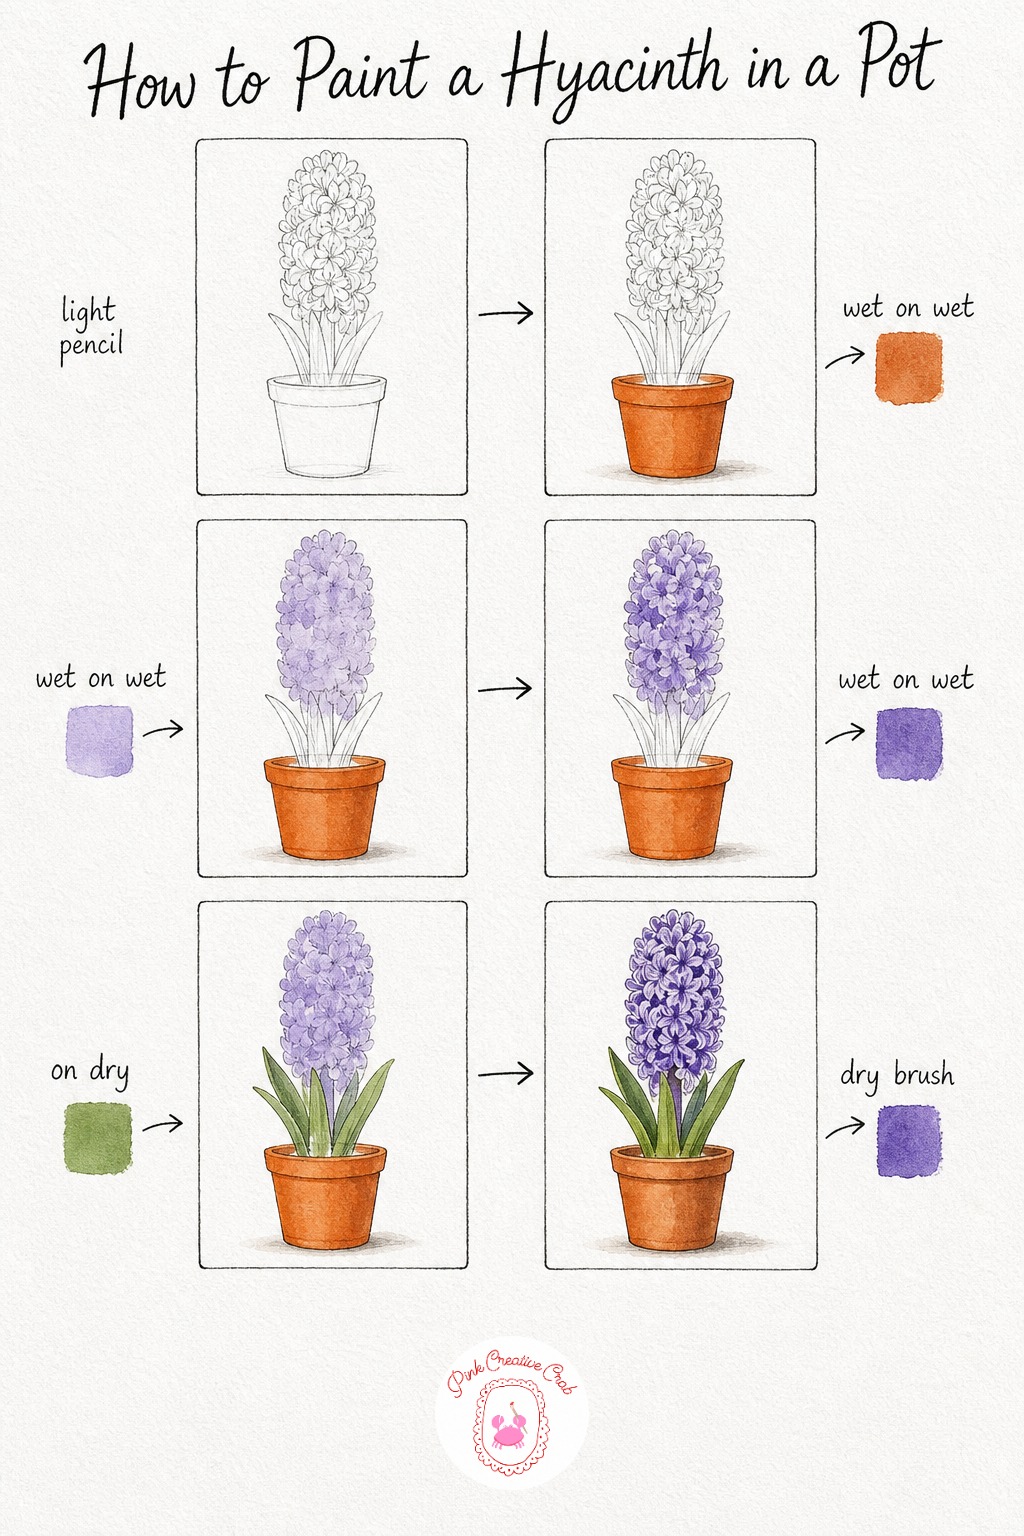
Sketch one dense upright hyacinth spike rising from a small rounded terracotta pot, keep the spike shape soft rather than a tight cone. No ink needed here, straight paint keeps the clustered florets looking natural rather than drawn.
Wash the pot in warm burnt orange first and let it dry fully before moving to the flower. Wet the whole spike shape and drop in pale purple, letting it pool thick in places, thin in others, then while still damp touch deeper violet unevenly through the cluster so it reads as many tiny florets rather than one flat shape.
Once bone dry, paint rising leaves in sap green on dry paper beside the pot. Stipple small curved floret marks across the dried spike with the tip of a fine brush, this is what sells the hyacinth texture, do not skip it even though it feels fussy. Finish with white gel pen dots for the brightest florets and the pot rim, then soft violet shadow down one side of the spike and beneath the pot. If your purple turns too blue, warm it slightly with a touch of pink before each layer.
Dahlia in Full Bloom
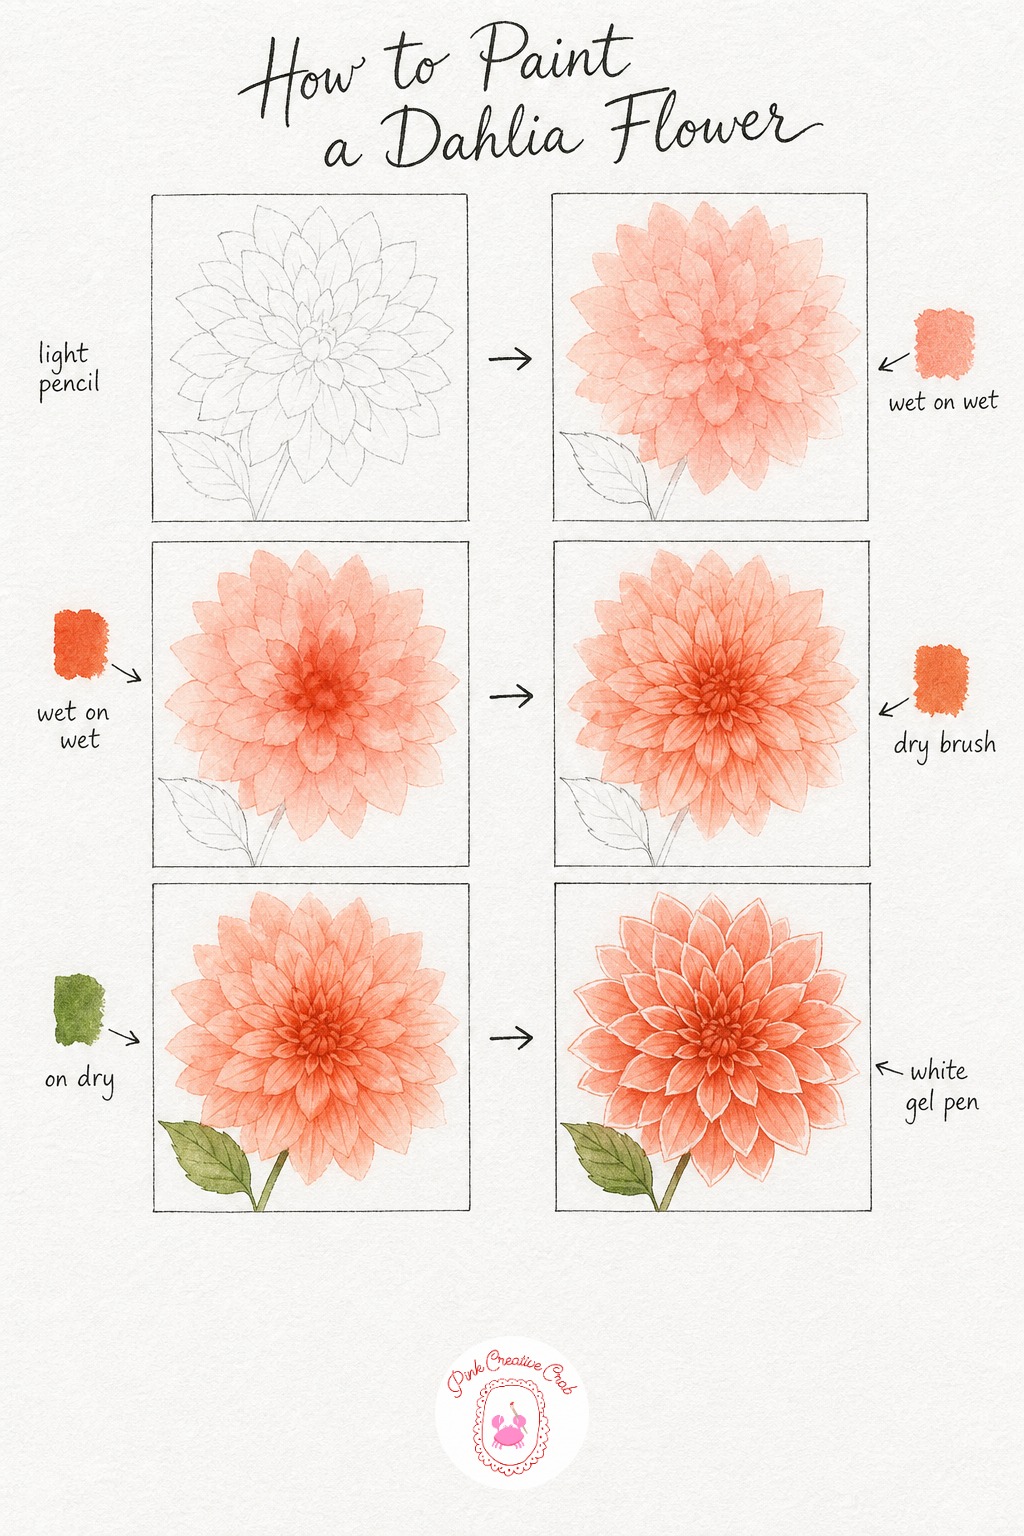
Sketch one large dahlia head with layered petals spiraling from a tight center, plus a single leaf beside the stem. Dahlias have more petals than any other flower in this set, so keep your pencil loose, you are mapping general petal zones, not every single petal.
Wet the whole flower head and drop in pale coral, letting it spread edge to edge, then while still damp touch deeper burnt orange into the very center so the color concentrates there the way a real dahlia darkens toward its middle. Let this dry completely, this is the step beginners rush most, and a damp dahlia center turns the next layer to mud instantly.
Once dry, paint fine petal lines radiating outward from the center with a dry brush loaded lightly, these lines do more to sell the layered structure than any amount of extra wash would. Paint the leaf and stem in sap green on dry paper. Finish with white gel pen flicks along a few outer petal tips and soft shadow tucked beneath the overlapping layers. For more bold single blooms painted this same loose way, browse our expressive loose watercolor flowers.
What to Do Next
Pick whichever flower is calling to you today, set out your paints, and work through its stages one at a time without rushing the drying steps. Paint along with this watercolor flowers tutorial collection often enough and loose petals start feeling like second nature.
Frequently Asked Questions
What paper works best for a watercolor flowers tutorial like this one?
Cold press watercolor paper at least 140 lb works best, since it holds up to repeated wet on wet washes without buckling or pilling under your brush.
How wet should my brush be for the petal washes?
Load the brush until it holds a visible bead of color, then touch it to the paper and let the pigment spread on its own rather than dragging it around.
How do I know a wash is dry enough for the next layer?
The paper loses its shine and feels cool rather than damp when you touch the back of your hand to it, which usually takes ten to fifteen minutes depending on humidity.
What if I do not have the exact paint color listed?
Mix the closest two colors you own, since flower petals forgive slight shifts in hue far more than they forgive the wrong wetness or timing of a layer.
Why do my petals keep coming out with hard dark edges instead of soft blooms?
Hard edges mean the paper or the previous layer had already started drying when you added more color, so work faster or mist the paper lightly before your next wash.
Have any thoughts?
Share your reaction or leave a quick response — we’d love to hear what you think!
-
 0
-
0
-
0
-
0
-
0
-
0


