

Table of Contents
- Before You Start
- Orange and Pink Swirl Teapot
- Red Checkered Mug With Hearts
- Floral Teacup Saucer and Cake
- Blue and White Teapot With Lemons
- Polka Dot Mug of Cocoa
- Striped Pink Teapot
- Scalloped Teacup With Berries
- Gingham Sugar Bowl
- Striped Orange Teacup and Spoon
- Floral Teapot With Steam
- Cottage Tea Table Scene
- Striped Red Teapot With Lemons
- Pastel Teapot With Bow
- Teapot and Teacup Pair
- Frequently Asked Questions
Teapot drawing is my happy corner of painting, the one where cute ceramics, cozy tea time and a handful of bold patterns all get to live on one page. I love how a single swirl, checker or sprig of flowers turns a plain little pot into something that feels like it belongs on a kitchen shelf, steam curling up and all.
Below you will find fourteen full worksheets, each one a different teapot, mug, teacup or small tea set, painted in watercolor with colored pencil accents for the sparkle and the fine pattern work. Pick the one that matches your mood today, keep your water jar close, and paint along from the first pencil circle to the last tiny highlight.
Using these images: free for personal projects such as printing, coloring, cards, journals and gifts. Handmade items that include them may be sold up to 30 pieces per design. More than that is commercial use and is not permitted, and neither is selling or sharing the images themselves or passing them off as your own. Please ask before any other use.
Before You Start
- Choose a cold press watercolor paper with a little texture so the paint settles into soft blooms instead of pooling flat on smooth paper.
- Sketch every shape in light pencil first, pressing just hard enough to see the line, since a heavy sketch will show through pale washes.
- Mix your washes looser than you think you need, since watery paint dries lighter and a thick mix can look muddy on something as small as a teapot.
- Test every new color on a scrap of the same paper before it touches the page, because dry paint always looks different from wet paint in the pan.
- Let each wash dry completely before adding pattern on top, and touch the paper lightly with a clean finger to check it is cool and matte, not cool and damp.
- Save your colored pencil for the very end, once the watercolor is bone dry, so the pencil lines stay crisp instead of dragging through wet paint.
Orange and Pink Swirl Teapot
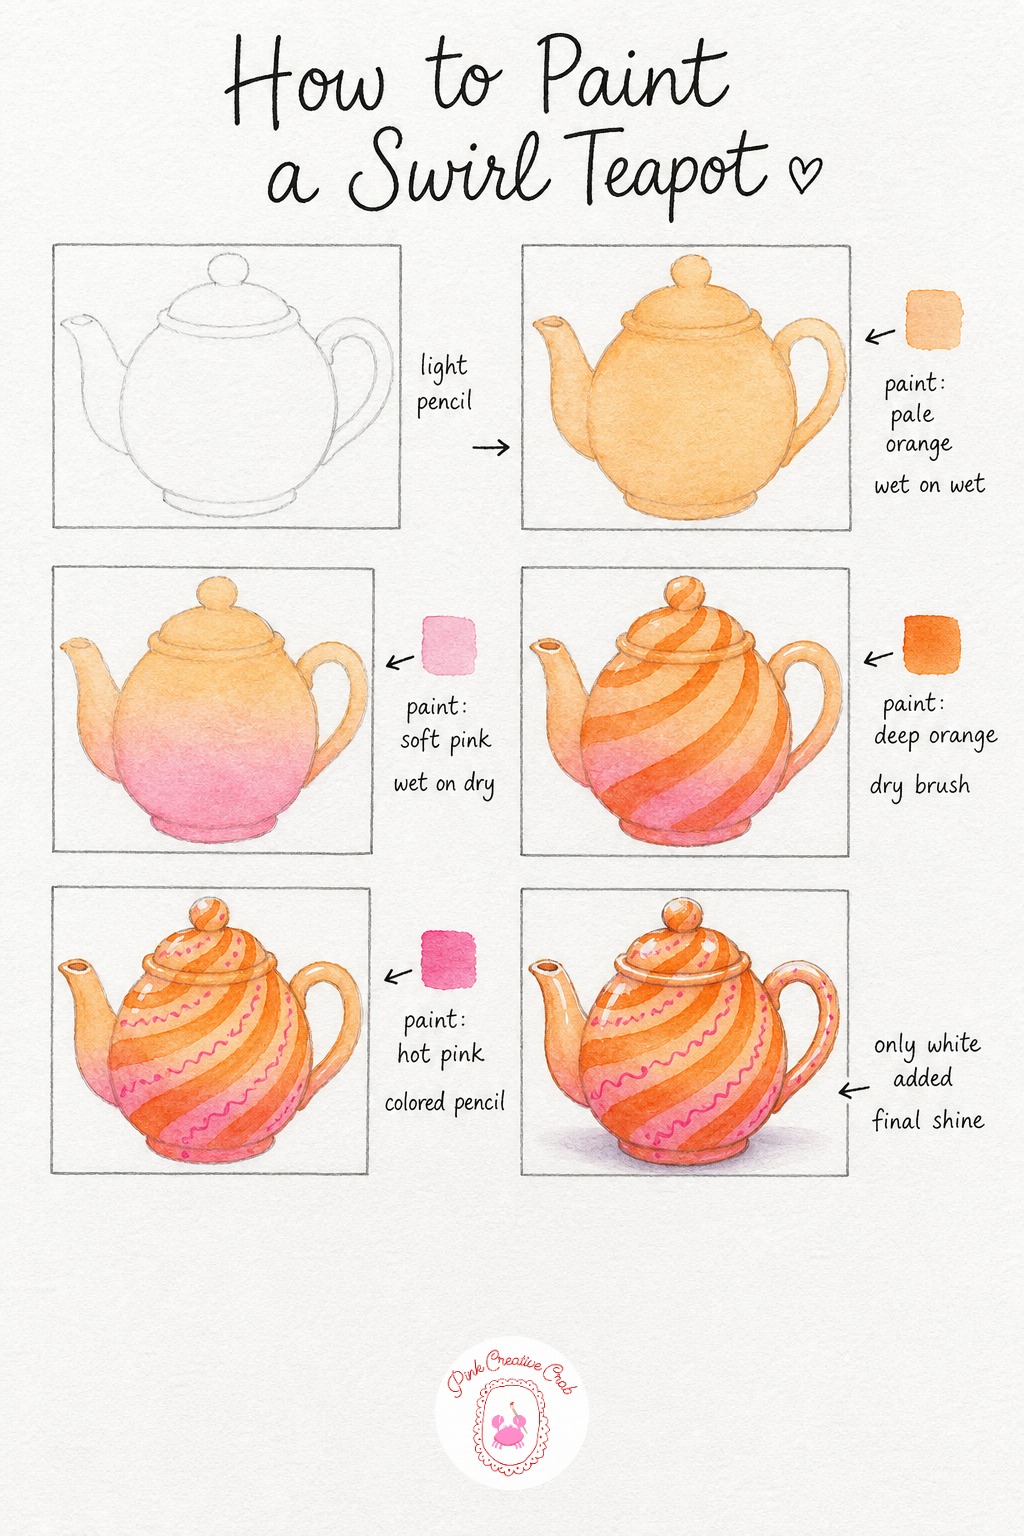
Start this teapot drawing with a light pencil circle for the body, then add a curved spout, a loop handle and a small round lid on top. Keep the sketch loose, since the swirls will cover most of the pencil line anyway.
Wash the whole pot in pale orange first, wet on wet so the color settles soft and even, then let it dry until the paper feels cool but not damp. Drop a soft pink wash over the lower curve while the orange stays untouched up top, building the two tone base this teapot is known for.
Once fully dry, paint deeper orange swirl stripes that curl from the base up toward the lid, using a dry brush so the stripes stay crisp rather than bleeding into the pink. Switch to colored pencil for the thin pink squiggles and dot clusters tucked between the swirls, then finish with a white gel pen for the shine on the spout and handle and a soft gray shadow under the base.
If your swirls wobble, thin brushes forgive more than thick ones, so keep a size two on hand for this stage.
Red Checkered Mug With Hearts
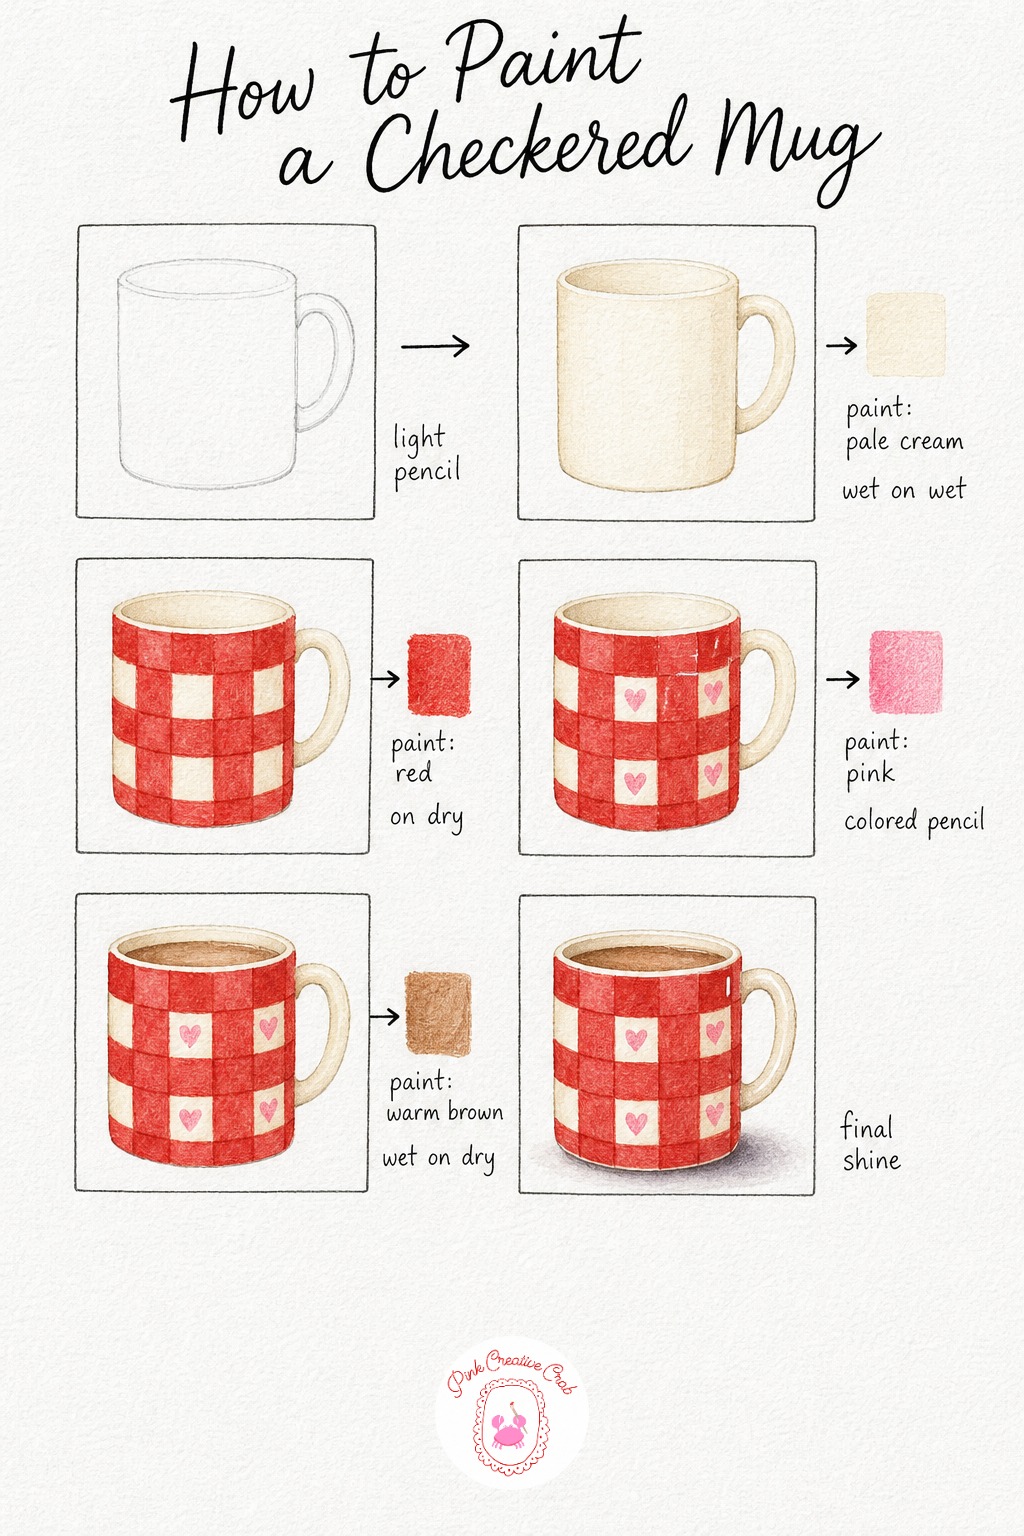
Sketch a simple straight sided cylinder for this mug, with a small loop handle on one side and a thin ellipse for the rim opening. A steady hand helps here, but a slightly wobbly cylinder still reads as a mug once the checkers go on.
Lay a pale cream wash over the whole shape first and let it dry fully, since the checker grid needs a dry, flat surface to sit on cleanly. Paint the red checkered squares in a simple grid pattern, leaving every other square bare cream, and work on dry paper so the red edges stay sharp instead of feathering.
Add a few tiny hearts into some of the cream squares using pink colored pencil, keeping them small and a little uneven for charm. Wash a warm brown across the inside rim to hint at the tea inside, then close with white gel pen shine on the handle and rim and a soft gray shadow beneath the mug.
If your grid lines drift, a ruler held lightly against the paper keeps the checkers honest without flattening the loose watercolor feel.
Floral Teacup Saucer and Cake
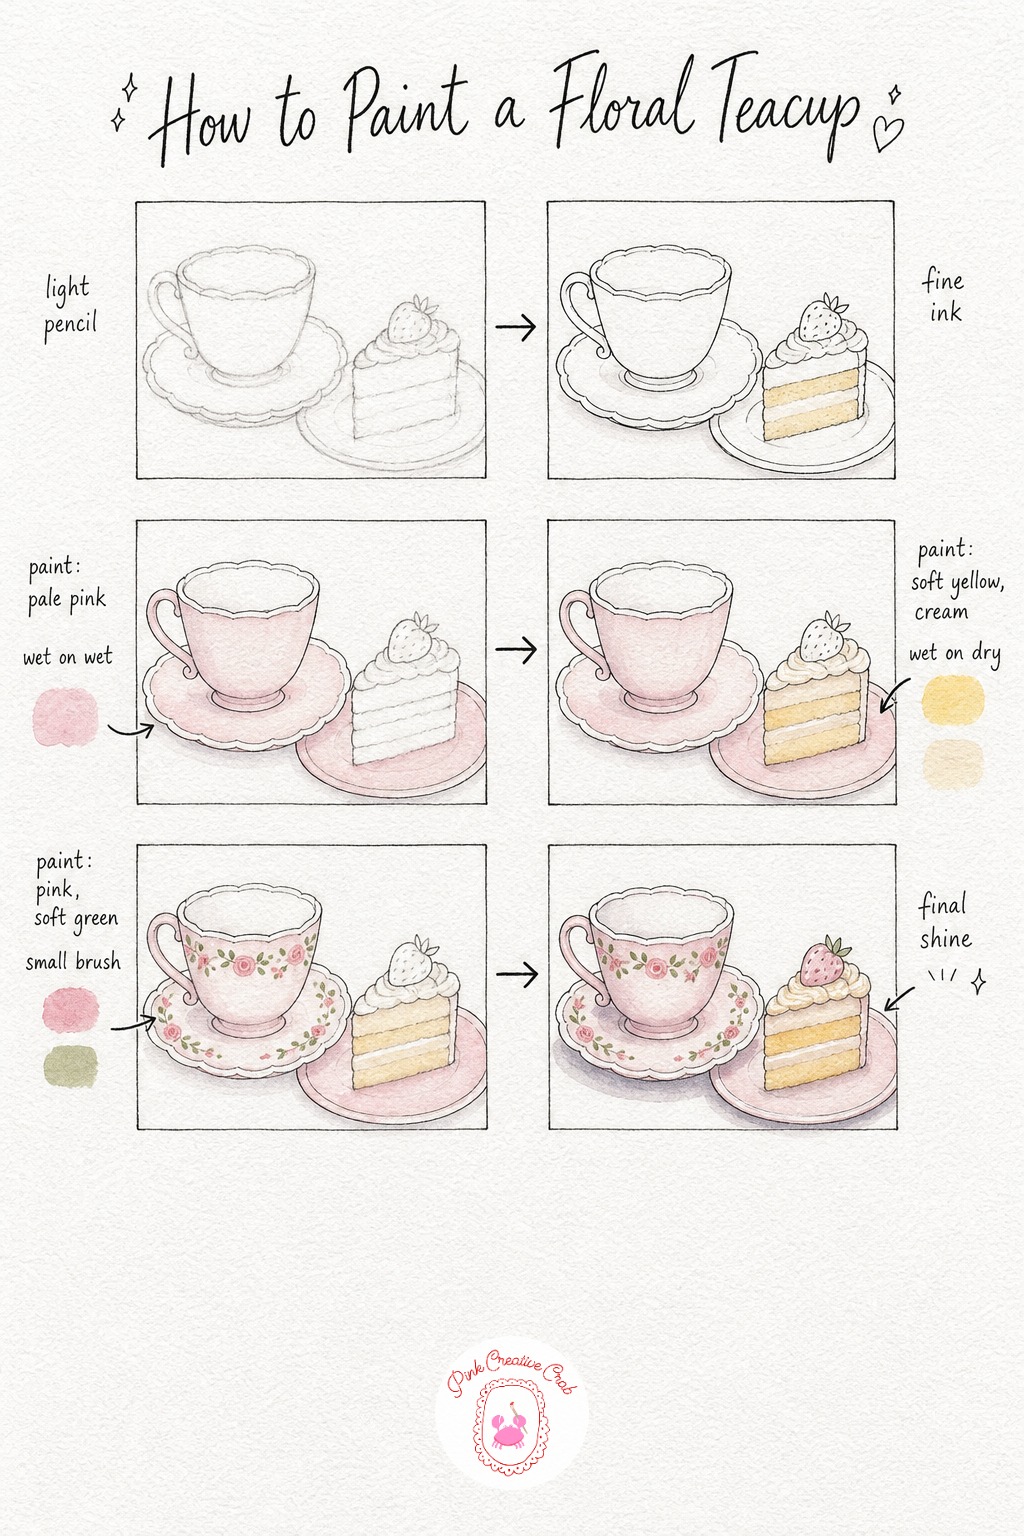
Sketch the teacup sitting on its saucer first, then add the cake slice just beside it, keeping the whole group small enough to fit together comfortably on the page. Trace the sketch in fine black ink once you are happy with the shapes, letting the pencil disappear underneath.
Wash pale pink over the cup, saucer and cake plate together so the whole scene reads as one cozy moment rather than three separate objects. Once dry, paint the cake layers in soft yellow with a cream frosting on top, keeping the washes light so the floral details can sit clearly over them later.
Paint tiny floral sprigs in pink and soft green around the rim of the cup and saucer, using a small round brush for control since this is the most delicate part of the whole piece. Finish with white gel pen shine along the cup rim and frosting, then add soft gray shadows beneath each piece to ground them on the table.
If the florals feel fussy, paint just three or four sprigs rather than a full ring, since a little restraint reads as elegant rather than empty.
Blue and White Teapot With Lemons
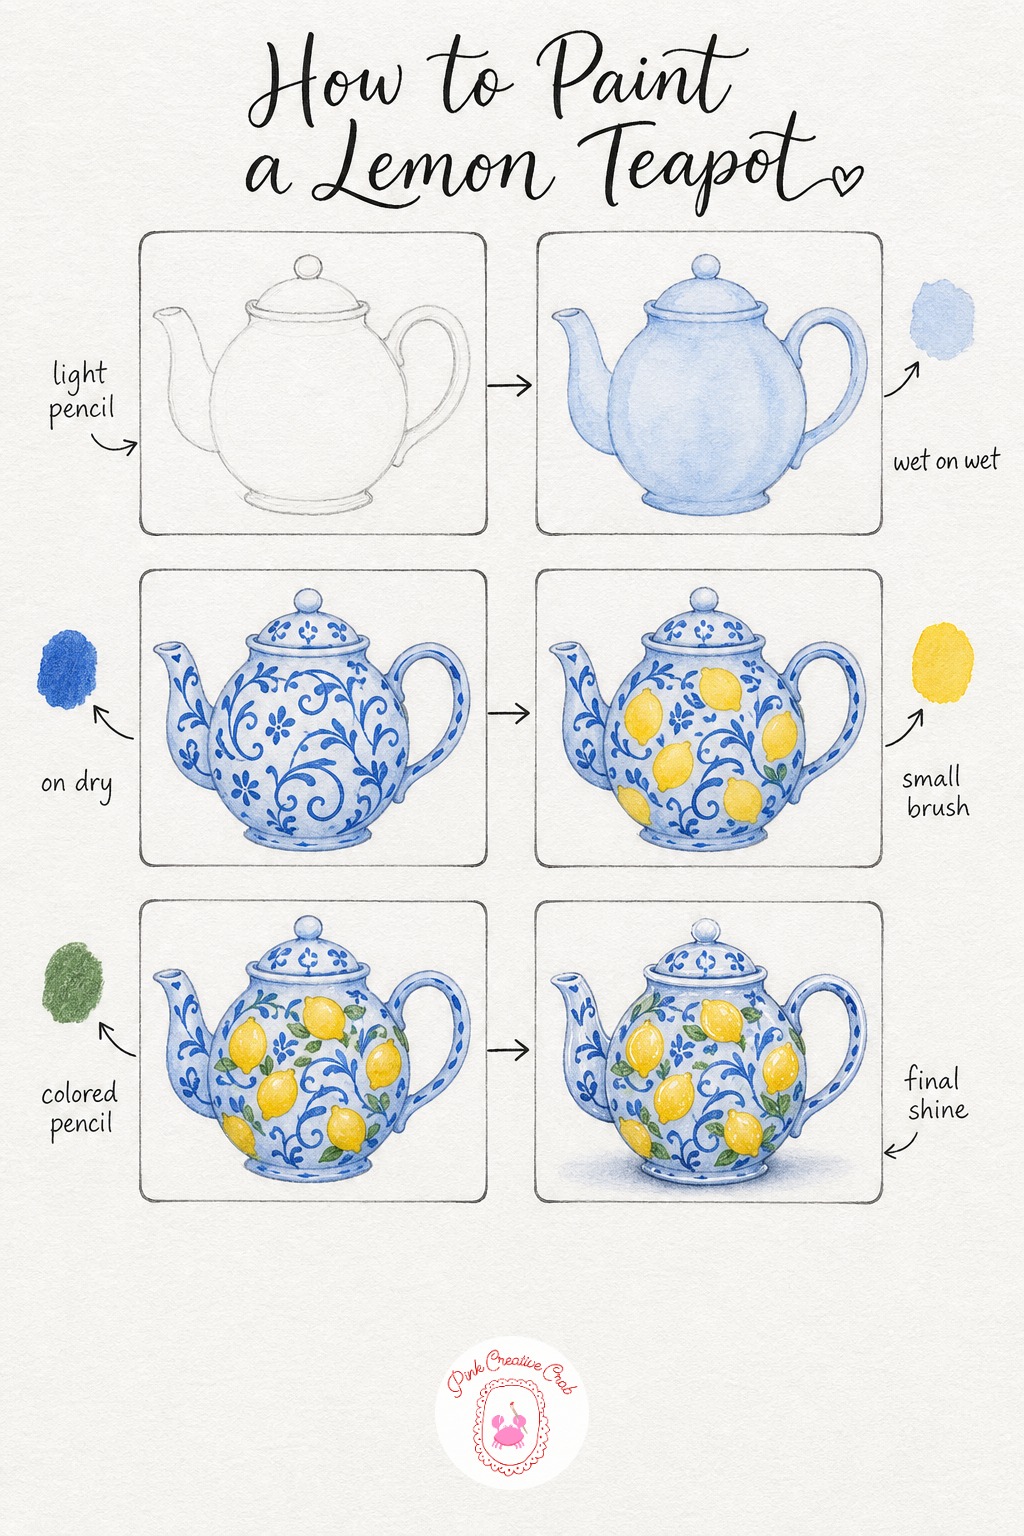
Draw the teapot body as a full rounded shape with a gently curved spout, a loop handle and a small domed lid, keeping the pencil light since blue and white patterns show every stray line. This pairing feels right at home beside the ideas in our blue and white painting lessons if you want more porcelain patterns after this one.
Wash pale blue over the whole pot and let it dry completely, then paint a deeper blue swirl and dot pattern across the body once the paper is fully matte again. Working on dry paper here keeps the pattern crisp instead of letting it melt into the base wash.
Paint small lemon shapes scattered across the teapot in bright lemon yellow, leaving tiny white gaps between lemon and background so each one reads clearly. Add thin green leaves beside each lemon with colored pencil once the yellow is dry, then finish with white gel pen shine on the spout, lid and lemon skins and a soft shadow beneath the base.
If your lemons come out too round, flatten one side slightly with the brush tip, since a slightly imperfect oval looks more like real fruit.
Polka Dot Mug of Cocoa
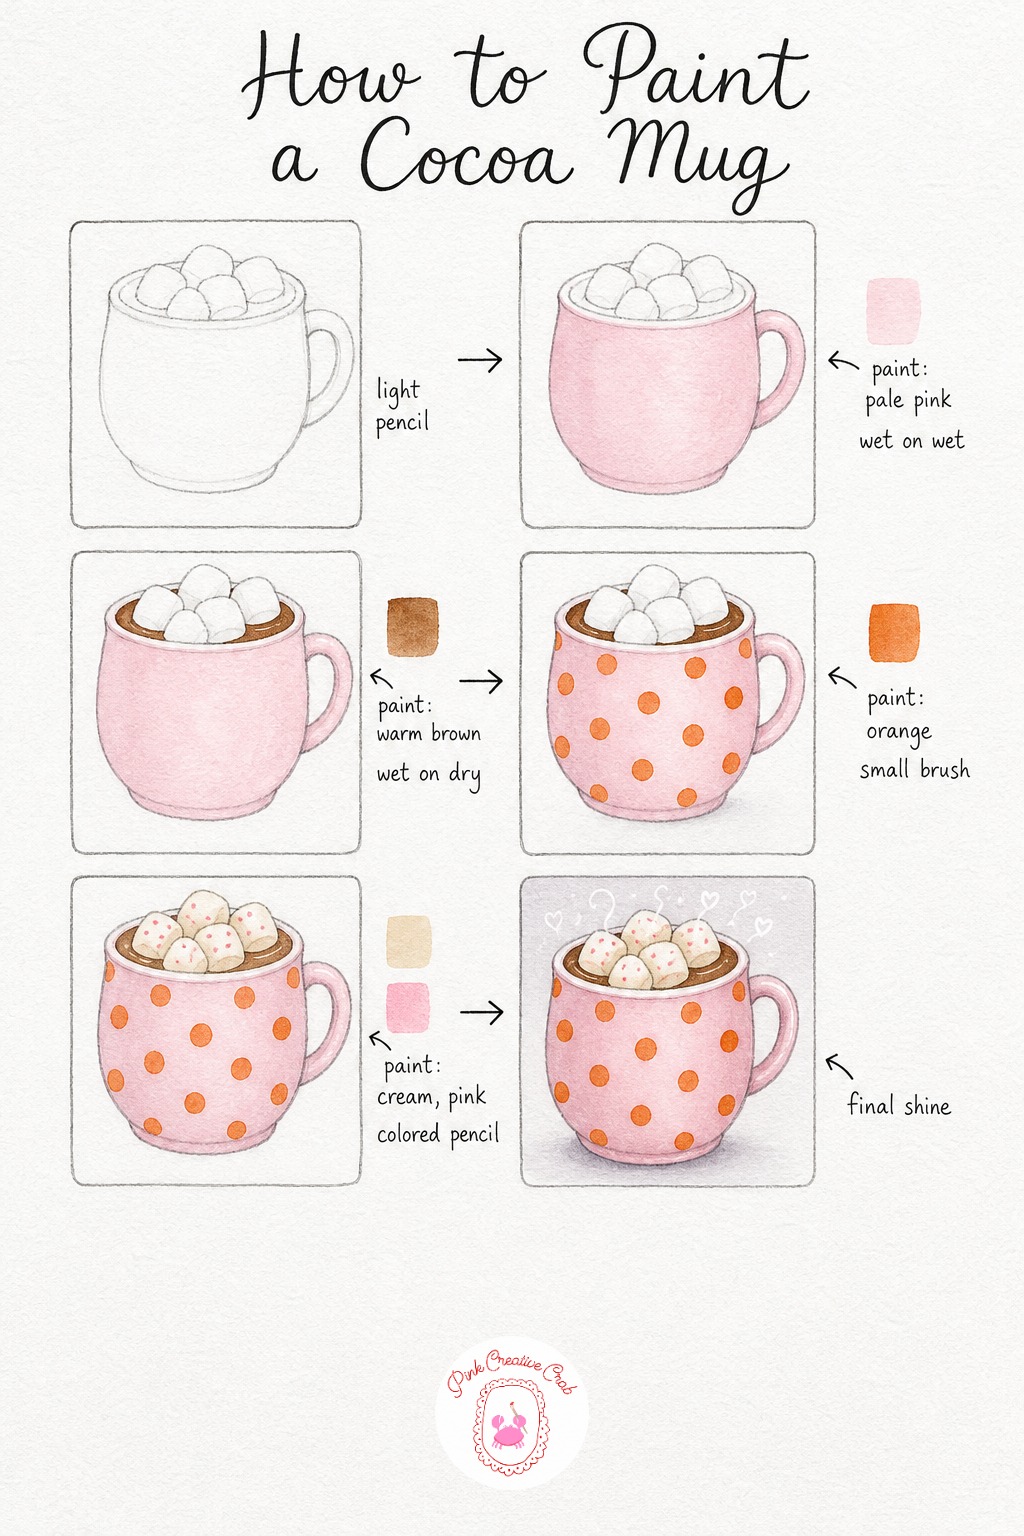
Sketch a rounded mug shape with a simple handle, then add two or three soft marshmallow shapes peeking over the rim before any paint goes down. Keep the marshmallows a little uneven, since perfectly round shapes look stiff next to the loose cocoa wash.
Wash pale pink over the mug body and let it dry, then paint a rich warm brown wash just inside the rim to suggest the cocoa itself. This brown can go on a touch thick, since cocoa reads better darker than other drinks in this set.
Paint small orange polka dots evenly across the pink mug body once it is dry, spacing them by eye rather than measuring for a friendlier, hand painted feel. Paint the marshmallows in soft cream, then add tiny pink dots to them with colored pencil once dry, and close with white gel pen steam squiggles rising above the mug and a soft shadow beneath the base.
If the polka dots smear, your pink base was still damp, so always touch test a corner before adding pattern on top.
Striped Pink Teapot
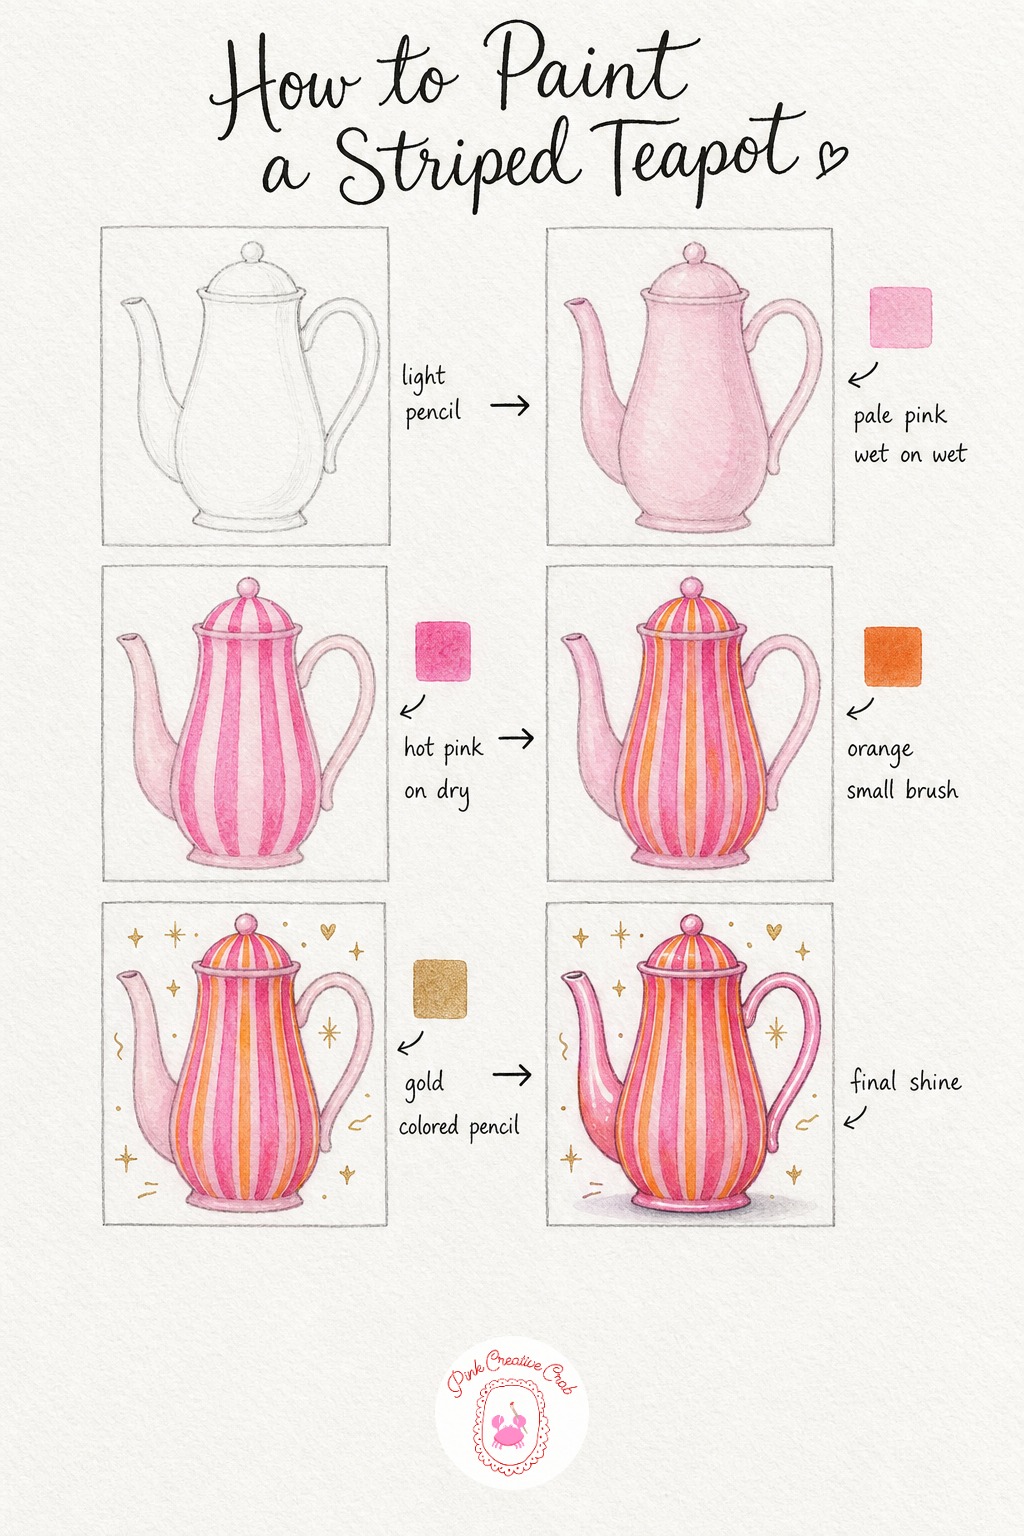
Sketch a tall rounded teapot body with a slim curved spout, a simple handle loop and a small lid, keeping the shape a touch taller than wide for a graceful silhouette. A light hand with the pencil matters most here since vertical stripes will sit right on top of this line.
Wash pale pink over the whole pot and let it dry fully before any stripe work begins, since wet stripes on a wet base will bleed into one soft blur. Paint hot pink vertical stripes evenly from the base up to the shoulder of the pot, spacing them by eye and letting them taper slightly near the top where the shape narrows.
Add thin orange stripes tucked between the pink ones once dry, using a smaller brush for these so they stay delicate rather than competing with the main stripes. Add sparkle marks and tiny squiggles around the teapot on the page itself with gold colored pencil, then finish with white gel pen shine on the spout and lid and a soft shadow under the base.
If stripes come out uneven, a very light pencil guide line before painting keeps the spacing honest without showing once stripes cover it.
Scalloped Teacup With Berries
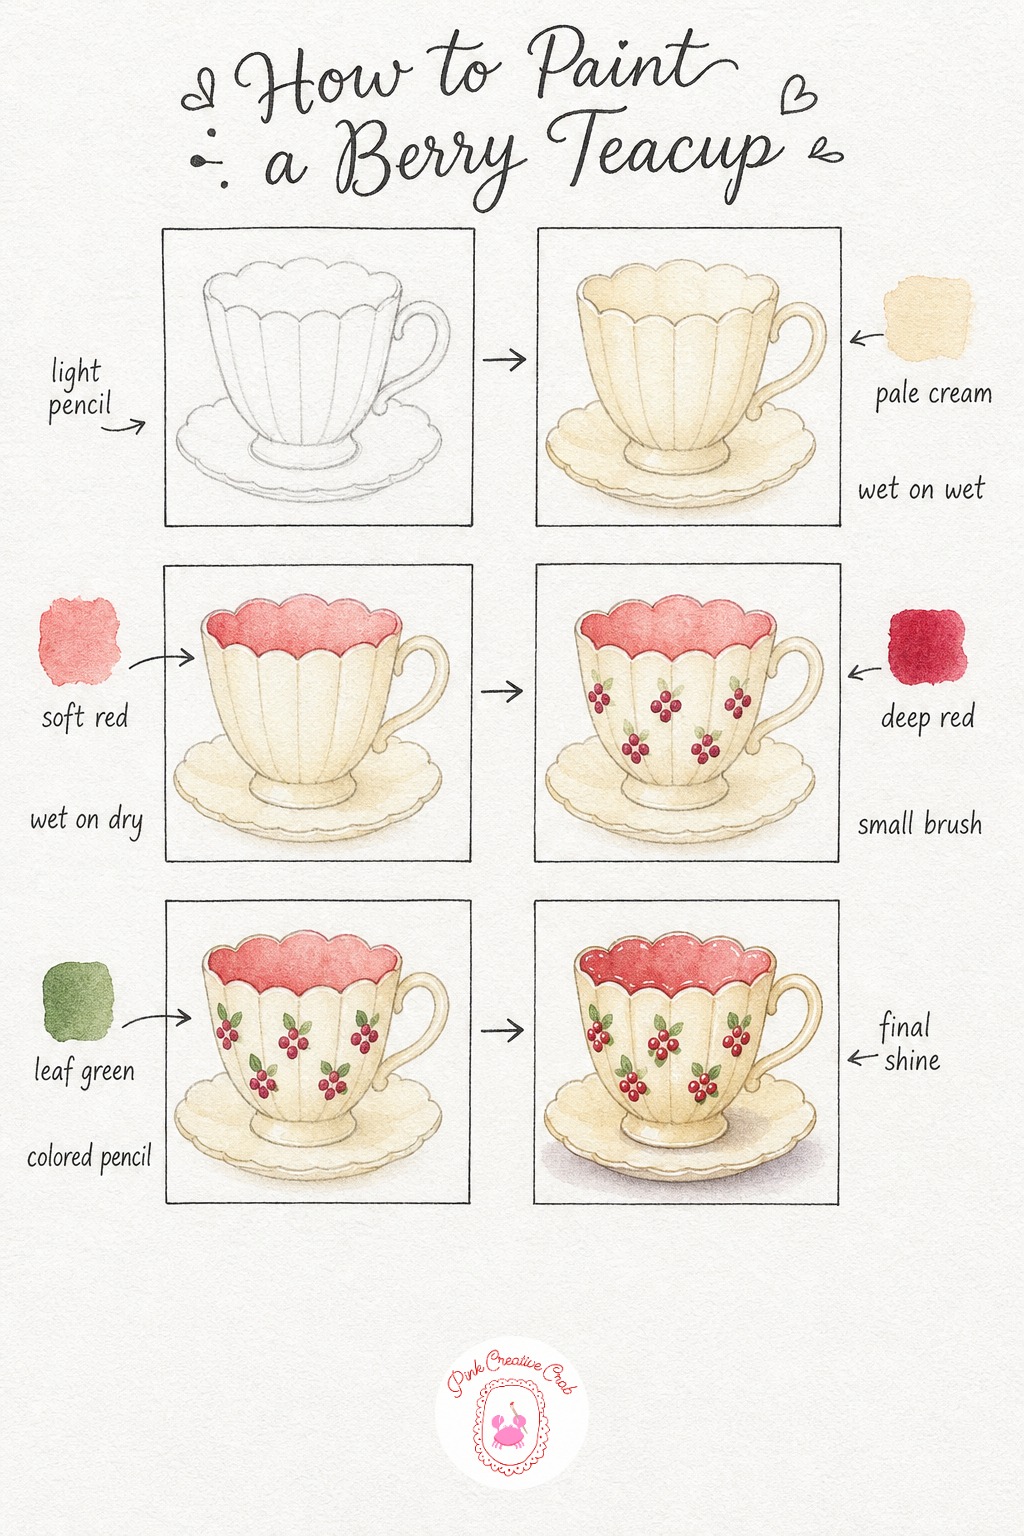
Draw the teacup with a gently scalloped top edge, a simple handle and a round saucer beneath it, keeping the scallops soft rather than sharp points. The scalloped rim is the detail that makes this cup feel special, so take your time shaping it in pencil before any paint touches the page.
Wash pale cream over the whole cup and saucer, then once dry, paint a soft red band around the scalloped rim to frame the top edge. Let that band dry completely before adding the berry clusters in deeper red scattered around the body of the cup, working on dry paper so each tiny berry stays round and distinct.
Add small green leaves tucked beside the berry clusters using colored pencil once the red is fully dry. Finish with white gel pen shine along the rim and on a few berries, then a soft gray shadow beneath the saucer to settle it onto the table.
If the berries bleed into each other, your brush had too much water, so blot it lightly on a tissue before each small dot.
Gingham Sugar Bowl
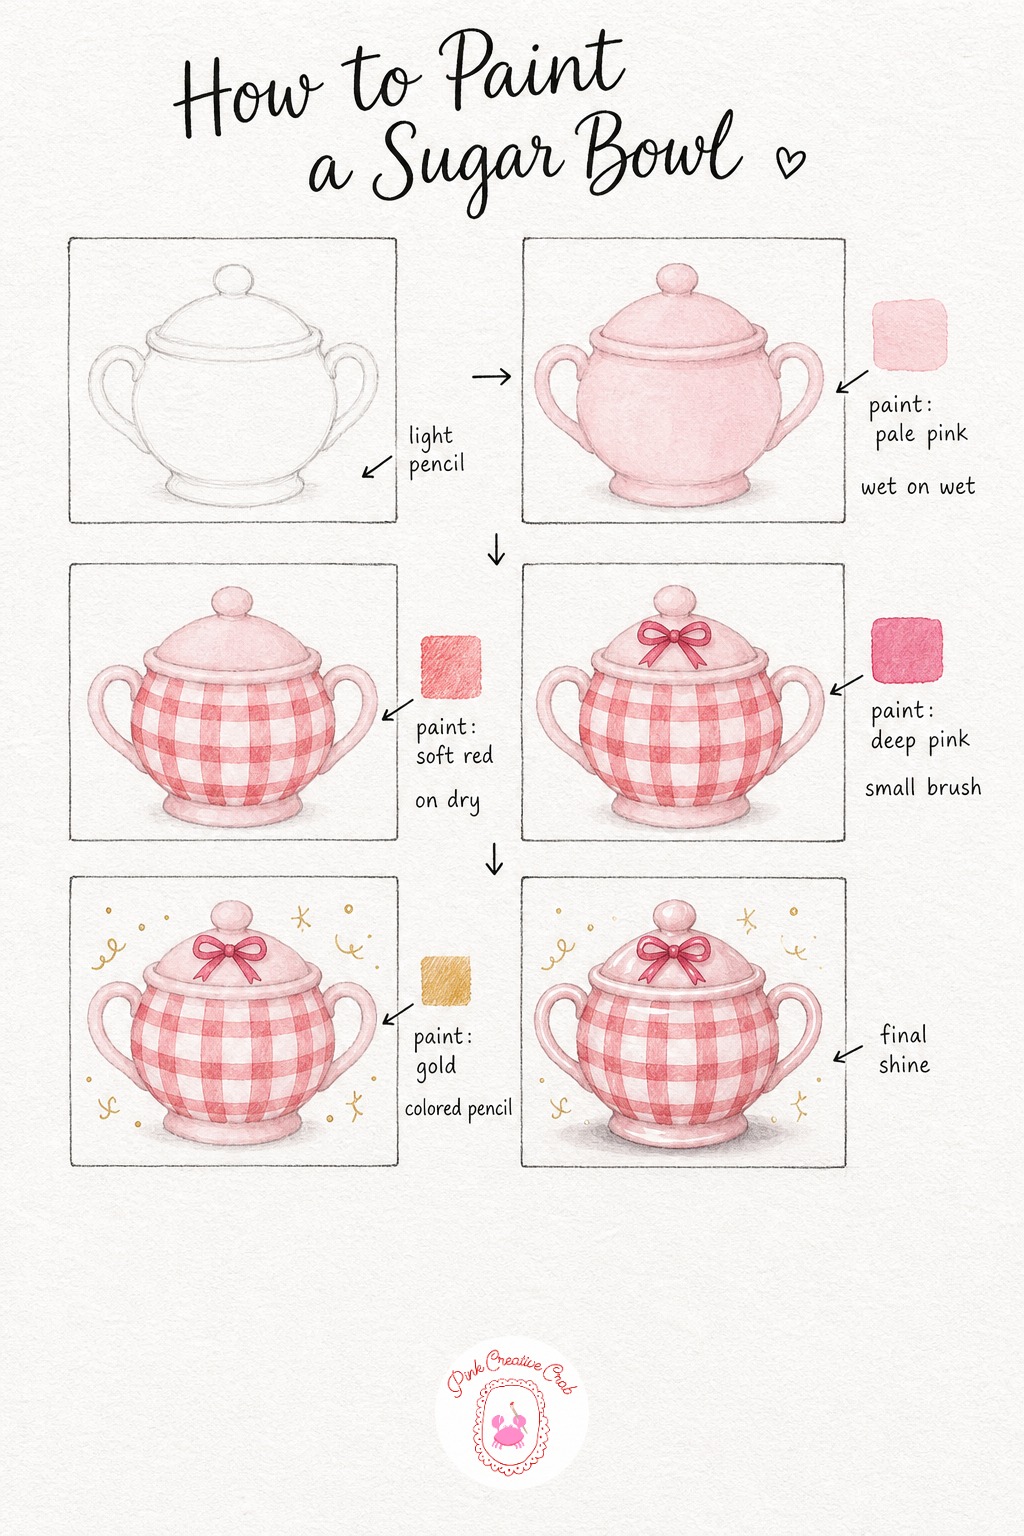
Sketch a round bowl shape with a fitted lid and two small curved handles on either side, keeping the proportions a little squat and cheerful. This small companion piece sits nicely beside any teapot in this set if you want to build a full tea tray scene across a few sessions.
Wash pale pink over the whole bowl and lid, then let it dry before building the gingham check grid, since wet gingham lines will blur into a soft smudge instead of a crisp pattern. Paint the check grid in soft red working on fully dry paper, leaving the pink showing through in alternating squares for the classic gingham look.
Paint a small bow shape on the lid in a slightly deeper pink once the gingham is dry, keeping the bow loose and simple rather than overly detailed. Add gold sparkle dots and squiggles scattered around the bowl with colored pencil, then finish with white gel pen shine on the lid and handles and a soft shadow beneath the base.
If the gingham squares look too stiff, soften a few edges with a slightly damp brush right after painting them for a hand stitched feel.
Striped Orange Teacup and Spoon
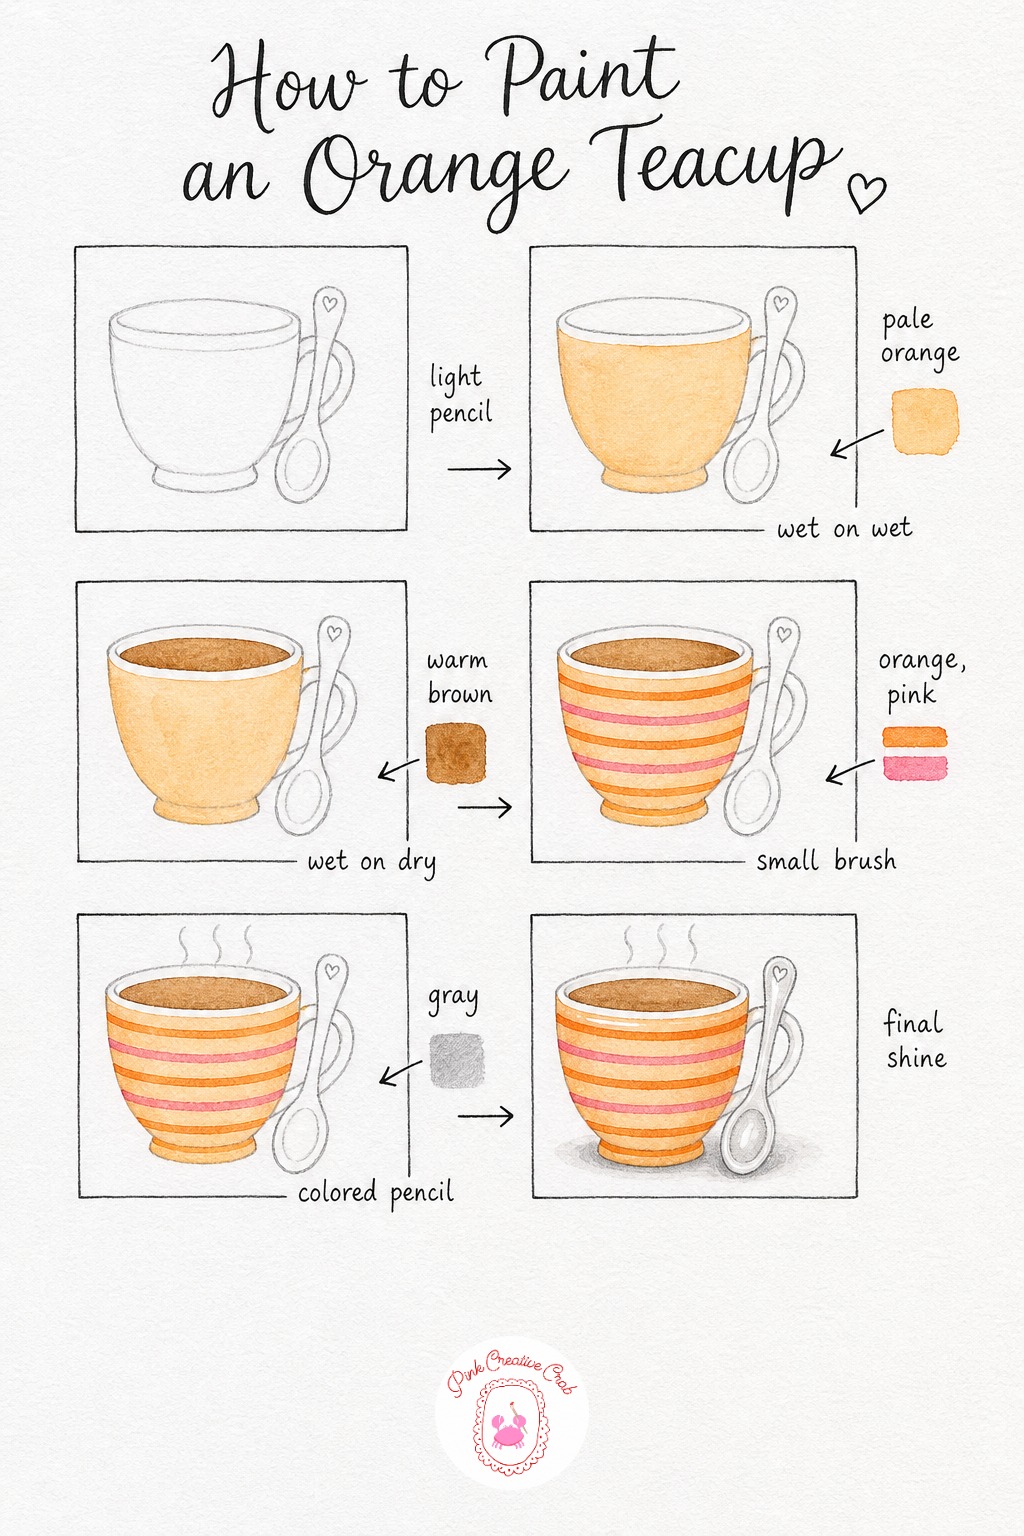
Sketch a simple round cup with a handle, then add a small spoon leaning against the side for a cozy, just poured feel. Keep the spoon small and simple, since it only needs to read as a spoon, not carry much detail of its own.
Wash pale orange over the cup body and let it dry, then paint a warm brown wash just inside the rim for the tea itself, keeping the brown slightly translucent so it still reads as liquid rather than a solid fill. Once dry, paint thin alternating orange and pink stripes around the outside of the cup using a small brush for control.
Add soft gray steam squiggles rising above the cup with colored pencil, keeping the lines loose and wavy rather than straight. Finish with white gel pen shine along the spoon and cup rim, then a soft shadow beneath the cup to settle it on the page.
If your stripes wander off the curve of the cup, paint in short dashes rather than one long stroke, which follows the curve more naturally.
Floral Teapot With Steam
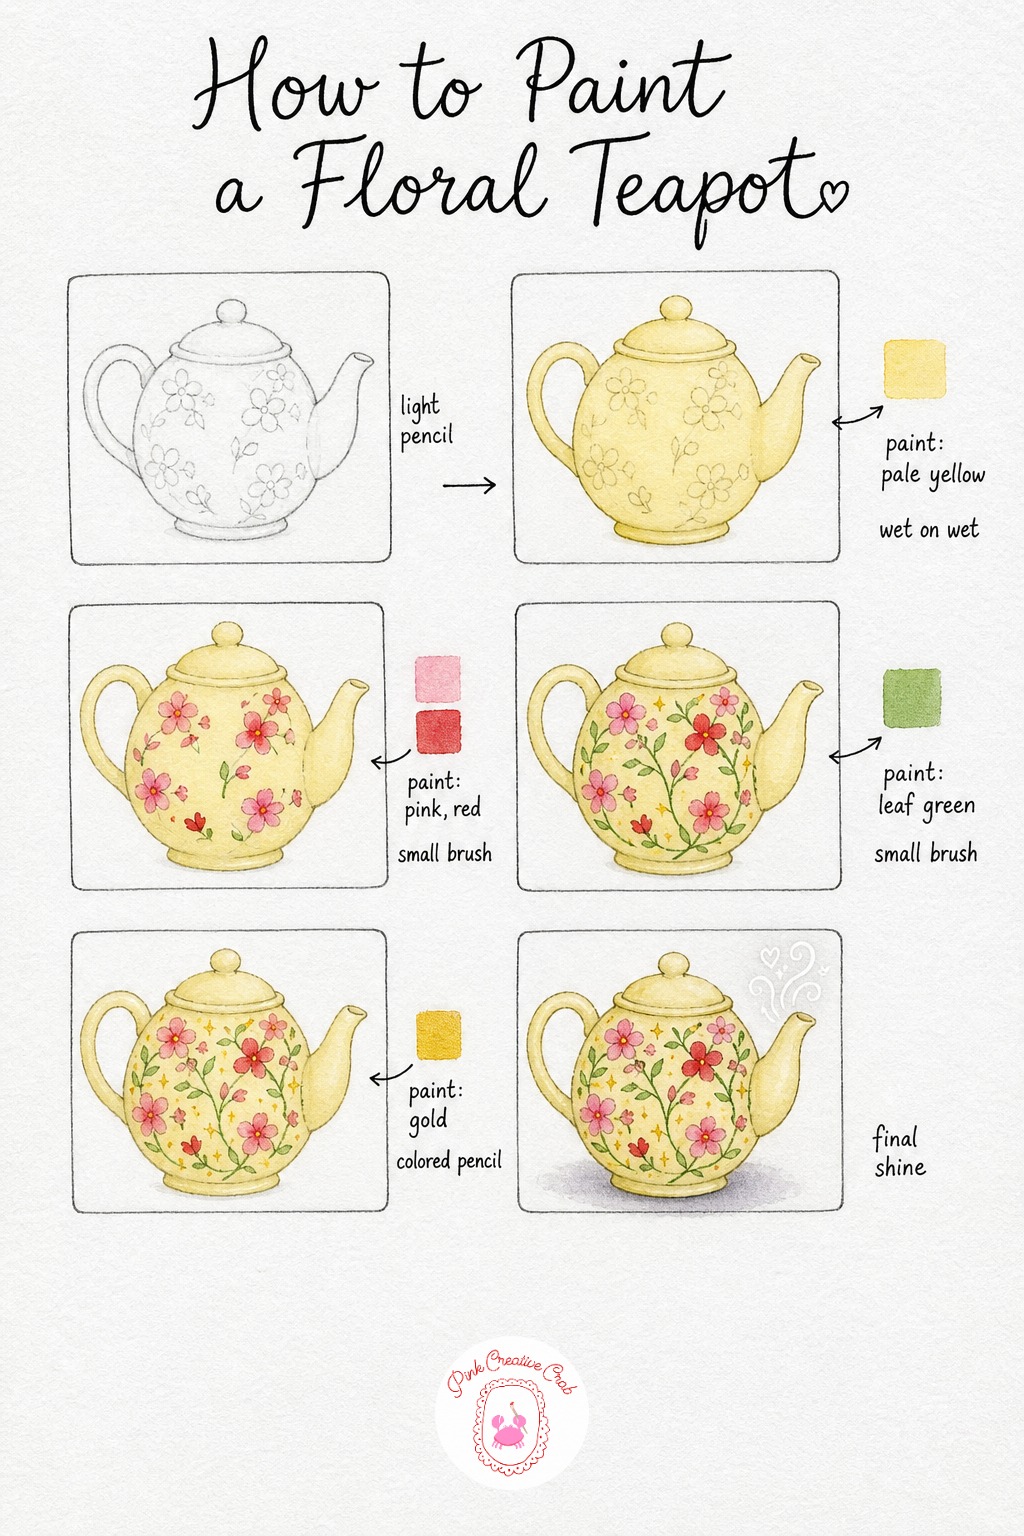
Draw the teapot body rounded and friendly, with a gentle spout curve, a loop handle and a small lid, and keep the pencil light since florals will cover most of the surface. This is the fussiest teapot in the set, so give yourself a little extra time with the flower placement in pencil before paint goes anywhere.
Wash pale yellow over the whole pot as a warm base that will glow softly under the florals once they go on. Once fully dry, paint small floral clusters scattered across the body in pink and red, working with a small round brush and letting each flower stay simple, just a few petal strokes around a center dot.
Connect the flowers with thin green stems and small leaves once the petals are dry, keeping the lines loose rather than rigid. Add gold sparkle dots scattered between the blooms with colored pencil, then close with white gel pen steam lines rising above the spout and a soft shadow beneath the base.
If the florals start to look crowded, leave a few bare yellow patches between clusters, since the breathing room actually makes the pattern read more clearly.
Cottage Tea Table Scene
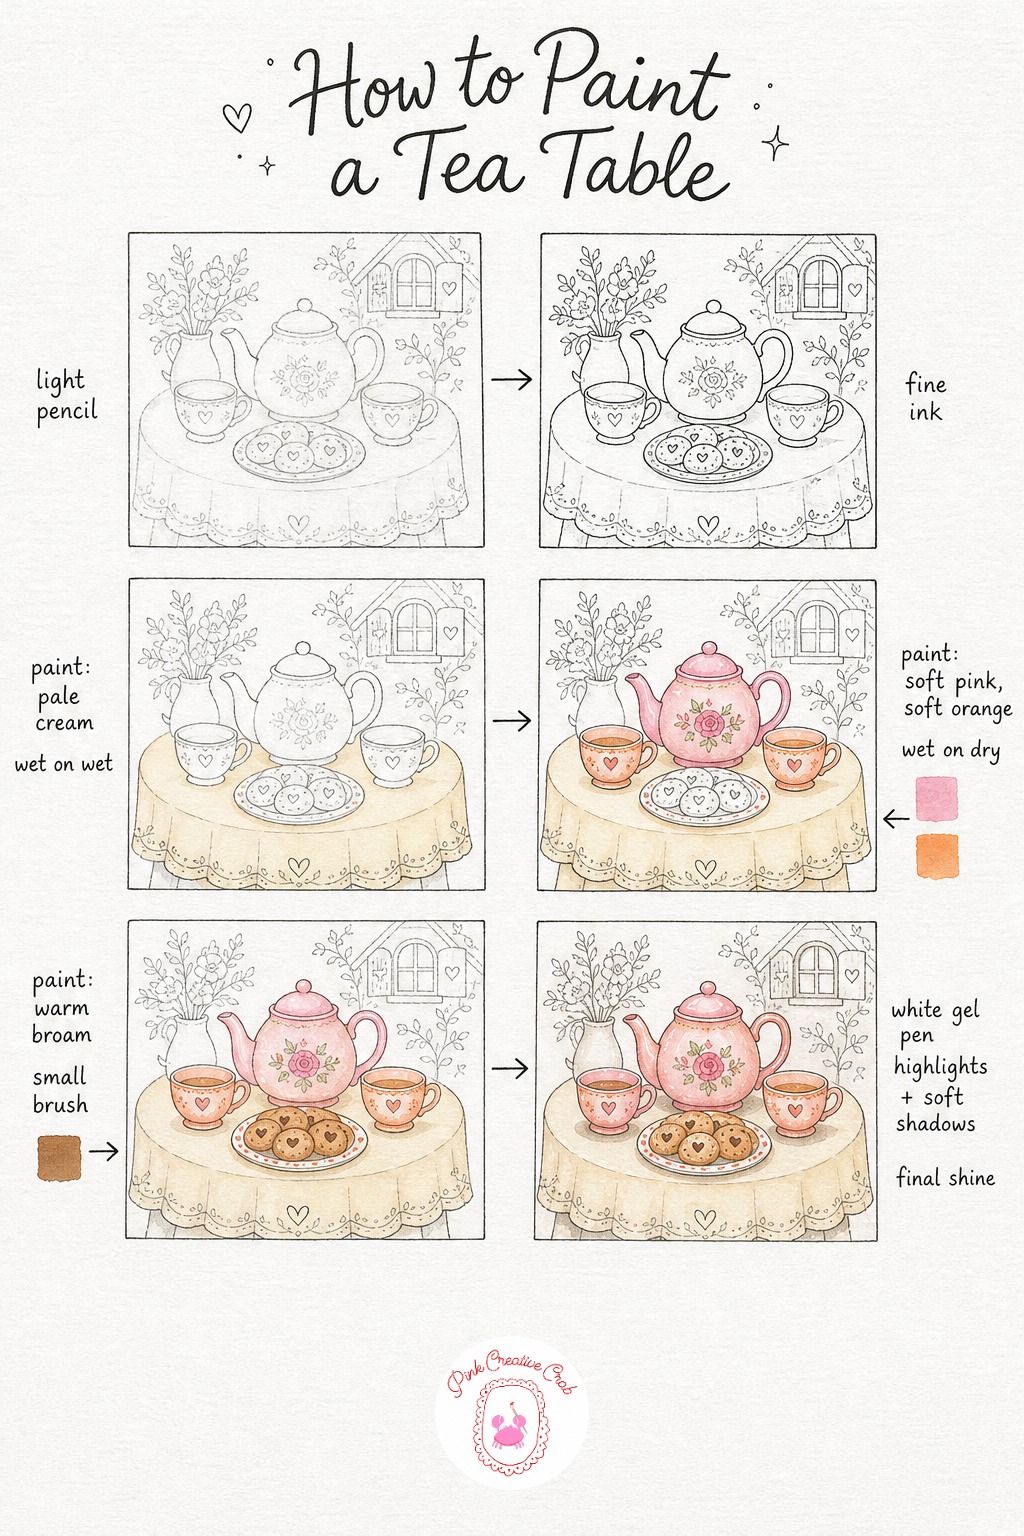
Sketch a small round table first, then arrange a teapot, two teacups and a plate of cookies across its surface, keeping everything close together so the whole scene reads as one cozy gathering. Trace the full arrangement in fine black ink once the layout feels balanced, letting the ink carry all the small details from here.
Wash pale cream across the tablecloth area as a soft background that will not compete with the ceramics sitting on top of it. Once dry, wash soft pink into the teapot and a soft orange into both cups, keeping each piece a slightly different shade so the eye can tell them apart at a glance.
Paint the cookies on the plate in a warm brown wash, letting the color pool a little at the edges for texture. Finish the whole scene with white gel pen highlights across every ceramic piece and the cookies, then add soft shadows beneath each object so the table feels grounded. If you enjoy building small painted scenes like this one, the layouts in our picnic drawing lessons follow a similar cozy approach.
Keep the pattern work on each piece simple here, since the scene already has five objects competing for attention.
Striped Red Teapot With Lemons
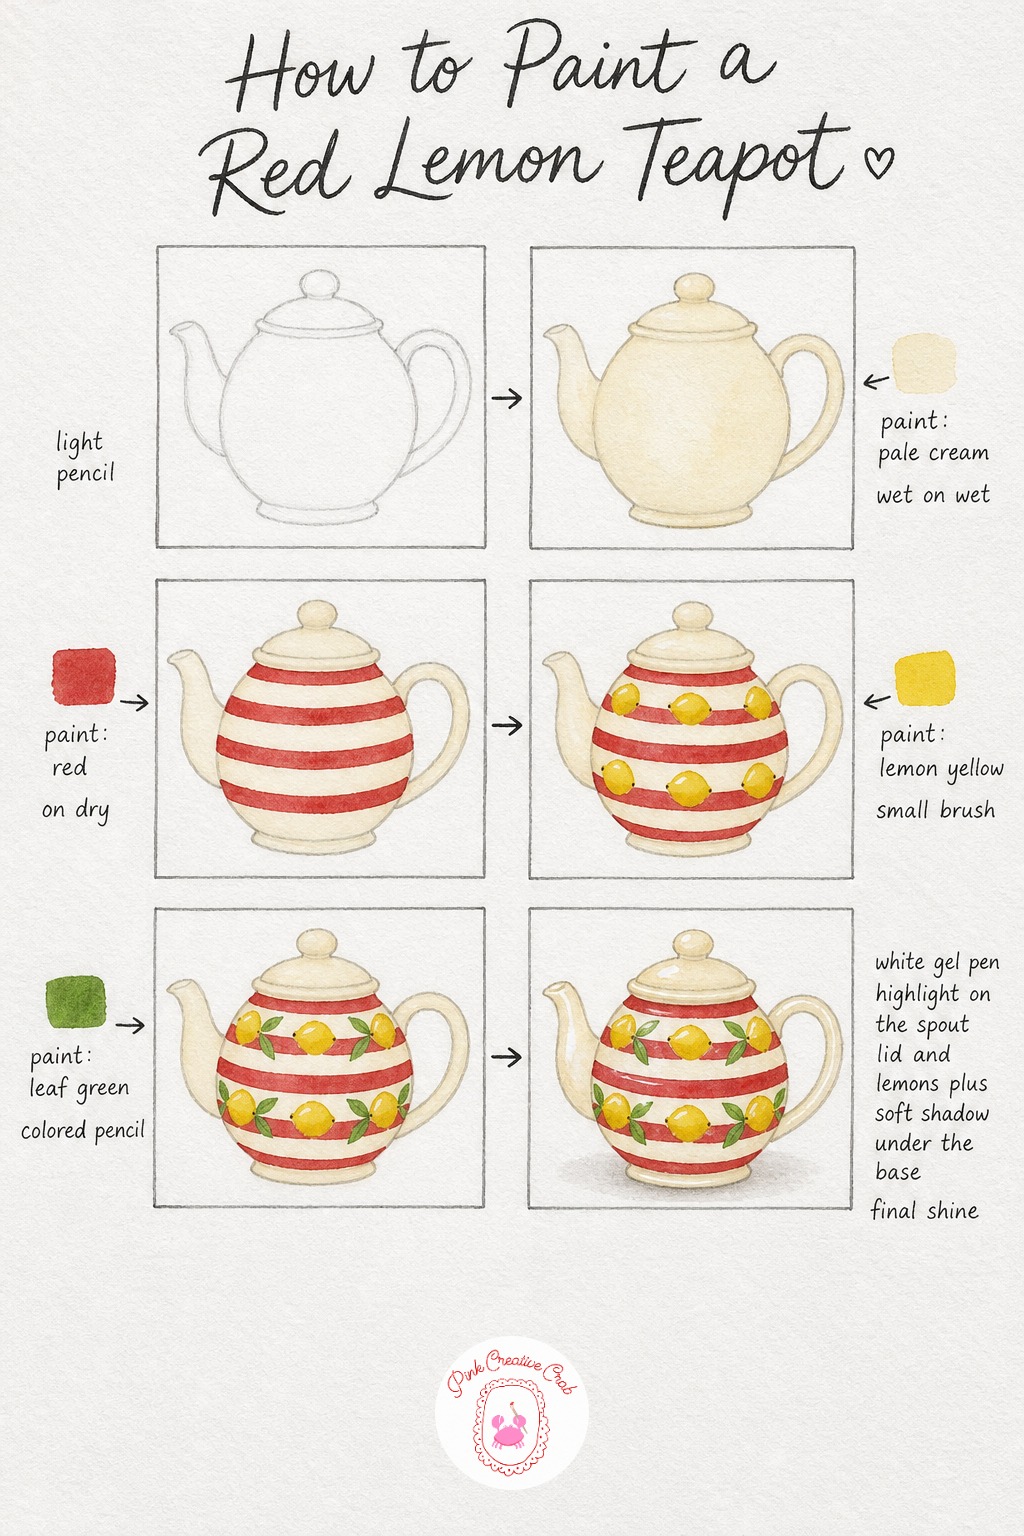
Sketch a rounded teapot body with a curved spout, simple handle and small lid, keeping the pencil light since horizontal stripes will sit right over this line. This bold red and yellow pairing feels like a sunny cousin to the blue and white lemon teapot earlier in this set.
Wash pale cream over the whole pot and let it dry fully before stripes go on, since horizontal bands need a dry, settled surface to stay crisp. Paint red stripes evenly around the body, spacing them by eye and letting them curve gently with the shape of the pot rather than running perfectly straight.
Add small lemon shapes tucked between the stripes in bright yellow once the red is dry, keeping each lemon simple and slightly flattened on one side. Add thin green leaves beside each lemon with colored pencil, then finish with white gel pen shine on the spout, lid and lemon skins and a soft shadow beneath the base.
If stripes and lemons start to overlap awkwardly, plan lemon spots in light pencil before the stripes go on so you know exactly where to leave gaps.
Pastel Teapot With Bow
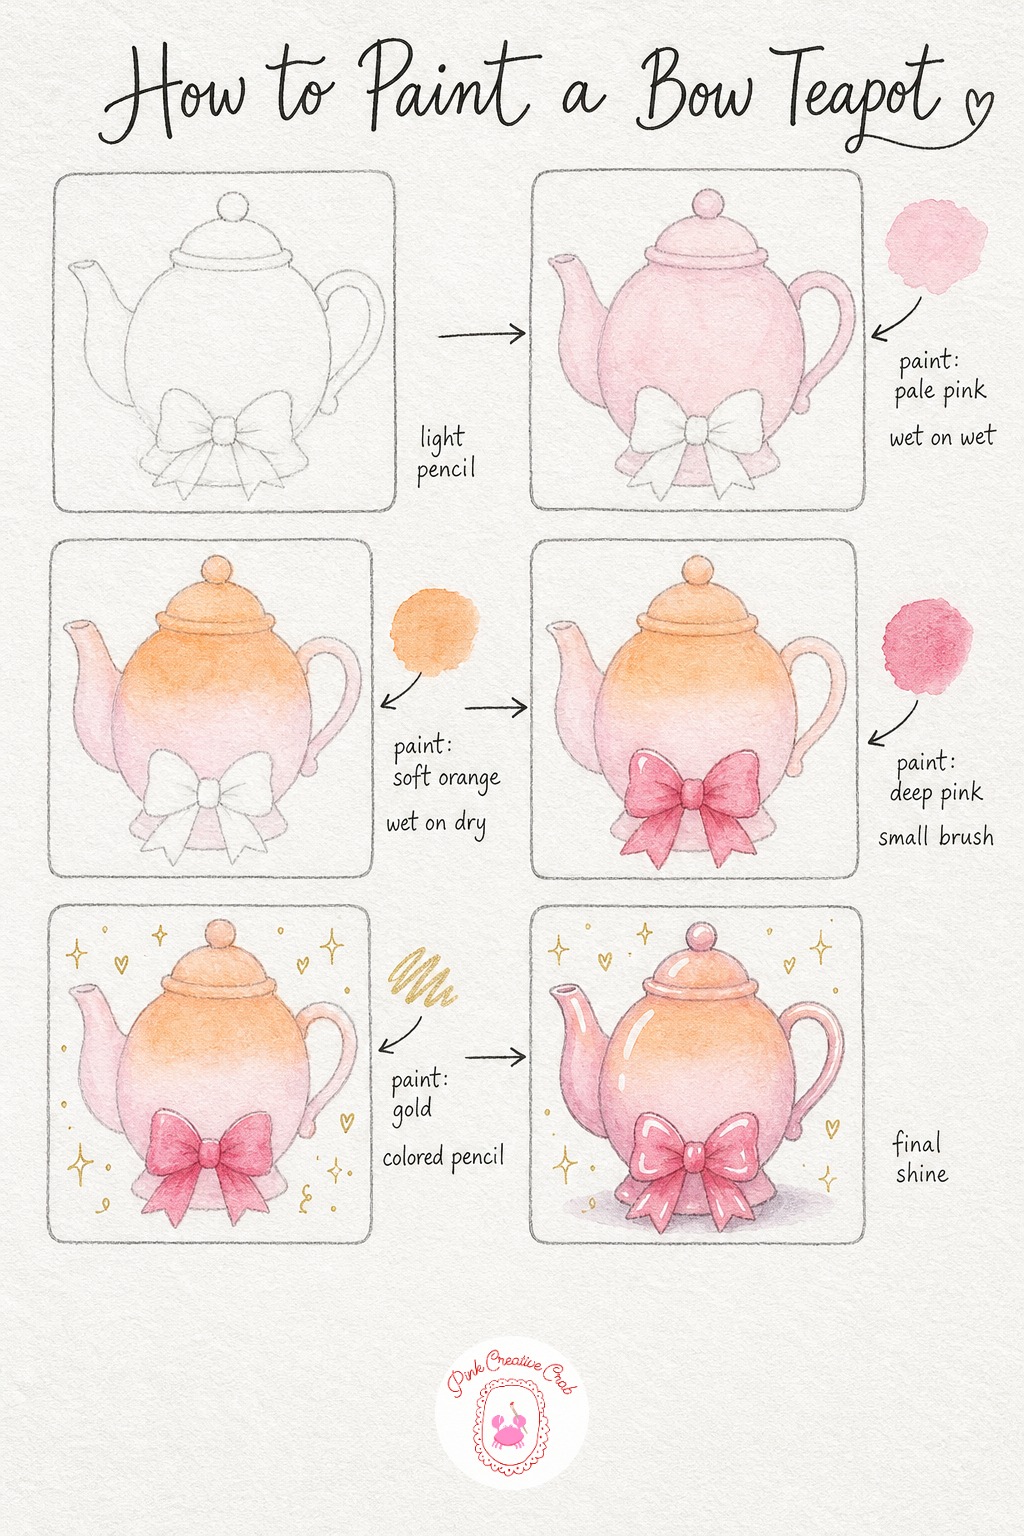
Draw the teapot body rounded and soft, with a small curved spout, loop handle, domed lid and a little bow shape tucked at the base where it meets the table. Keep the bow simple, just two loops and a short tail, since it reads clearly even at a small size.
Wash pale pink across the whole body first and let it dry, then layer a soft orange wash over the top half near the lid so the two colors blend gently where they meet. This two tone approach gives the pot a soft, almost sunset like glow without any hard pattern lines competing for attention.
Paint the bow at the base in a deeper pink once the body washes are dry, keeping the brushwork loose and a little textured for a ribbon like feel. Scatter gold sparkle marks and squiggles around the teapot with colored pencil, then finish with white gel pen shine on the spout, lid and bow and a soft shadow beneath the base.
If the two washes blend into a muddy patch, let the pink dry fully before the orange goes on, since wet over wet is what causes the muddiness here.
Teapot and Teacup Pair
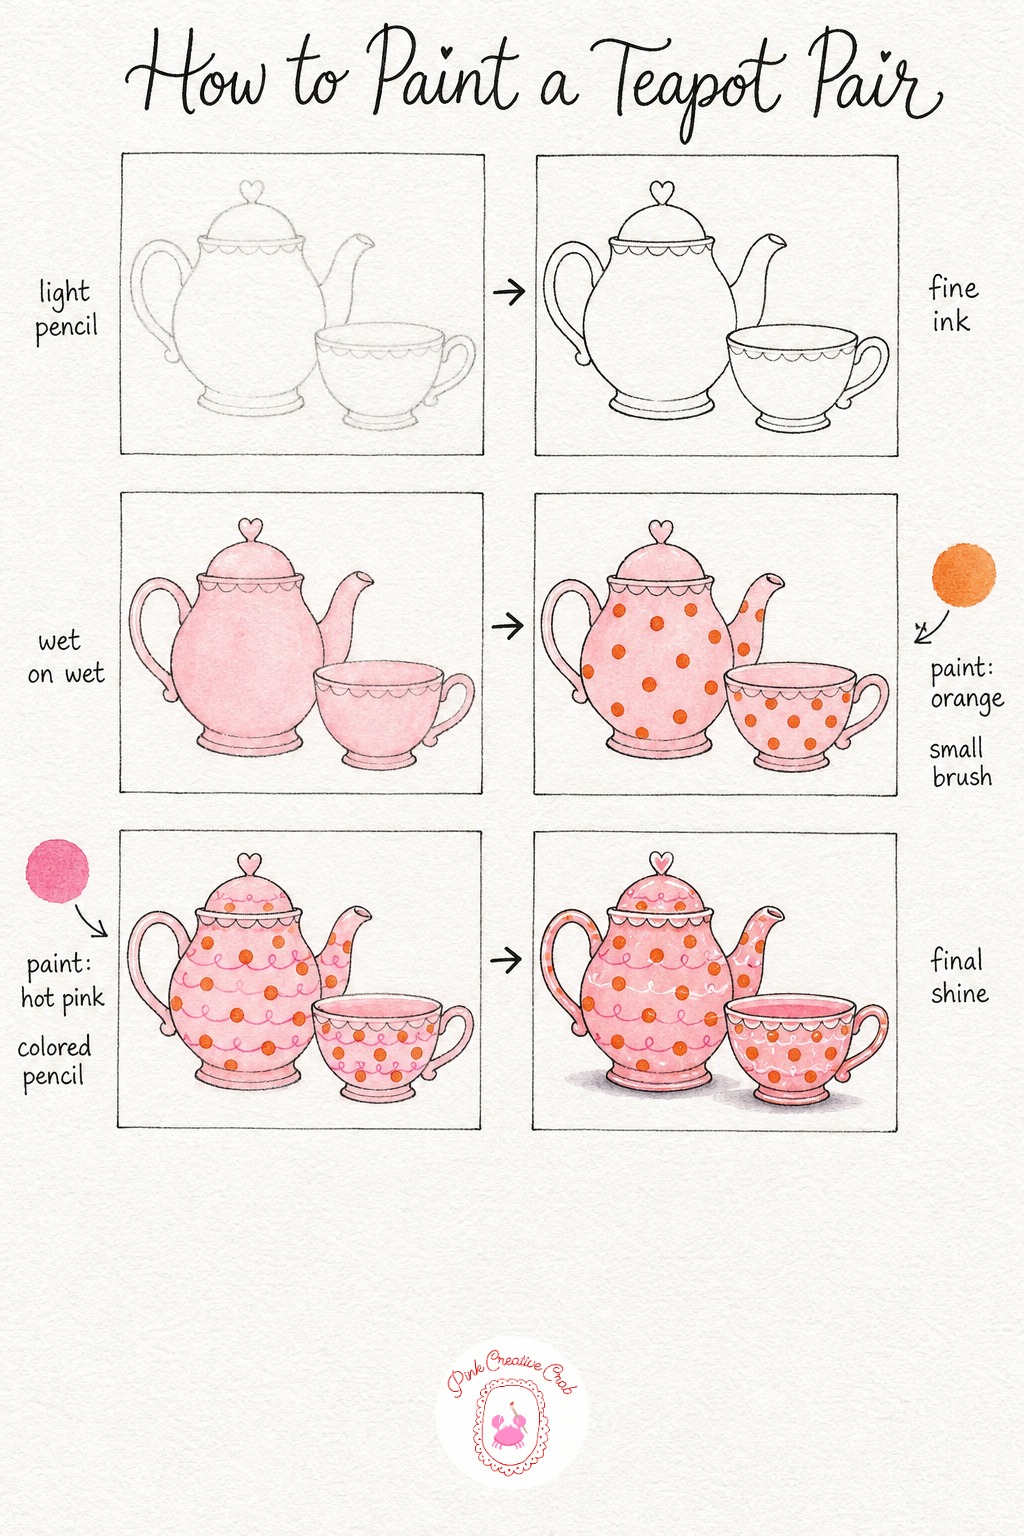
Sketch the teapot and its matching teacup sitting close together, keeping the cup smaller and set slightly in front so the pair reads as one set rather than two separate drawings. Trace both shapes in fine black ink once the pencil feels right, carrying the same line weight across both pieces so they feel truly matched.
Wash pale pink across both the teapot and teacup together in one pass, since a shared base coat is what makes a pair feel like a pair. Once fully dry, paint matching orange polka dots across both pieces, keeping the dot size and spacing consistent so the set reads as one design.
Add thin pink squiggle lines tucked between the dots on both pieces using colored pencil, then finish with white gel pen shine on the spout, handle and cup rim, plus soft shadows beneath each piece to settle them on the page. If you enjoy pairing small painted objects like this, our easy step by step drawing ideas have more cozy little pairings to try next.
Keep the dot pattern identical on both pieces, since matching detail is what sells the idea of a set.
What to Do Next
Pick whichever teapot, mug or teacup is calling to you today, set out your paints and paper, and paint along one stage at a time until the last shine goes on.
Frequently Asked Questions
What paper works best for teapot drawing with watercolor and colored pencil?
A cold press watercolor paper around 140 pound weight works best, since it holds up to wet washes without buckling and still takes colored pencil cleanly on top once dry.
Do I need to know how to paint patterns before trying these teapots?
No, every pattern here breaks down into simple repeated shapes like stripes, dots and small flowers, and the step by step order shows exactly when each one goes on.
How do I keep my watercolor washes from looking muddy on something this small?
Mix your paint looser than feels natural and let each wash dry fully before the next one goes on, since layering wet paint over wet paint is what causes muddiness on small shapes.
Can I skip the colored pencil and paint the whole teapot in watercolor only?
Yes, you can paint the pattern details in watercolor with a very small brush instead, though the colored pencil gives crisper lines for tiny hearts, squiggles and sparkle marks.
What if I do not have the exact paint colors shown in a tutorial?
Mix close substitutes from a basic set, since a warm red and yellow make orange, and a touch of blue into pink makes a usable soft purple for any pattern here.
Have any thoughts?
Share your reaction or leave a quick response — we’d love to hear what you think!
-
 0
-
0
-
0
-
0
-
0
-
0


