

Table of Contents
- Before You Start
- Espresso Martini
- Aperol Spritz
- Pink Cosmopolitan
- Champagne Coupe With Bubbles
- Mojito With Mint and Lime
- Whiskey Sour With Cherry
- French 75 Flute
- Pina Colada With Pineapple
- Blue Lagoon Martini
- Negroni on the Rocks
- Margarita With Salt Rim
- Tequila Sunrise
- Gin and Tonic With Lime
- Bellini With Peach
- Rooftop Spritz Scene
- Bar Cart Still Life
- Poolside Mojito Scene
- Candlelit Martini Scene
- Frequently Asked Questions
Cocktail glass drawing is one of those ideas that looks fancy on Pinterest and is actually such a relaxed way to spend an evening with your paints. I love how each glass is really just a few clean shapes, a wash of transparent color and a couple of white highlights, and suddenly you have something that looks like it belongs on a cocktail menu.
Below you will find eighteen different drinks, from a classic espresso martini with its coffee beans to a champagne coupe fizzing with bubbles. Each one comes as one worksheet that walks you from the first pencil outline to the finished glass, so you can pick whichever drink matches your mood and paint along today.
Using these images: free for personal projects such as printing, coloring, cards, journals and gifts. Handmade items that include them may be sold up to 30 pieces per design. More than that is commercial use and is not permitted, and neither is selling or sharing the images themselves or passing them off as your own. Please ask before any other use.
Before You Start
- Use real watercolor paper, at least 300gsm, so the glass outlines stay crisp instead of buckling under wet washes.
- Keep your pencil lines light and loose at the sketch stage, since dark graphite will show through pale liquid colors once you paint over it.
- Mix your liquid colors on a scrap paper palette first and let a test swatch dry, because wet watercolor always looks darker than it dries.
- Load your brush with plenty of water for the big glass washes, then switch to a smaller round brush for rims, fruit slices and reflections.
- Let every layer dry fully before adding the next one, or your clean glass edges will bleed into a muddy blur.
- Save the white of the paper for highlights and bubbles rather than painting around them with white paint, and add a white gel pen touch only at the very end.
Espresso Martini
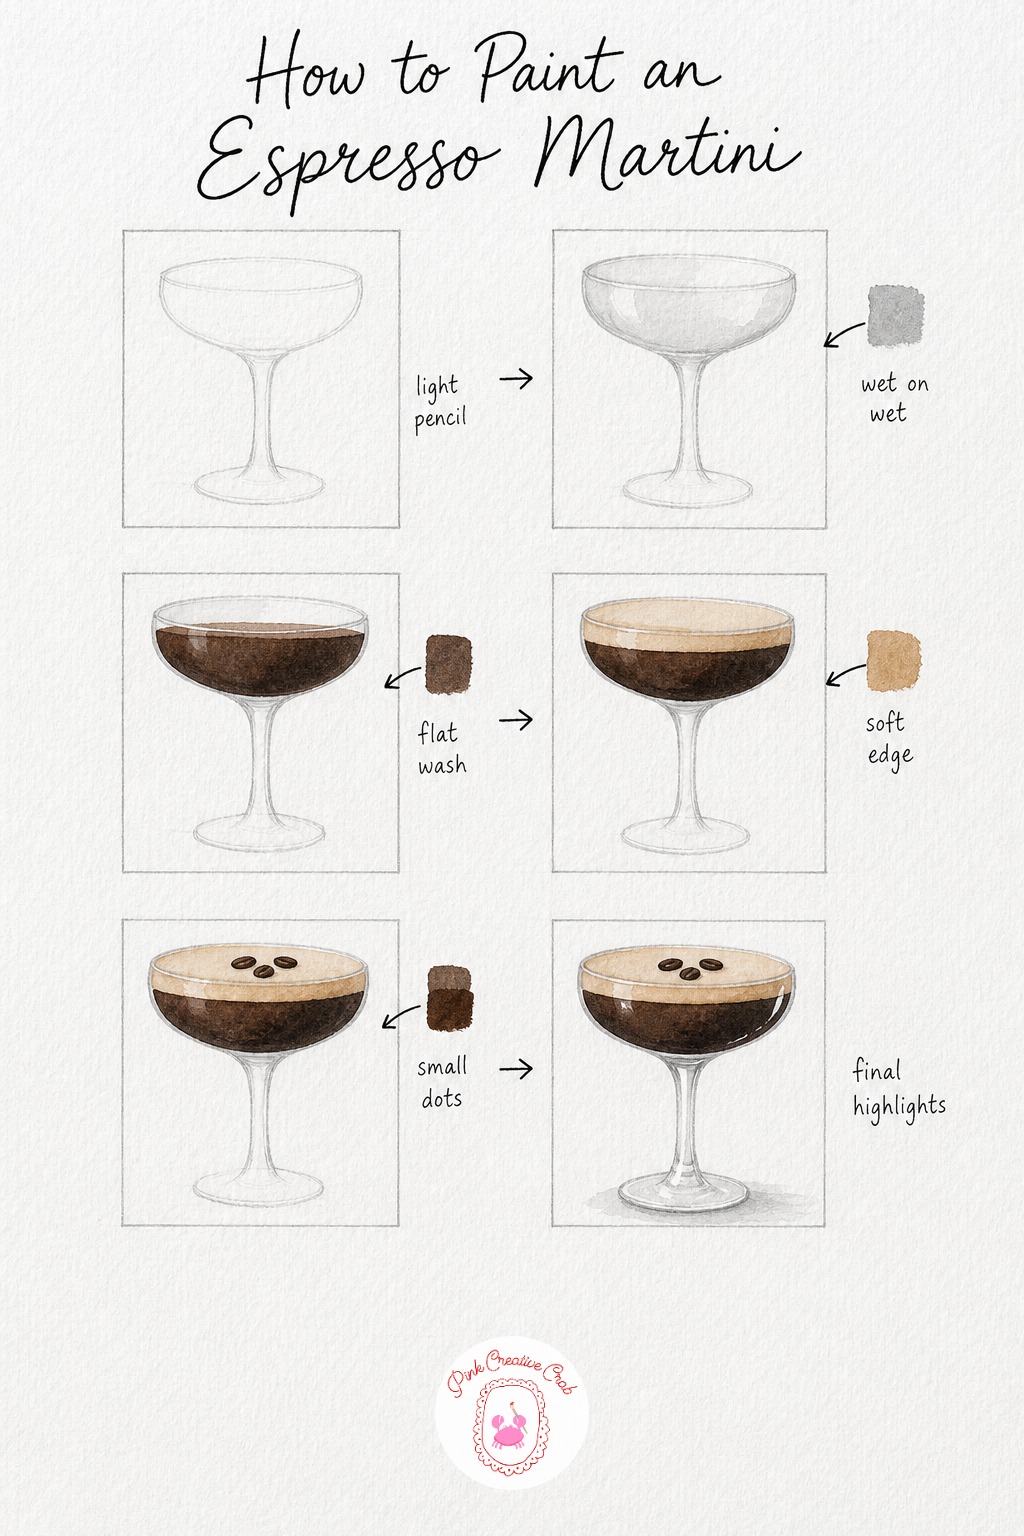
Start this espresso martini with a light pencil coupe, a wide shallow bowl on a slim stem and a small round foot. Keep the glass symmetrical but do not worry about perfection, a slightly wobbly outline still reads as hand painted and charming.
Wash the bowl shape with a very pale grey, just enough pigment to suggest glass rather than color it solid, and let that dry before touching the inside. Drop in the coffee brown wash for the liquid while the paper is dry so the edge against the glass stays clean, then add a lighter tan line just under the rim for the foam.
Paint the three coffee beans last with tiny ovals of dark brown, leaving a thin paper line down the center of each one for that classic bean crease. If your brown looks too flat, mix in a touch of sepia for warmth before it dries completely.
Finish with white gel pen flicks along the stem and bowl edge to catch the light, plus a soft shadow pooling under the base. Keep the shadow loose and transparent so the glass still feels like it is floating.
Aperol Spritz
Sketch a tall wine glass shape in light pencil, wide at the bowl and tapering into a slim stem, with a half circle orange slice perched on the rim. This spritz loves a generous bowl, so let the outline curve out nicely before it narrows.
Wash the glass itself with a thin grey, then once dry fill the liquid area with a lively orange, leaving a few irregular white shapes for ice cubes floating inside. Painting around those white spaces while the wash is still wet keeps their edges soft rather than cut out.
Add tiny circles of a slightly deeper orange here and there for rising bubbles, keeping them small and scattered rather than evenly spaced. The orange slice gets its own deeper wash with a thin unpainted line for the white pith and a few short lines suggesting the citrus segments.
Close with white gel pen sparkles on the ice and glass rim, and a pale shadow under the base to ground the glass on the table. If your orange feels too orange, a tiny touch of burnt sienna warms it toward a true Aperol shade.
Pink Cosmopolitan
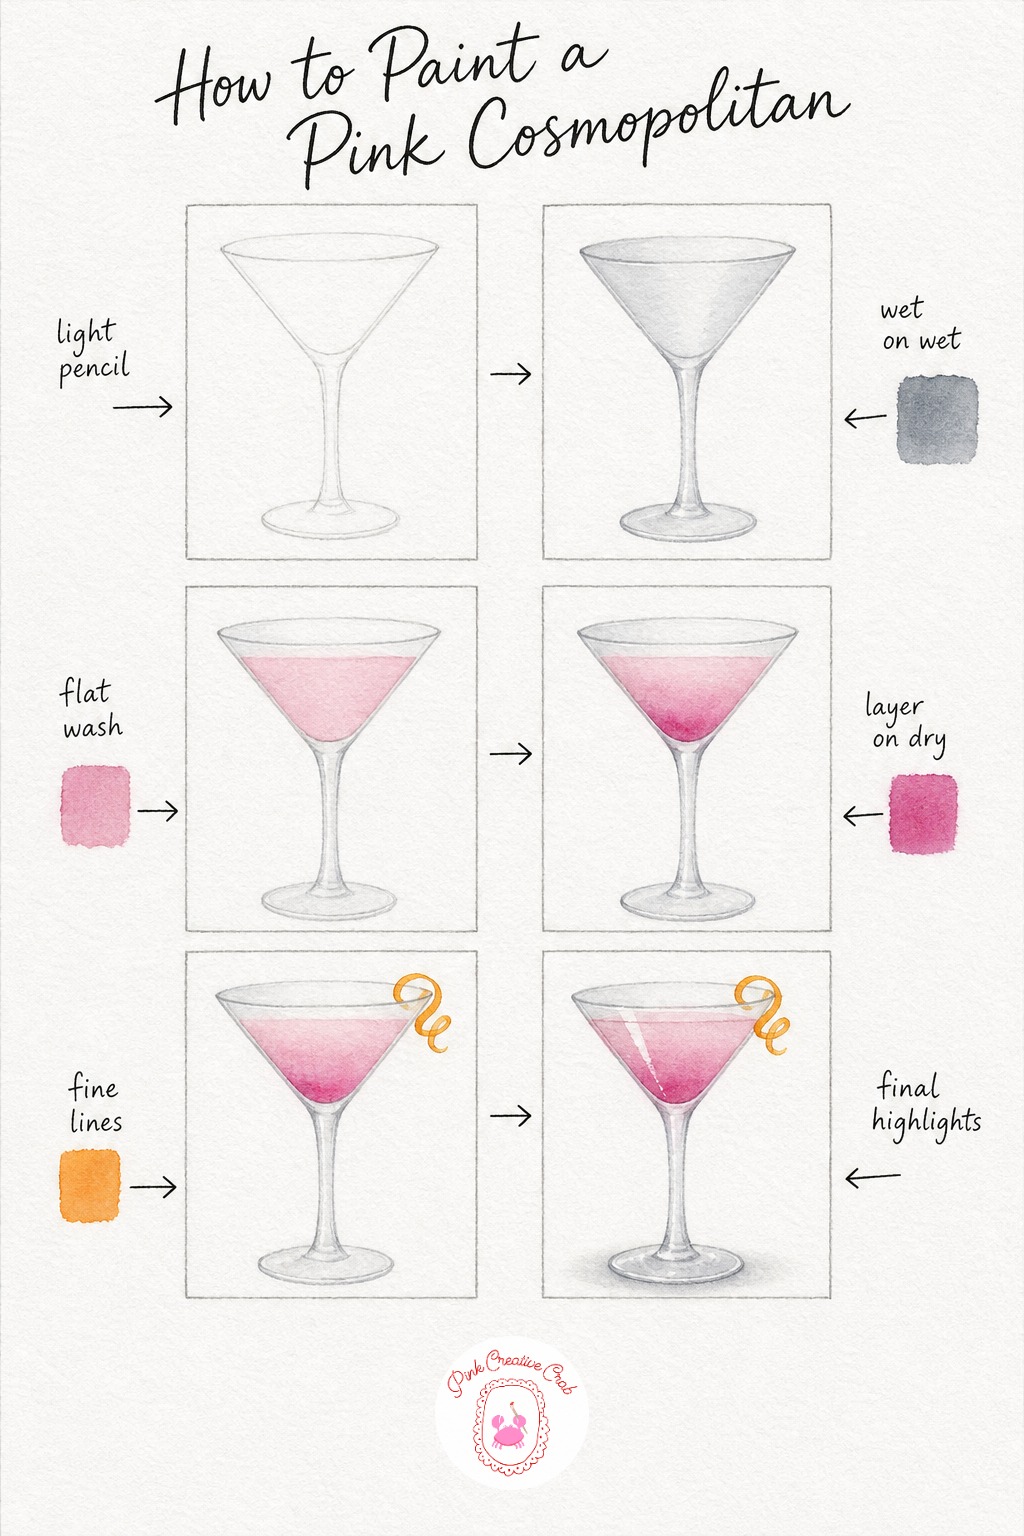
This glass is the trickiest shape here, a wide V tapering to a point, so pencil it in lightly and check the two sides match before you pick up a brush. A long thin stem and small round foot finish the classic silhouette.
Give the glass itself a whisper of grey wash, then once bone dry fill the triangular liquid with a soft pink, pulling the brush confidently from one rim corner down to the point so the wash stays smooth. Avoid overworking this layer, cosmopolitans look best with clean flat color rather than streaks.
While that first pink is dry, glaze a slightly stronger pink across the bottom third of the liquid to suggest depth and light passing through the glass. Add the orange twist above the rim with a fine brush, just a thin curling line, which gives the whole painting a nice pop of contrast.
Finish with a single white gel pen highlight running down the side of the bowl and a soft grey shadow pooling beneath the foot. Keep your pink mix testing on scrap paper first since cosmopolitan pink can turn too purple with too much blue in the mix.
Champagne Coupe With Bubbles
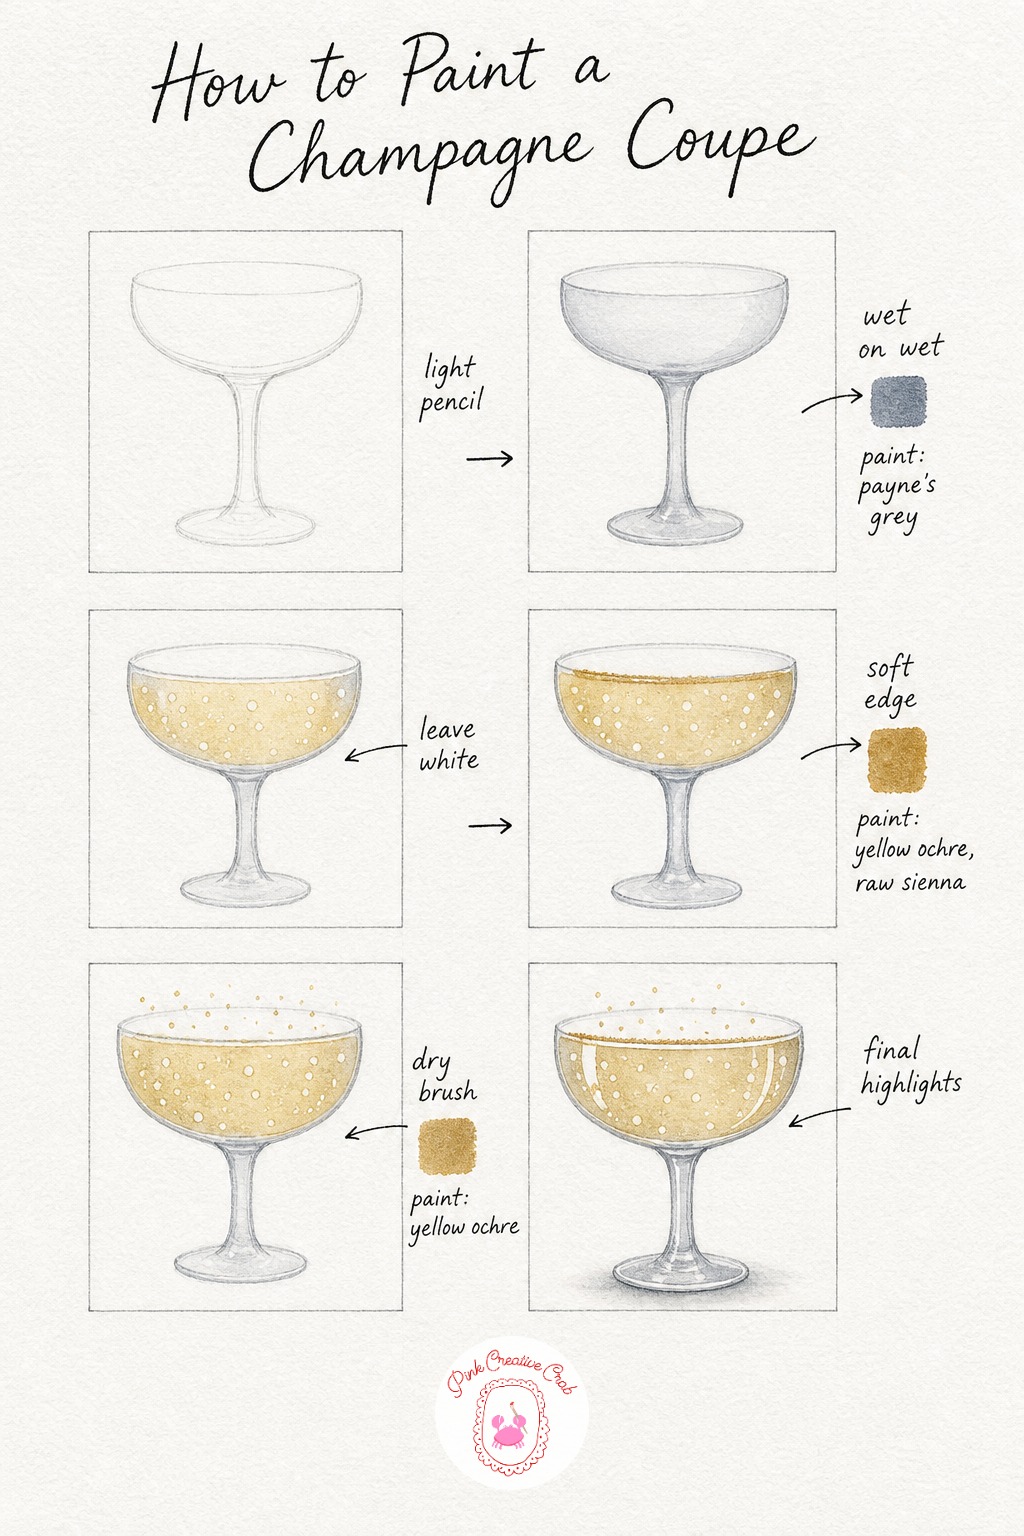
Pencil in the wide, shallow bowl of a coupe glass, rounder and lower than a martini glass, sitting on a slender stem. This is a gentle shape to practice keeping your curves smooth on the first pass.
Wash the glass itself with the lightest touch of grey so it still reads as clear glass, then let it dry fully. Fill the liquid with a pale golden wash, dabbing out tiny circles with a damp clean brush or simply painting around small reserved white dots to suggest rising bubbles.
Add a slightly stronger gold line just under the rim where the surface of the champagne catches the light, and scatter a handful of tiny gold dots above the liquid line, inside the empty part of the glass, for bubbles still floating up. Keep these dots small and uneven, real bubbles never line up neatly.
Finish with crisp white gel pen highlights along the curve of the bowl and down the stem, plus a soft transparent shadow under the foot. If your paper tears from dabbing out bubbles, switch to the reserve method and simply paint around small white circles instead.
Mojito With Mint and Lime
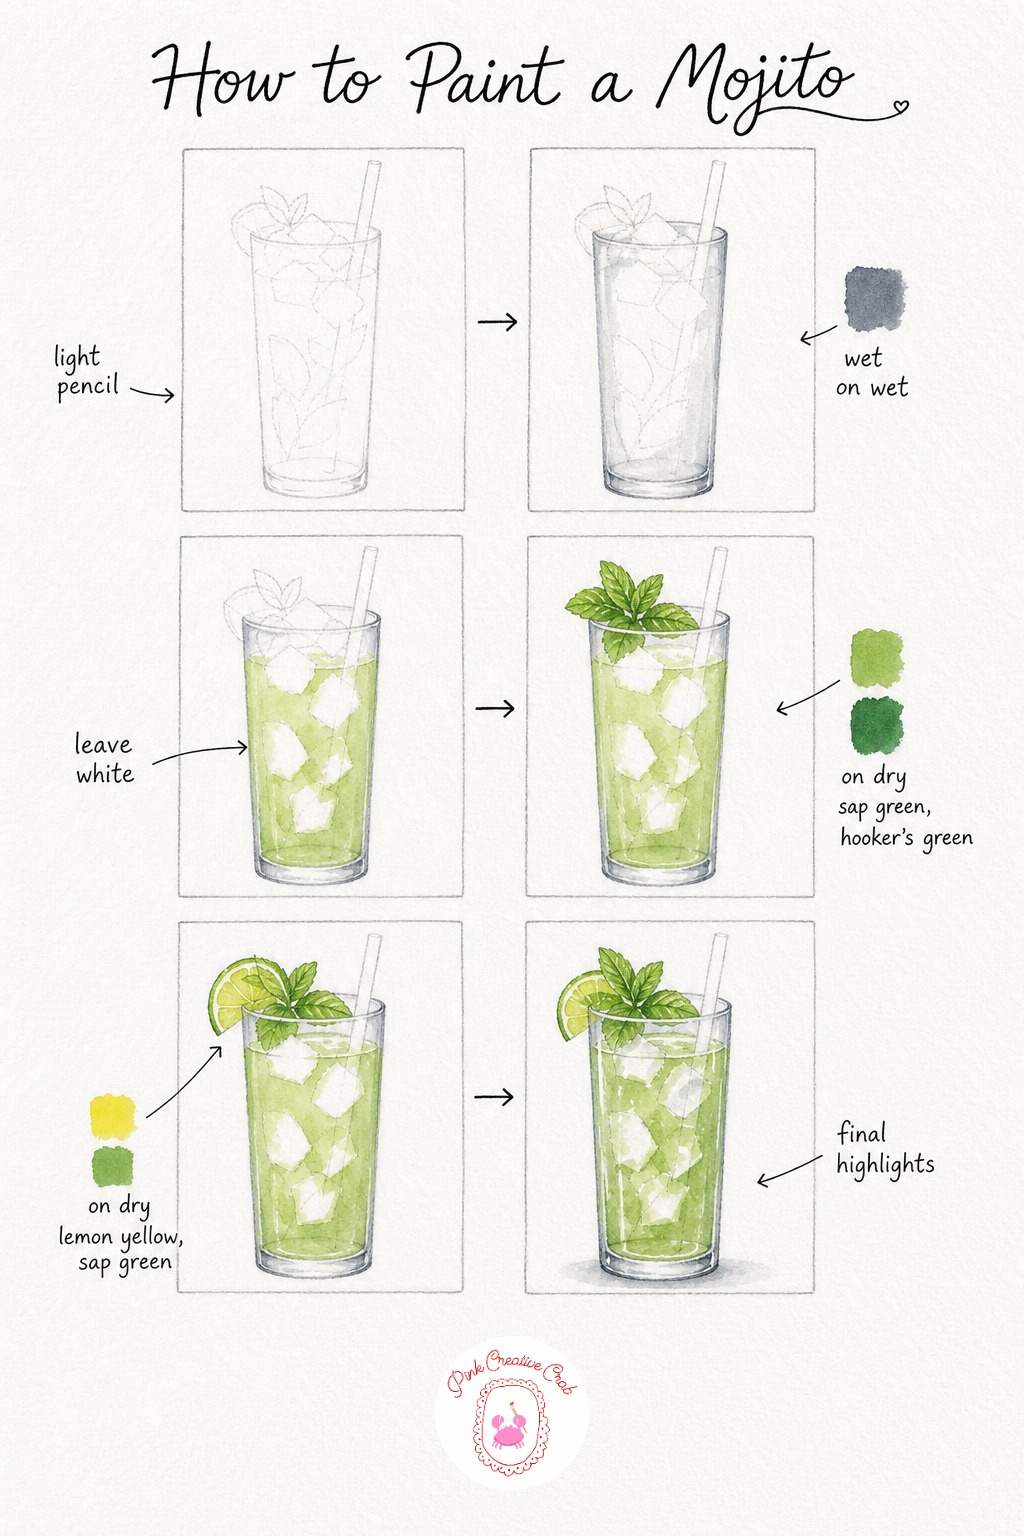
Sketch a tall straight glass in light pencil with a simple straw leaning out of the top, keeping the sides parallel so the glass does not look like it is tipping over. A mojito glass is forgiving since straight lines are easier than curves.
Wash the glass with a thin grey, working carefully around the straw shape so it stays white paper for now. Once dry, fill the liquid with a lively green wash, leaving a few white gaps of various sizes for ice cubes, similar to the spritz technique.
Paint two or three mint leaves tucked near the rim using a brighter green, then while still slightly damp drag a thin dry brush line down the center of each leaf for a simple vein. The lime wedge gets its own small wash of yellow green flesh with a thin unpainted ring for the pith.
Color the straw with a pale stripe of any bright shade you like, pink or yellow works nicely against the green. Finish with white gel pen on the ice cubes and glass rim, and a soft shadow under the base to settle the glass on the page.
Whiskey Sour With Cherry
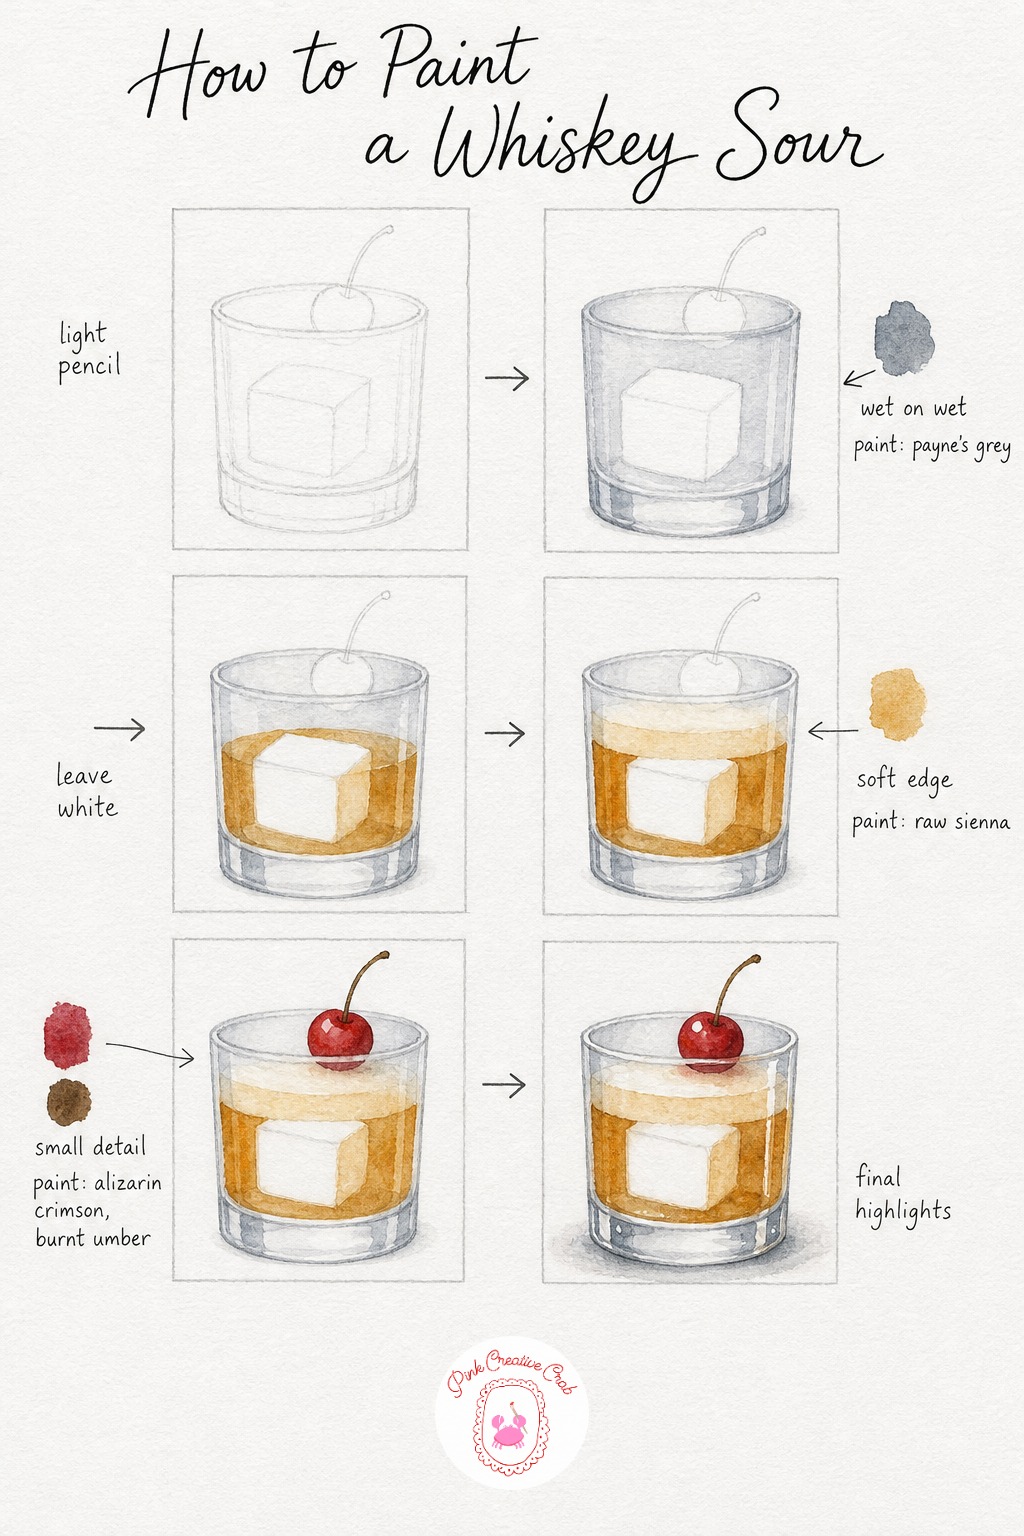
Draw a short, wide rocks glass in light pencil, straight sides and a flat bottom, with a small circle for the cherry balanced right on the rim. This is one of the simplest glass shapes in the whole set, great if you want a quick confidence win.
Wash the glass with a thin grey and let it dry completely. Fill the liquid with a warm amber wash, leaving one big irregular white square or rectangle unpainted in the middle for the ice cube, since whiskey sours always look better with a single bold cube.
Add a pale frothy layer just under where the cherry sits, using a slightly lighter wash to suggest the whipped egg white foam classic to this drink. Paint the cherry as a small bright red circle with a thin curling brown stem on top, and leave one tiny white dot unpainted on the cherry for its shine.
Finish with white gel pen on the ice cube edges and a dot of shine on the cherry, then a soft shadow beneath the glass. If your amber looks too orange, add a touch of burnt umber to deepen it toward real whiskey color.
French 75 Flute
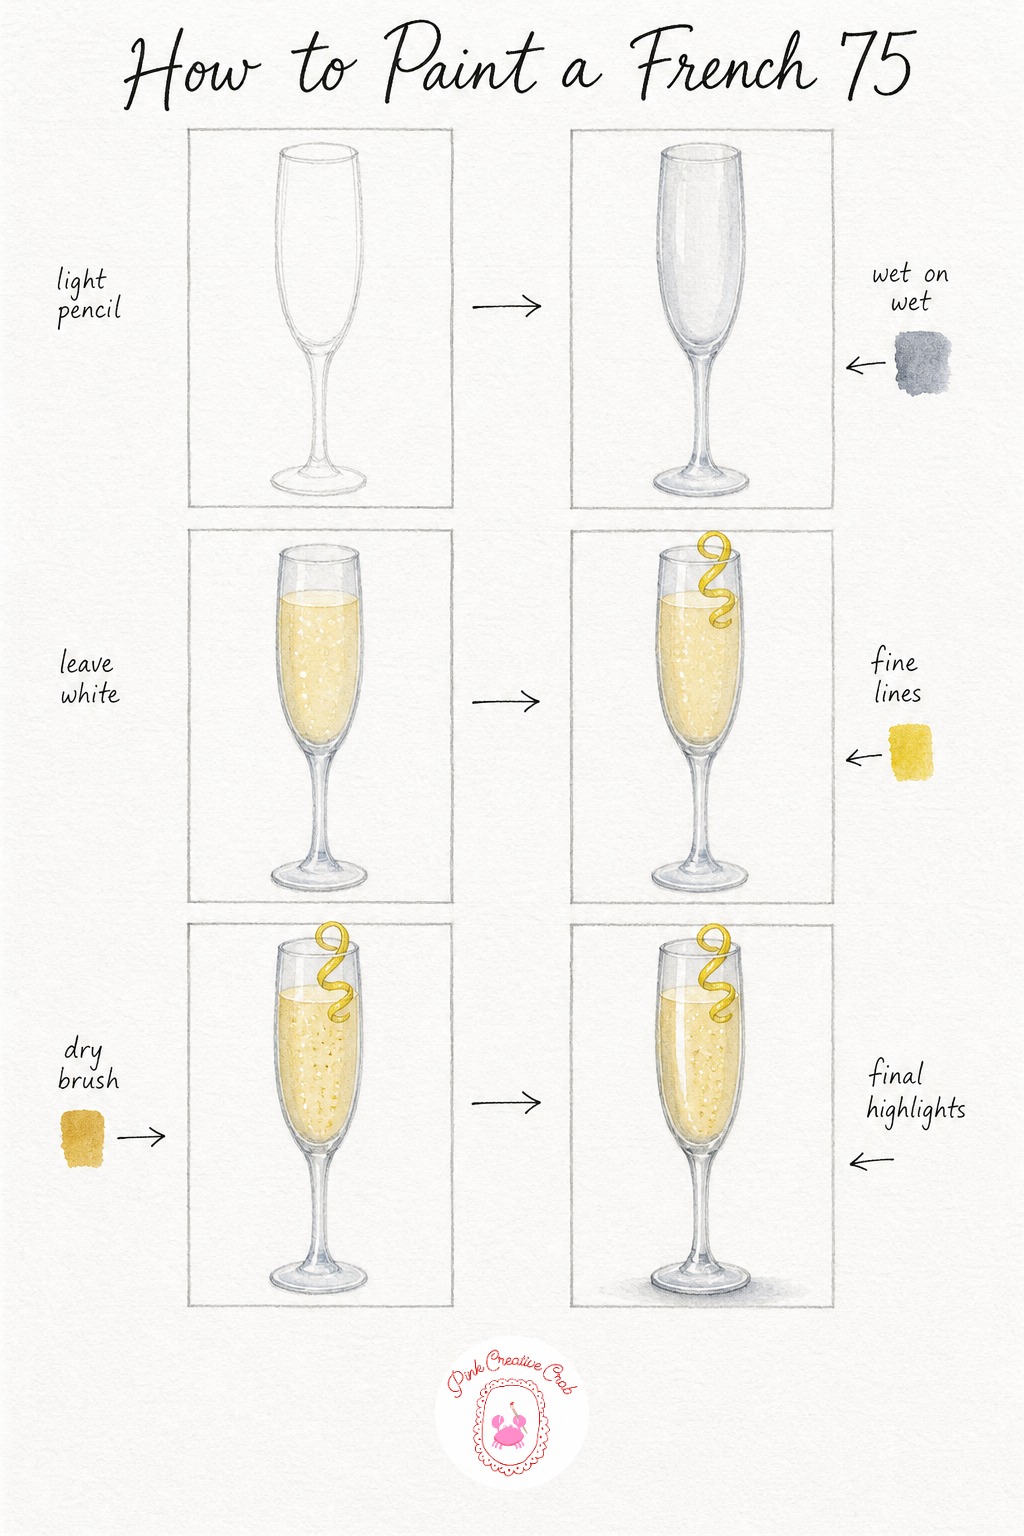
Pencil a tall narrow flute, the tallest glass in this whole collection, so give yourself a generous strip of paper and keep the two side lines running nearly straight and parallel. A ruler is fine for the first guide lines if curves feel tricky today.
Wash the glass with a very pale grey and let it dry, then fill most of the tall liquid shape with a soft gold wash. Because the shape is so narrow, work quickly in one or two brush strokes so the wash stays even without streaking.
Add a thin curling lemon twist just above the rim, a single confident line rather than a thick shape, since the flute itself is already so slender. Scatter a few tiny bubble dots up through the gold liquid, smaller and more frequent near the top where bubbles gather before they pop.
Finish with one clean white gel pen line running the full height of the glass for that glossy reflection, plus a small soft shadow at the base. If your hand shakes on tall straight lines, turn the paper instead of your wrist for a steadier stroke.
Pina Colada With Pineapple
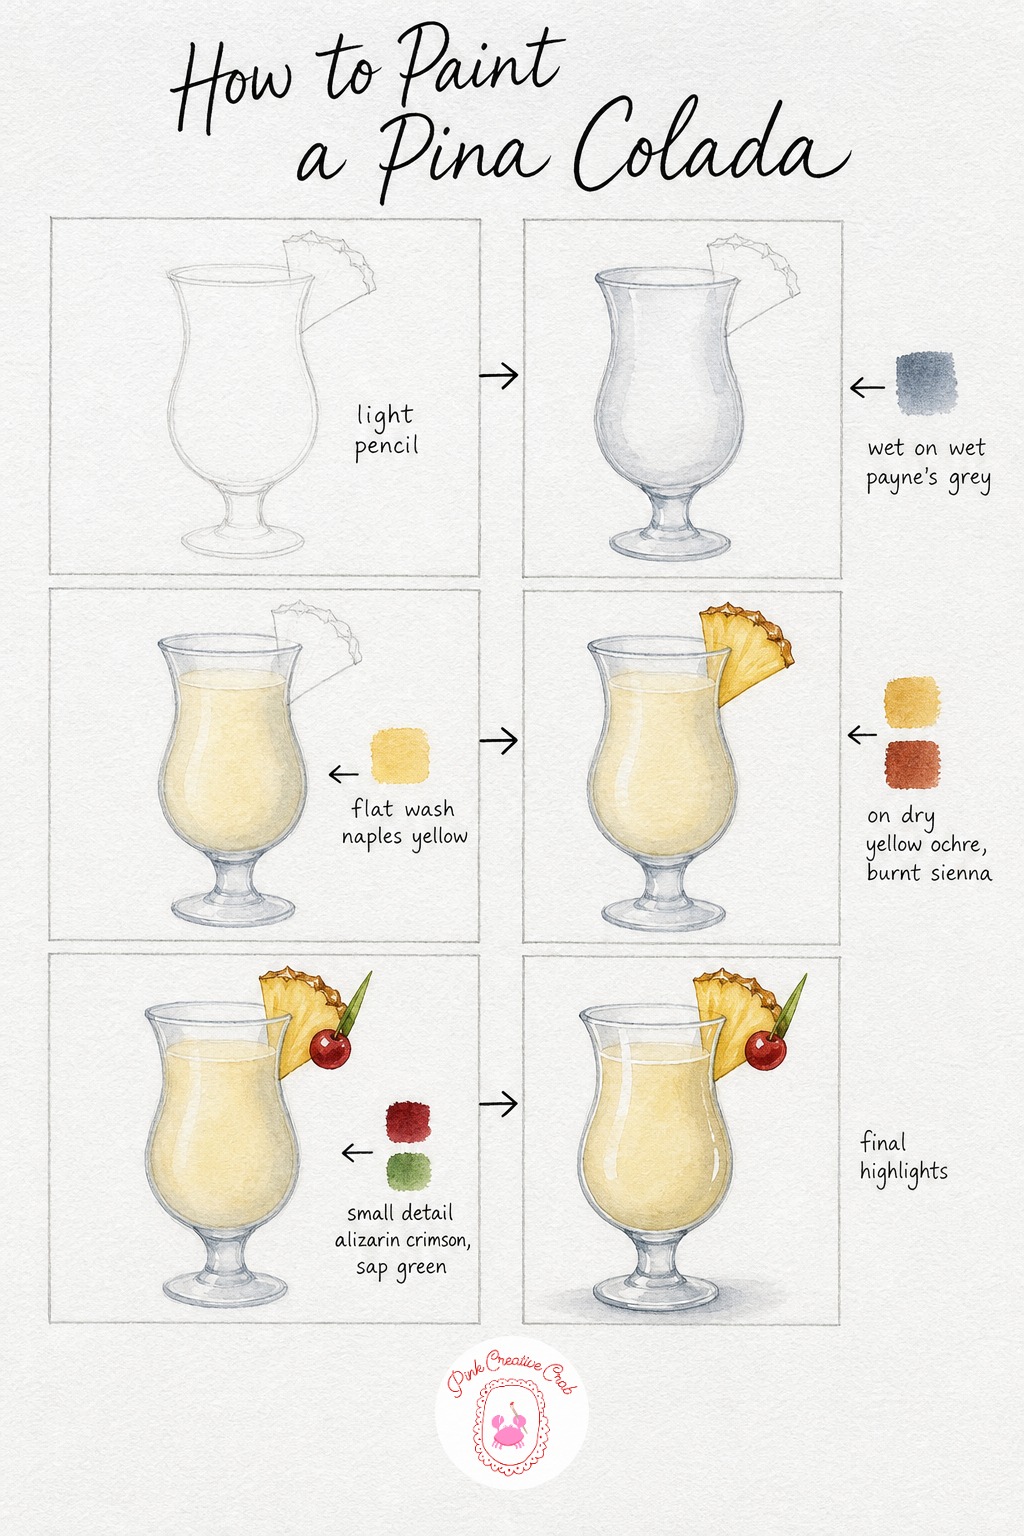
Sketch a curvy hurricane glass, wider at the top and bottom with a pinched waist in the middle, plus a pineapple wedge balanced on the rim. This shape takes a little patience, so draw the center curve first and build the rest around it.
Wash the glass lightly in grey, then once dry fill the whole liquid area with a creamy pale yellow in one smooth even pass, since a pina colada has no ice cubes or bubbles to leave white for. The color should look milky rather than transparent, so use slightly more pigment than you did for the other drinks.
Paint the pineapple wedge with a warm golden wash for the flesh and a short rough textured edge in burnt sienna for the rind, dabbing the brush rather than stroking it smoothly. A small red cherry with a tiny green leaf tucked beside the pineapple adds a cheerful final garnish.
Close with white gel pen highlights running down the curved sides of the glass and a soft shadow under the base. If your yellow dries too pale, layer a second thin wash once the first is fully dry rather than trying to fix it wet.
Blue Lagoon Martini
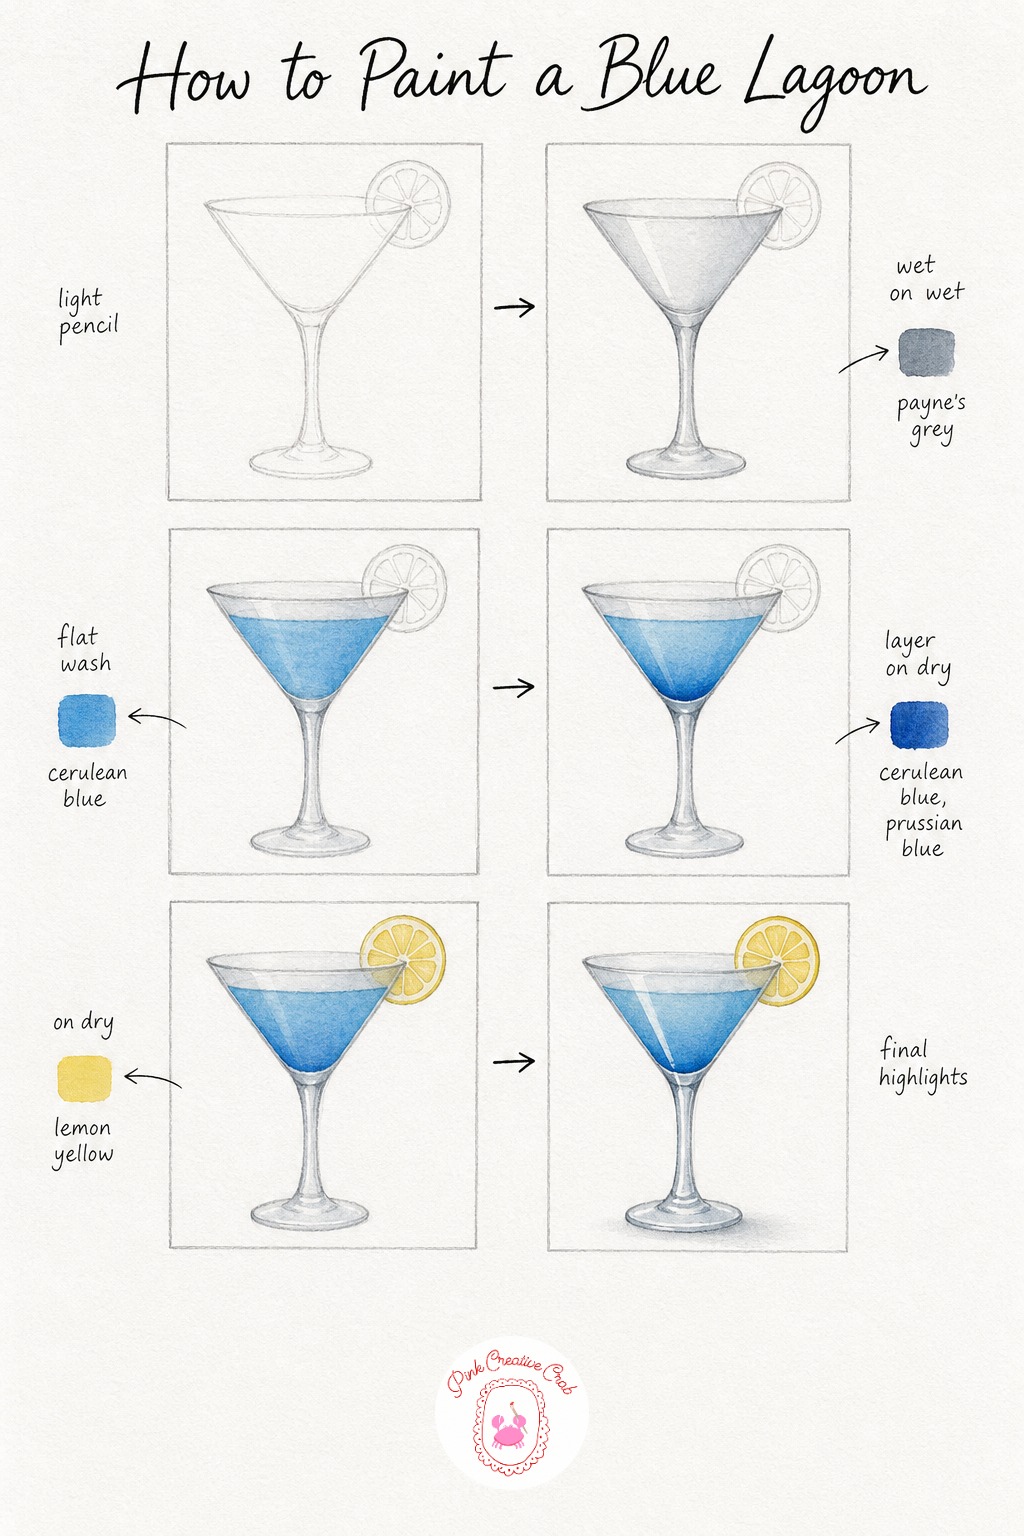
Pencil the classic martini V shape again here, wide rim narrowing to a point, with a thin round lemon wheel resting on the edge. By now this glass shape should feel familiar if you painted the cosmopolitan earlier in the set.
Wash the glass itself with the thinnest grey, then once dry fill the triangle with a clear bright blue, pulling the brush in one smooth stroke from each top corner down to the point. A cocktail this color looks best bold, so do not be shy with the pigment.
While dry, glaze a touch more blue across the lower portion of the liquid for depth, the same trick used on the cosmopolitan. The lemon wheel on the rim gets a pale yellow wash with a few thin unpainted lines radiating out from the center to suggest the citrus segments.
Finish with a single white gel pen streak down the glass for shine and a soft shadow pooling under the foot. If your blue looks flat, a tiny touch of Prussian blue in the shadow glaze gives it more depth without muddying the color.
Negroni on the Rocks
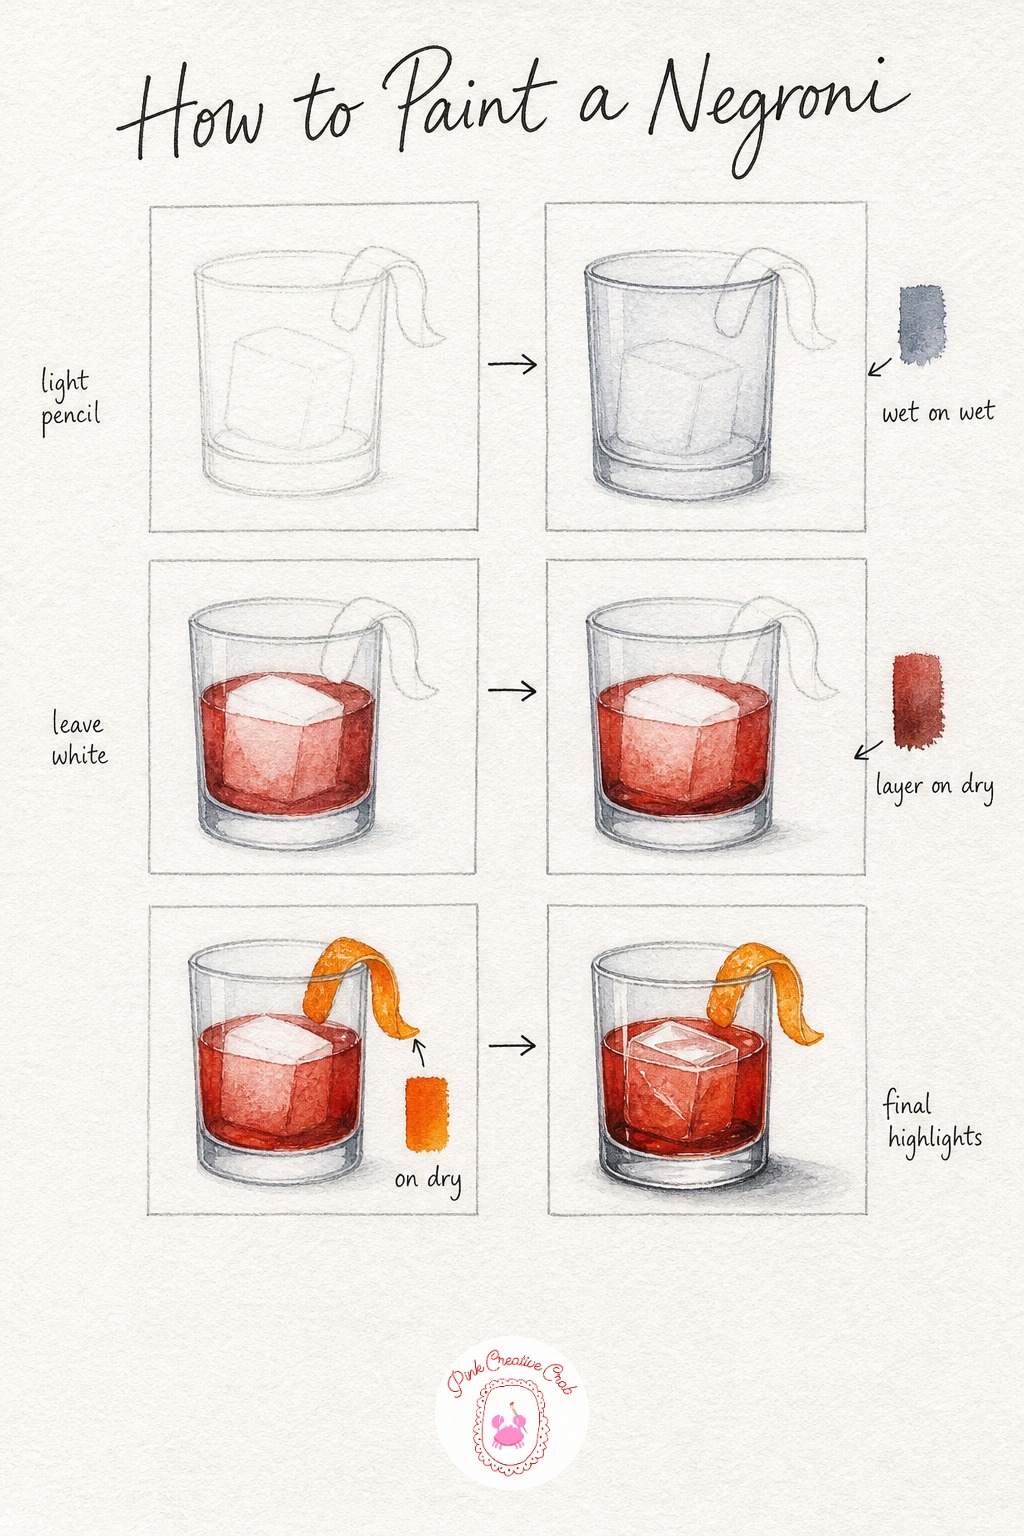
Draw a short wide rocks glass just like the whiskey sour, straight sides and a flat base, with a thin curl of orange peel draped across the rim. The simple glass shape leaves room to focus on getting that rich red color right.
Wash the glass in thin grey and let it dry fully before moving on. Fill the liquid with a deep red wash, leaving one large irregular white shape for the ice cube, the same reserve technique used for the whiskey sour and spritz.
Once that red is dry, glaze a touch more red mixed with a little burnt umber across the lower half of the liquid, which gives the negroni its characteristic deep, almost brick-like tone. Paint the orange peel with a confident curved stroke of bright orange draped over the rim edge.
Finish with white gel pen catching the edge of the ice cube and a small highlight on the glass rim, then a soft shadow under the base. If the red looks too pink, add burnt umber rather than more red to deepen it without losing the glow.
Margarita With Salt Rim
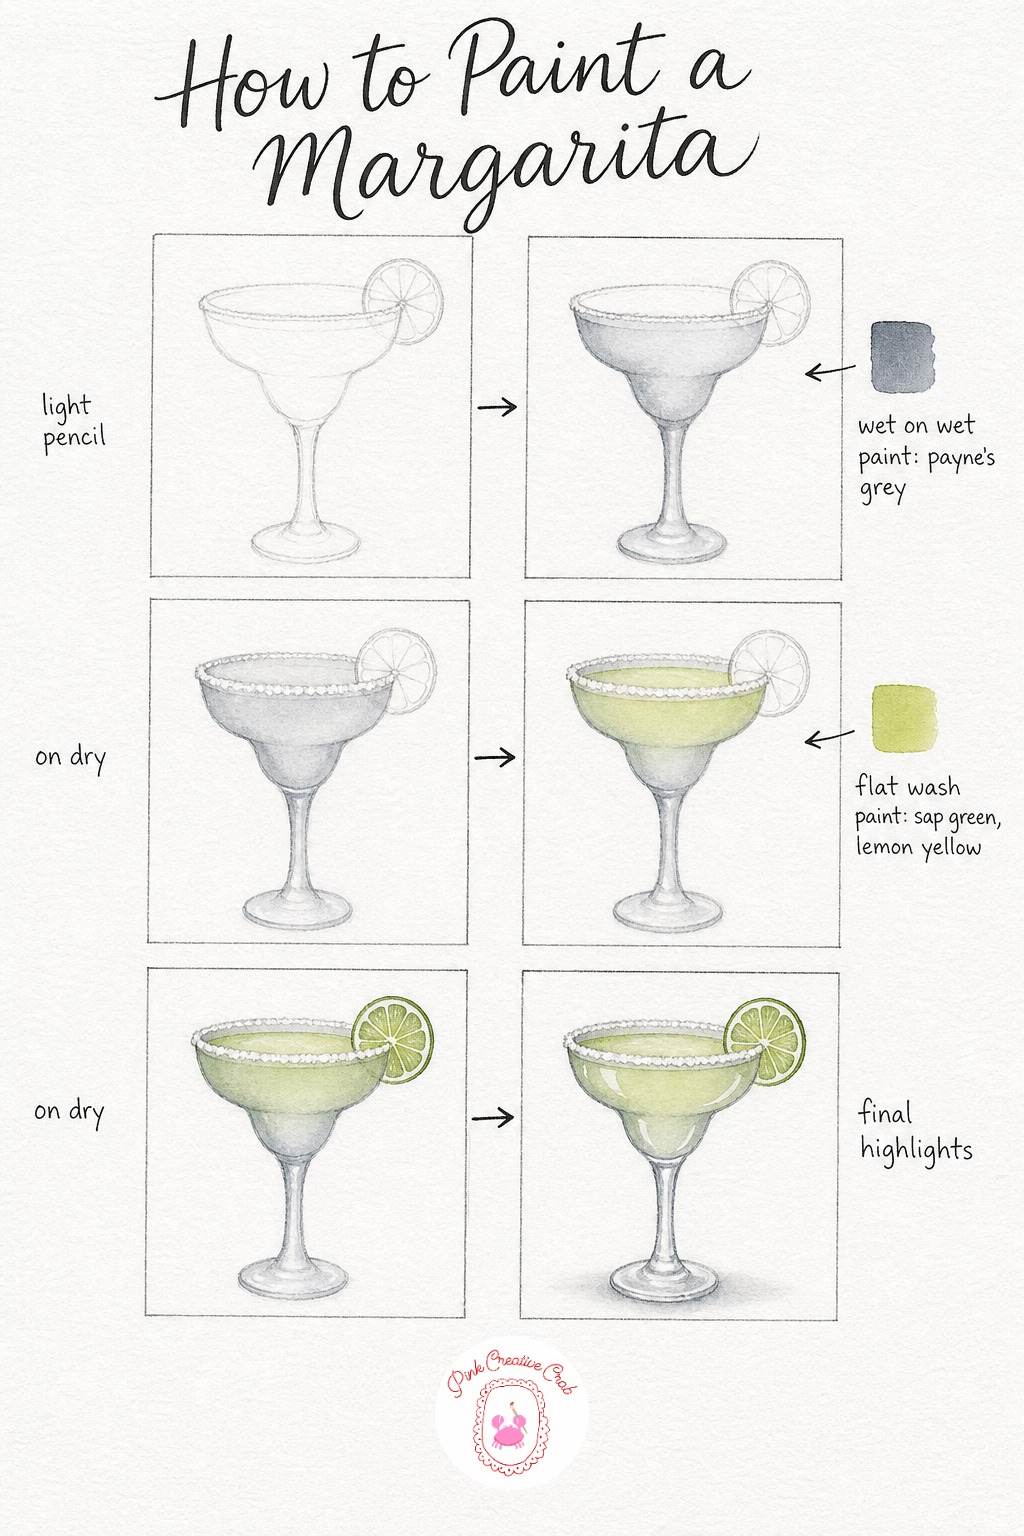
Sketch the wide shallow bowl of a margarita glass on its short stem, a shape somewhere between a coupe and a martini glass. Keep the rim nice and round since the salt detail works best on a clean curved edge.
Wash the glass itself with thin grey and let it dry. Before adding any liquid color, dot white gel pen crystals all around the outer rim edge to suggest the salt, since adding salt texture after the liquid color keeps the dots crisp and separate from the wash.
Once the salt dots are dry, fill the liquid with a pale lime green, mixing sap green with a touch of lemon yellow for that classic margarita glow. Keep this wash light and even rather than deep, margaritas read best pale and fresh rather than dark.
Paint the lime wheel on the rim with a thin green wash and a reserved white ring for the pith, the same approach used for the mojito’s lime wedge. Finish with a white gel pen highlight down the bowl and a soft shadow under the base to ground the glass.
Tequila Sunrise
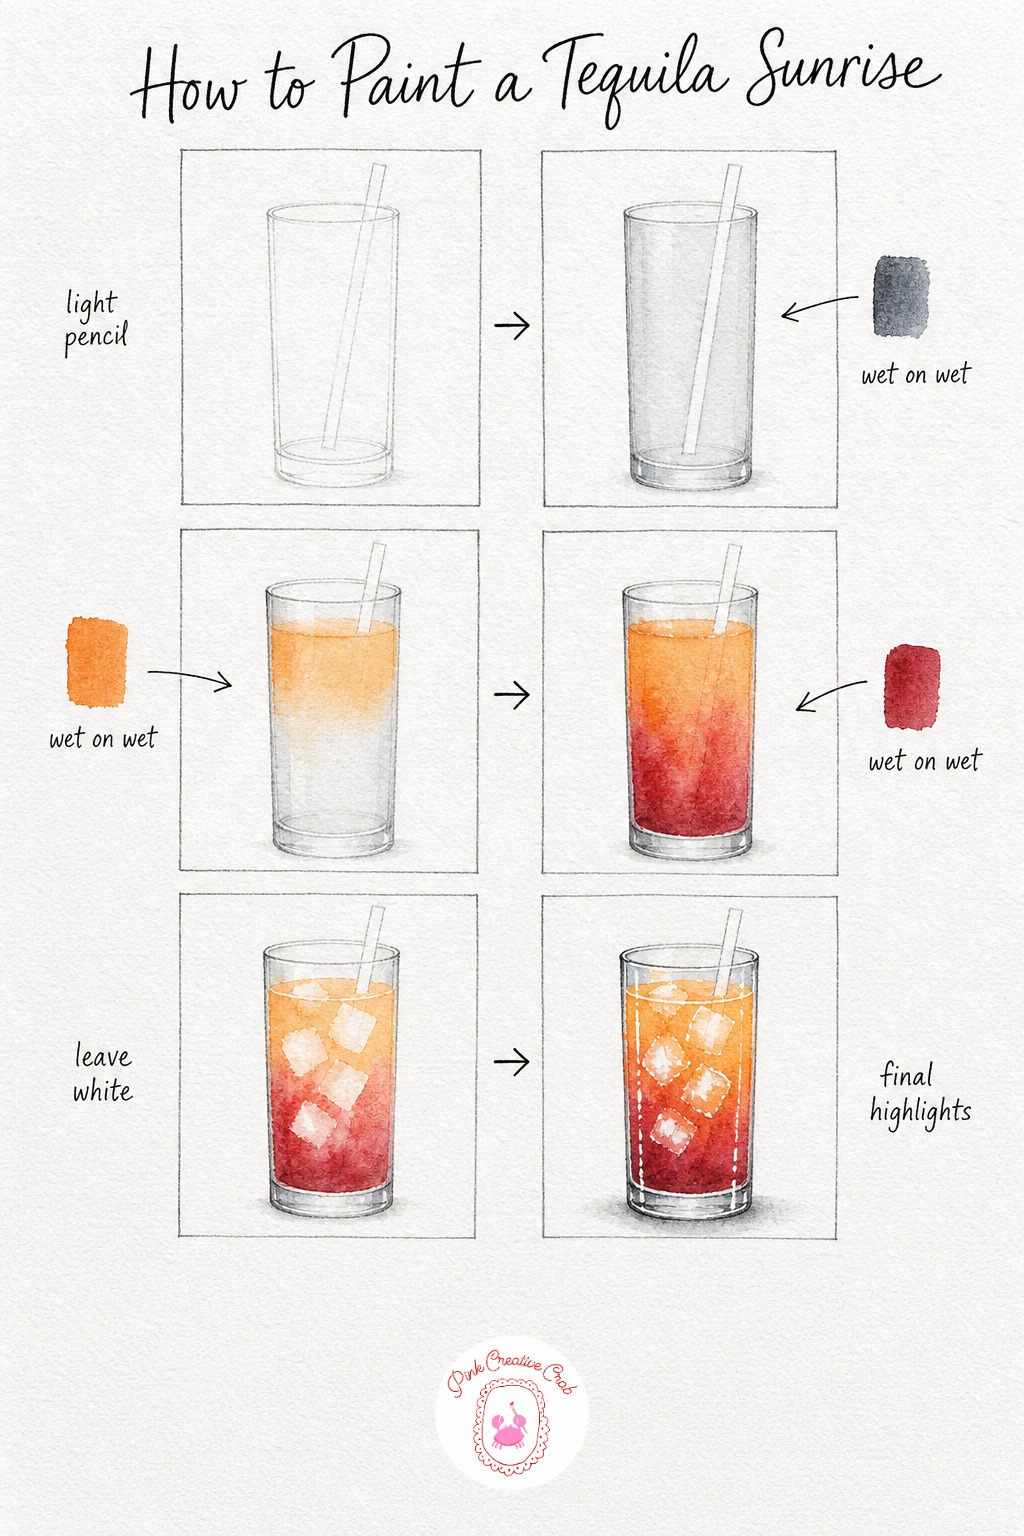
Pencil a tall straight glass with a straw leaning out, the same basic highball shape as the mojito. This drink is really about the gradient inside rather than the glass shape, so feel free to paint quickly through this stage.
Wash the glass in thin grey, working around the straw, and let it dry. While the paper is still damp from a fresh water glaze over the liquid area, drop in pale orange across the top two thirds, then while that orange is still wet, touch a small amount of deep red into the bottom third and let the two colors bloom together softly where they meet.
This wet on wet blending is the whole trick of a tequila sunrise, so do not touch the area again once the colors start merging or you will disturb the soft gradient. Leave a couple of small irregular white shapes untouched within the liquid for ice cubes before everything dries.
Once fully dry, add white gel pen highlights along the ice edges and down the glass, plus a soft shadow beneath the base. If your colors blend too much into a muddy orange red, use less water next time and let the first wash dry slightly before adding the red.
Gin and Tonic With Lime
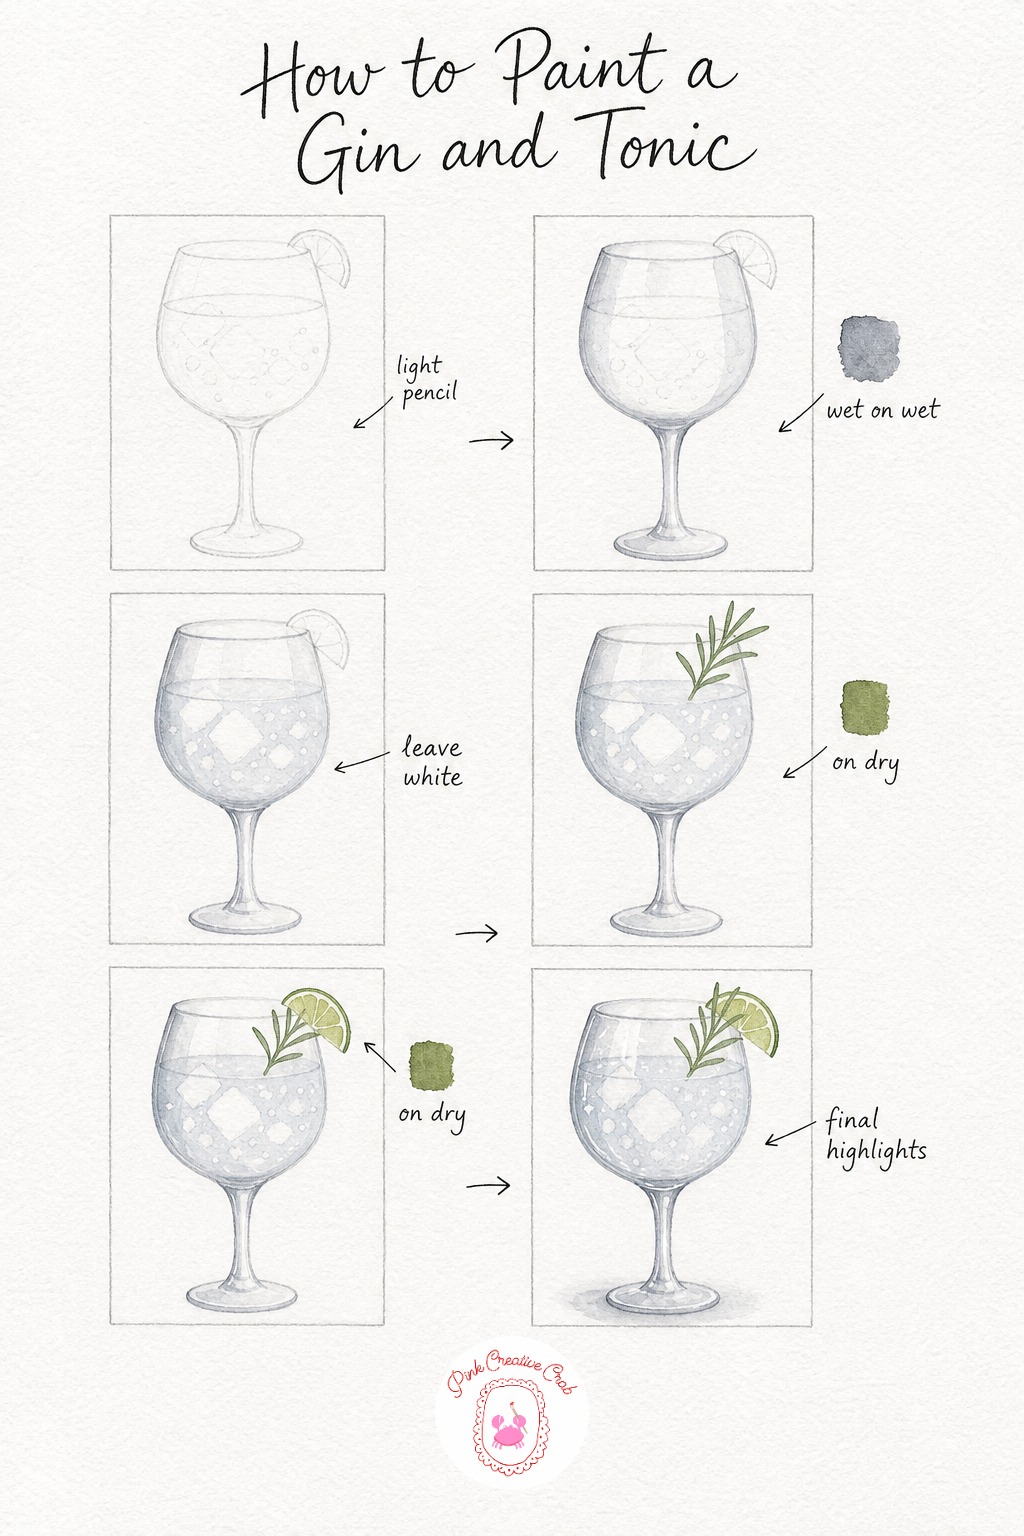
Sketch a rounded balloon glass, wider in the middle than at the rim or base, with a lime wedge perched on the edge. This glass shape is more generous than the others, so give the curve plenty of room on the page.
Wash the glass in thin grey and let it dry completely. A gin and tonic is nearly clear, so mix only the faintest blue grey wash for the liquid, leaving several white gaps of different sizes for both ice cubes and rising bubbles, the lightest liquid wash of the whole collection.
Add a small sprig of rosemary or a mint leaf tucked near the rim with soft green strokes, which gives this otherwise pale drink a lovely pop of color. Paint the lime wedge the same way as the mojito, green flesh with a reserved white pith line.
Finish with white gel pen on the ice cubes and glass rim, plus a very soft shadow under the base. If your liquid wash disappears entirely once dry, that is fine for this drink, a gin and tonic should look almost like plain water with a hint of color.
Bellini With Peach
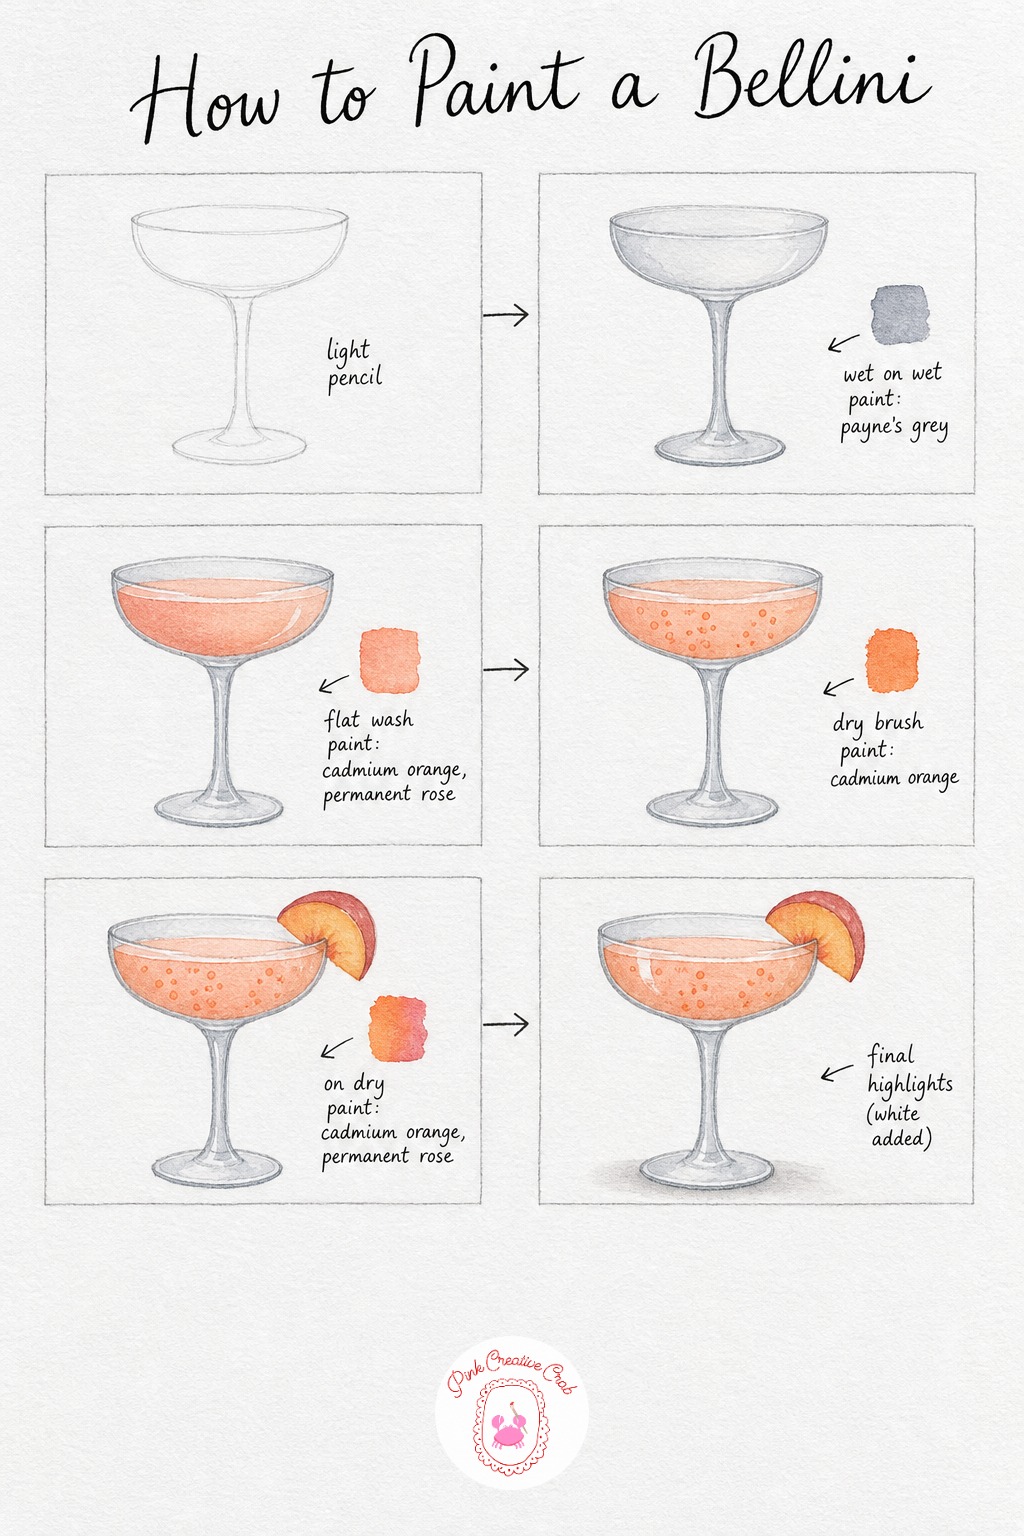
Pencil the same wide coupe shape used for the champagne glass earlier, since a bellini is traditionally served in this gentle rounded bowl on a slim stem. Practicing this shape twice helps the curve feel more natural the second time.
Wash the glass with the lightest grey and let it dry fully. Mix a soft peach by blending cadmium orange with a touch of permanent rose, then fill the liquid area with this warm blush wash in one smooth even layer.
Once dry, dot a handful of tiny bubble shapes through the peach liquid using a slightly stronger version of the same color, keeping them small and scattered near the top where bubbles naturally gather. A thin peach slice resting on the rim finishes the garnish, painted with the same peach mix and a slightly deeper pink edge where the skin would be.
Close with a white gel pen highlight down the curve of the bowl and a soft shadow beneath the foot. If your peach color leans too orange or too pink, adjust the ratio on scrap paper until it matches real peach flesh before committing to the glass.
Rooftop Spritz Scene
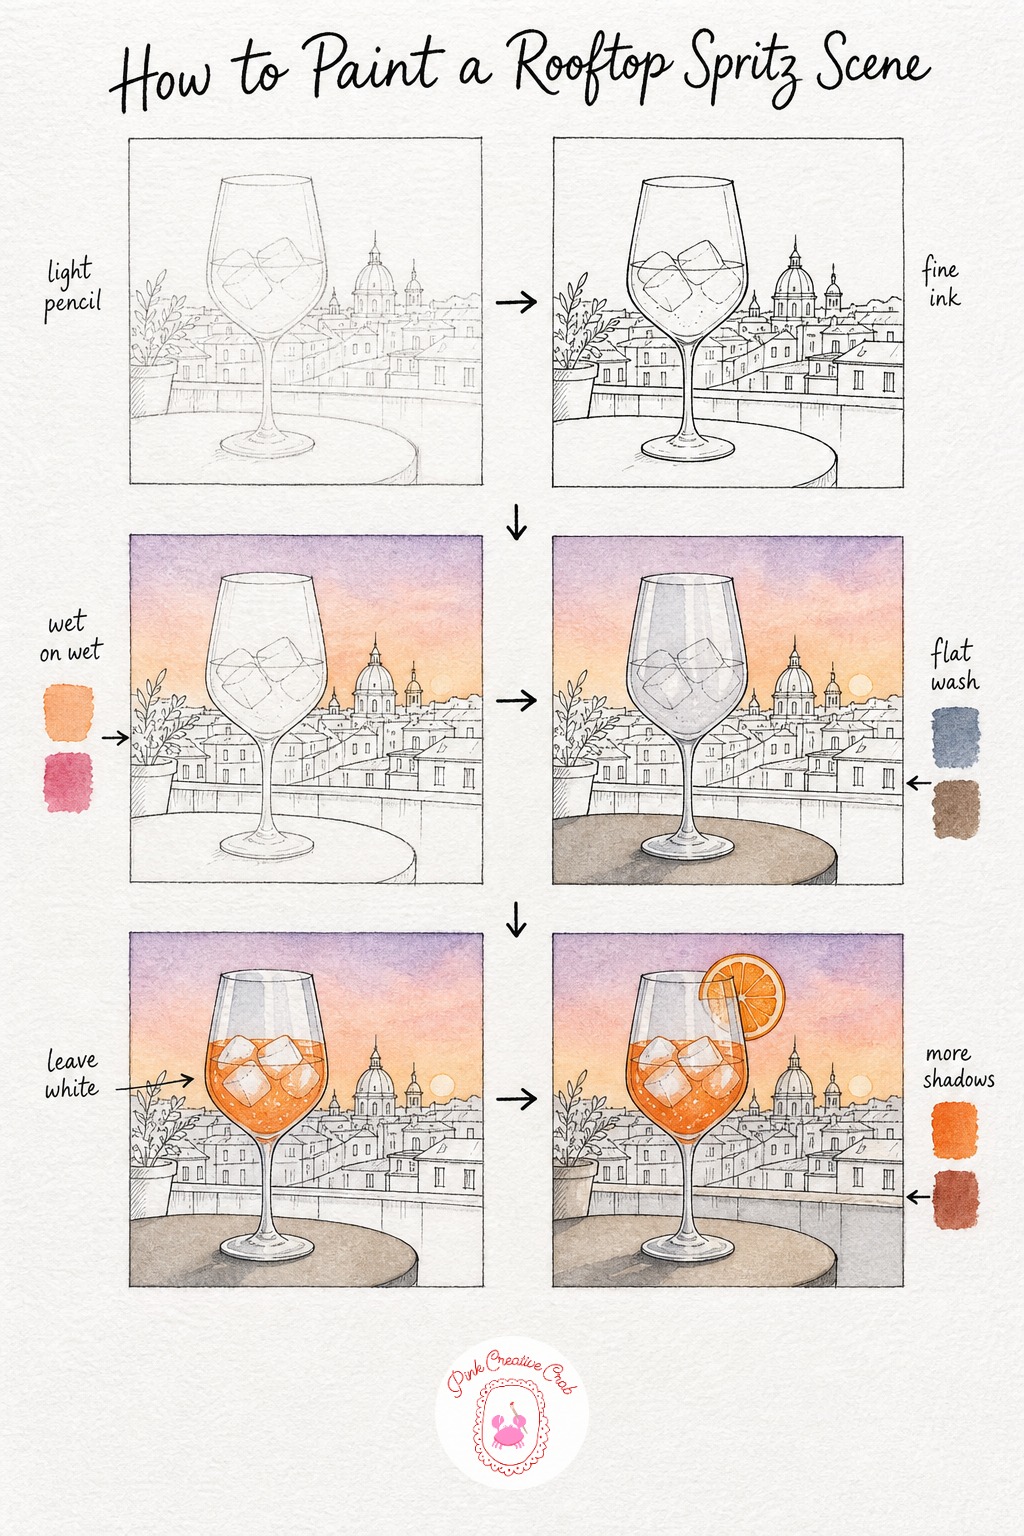
This little scene pairs the spritz glass with a simple rooftop backdrop, so start with a loose pencil layout of the glass sitting on a small round table, with a few simple building shapes along the horizon behind it. Keep the buildings basic rectangles and triangles, this is about mood rather than architectural detail.
Once the pencil feels right, trace over the main lines with a fine black ink pen, which gives the whole scene a clean illustrated look once the color goes in. Let the ink dry completely before any paint touches it.
Wash the sky first with a soft peach blending into lavender, working wet on wet so the colors melt into each other behind the skyline. Once that dries, wash the glass in thin grey and the tabletop in a warm grey brown, then fill the drink itself with bright orange, leaving a few white gaps for ice.
Add the orange slice on the rim last, then finish the whole scene with soft shadows under the glass and along the table edge to ground everything in one spot. If you enjoy painting little scenes like this, the picnic drawing collection has more outdoor sipping and snacking scenes to try next.
Bar Cart Still Life
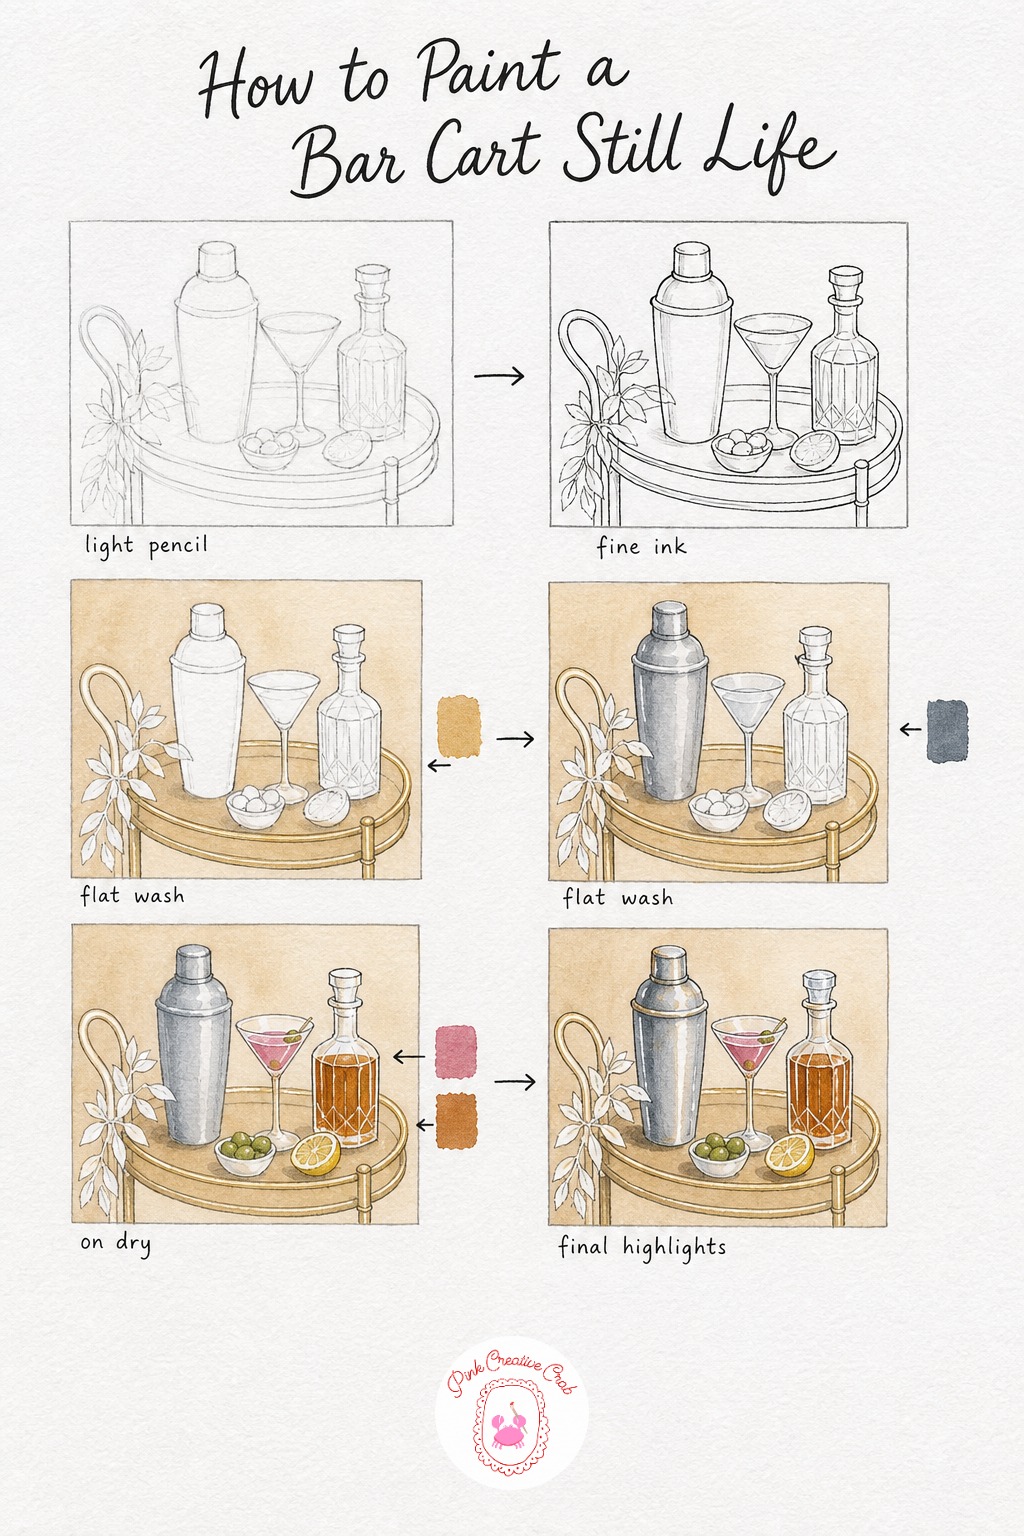
Lay out this little still life in pencil first, grouping a cocktail shaker, a filled martini glass and a bottle close together on a simple cart shelf. Overlapping the objects slightly makes the grouping feel natural rather than lined up in a row.
Trace the whole arrangement in fine black ink once you are happy with the pencil, which keeps each object’s edge crisp against the others when the washes start overlapping later. Let the ink dry fully before any water touches the page.
Wash the background wall and cart surface with one pale warm color to unify the scene, then once dry give the shaker a cool metallic grey and the glass a thin clear wash. Fill the martini glass with pink liquid and the bottle with a warm amber, letting each dry separately so the colors stay clean where objects meet.
Finish with white gel pen catching the metal shine on the shaker and the glass rim, then soft shadows pooling under each object to seat them on the shelf. If you like grouping small objects this way, the fruit basket drawing lessons use a similar overlapping layout.
Poolside Mojito Scene
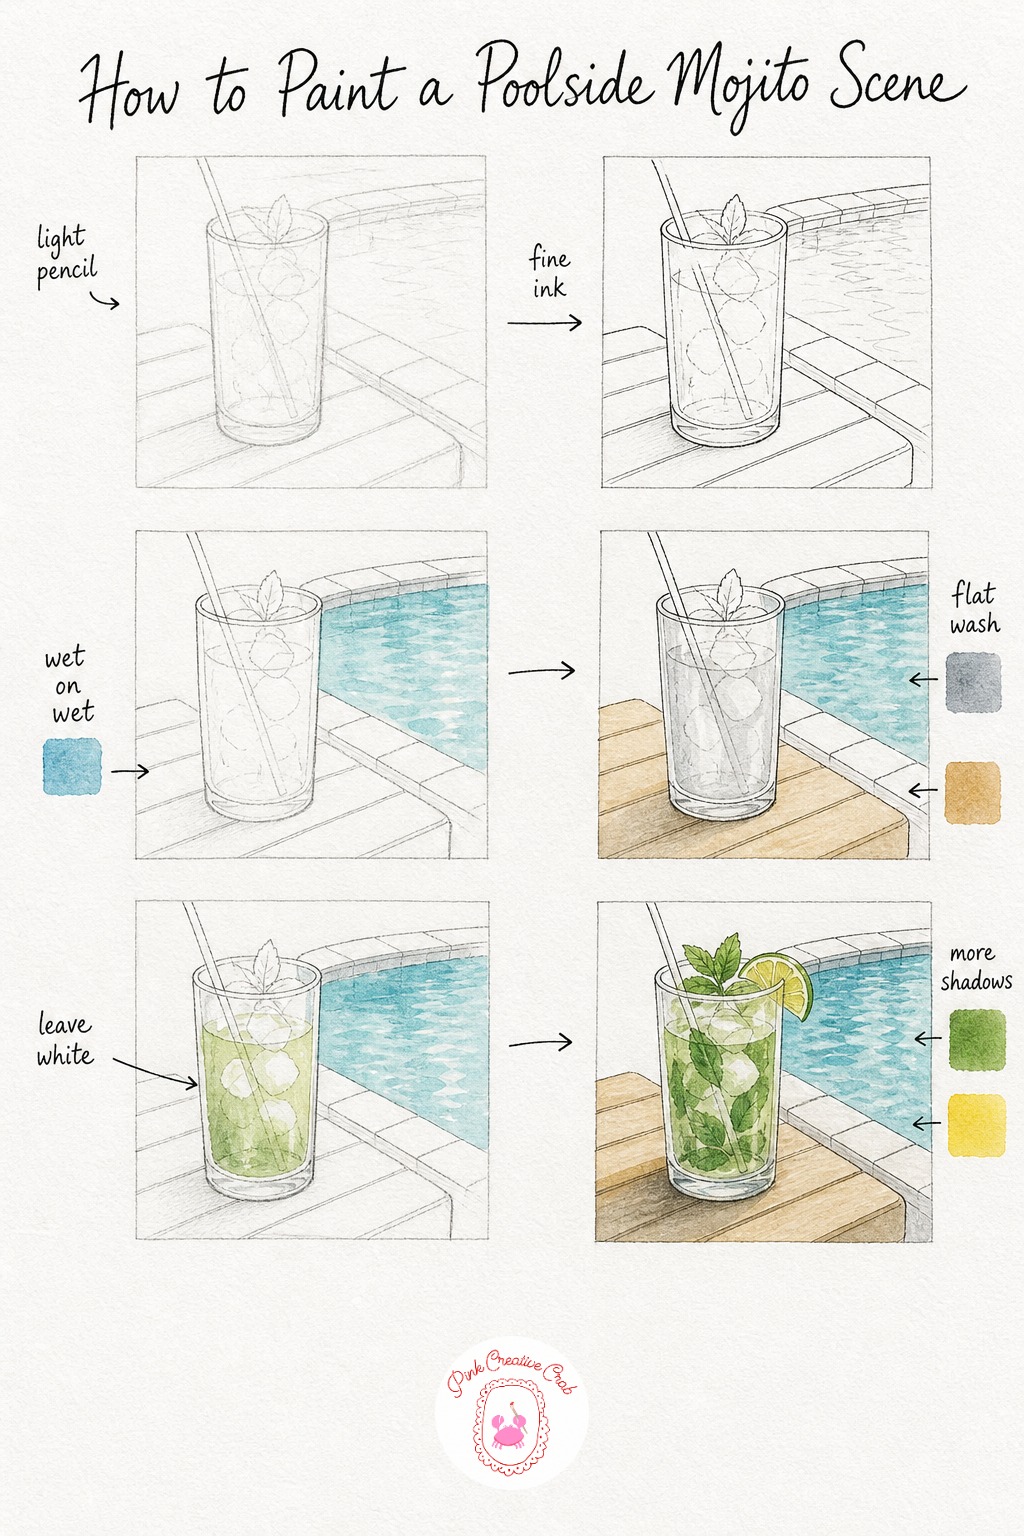
Sketch this scene with the mojito glass sitting close on a lounge table, and the edge of a swimming pool suggested behind it with just a simple curved line and a strip of water. You do not need to draw the whole pool, a small glimpse is enough to set the mood.
Go over your pencil lines with fine black ink, keeping the pool edge and table simple so they do not compete with the glass for attention. Let the ink dry before adding any color.
Wash the pool water first with a soft turquoise, letting the edges stay a little uneven since moving water never has a perfectly flat color. Once dry, give the glass a thin grey wash and the table a warm tan, then fill the mojito liquid with fresh green, leaving white gaps for ice just like the standalone mojito tutorial.
Add the mint leaves and lime wedge last with small careful brushstrokes, then finish with soft shadows under the glass and along the table edge. If you enjoy this relaxed poolside mood, the loose watercolor flowers lessons share the same easy wet on wet blending for backgrounds.
Candlelit Martini Scene
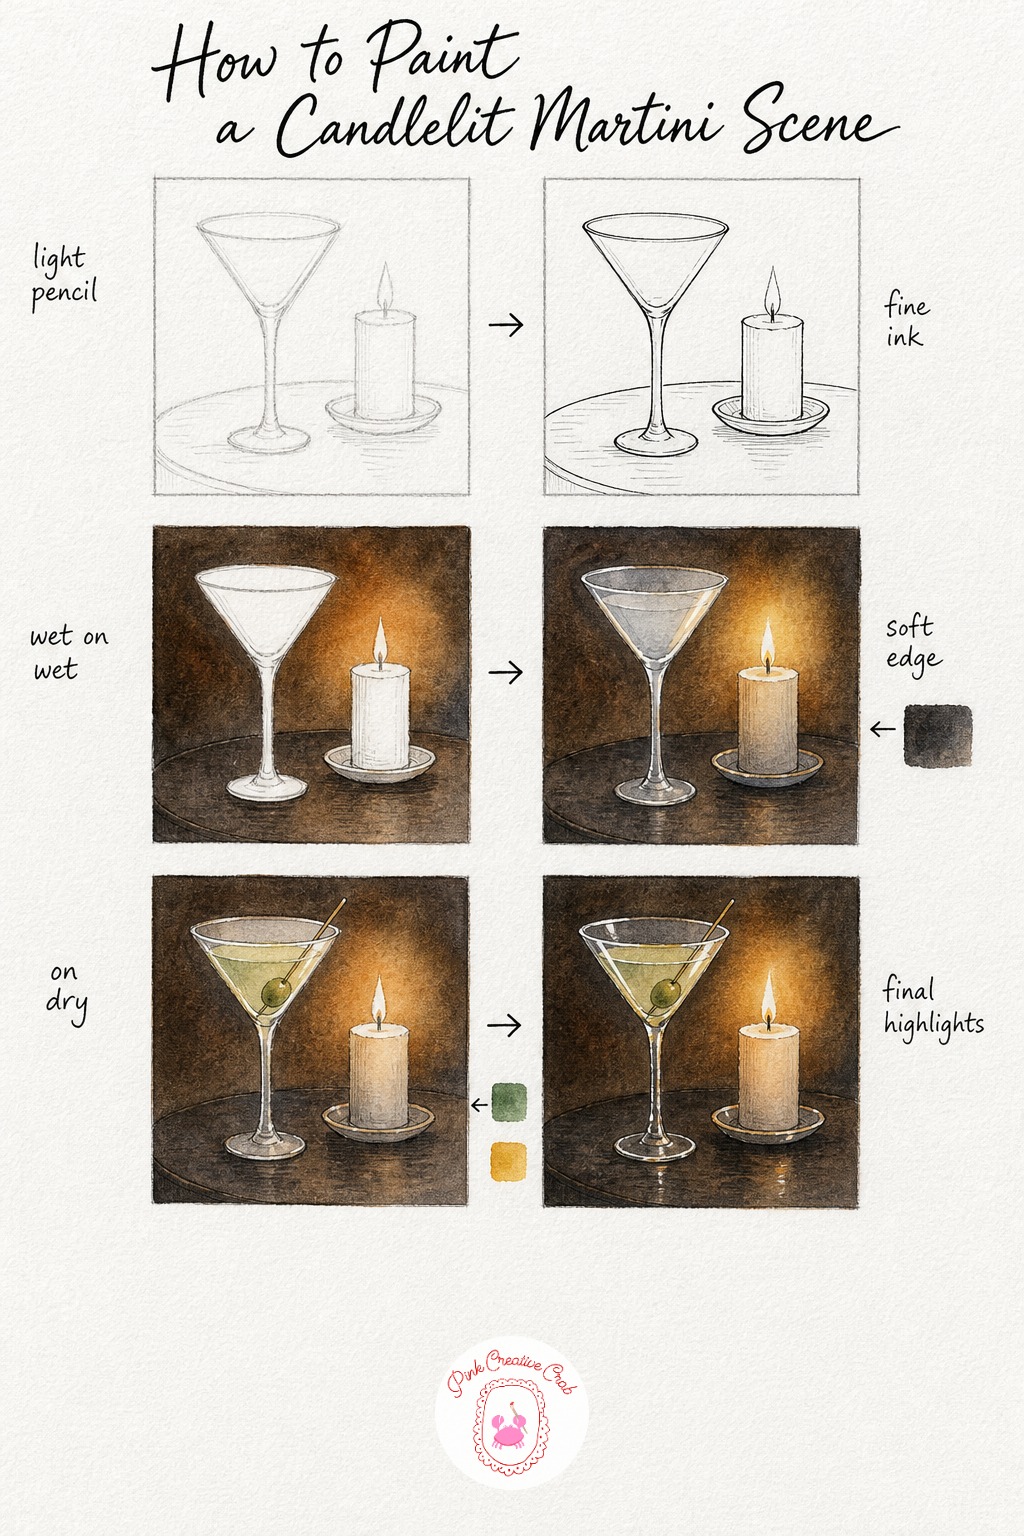
Sketch a classic martini glass beside a simple candle shape, a small base, a thin body and a tiny flame on top, sitting together on a dark tabletop. Keeping the candle smaller than the glass keeps the cocktail as the real star of the scene.
Trace both shapes in fine black ink along with a loose table edge line, then let it dry completely. This scene relies on contrast between dark background and warm candlelight, so the ink line matters more here than in the brighter scenes.
Wash the background around the candle with a deep warm brown grey, leaving a soft lighter halo untouched around the flame itself to suggest the glow. Once dry, wash the glass in pale grey and warm the halo area with a touch of yellow right at the flame’s edge.
Fill the martini liquid with the palest clear wash, almost just water with a hint of green, and paint one small olive on a thin pick resting across the rim. Finish with white gel pen catching the glass edge and the candle flame tip, plus soft shadows spreading across the dark table.
What to Do Next
Pick whichever glass matches your mood tonight, print the sheet, and work your way from the light pencil lines through to those final white gel pen highlights. Once you have a few done, they make a lovely little series to pin together or frame side by side.
Frequently Asked Questions
What is the easiest cocktail glass to start with for cocktail glass drawing beginners?
The whiskey sour or negroni rocks glass is easiest, since it is just a short straight-sided shape with no curved bowl or stem to get symmetrical. Start there before moving to martini or coupe shapes.
How do I keep the glass edges clean in cocktail glass drawing?
Let each wash dry completely before painting the next shape beside it, and use a damp (not soaked) brush so color does not creep past your pencil line. A fine round brush gives you the most control along curved rims.
What paint consistency works best for the liquid inside the glass?
Use a thin, well-watered mix for the first wash so the color stays transparent like real liquid, then layer a second glaze once dry if you want more depth. Liquid washes should always look lighter than you expect while wet.
How do I make the ice cubes and bubbles look realistic?
Leave irregular white paper shapes unpainted for ice, and dot tiny uneven circles in a slightly stronger shade of the liquid color for bubbles. Avoid making ice cubes too perfectly square or bubbles too evenly spaced.
Can I use a different paint brand if I do not have the exact colors listed?
Yes, any watercolor set works as long as you can mix a similar warm or cool tone, since these cocktails rely more on value and transparency than an exact pigment match. Test your mix on scrap paper before painting the glass.
Have any thoughts?
Share your reaction or leave a quick response — we’d love to hear what you think!
-
 0
-
0
-
0
-
0
-
0
-
0


