

Table of Contents
- Before You Start
- Lavender Field With Farmhouse
- River Bend With Willows
- Rolling Hills With Winding Road
- Sunflower Field At Sunset
- Birch Grove In Spring
- Wheat Field Under Clouds
- Mountain Lake At Dawn
- Poppy Meadow With Fence
- Vineyard Rows In Autumn
- Seaside Cliff Path
- Country Orchard In Blossom
- Frequently Asked Questions
I love how forgiving a landscape is when you break it into flat layers, and that is exactly what this set of easy landscape painting for beginners step by step lessons does. Sky first, then the ground, then the shapes that make a field feel like a field or a river feel like a river. Nothing fussy, nothing that needs years of brush control, just calm layers stacked one on top of the other.
Below you will find eleven small scenes, lavender rows, a sleepy river bend, rolling hills, a sunflower field catching the evening light, a birch grove in spring, and more. Each one comes with a worksheet that walks you from the first pencil lines to the last little shadow, with a paint swatch beside every stage so you always know what to load on your brush.
Using these images: free for personal projects such as printing, coloring, cards, journals and gifts. Handmade items that include them may be sold up to 30 pieces per design. More than that is commercial use and is not permitted, and neither is selling or sharing the images themselves or passing them off as your own. Please ask before any other use.
Before You Start
- Stretch or tape a sheet of heavy mixed media or canvas paper to a board so it does not buckle under wet acrylic washes.
- Keep your pencil sketch light and loose, just enough to mark the horizon and the main shapes, since acrylic covers pencil easily.
- Thin your acrylics with a little water for the first sky and ground layers so they go on flat and smooth, almost like gouache.
- Always test a new color mix on a scrap of the same paper before it touches the painting, acrylic dries a shade darker than it looks wet.
- Let each flat layer dry fully before adding the next, a few minutes under a fan or a hairdryer is enough and saves you from muddy edges.
- Use a smaller round or flat brush only for the last stage of details, the earlier layers go on best with a soft, wide, flat brush.
Lavender Field With Farmhouse
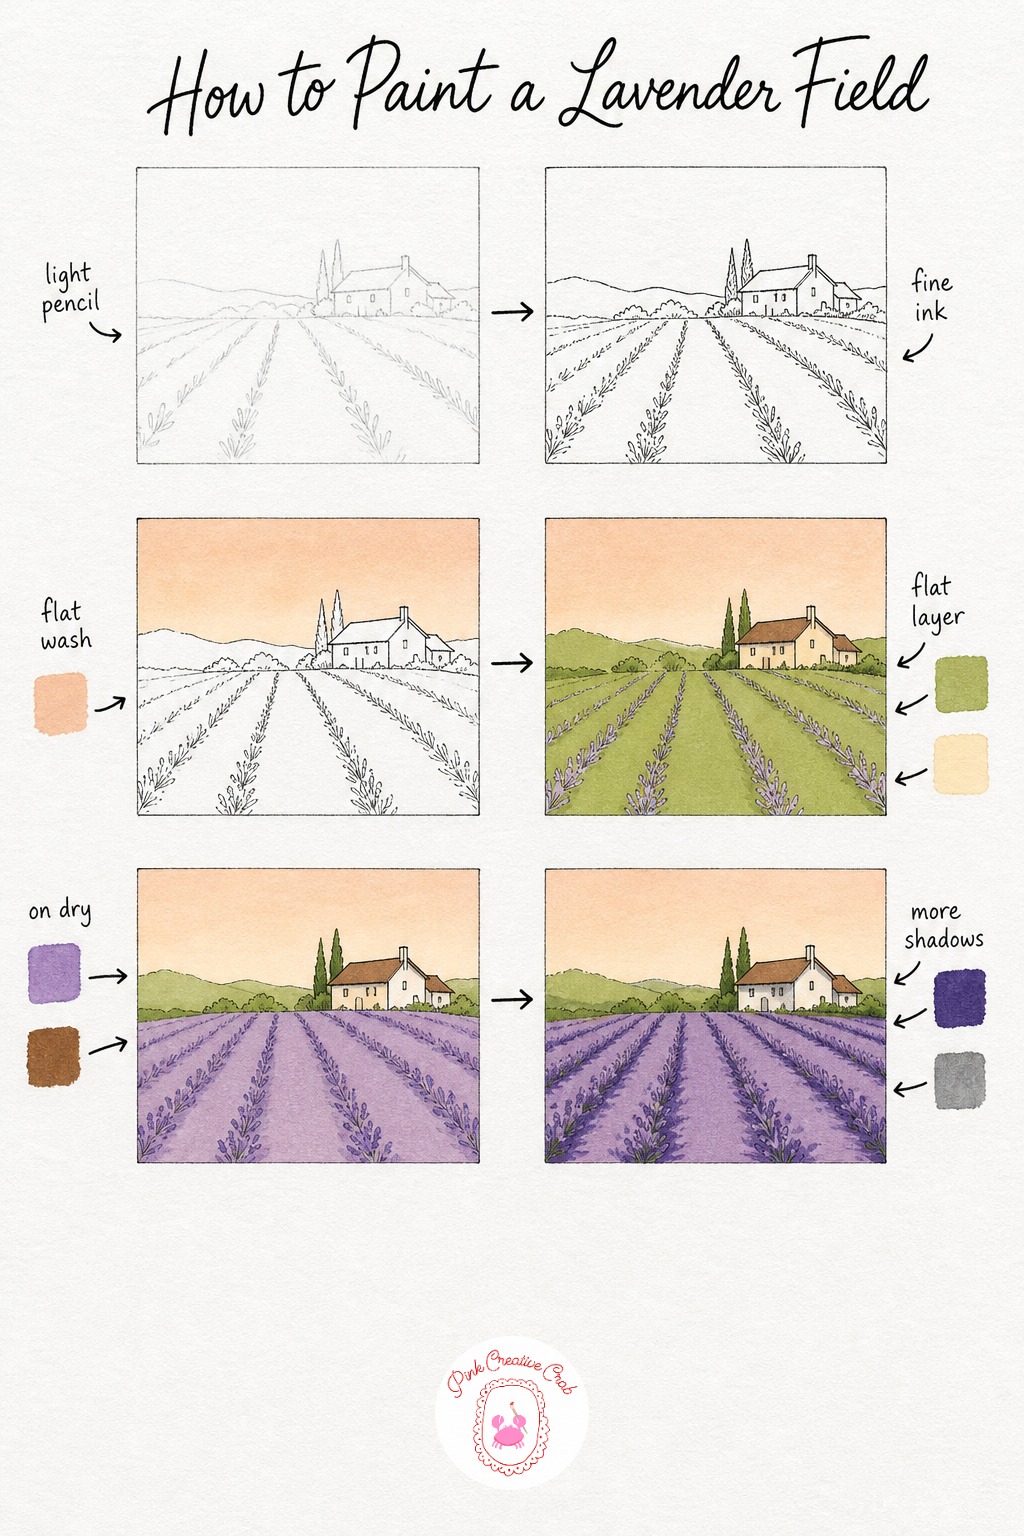
Start with a light pencil line for the horizon, set low on the page, then rough in the farmhouse shape and a few guide lines for where the lavender rows will sit. Go over those lines in fine black ink so the farmhouse keeps its shape once the paint starts layering on top, this is the one scene step where ink comes before color.
Thin your pale peach acrylic with water and sweep it flat across the sky, then once that is dry lay a soft green wash over the whole ground and a flat cream over the farmhouse walls. These two layers are your base, keep them smooth and let them dry completely, a damp patch will drag your next color into mud.
On dry paint, dash in rows of dusty purple across the field with the edge of a flat brush, letting the rows get smaller as they reach the horizon for depth, then paint the roof a warm brown. Beginners often crowd the rows too close together, so leave visible green between them.
Finish with a deeper purple shadow along the base of each lavender row and a soft gray shade tucked under the farmhouse eaves and roofline, this is what gives the whole field its sense of light. If your purple feels flat, the color mixing guide is worth a look before you start.
River Bend With Willows
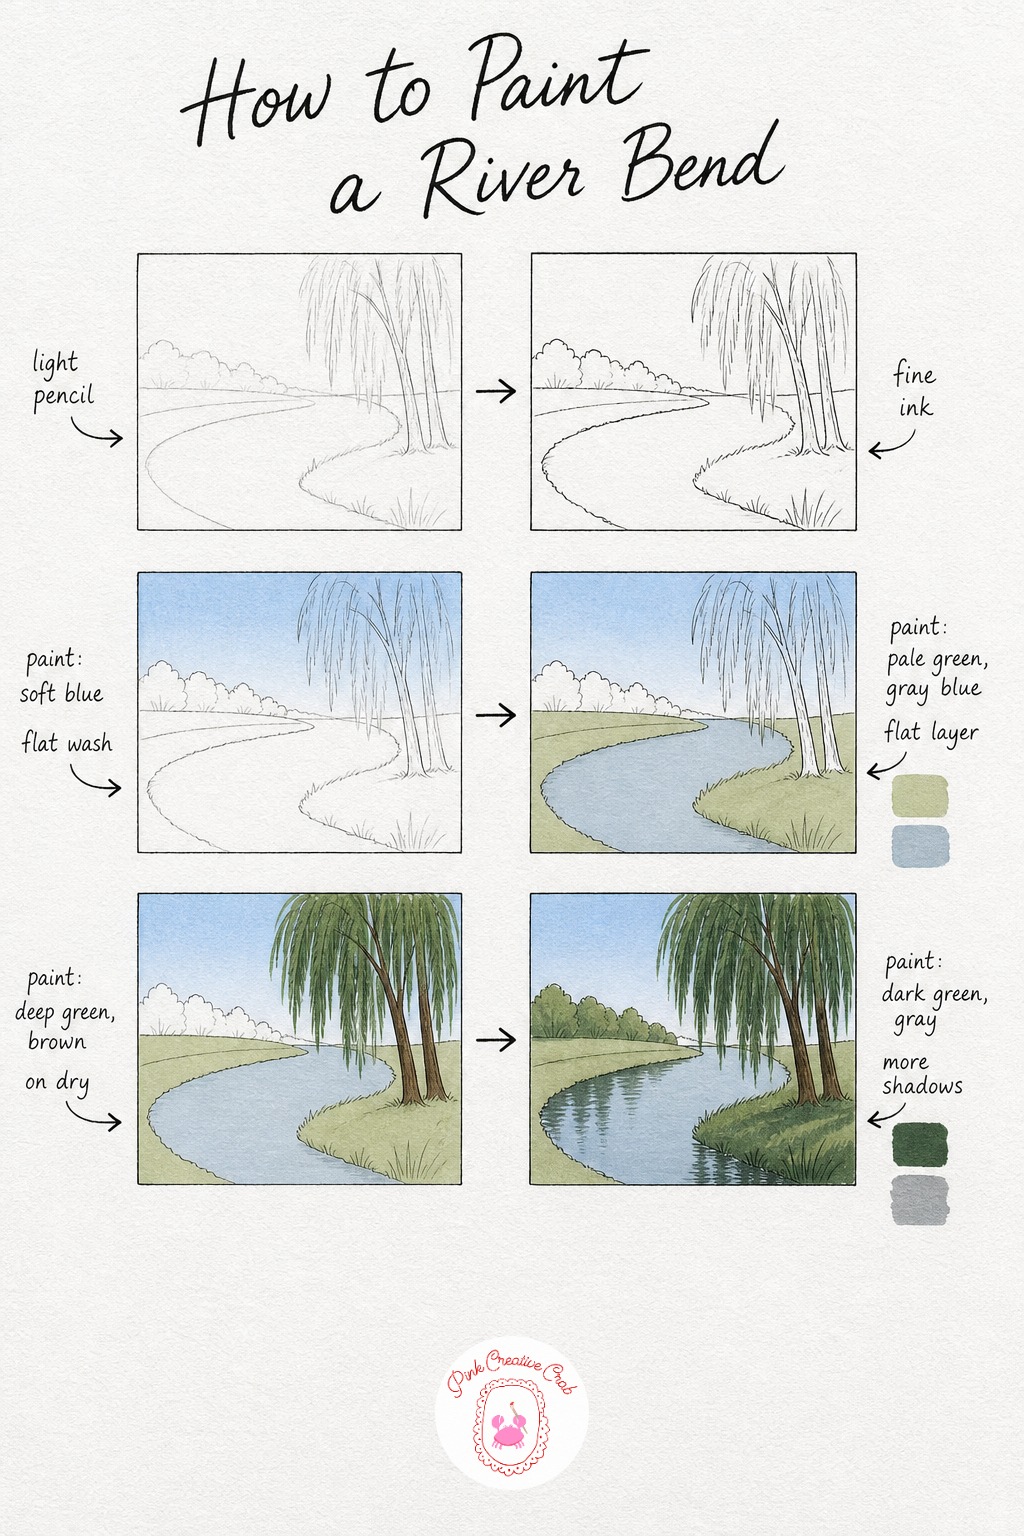
Sketch the river as a soft curving band that narrows toward the horizon, then add the far bank and two or three simple willow trunks leaning over the water. Trace these lines in fine black ink so the river edges stay crisp once washes start going on top of them.
Paint a soft blue wash across the whole sky down to the horizon and let it dry, then switch to a pale green wash over both grassy banks and a gray blue wash inside the river shape itself. Keep the river wash loose and a little streaky, real water is never perfectly flat.
Once dry, paint the willow canopies in deep green as soft drooping clusters hanging over the bend, then add simple brown trunks underneath each one. This is where the river bend starts to feel like a real place, so take your time shaping the willow clusters rather than rushing them.
Finish with short dark green strokes just under the willows to suggest their reflection in the water, plus a thin gray shadow along the near bank where it meets the river. If a round brush feels tricky for the trunks, a small flat brush turned on its edge works just as well.
Rolling Hills With Winding Road
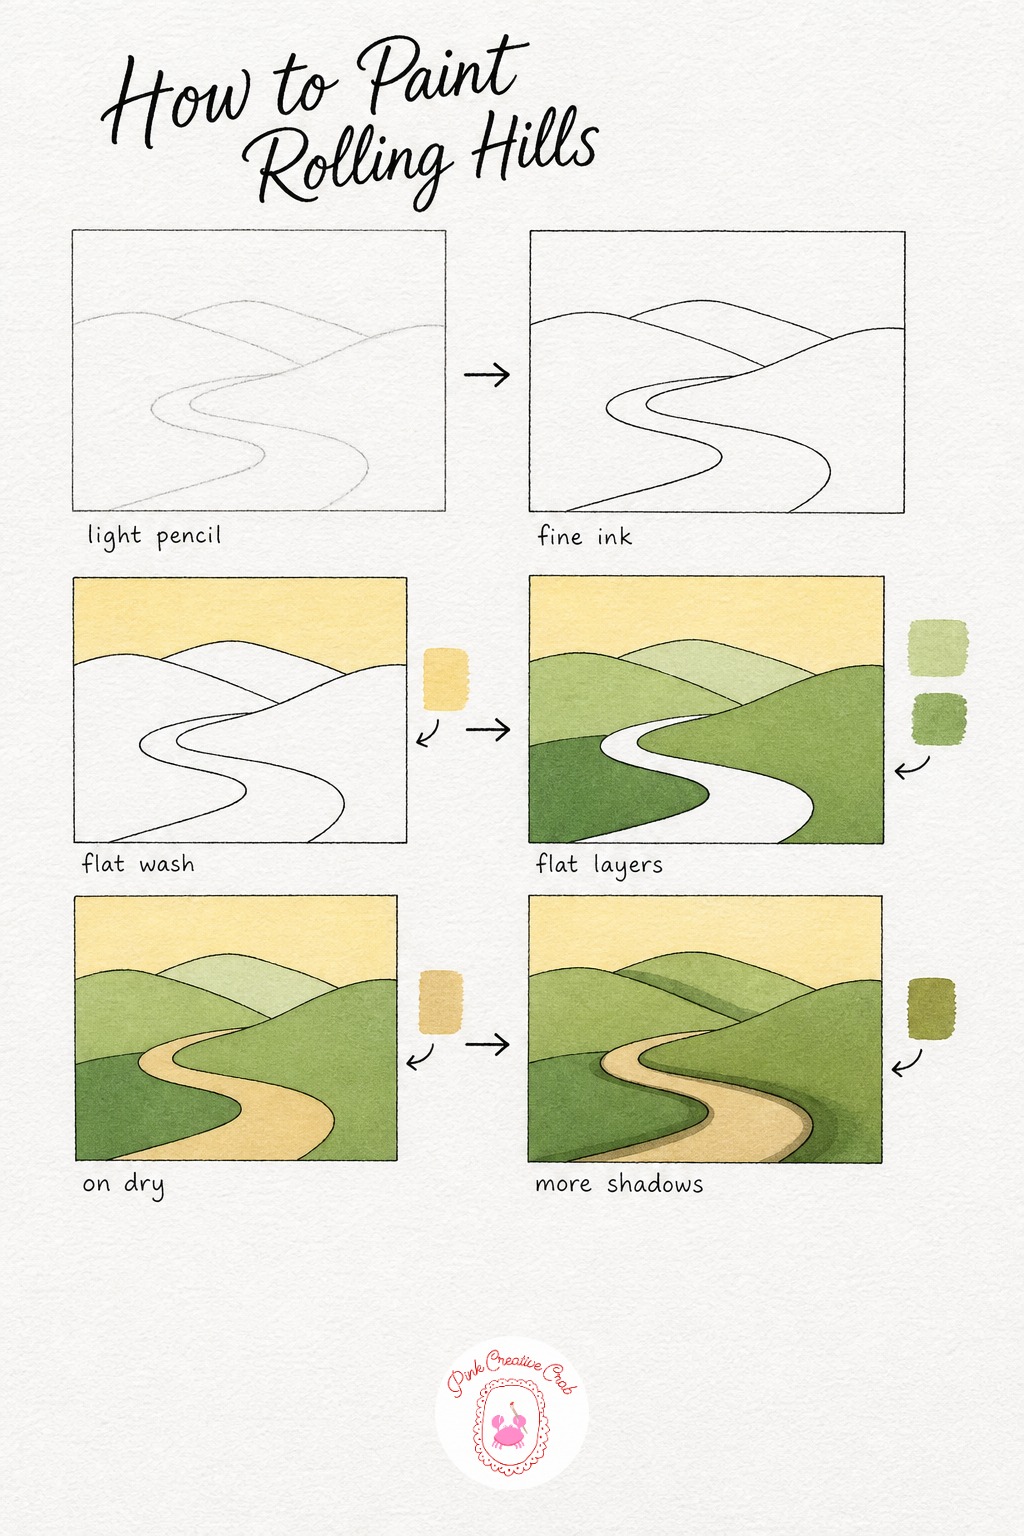
Draw three soft hill shapes overlapping each other from back to front, then add a winding road that curves between them down to the bottom of the page. Go over these shapes in fine black ink so the layering of hills stays readable once the greens start stacking on top.
Wash a warm pale gold across the sky above the farthest hill and let it dry fully. Then paint each hill as its own flat layer, lightest green furthest back and deepest green closest to you, this simple trick is what makes rolling hills feel like they recede into the distance.
Once the greens are dry, paint the winding road in a warm tan, following its curves loosely rather than trying to keep perfectly straight edges. A slightly wobbly road actually reads as more natural here, so do not worry about ruling it out.
Finish by adding a soft olive green shadow along one side of each hill, as if the light comes from one direction, and a touch of shadow where the road dips around each curve. These small shadows are what turn flat green shapes into hills with real form, and the same shaping trick works beautifully if you ever move on to oil painting landscapes later on.
Sunflower Field At Sunset
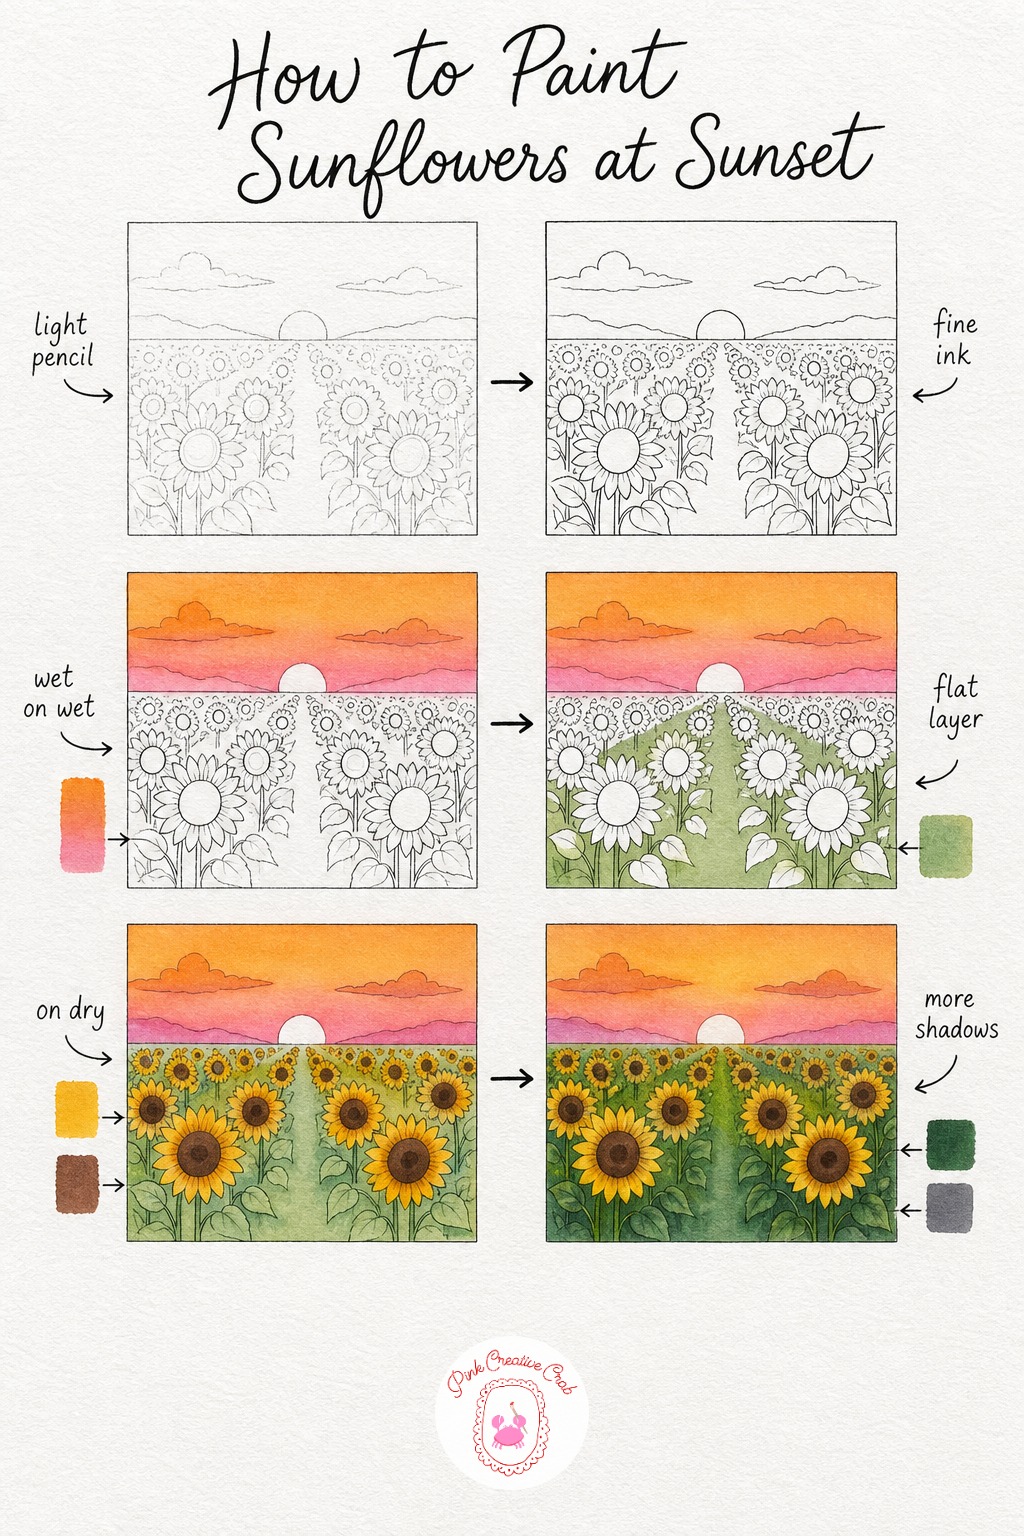
Sketch a low horizon line and a loose row of simple sunflower circles facing slightly different directions, bigger in front and smaller toward the back. Outline the flower heads and stems in fine black ink so they stay defined once the warm sky washes over everything behind them.
Wet the sky area first, then drop in orange near the horizon and pink higher up, letting the two blend softly where they meet. This wet on wet blend is what gives the sunset its glow, so do not worry if the colors drift into each other a little.
Once the sky is completely dry, paint a soft green wash across the ground, then once that dries too, fill each sunflower head with golden yellow petals and a small brown center. If golden yellow feels too thin on its own, our watercolor sunflower tutorial has helpful tips on building up petal color that apply here too.
Finish with deep green stems and a few simple leaves, then tuck a soft gray shadow beneath each flower head where it meets its stem. That little shadow is what lifts the sunflowers off the page instead of letting them sit flat against the sunset.
Birch Grove In Spring
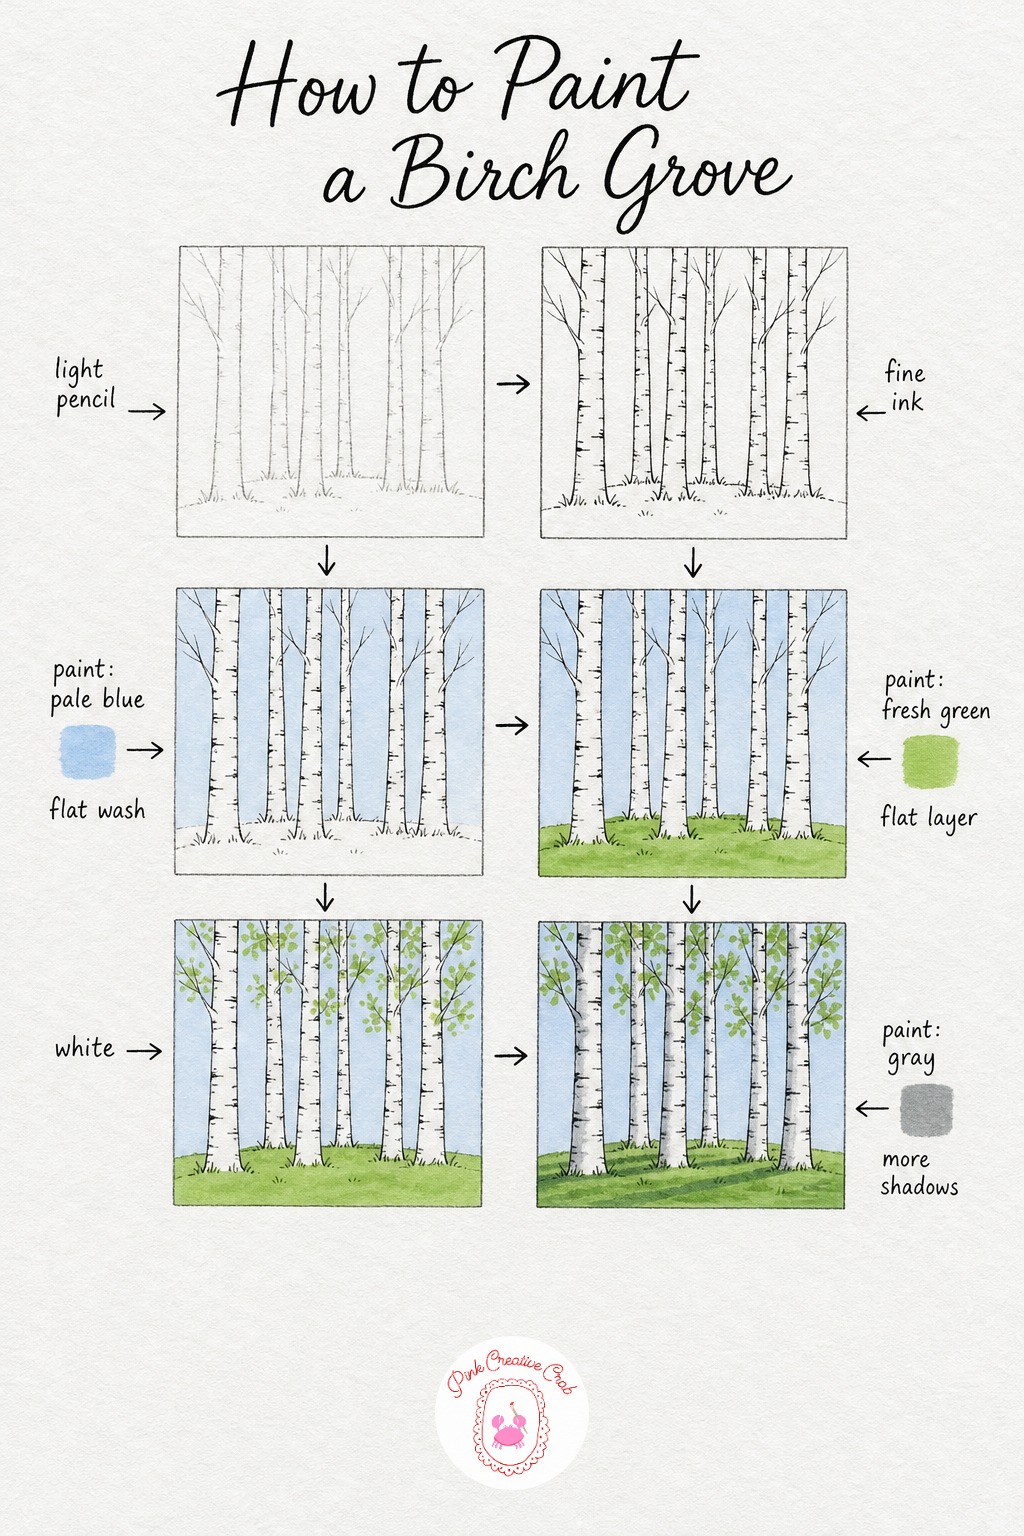
Draw several tall, slightly leaning birch trunks across the page with a soft horizon line for the ground, spacing them unevenly so the grove feels natural rather than planted in a row. Trace the trunks and a few thin branches in fine black ink, this keeps them crisp once white paint goes over them later.
Wash a pale blue sky into the gaps between the trunks and let it dry, then paint a fresh green wash across the ground beneath the whole grove. These two flat layers do most of the work, the trunks and leaves simply sit on top once they are dry.
Paint each trunk white, then once that white has dried, add short horizontal black marks along the trunks the way real birch bark looks, plus small clusters of light green leaves scattered along the upper branches. Keep the black marks sparse, too many and the trunks start to look striped rather than textured.
Finish with a gray shadow stripe running down one side of each trunk and a soft gray shade pooling on the ground where the trees meet. If you enjoy this fresh spring palette, our acrylic flower painting ideas lean on similar greens and are worth trying next.
Wheat Field Under Clouds
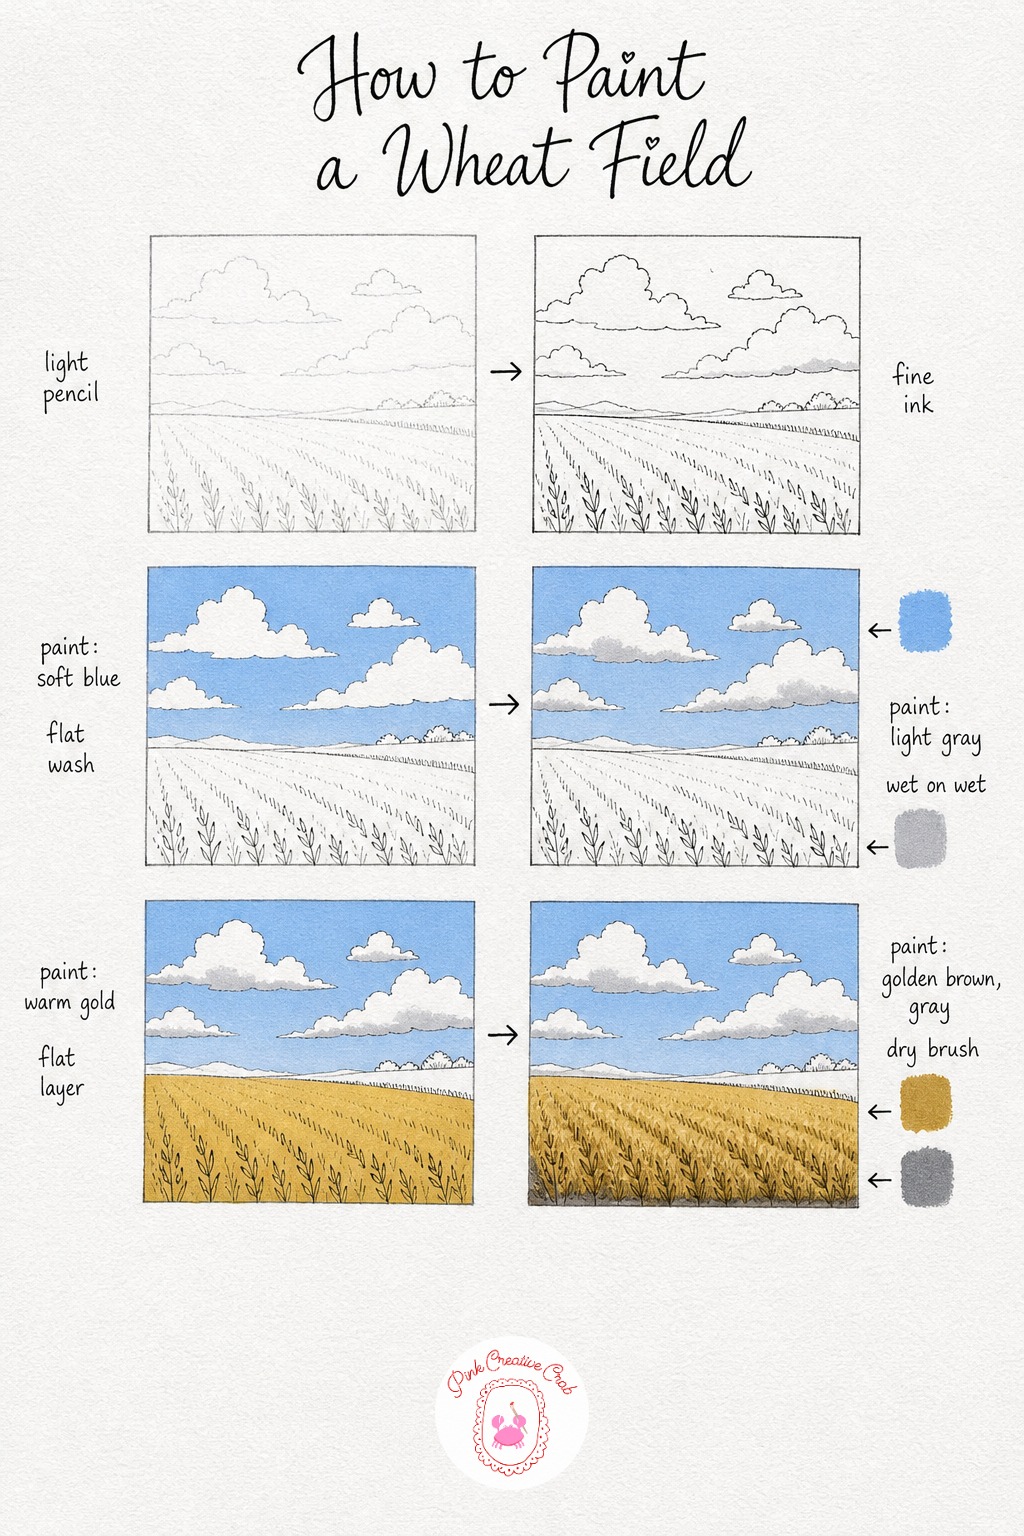
Sketch a horizon about a third of the way up the page, add two or three simple cloud shapes above it, and leave the rest for a flat wheat field below. Outline the clouds and the field edge in fine black ink so the soft blue sky wash does not blur their shapes later.
Paint the sky in a soft blue, leaving the cloud shapes bare, then while that blue is still slightly damp, tuck a light gray shadow into the underside of each cloud so it blends gently at the edge. This wet on wet touch is what gives the clouds their soft, rounded look.
Once the sky is fully dry, wash warm gold flat across the entire field below the horizon. Let that dry completely before the next layer, gold acrylic can lift if you work over it while damp.
Finish with a dry brush loaded with golden brown, dragged in short upward strokes across the field to suggest individual stalks of wheat, then a soft gray shadow along the very bottom edge of the field for grounding. Less is more with the stalk strokes, a few hundred loose marks read better than trying to paint every stem.
Mountain Lake At Dawn
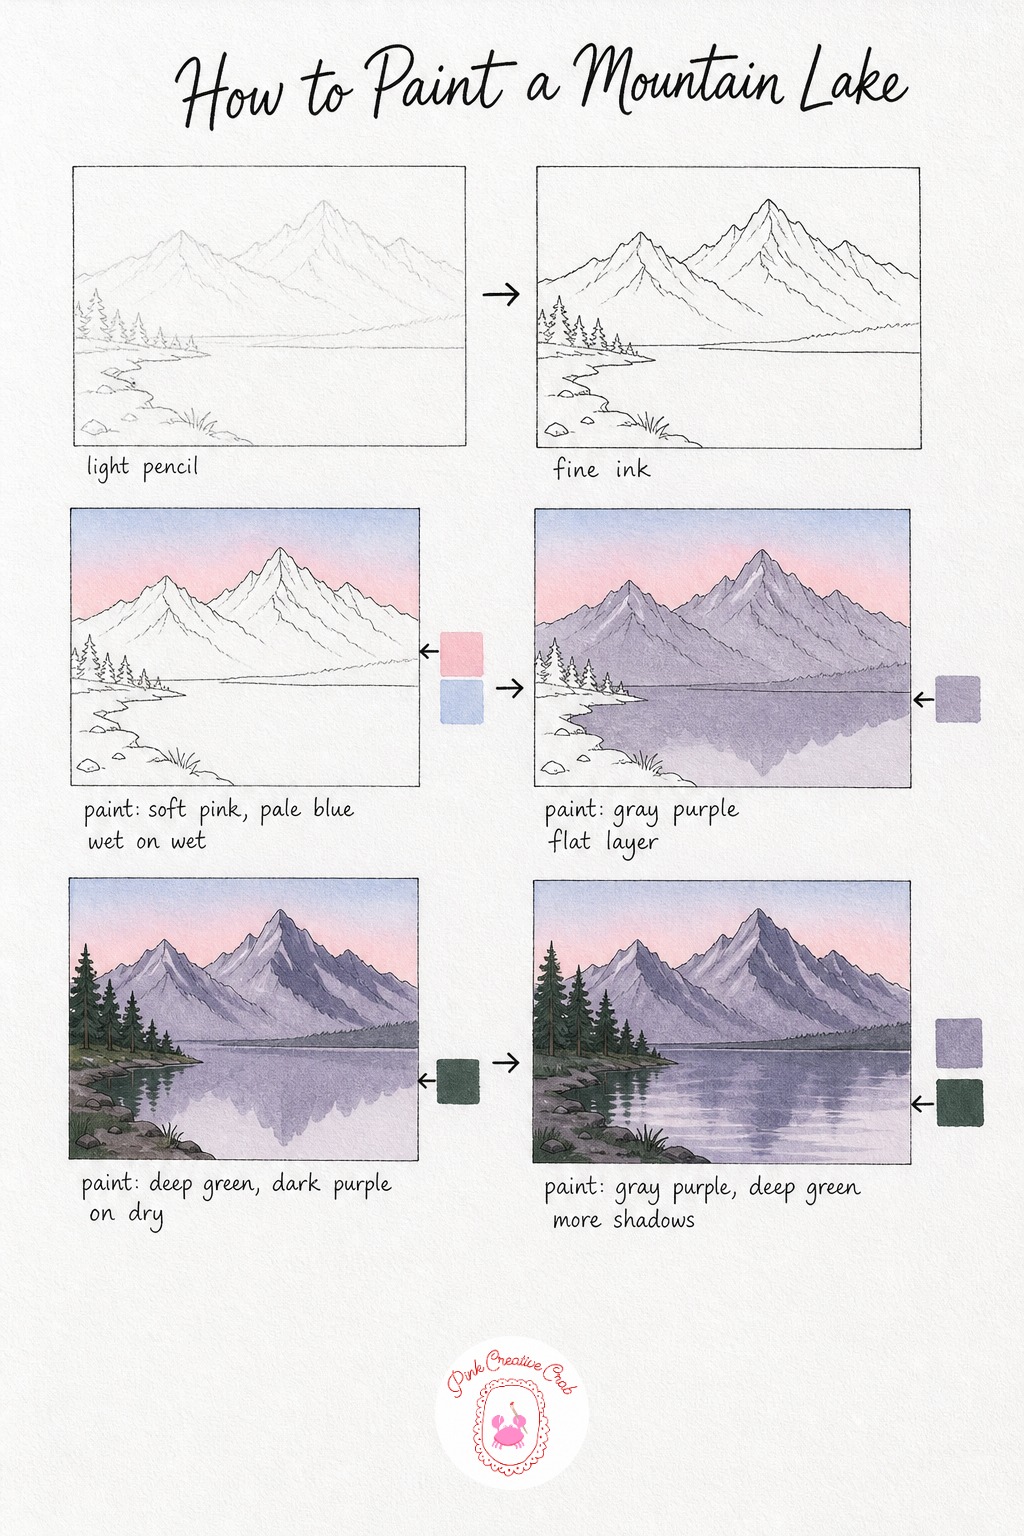
Sketch two or three overlapping mountain peaks above a horizon line, then a simple shoreline curving into the lake below. Trace the ridgelines and shoreline in fine black ink so the soft dawn colors stay contained to their own shapes.
Wet the sky and blend soft pink near the horizon into pale blue higher up, letting the colors meet softly in the middle. Once that dries, paint the mountains and the lake in the same flat gray purple wash, this shared color is what makes a lake feel like it is truly reflecting the mountains above it.
Add a deep green tree line along the shore where land meets water, then paint a darker purple shadow down one side of the mountains to give them form. Beginners often skip this shaded side, but it is what separates a flat triangle from a mountain with real weight.
Finish with a few soft horizontal strokes of gray purple and deep green pulled gently across the lake to suggest reflection, plus a touch of shadow along the near shoreline. Keep these reflection strokes loose and horizontal, never vertical, or the water will stop looking still.
Poppy Meadow With Fence
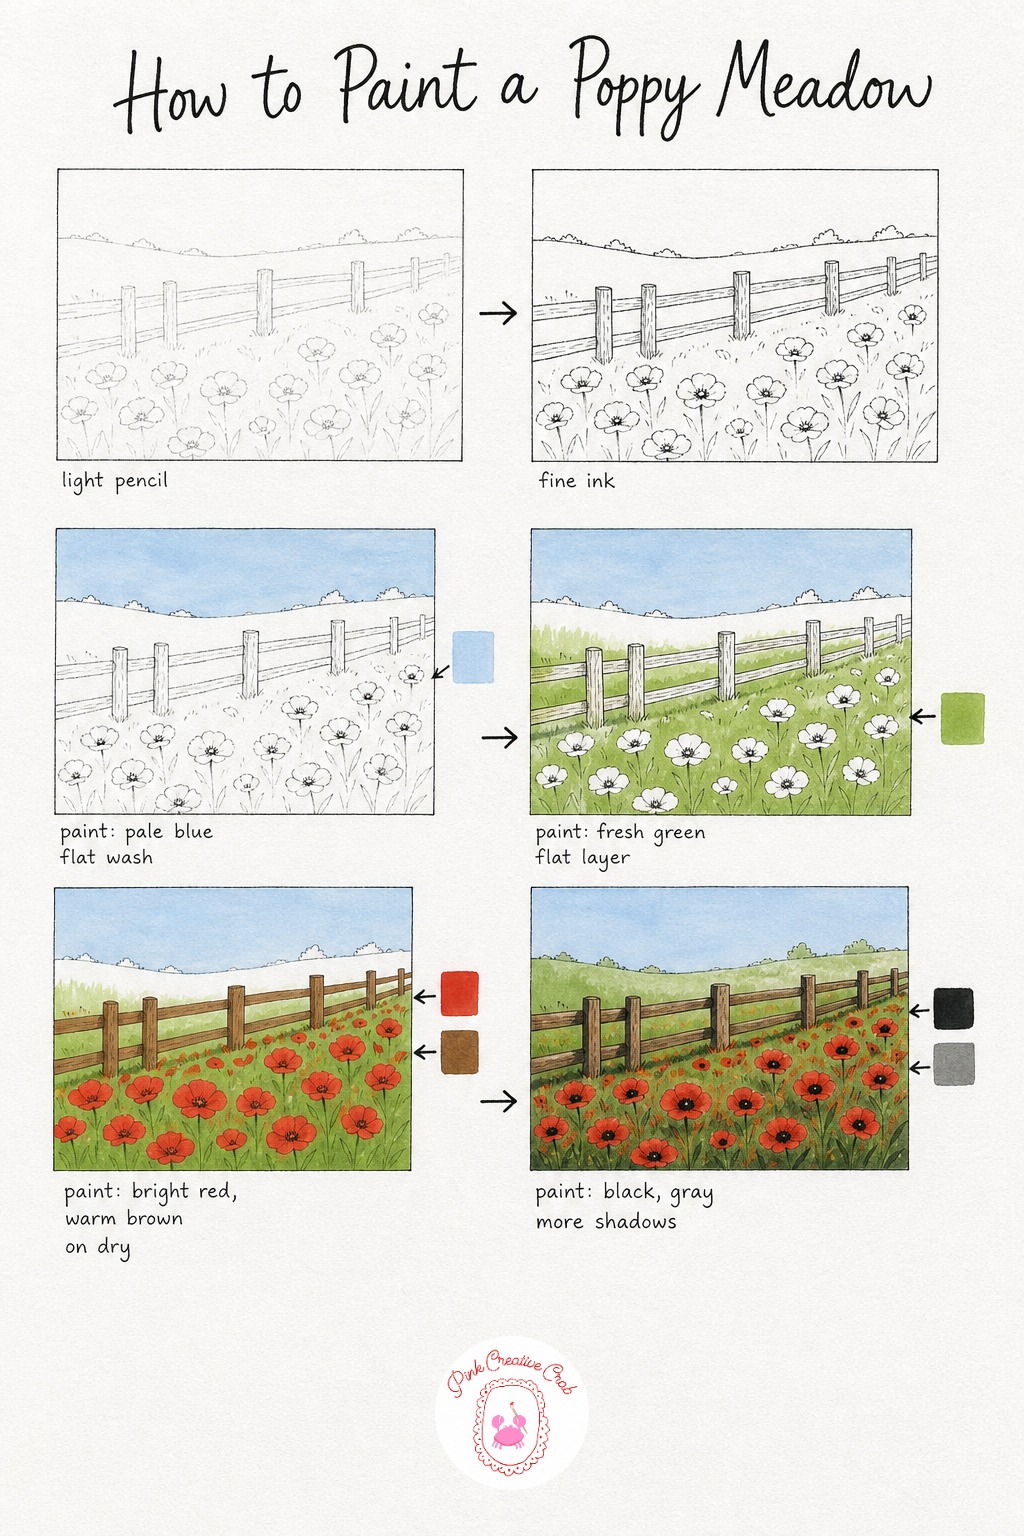
Draw a low horizon, a simple wooden fence running across the lower third, and scatter small circles for poppies throughout the meadow, more of them toward the front. Outline the fence posts and a dot for each poppy center in fine black ink before any color goes down.
Wash a pale blue sky above the horizon and let it dry, then cover the whole meadow in a fresh green flat layer. Let this green dry completely, it is the base every poppy will sit on top of.
Once dry, dot bright red petals across the meadow following your pencil marks, keeping the poppies loose and a little irregular in shape since real poppies are never perfectly round. Paint the fence in warm brown at the same stage, simple flat strokes along each post and rail.
Finish with a small black dot in the center of each poppy and a soft gray shadow running along the base of the fence and across parts of the ground. If fences and props like this appeal to you, the picnic drawing lessons cover more outdoor scene details worth exploring next.
Vineyard Rows In Autumn
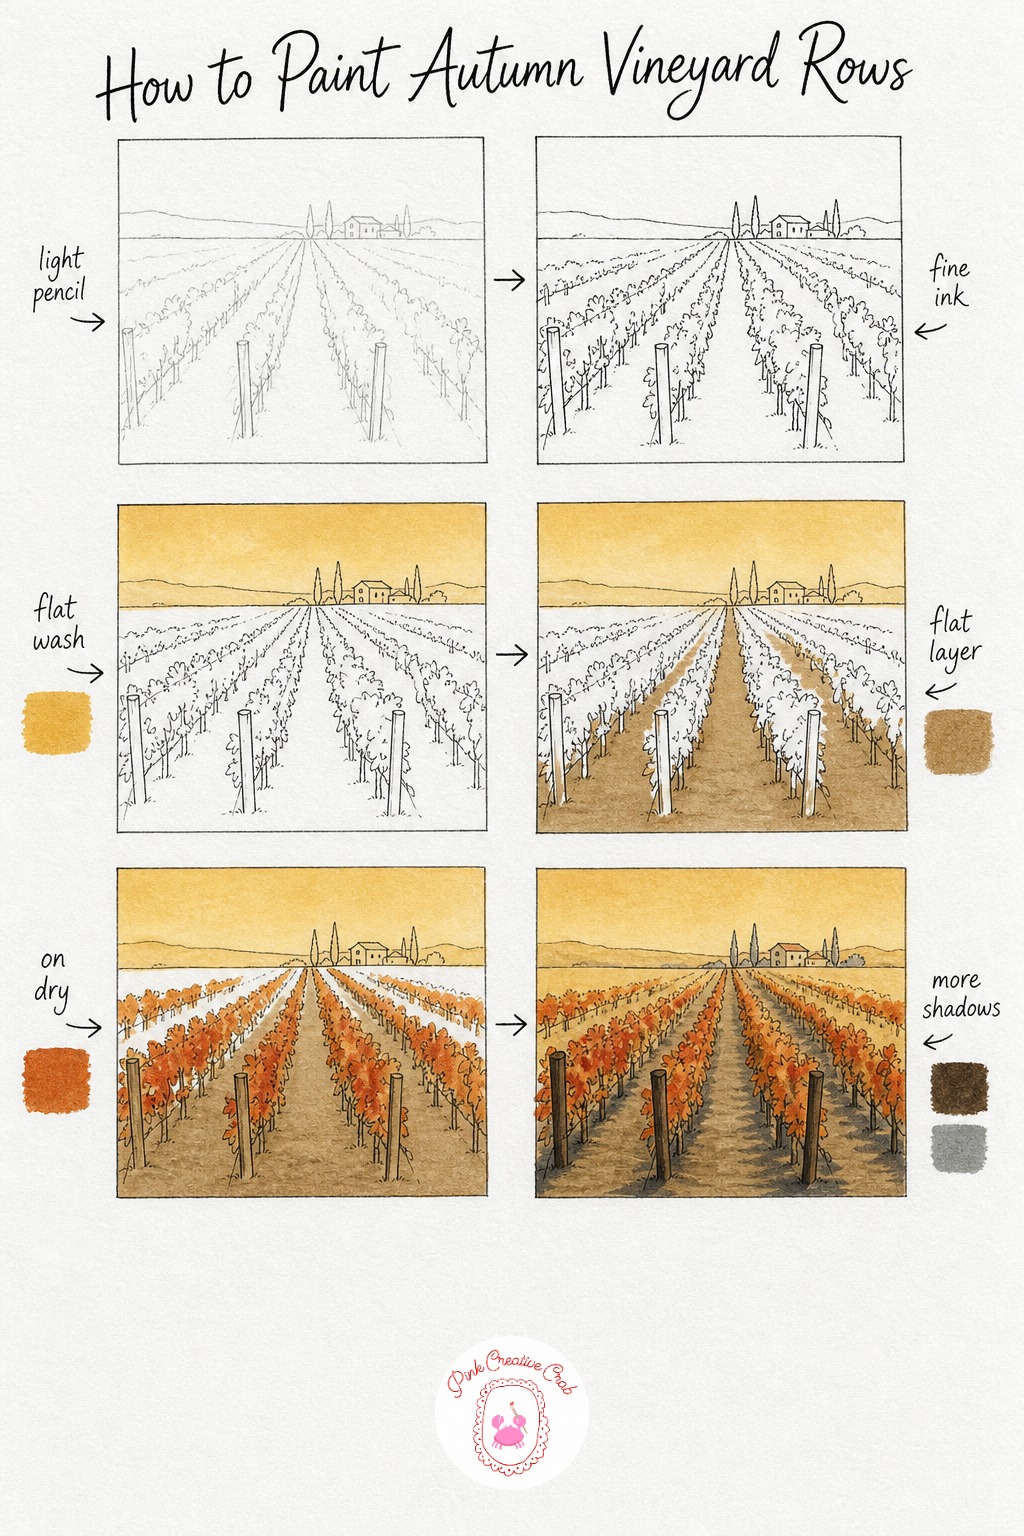
Sketch a horizon line and several rows of vines angled so they converge toward a point in the distance, this simple perspective trick is easier than it sounds and gives the whole scene depth. Trace the rows and a few post shapes in fine black ink to keep them readable once the warm autumn washes go on.
Paint a warm golden sky down to the horizon, then once dry, wash soft brown across the ground showing between the vine rows. These two flat layers set the whole autumn mood before a single leaf gets painted.
Paint rust orange leaf clusters along each row, keeping them smaller and closer together as the rows recede toward the back of the picture. This change in size is what sells the distance, so resist the urge to paint every row the same scale.
Finish with dark brown posts peeking between the leaves and a soft gray shadow running beneath each row where it meets the ground. If mixing warm rust tones feels tricky, the color mixing guide walks through warming and cooling a base color step by step.
Seaside Cliff Path
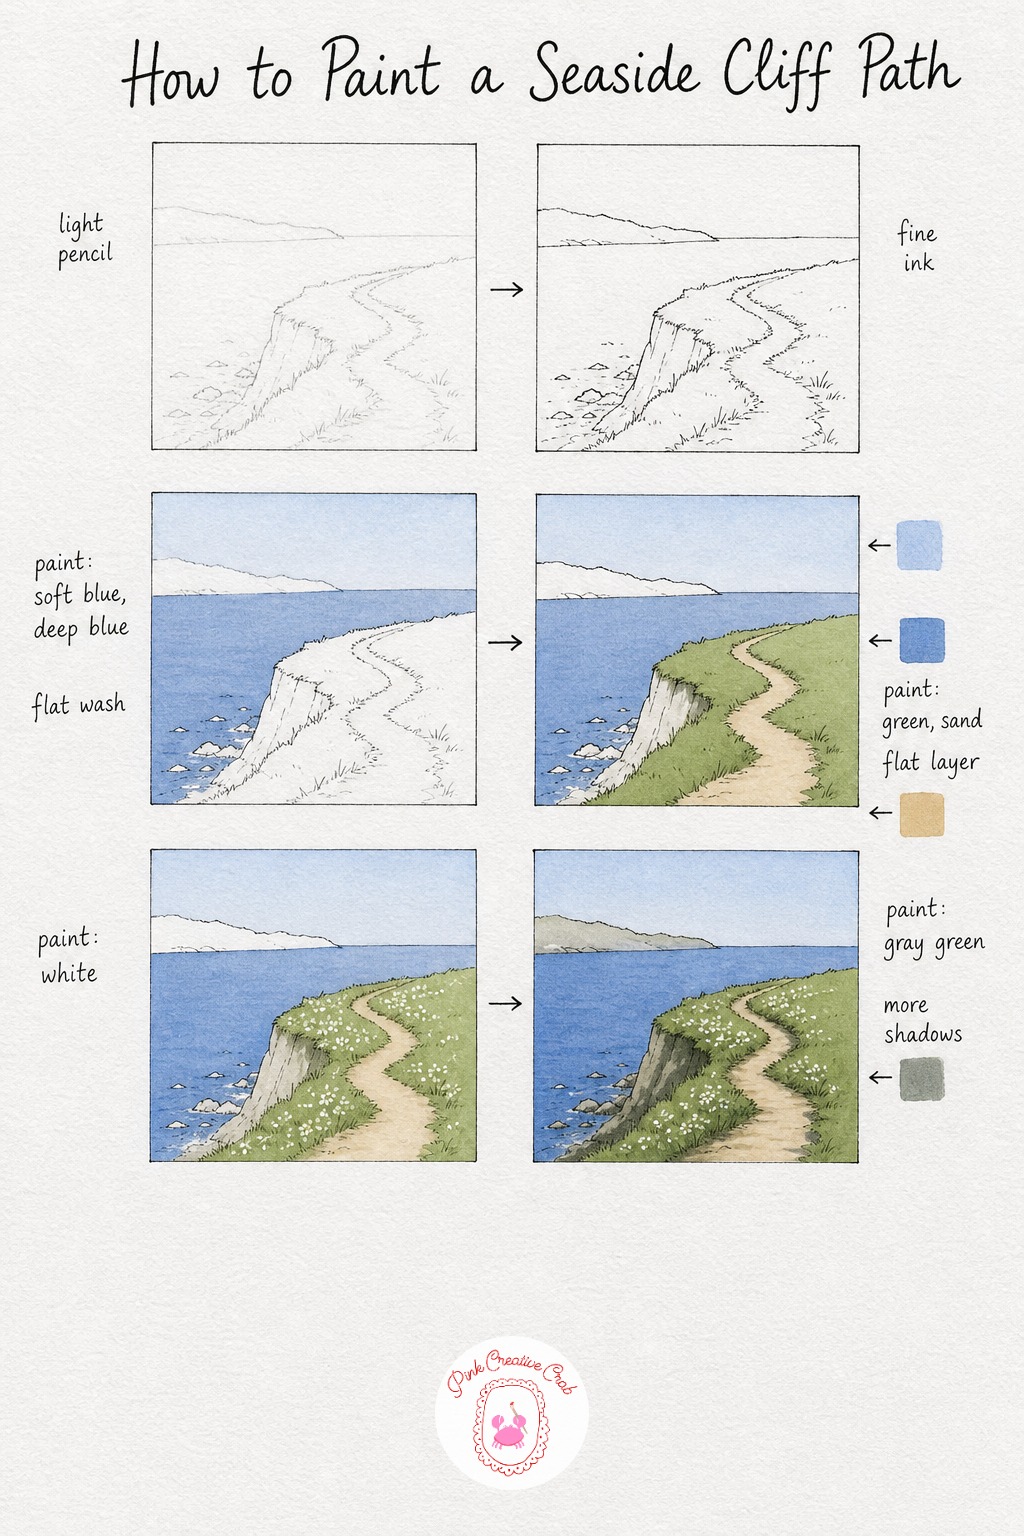
Draw a horizon line low on the page for the sea, then a cliff edge curving across the middle with a winding path leading from the foreground toward the top of the cliff. Outline the cliff edge and path in fine black ink so the shapes stay crisp under the sea and sky washes.
Paint the sky in soft blue and, once dry, paint the sea below the horizon in a slightly deeper blue, keeping the line between them clean and flat. Then wash green across the cliff top and a warm sandy color along the path, letting both dry fully before adding anything on top.
Dot small wildflowers along the cliff top using a tiny brush loaded with white and yellow, scattering them unevenly rather than in a neat line. A few scattered dots read as flowers far better than a tidy row ever does.
Finish with a soft gray green shadow running along the cliff edge where it drops to the sea, and a touch more shadow where the path dips and curves. For more seaside color ideas beyond this one scene, browse the oil painting landscape ideas for inspiration you can adapt to acrylic.
Country Orchard In Blossom
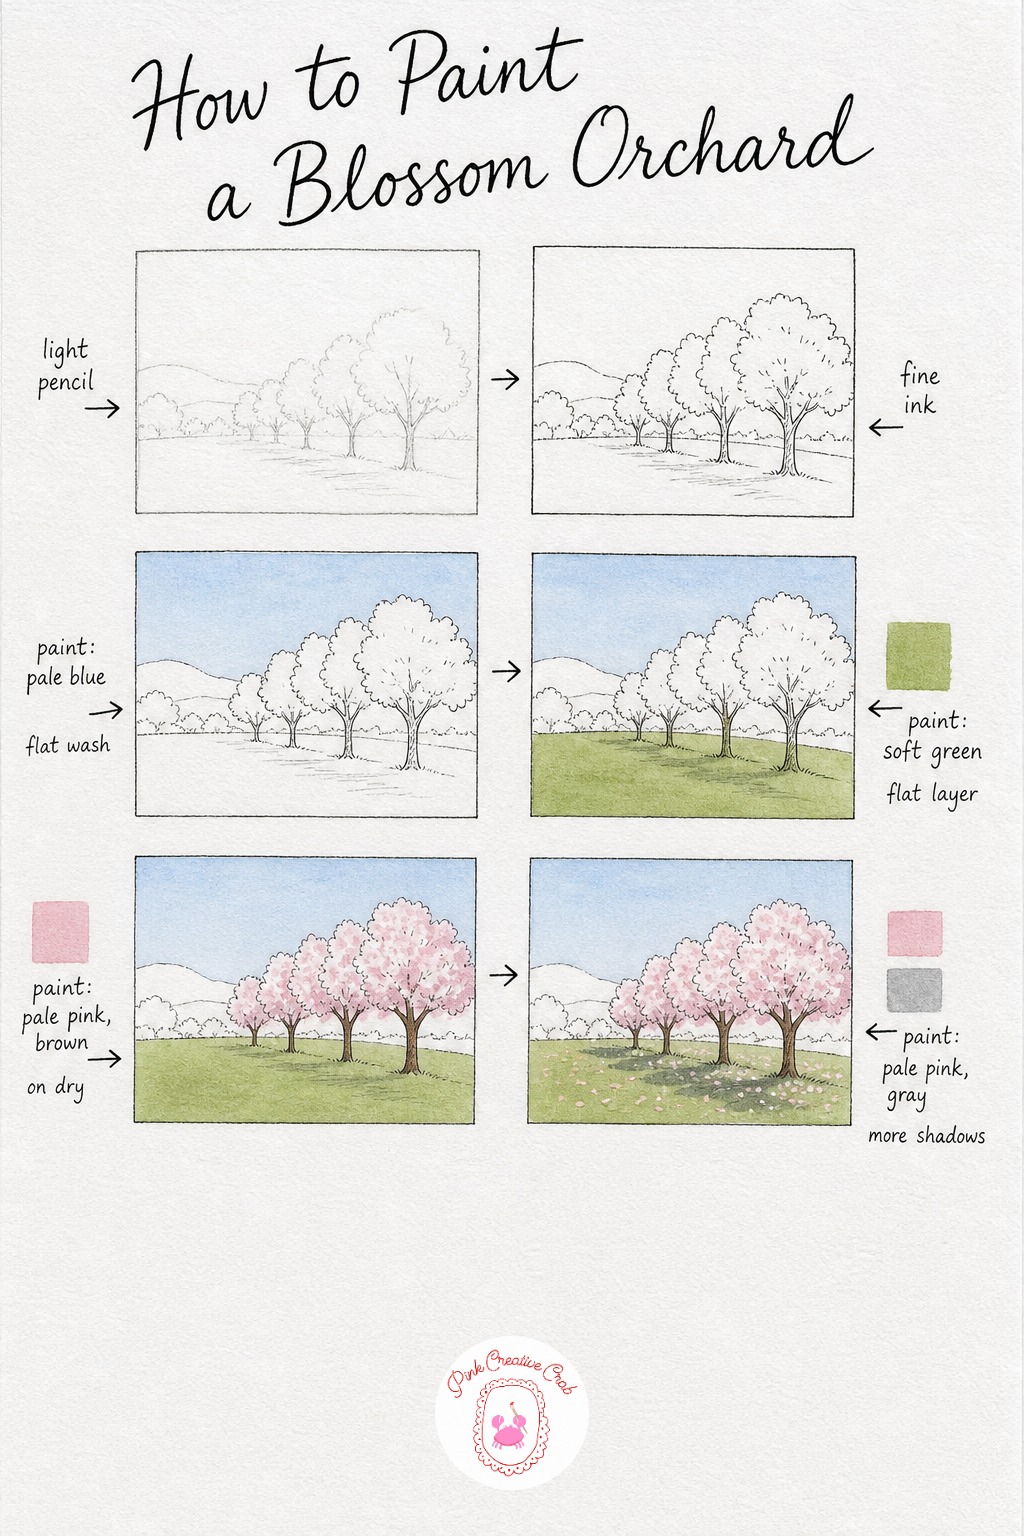
Sketch a simple row of three or four small trees along a soft horizon, each one just a trunk and a rounded canopy shape, spaced unevenly so the orchard feels natural. Trace the trunks and canopies in fine black ink before any wash goes on.
Wash a pale blue sky into the gaps between the trees and let it dry, then paint a soft green wash across the grassy ground beneath the whole orchard. Keep both washes flat and simple, the blossoms will do the detailed work later.
Fill each tree canopy with soft dabs of pale pink to suggest clusters of blossom, dabbing rather than brushing smoothly so the texture stays loose and flower like. Paint a simple brown trunk beneath each canopy once the pink has had a moment to set.
Finish with a few scattered pink dots on the ground beneath the trees, as if petals have drifted down, plus a soft gray shadow pooling at the base of each trunk. If you love this blossom palette, the acrylic flower painting ideas are full of similar soft pink techniques to try next.
What to Do Next
Pick whichever scene is calling to you most, print or open the worksheet, and paint through its stages in one relaxed sitting, sky to shadow.
Frequently Asked Questions
What acrylic paint colors do I need for easy landscape painting for beginners step by step?
A small starter set covers it: a sky blue, a warm yellow, a soft green, a touch of purple or pink, plus white, black and brown. Most of the fresh greens and sunset tones in these lessons come from mixing those few colors together.
Do I need to seal or varnish the finished landscape painting?
A varnish is optional but not required for these lessons. Acrylic dries to a stable, slightly glossy finish on its own, so varnish is only worth adding if you plan to hang the piece or want extra protection from dust.
How wet should my acrylic paint be for the sky and ground layers?
Thin it with a little water until it moves like a light cream, smooth enough to glide flat across the paper without streaking or pooling. Too watery and it will look patchy, too thick and brush marks will show.
What if I make a mistake on a flat color layer?
Let it dry fully, then simply paint over it with the correct color, acrylic covers itself well once dry. This is one of the easiest parts of working in acrylic compared to more transparent paints.
How do I make my landscape look less flat and more realistic?
Add a shadow on one consistent side of every shape, hills, trees, trunks and fences alike, as if the light always comes from the same direction. That single habit does more for depth than any extra detail.
Have any thoughts?
Share your reaction or leave a quick response — we’d love to hear what you think!
-
 0
-
0
-
0
-
0
-
0
-
0


