

Christmas acrylic painting gets a modern update here: flat punchy backgrounds in burgundy, pink, mint and navy, clean shapes, and just enough red, green and gold to feel festive without tipping into clutter. Every canvas below reads more like a print you would frame all year than a seasonal craft, and that is exactly the point.
You will find styled still lifes, animals in their holiday best and a few quiet objects that carry the whole mood on their own. Scroll at your own pace, pick whatever canvas is calling to you tonight, and paint it start to finish before the kettle goes cold.
Using these images: free for personal projects such as printing, coloring, cards, journals and gifts. Handmade items that include them may be sold up to 30 pieces per design. More than that is commercial use and is not permitted, and neither is selling or sharing the images themselves or passing them off as your own. Please ask before any other use.
Start with the easiest still life on the list: a bowl of clementines sitting against a flat burgundy background, with a velvet bow draped over the rim. Paint the burgundy field first with a large flat brush, let it dry, then sketch the bowl and fruit shapes lightly in pencil.
Block the clementines in solid orange, then drop in a darker burnt orange on the shadowed side while the paint is still workable so the two colors blend just at the edge. Paint the bowl in a flat cream or white, add the ribbon last in a deep red with a few quick highlight strokes to suggest velvet folds.
The common mistake here is painting every clementine the same flat orange with no shadow side, which flattens the whole bowl. Keep one consistent light source, even just an imagined one from the upper left, so every piece of fruit shows a highlight and a shadow in the same place.
If you do not have burgundy on hand, mix it from alizarin crimson and a touch of Payne’s grey.
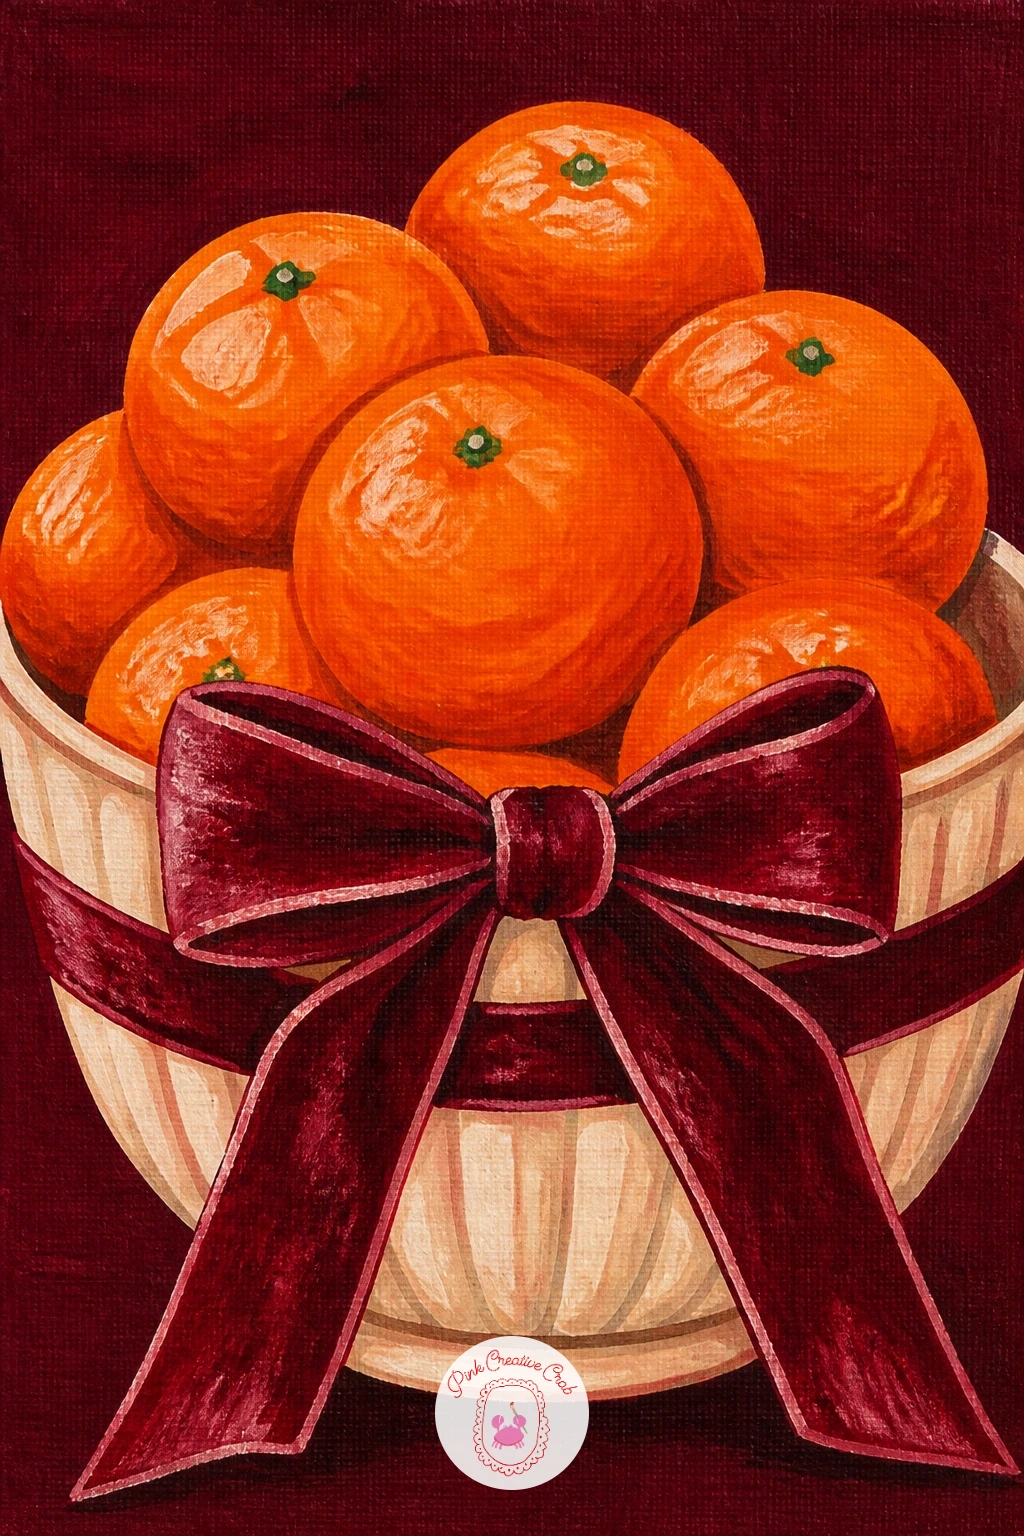
You Will Need
- canvas or canvas board
- large flat brush for backgrounds
- small round brush for fruit highlights
- pencil for light sketching
Palette: Burgundy,Cadmium Orange,Burnt Sienna,Titanium White,Deep Red
Try adding one clementine with a peeled strip of rind curling off it for a bit of movement, and look at real citrus skin texture before you paint the dimpled surface.
Move from fruit to fur with a shaggy highland cow wearing a Christmas wreath around its neck. Work on a flat mint or soft sage background, painted first and dried completely, then sketch the cow’s head and shoulders large enough to fill most of the canvas.
Block in the base fur color in warm burnt sienna, keeping the shape simple and chunky rather than tracing every curl. Once that layer is dry, use a smaller stiff brush to drag short dry-brush strokes of a lighter tan and a darker umber over the base coat, following the direction the fur would grow, to build the shaggy texture without painting every single hair.
The wreath goes on last in flat green with a few dots of red berries and a ribbon bow, painted on top of the dry fur. If dry brushing feels tricky, load a fan brush very lightly with paint and dab instead of dragging, which gives a similar broken texture with less control needed.
Keep the horns and eyes for the very last strokes so they stay crisp against the textured coat.
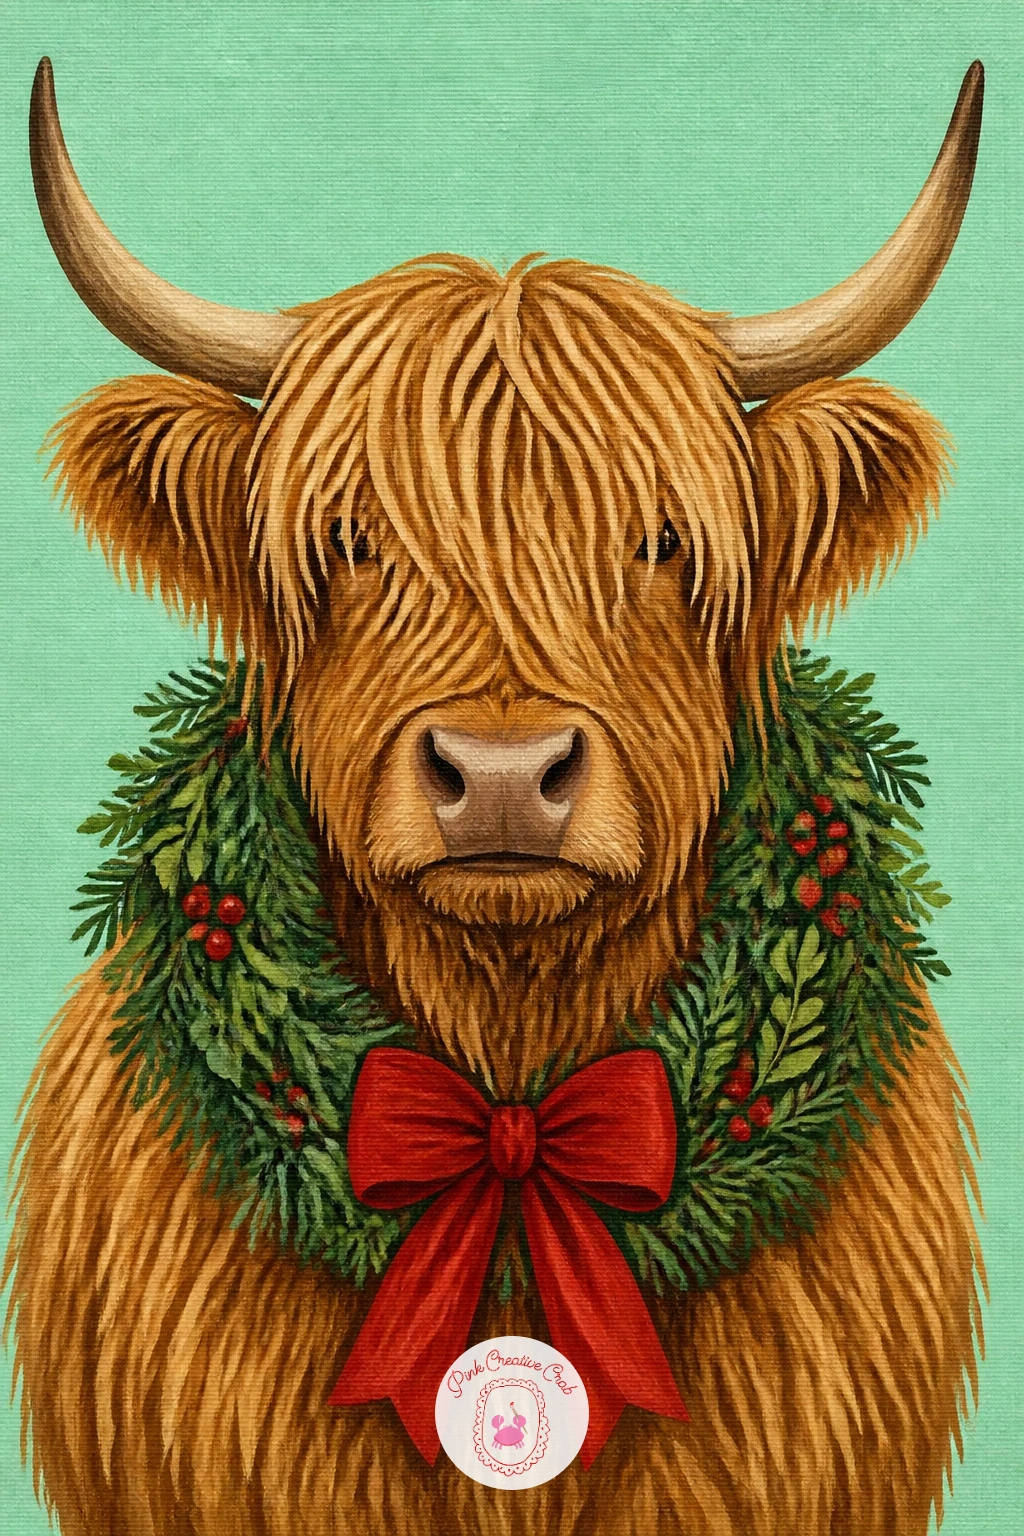
You Will Need
- canvas or canvas board
- stiff flat or fan brush for dry brushing
- small round brush for wreath and details
- burnt sienna and umber acrylics
Palette: Mint Green,Burnt Sienna,Raw Umber,Sap Green,Cadmium Red
Reference a few real highland cow photos for the fringe over the eyes, it is the one feature that makes the whole painting read instantly as this breed.
Give yourself a break from fur and turn to a single champagne coupe holding a cherry and a small sprig of pine, set against a flat navy background. Paint the navy field first and let it dry hard before adding the glass, since any wet edges will drag dark paint into your highlights.
Sketch the coupe’s outline lightly, then paint the glass itself almost entirely in white and pale grey, saving the darkest navy as negative space showing through rather than painting the glass solid. Picture the eye level sitting just below the rim of the glass, looking slightly up at it, which keeps the ellipse of the rim shallow and believable.
Add the champagne as a warm gold wash inside the bowl of the glass, then the cherry in deep red with one bright white highlight dot, and the pine sprig in two greens for depth. Keep the stem of the glass thin and painted in one confident stroke rather than several shaky ones.
If gold paint is not in your kit, mix yellow ochre with a touch of white and a tiny bit of burnt sienna.
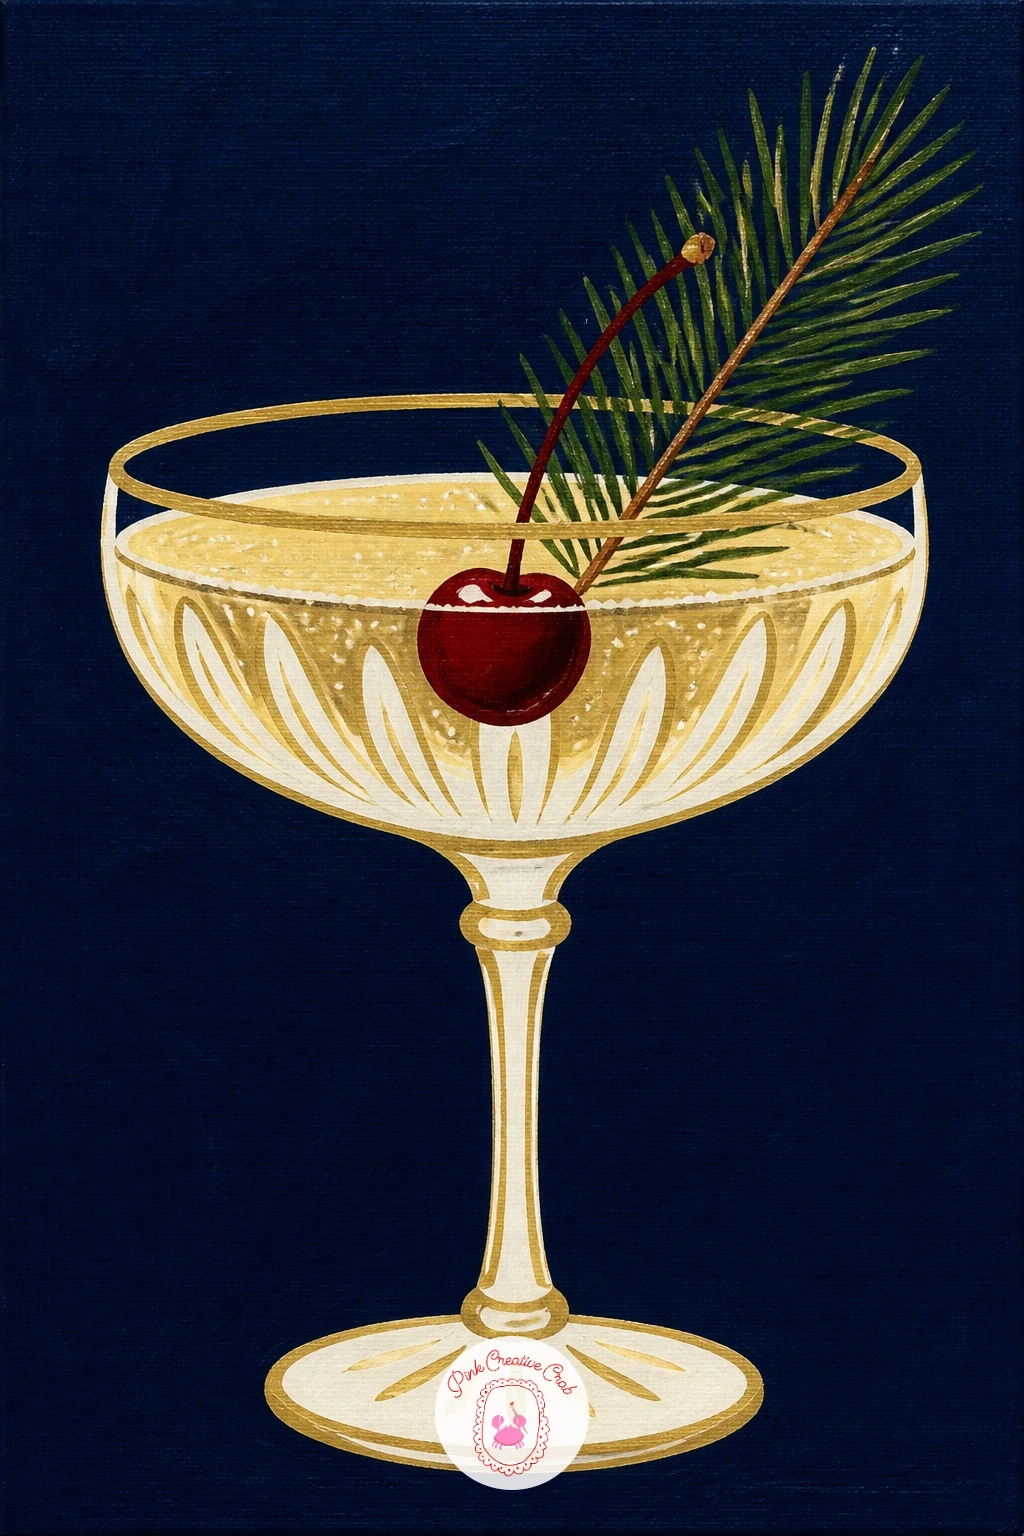
You Will Need
- canvas or canvas board
- fine round brush for the stem and highlights
- small flat brush for the glass bowl
- white and navy acrylics
Palette: Navy,Titanium White,Gold Ochre,Deep Red,Sap Green
Leave a thin unpainted sliver of canvas or white paint along the glass rim to read as a bright highlight, it does more work than any amount of shading.
From a single glass to a pair of birds: two cardinals perched on a snow-dusted branch gives you a chance to practice a simple animal pair without a cluttered scene. Paint a flat pale blue or soft grey background first, then sketch the branch running diagonally across the canvas with the two birds sitting close together.
Block each cardinal in flat bright red, keeping the body a simple rounded teardrop shape, then add the black face mask and beak once the red is dry. Make the two birds slightly different sizes and angles, one looking forward and one turned toward its partner, so the pair feels alive rather than copied and pasted.
Paint the branch in flat brown, then use a loaded brush to dab soft white snow clumps along the top edge of the branch, letting some brown show through so the snow looks settled rather than painted as a solid cap.
Swap the pale blue background for white if you want more contrast with the red birds.
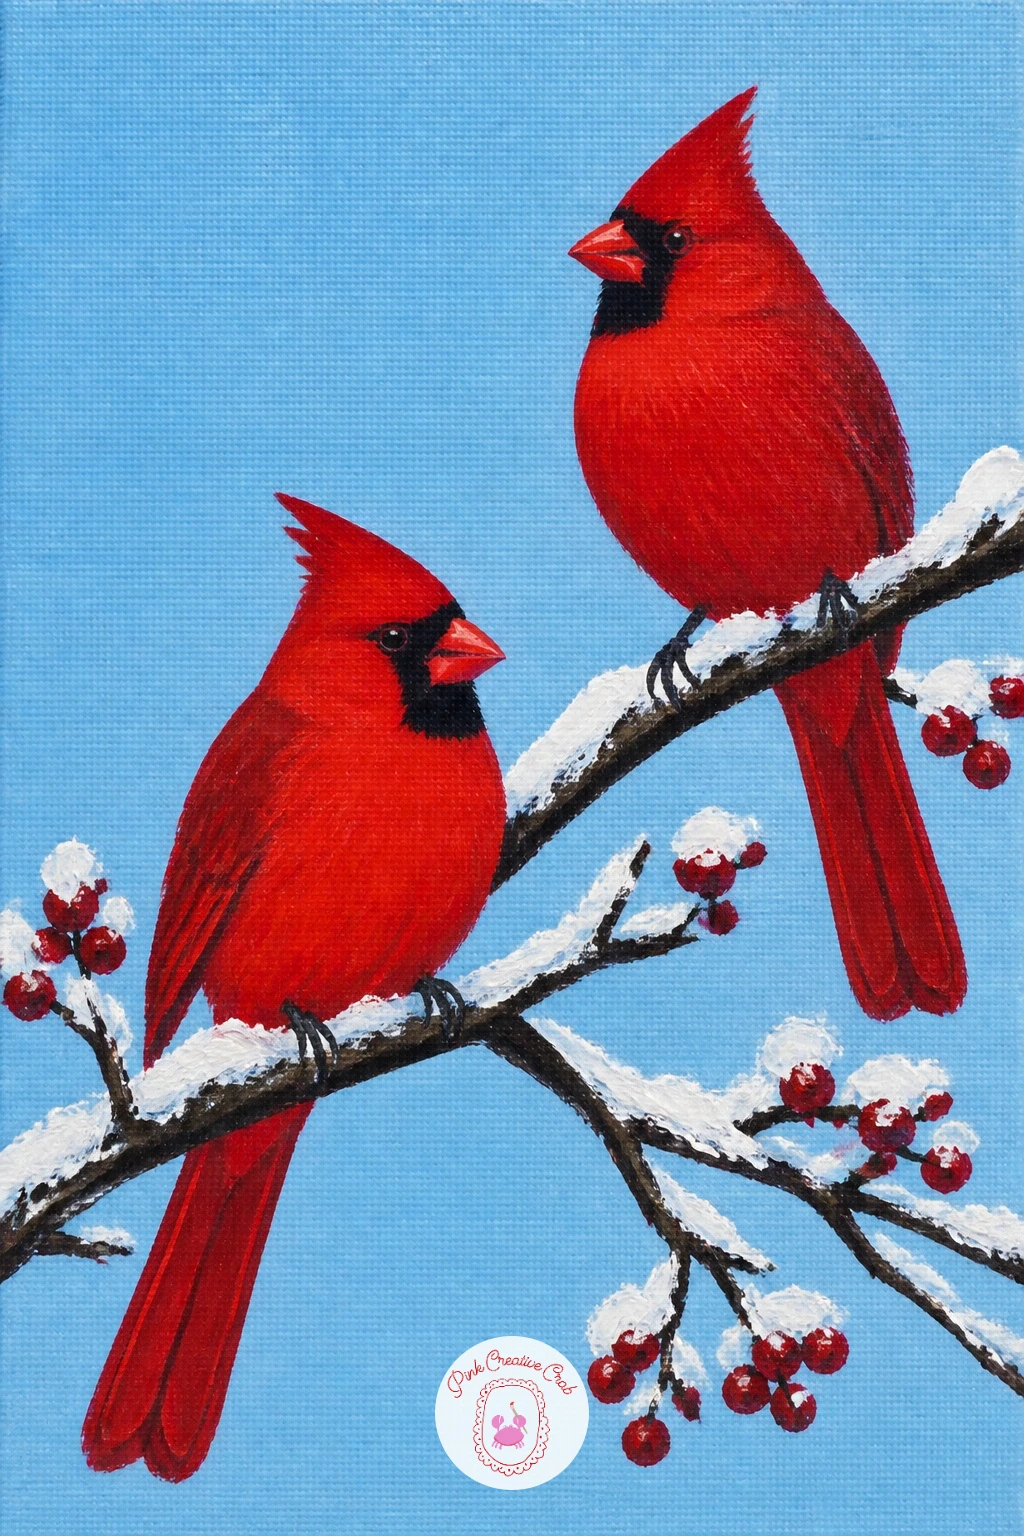
You Will Need
- canvas or canvas board
- small round brush for the birds
- flat brush for the branch
- white acrylic for snow texture
Palette: Pale Sky Blue,Cadmium Red,Carbon Black,Raw Umber,Titanium White
Keep the two cardinals close enough that their shapes almost touch, a gap that is too wide reads as two separate paintings instead of one scene.
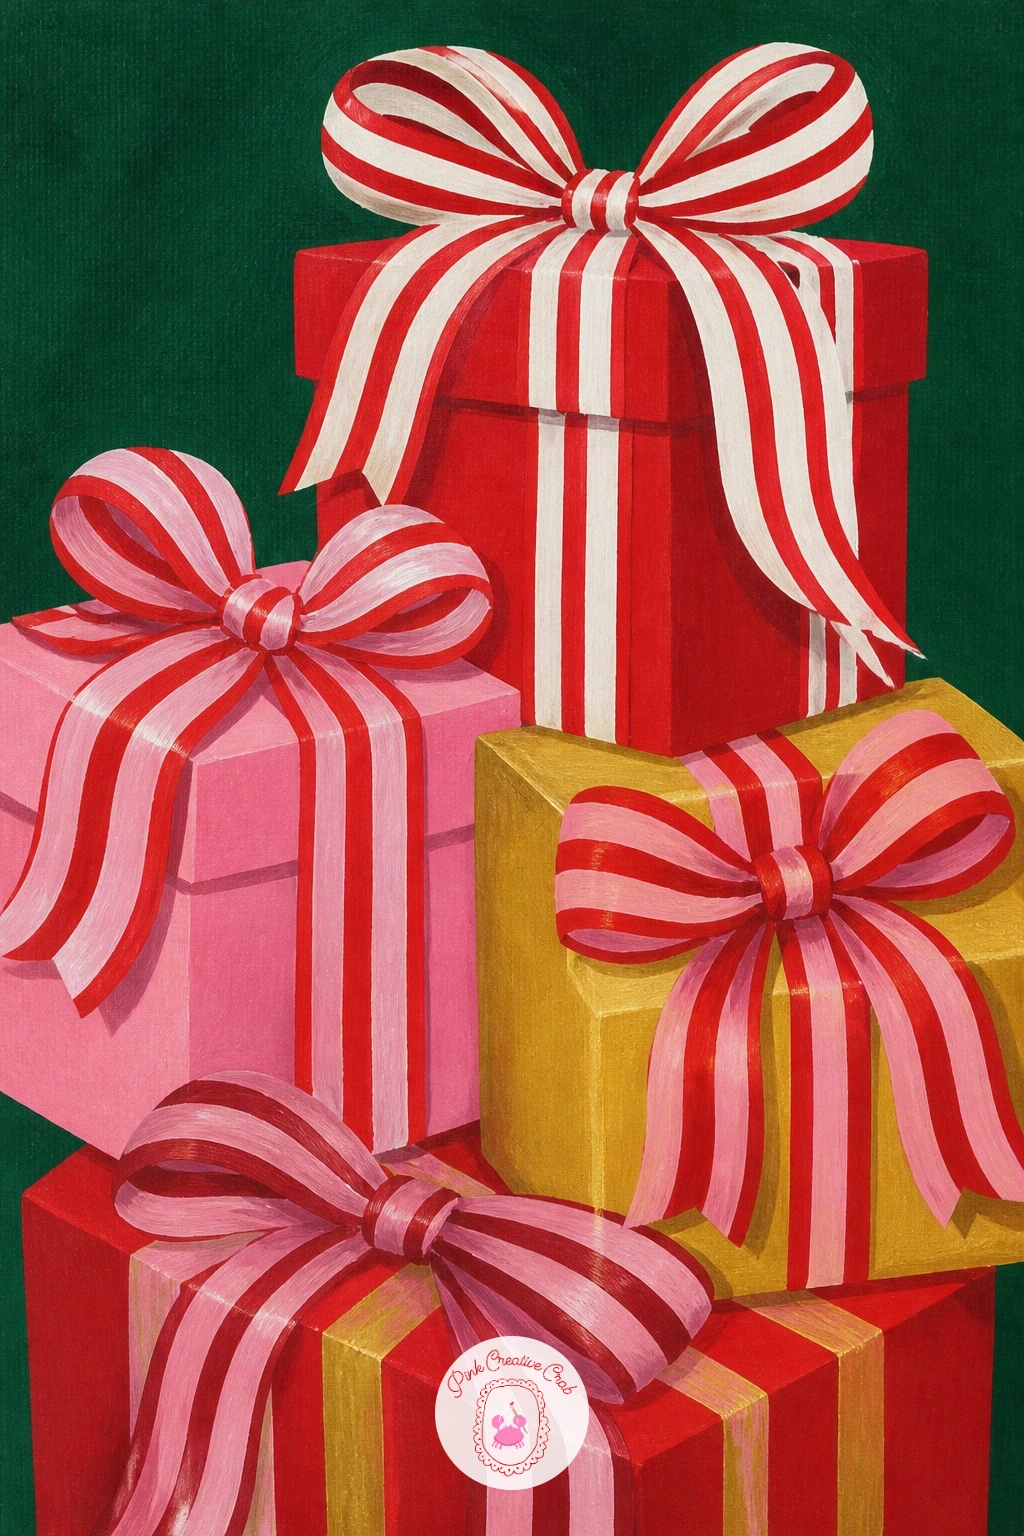
Build confidence with flat shapes by stacking three or four wrapped presents in different sizes, each with a striped ribbon, against a flat deep green background. Paint the background first, then sketch the boxes as simple stacked rectangles, varying the sizes so the stack reads as a pile rather than a grid.
Give each box a different wrapping color in solid flat paint, using painter’s tape on dry canvas if you want perfectly straight edges between boxes. Once every box is dry, add the ribbons as straight bands running across each box, then the bow on top painted as two simple loops and a knot rather than a fussy tangle of fabric.
The quick ten minute version stops at flat boxes and ribbons with no extra detail, which already reads as a clean modern print. Give it forty minutes and you can add a thin painted shadow under the stack and a subtle stripe pattern on one or two of the ribbons using a fine liner brush.
Keep every stripe the same width by eye rather than measuring, slight variation actually looks more hand painted and less sterile.
You Will Need
- canvas or canvas board
- painter’s tape (optional)
- fine liner brush for stripes
- three or four wrapping colors
Palette: Forest Green,Cadmium Red,Gold Ochre,Blush Pink,Titanium White
Try swapping one present for a round hat box shape next time, it breaks up the rectangles and makes the stack feel more varied and interesting.
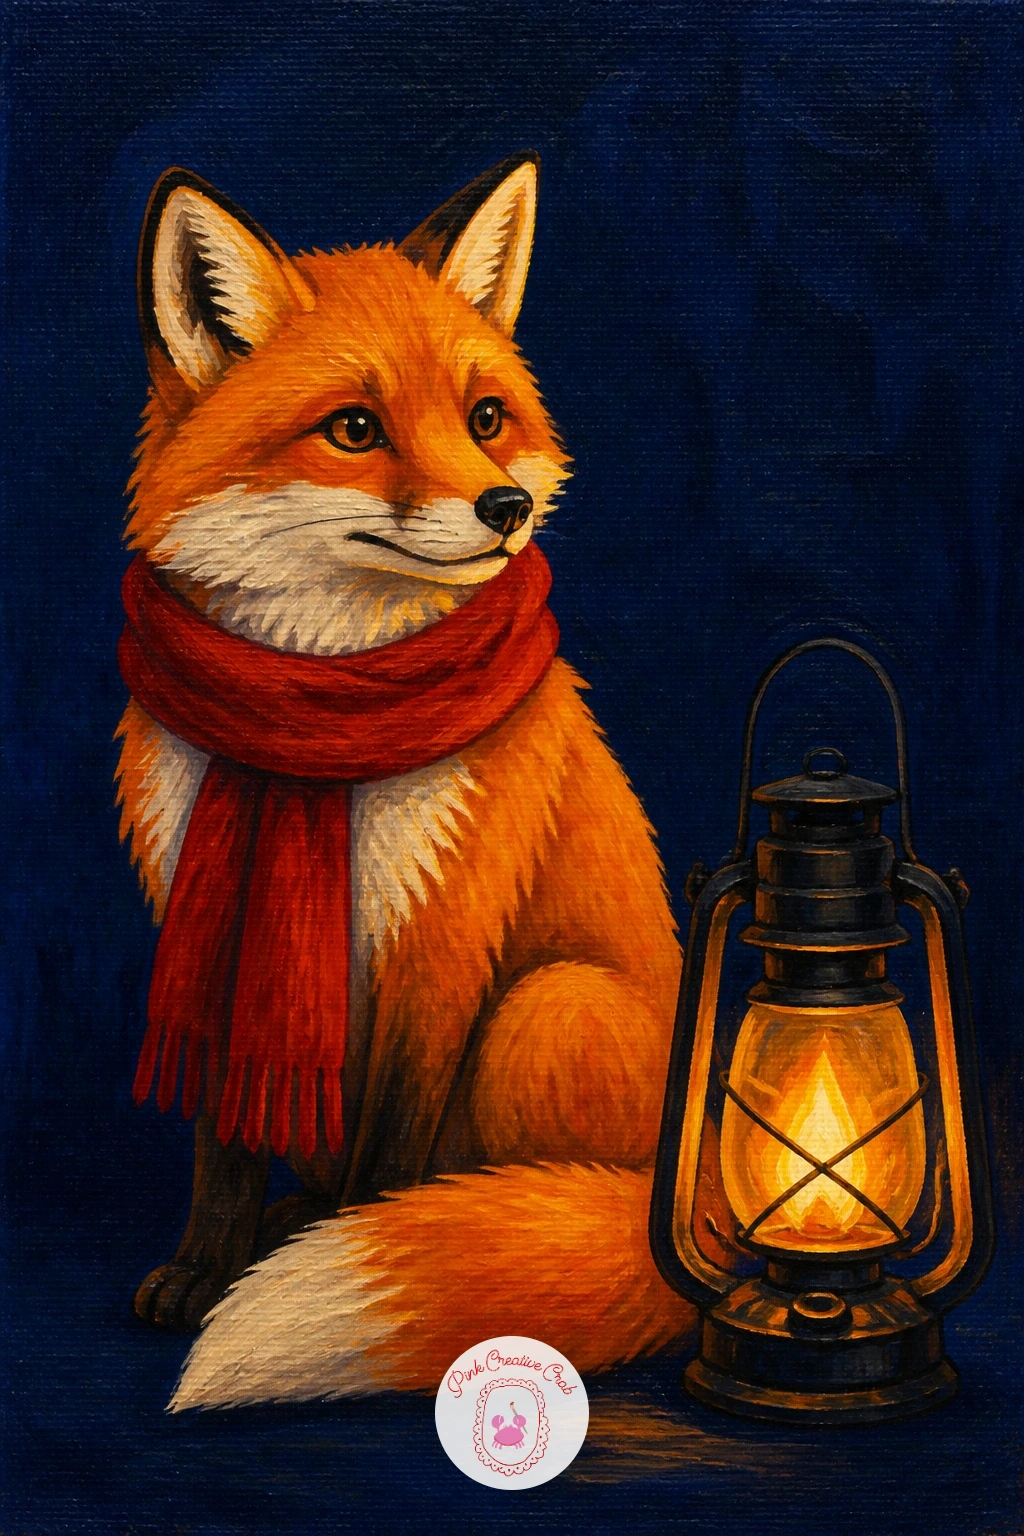
Give the stack of gifts a rest and paint a small scene instead: a fox wrapped in a red scarf sitting beside a glowing lantern. Choose a flat deep navy or near-black background so the lantern light has somewhere dark to shine against, and sketch the fox sitting upright with the lantern placed just beside its paws.
Picture the lantern as the only light source in the scene, which means the side of the fox facing it gets warm orange-tinted highlights while the far side stays in cool shadow blues. Paint the fox’s base coat in flat orange first, then work the lit side with a touch of yellow mixed in and the shadow side with a little blue or violet mixed into the orange.
Add the lantern last, painting the glass panes in warm yellow with a soft white glow bleeding slightly into the dark background around it. The red scarf goes on top of the dry fox in one confident flat shape with a couple of fold lines in a darker red.
If blending the two lighting temperatures feels hard, keep it simple and paint the fox in flat orange with just the scarf and lantern glow to carry the warmth.
You Will Need
- canvas or canvas board
- small round brush for the fox face
- fine brush for the lantern glow
- yellow, blue and orange acrylics
Palette: Deep Navy,Cadmium Orange,Cadmium Red,Warm Yellow,Dioxazine Violet
Dot a few tiny white sparkle marks around the lantern glow once everything else is dry, a trick borrowed from the glowing windows in these watercolor christmas cards ideas.
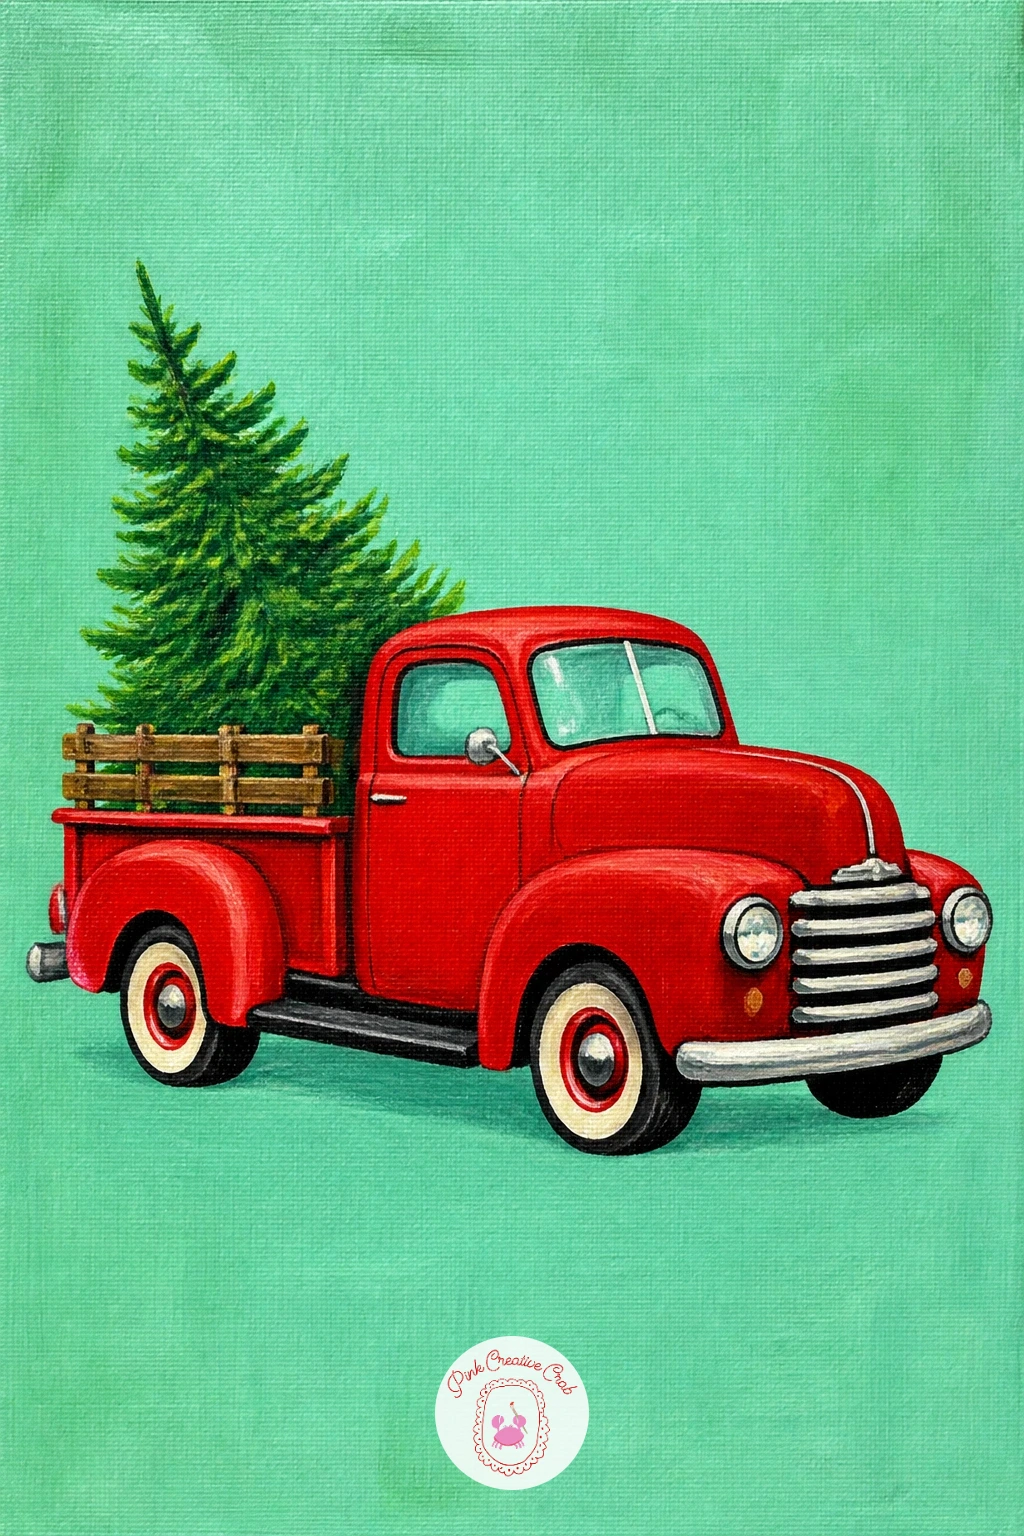
Shift gears into a vehicle scene with a vintage red pickup truck carrying a small Christmas tree in its bed, parked flat against a soft mint background. Sketch the truck’s boxy body shape first, keeping the proportions simple: a wide low body, round fenders and a tree sitting upright in the open bed.
Measure the truck’s cab height against its total length before you paint, a vintage truck reads correctly when the cab takes up roughly a third of the total length and sits a little taller than the hood. Block the body in flat red, the fenders and bumper in a lighter cream or chrome grey, then add the tree in two layers of green with a few painted dots for ornaments.
Keep the wheels as simple flat black circles with a small grey hubcap dot, resisting the urge to paint tire tread or rust detail that would pull this toward realism instead of a clean print look.
Swap the mint background for a soft blush pink if you want a warmer palette.
You Will Need
- canvas or canvas board
- ruler or straight edge for the truck body
- small round brush for tree and details
- red and mint acrylics
Palette: Mint Green,Cadmium Red,Cream,Forest Green,Carbon Black
Look at a few real vintage truck photos for the rounded fender shape, it is the single detail that makes a truck read as vintage rather than modern.
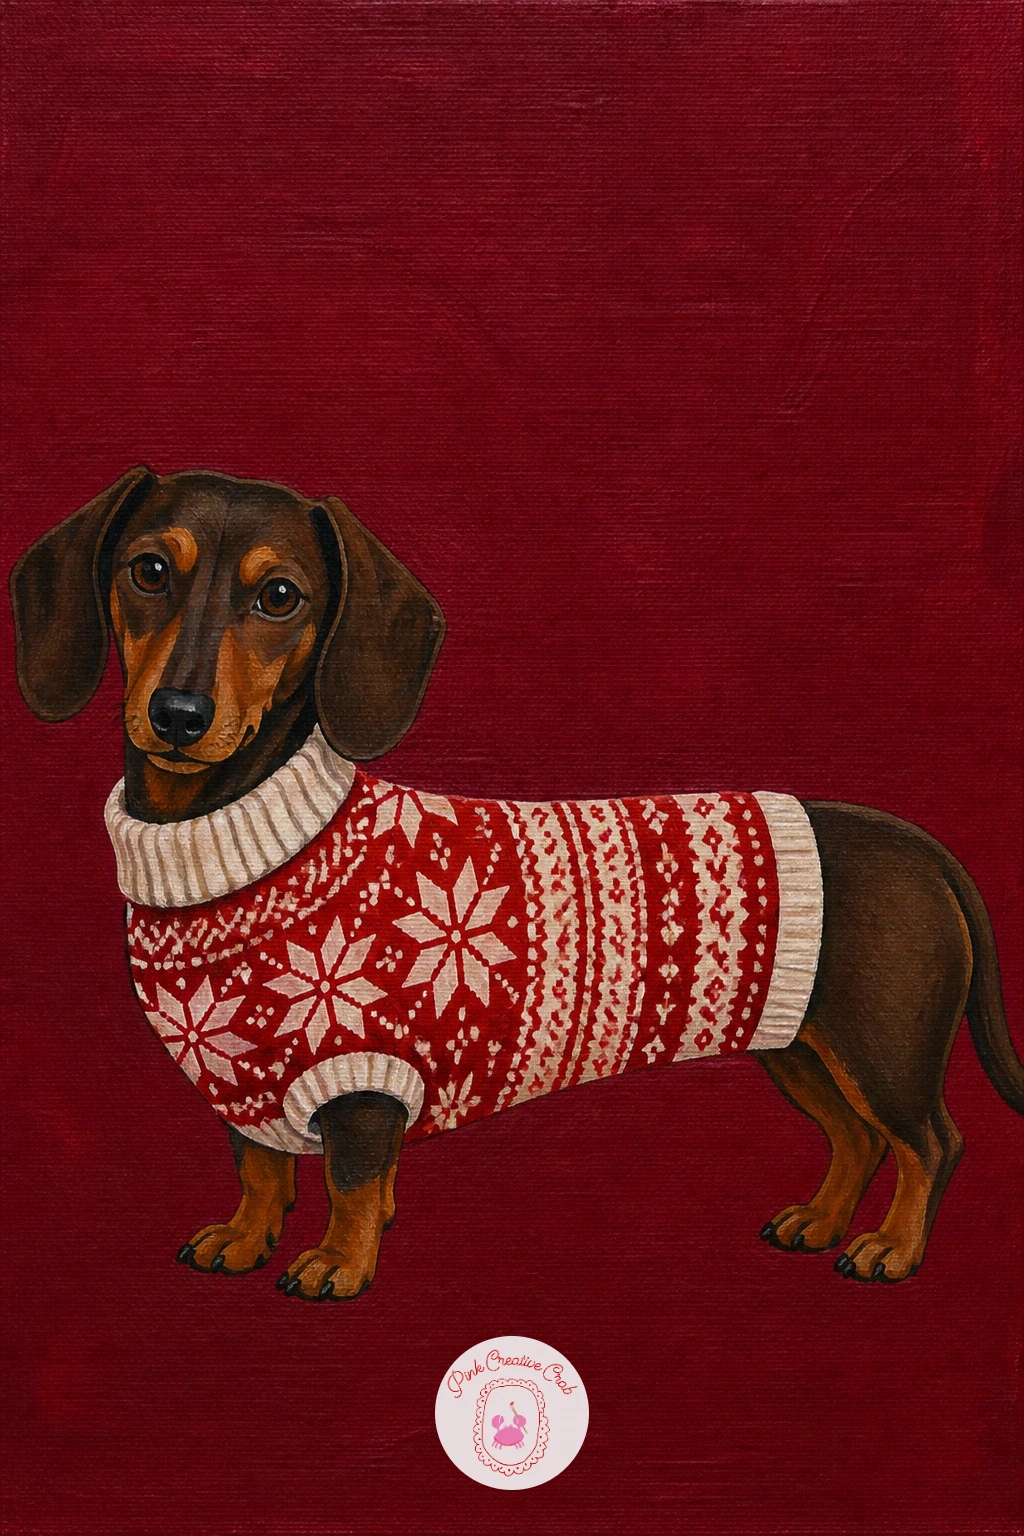
Bring the mood back down to a cozy portrait: a long dachshund wearing a knitted Christmas sweater, sitting against a flat burgundy or navy background. Sketch the long low body first, keeping the proportions in mind: a dachshund’s body is roughly twice as long as it is tall, and getting that ratio right matters more than any detail of the face.
Paint the base coat of the dog in flat warm brown, then add the sweater on top in a contrasting color with a simple knitted pattern suggested by a few painted ribs or a snowflake dot rather than a fully rendered cable knit. The ears and tail stay soft and rounded, painted with a slightly drybrushed edge so they do not look stiff against the flat background.
The common misstep is making the legs too long, which turns a dachshund into a generic dog. Keep the legs short and stubby and the body close to the ground.
If you want a quicker version, skip the sweater pattern entirely and paint it as one flat solid color block.
You Will Need
- canvas or canvas board
- small round brush for the sweater pattern
- stiff brush for drybrushed fur edges
- brown and a bold sweater color
Palette: Burgundy,Burnt Sienna,Cadmium Red,Titanium White,Gold Ochre
Paint the sweater’s pattern in a slightly raised texture using a thicker mix of paint, it reads as knitwear even from across a room.
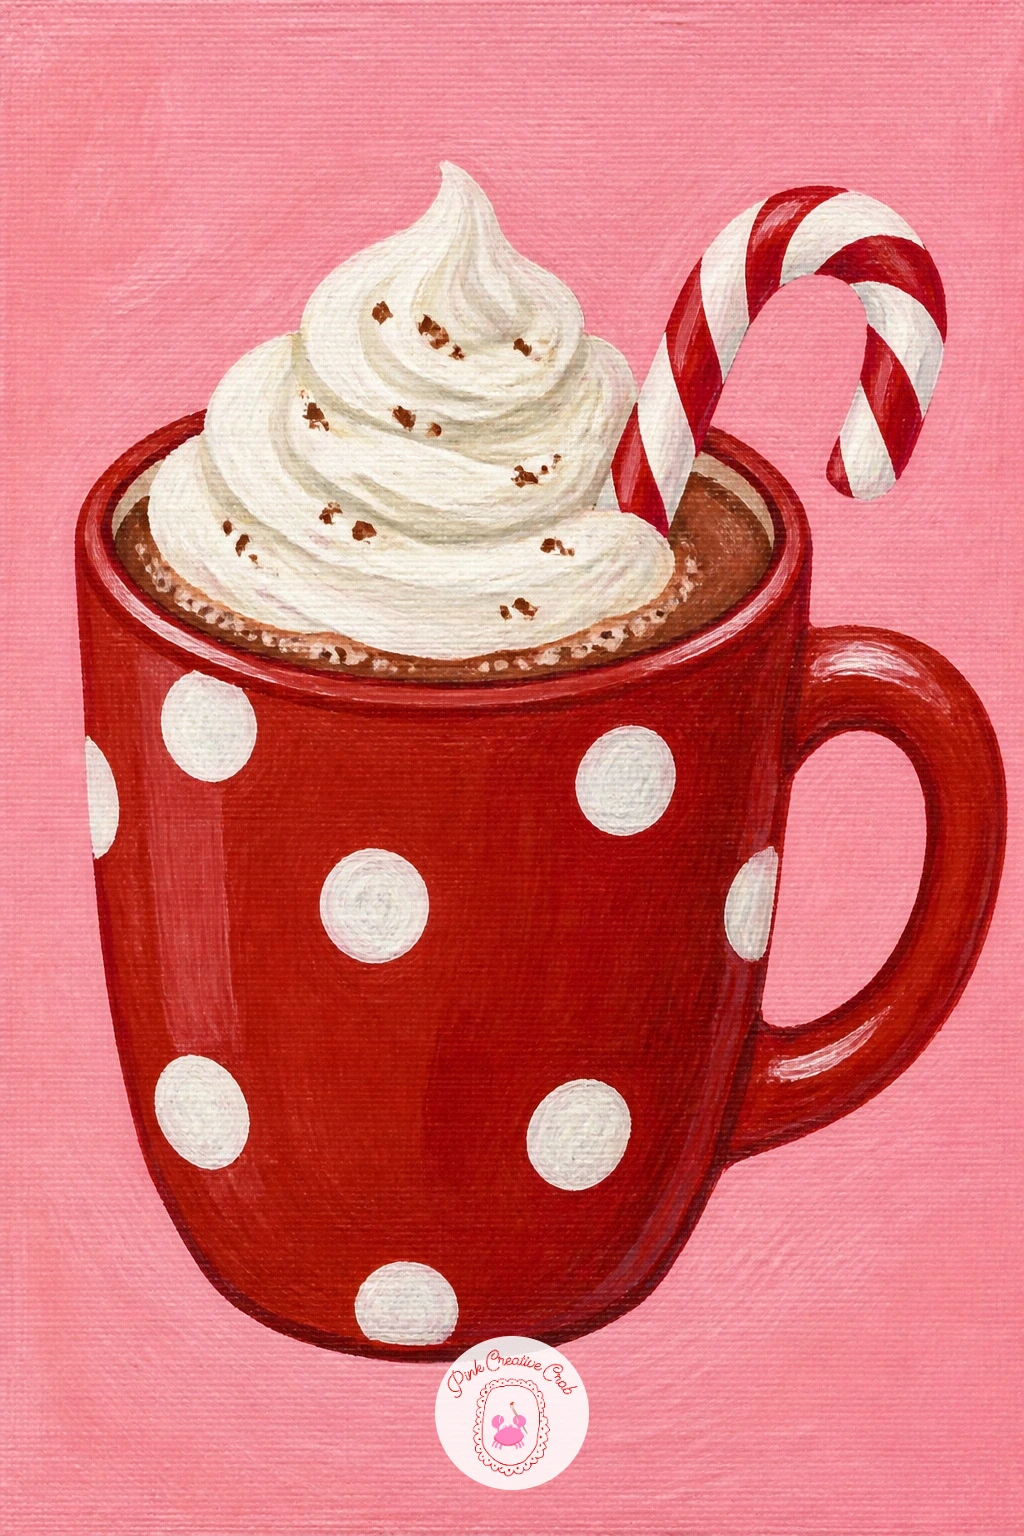
Return to still life with something simple and cozy: a mug of cocoa topped with whipped cream and a candy cane, set against a flat soft pink background. Paint the pink field first, then sketch the mug as a basic cylinder shape with a simple curved handle, keeping the ellipse of the rim shallow since you are viewing it slightly from above.
Block the mug in flat white or cream, then add the cocoa as a rich brown fill inside the rim, leaving a small gap of mug color showing as the lip. The whipped cream goes on in loose soft peaks of white with a touch of blue-grey shadow mixed in for the undersides of each peak, and the candy cane sits propped against the rim in alternating red and white stripes.
A flat mug with no shading looks like a sticker rather than a solid object, so keep one soft shadow along the lower curve of the mug to suggest it is round.
Swap the candy cane for a cinnamon stick if you want a less literal Christmas symbol.
You Will Need
- canvas or canvas board
- small round brush for whipped cream peaks
- fine brush for candy cane stripes
- brown and pink acrylics
Palette: Blush Pink,Burnt Umber,Titanium White,Cadmium Red,Payne’s Grey
Dab a tiny bit of gold paint along the mug’s rim for a ceramic shine, it is a small touch but it lifts the whole still life.
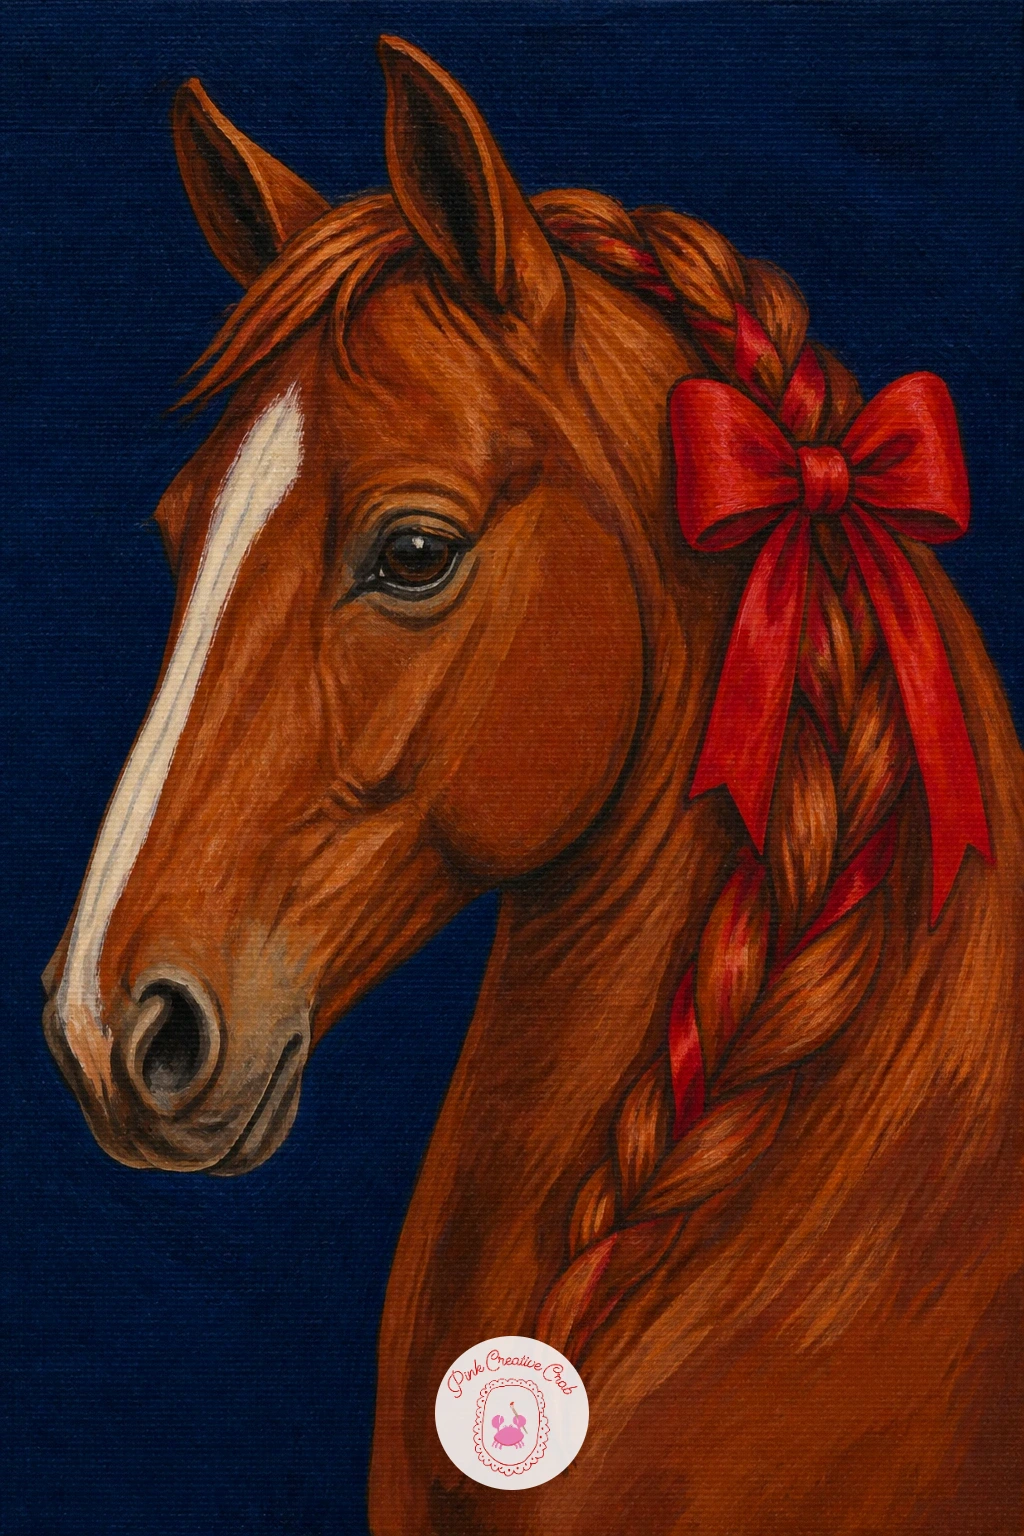
Step up to a larger animal portrait with a horse’s head and neck, mane threaded with a red bow, set against a flat navy background. Sketch the head first using simple comparison: the length from the ear to the nose is roughly the same as the length from the ear down to the base of the neck, and checking that proportion before you paint saves a lot of correcting later.
Block the coat in flat chestnut brown, then build the mane in loose flowing strokes of a darker brown and black, letting the strokes follow the direction hair actually falls rather than painting each one stiff and straight. The bow sits woven into the mane partway down, painted last in flat red with two simple loops.
Keep the eye large, dark and glossy with one small white highlight dot, since the eye is what makes the whole portrait feel alive rather than stiff.
If a chestnut coat feels like too much blending, paint the horse in a solid dark grey or black for a simpler, bolder version.
You Will Need
- canvas or canvas board
- long round brush for mane strokes
- small brush for the eye highlight
- chestnut brown and black acrylics
Palette: Navy,Chestnut Brown,Carbon Black,Cadmium Red,Titanium White
Study a reference photo of a horse’s mane up close before you paint, the way it falls in uneven clumps rather than one smooth sheet makes the texture believable, and this horse pencil drawing guide at horse pencil drawing beginner ideas breaks the head proportions down further.
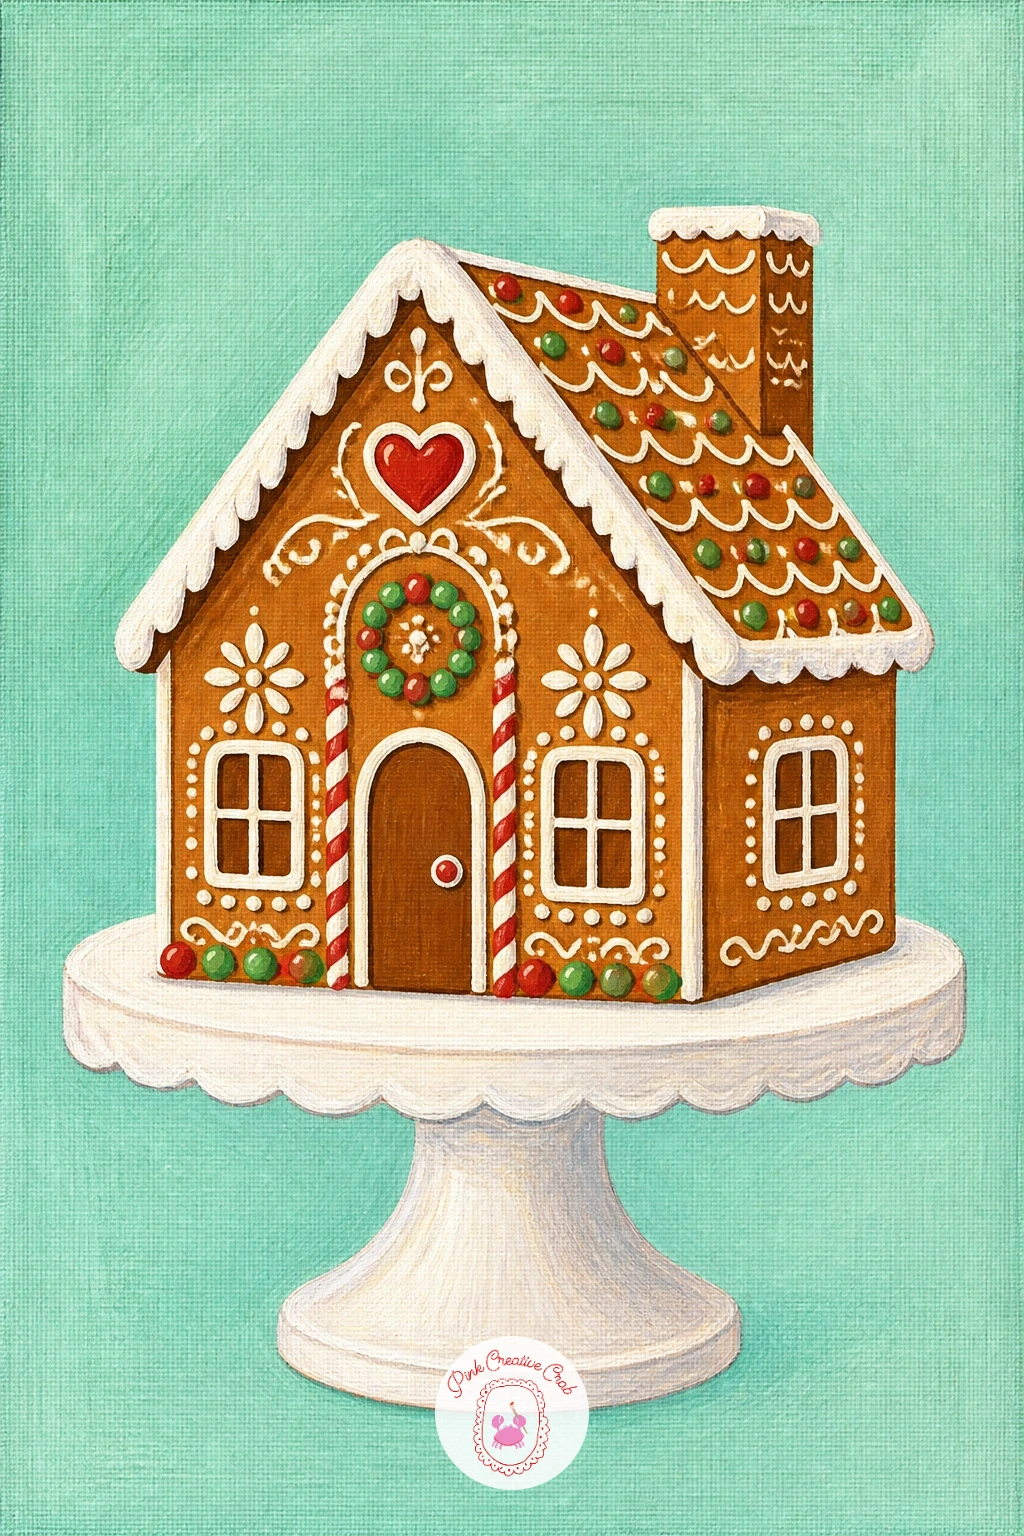
Ease back into something playful: a gingerbread house with icing details, displayed on a cake stand against a flat mint background. Sketch the house as a simple box with a triangular roof, keeping the roof peak centered so the whole shape sits straight rather than leaning.
Paint the walls in flat warm brown, then the roof in a slightly lighter tan, and once both are dry use a fine brush loaded with white to pipe icing lines along every roof edge and window frame the way real royal icing would sit. Add a few dot candies in red and green along the icing lines and a round candy cane door.
The cake stand underneath is a simple white pedestal shape, painted with one soft grey shadow line where it meets the base of the house to ground it. Quick version: stop after the icing lines and a few candy dots. With more time, add a light dusting of white snow texture flicked across the roof with a nearly dry brush.
If white icing lines feel shaky freehand, use a fine paint pen instead of a brush for cleaner control.
You Will Need
- canvas or canvas board
- fine brush or paint pen for icing lines
- small round brush for candy dots
- brown, tan and white acrylics
Palette: Mint Green,Burnt Sienna,Tan,Titanium White,Cadmium Red
Keep every icing line slightly wavy rather than ruler-straight, real piped icing never comes out perfectly even and the wobble adds charm.
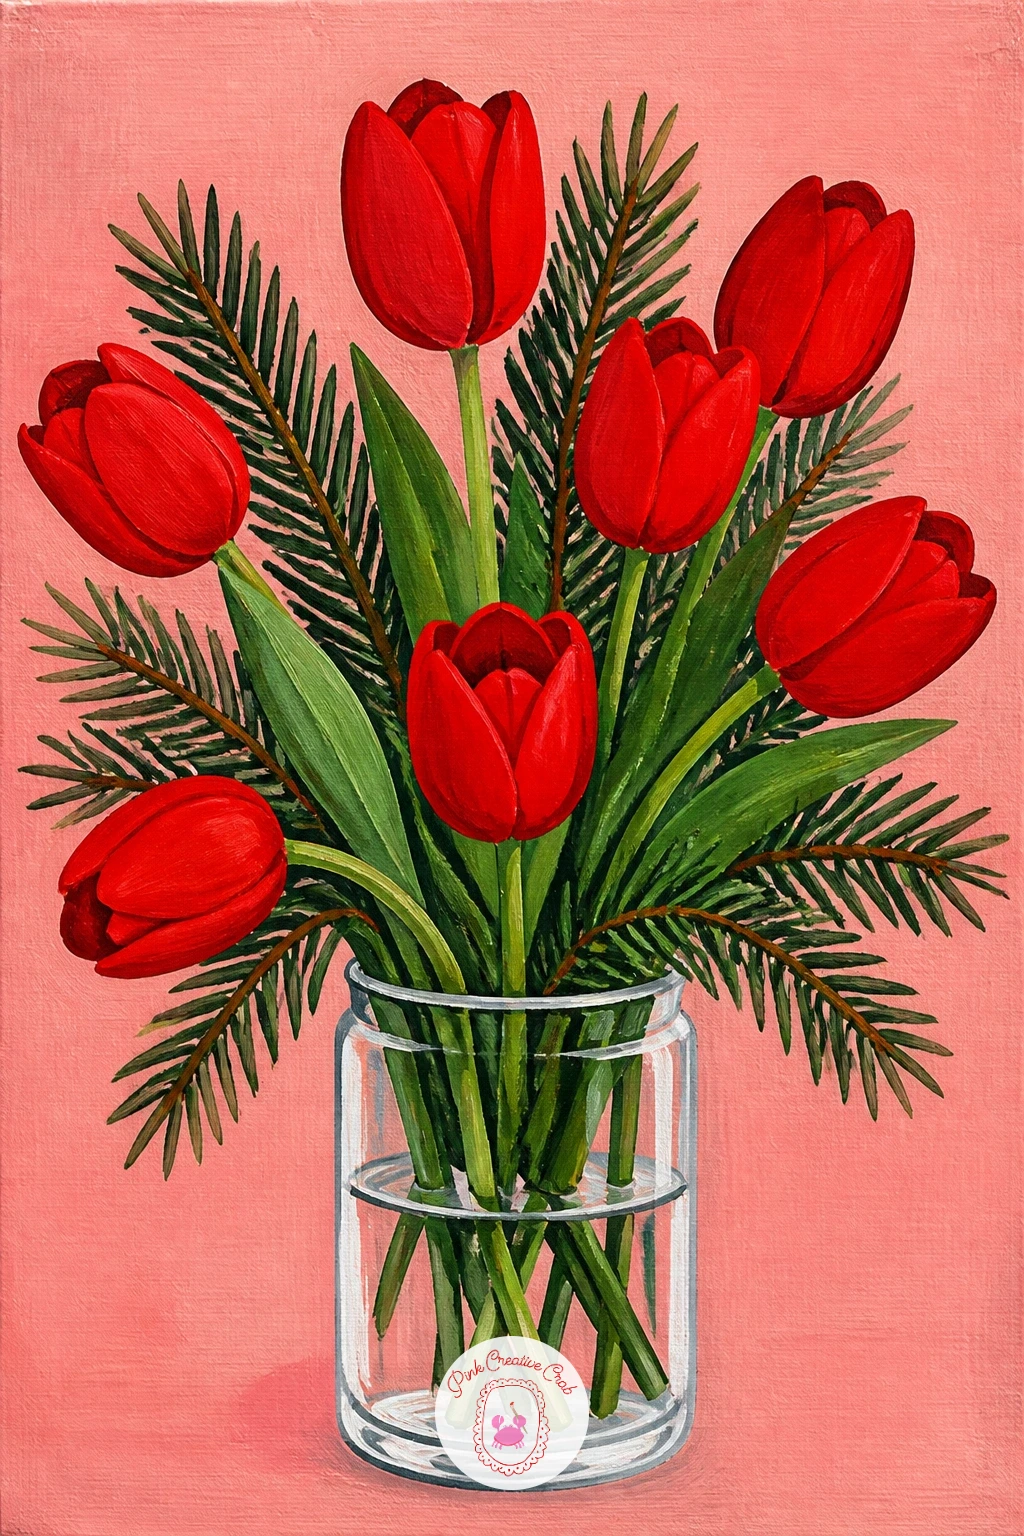
Bring in a floral still life with red tulips and a few pine sprigs arranged in a clear glass vase, set against a flat soft blush background. Paint the background first, then sketch the vase as a simple cylinder, and the tulip stems rising from it at slightly different angles so the bouquet does not look stiffly symmetrical.
Block each tulip bloom in flat red first, then once dry, add one petal edge per bloom in a brighter red-orange to suggest the curve of the petal catching light. The pine sprigs weave between the stems in two greens, painted with quick angled strokes for each needle cluster rather than individual needles.
The glass vase is the trickiest part: paint it mostly in the background color showing through, with just a few curved white highlight strokes down one side and a soft grey line at the base where it sits on a surface, which reads instantly as glass without painting it solid.
If a full bouquet feels like too much, paint just three tulips instead of five or six.
You Will Need
- canvas or canvas board
- small round brush for petals
- fine brush for pine needles and glass highlights
- two greens and two reds
Palette: Blush Pink,Cadmium Red,Red Orange,Sap Green,Titanium White
Look at the flower technique notes in acrylic painting flowers ideas for beginners for more ways to vary petal edges and keep blooms from looking identical.
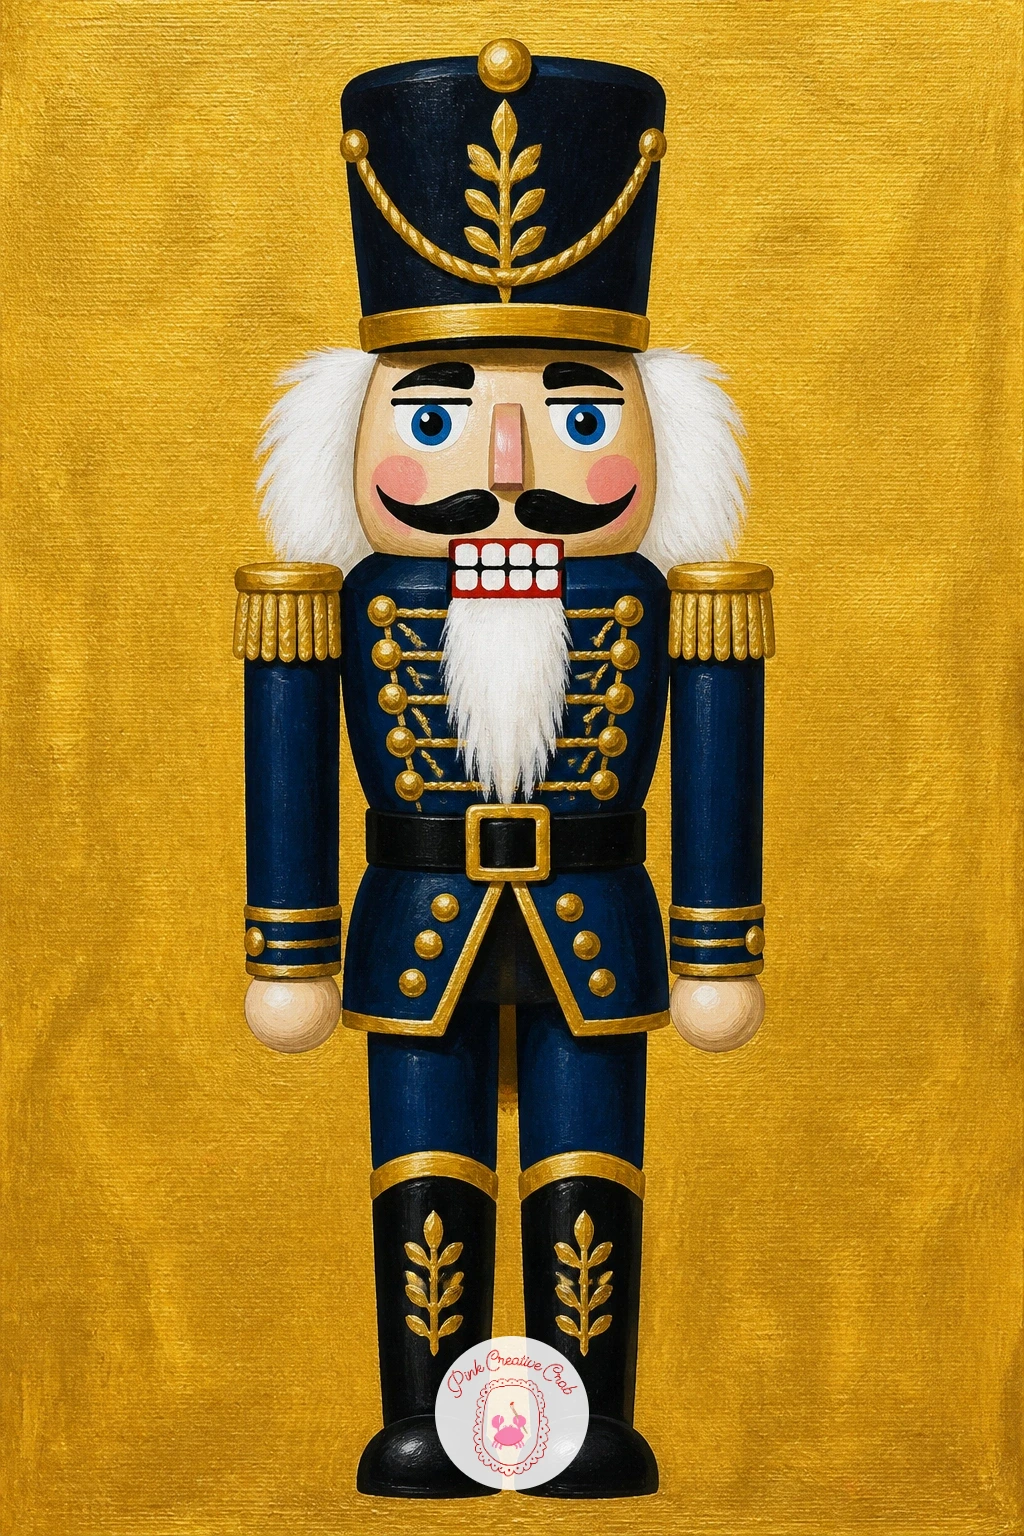
Give a classic character a graphic update: a nutcracker figure standing tall against a flat gold background. Sketch the figure as simple stacked shapes, a tall rectangle for the body, a smaller one for the head, keeping the proportions a touch exaggerated and toylike rather than realistic.
Picture the light coming from directly above, like a spotlight, which means the top of the hat and shoulders get the brightest highlight while the sides of the face and body fall into soft shadow. Paint the uniform in flat navy or red with gold braid details added last in thin confident lines, then the face in simple flat cream with two small black dot eyes and a painted mustache.
Keep the gold background completely flat and unshaded so the figure pops forward as the only dimensional element in the painting, which is what gives this one its modern print feeling.
If metallic gold paint is unavailable, mix yellow ochre with a touch of white and a tiny dot of burnt sienna for a convincing substitute.
You Will Need
- canvas or canvas board
- fine brush for gold braid details
- small round brush for the face
- gold or yellow ochre acrylic
Palette: Gold,Navy,Cadmium Red,Cream,Carbon Black
Try a second version with the uniform painted in deep green instead of navy next time, it shifts the whole mood while keeping the same gold backdrop.
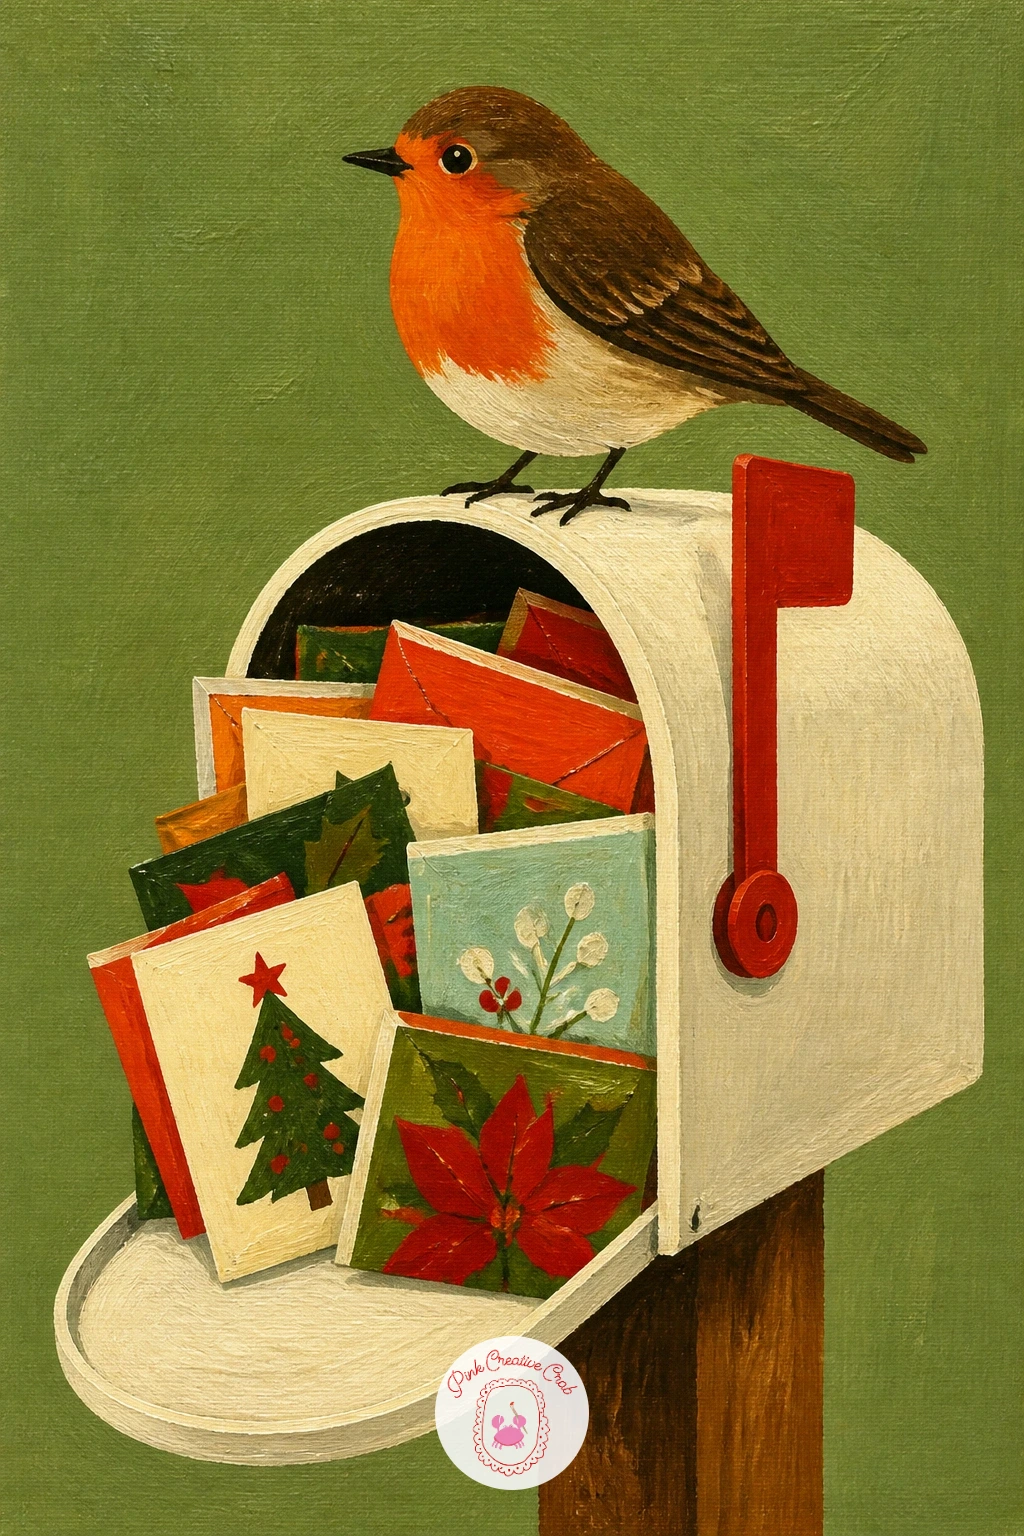
Build a small scene around a robin perched on top of a mailbox stuffed with Christmas cards, set against a flat sage or mint background. Sketch the mailbox as a simple rounded arch shape with the door slightly open and card corners poking out, then perch the robin on the curved top.
Block the mailbox in flat red or navy, then once dry paint the card edges poking out in small strips of white, cream and red, just enough to suggest a stuffed mailbox without painting every card in detail. The robin goes on last: an orange-red breast, soft grey-brown back, and simple round body shape sitting with its feet tucked under it.
The quick ten minute version keeps the mailbox plain with just two or three card corners showing. The forty minute version adds a light snow cap along the mailbox roof and a few painted holly leaves tucked among the cards.
Keep the robin smaller than the mailbox so the scale reads correctly and the bird does not overwhelm the scene.
You Will Need
- canvas or canvas board
- small round brush for the robin
- fine brush for card edges
- red or navy acrylic for the mailbox
Palette: Sage Green,Cadmium Red,Burnt Orange,Raw Umber,Titanium White
Look at the little animal scenes in christmas sketchbook ideas for more ways to pair a bird with a small seasonal prop like this one.
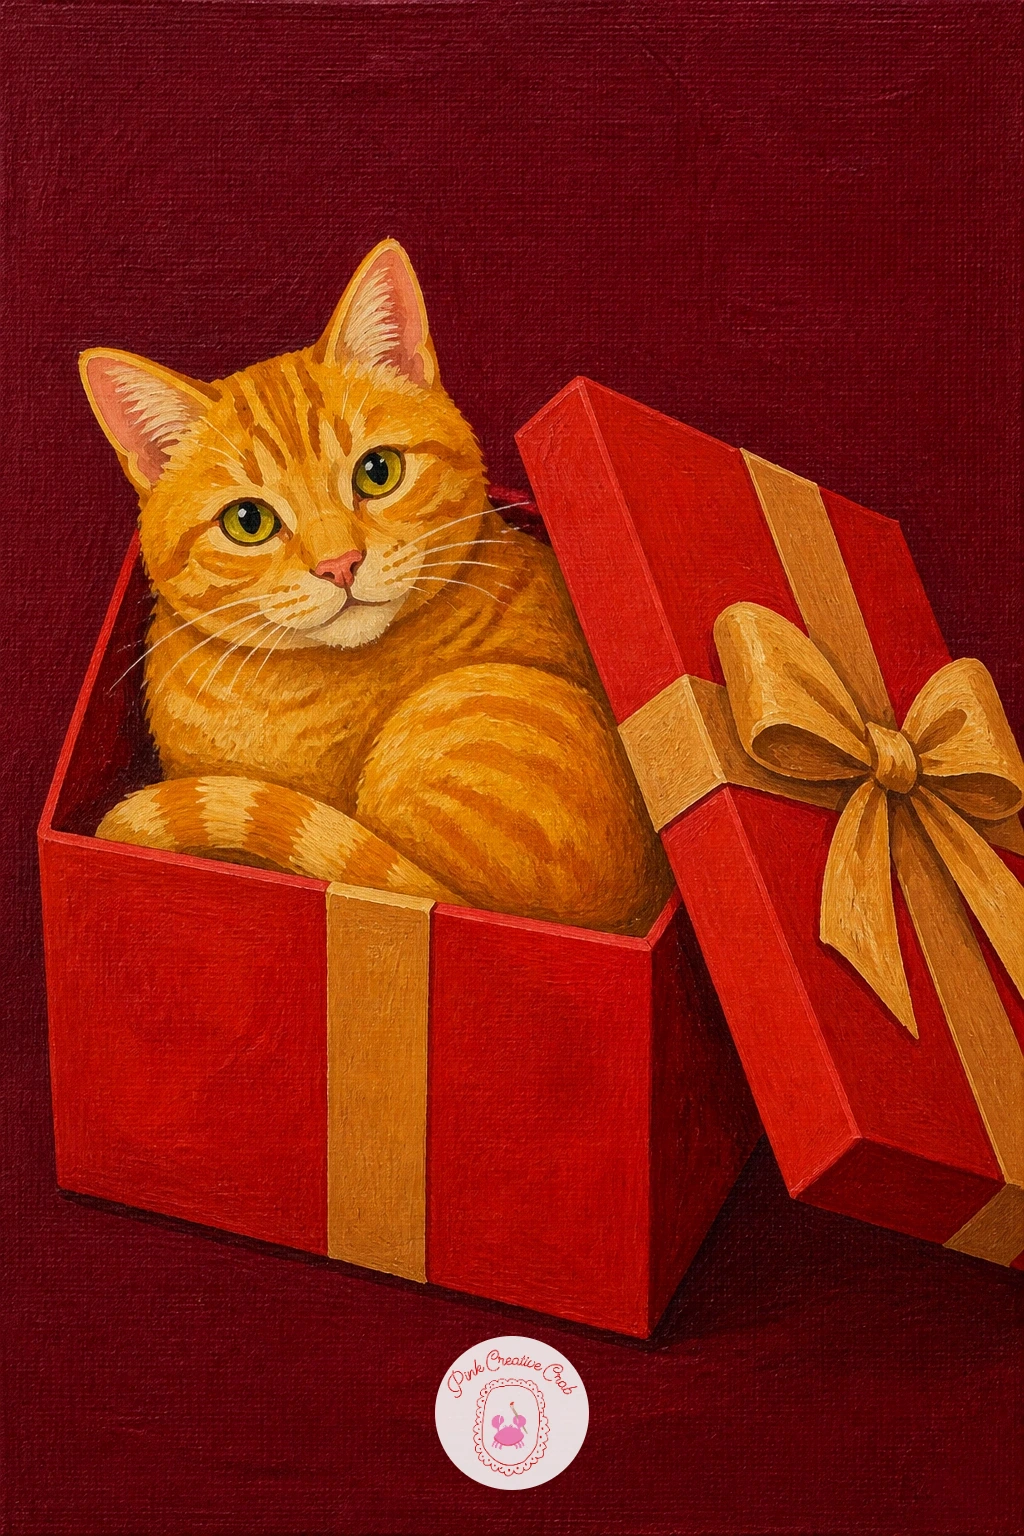
Keep the mood playful with a cat sitting curled inside an open gift box, lid tilted beside it, set against a flat burgundy background. Sketch the box first as a simple open rectangle with the lid propped at an angle, then fit the cat’s rounded body inside it, letting the paws and tail spill slightly over the edge.
Block the box in flat red or cream with a ribbon detail painted last, then paint the cat in flat grey, orange or black depending on your preference, keeping the body shape soft and round rather than angular. The eyes are the one place to slow down: paint them large, slightly almond shaped, with a bright highlight dot that gives the whole cat its expression.
A box that looks flat and lifeless usually needs one soft shadow painted along the inside base where the cat sits, which tucks the body into the box instead of floating on top of it.
If you want a simpler version, skip the ribbon and paint the box as one plain solid color.
You Will Need
- canvas or canvas board
- small round brush for the cat’s face
- fine brush for ribbon details
- grey, orange or black acrylic for the cat
Palette: Burgundy,Cream,Burnt Orange,Carbon Black,Cadmium Red
Try a tabby pattern next time using thin curved strokes of darker paint over the base coat, it adds personality without much extra time.
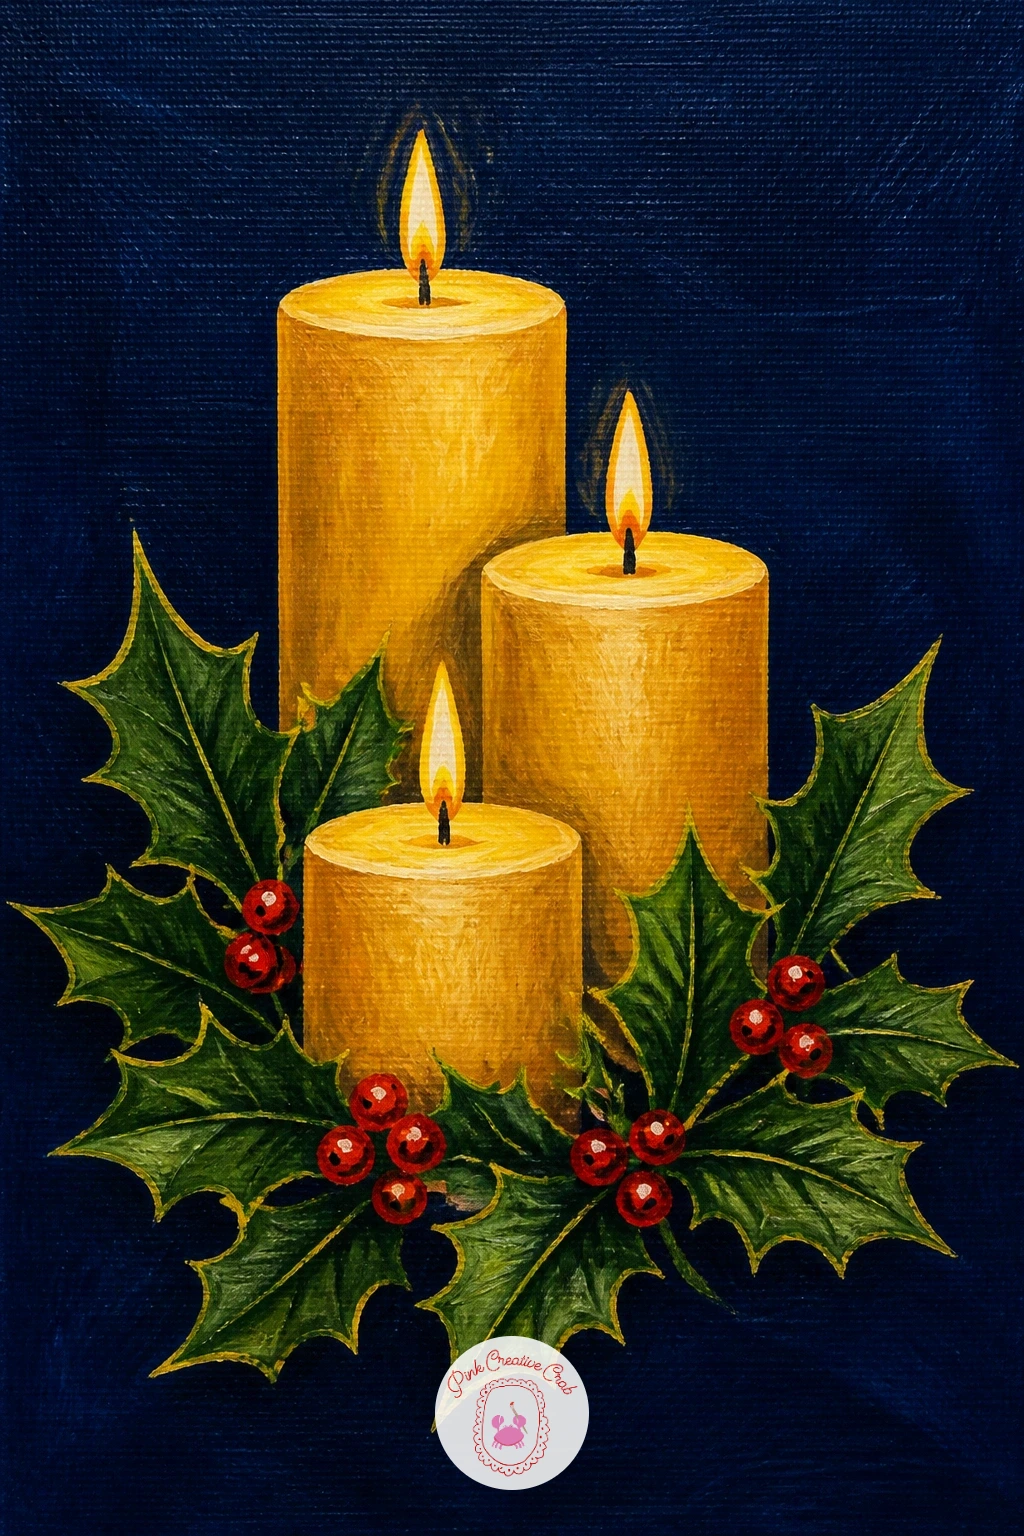
Slow the pace with a simple still life of three candles at different heights, tied together with a sprig of holly, against a flat navy background. Sketch the candles as three simple cylinders, varying the heights so the composition has rhythm instead of three identical columns.
Picture a single warm light source coming from the flames themselves, which means the top third of each candle picks up a soft gold glow while the lower two thirds stay in the cooler base color. Paint the candle bodies first in flat cream, then the flames in layered yellow and orange with a tiny dark wick mark, and let the glow bleed softly into the navy background around each flame using a dry, barely loaded brush.
The holly sprig sits wrapped around the base of the candles, painted in two greens with small bright red berry dots added last so they sit on top of everything else.
If blending the glow feels tricky, keep the background fully flat and let the bright flame colors do all the work of suggesting light.
You Will Need
- canvas or canvas board
- small round brush for flames
- dry flat brush for the glow blend
- cream, yellow and orange acrylics
Palette: Navy,Cream,Warm Yellow,Cadmium Orange,Sap Green
Add a thin ring of dripped wax down one candle using a slightly raised line of cream paint, it is a small realistic touch that reads well up close.
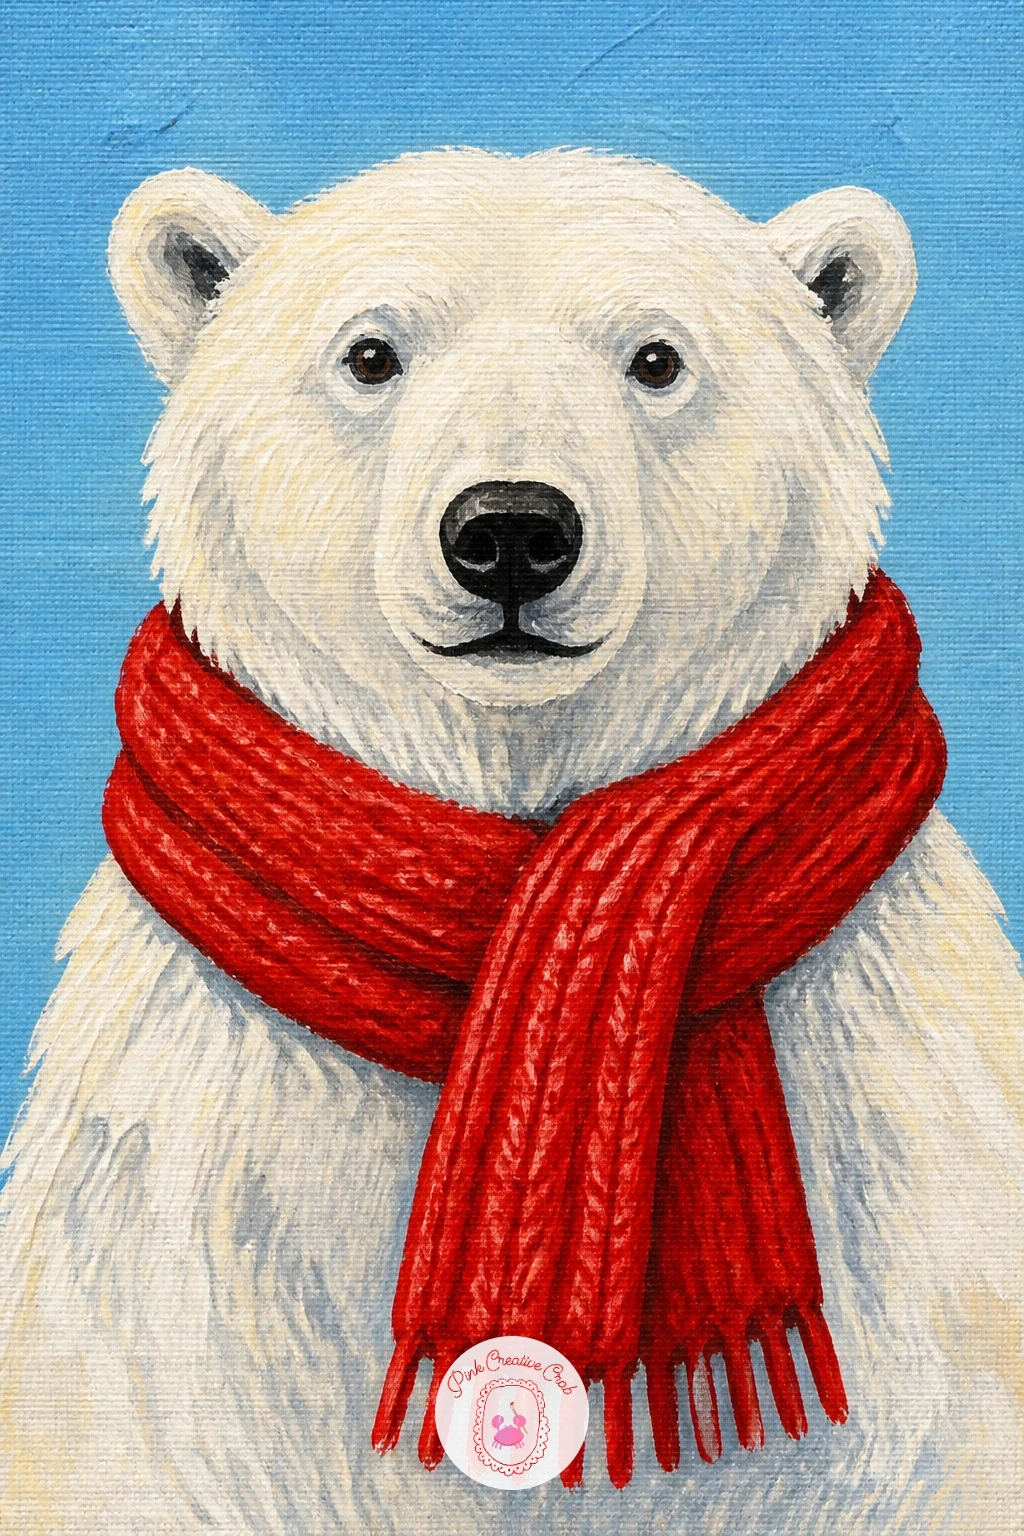
Return to an animal portrait with a polar bear wearing a knitted scarf, set against a flat icy blue or navy background. Sketch the bear’s head and shoulders large in the frame, keeping the skull rounded and the snout fairly short and blunt, which is what separates a polar bear from a generic bear shape.
Block the fur in a layered mix of white, pale blue-grey and a touch of cream rather than pure flat white, since pure white against a pale background tends to disappear. Use a dry brush loaded lightly with white to drag short strokes over the base coat for texture, keeping strokes following the direction fur actually grows around the face and ears.
The scarf goes on last in a bold red or green, painted in one flat shape with a couple of simple fold lines, wrapped loosely around the neck.
If a fully dry-brushed coat feels like a lot of work, keep the fur mostly flat and save the dry-brush texture for just the edges of the ears and chin.
You Will Need
- canvas or canvas board
- dry stiff brush for fur texture
- small round brush for the scarf
- white, pale blue-grey and cream acrylics
Palette: Icy Blue,Titanium White,Payne’s Grey,Cadmium Red,Cream
For sharper lifelike fur edges, look at the layering methods in acrylic painting animals techniques, which apply well to this bear’s coat.
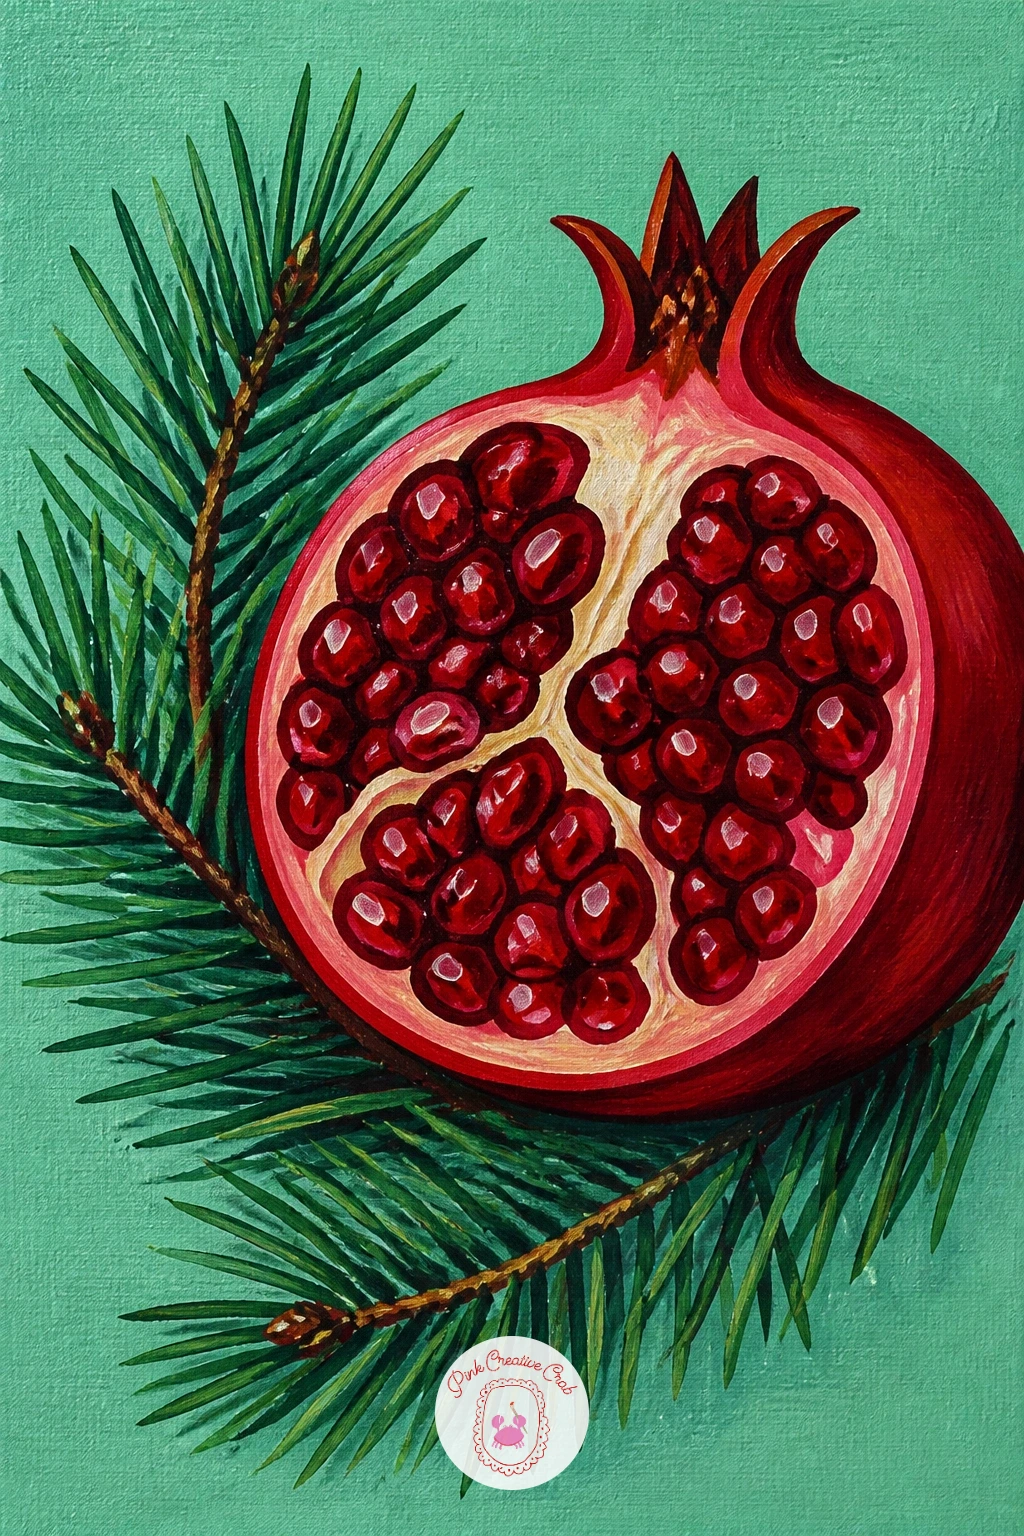
Return to still life with a pomegranate cut in half, seeds exposed, resting beside a few pine sprigs on a flat mint background. Sketch the whole fruit shape first as a simple sphere, then the cut half beside it as a rounded bowl shape with a jagged inner rind edge.
Block the outer skin in deep red, then the cut inner rind in a pale pink-cream, and once dry use a small round brush to stipple dozens of tiny jewel-red seed shapes packed tightly inside the cut half, varying the red slightly from seed to seed so they do not look like a flat pattern.
Pine sprigs sit tucked beside the fruit in two greens, painted with quick angled strokes. A pomegranate that looks flat usually needs a few seeds painted with a tiny white highlight dot each, which gives them the glossy wet look real pomegranate seeds have.
If stippling dozens of seeds feels slow, paint fewer, larger seed clusters instead of trying to fill the entire cut surface individually.
You Will Need
- canvas or canvas board
- small round brush for stippling seeds
- fine brush for pine sprigs
- deep red and pink-cream acrylics
Palette: Mint Green,Deep Red,Blush Pink,Jewel Red,Sap Green
Mix two slightly different reds for the seeds and alternate between them rather than using one flat red, it instantly reads as more realistic and jewel-like.
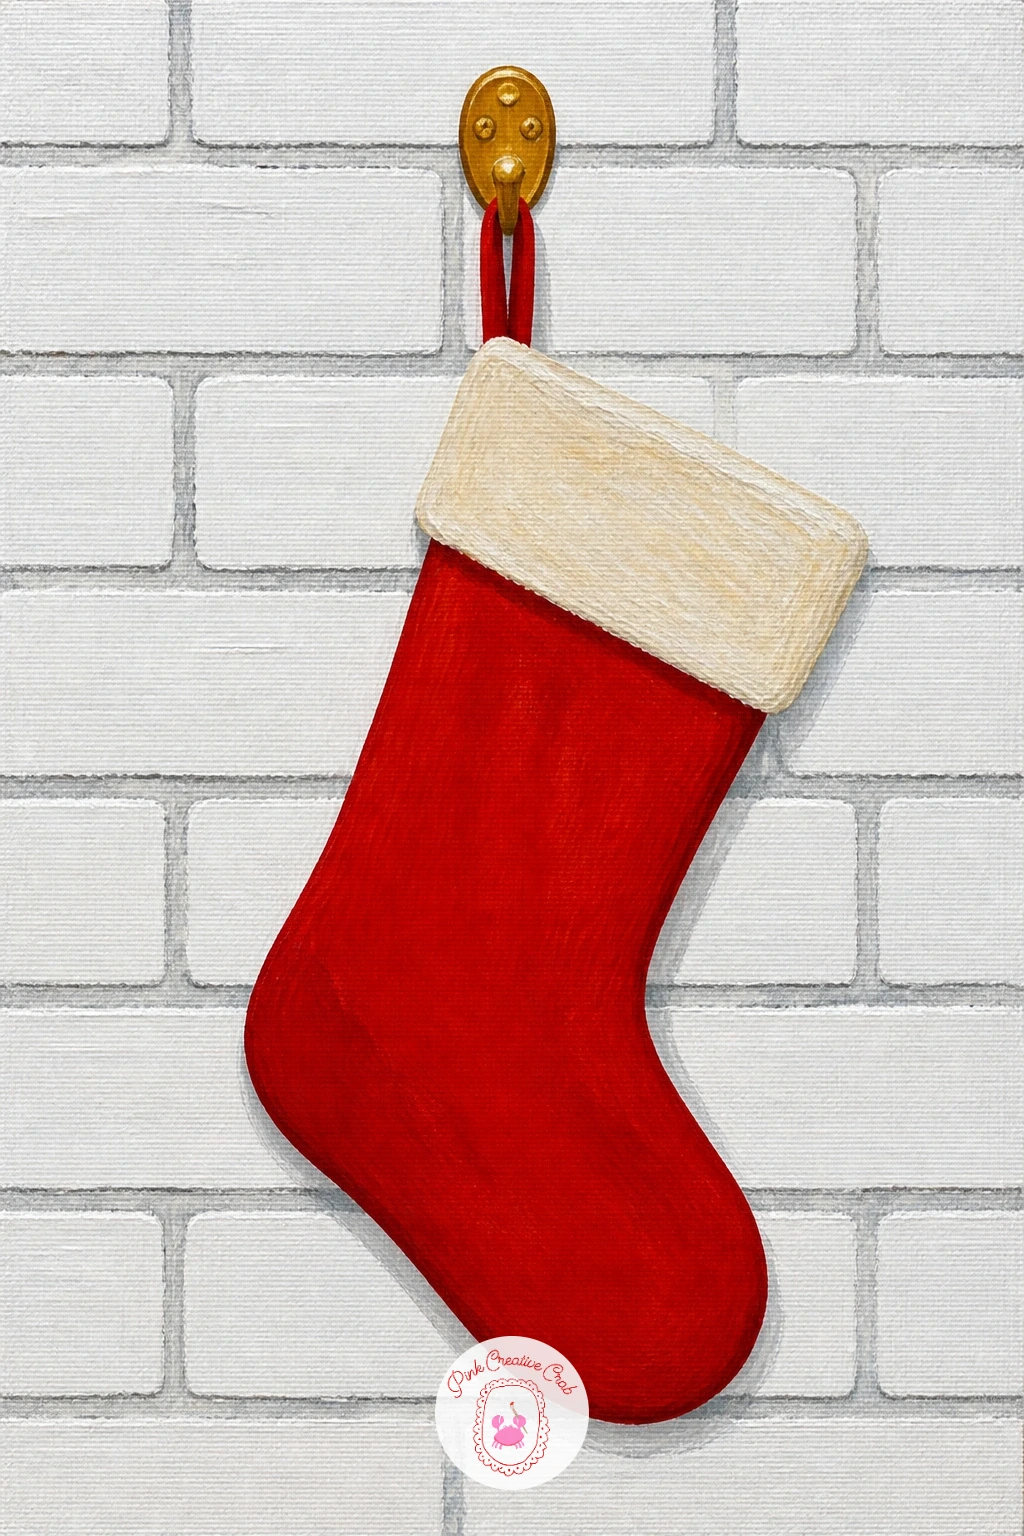
Take on a background texture challenge with a single red stocking hanging from a hook against a white brick wall. Paint the brick wall first by blocking the whole canvas in off-white, then once dry use a fine brush and a ruler or straight edge to paint thin grey mortar lines in a simple offset brick pattern across the surface.
Sketch the stocking shape over the dry brick, then block it in flat red with a cream cuff at the top, keeping the toe curved and slightly rounded rather than pointed. A small brass hook holds it to the wall, painted in just a few strokes of gold.
The common misstep is making the brick pattern too busy, which fights with the stocking for attention, so keep the mortar lines thin and the brick color close to the background so it reads as texture rather than a competing pattern.
If a full brick wall feels like too much, paint just a plain white background and add the brick lines only in the small area directly behind the stocking.
You Will Need
- canvas or canvas board
- ruler or straight edge for brick lines
- fine brush for mortar lines
- red and cream acrylics
Palette: Off White,Warm Grey,Cadmium Red,Cream,Gold Ochre
Try hanging two stockings of different sizes side by side next time for a fuller composition without much extra painting time.
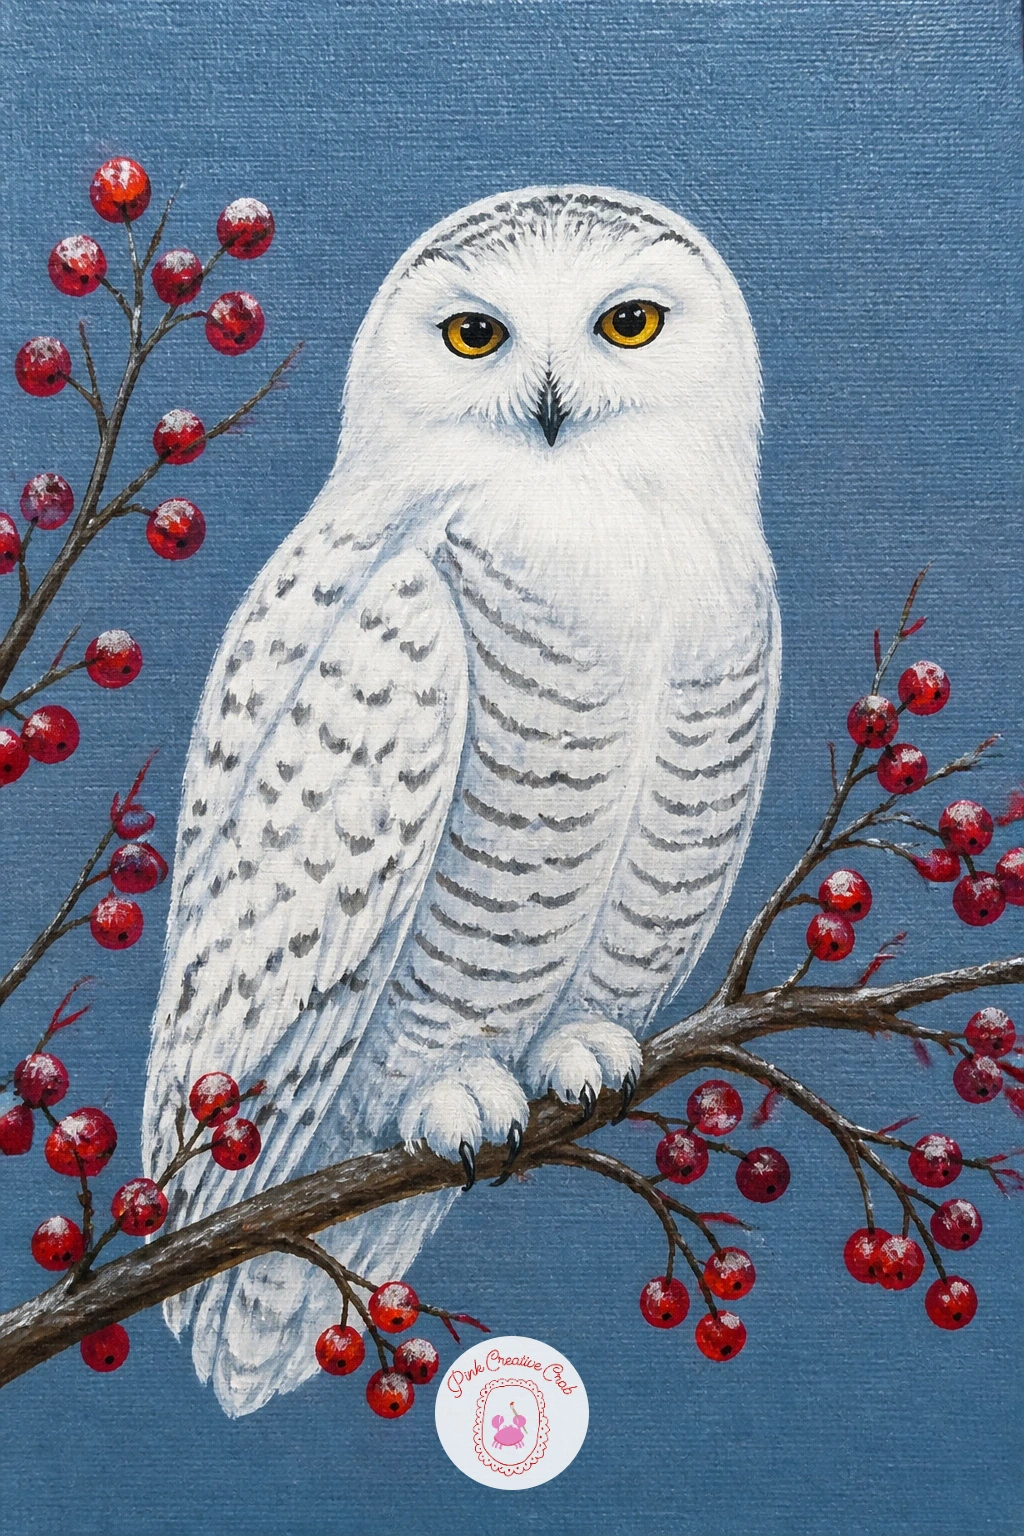
Move to a quieter animal subject with a snowy owl perched on a branch dotted with red berries, set against a flat dusty blue background. Sketch the owl as a simple rounded body shape with a flat-topped head, large forward-facing eyes set close together, which is the detail that makes it read instantly as an owl rather than another bird.
Block the body in layered white, pale grey and cream, then use a small round brush to add soft dark speckle marks scattered across the chest and wings, following the pattern of real snowy owl markings loosely rather than copying every spot. The eyes get painted last in bright yellow-gold with a black pupil, placed carefully centered and level so the owl does not look cross-eyed.
The branch sits below in flat brown with a cluster of red berries dotted along it, each berry finished with one tiny white highlight.
If the owl’s speckled markings feel fiddly, keep them loose and scattered rather than trying to match a reference exactly.
You Will Need
- canvas or canvas board
- small round brush for speckle marks
- fine brush for the eyes and berries
- white, grey and yellow-gold acrylics
Palette: Dusty Blue,Titanium White,Payne’s Grey,Warm Gold,Cadmium Red
Keep the two eyes exactly level with each other by checking them against a ruled pencil line before you paint the final color in.
Take a break from animals and paint a bowl overflowing with vintage-style Christmas baubles in mismatched colors and patterns, set against a flat navy background. Sketch a simple round bowl shape first, then fill it with eight or ten circle shapes of varying sizes, overlapping slightly so the pile feels full rather than evenly spaced.
Block each bauble in a different flat color from your palette, letting a few repeat so the grouping feels cohesive rather than random. Once every circle is dry, add one simple pattern per bauble, a stripe, a few dots, a thin metallic band, so each one reads as a distinct vintage ornament rather than a plain colored ball.
Every bauble needs one small curved highlight stroke near the top to read as glossy glass rather than flat matte circles, which is the detail that sells the whole pile.
If ten baubles feels like too many, paint five or six larger ones instead and let them fill the bowl just as well.
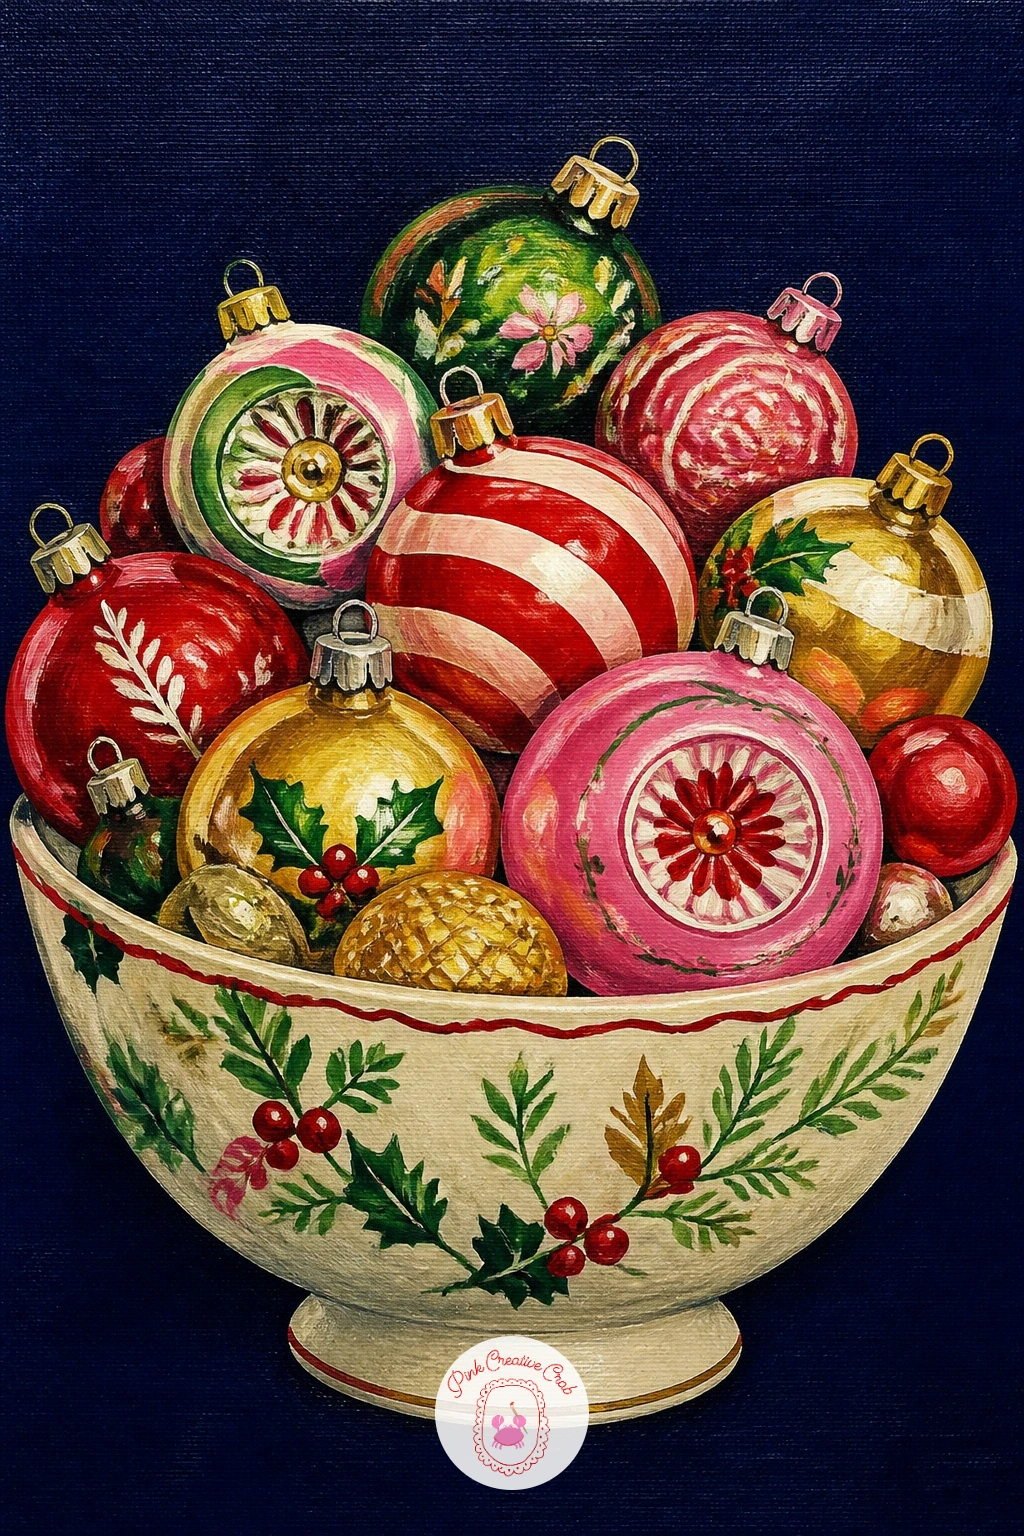
You Will Need
- canvas or canvas board
- small round brush for pattern details
- fine brush for highlights
- four or five bauble colors plus gold
Palette: Navy,Deep Red,Gold,Sap Green,Blush Pink
Keep one or two baubles a matte finish with no highlight stroke at all, the contrast between glossy and matte makes the shiny ones read even shinier.
Lighten the mood again with a penguin standing upright and wearing a small bow tie, set against a flat pale blue or mint background. Sketch the penguin as two simple overlapping shapes, a rounded body and a smaller round head, keeping the belly patch large and centered since that white shape is what makes a penguin read clearly at a glance.
Block the back and wings in flat black, the belly and face patch in white, then the beak and feet in a small bright orange. Once the black is fully dry, add the bow tie at the neck in a bold red or gold, painted as two simple triangles meeting at a center knot.
Keep the black-to-white edge on the belly clean and slightly curved rather than a straight line, which gives the penguin a friendlier, rounder feel.
If you want a quicker version, skip the bow tie’s fold detail and paint it as one flat solid shape.
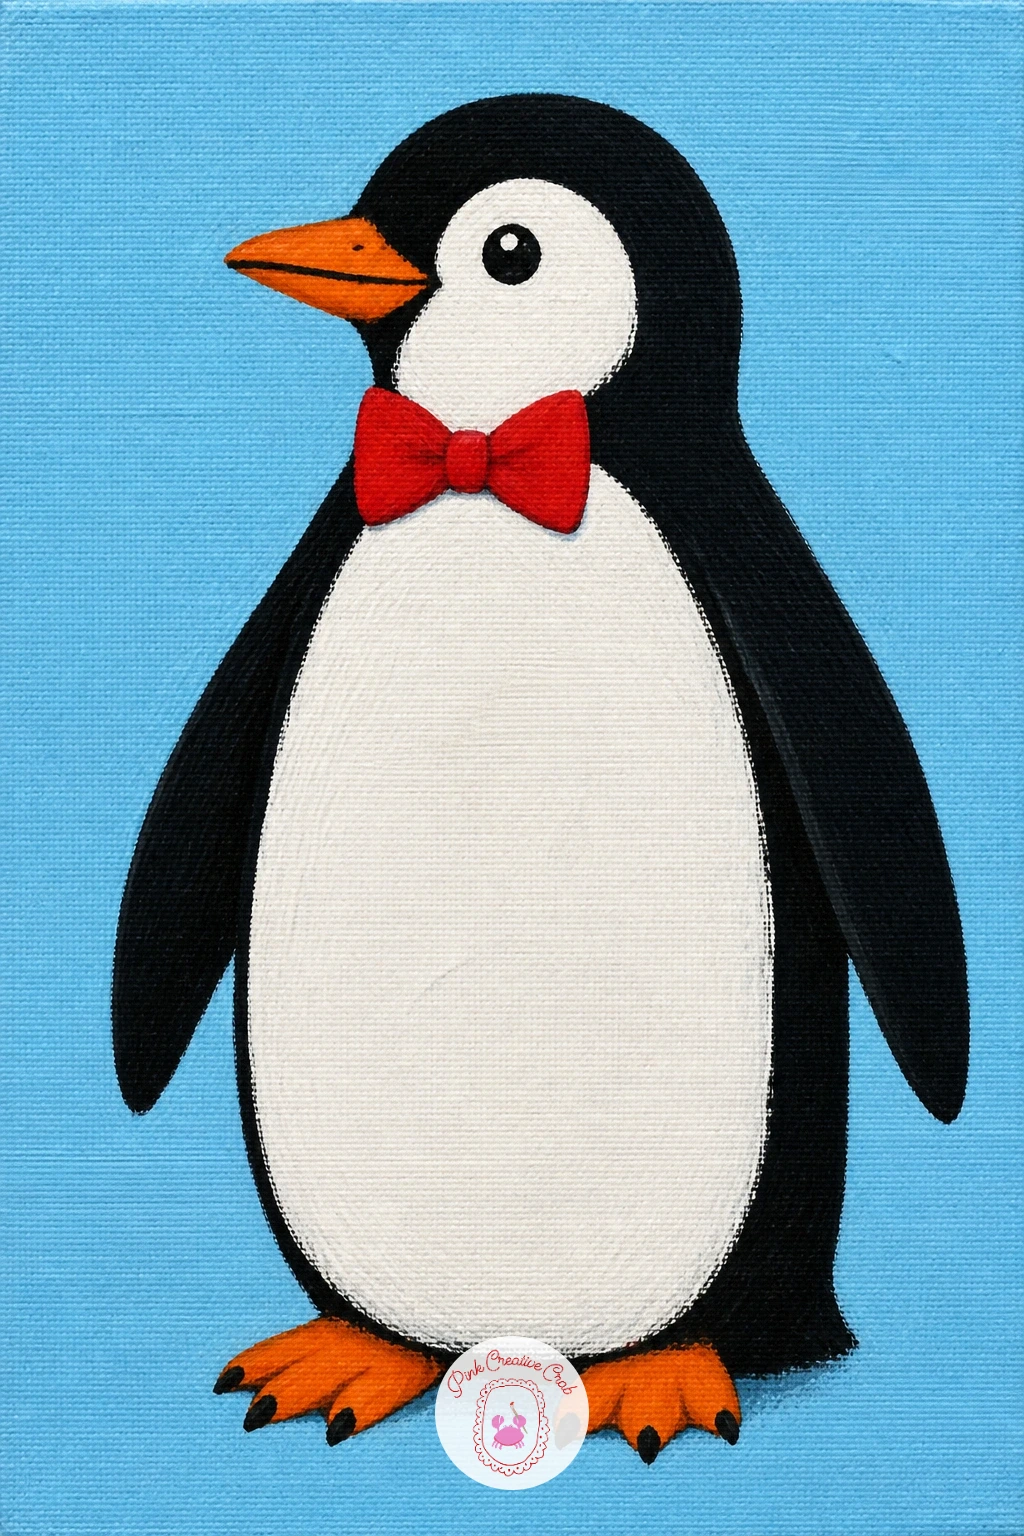
You Will Need
- canvas or canvas board
- small round brush for the belly edge
- fine brush for the bow tie
- black, white and orange acrylics
Palette: Pale Blue,Carbon Black,Titanium White,Cadmium Orange,Cadmium Red
Try a pair of penguins standing side by side next time, one slightly smaller, for a sweet two-figure version of the same idea.
Return to a drink still life with a festive cocktail in a short glass, garnished with a sprig of rosemary and a few cranberries, set against a flat burgundy background. Sketch the glass as a simple tumbler shape, keeping the ellipse at the rim shallow since you are viewing it roughly at eye level with the drink itself.
Block the glass mostly in the background color showing through, adding the drink inside as a rich pink or amber wash depending on your cocktail of choice, then a few painted ice cube shapes in pale blue-white near the top. The rosemary sprig leans out of the glass in muted green, painted with quick short strokes, and three or four cranberries float near the rim in bright red with tiny white highlight dots.
A glass that looks flat usually needs one soft vertical highlight stroke of white down one side to suggest the curve of real glass.
If pink feels too specific, swap the drink color for a warm amber or clear sparkling look instead.
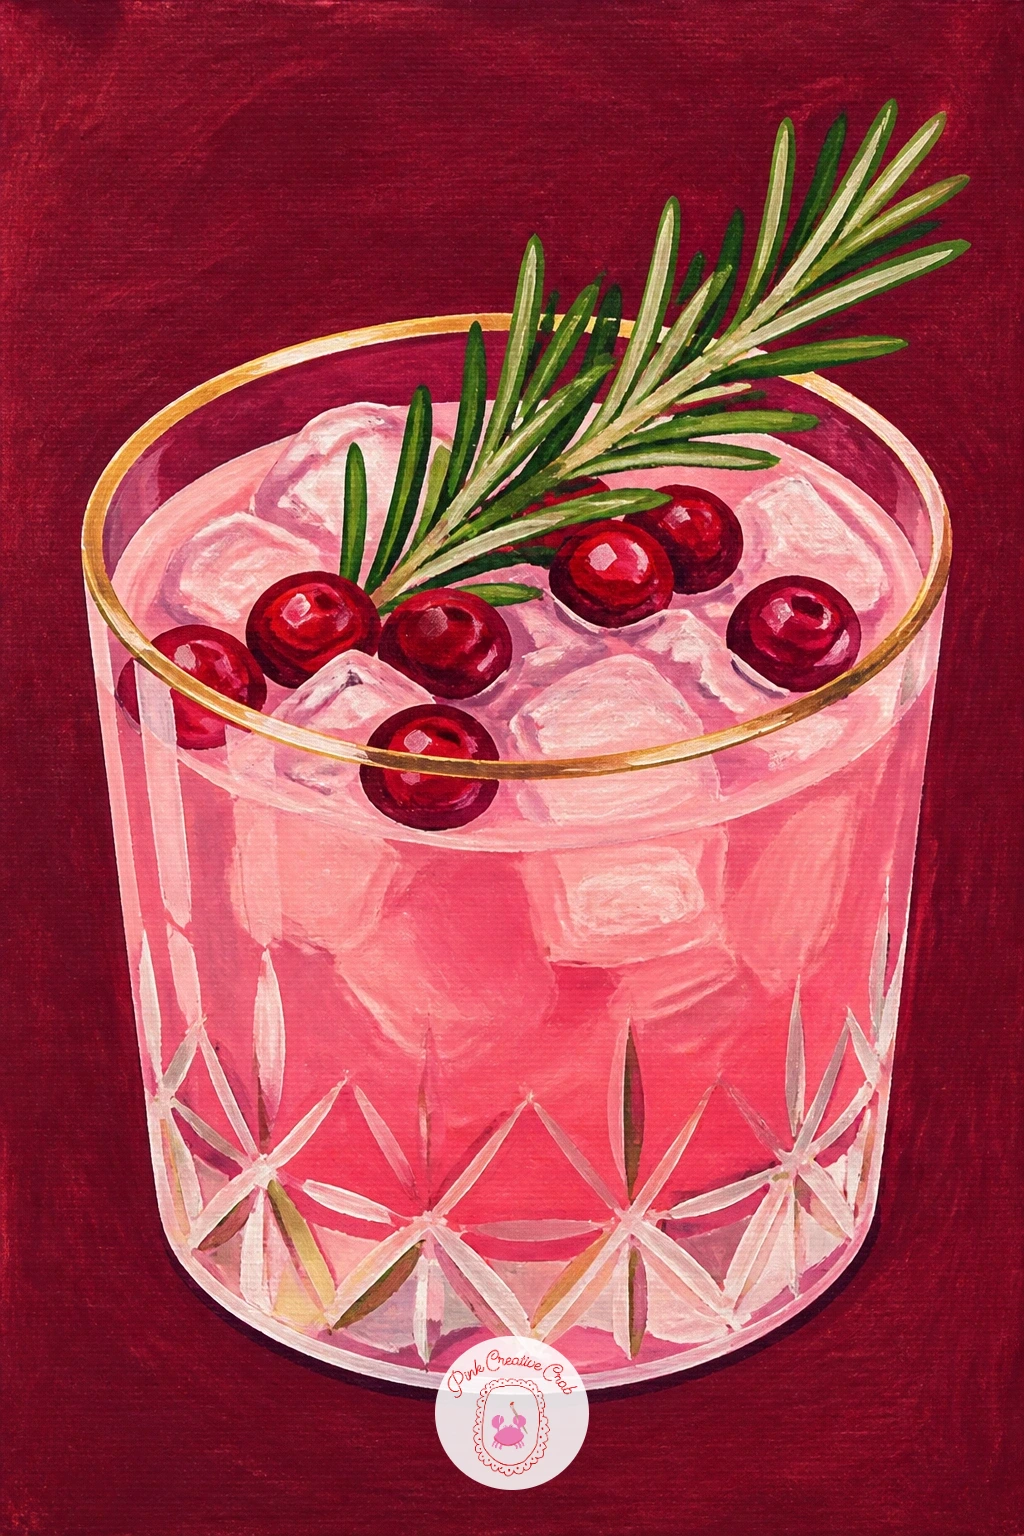
You Will Need
- canvas or canvas board
- fine brush for glass highlights
- small round brush for rosemary and cranberries
- pink or amber acrylic for the drink
Palette: Burgundy,Rose Pink,Titanium White,Sap Green,Cadmium Red
For more drink and tablescape ideas at this same confident level, browse acrylic painting food ideas for composition tips that apply well here.
Shift back to animals with a woolly sheep wearing a small bell tied around its neck with a ribbon, set against a flat soft blue background. Sketch the sheep’s body as one large rounded cloud shape for the wool, with a small simple face and legs peeking out from underneath.
Block the wool in off-white, then once dry, load a round brush fairly thick with white and dab it in overlapping little curved strokes across the whole body rather than one flat fill, which builds the bumpy wool texture directly as you paint instead of adding it as a separate step. Keep the face, ears and legs in a flat soft grey or black, painted simply with no texture so they contrast against the woolly body.
The bell and ribbon sit at the neck last, the ribbon in red and the bell in a small gold oval with one black dot for the opening.
If the dabbed wool texture feels slow across a whole body, texture only the outer edge of the sheep and keep the center fill flatter.
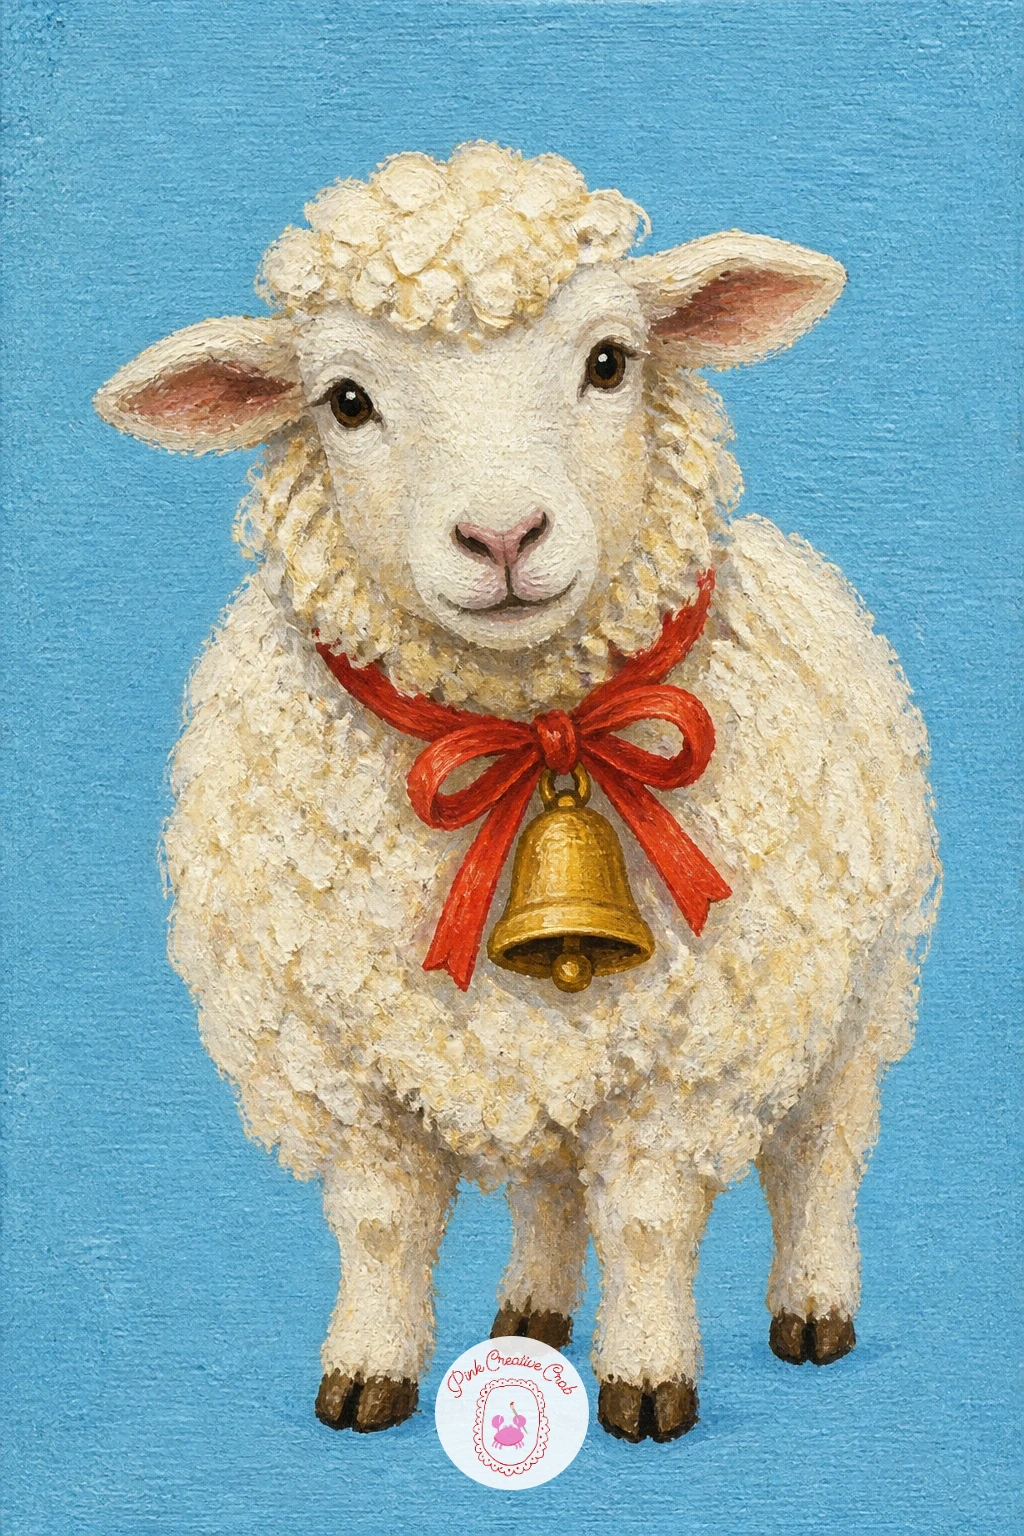
You Will Need
- canvas or canvas board
- round brush loaded thick for wool dabbing
- fine brush for the bell and ribbon
- off-white and grey acrylics
Palette: Soft Blue,Off White,Warm Grey,Cadmium Red,Gold
Dab the wool texture in several slightly different whites and creams rather than one single white, the subtle variation makes the fleece look thicker and more dimensional.
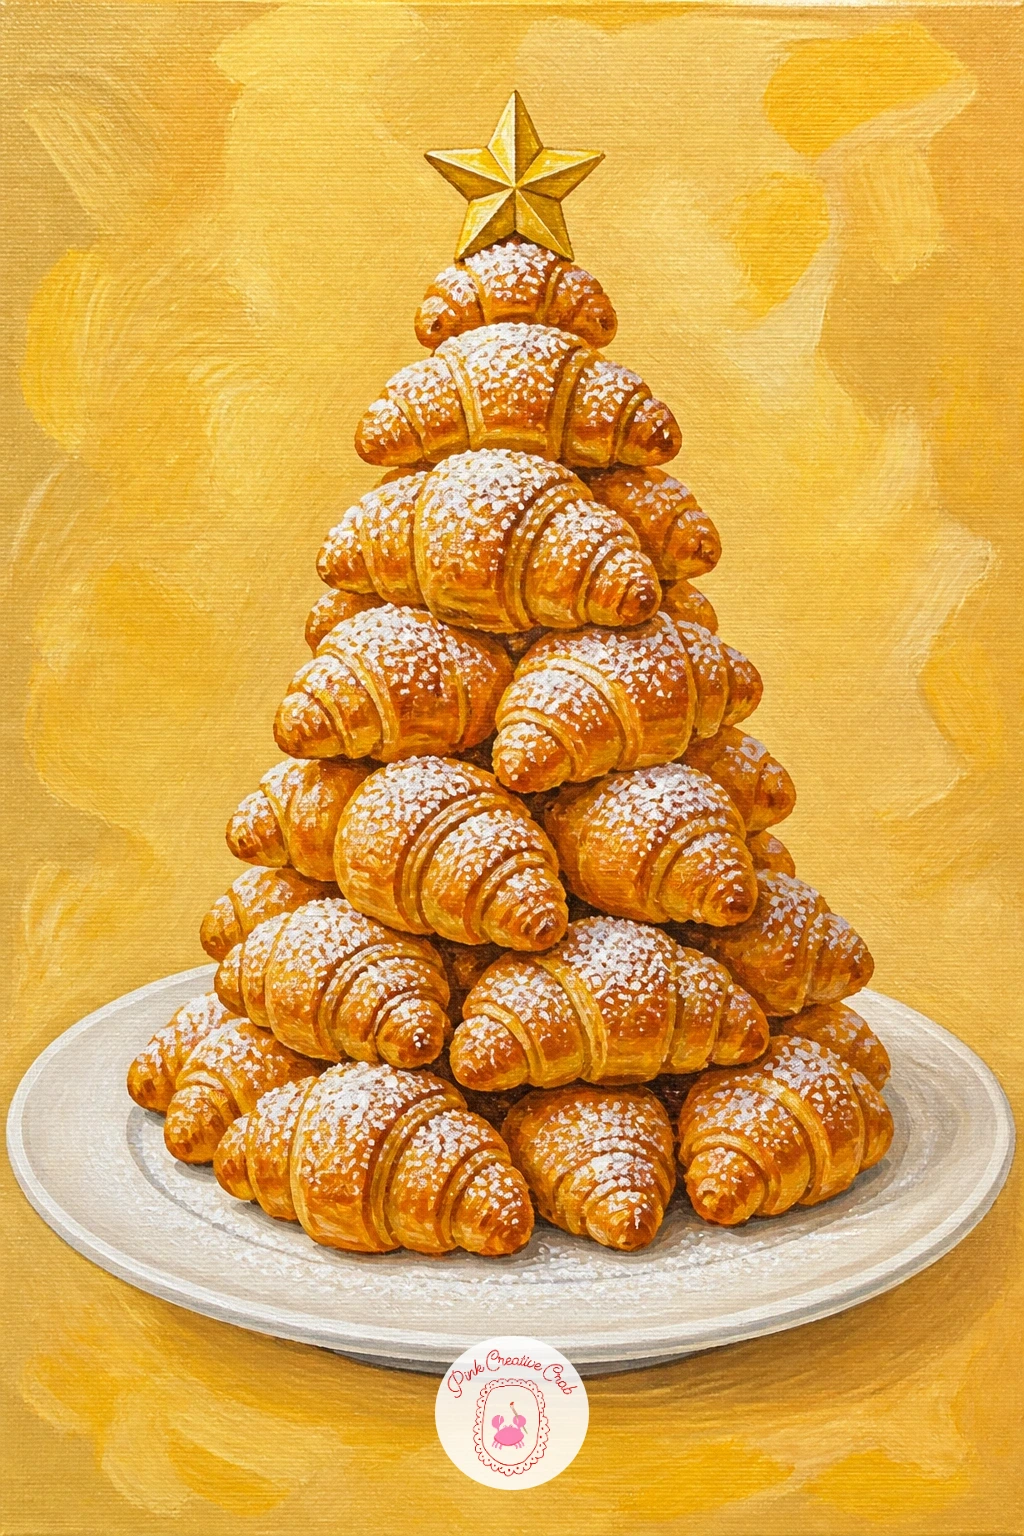
Have some fun with a food pun: mini croissants stacked into a Christmas tree shape on a plate, dusted with powdered sugar snow. Sketch the tree shape first as a simple triangle made of five or six overlapping crescent shapes, largest at the base and smallest near the top, with one tiny round shape on top to finish the point.
Block each croissant in warm golden brown, varying the shade slightly from one to the next so the stack does not look like identical copies. Once dry, add a few darker brown lines along each crescent to suggest the flaky layered ridges of real pastry, then flick small dots of white across the whole stack for the powdered sugar.
The plate underneath is a simple flat white or cream oval, finished with one soft grey shadow line where the tree sits on it.
If flicking sugar dots feels messy, load an old toothbrush lightly with white paint and run a thumb across the bristles for a fine natural speckle instead.
You Will Need
- canvas or canvas board
- small round brush for pastry ridges
- old toothbrush for sugar speckle (optional)
- golden brown acrylics in two shades
Palette: Golden Brown,Deep Brown,Titanium White,Cream,Warm Grey
Try stacking the croissants into a wreath circle instead of a tree next time for a different shape using the exact same technique.
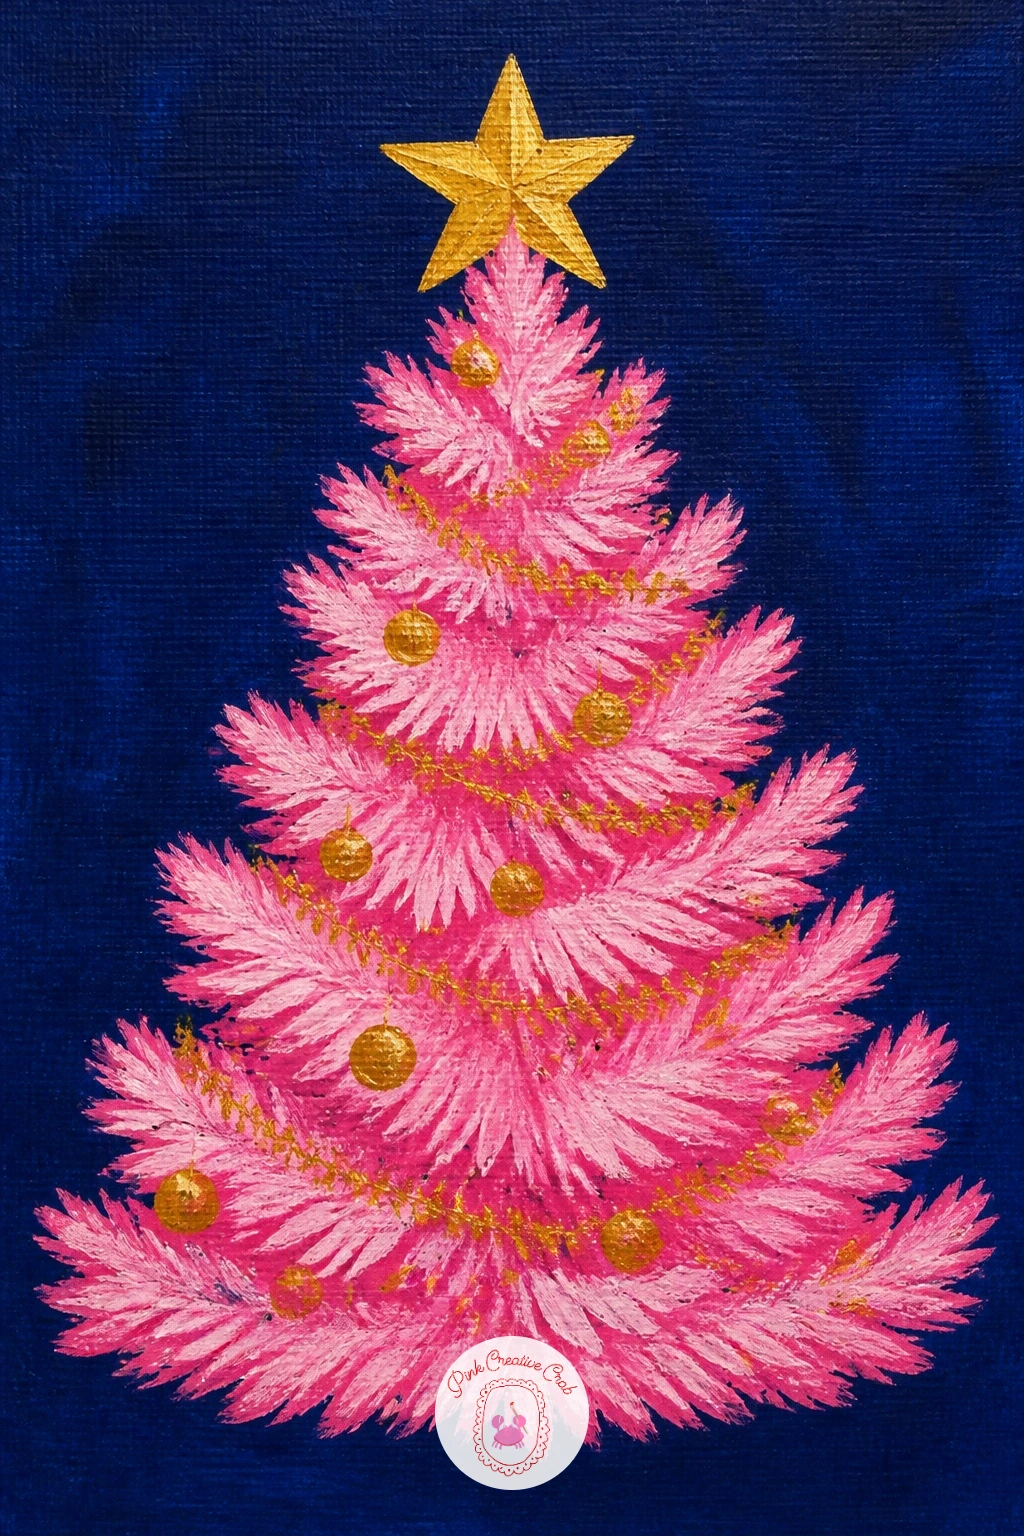
Go fully modern with a pink tinsel Christmas tree standing against a flat navy or sky blue background, no ornaments, just color and shine. Sketch the tree as a simple triangle silhouette, then rather than painting smooth solid sides, break the whole shape into short feathery strokes radiating outward, the way real tinsel catches light in uneven tufts.
Load a round brush with a bright pink and work from the base of the tree upward, pulling short strokes outward from an imaginary center line so the texture reads as fluffy rather than flat. Once the base layer is dry, go back in with a slightly lighter pink or a touch of white mixed in and repeat the same stroke direction over just the areas that would catch the most light, building the shine without painting a hard highlight.
Finish with a simple gold star or a few gold dot ornaments scattered through the branches.
If pink feels too bold, the same technique works just as well in classic green or icy white.
You Will Need
- canvas or canvas board
- round brush for feathery tinsel strokes
- fine brush for the gold star
- two shades of pink acrylic
Palette: Navy,Hot Pink,Pale Pink,Gold,Titanium White
Keep the stroke direction consistent across the whole tree, mixed directions read as messy while one consistent radiating pattern reads as deliberate tinsel.
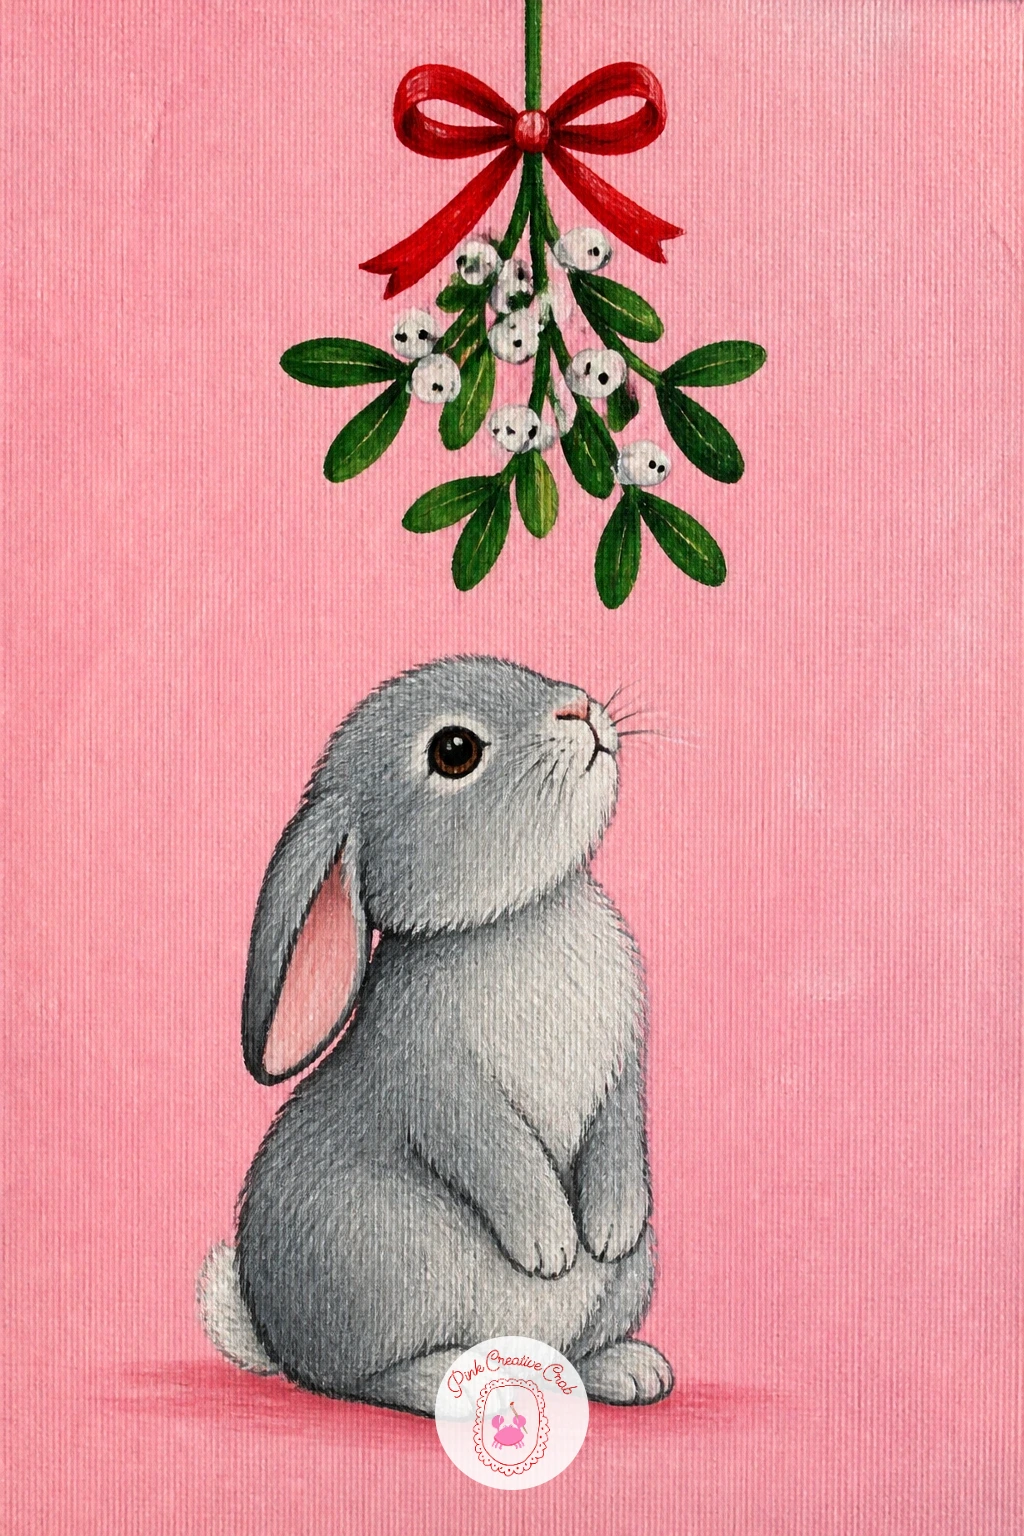
Soften the mood with a small bunny sitting beneath a sprig of mistletoe, set against a flat pale pink background. Sketch the bunny as a simple rounded body with long upright ears, keeping the ears roughly as long as the whole body to get the proportion right, then hang the mistletoe sprig above from the top edge of the canvas.
Block the bunny’s fur in soft grey-brown, then use a dry round brush to drag very short light strokes over the ears and chest for a touch of fur texture, keeping the rest of the body fairly smooth and flat for contrast. The eyes sit large and dark with a single white highlight dot each.
The mistletoe hangs on a thin painted string, with small round white berries and simple pointed green leaves painted in pairs along the stem.
If the hanging string feels fiddly to paint straight, use a ruler as a guide for just that one thin line.
You Will Need
- canvas or canvas board
- dry round brush for fur texture
- fine brush for the mistletoe string
- grey-brown and green acrylics
Palette: Pale Pink,Warm Grey,Cream,Sap Green,Titanium White
Try painting two bunnies side by side next time, noses almost touching under the mistletoe, for a sweeter paired version of the same idea.
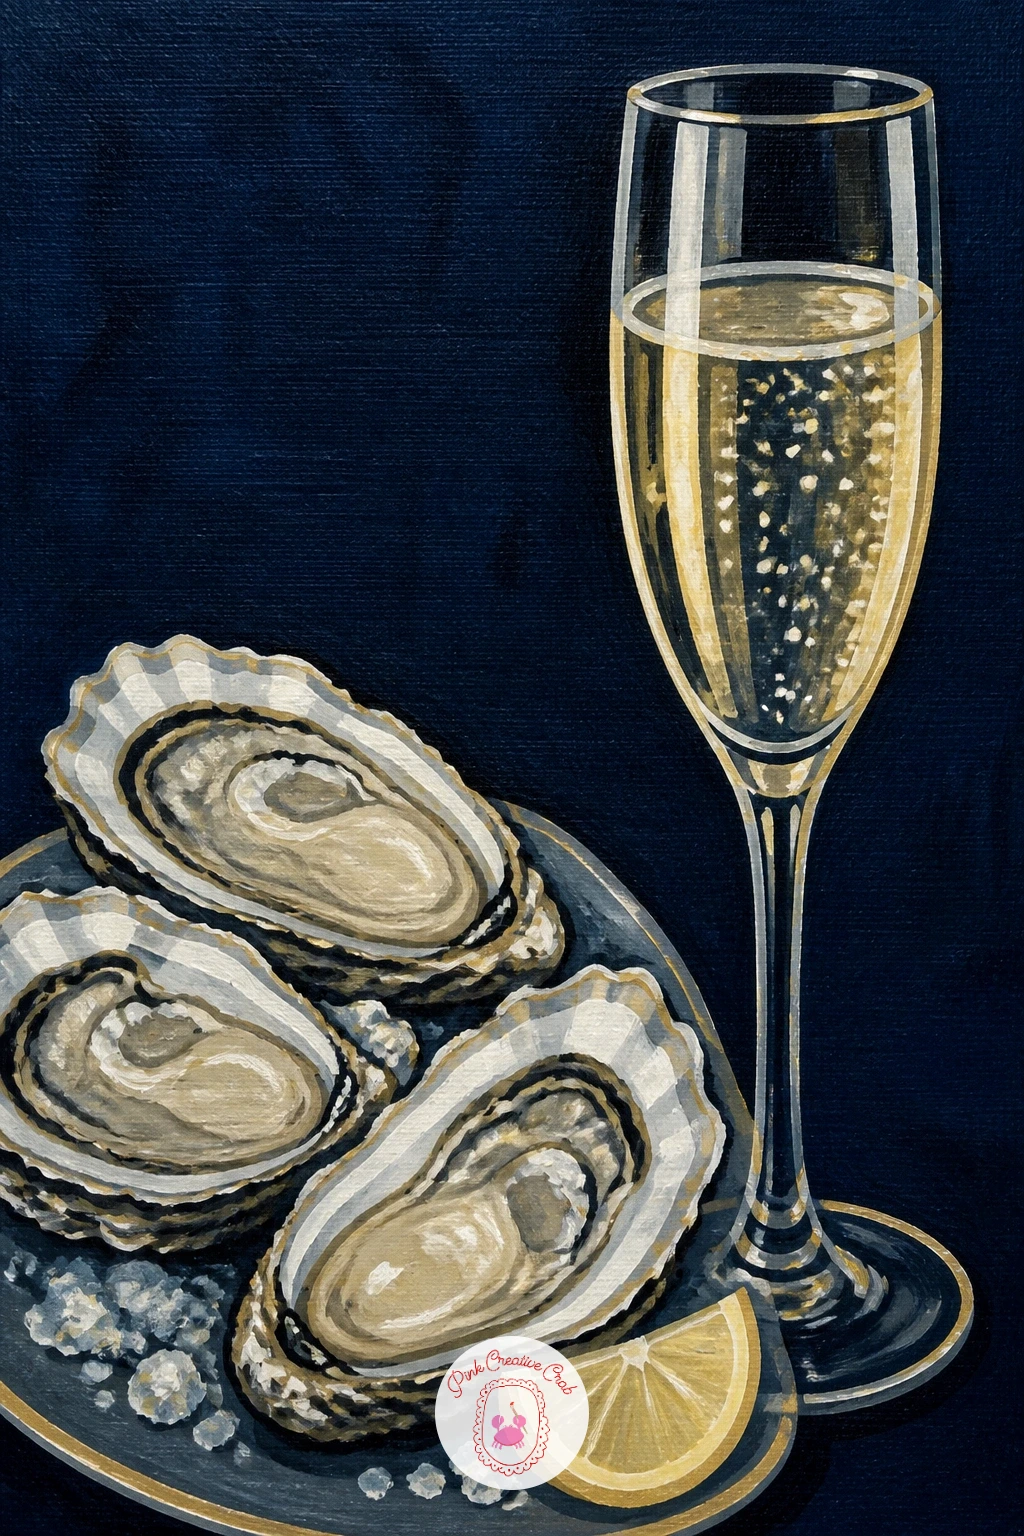
Mark the turn of the year with a small luxury still life: a few oysters on the half shell beside a glass of champagne, set against a flat navy or black background. Sketch the oyster shells first as simple curved teardrop shapes, slightly overlapping, with the champagne glass standing just behind them.
Picture a single bright light source from above and slightly to one side, which means each shell’s ridged exterior catches a line of highlight along the top curve while the inner shell stays pale and smooth. Block the shell exteriors in grey-blue and taupe with quick curved strokes following the ridges, then paint the pale smooth interior and the oyster itself as a soft grey-cream oval nestled inside.
The champagne glass behind sits mostly in background color with a gold wash for the drink and a few tiny white dots for bubbles, echoing the glass from the earlier coupe idea but set here as part of a fuller tablescape.
If painting the ridged shell exterior feels fussy, simplify it to three or four confident curved strokes rather than many small ones.
You Will Need
- canvas or canvas board
- small round brush for shell ridges
- fine brush for bubbles and highlights
- grey-blue and taupe acrylics
Palette: Deep Navy,Grey Blue,Taupe,Cream,Gold
Add one small lemon wedge beside the oysters for a bright yellow accent that balances all the cool greys and blues in this composition nicely.
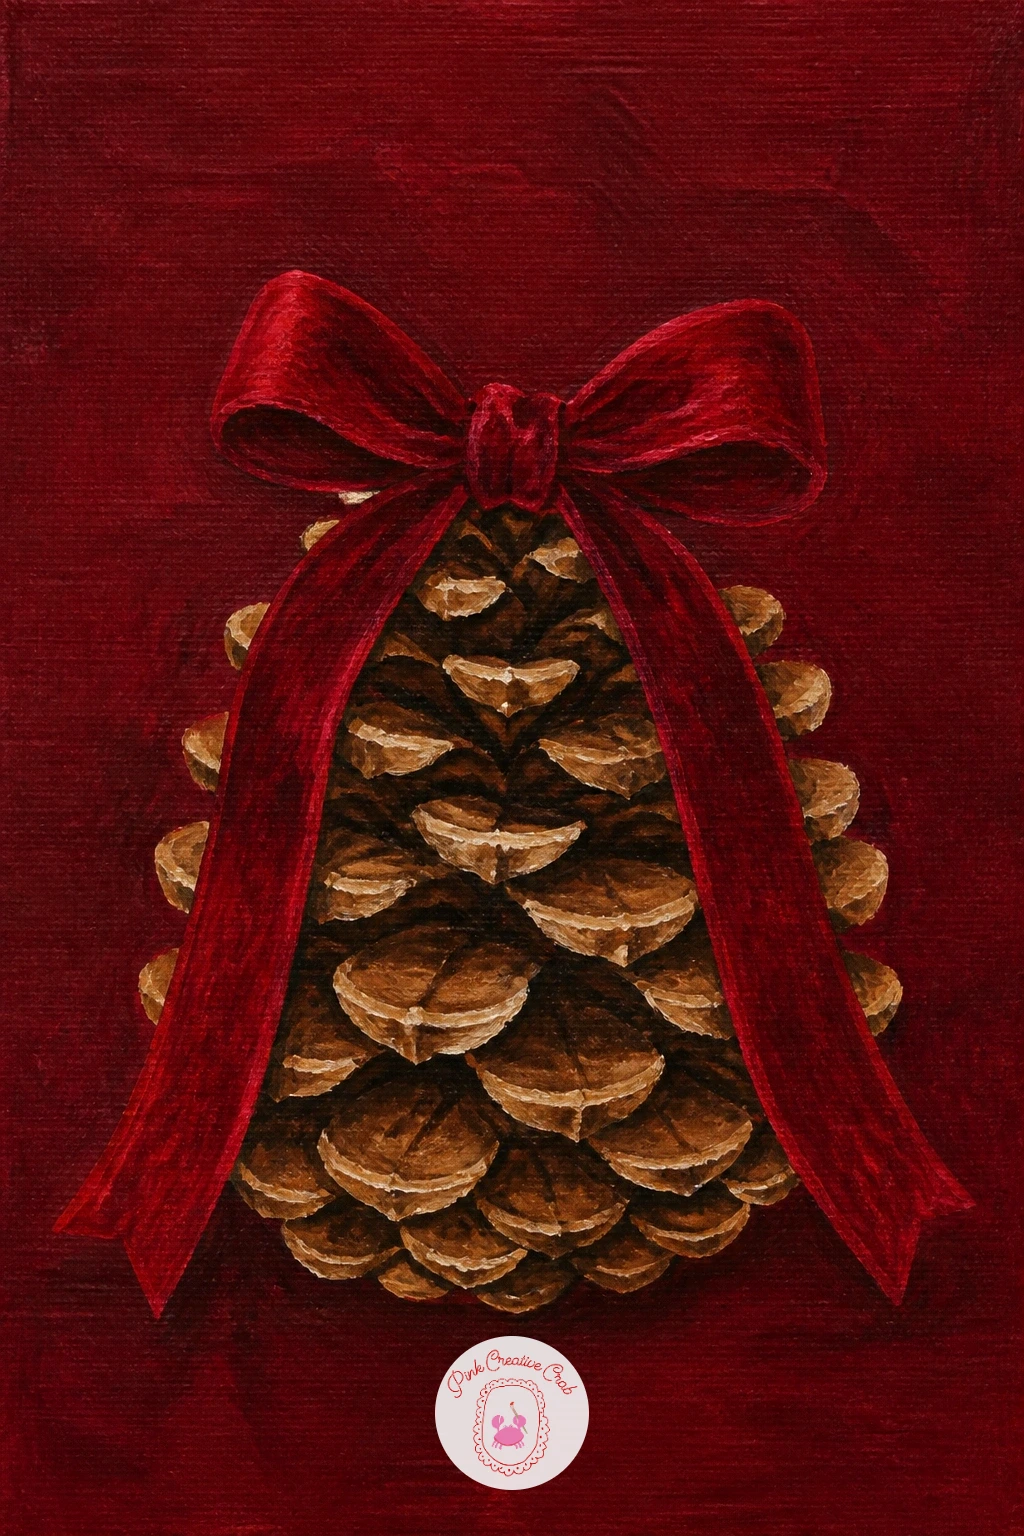
Close the list with the simplest subject of all: a single pine cone tied with a velvet ribbon bow, set against a flat burgundy or mint background. Sketch the pine cone as a simple elongated oval, then mark it with a loose spiral guide to place where the scale rows will sit before you paint any detail.
Block the whole cone in flat medium brown, then once dry, use a small round brush to paint individual scale shapes in overlapping rows, each one a short curved stroke slightly darker or lighter than its neighbor so the texture reads as bumpy rather than smooth. Work from the base up to the pointed tip, letting the scales get smaller as you go.
The ribbon ties around the middle in deep red, painted in one flat shape with a couple of fold lines to suggest velvet’s soft matte texture rather than shiny satin.
If painting every scale individually feels slow, paint the whole cone in silhouette first and texture only the half that catches the light.
You Will Need
- canvas or canvas board
- small round brush for scale texture
- fine brush for the ribbon
- two shades of brown acrylic
Palette: Burgundy,Medium Brown,Dark Brown,Cadmium Red,Cream
For more small object still life compositions at this same clean modern level, see still life painting ideas for beginners for extra setup inspiration.
What to Do Next
Pick whichever canvas you keep scrolling back to, cut a board to size if you need to, and paint the flat background first so it has time to dry while you mix your other colors. One finished canvas tonight beats a dozen half-started ones on a shelf.
Frequently Asked Questions
What paint works best for bold flat backgrounds in christmas acrylic painting?
Student or artist grade acrylic in a heavy body formula covers best in one or two coats. Thin student paints need an extra coat to go fully flat and opaque, so budget the extra drying time if that is what you have on hand.
How do you keep acrylic backgrounds flat and even without brush marks?
Load the brush generously and work in one direction across the whole background in a single session before it starts to dry. Going back over a half-dry patch is what causes streaks, so mix enough paint up front to cover the area in one pass.
Do these christmas acrylic painting ideas need a full canvas or will a small board work?
A small canvas board, around eight by ten inches, suits every idea on this list and finishes faster than a larger canvas. Save bigger canvases for subjects with more fine detail, like the gingerbread house or the bauble bowl, where extra space helps.
How do you fix a mistake on dried acrylic paint?
Paint back over the dried area once it is fully set, acrylic covers itself completely once dry and does not need sanding first. For a large correction, let the new layer dry fully before adding any fine detail on top so edges stay crisp.
What is the easiest idea on this list to start with as a true beginner?
The clementines with a velvet bow or the candle trio both use simple shapes and few color transitions, making them the most forgiving places to start. Both rely mainly on flat shapes and one confident highlight, with no fur or feather texture to manage yet.
Have any thoughts?
Share your reaction or leave a quick response — we’d love to hear what you think!
-
 0
-
0
-
0
-
0
-
0
-
0


