

Table of Contents
- Satin Bow on Love Letters
- Teacup With Pearls and Ribbon
- Cherry Cake With a Bow
- Vintage Perfume Bottle With Lace
- Bunny With a Pink Bow Among Roses
- Lace Glove and Rose
- Heart Locket on a Velvet Cushion
- Cherry Tart on a Lace Doily
- Jewelry Box With Spilling Pearls
- Hand Mirror With Ribbon Trim
- Macarons on a Cake Stand
- Powder Compact With a Bow Clasp
- Vanity Table With Bow Chair
- Strawberry Cupcake With Ribbon Wrap
- Bow Tied Gift Box With Roses
- Birdcage With a Bow and Roses
- Love Letter With Wax Seal and Rose
- Frequently Asked Questions
I love coquette drawing because it turns the smallest things, a ribbon, a pearl, a slice of cake, into something worth lingering over. Every page here leans into that soft, pretty mood: blush pink and cherry red over clean fineliner, with a little white gel pen shine to finish each bow and pearl.
Pick whichever scene catches your eye today and draw along from the first light outline to the last highlight. Below you will find 17 small coquette scenes, each one a full sitting, each one built to feel finished by the time you set your pens down.
Using these images: free for personal projects such as printing, coloring, cards, journals and gifts. Handmade items that include them may be sold up to 30 pieces per design. More than that is commercial use and is not permitted, and neither is selling or sharing the images themselves or passing them off as your own. Please ask before any other use.
Satin Bow on Love Letters
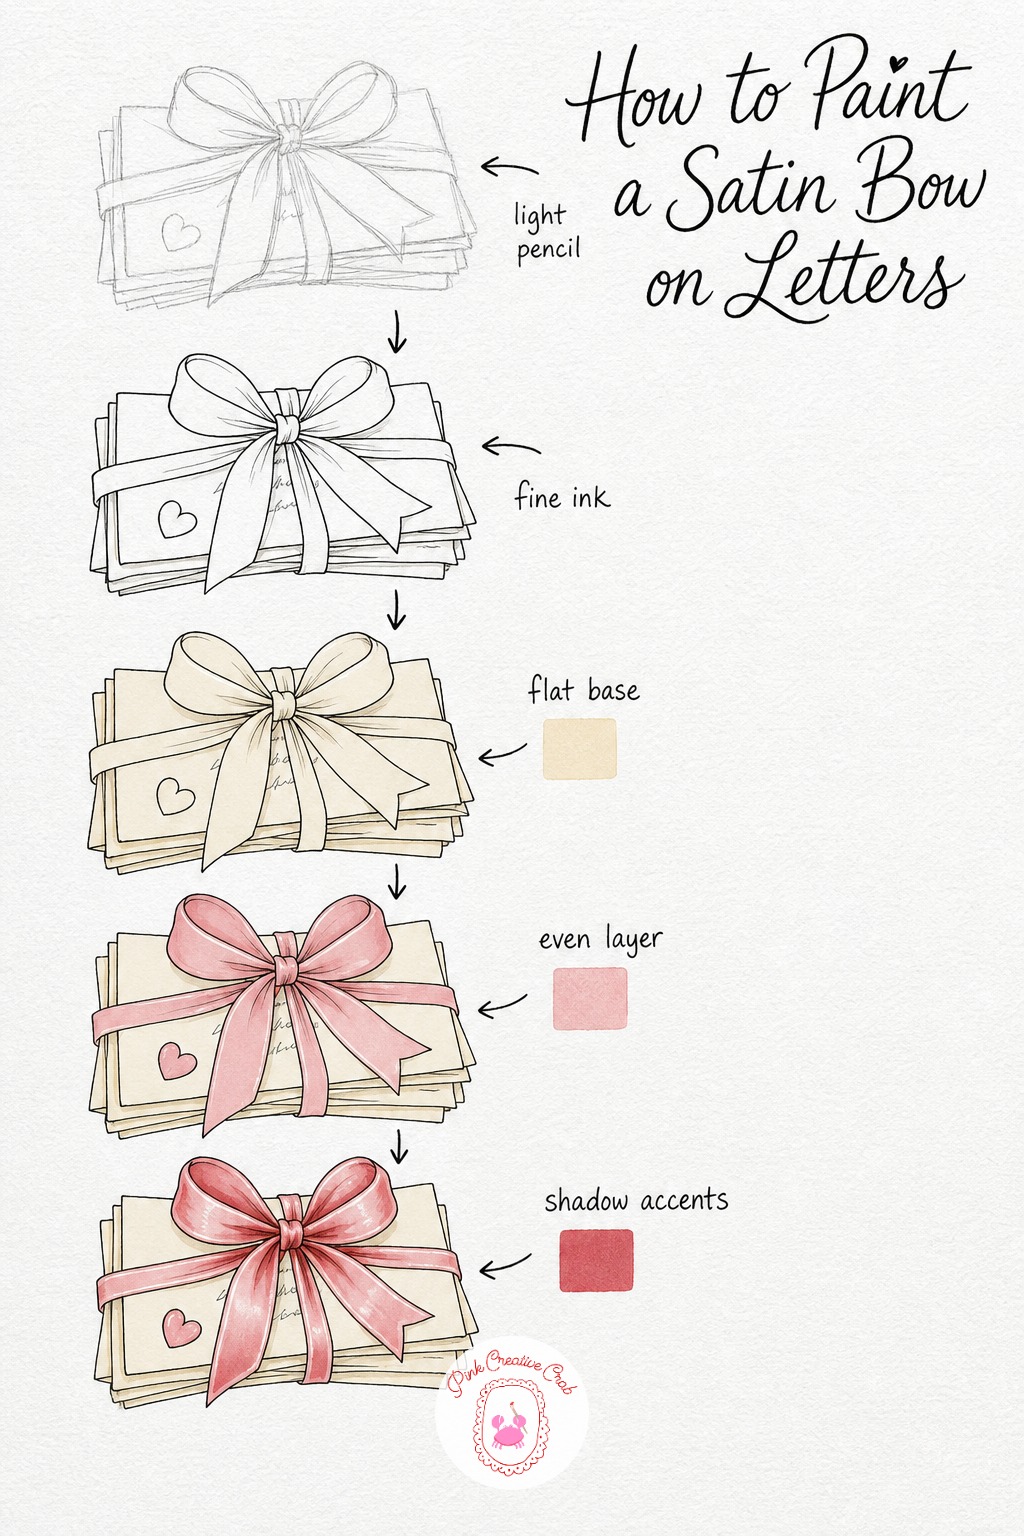
Start with a light pencil stack of letters, a few tucked under each other, tied with a wide bow across the middle. Keep the bow loops soft and a little uneven, that is what makes it look hand tied rather than printed.
Ink the letters and ribbon in fine black line, then lay cream over the paper and blush pink over the whole bow before working cherry red into the folds where the ribbon tucks under itself. Finish with white gel pen along the top of each loop so the satin catches light. Keep one envelope flap peeking out for a little story.
Teacup With Pearls and Ribbon
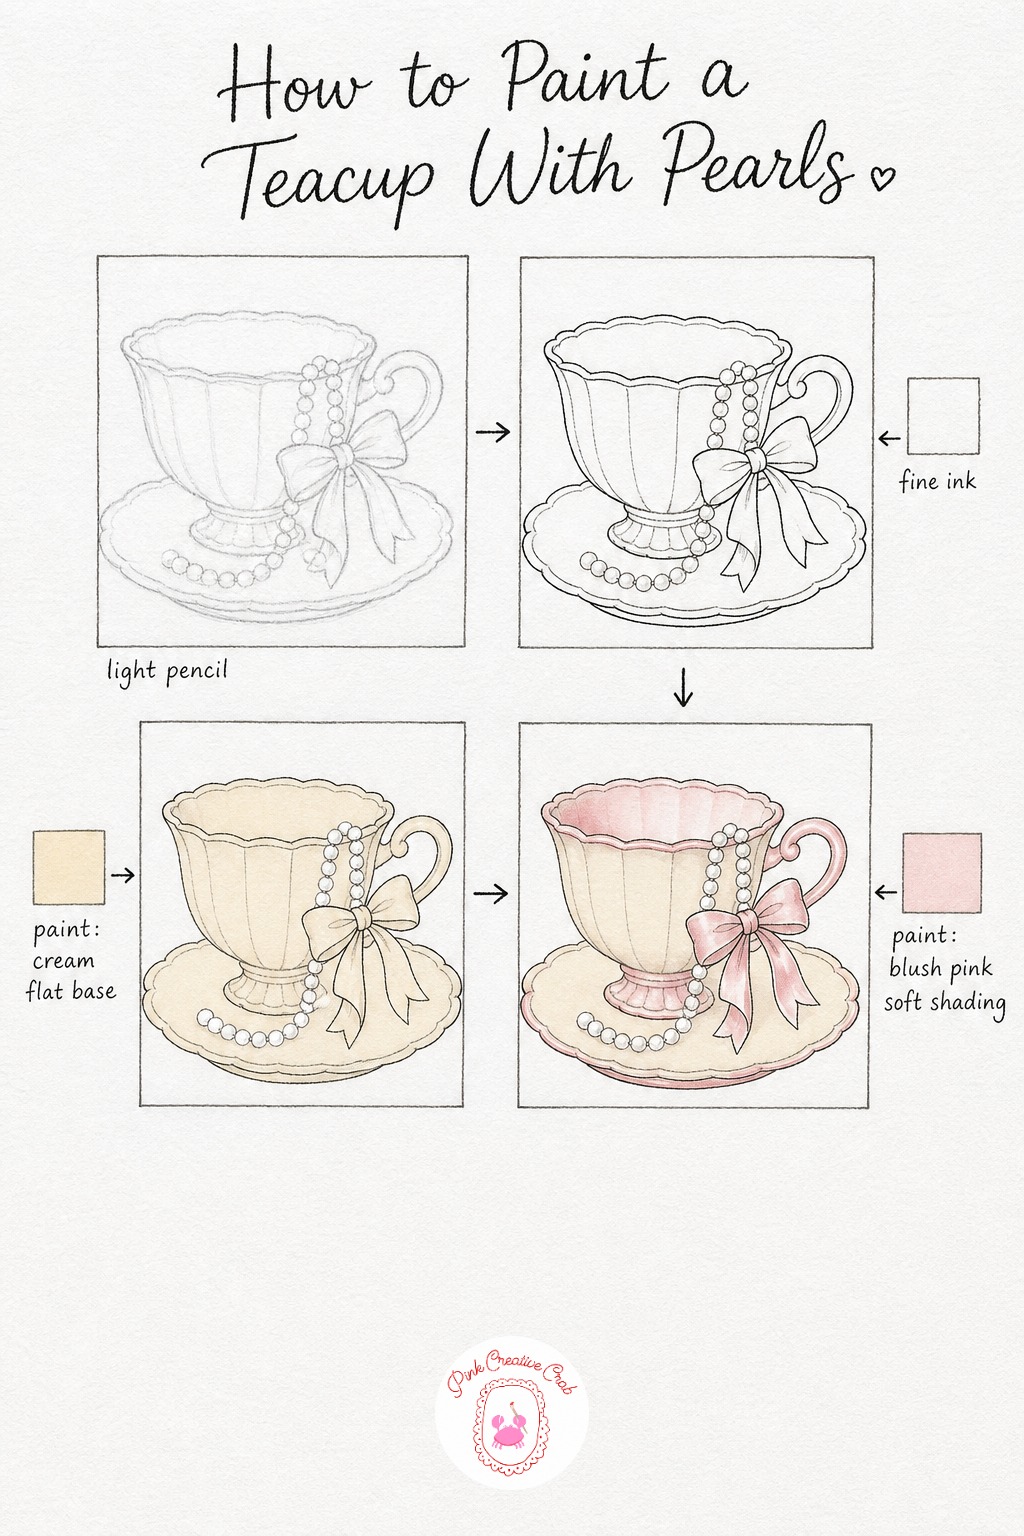
Sketch a rounded footed teacup on its saucer, then drape a loose string of pearls over the handle and tie a tiny bow where the pearls meet. Ink the whole thing in fine line, keeping the pearl circles small and slightly irregular.
Lay cream over the whole cup first, then bring blush pink into the rim shadow and under the saucer lip. Color the little bow cherry red, and save the white gel pen for last, one dot of shine on each pearl and a single clean line along the rim.
Cherry Cake With a Bow
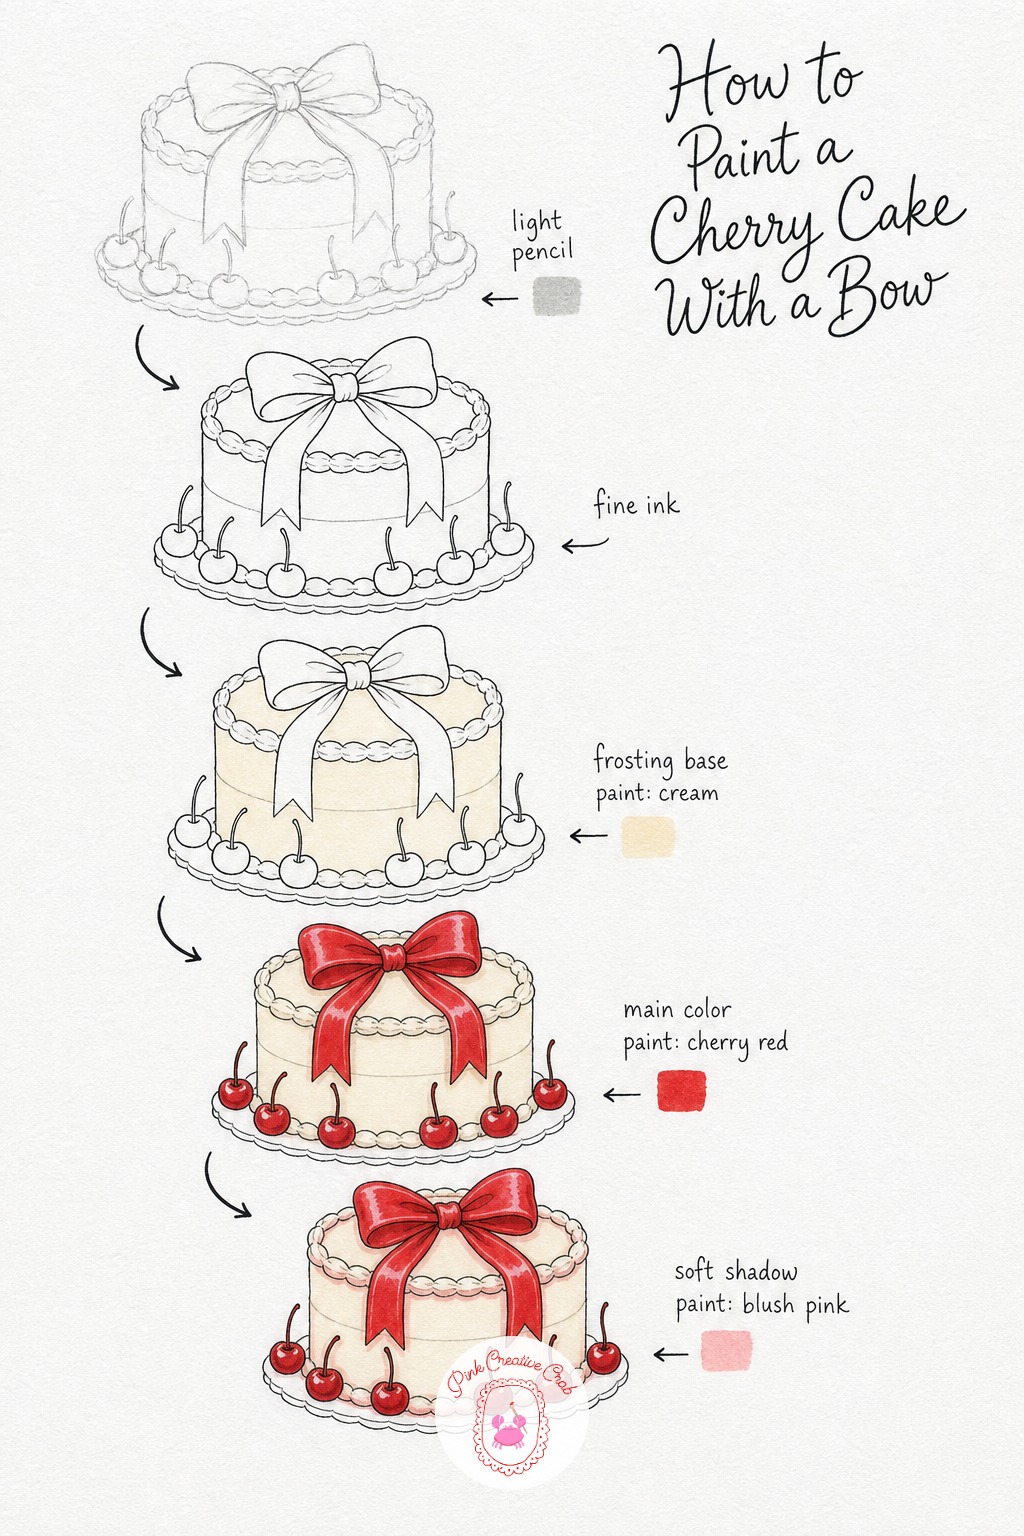
Draw a simple two layer cake with a thick ribbon bow sitting on top and a few whole cherries resting around the base. A light pencil pass is enough, you can smooth the frosting edges once you ink.
Ink the layers and ribbon in fine line, then wash the frosting cream and fill the cherries and bow cherry red. Blush pink goes into the frosting shadows, and a dot of white gel pen on each cherry makes them look wet and glossy. If you like baking scenes, this one pairs nicely with the layouts in this picnic drawing collection.
Vintage Perfume Bottle With Lace
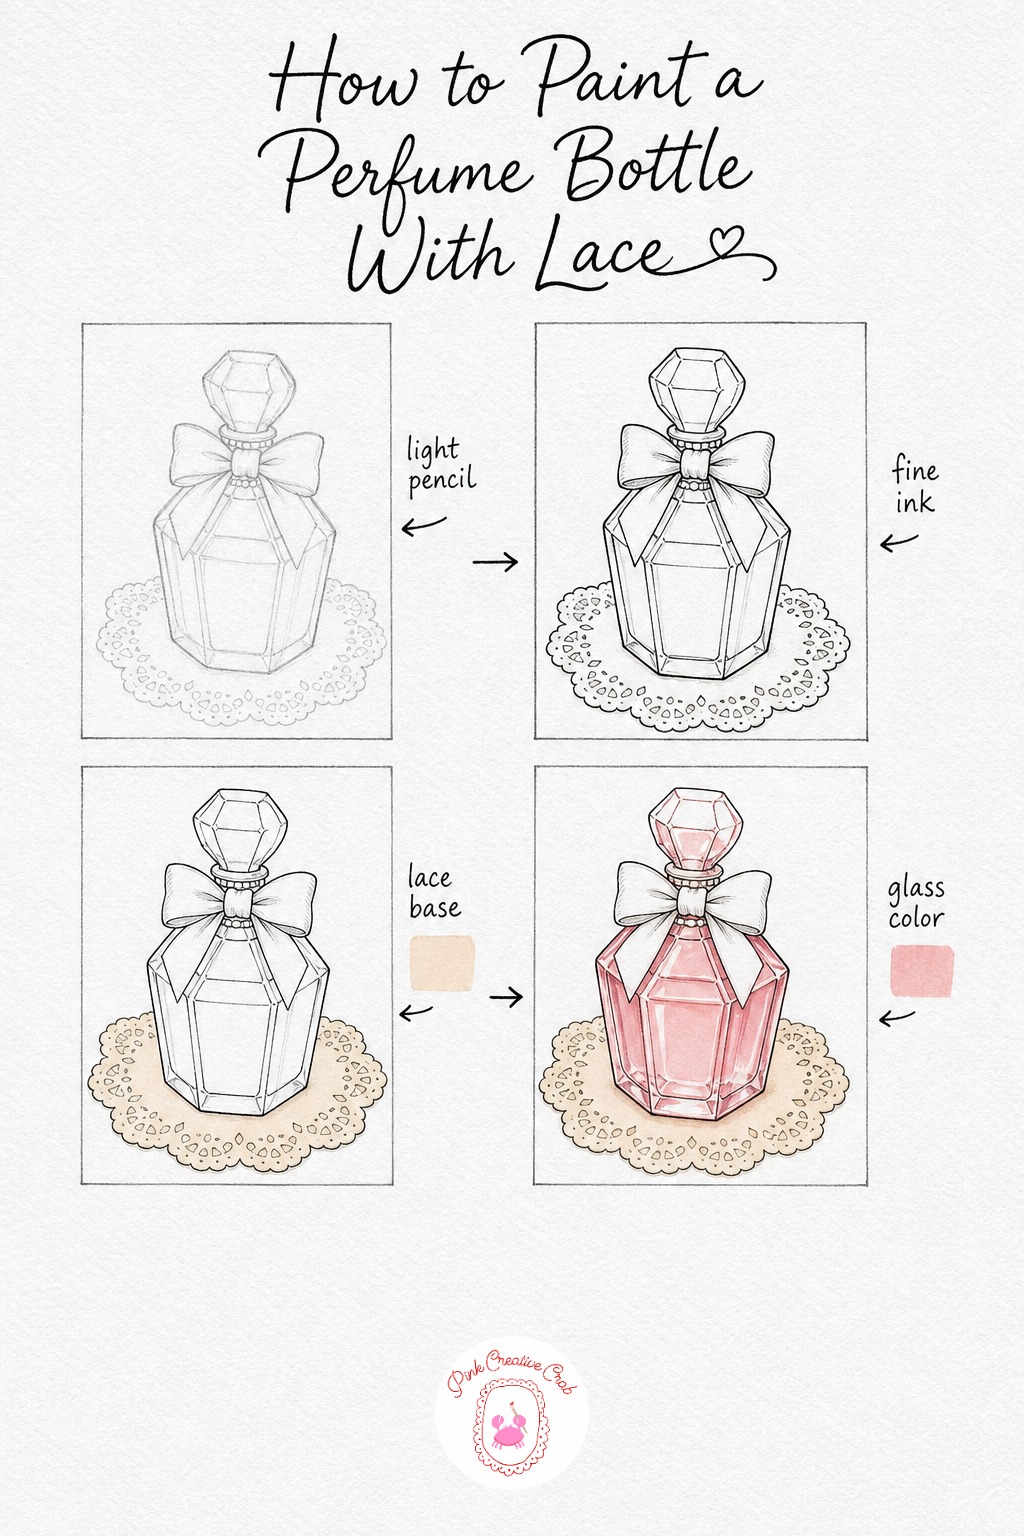
Sketch a faceted bottle sitting on a small lace doily, with a narrow bow knotted around the stopper. Keep the facet lines straight and simple, a few long triangles are enough to suggest cut glass.
Ink the bottle, lace scallops and bow, then wash the doily cream and fill the glass blush pink, leaving the facet lines as pale breaks. Add cherry red to the bow and finish with white gel pen streaks down the glass edges and a few dots along the lace trim.
Bunny With a Pink Bow Among Roses
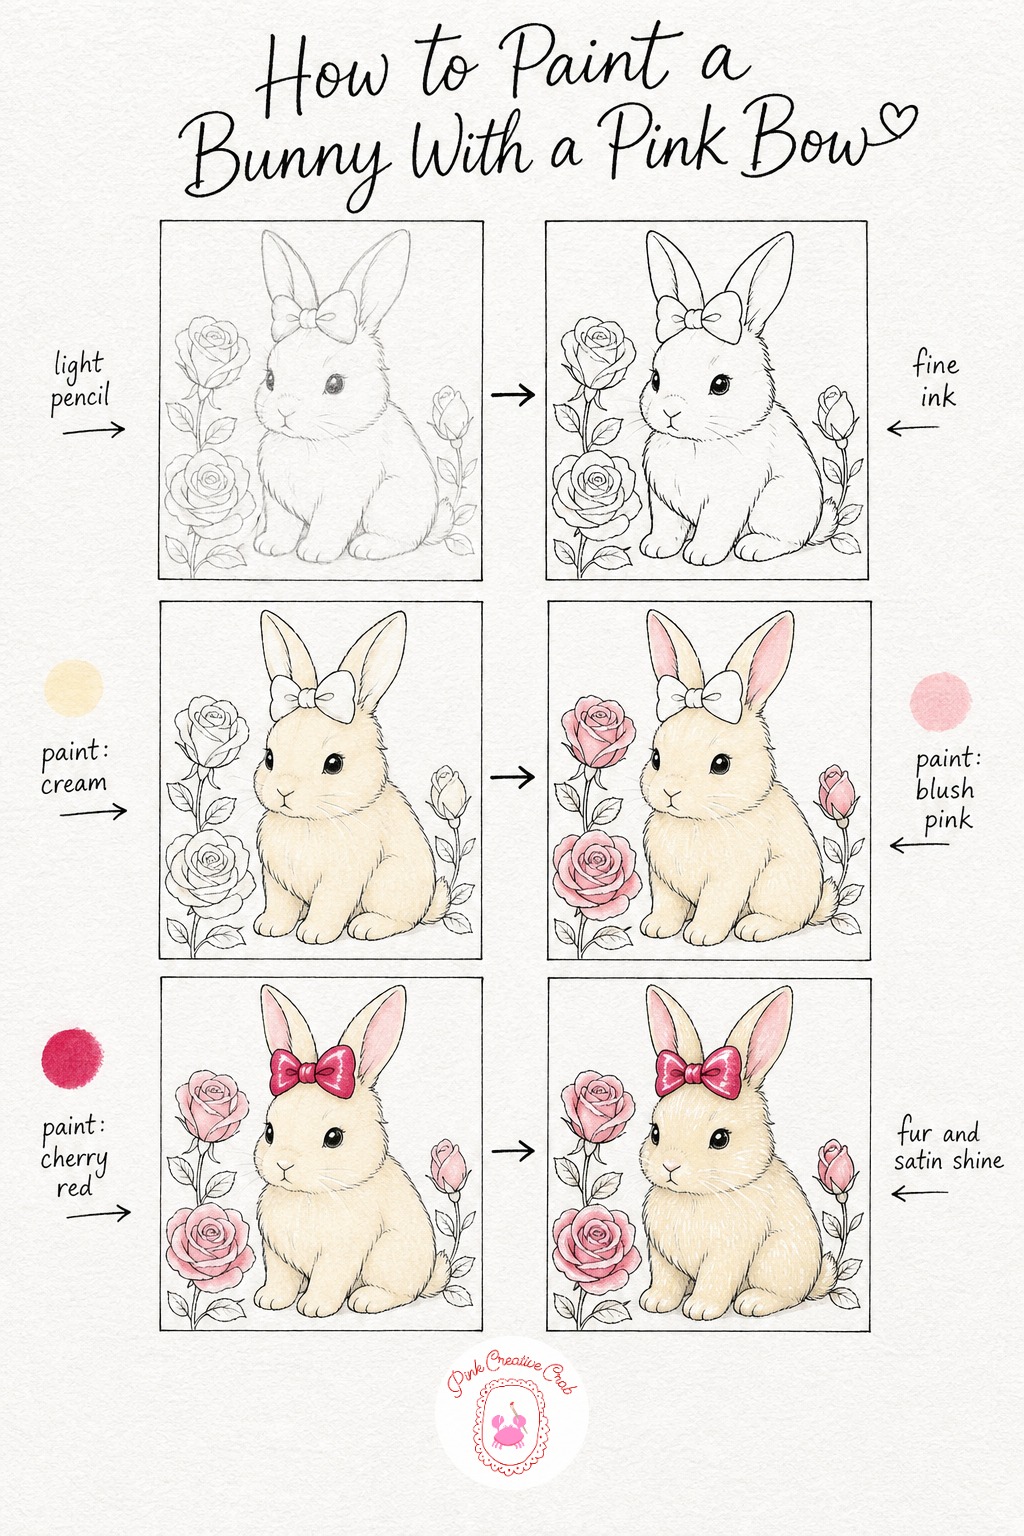
Draw a round, sitting bunny with soft long ears and a bow perched between them, then scatter a few open roses around its feet. Keep the pencil loose, this scene reads best with gentle, rounded shapes.
Ink the bunny and roses in fine line, wash the fur cream, and bring blush pink into the roses and the inner ears. Color the bow cherry red, then finish with white gel pen whiskers and a streak of shine across the ribbon. Readers who enjoy soft animal scenes might also like this cat sketchbook collection for more gentle ideas.
Lace Glove and Rose
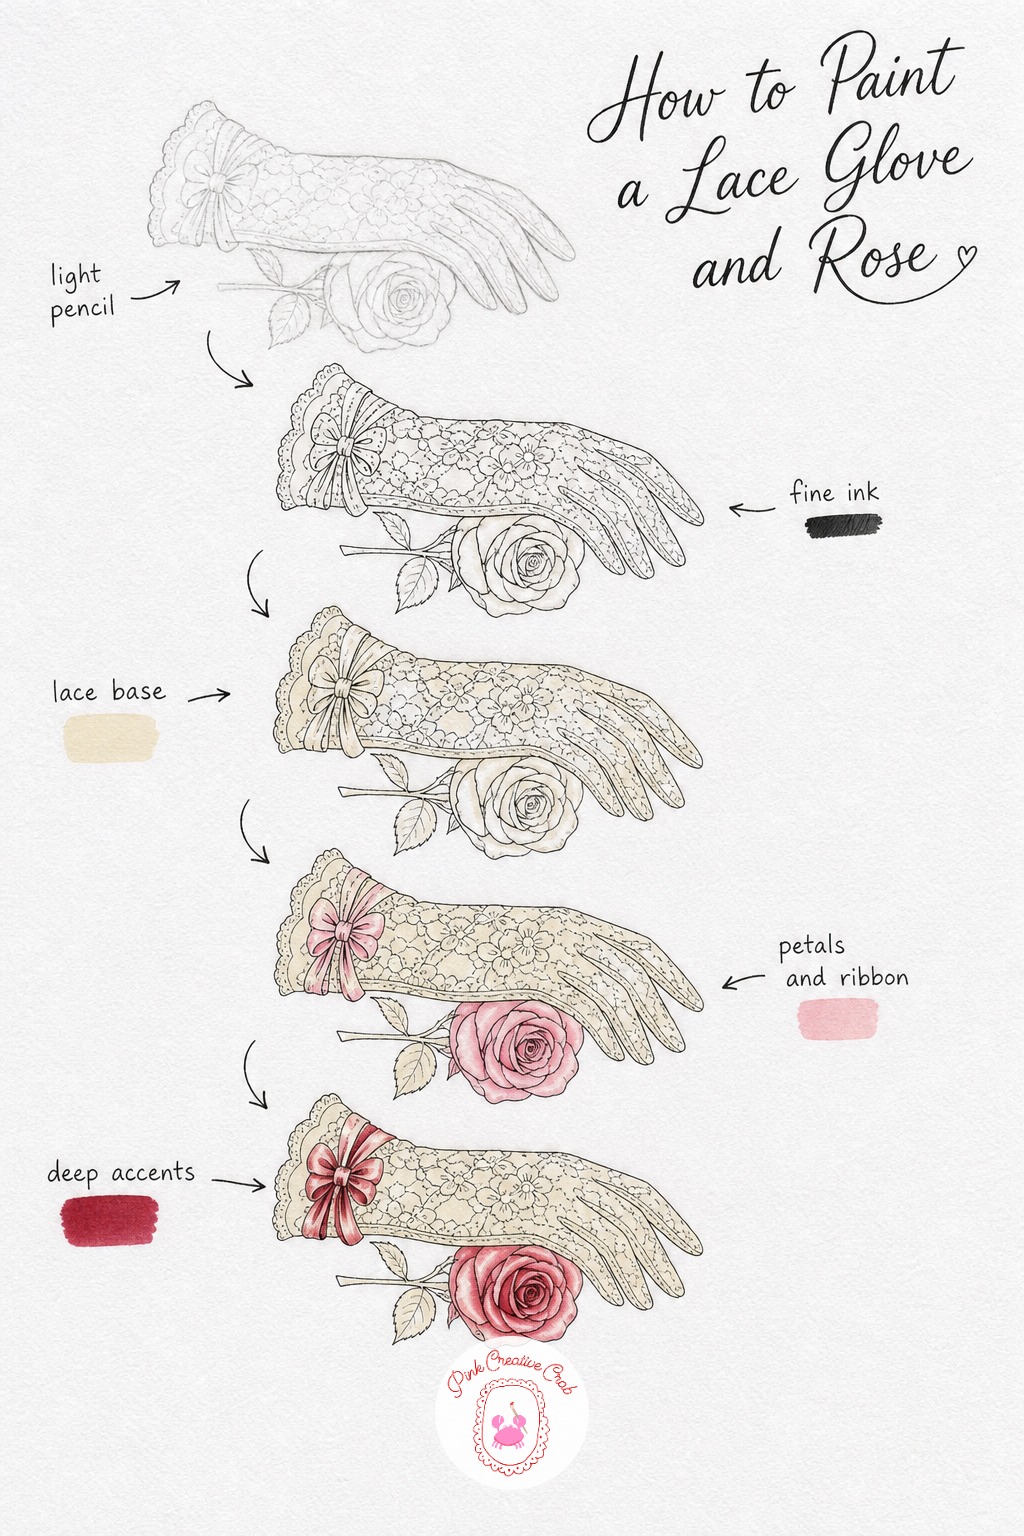
Sketch a long glove laid out softly, cuff open, with a rose resting across the fingers. Draw the lace pattern as a simple row of small loops along the cuff edge rather than every tiny thread.
Ink the glove and rose, wash the fabric cream, then bring blush pink into the petals and cuff ribbon. Cherry red goes into the rose center and ribbon folds for depth, and white gel pen dots finish the lace holes with a clean, pretty shine.
Heart Locket on a Velvet Cushion
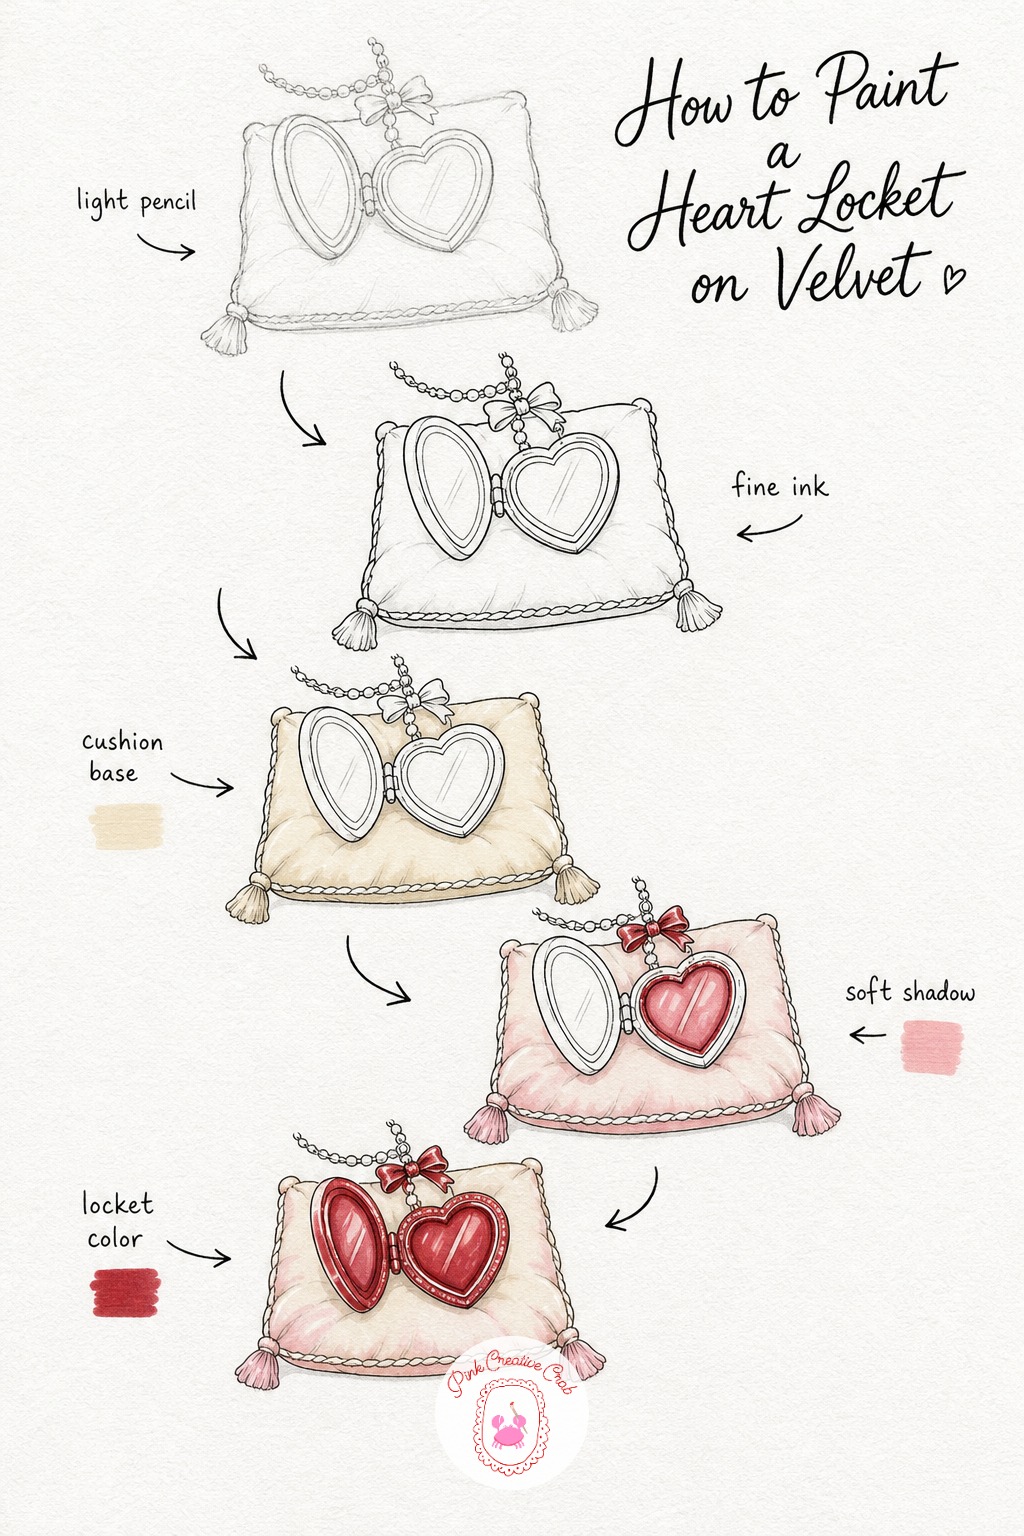
Draw a small open heart locket with a fine chain and a tiny bow where the chain meets the clasp, resting on a tasseled cushion. Keep the cushion corners soft and slightly puffed.
Ink the locket and cushion, then wash the cushion cream and bring blush pink into its folds and tassels. Fill the locket cherry red, and finish with white gel pen along the chain links and locket rim so the metal catches light.
Cherry Tart on a Lace Doily
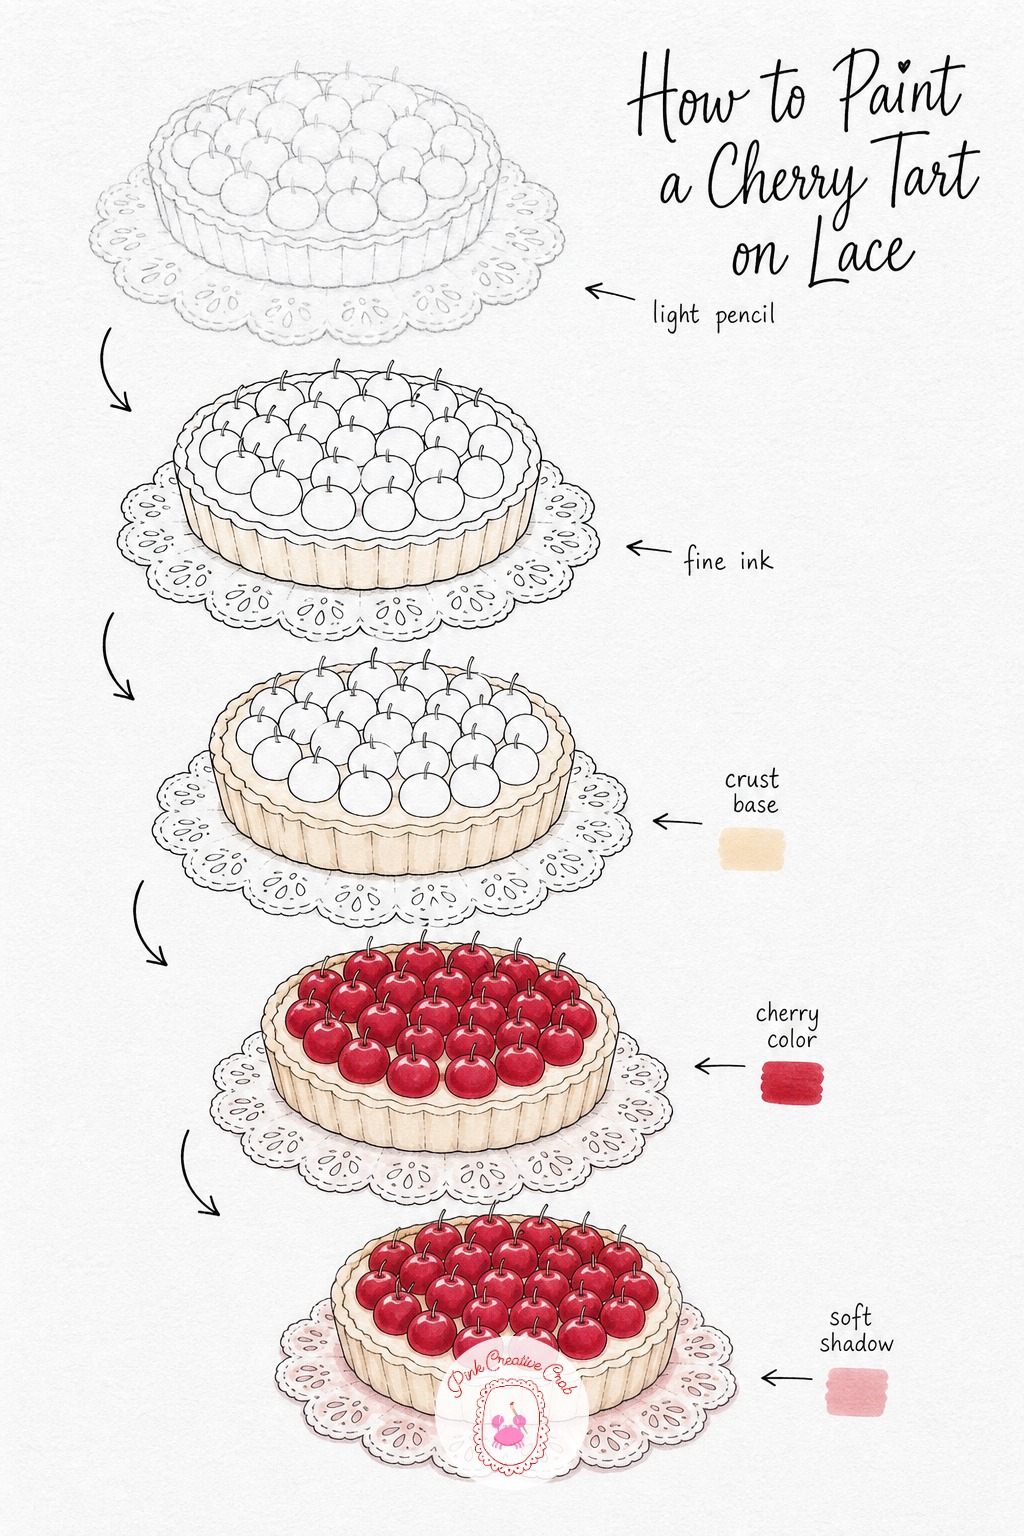
Sketch a round tart with a fluted crust edge, a handful of whole cherries arranged on top, resting on a scalloped lace doily. Keep the crust lines slightly wavy for a hand baked feel.
Ink the tart and doily, then wash the crust cream and fill the cherries cherry red. Blush pink softens the crust shadows and doily folds, and white gel pen dots give each cherry its glossy shine. A light touch on the doily scallops keeps the lace from looking too busy.
Jewelry Box With Spilling Pearls
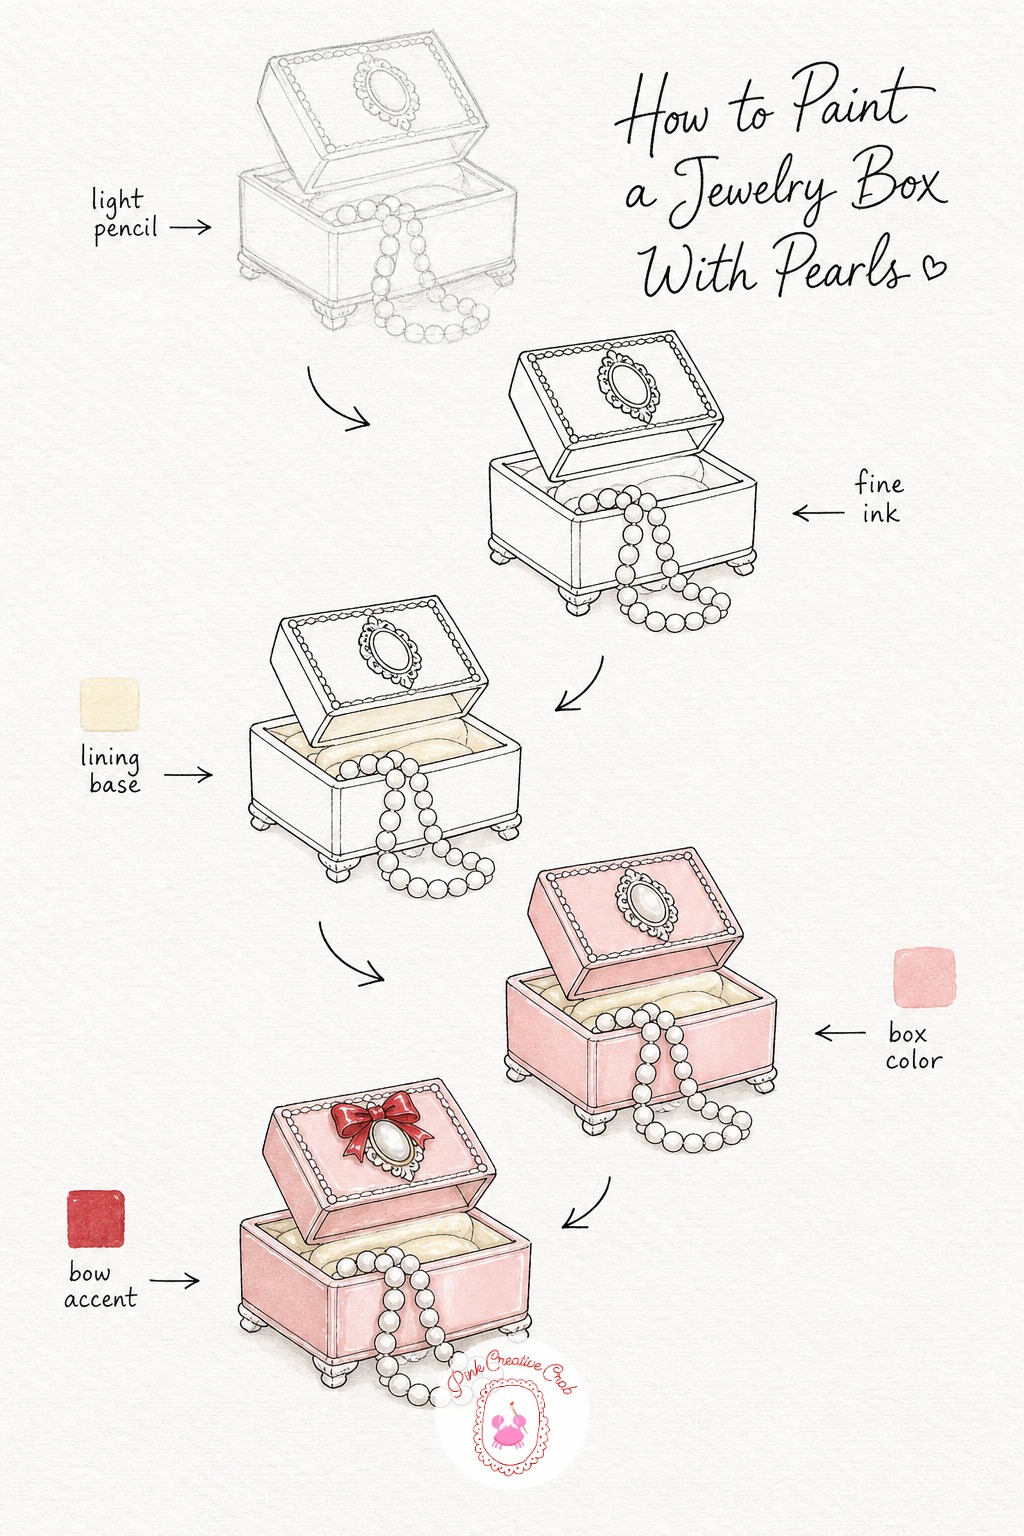
Draw a small open box with the lid tilted back and a string of pearls tumbling out over the front edge. A tiny bow on the lid adds a sweet finishing detail.
Ink the box and pearls, wash the inside lining cream, then fill the outer box blush pink and the lid bow cherry red. Finish with a dot of white gel pen on each pearl and a thin shine line along the box’s top edge, so it looks freshly opened.
Hand Mirror With Ribbon Trim
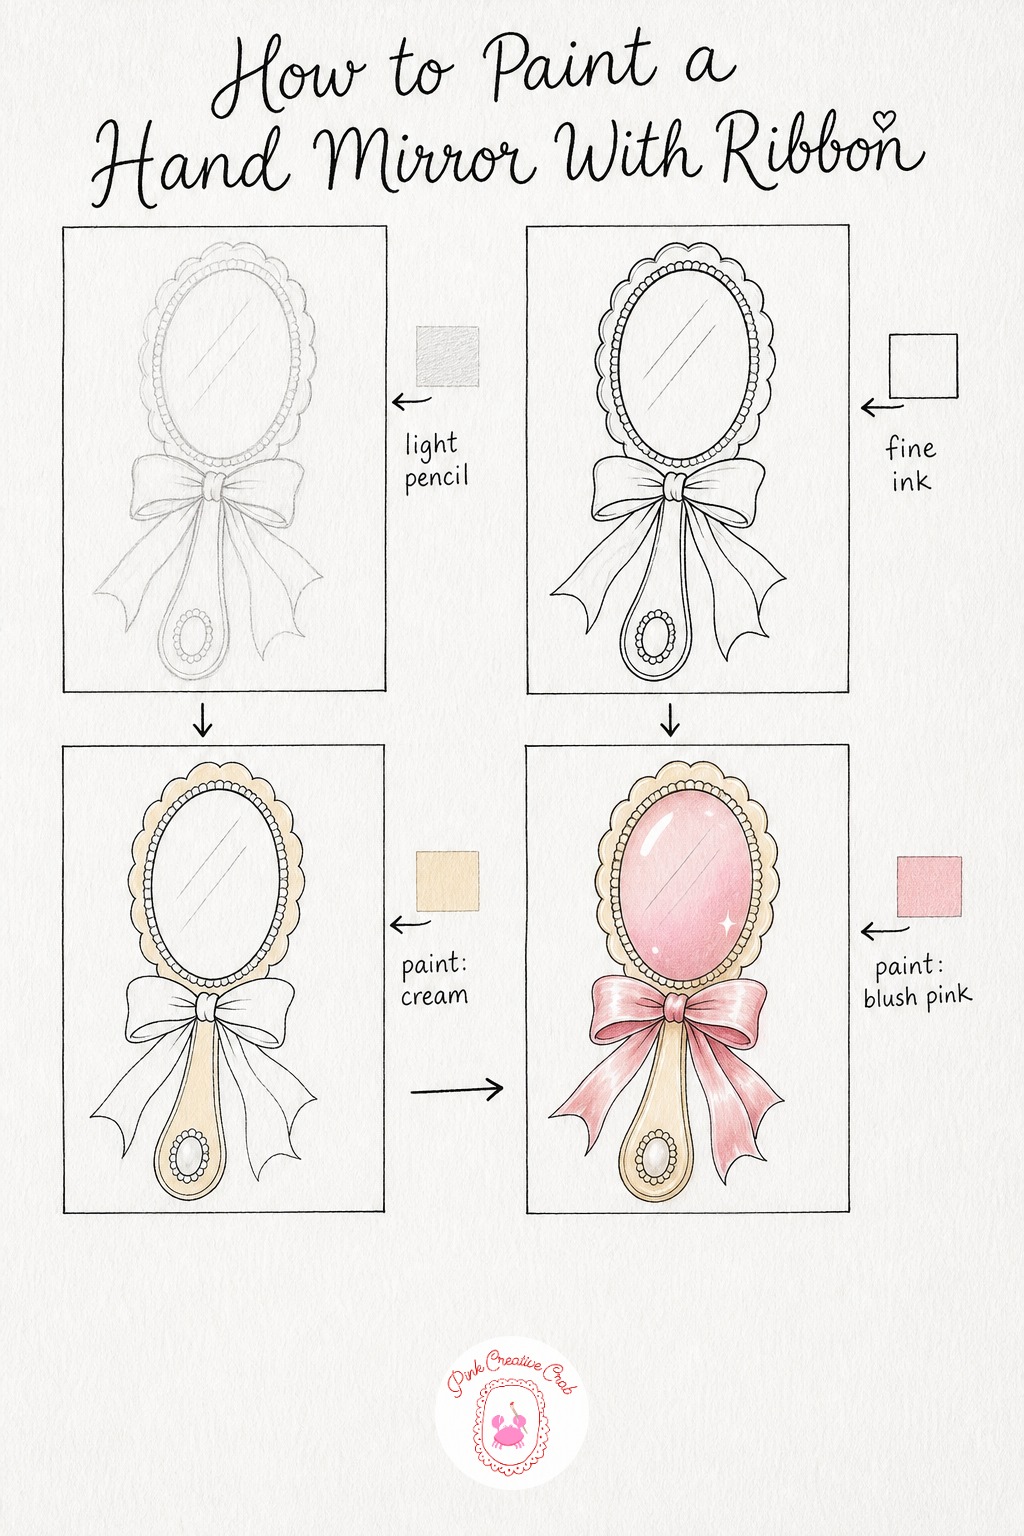
Sketch an oval mirror on a short handle, with a bow tied just below the glass. Keep the frame edge smooth and rounded, that curve is what sells the vintage feel.
Ink the mirror and bow, wash the frame cream, then tint the glass blush pink in a soft gradient from edge to center. Fill the bow cherry red and finish with a curved line of white gel pen across the glass to suggest reflected light, plus a small shine along the frame.
Macarons on a Cake Stand
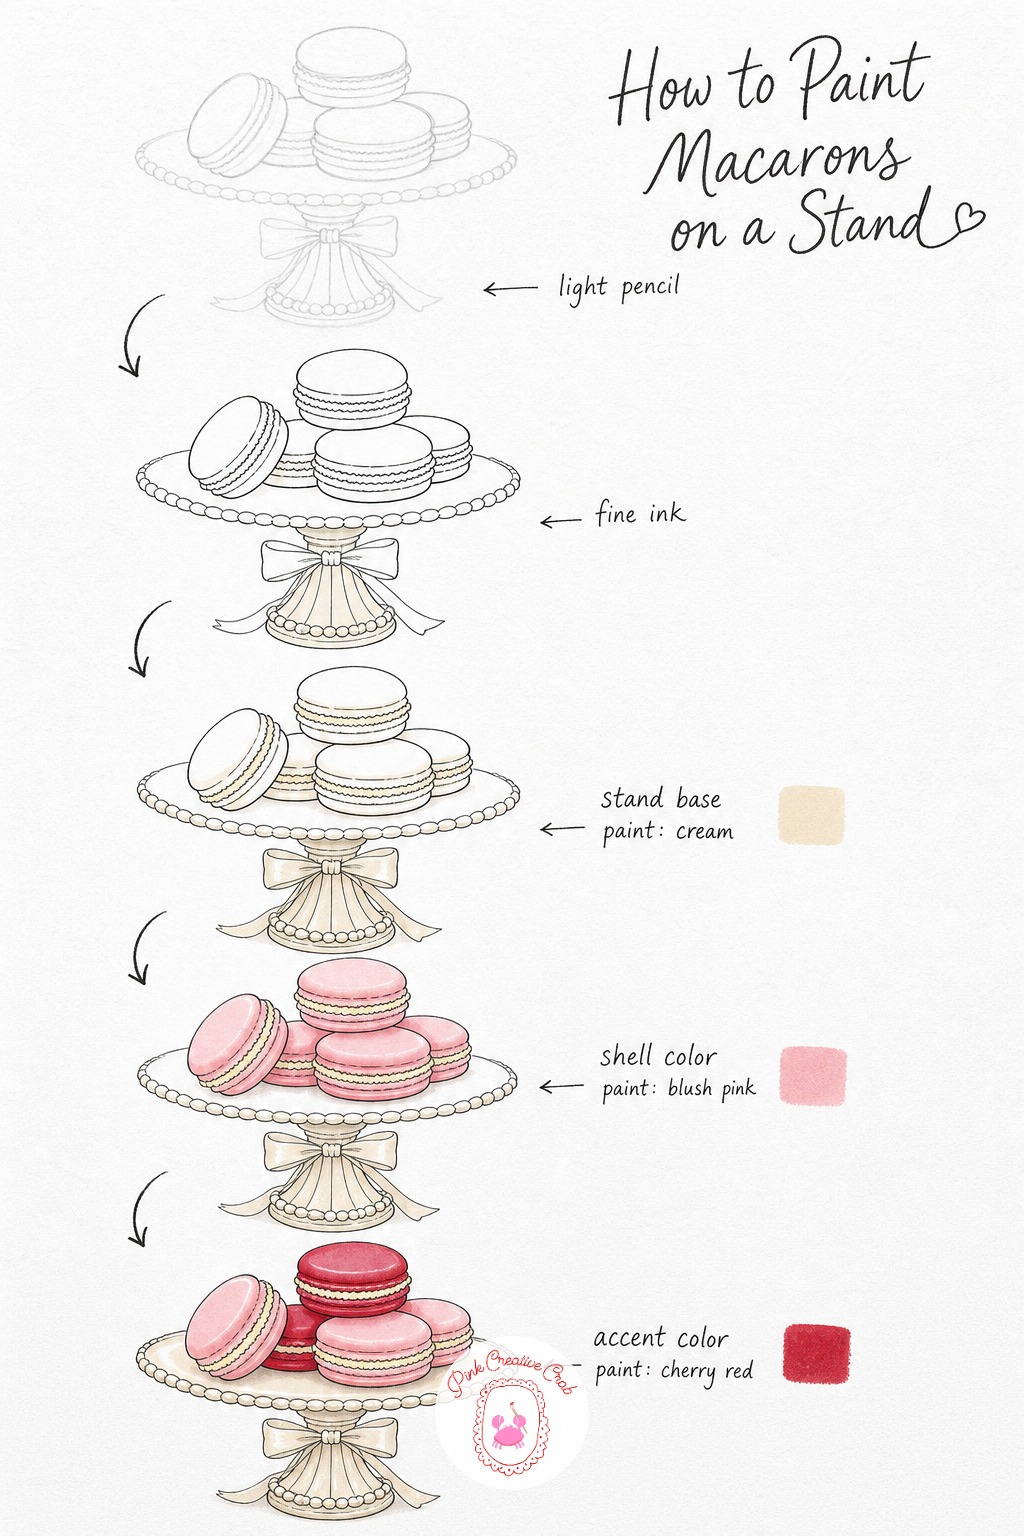
Draw a simple tiered stand with three or four round macarons stacked on top, each one showing its characteristic ruffled edge where the shell meets the filling. Keep the shapes round and slightly uneven.
Ink the stand and macarons, wash the stand cream, then fill most shells blush pink and one or two cherry red for variety. A dot of white gel pen on the top of each macaron gives it that soft, sugary shine without extra shading needed.
Powder Compact With a Bow Clasp
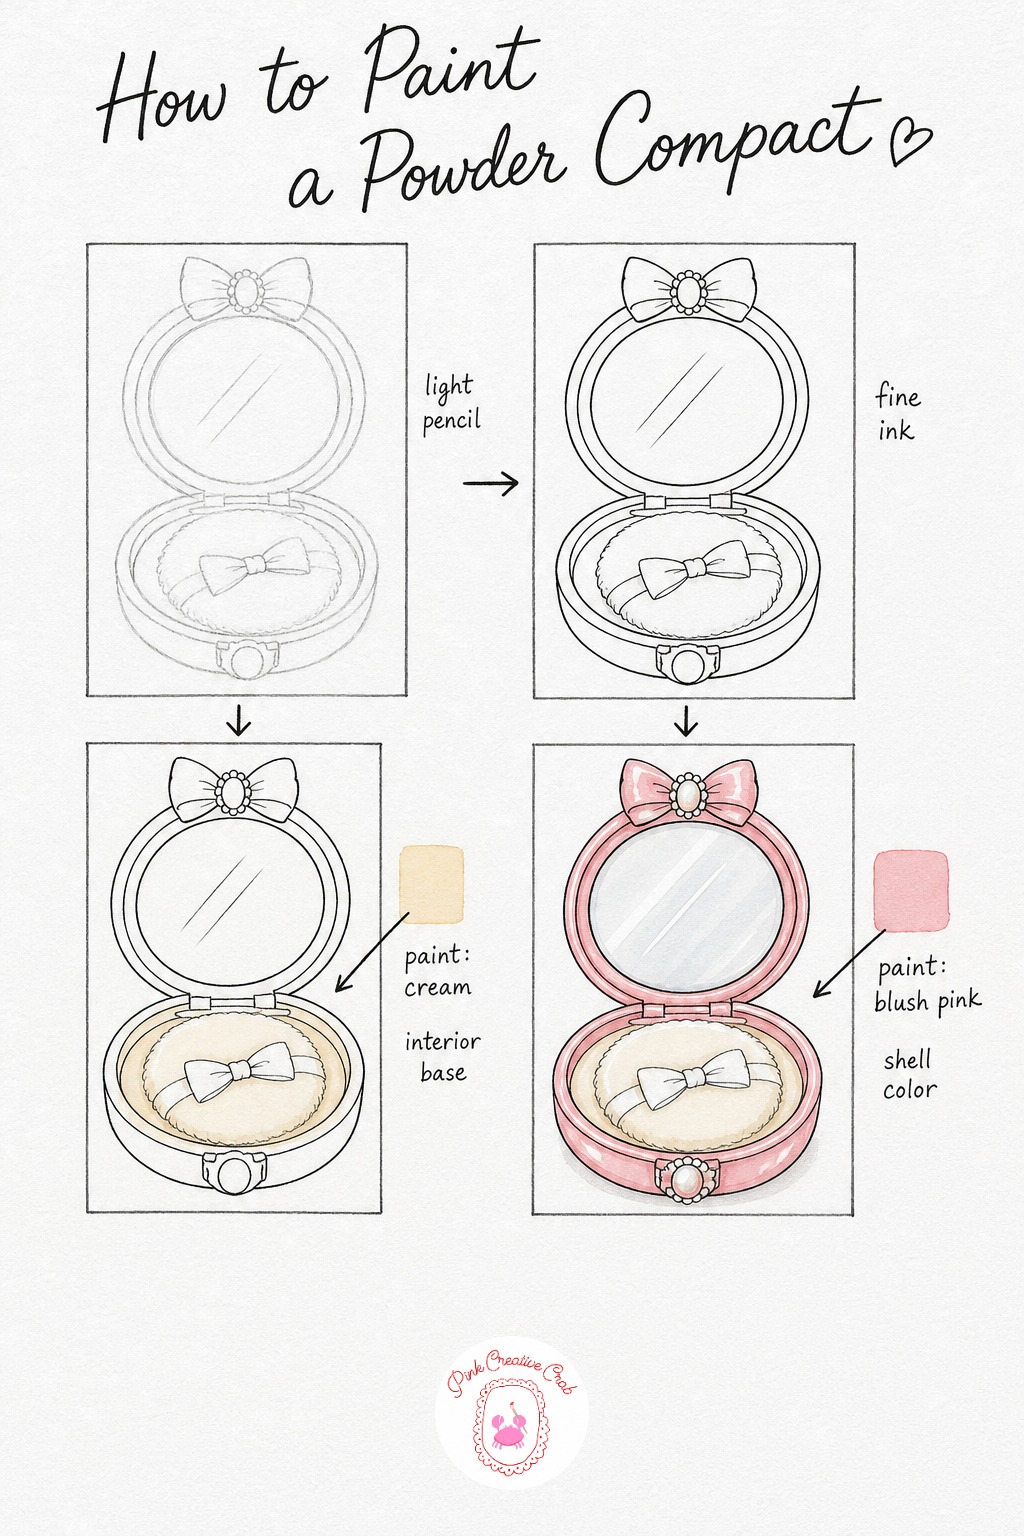
Sketch a round compact open on its hinge, with a powder puff resting inside and a bow shaped clasp at the front. Keep the mirror oval simple, you will add its shine with gel pen later.
Ink the compact and clasp, wash the puff and tray cream, then fill the outer shell blush pink and the clasp cherry red. Finish with white gel pen along the rim and a diagonal shine across the mirror glass so it looks polished.
Vanity Table With Bow Chair
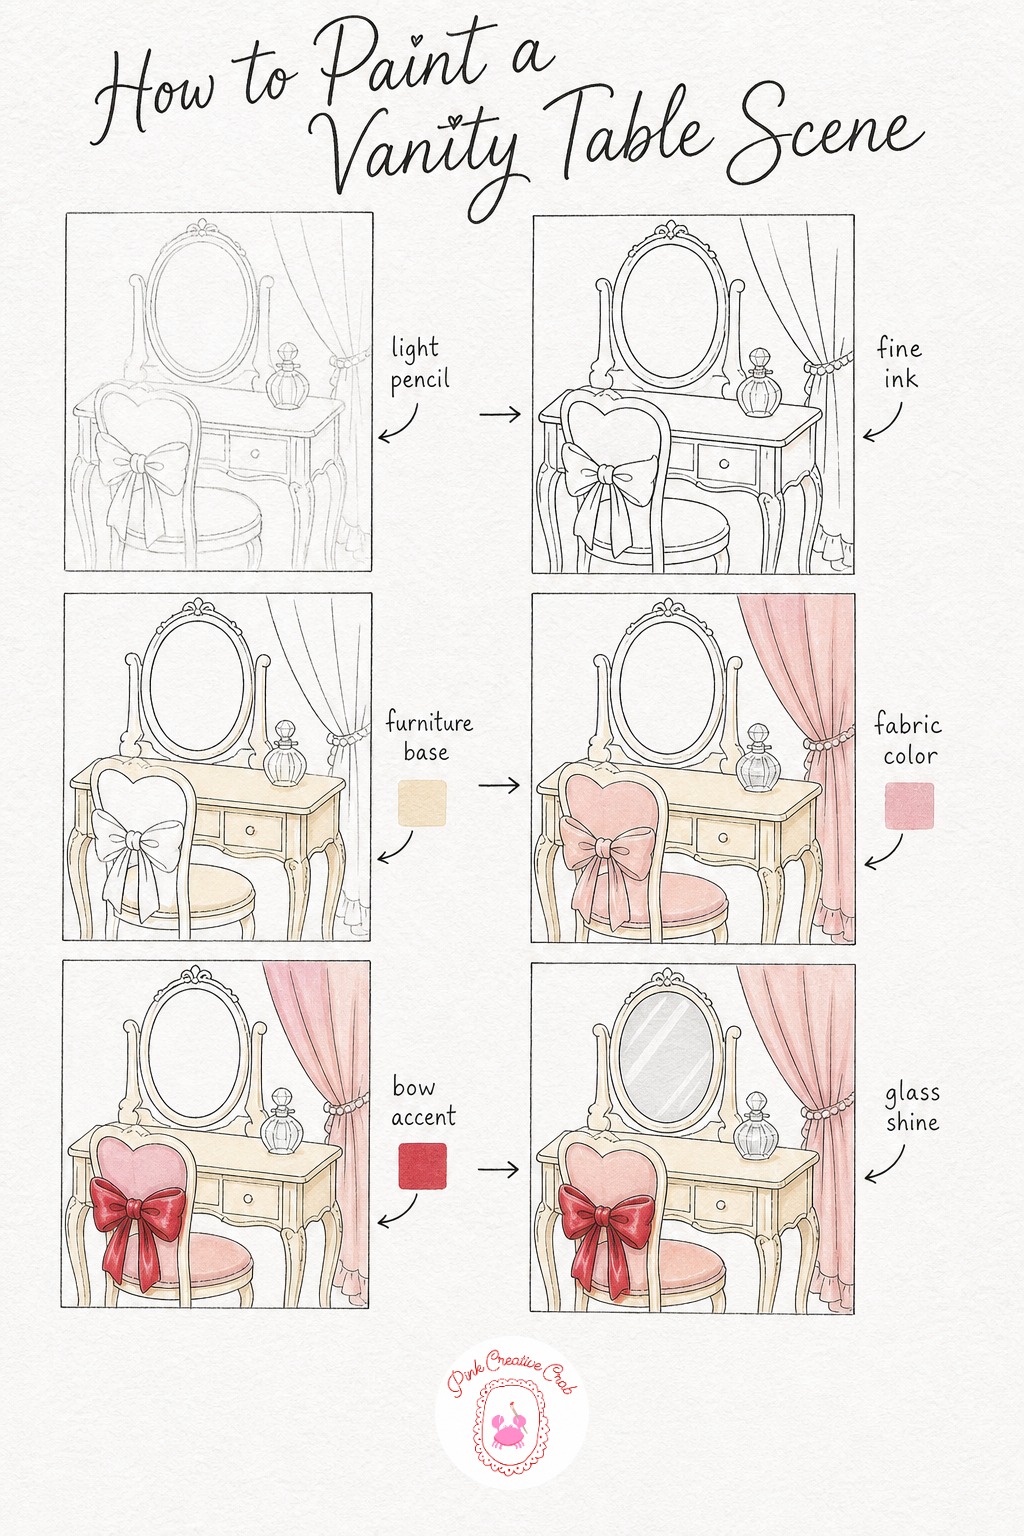
Build this one as a small room corner: a vanity table with an oval mirror, a chair with a bow tied on its back, and a perfume bottle sitting on the table top. Keep the furniture shapes simple and slightly rounded.
Ink the whole scene, wash the table and cushion cream, then bring blush pink into the chair fabric and curtain. Color the chair bow cherry red and finish with white gel pen on the mirror and bottle glass. For more small room scenes like this, this village scene collection has gentle ideas too.
Strawberry Cupcake With Ribbon Wrap
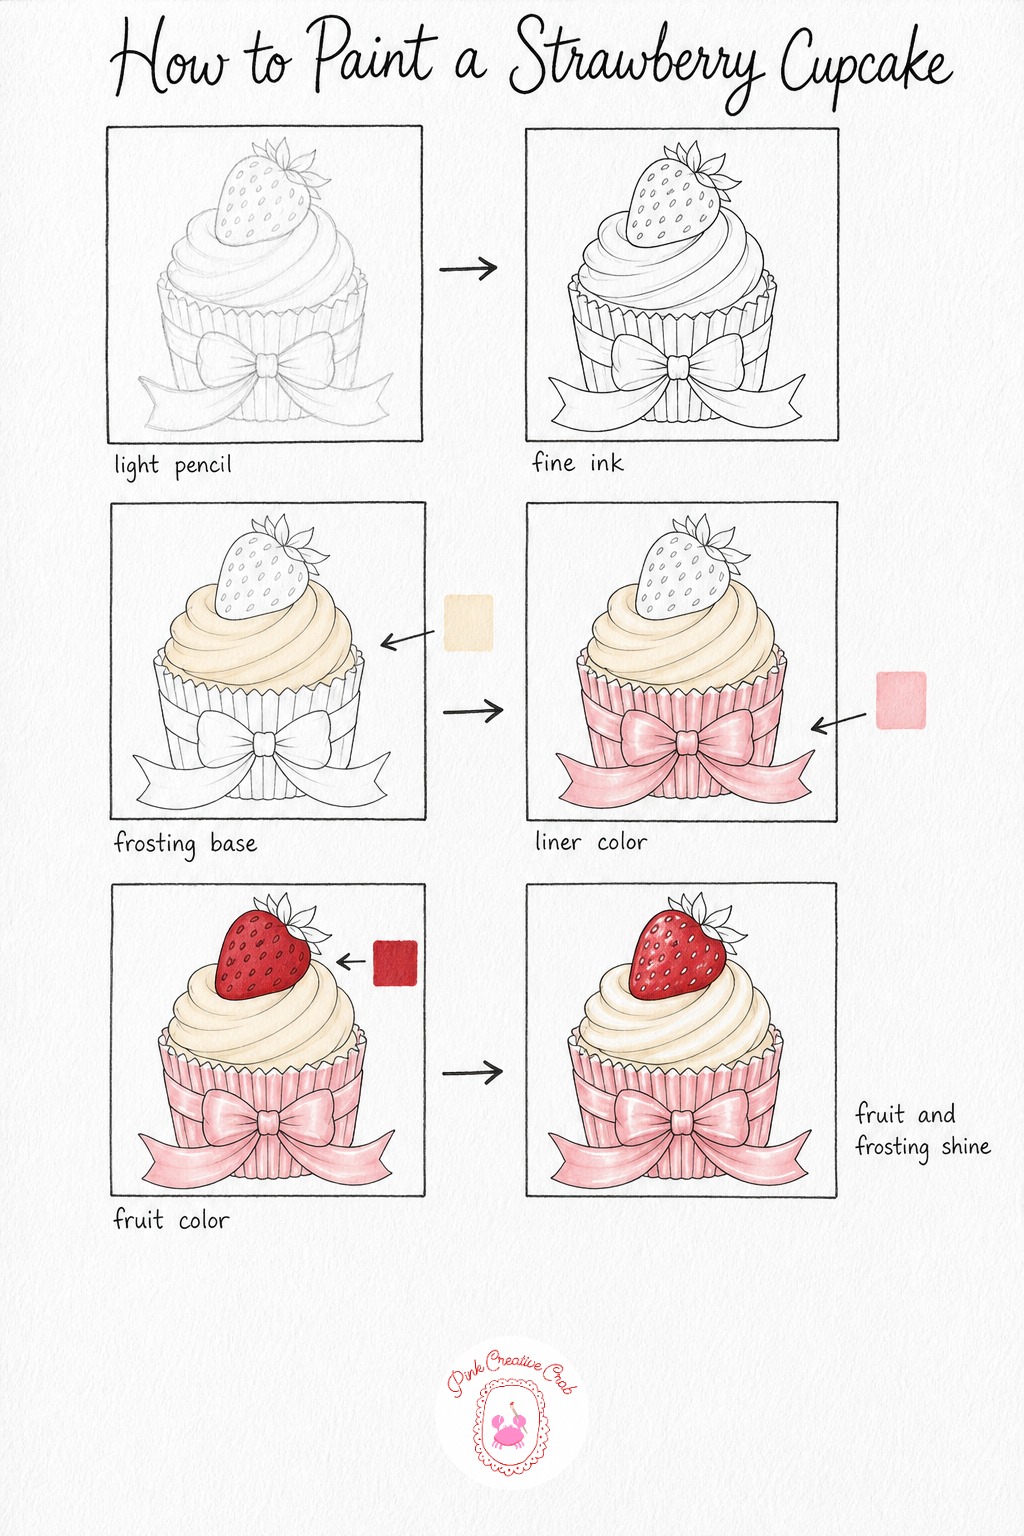
Draw a cupcake with a swirled frosting top, a ribbon wrapped around the liner, and a single strawberry perched on top. Keep the frosting swirl loose, a few curved lines are enough.
Ink the cupcake and strawberry, wash the frosting cream, then fill the liner and ribbon blush pink and the strawberry cherry red. White gel pen adds tiny seed dots to the strawberry and a soft shine streak along the frosting swirl to finish.
Bow Tied Gift Box With Roses
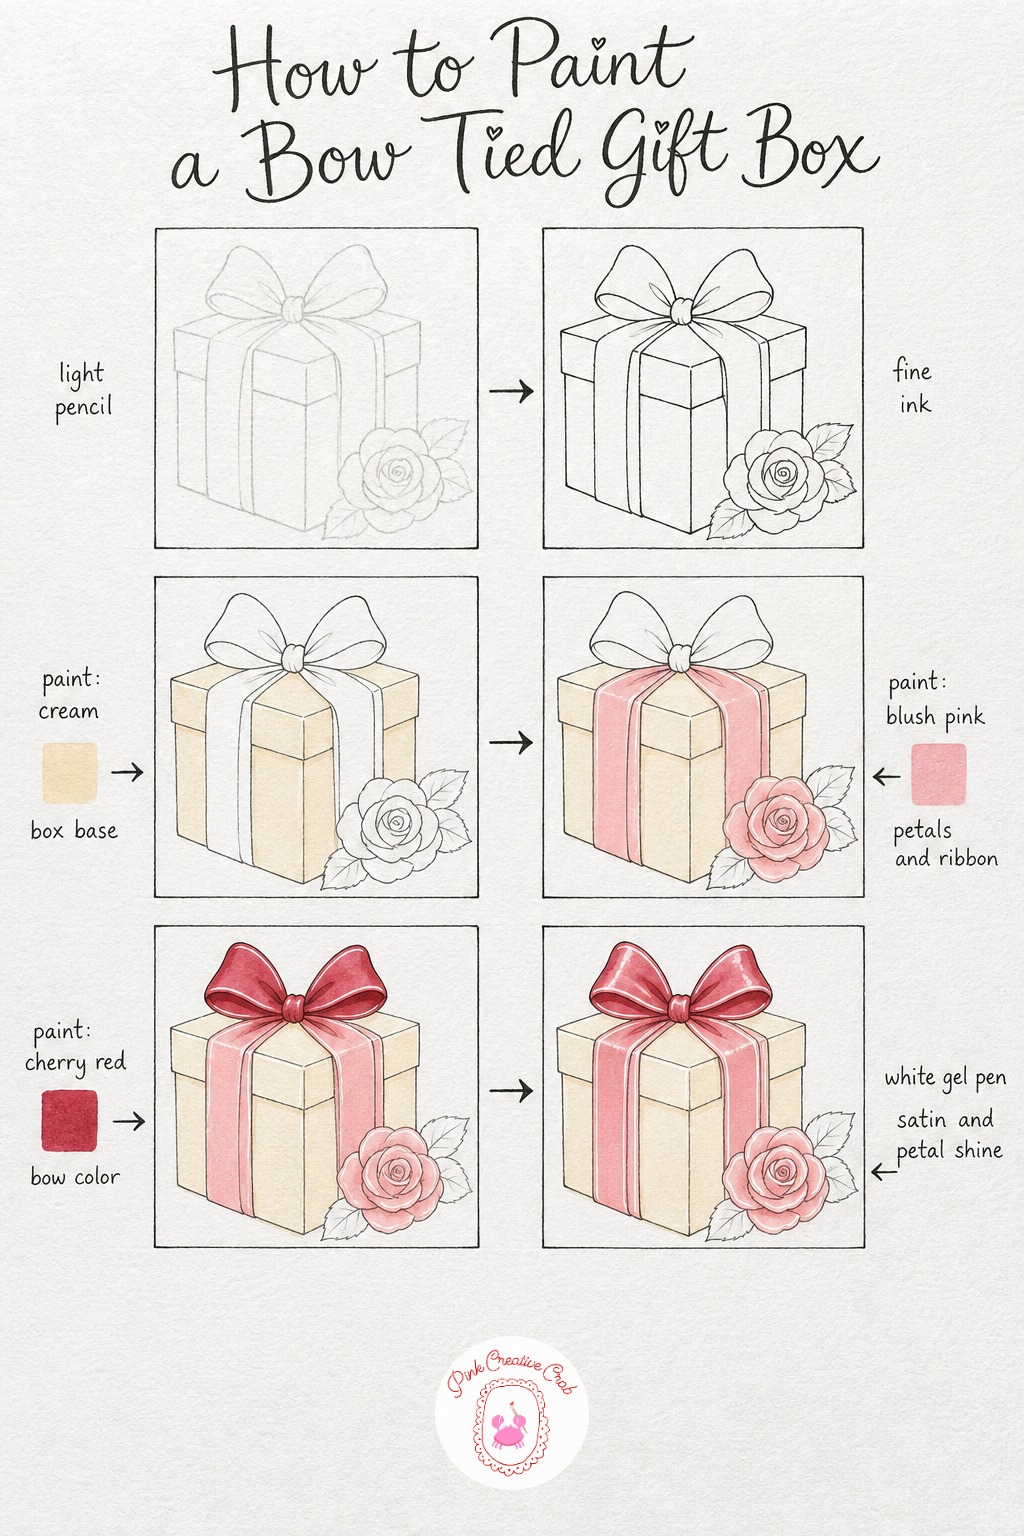
Sketch a simple square box with a wide bow sitting on top and a single rose tucked beside it. Keep the box edges straight and the bow loops soft and round.
Ink the box, bow and rose, then wash the box cream and bring blush pink into the petals and ribbon tails. Fill the bow’s main knot cherry red for a strong center of color, and finish with white gel pen along every ribbon fold and petal edge for that satin gleam.
Birdcage With a Bow and Roses
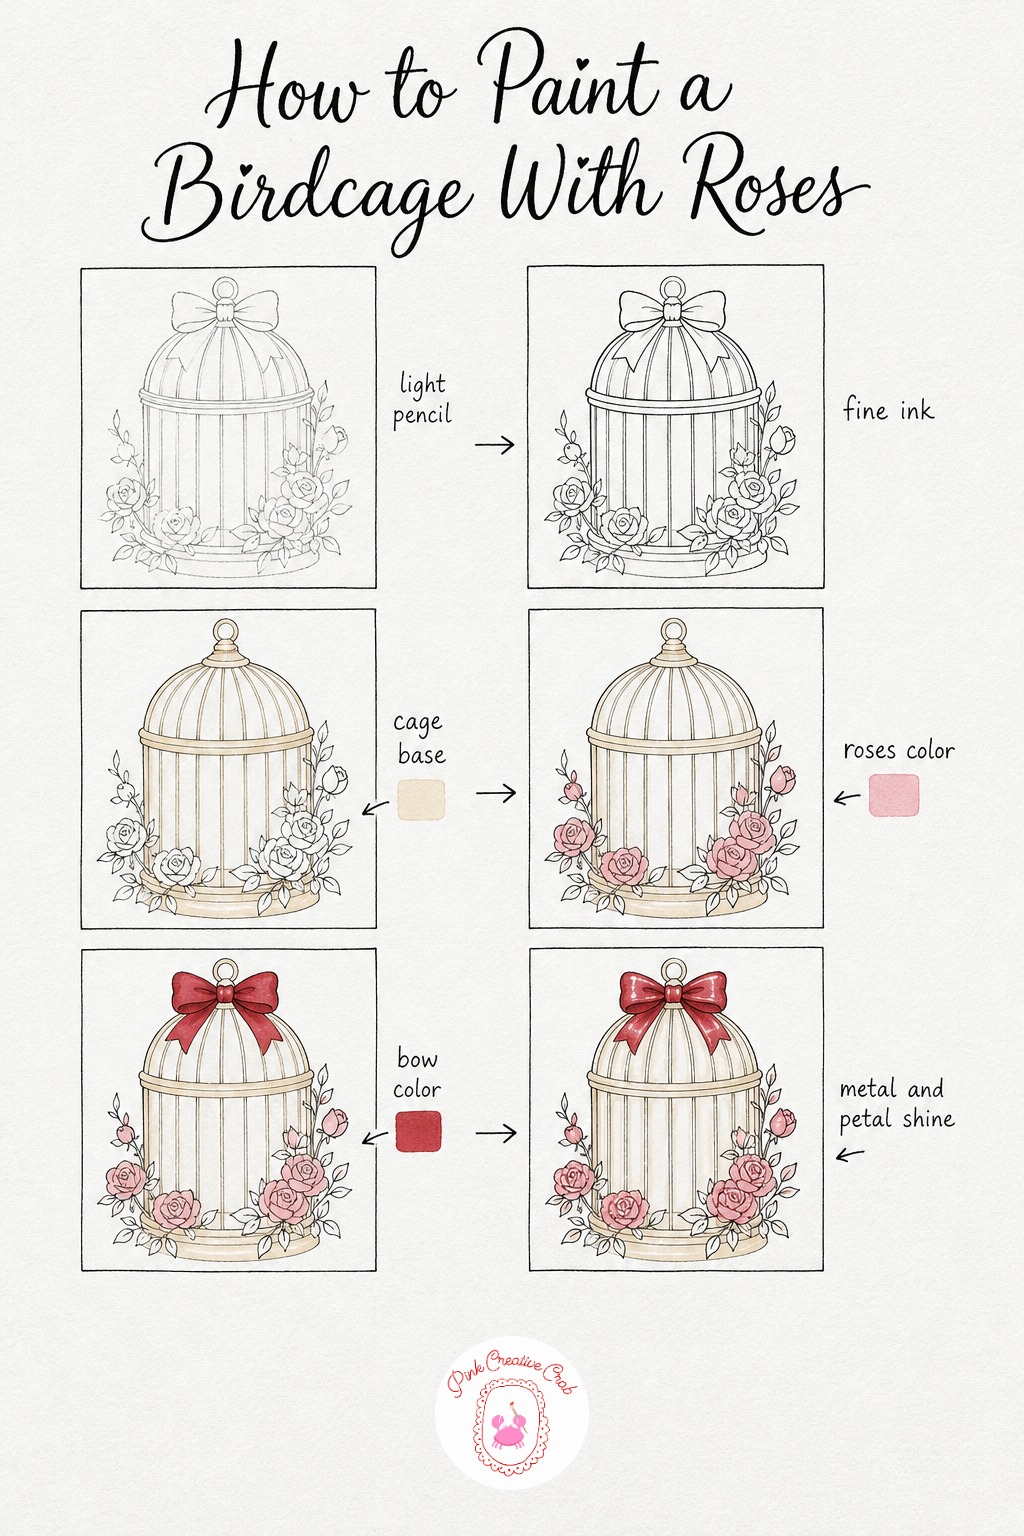
Draw a round birdcage with a loop handle, a bow tied where the handle meets the dome, and roses twining up around the base. Keep the bars as simple vertical lines, evenly spaced.
Ink the cage, bow and roses, wash the bars cream, then fill the climbing roses blush pink and the bow cherry red. Finish with white gel pen along the curved bars for a metal shine and a few highlight dots scattered across the rose petals.
Love Letter With Wax Seal and Rose
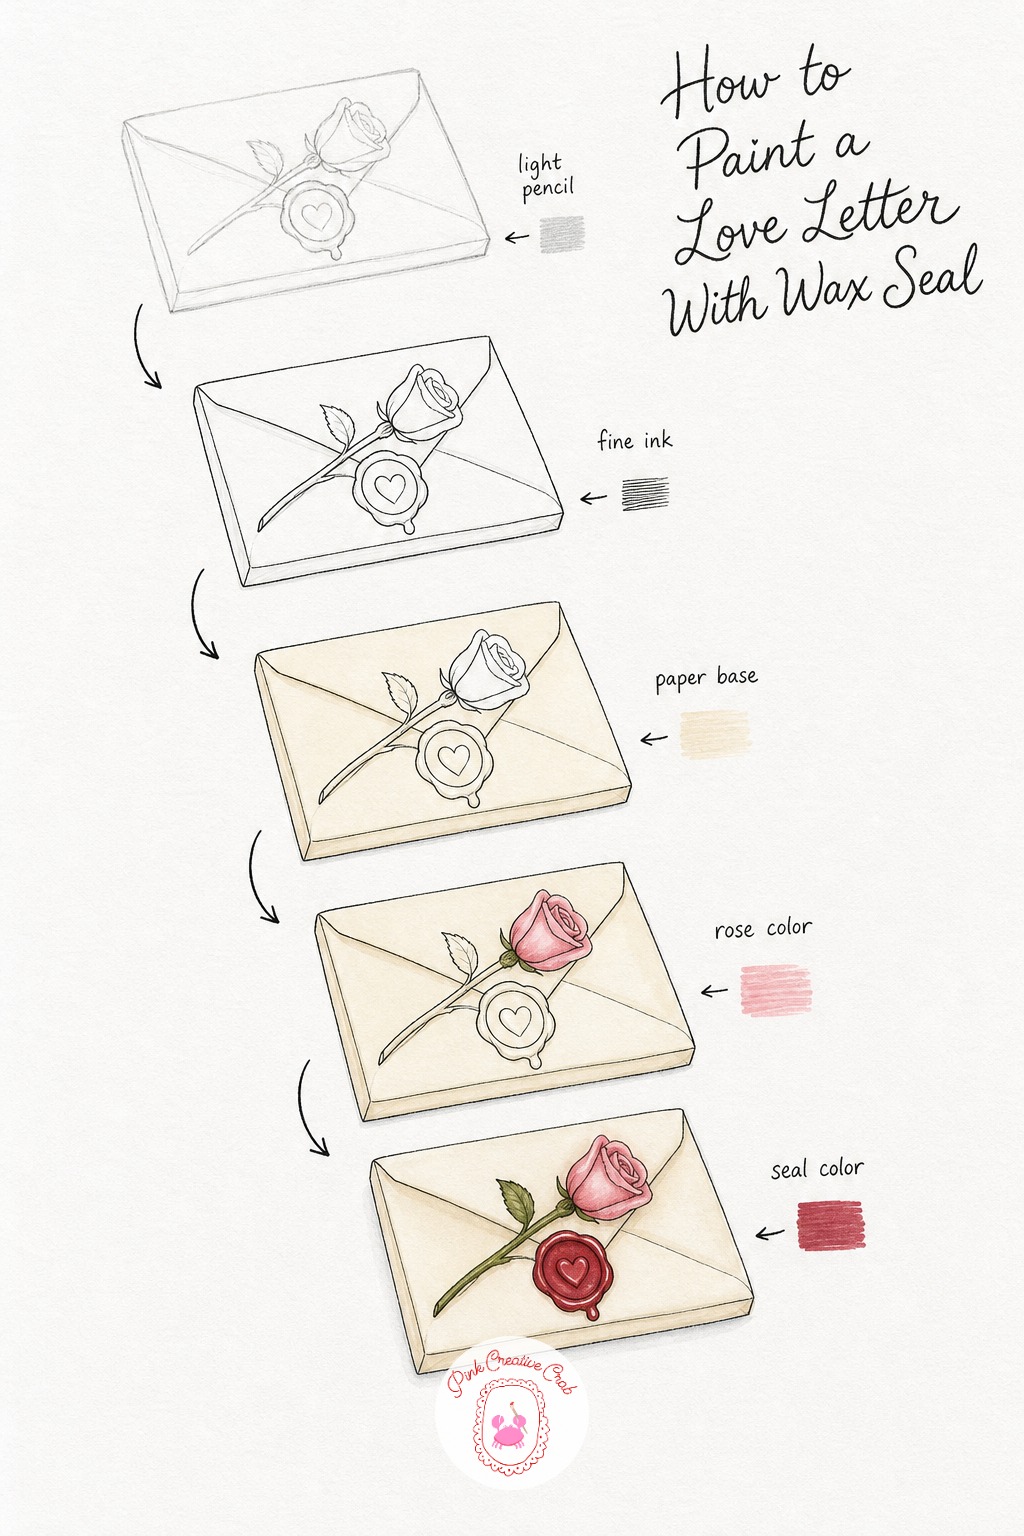
Sketch a single folded letter with a round wax seal stamped near the fold and a small rose laid diagonally across it. Keep the paper edges slightly curled for a worn, loved look.
Ink the letter, seal and rose, then wash the paper cream and fill the rose petals blush pink. Color the wax seal cherry red and finish with white gel pen along its raised edge, plus a small glint on the rose petals. This pairs sweetly with the satin bow letters tutorial above if you want a matching set.
What to Do Next
Pick one scene, gather your fineliner, markers and white gel pen, and work through it stage by stage today. Once you have the rhythm down, the rest of this collection goes quickly, and you will have a whole set of soft, pretty pages to show for it.
Frequently Asked Questions
What paper works best for coquette drawing with alcohol markers?
Smooth marker paper or a blending card works best, since it keeps alcohol marker ink from feathering through fineliner lines. Regular sketchbook paper can work in a pinch, but test a corner first.
Do I need to ink every coquette drawing before coloring?
Yes, a fine ink line locks in your pencil sketch so the marker color stays clean inside the edges. Let the ink dry fully before erasing pencil marks or adding any marker layers.
How do I get the soft coquette color palette right?
Stick to blush pink, cream and cherry red as your three main colors, using cream for the lightest base layer everywhere. Cherry red stays reserved for small accent areas like bows, cherries and wax seals.
When should I add the white gel pen highlights?
Always last, once every marker layer is fully dry, so the ink does not smear into the wet color underneath. A dry gel pen tip glides more smoothly, so test it on scrap paper first if it feels scratchy.
Can beginners draw these coquette scenes without much drawing experience?
Yes, every scene here builds from a light pencil outline in just a few stages, so no advanced drawing skill is required. Keep shapes simple and rounded, since that soft, slightly imperfect look is part of the coquette style.
Have any thoughts?
Share your reaction or leave a quick response — we’d love to hear what you think!
-
 0
-
0
-
0
-
0
-
0
-
0


