

A sketchbook art journal earns its keep in winter, when the days are short and a single page can hold a whole afternoon: the walk you took, the soup you made, the light outside your window. Nothing here needs to be perfect. A wobbly dog, a lopsided mug, a patch of watercolor that bled further than planned all belong on the page exactly as they are.
Below are 29 winter spreads you can start and finish in one sitting, each one a small drawn scene paired with doodled notes, a swatch or two and a taped keepsake. Pick whichever matches your week, open to a fresh page, and let the ink do the rest.
Using these images: free for personal projects such as printing, coloring, cards, journals and gifts. Handmade items that include them may be sold up to 30 pieces per design. More than that is commercial use and is not permitted, and neither is selling or sharing the images themselves or passing them off as your own. Please ask before any other use.
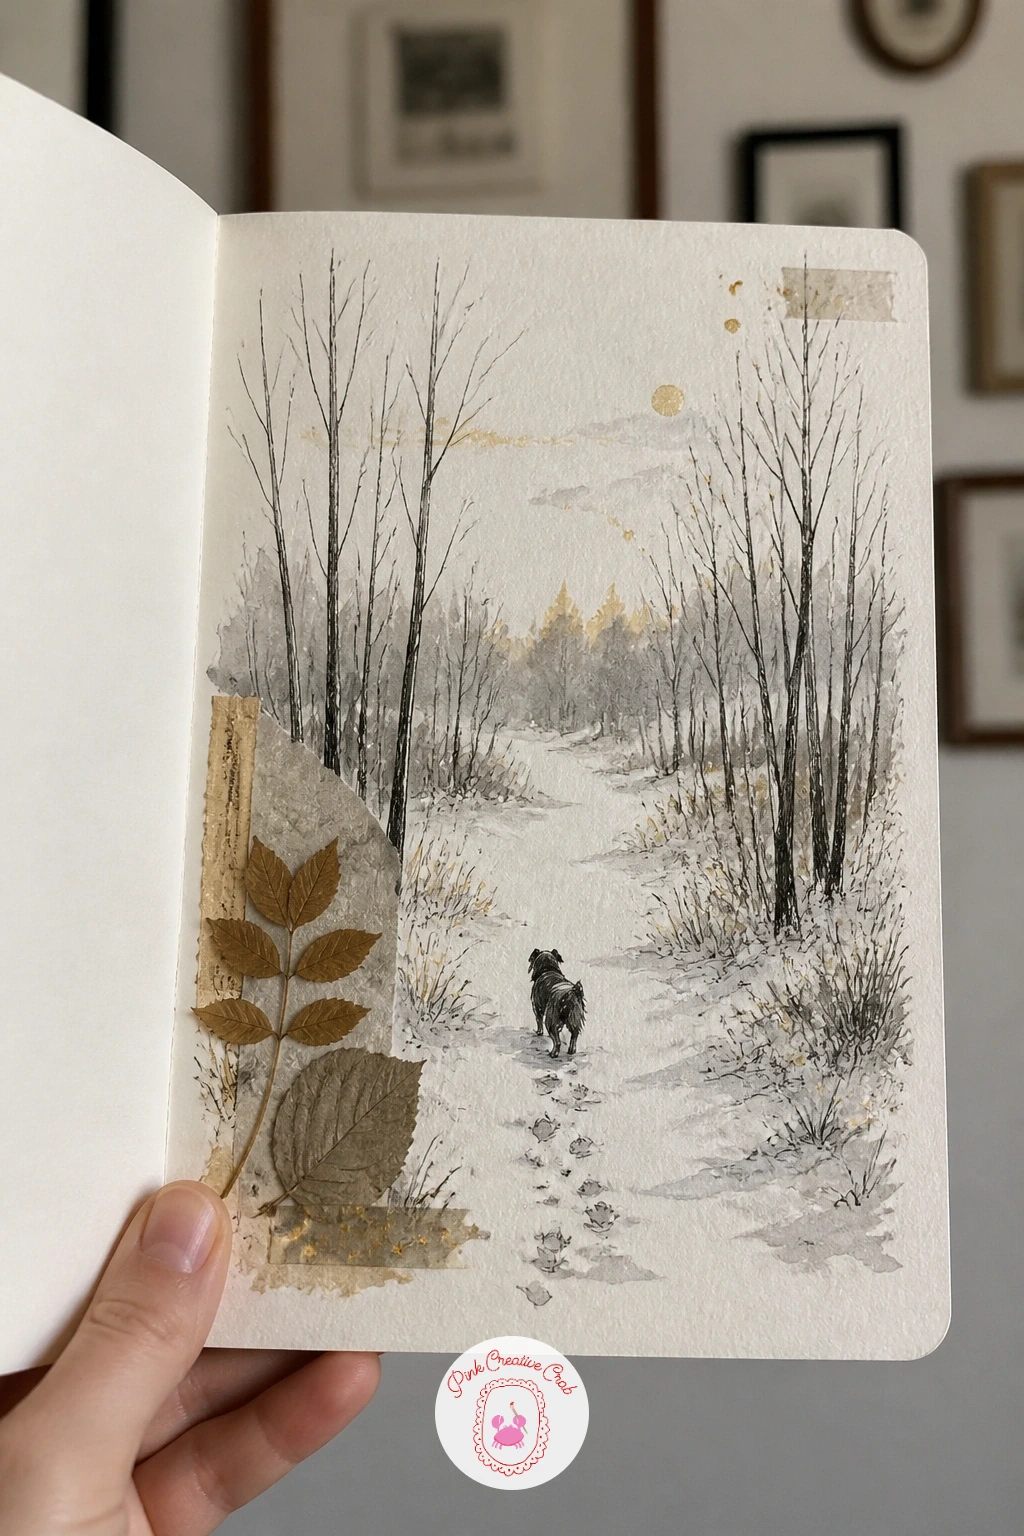
Start this spread with the dog, since the rest of the page builds around it. Block in a simple standing shape with a fineliner, round back and tail first, then add two triangle ears and short pencil lines for fur texture along the chest. Keep the legs stumpy rather than long, which reads better at small size and is far more forgiving if your proportions drift.
Once the dog sits happily on the page, sketch a thin winter tree or two behind it and a curved path of dots for footprints in the snow. Mix a pale blue-grey wash for the sky and let it dry before you press real winter leaves onto the lower corner with a dab of glue stick.
If the dog looks stiff, add one bent back leg mid-stride and a flick of a tail; movement fixes more than careful shading ever does. Squiggle a few lines of doodled notes along the margin as if you had jotted down the route.
No pressed leaves on hand today: draw them instead, outline and a single vein line, then wash a dull gold over the top.
You Will Need
- pressed winter leaves
- glue stick
Palette: Payne’s Grey,Raw Umber,Sap Green,Titanium White
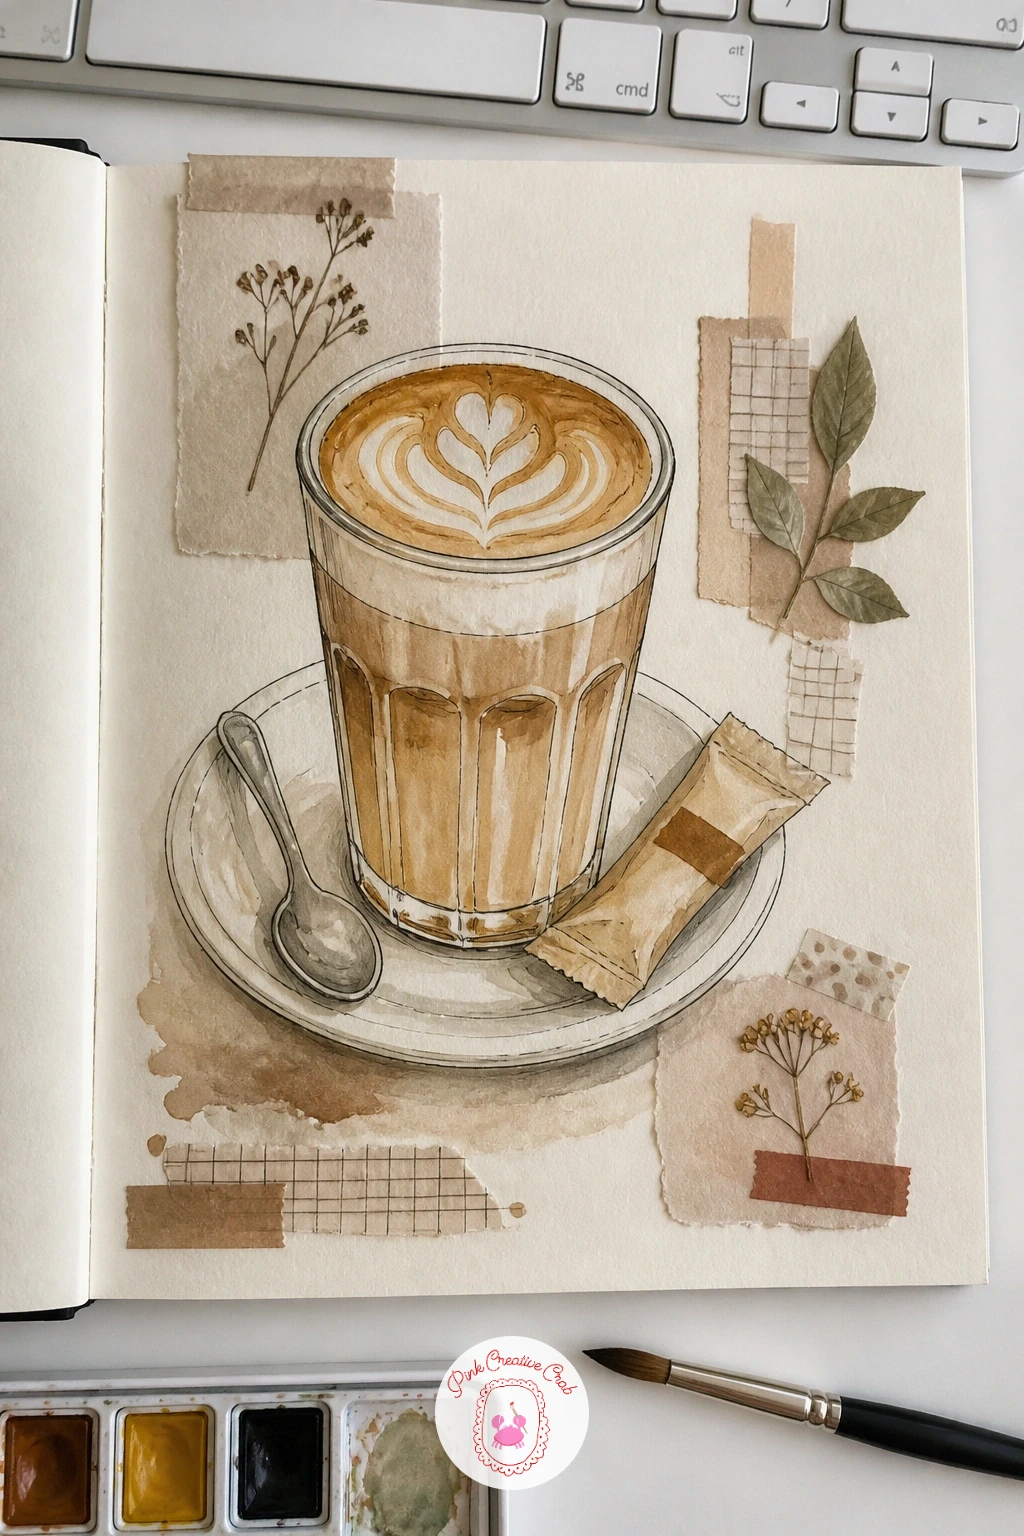
Draw the latte glass first since it anchors the whole page: a tall tapered cup shape, a slightly wobbly foam line across the top, and two or three loose swirl marks to suggest latte art. Fineliner handles the glass outline best, kept loose rather than ruled straight. Watercolor the coffee in warm brown and leave the foam untouched white paper.
Around the cup, sketch a small saucer, a spoon at an angle and a window shape behind it all with a hint of a street outside. This is where eye level matters: draw the cup slightly from above, since that is how you actually look down at a table, while the window behind sits at a normal straight-on angle.
Tape a real sugar packet beside the cup, or if you saved none, draw a small rectangle with a torn corner and fill it with pale cross-hatching to suggest sugar grains. Add squiggled note lines nearby as if recording what you ordered.
Keep the whole scene small, cup and saucer no bigger than a few inches, so the page still has room to breathe.
You Will Need
- taped sugar packet or paper scrap
Palette: Burnt Sienna,Ivory Black,Cream White,Warm Grey
Try drawing the cup from a steeper angle on a second attempt, so you see more of the foam surface. It changes the whole feel of the page from casual to almost architectural.
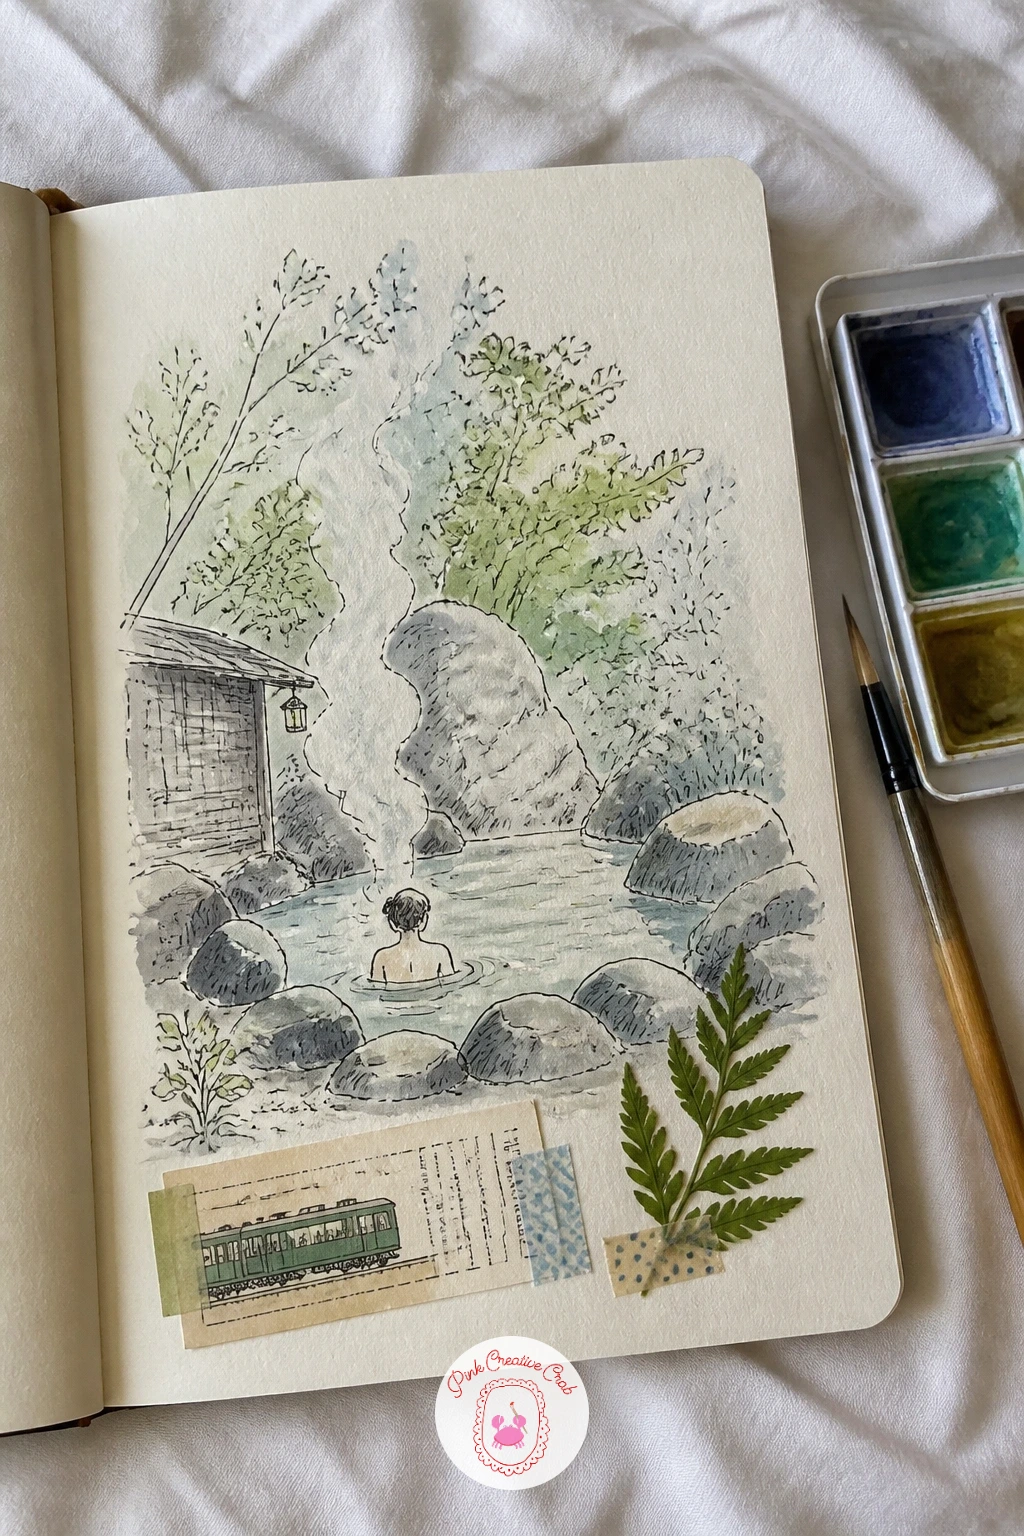
Build the steaming pool before anything else goes on the page. Draw a simple curved pool shape with a fineliner, rocks stacked loosely around the rim, then add steam with a few soft upward curling lines rather than straight ones, since straight lines read as smoke, not steam.
Wash the water in a cloudy blue-green, leaving some white gaps near the surface where steam would catch the light. This is the trick that saves most hot spring sketches: steam only looks convincing against a slightly darker background, so paint the trees or hillside behind it a touch darker before you add the white curls on top.
Once the pool is dry, tape in a train ticket along the edge of the page and ring it with a few doodled squiggles as a caption. A small figure soaking in the water, just an oval head above the rim, finishes the scene without needing real anatomy.
No real ticket saved: draw a simple ticket outline instead and add a torn perforated edge in pencil.
You Will Need
- train ticket or paper scrap
Palette: Cerulean Blue,Teal Green,Slate Grey,Soft White
Center the pot first, since every other drawing on this page circles around it. A simple round pot with two handles and a lid works at any skill level: keep the lid slightly tilted, as if steam just escaped, and add three or four wavy steam lines rising from the gap.
Around the pot, sketch the vegetables that go into the soup: a carrot with a feathery top, a halved onion showing its rings, a few peas in a pod. Draw each one small and separate rather than crowded together, which keeps the page readable even on a phone screen later.
Watercolor each vegetable its true color while the pot stays a plain warm grey or brown, so the eye lands on the vegetables first. If the onion rings look flat, add one curved shadow line inside each ring with a fine pencil before inking over it lightly.
Squiggle a line of doodled notes down one side like a recipe list, and if you want a quicker version, skip the vegetables and just paint the steaming pot with one bay leaf tucked beside it.
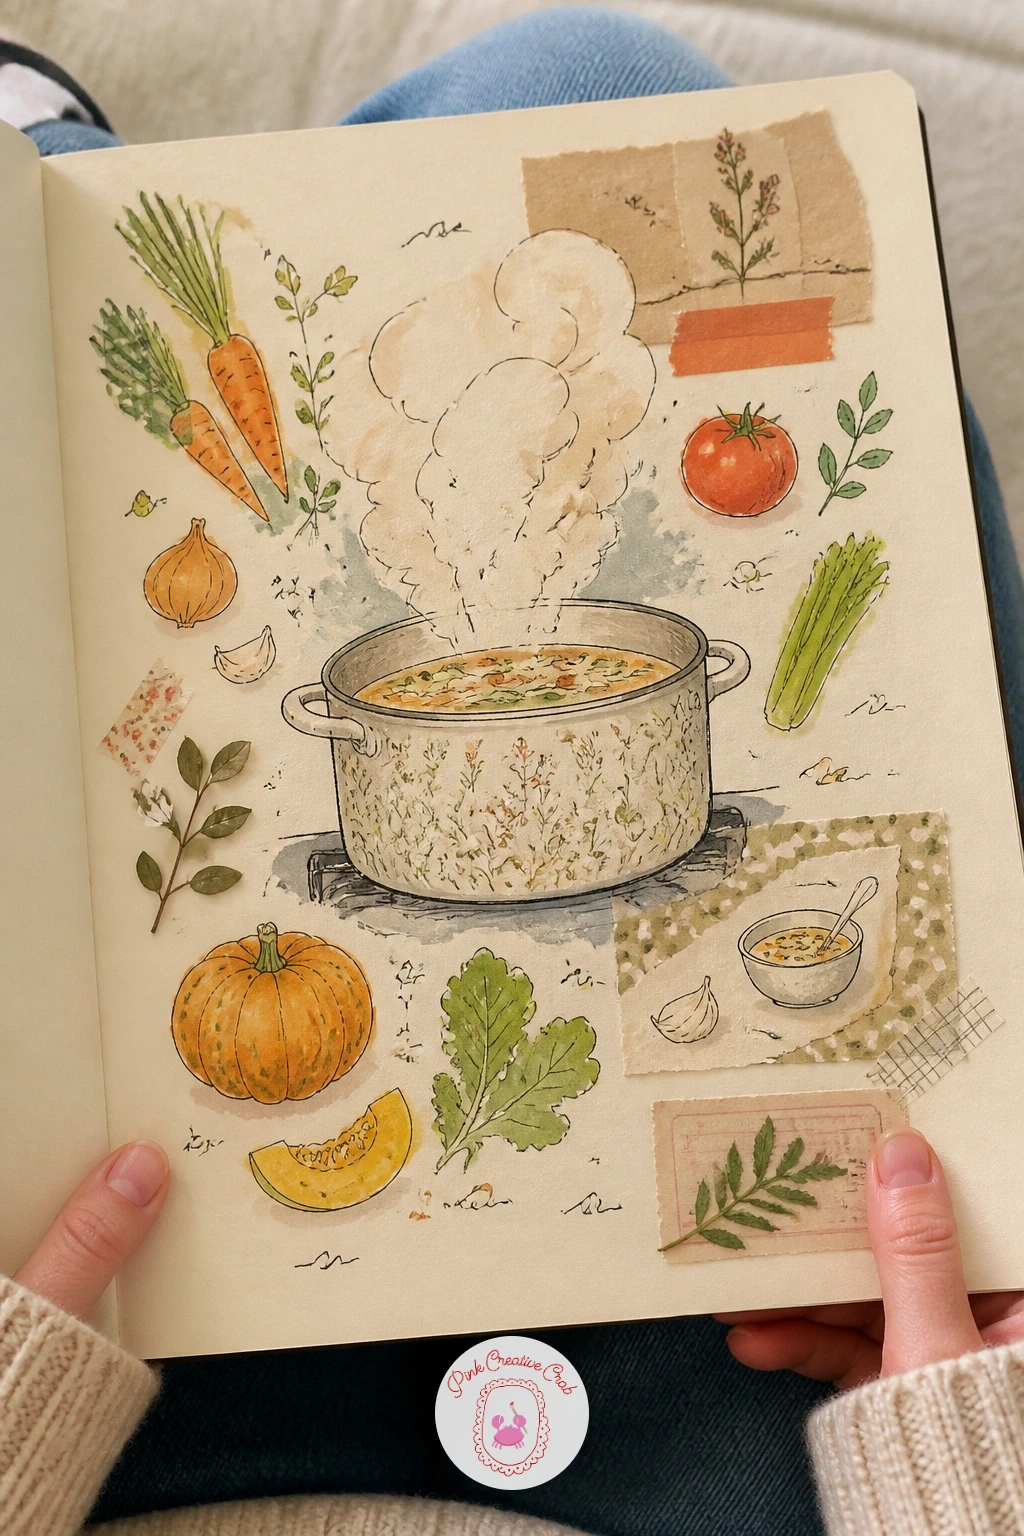
Palette: Cadmium Orange,Sap Green,Burnt Umber,Pale Yellow
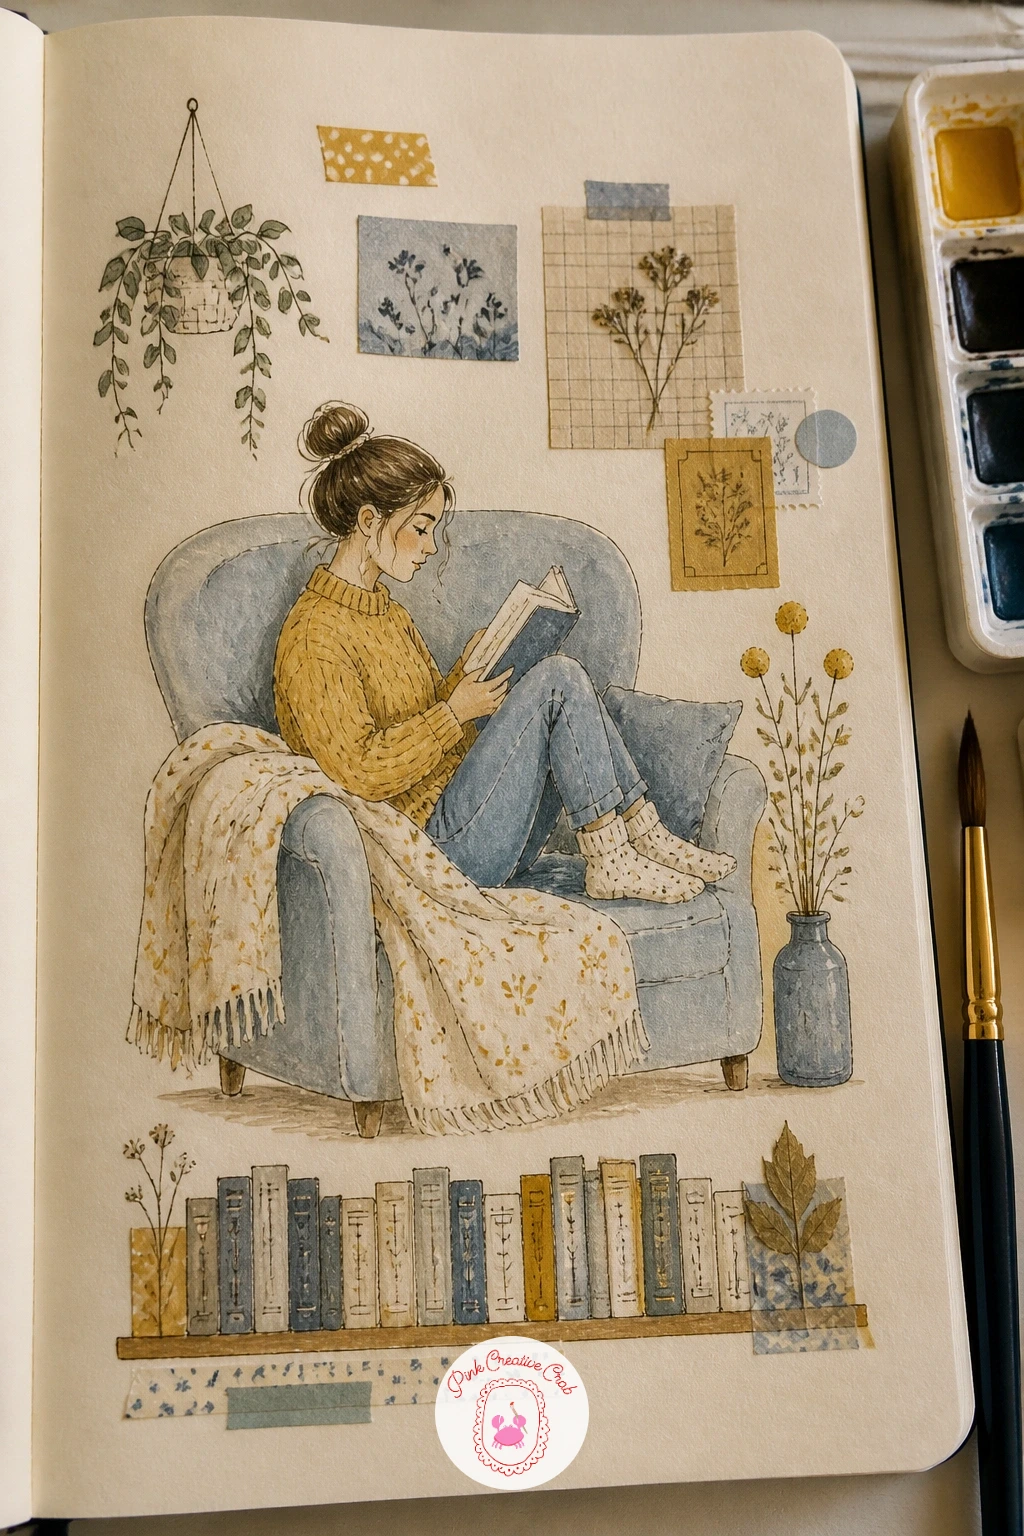
Sketch the armchair before the girl who sits in it, since the chair gives you something solid to fit a figure into. Draw a wide rounded chair shape with soft arms, then tuck a simple seated figure inside it: knees bent up, a book held open, hair falling forward. Keep the figure loose and small-scale rather than detailed, which suits a page meant to be finished quickly.
A blanket draped over one arm of the chair softens the whole drawing and hides any awkward proportions in the legs. Wash the chair in a warm mustard or rust, the blanket in a contrasting soft blue, and leave the figure mostly line work with just a touch of color on the sweater.
Along the bottom of the page, draw a small row of book spines of different heights and widths, each with a different pattern of lines rather than readable titles, to log what you have been reading. A few squiggled notes beside the chair round out the page as if jotting your thoughts.
If you borrow ideas from other themed page ideas, this spread pairs nicely with a cozy evening page later in the sketchbook.
Palette: Mustard Yellow,Dusty Blue,Warm Brown,Soft Pink
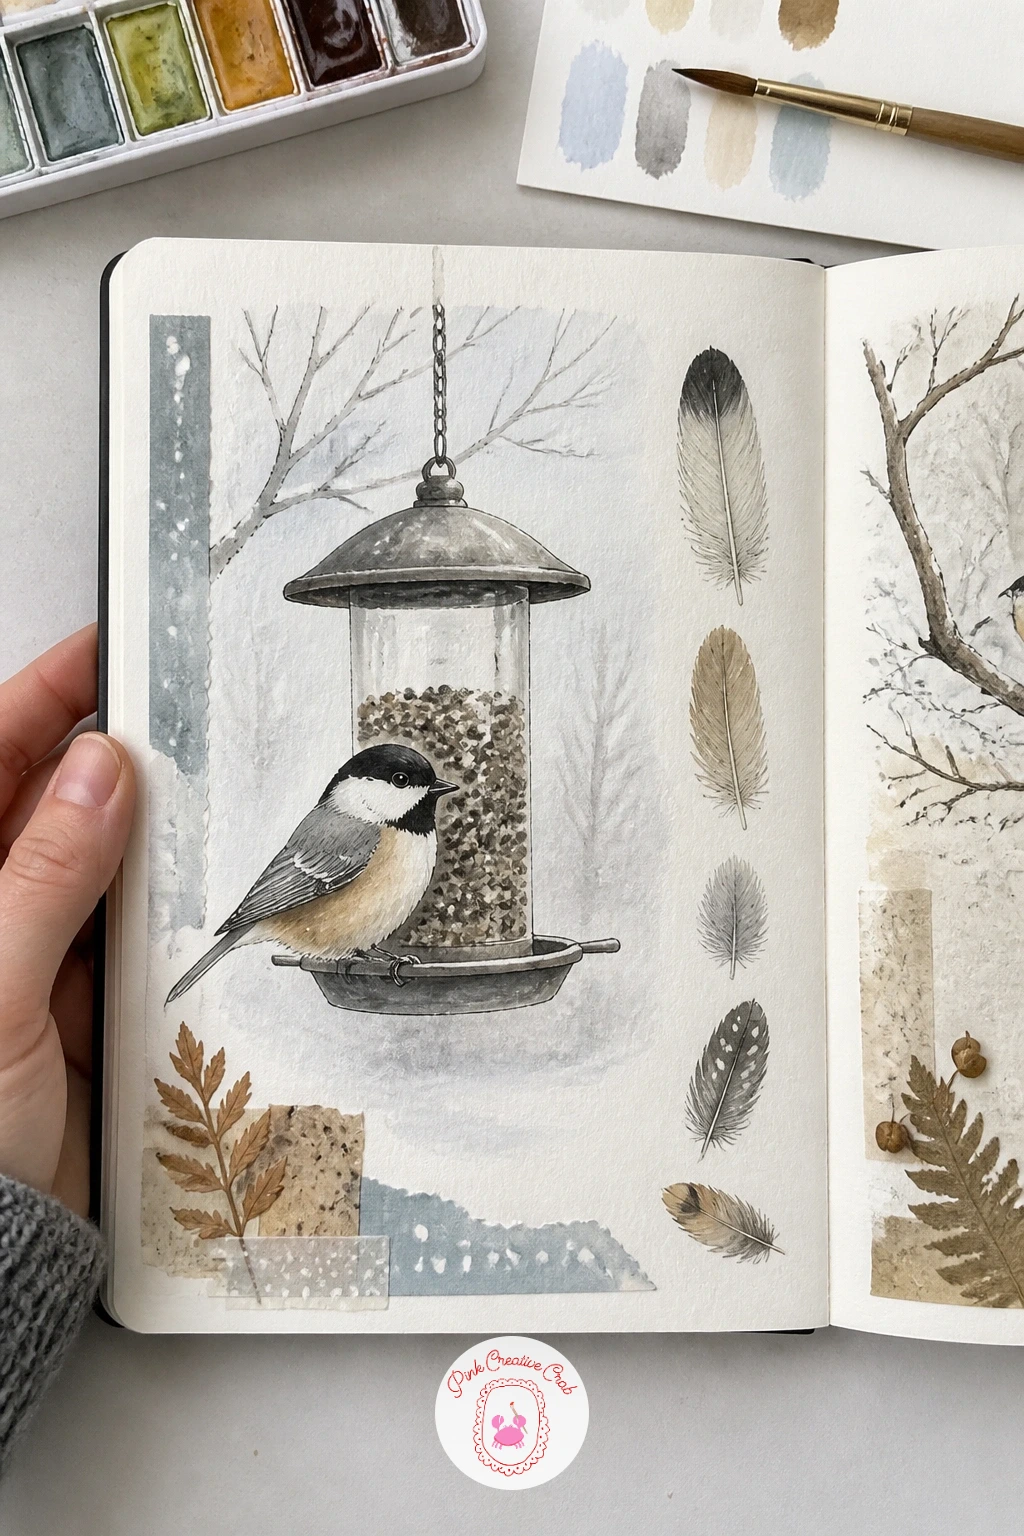
Draw the chickadee first, perched at the feeder, since its small round body sets the scale for everything else on the page. Start with two overlapping circles for body and head, a short pointed beak, and thin stick legs gripping the feeder edge. Fineliner keeps the black cap and bib crisp, which is the one detail that makes a chickadee read instantly as itself.
Eye level matters here: draw the feeder at the chickadee’s height, slightly below your own eye level looking up, which gives the whole scene a sense of looking outward through a window rather than down at a diagram. Add a soft wash of pale grey-blue behind the bird for winter sky.
Around the main scene, sketch a few loose feather studies, just simple curved shapes with a center line and barb marks, as if you had studied one found on a walk. Watercolor them in soft browns and creams.
Swap real feather studies for small color swatches if feathers feel fiddly, three rounded blobs in different bird-toned colors work just as well as a record.
Palette: Payne’s Grey,Ivory Black,Warm Buff,Pale Sky Blue
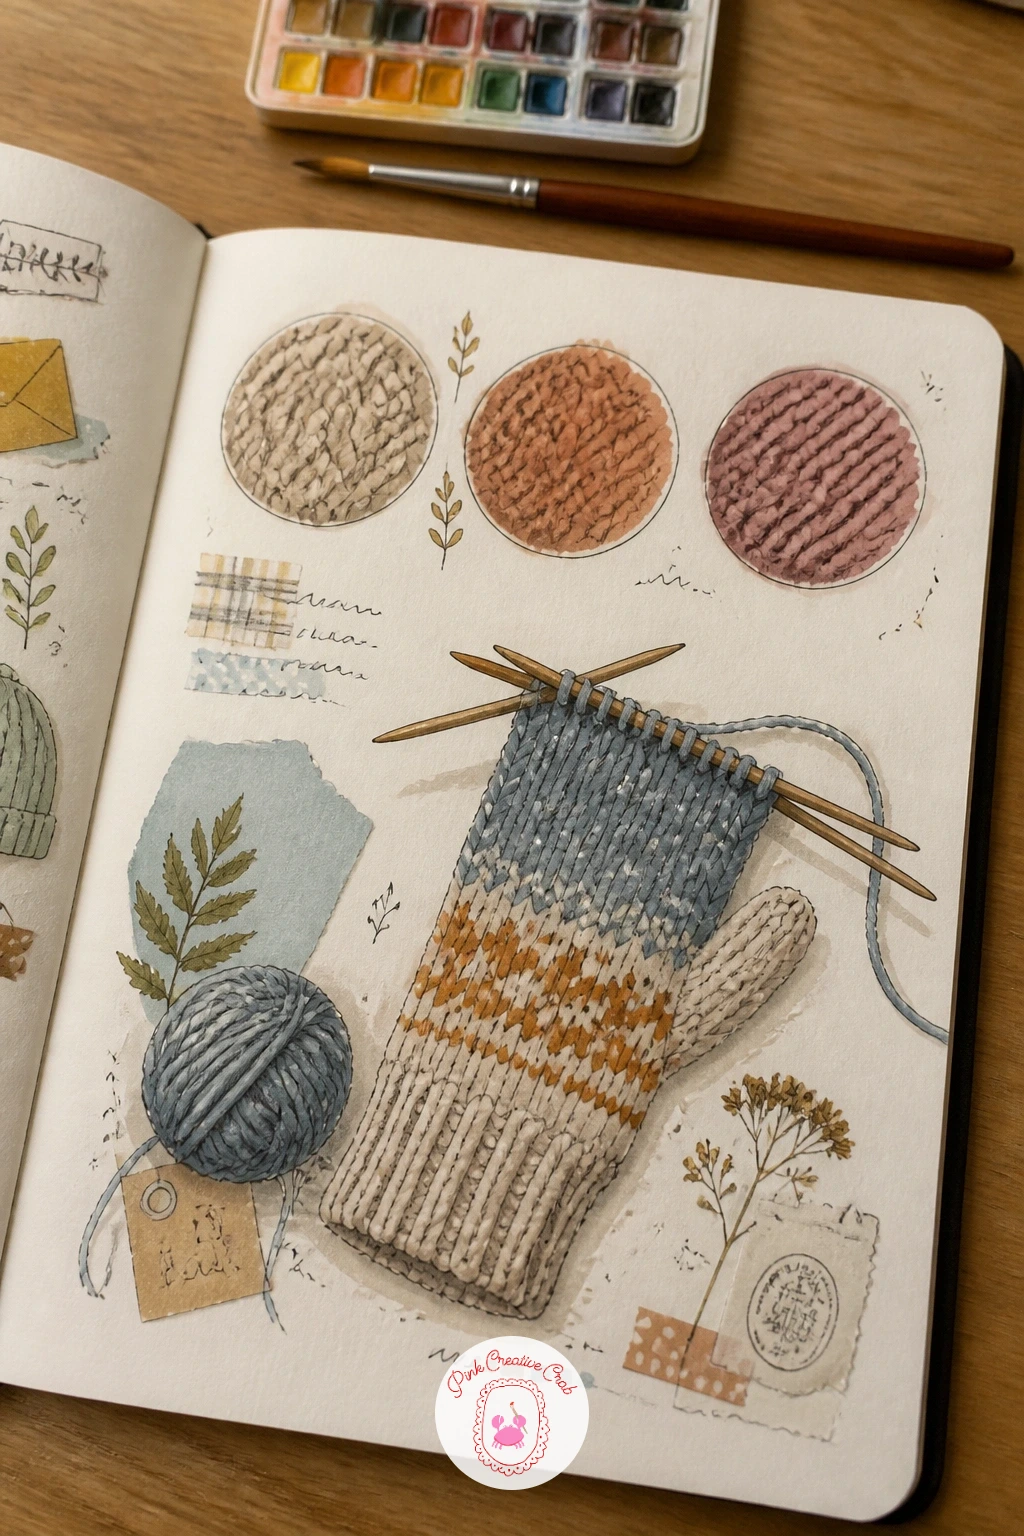
Lay down the yarn swatches before the mitten, since they set your palette for the whole page. Draw two or three loose rounded shapes, a little like soft pebbles, and fill each with short diagonal fineliner strokes to suggest knit texture, then wash a different color over each one once the ink is dry.
Sketch the half-done mitten next to the swatches: a simple mitten outline with the top left open and a row of horizontal lines inside to show where the knitting stops, needles poking out at an angle. This is the one hands-on trick worth using here, pressing the fineliner a little harder on the ribbed cuff and lighter on the open stitches gives the mitten a real sense of texture without extra drawing.
A few squiggled lines beside the mitten can stand in for a pattern note or row count. Keep the whole page in a narrow color family, two or three wool shades, so it reads like one coherent project rather than scattered sketches.
No real yarn colors to match: invent a palette from a favorite sweater instead.
Palette: Cranberry Red,Oatmeal Beige,Forest Green,Charcoal Grey
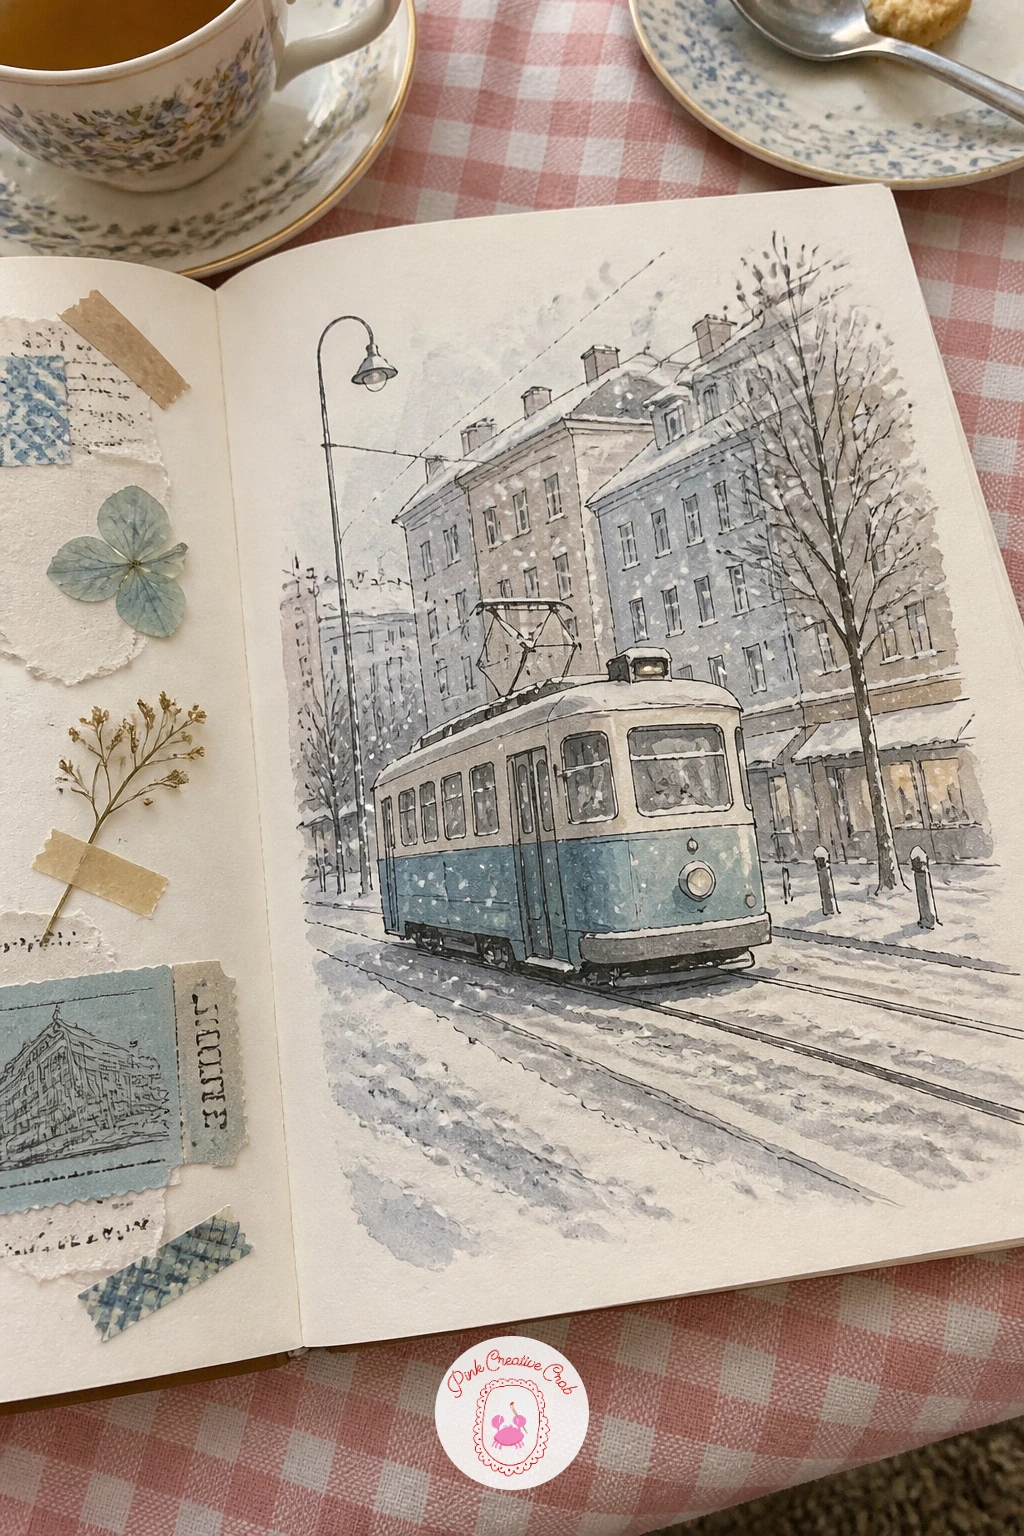
Block in the tram before anything else, since its boxy shape is the easiest part of this scene to get right. Draw a long rectangle with rounded corners, a row of small square windows, and thin lines for the overhead wire running off the top edge. Keep the perspective simple: draw the tram almost straight-on, which avoids the trickier angled windows a side view would need.
Behind the tram, sketch a row of simple building fronts, just rectangles with a few window squares, fading smaller toward one side of the page to suggest a street receding into the distance. A light grey-blue wash over the sky and a scatter of small white dots left unpainted for falling snow finishes the mood.
Tape a museum ticket somewhere along the street line, tilted slightly, and add a few squiggled notes beside it as a caption for the day. If a ticket is not on hand, draw a simple ticket shape with a torn edge and a round stamp mark instead.
Readers who enjoy whole city scenes like this might also like the little houses in this sketchbook idea collection.
You Will Need
- museum ticket or paper scrap
Palette: Slate Blue,Brick Red,Soft Grey,Snow White
Sketch the hill as one long curving line first, since it decides where every figure sits afterward. Place two or three small kids along the slope, each just a rounded body on a simple sled shape, arms out for balance, drawn smaller the further up the hill they sit to suggest distance.
Keep proportions friendly here by comparing each child to the sled beneath them: a sled is usually about as long as a child is tall, which keeps the figures from towering oddly over their own sleds. Watercolor the hill in a pale blue-white and let a little of the cream paper show through for sunlit patches.
Tape a small mitten tag to one corner, the kind of paper tag with a loop you might clip to a child’s glove, and ring it with a few squiggled notes. A scatter of dot marks flying off the lead sled suggests spraying snow without any extra drawing.
If figures feel daunting, draw just one sledder close up and leave the rest of the hill empty with footprint trails instead.
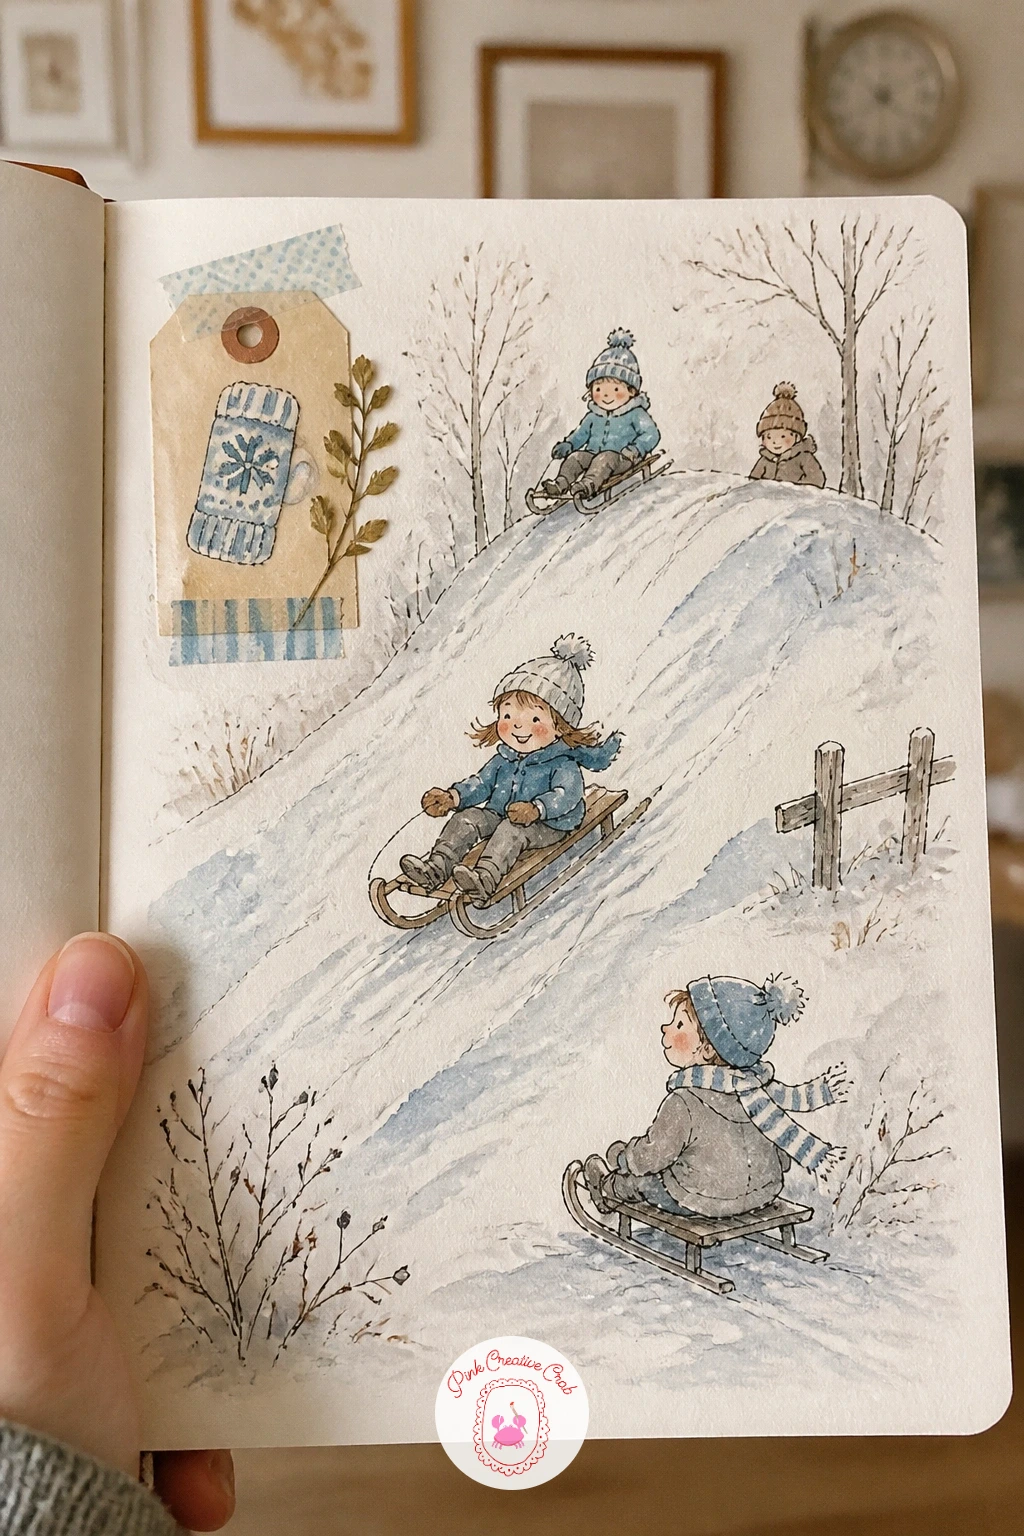
You Will Need
- mitten tag or paper scrap
Palette: Pale Blue,Cadmium Red,Warm Grey,Snow White
Rule out seven small window shapes first, loosely with a fineliner rather than a ruler, so they keep the hand-drawn feel of the rest of the page. A simple grid of two rows works well, or a single wavy row if your page is narrow.
Fill each window with one day’s sky: a plain grey wash for cloud, a pale blue with one sun mark, a darker wash with falling dot marks for snow. This is the quickest version of this spread, ten minutes is enough to wash all seven windows and let the page dry while you do something else; a forty-minute version adds a tiny rooftop silhouette along the bottom of each window and a cloud shape unique to that day’s weather.
Leave a thin strip below each window for a squiggled note, as if logging the temperature or your mood that day. Keep the seven washes from matching too closely, since variety across the row is the whole point of the spread.
No watercolor on hand: colored pencil works just as well for soft, layered skies in each window.
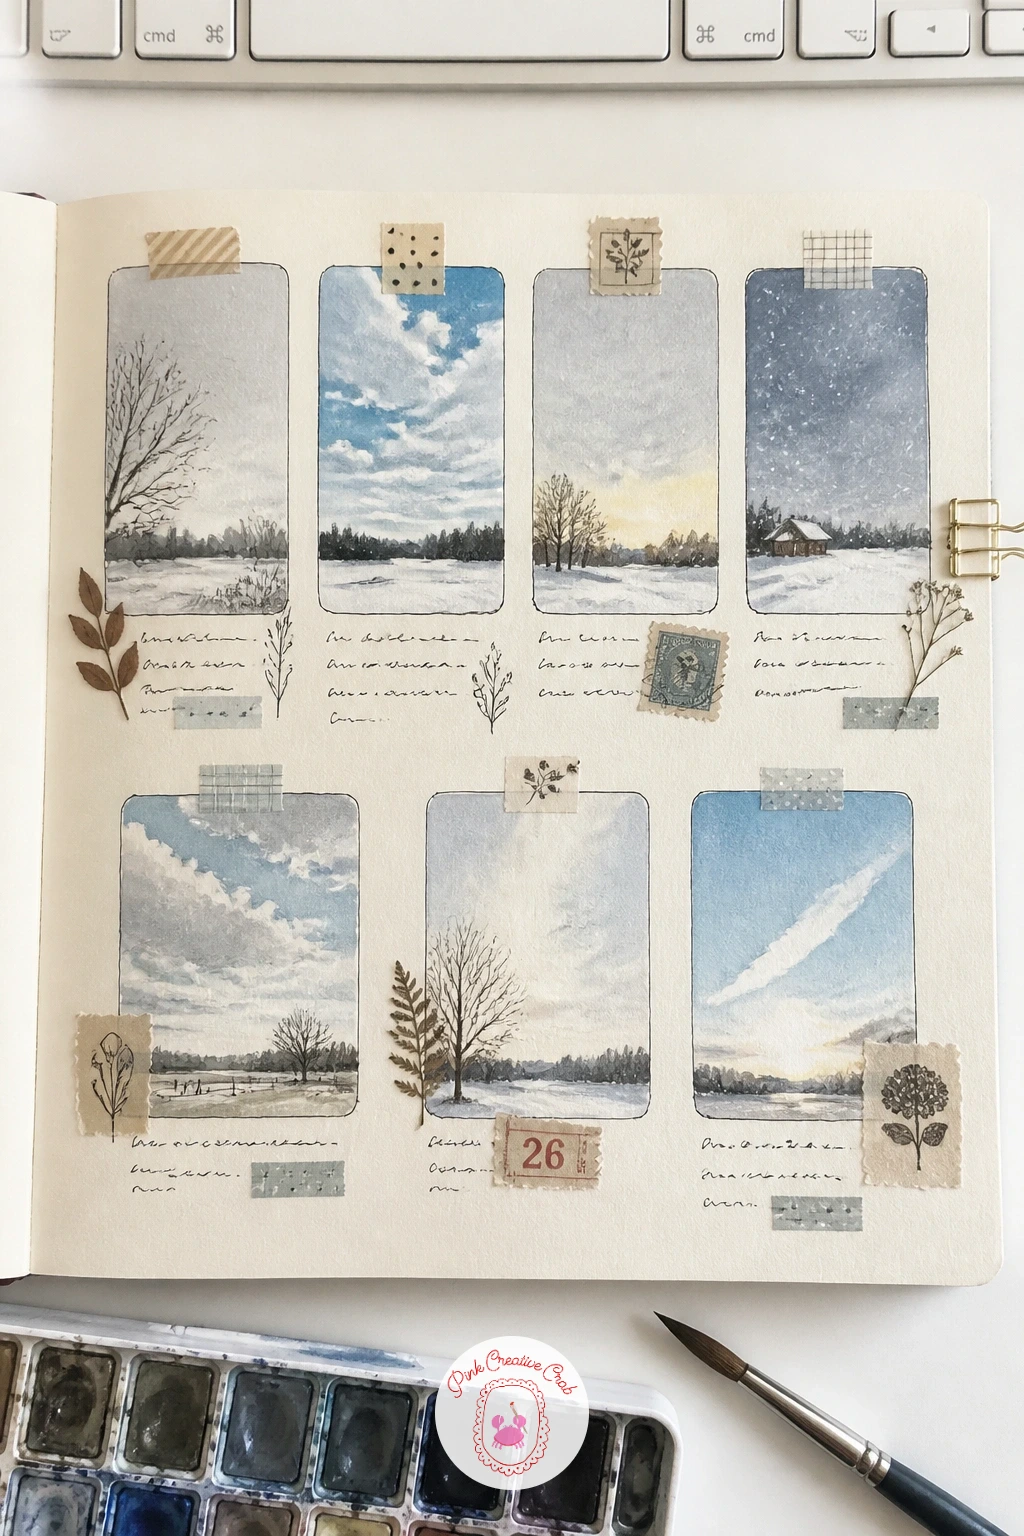
Palette: Pale Grey,Sky Blue,Dove White,Storm Blue
Slice the blood orange before you draw the whole fruit, since the cut cross-section is the most satisfying part of this page and worth leading with. Draw a simple circle, then add irregular inner segments radiating from the center, leaving thin white pith lines unpainted between them.
Watercolor the segments in a mix of red and orange, dropping a stronger red into the center of a few segments while the paper is still wet so the colors bleed softly into each other, which is exactly how a real blood orange looks inside. Keep one whole uncut orange beside the slice for contrast, just a plain circle with a small stem mark.
Paint three or four small color swatches nearby, little rounded blobs testing different reds and oranges, as though mixing toward the right shade before committing to the fruit itself. A few squiggled notes beside the swatches finish the record.
If blood orange reds feel too bold, swap in a regular orange and a soft yellow-orange palette instead.
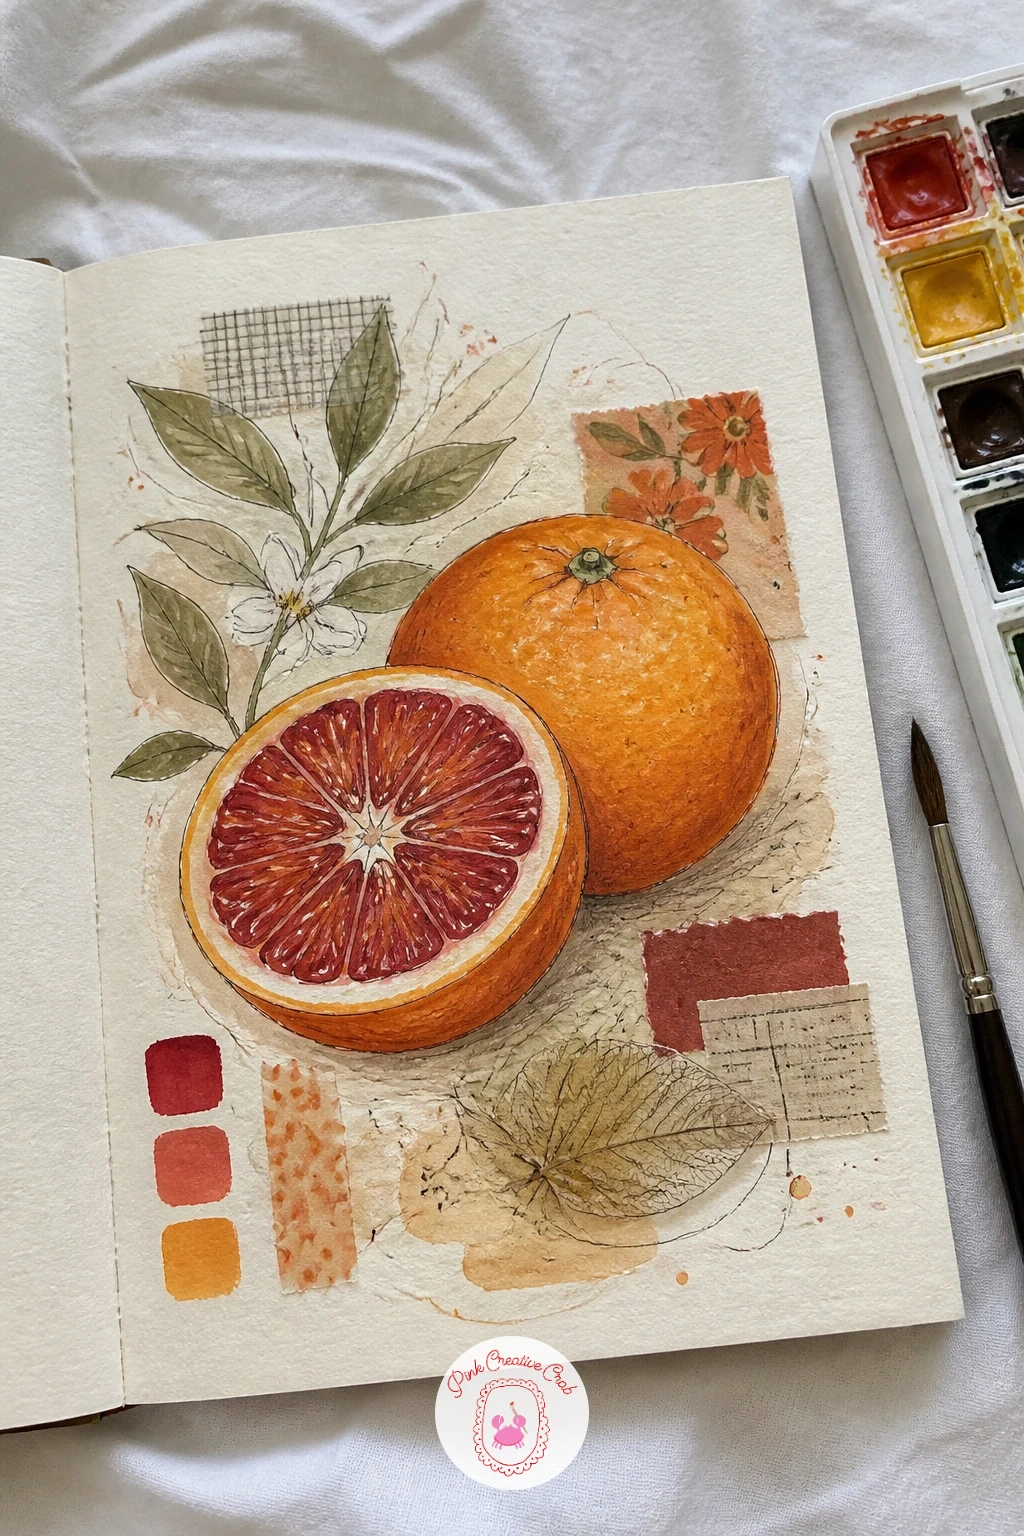
Palette: Alizarin Crimson,Cadmium Orange,Pale Pink,Cream White
Try wetting the whole segment area first and dropping color in rather than painting each segment separately. It keeps the bleed between colors soft instead of blotchy.
Start with the candle, since its simple shape anchors the warm corner of the page. Draw a short cylinder with a melted-looking top edge and a small teardrop flame, then add a soft orange glow around it with a loose, uneven wash rather than a hard-edged circle, since candlelight never has a clean boundary.
Curl a cat beside the candle, just one rounded body shape with a tucked tail and two triangle ears, eyes closed in a simple curved line. Keep the cat small and low on the page so the candle still reads as the brightest, most important shape.
Off to one side, doodle a small playlist card: a simple rectangle with a few wavy lines standing in for song titles and a tiny music note doodle in the corner. This is a nice spread to pair with the slower, book-themed pages in this sketchbook idea roundup if you keep several cozy spreads together.
Swap the candle for a small lamp shape if open flame feels tricky to shade convincingly.
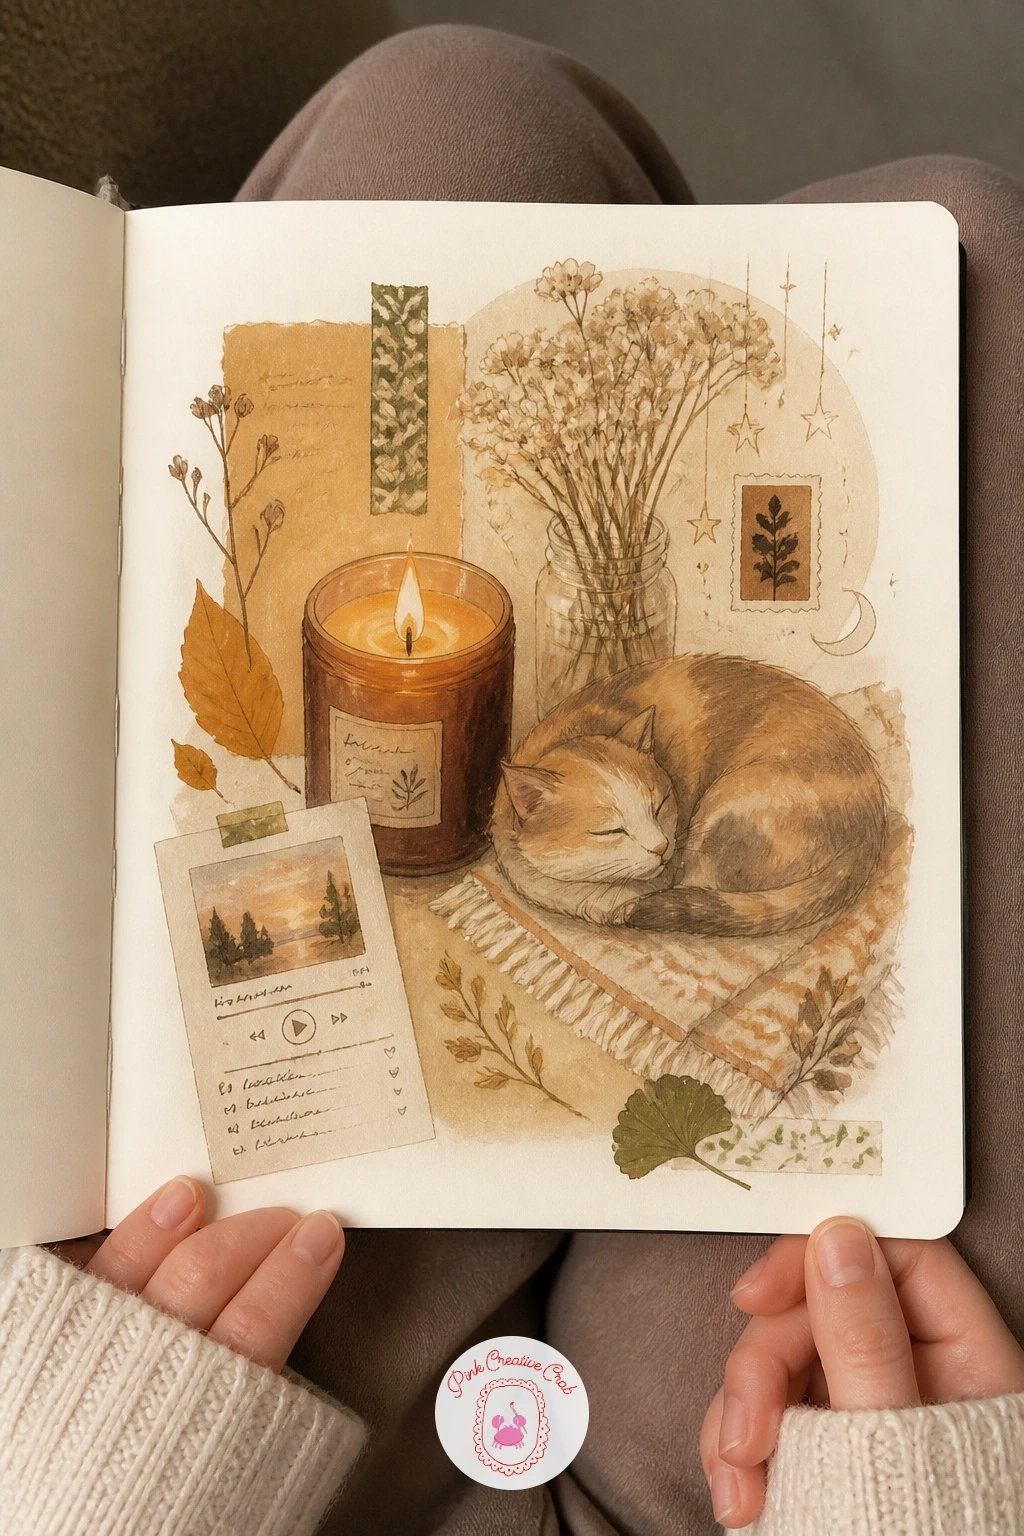
Palette: Amber Orange,Warm Grey,Deep Umber,Soft Cream
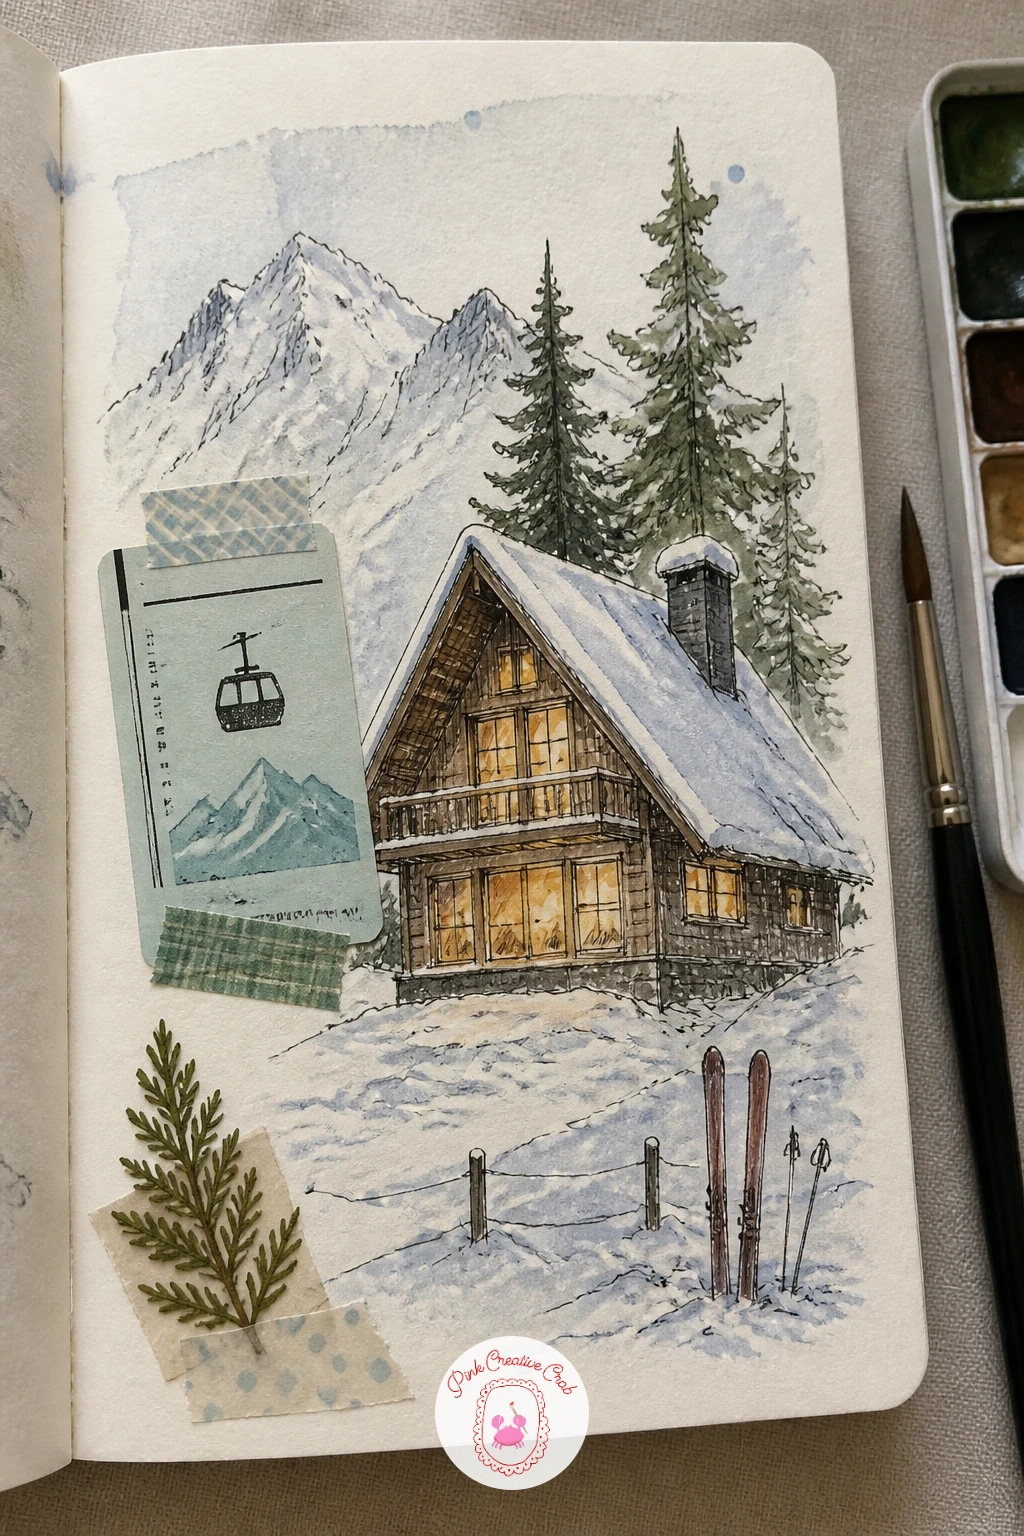
Draw the chalet first, a simple triangle roof over a square body, with two or three small square windows glowing warm against the rest of the page. Keep the roofline steep, which is what reads instantly as alpine rather than any other kind of cabin.
Light matters most on this spread: decide where the sun sits, usually low and off to one side in a winter scene, and shade the snowbanks around the chalet with a soft blue-grey only on the side facing away from that light. The lit side of the roof and snow stays pure white paper.
Add a row of thin pine trees down one side of the page, each just a tall triangle with a jagged edge, dusted with the same blue-grey shadow tone. Tape a lift pass somewhere near the chalet and ring it with squiggled notes as if logging the day’s runs.
No lift pass saved: draw a simple pass shape with a punched hole and a lanyard line instead.
You Will Need
- lift pass or paper scrap
Palette: Alpine Blue,Warm Yellow,Forest Green,Snow White
Choose one leaf to study closely before drawing the whole plant, since a single well-observed leaf teaches you the shape faster than guessing at the full plant at once. Draw its outline slowly with a fineliner, pausing at every lobe or point, then add the vein pattern branching out from a central line.
Once that leaf feels right, build the rest of the plant around it: a simple pot shape at the base, then a few more leaves at different angles radiating from the soil, each slightly smaller or turned sideways to avoid a flat, symmetrical look. Watercolor each leaf a slightly different green so the plant reads as leafy rather than one solid blob.
Alongside the plant, jot a small repotting diary: a squiggled line of notes and a simple drawn arrow pointing from an old pot shape to a new, slightly bigger one. This records the plant’s progress without needing readable words.
If leaves keep coming out too symmetrical, turn the page sideways while drawing the second and third leaf, which naturally varies the angle.
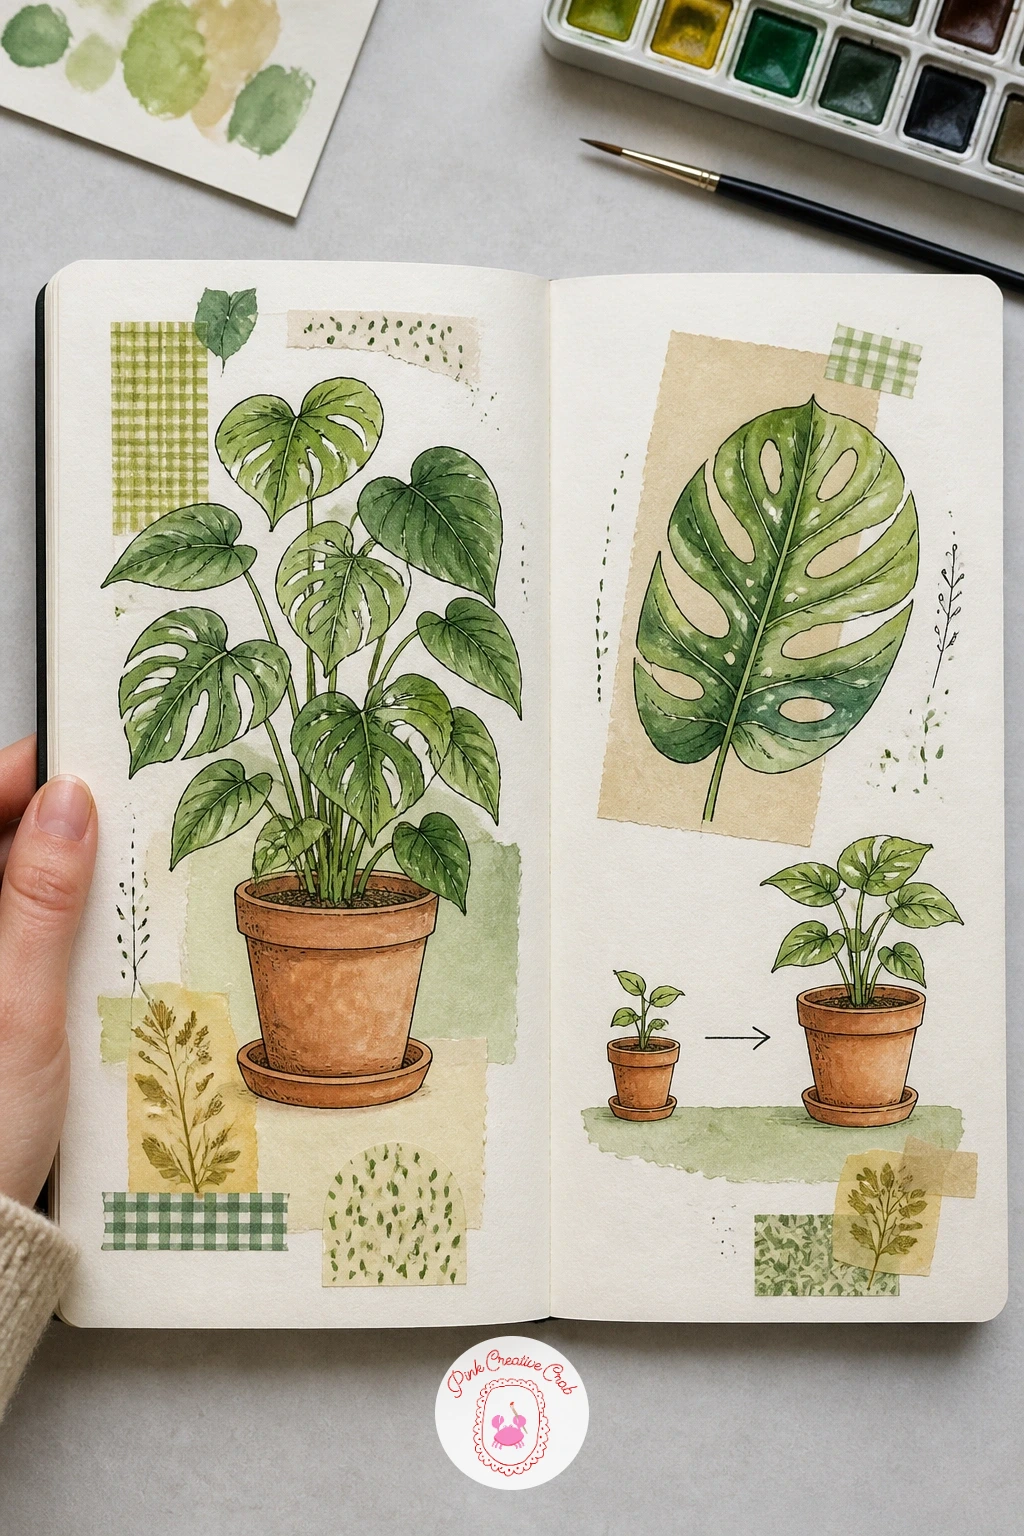
Palette: Sap Green,Olive Green,Terracotta,Warm Brown
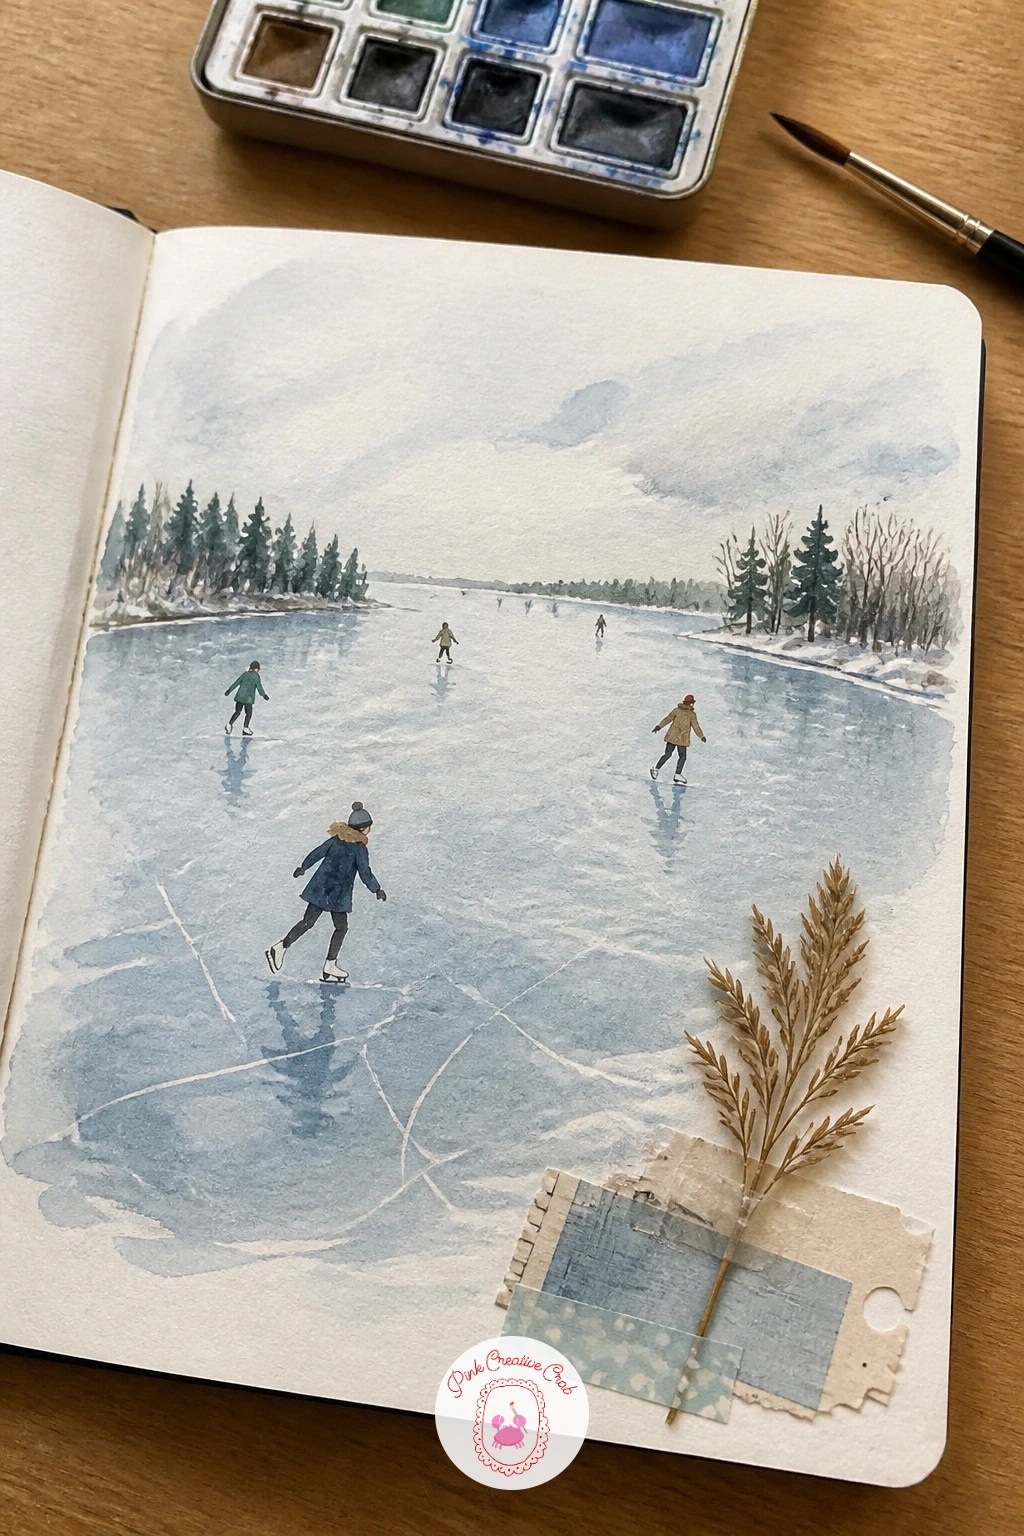
Lay the ice down first as one wide pale wash across the lower half of the page, since everything else sits on top of it. Leave a few streaky gaps of untouched cream paper within the wash to suggest the uneven shine of real ice.
Sketch two or three skaters next, each a simple leaning figure with one leg extended back and arms out for balance. This is where a quick texture trick helps: once the ice wash is fully dry, scratch a few thin curved lines into it with the end of a dry brush handle or a craft knife tip to suggest skate marks cutting across the surface.
Add a thin tree line along the horizon and press a single dried reed or stalk into the lower corner of the page with a dab of glue, half tucked beside the ice. A few squiggled notes near the skaters round out the scene.
No dried reed available: draw one instead, a few thin tapering lines with a seed head at the top.
You Will Need
- dried reed or pressed stalk
- glue stick
Palette: Ice Blue,Slate Grey,Charcoal,Pale Cream
Place the jug before the tulips, a simple rounded vessel with a narrow neck, since the tulip stems need something to lean out from. Draw three or four tulip stems rising at slightly different angles, each topped with a closed, egg-shaped bloom rather than an open flower, which is both easier to draw and more true to how tulips actually look in a vase.
Watercolor the blooms in two or three related colors, letting them bleed a little into each other at the base of each flower while the paper is still damp. The jug can stay a plain grey-blue or terracotta so the tulips carry all the color on the page.
Beside the jug, paint a short row of small color test swatches, as if trying out tulip shades before committing to the final blooms. This is a nice spread to try alongside the tulip and flower pages in this February doodle collection if you like mixing floral motifs through a winter sketchbook.
If stems look too stiff and parallel, curve one or two gently to the side; real stems rarely stand perfectly upright.
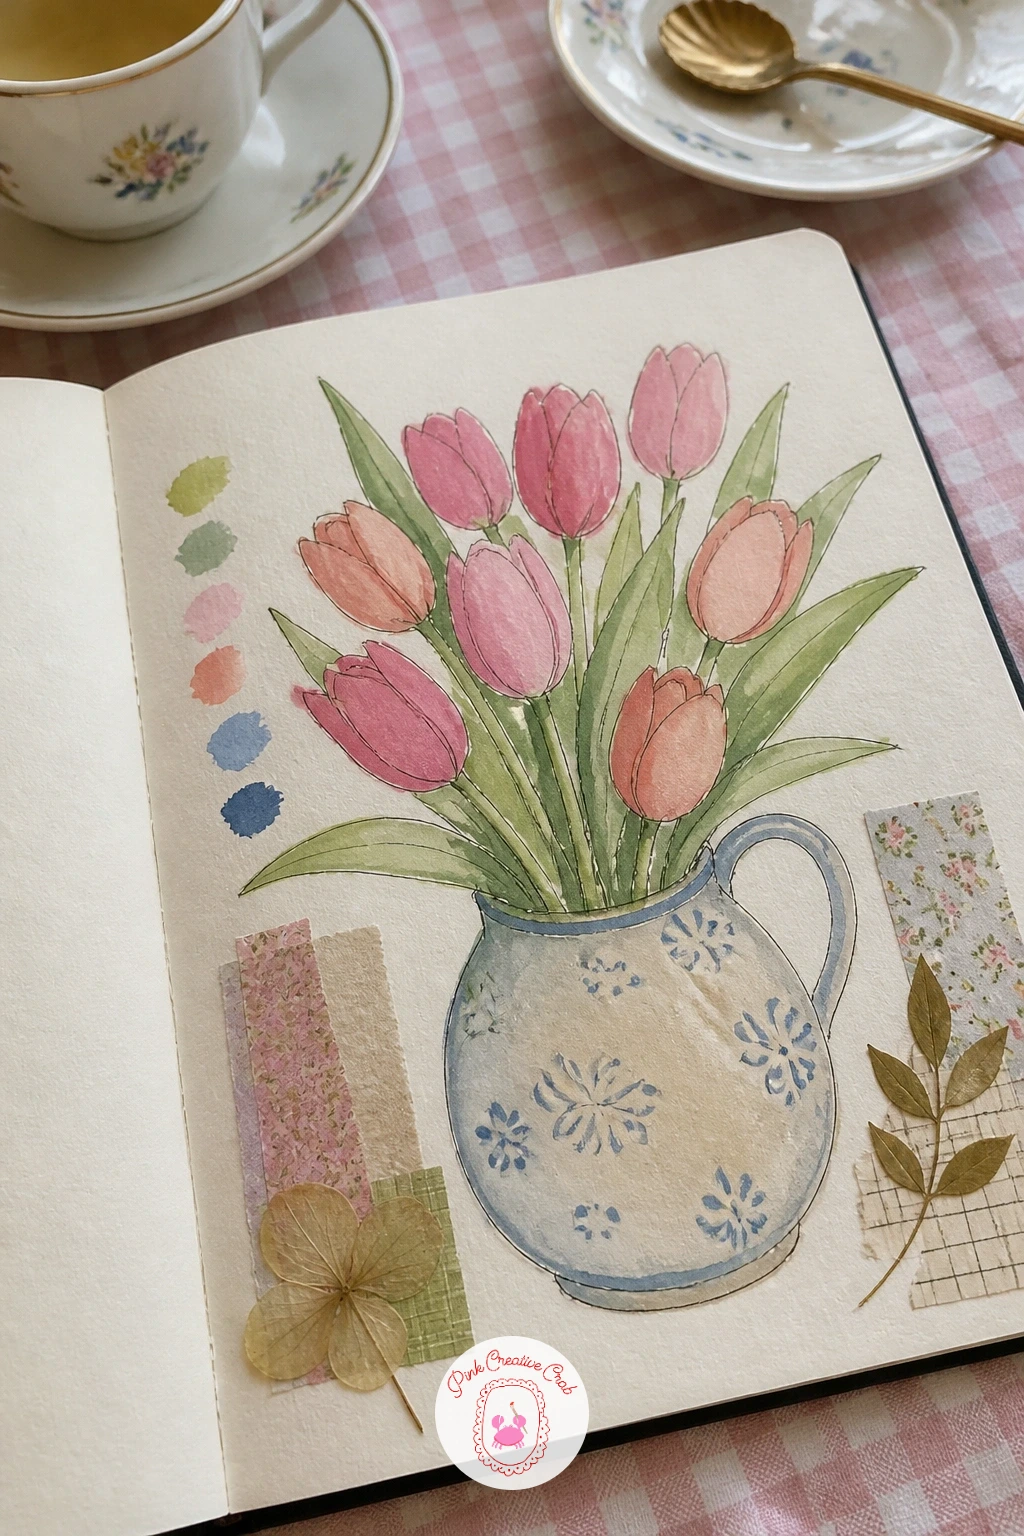
Palette: Rose Pink,Soft Coral,Sap Green,Terracotta
Round out the snowman’s three body circles first, smallest on top, before adding any face or arms. Keep the circles slightly uneven and stacked a little off-center, which looks far more like a real homemade snowman than three perfect, aligned spheres.
Add simple stick arms, a scribble of dots for buttons, and a small triangle nose, then wash the whole figure in the palest blue-grey shadow only where the light would not reach, leaving the rest as plain white paper. A scatter of falling dot marks across the sky finishes the weather.
Here is the quickest version of this page: snowman, sky dots and one swatch of blue, done in under ten minutes. The longer version adds a scarf with a knit pattern, a background fence line and a few footprints leading up to the snowman from the edge of the page.
Press an actual coffee cup against the lower corner of the page before you start drawing, to leave a pale ring stain, then draw loosely around it as if it happened while you worked.
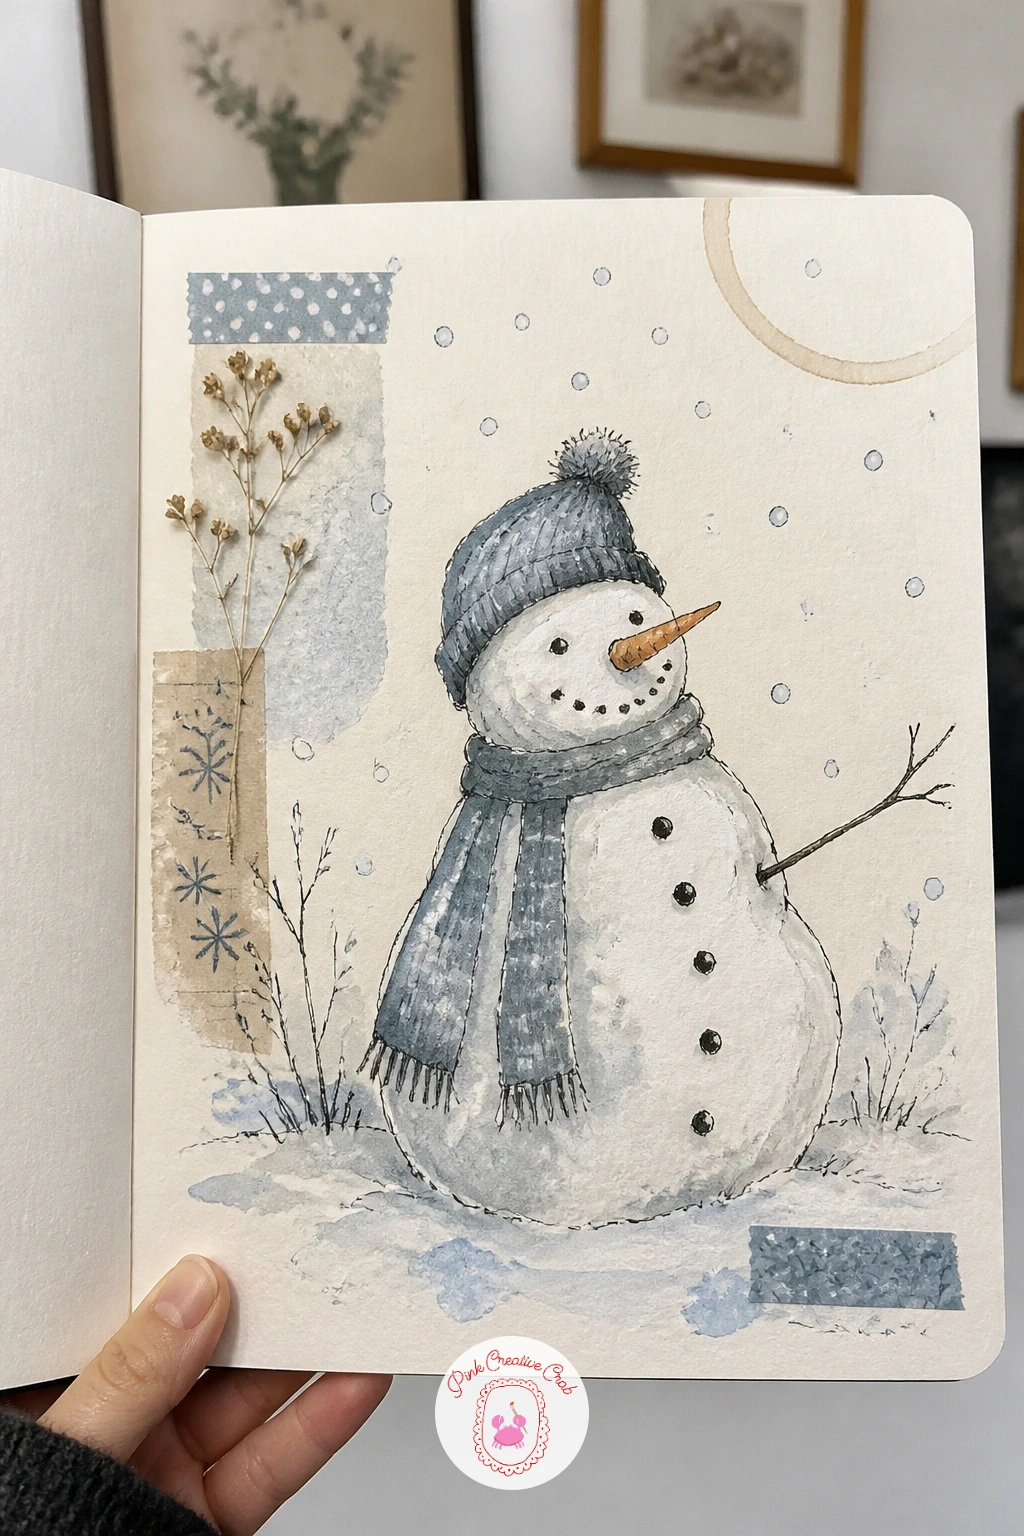
You Will Need
- coffee cup for a ring stain
Palette: Pale Blue,Charcoal Grey,Carrot Orange,Snow White
Draw one large monstera leaf as the centerpiece, starting with the central vein line and working outward to the characteristic split edges and holes. Keep the splits uneven in size, since a monstera leaf never has two identical lobes, and that irregularity is what makes it recognizable.
Once the main leaf is inked, lay a second leaf flat on the page beside it and trace lightly around it in pencil before going over the outline in fineliner, giving you one drawn leaf and one true-to-scale traced leaf side by side for comparison. Watercolor both in slightly different greens so they read as two separate studies rather than a repeated shape.
Add a thin stem running down to a simple pot shape at the base of the page, and jot a short squiggled care note beside it, as if reminding yourself when it was last watered. This pairs well with the leafier spread elsewhere in this list if you want two different houseplant pages across your sketchbook.
No real leaf to trace: draw a second monstera leaf at a smaller scale instead, turned to show its back.
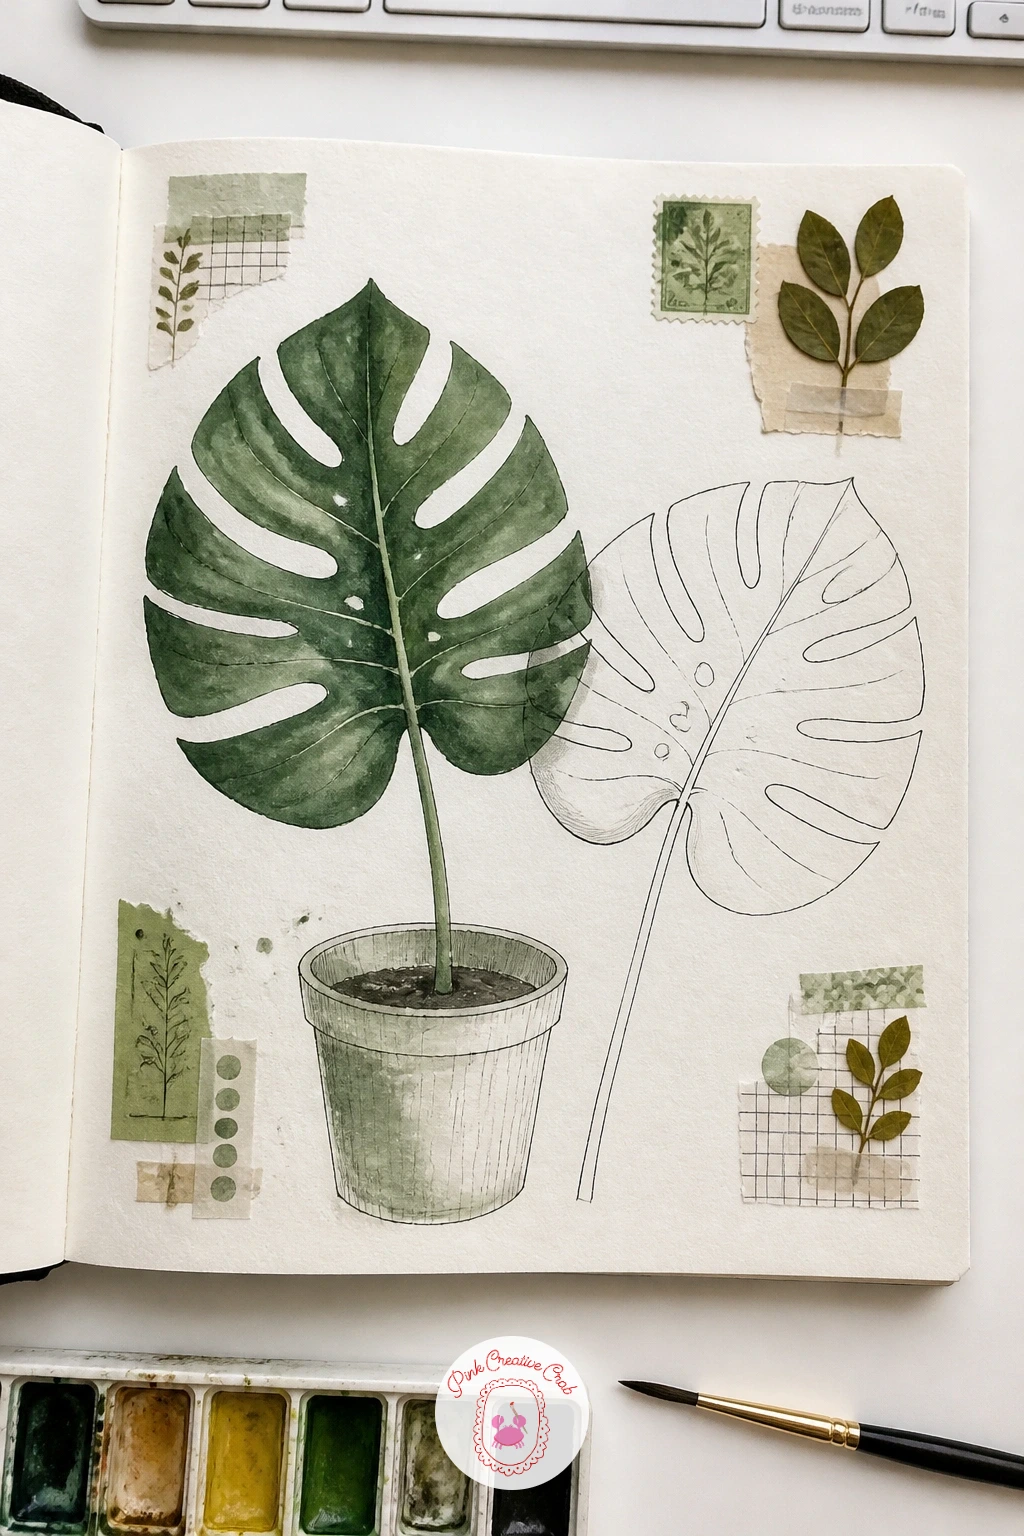
Palette: Deep Green,Olive Green,Terracotta,Warm Brown
Stack the woodpile first, a simple grid of short log ends drawn as overlapping ovals, since that repeating shape is oddly satisfying to fill in and sets a cozy tone for the rest of the page. Shade alternating rings inside a few log ends to suggest cut wood grain.
Beside the woodpile, draw a pair of boots standing at an angle, laces loose and a little mud or snow smudged at the sole. Compare the boots to the woodpile as you draw, a boot is usually about as tall as three or four stacked logs, which keeps the scale of the whole page sensible without measuring anything exactly.
Tear a small map scrap, real or drawn, and tape it at an angle across one corner, with a squiggled trail line marked on it in pencil. A few short grass or twig marks around the boots ground the whole scene.
If a map scrap is not on hand, draw a torn rectangle with a few contour-style wavy lines instead, and age the edges with a little diluted brown wash.
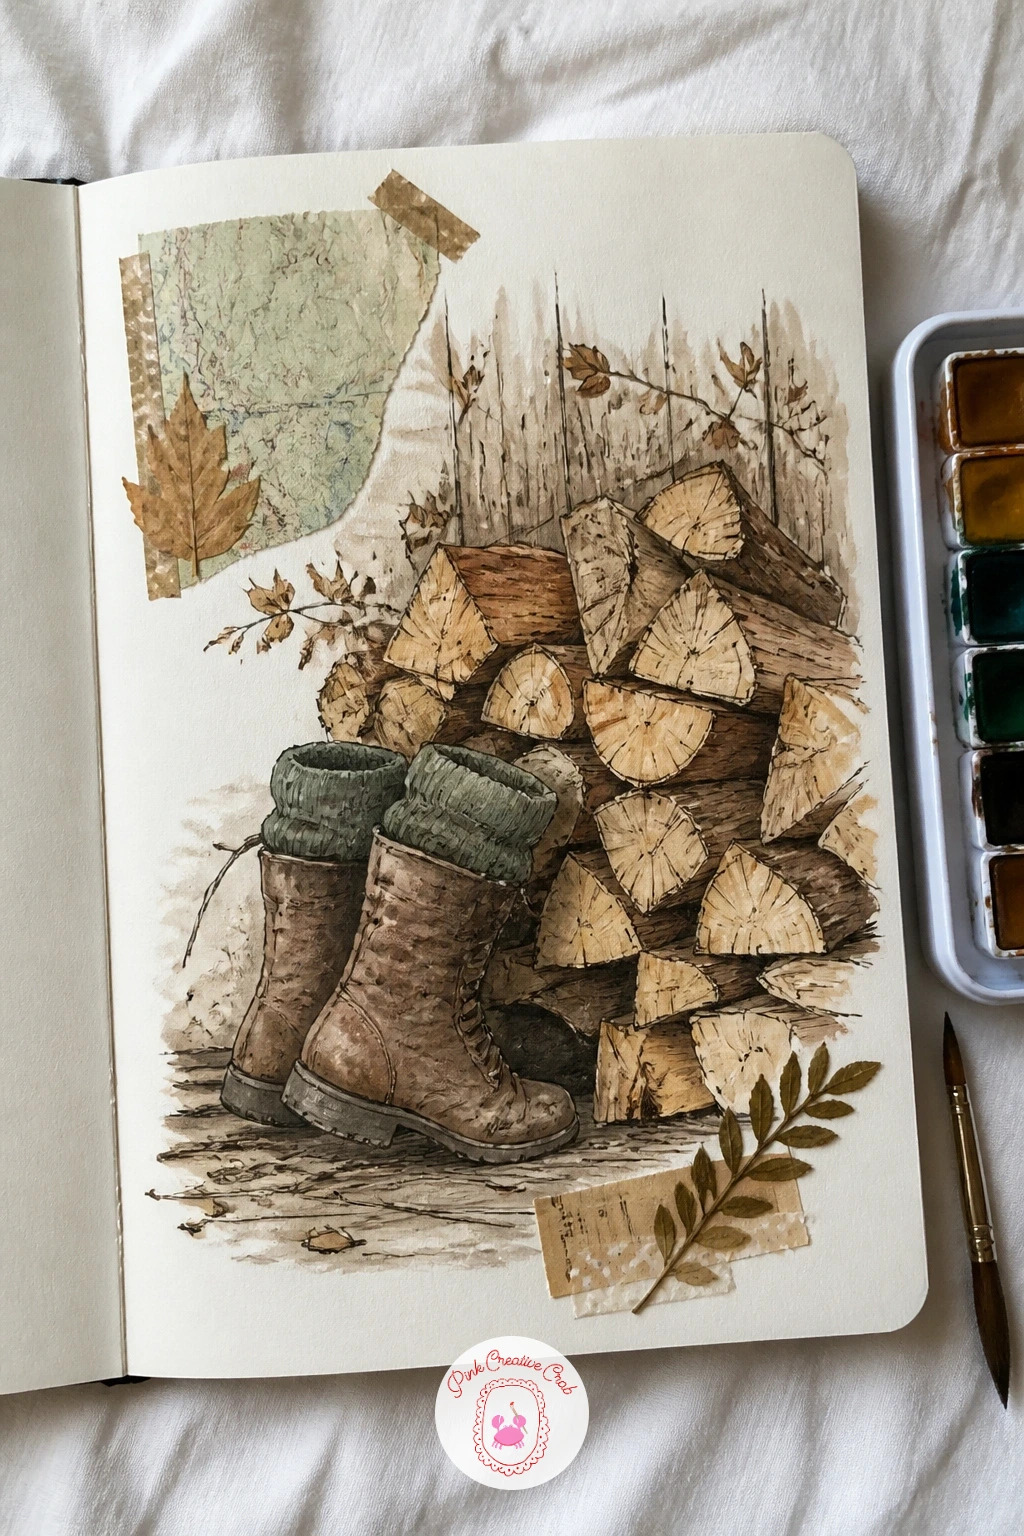
You Will Need
- map scrap or torn paper
Palette: Warm Brown,Burnt Sienna,Forest Green,Charcoal
Mark out a row of small circles across the top of the page first, evenly spaced with a light pencil, before inking the moon phases into them. Fill each circle with a different crescent or gibbous shadow, keeping the dark side soft rather than a hard flat fill, which reads more like moonlight than a solid cutout.
Below the row of moons, paint a single quiet snowy landscape stretching the width of the page: a low horizon line, a few dark tree silhouettes, and a wide wash of deep blue-grey for the snow at night. This is the spread where perspective stays deliberately flat and simple, a single horizon with nothing receding sharply, so all the visual interest stays in the moon row above.
Leave one or two stars as tiny unpainted dots scattered across the dark sky wash, and squiggle a short note beneath one or two of the moon phases as if logging the date.
If circles feel uneven freehand, trace around a coin or a small cap for each one before inking the shadow inside.
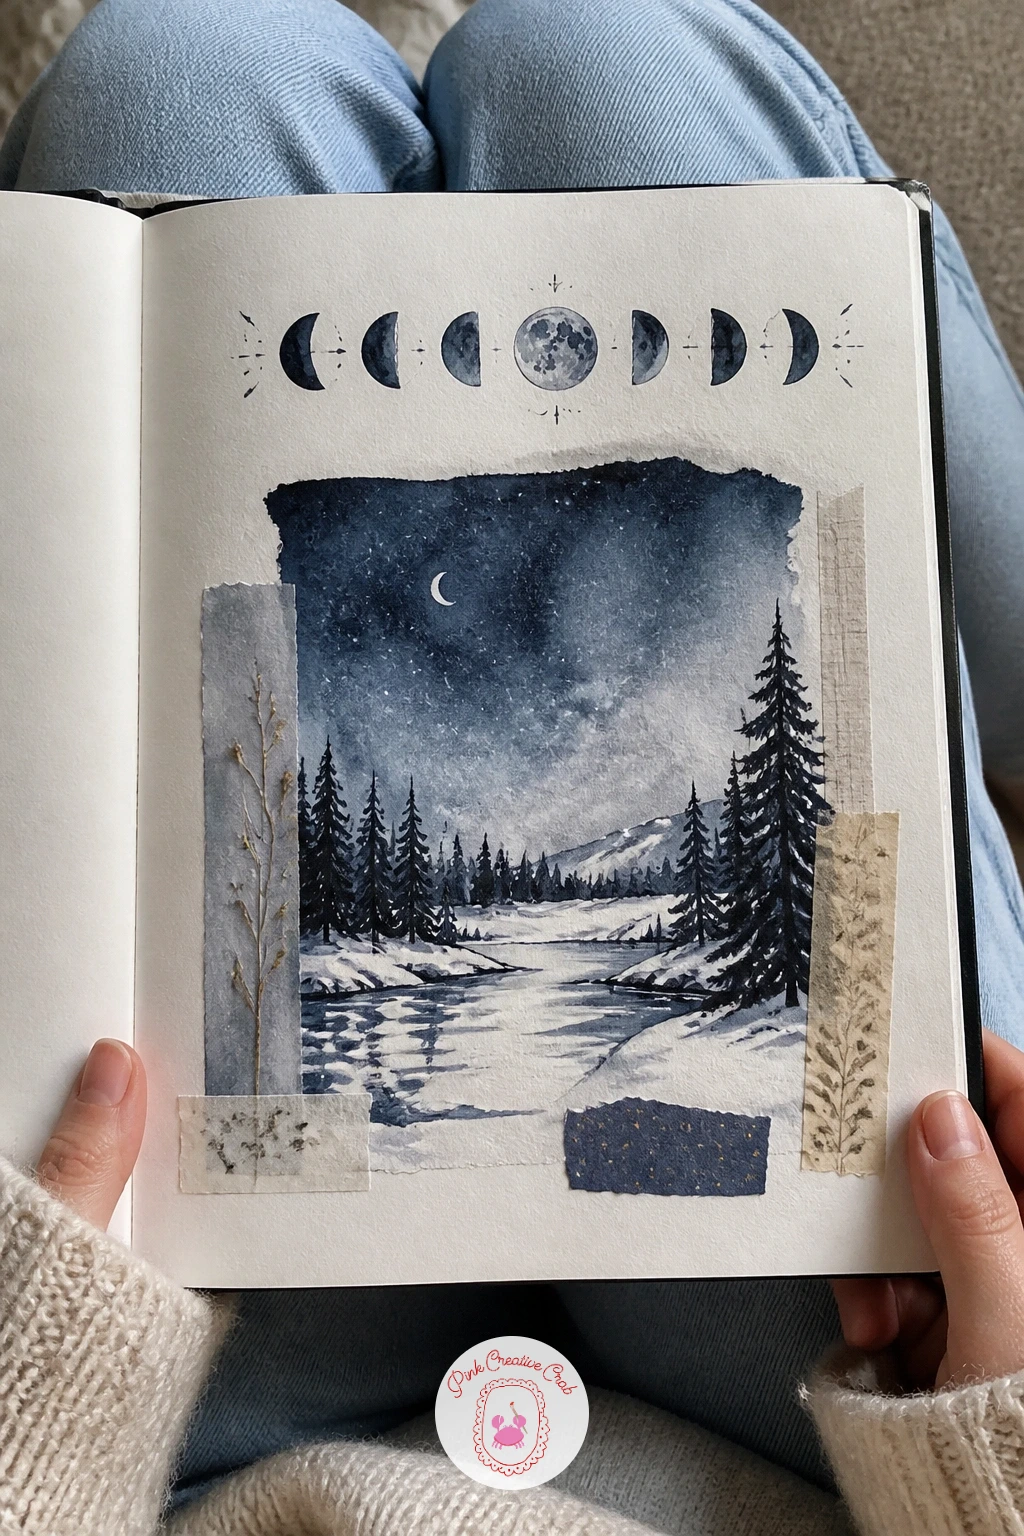
You Will Need
- small coin or cap to trace circles
Palette: Indigo,Pale Grey,Deep Blue,Snow White
Draw the four teacups in a loose row first, keeping each one a slightly different shape and size so the row does not feel mechanically repeated. A simple oval cup on a thin saucer line is enough; vary the handle angle on each one for extra character.
Watercolor each cup a different soft shade, tea stains at the rim in deeper tones of the same color, which is a nice quick texture trick: drop a stronger wash right where the liquid would sit inside the cup and let it fade upward toward the rim. Leave the cup exterior mostly pale so the contrast feels deliberate.
Tape a torn paper tea tag below each cup, the kind with a small string loop, or draw one if none are saved, a narrow rectangle with a punched hole and a frayed string line. Squiggled notes beside each tag can stand in for tasting impressions.
For a faster version, draw and tape just two cups and tags instead of four, keeping the same layout at half the scale.
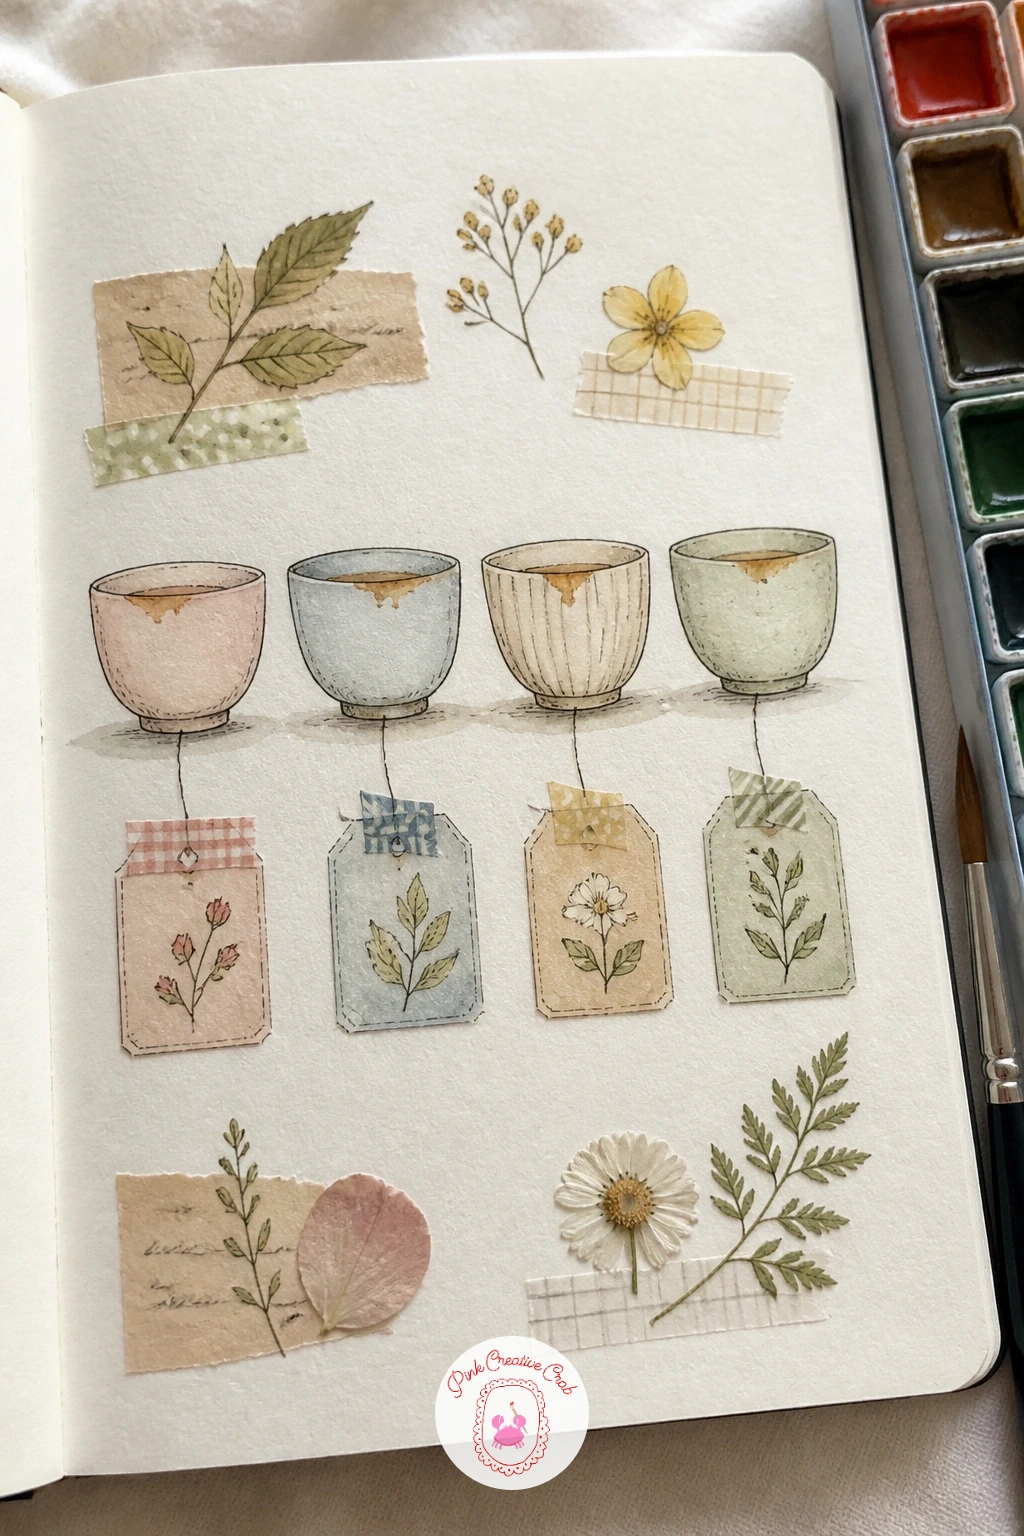
You Will Need
- tea tags or paper scraps
Palette: Amber Gold,Rose Taupe,Sage Green,Cream White
Choose three small drawings for this page rather than one large scene: a curled cat, a bowl of soup, and a simple seated figure standing in for a friend. Spacing them apart with plenty of white paper between them keeps the page feeling calm rather than crowded.
Draw the cat first, a simple loaf shape with closed eyes, then the soup bowl with a few wavy steam lines, and finally the friend figure as a loose seated outline with a raised hand, as if mid-wave or mid-laugh. Keep all three at a similarly small scale so none dominates the page.
Watercolor each in a warm, slightly different tone, and connect them loosely with a thin wandering line or a few scattered dot marks rather than a straight border, which keeps the page feeling like a gathered collection rather than a strict grid. Squiggled notes beside each drawing can stand in for what they represent.
If three subjects feels like too much for one sitting, start with just the cat and the soup bowl and add the friend figure another day.
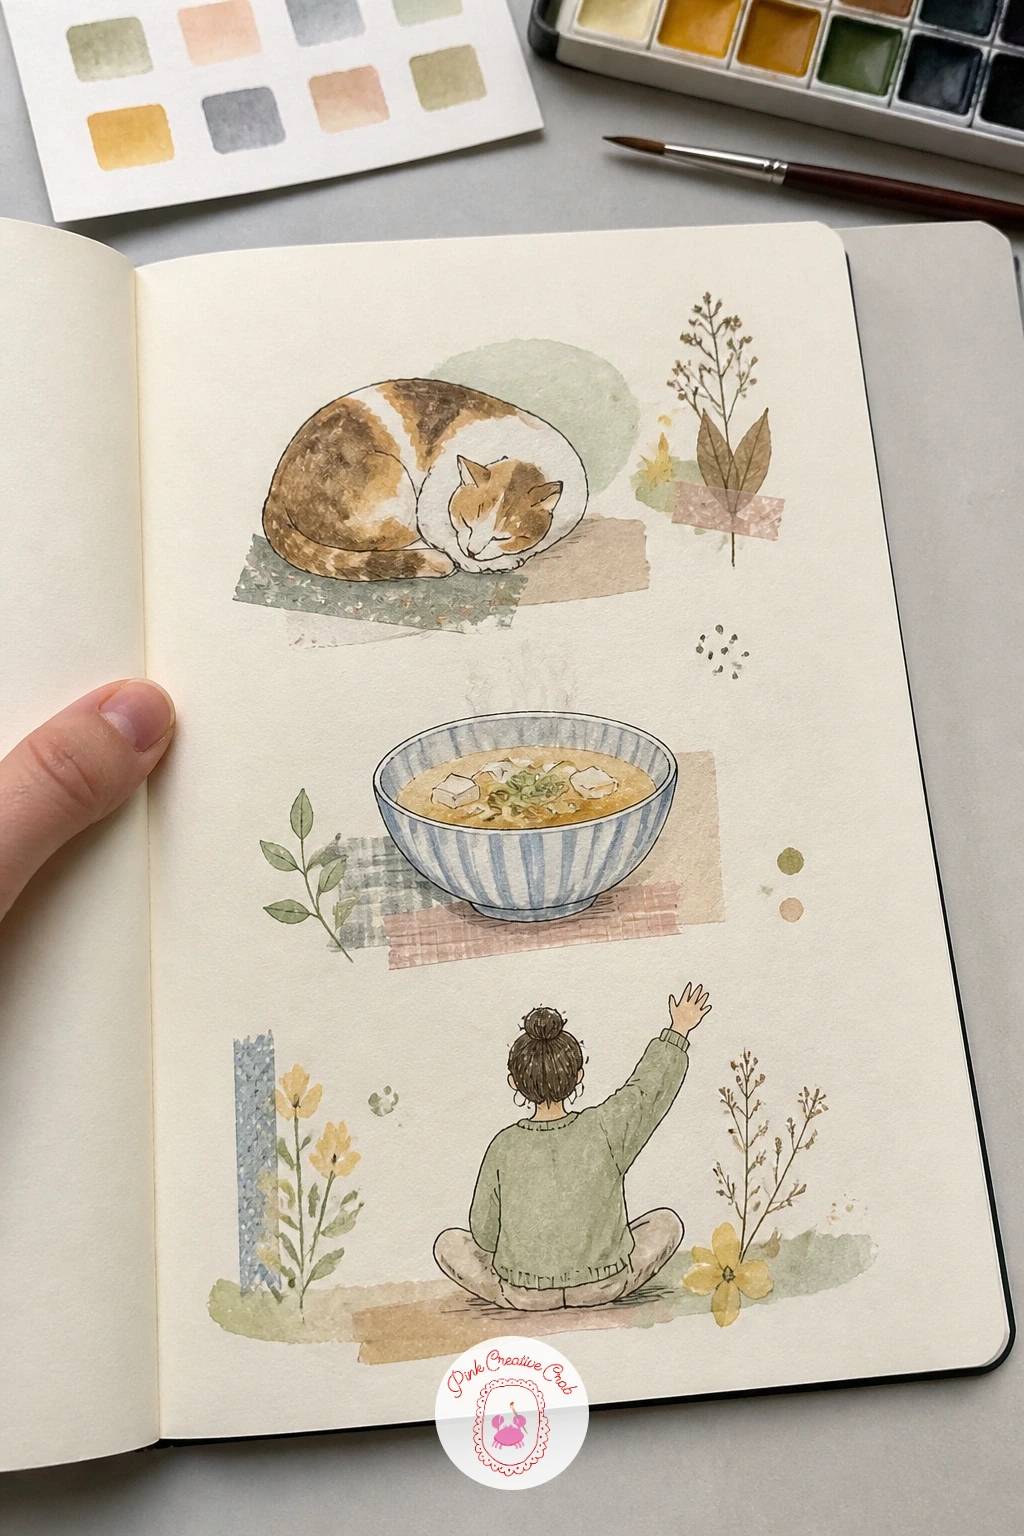
Palette: Warm Orange,Soft Pink,Sage Green,Cream White
Sketch two or three mismatched teacups first, found-object style, each with a slightly chipped rim or an odd pattern of dots and stripes rather than a matching set. This mismatch is actually easier to draw than a uniform set, since no two cups need to align.
Watercolor each cup a different pattern and color, keeping the painted pattern loose rather than precisely repeated, which suits the secondhand, slightly worn feel of the subject. A thin crack line in pencil across one cup adds character without extra effort.
Tape a small price tag near the cups, tilted at an angle as if just peeled off, or draw one instead with a looped string and a torn corner. A few squiggled notes beside the tag can record where the find came from.
If cups feel repetitive to draw three times, swap one for a small saucer or teapot instead, keeping the same loose, mismatched feel across the group.
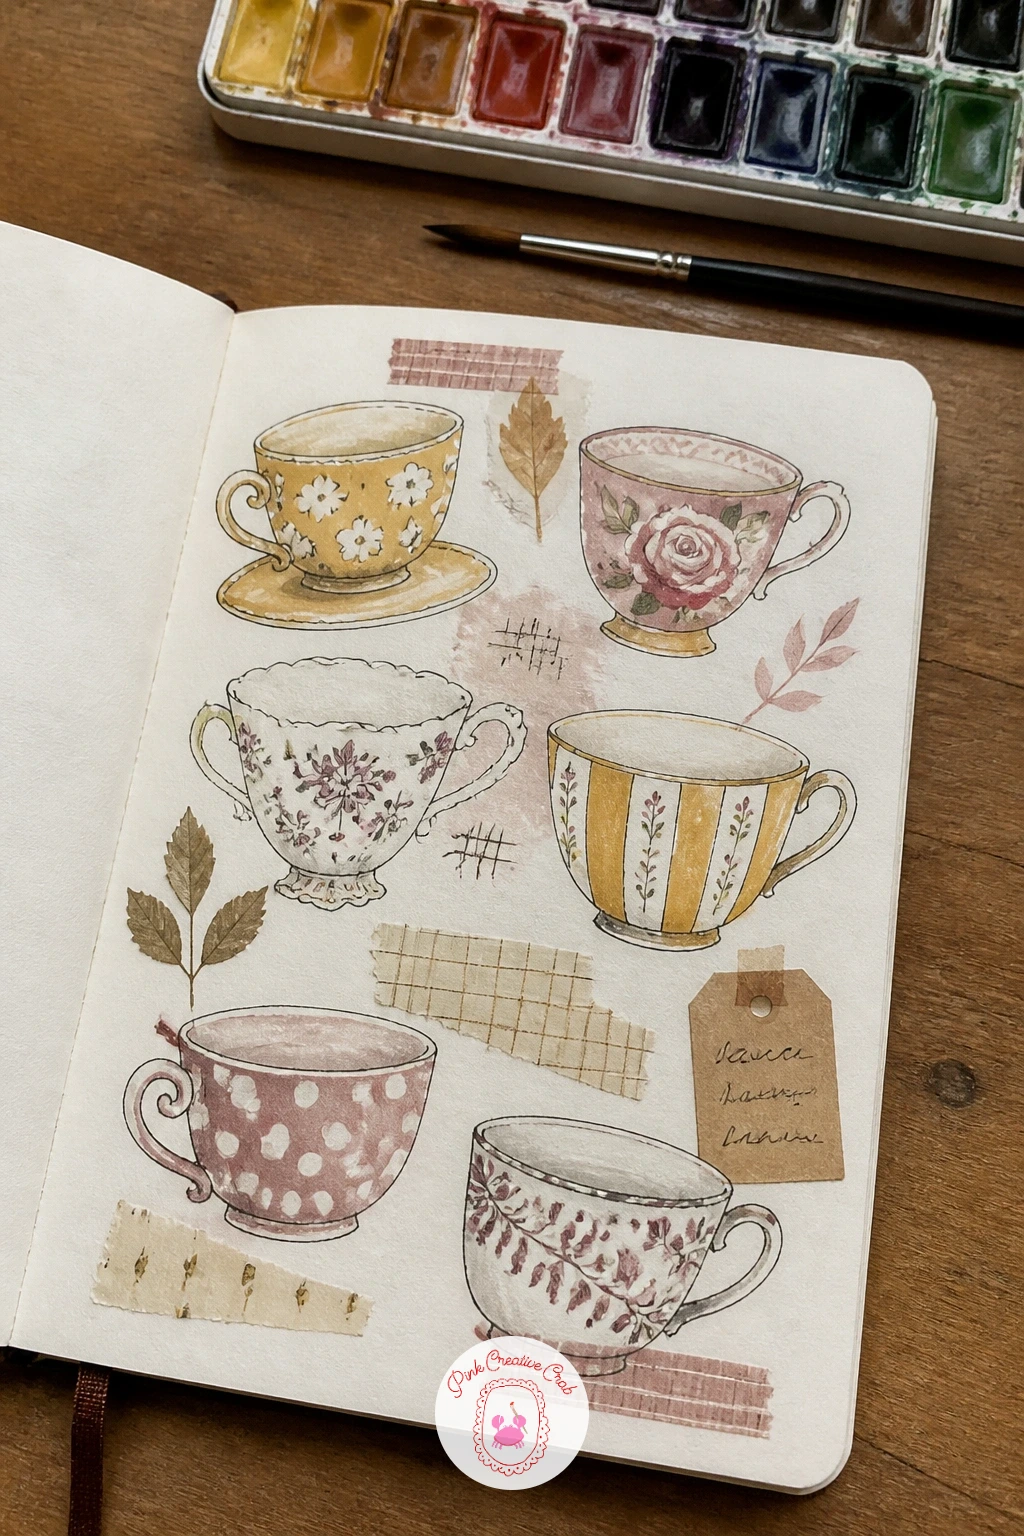
You Will Need
- price tag or paper scrap
Palette: Dusty Rose,Mustard Yellow,Sage Green,Cream White
Draw one coat first as the largest shape on the page, a simple A-line silhouette with a wide collar and two patch pockets, before adding any hats or accessories around it. Keep the coat outline loose rather than fitted, since a slightly oversized shape is both easier to draw and reads as cozier.
Watercolor the coat in a deep, warm tone and let it dry before adding one or two hats beside it, simple dome or beanie shapes with a small pompom circle on top. A scarf can loop loosely beneath the coat collar, drawn as a few parallel wavy lines rather than a stiff rectangle.
Tape small fabric snips next to each garment, real scraps of wool or knit fabric if you have any on hand, or paint a few rectangular swatches in coordinating colors instead. Squiggled notes beside each item can log the fabric or where it came from.
If a full coat feels like too much for one sitting, draw just the hat and scarf with their fabric swatches and save the coat for a second page.
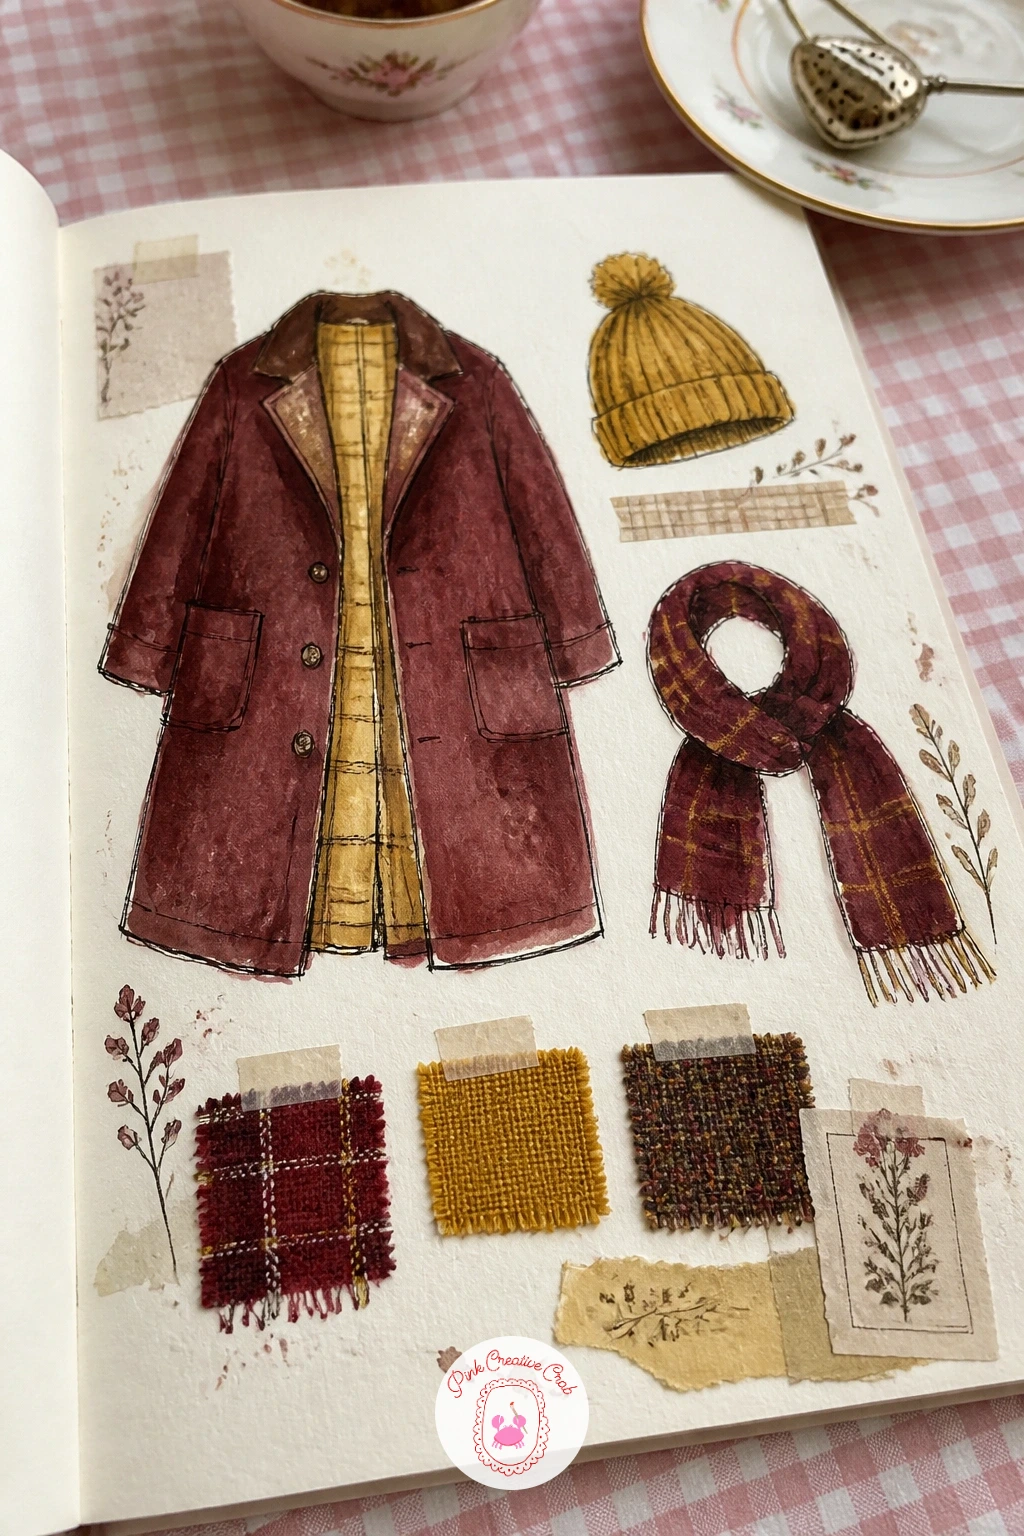
You Will Need
- fabric snips or paper scraps
Palette: Deep Burgundy,Mustard Yellow,Charcoal Grey,Cream White
Perch the nuthatch first, since its head-down posture on a tree trunk is the most distinctive shape to get right before adding the sparrows around it. Draw it clinging sideways or upside down on a short vertical branch, round body, short tail, a long thin beak.
Add two or three sparrows nearby at the actual feeder, each a plainer rounded body with simple streaked markings on the wing drawn as short parallel fineliner strokes. Keep the sparrows smaller and closer together than the single nuthatch, which naturally draws the eye to it first.
Paint a row of small seed swatches along the bottom of the page, little scattered dot clusters in different warm browns and golds to represent different seed types. A few squiggled notes beside the birds can log which ones visited today.
If feather markings feel fussy on every sparrow, detail just one fully and leave the others as softer, looser shapes; the eye will fill in the rest.
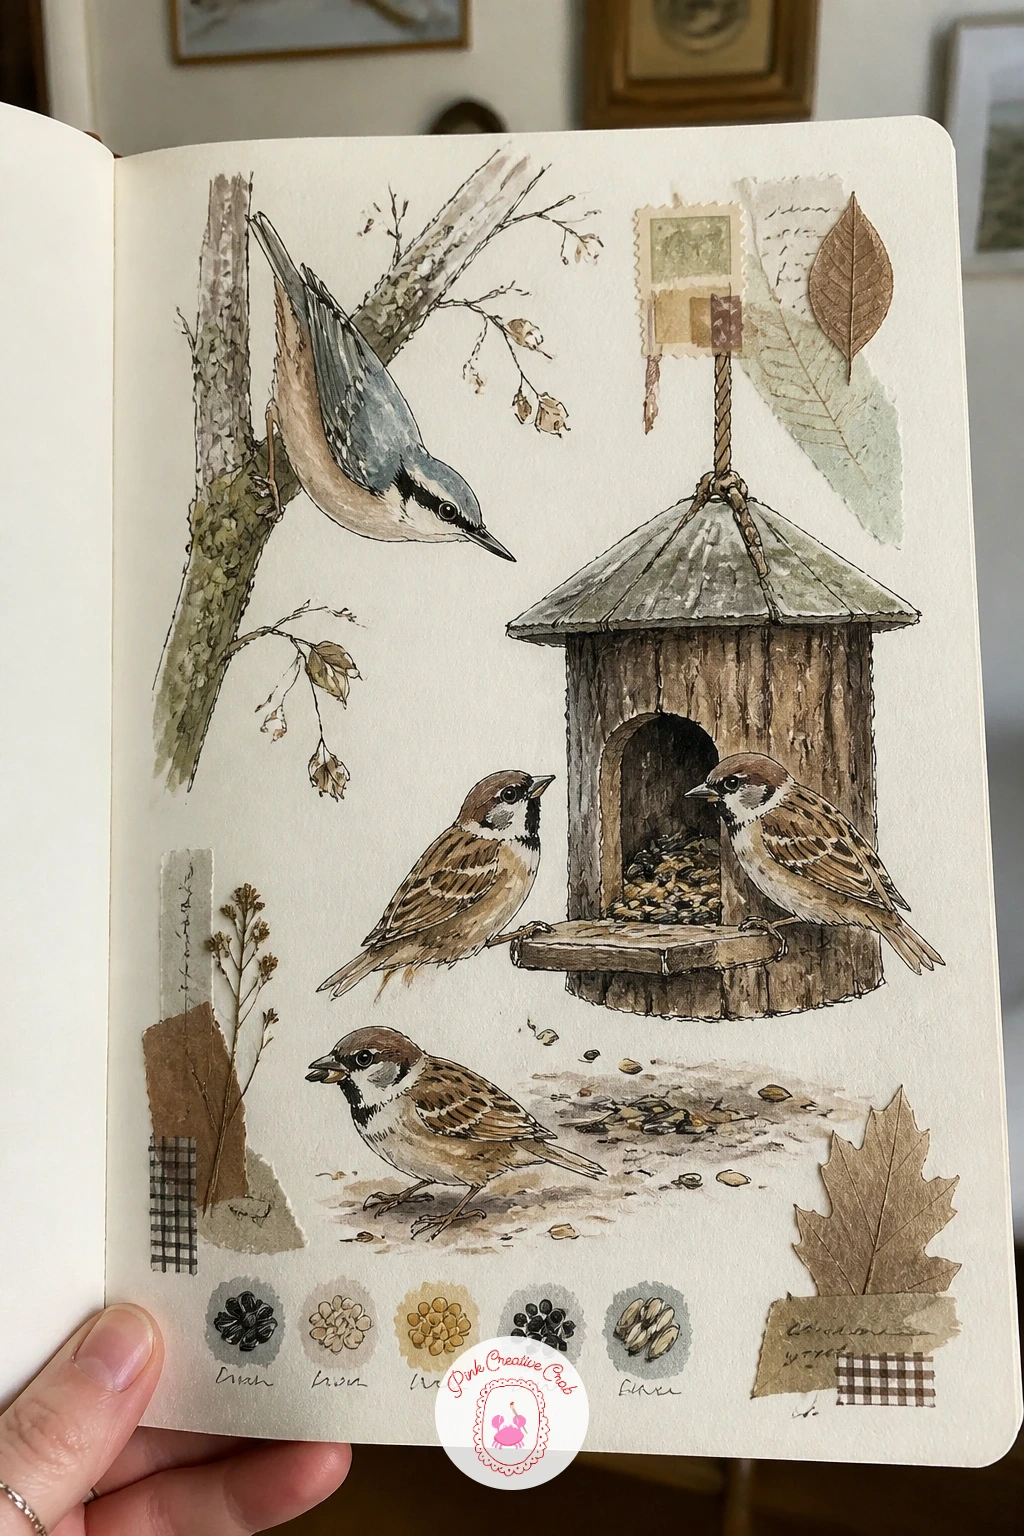
Palette: Warm Brown,Slate Grey,Golden Ochre,Cream White
Draw the mountain path first, a single winding line climbing from the bottom of the page to a small peak near the top, since this line decides the whole composition before anything else goes on. Keep the switchbacks loose and uneven rather than a neat zigzag, which feels more like an actual trail.
Add a few simple pine trees scattered along the lower slopes, getting smaller and sparser as the path climbs higher, until the very top is left bare rock or snow. Watercolor the lower slopes in green and brown, shifting to pale blue-grey and white near the peak, which is the easiest way to suggest altitude without any complex shading.
Mark a few small dots or flags at bends along the path, each paired with a squiggled note as if marking a goal to reach that month. A tiny figure near the base of the path, just a simple standing shape, gives a sense of scale to the whole mountain.
For a quicker version, skip the trees and just paint the winding path and peak with two or three goal markers along it.
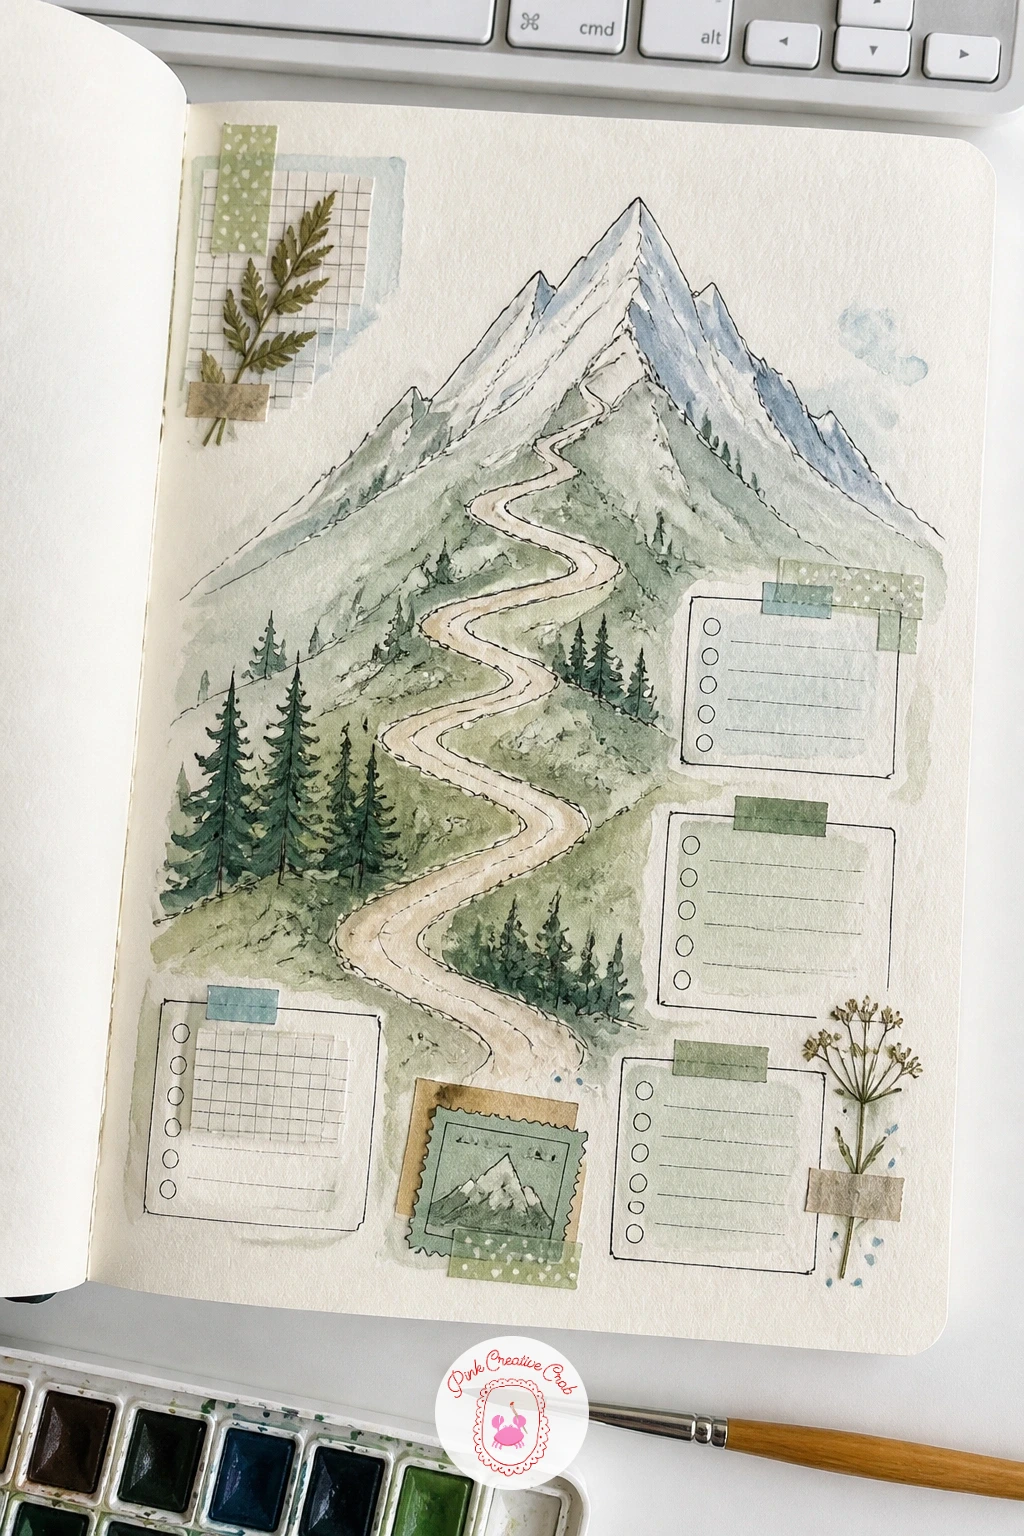
Palette: Forest Green,Warm Brown,Pale Blue Grey,Snow White
Draw the mug first, a simple rounded shape with a thick handle, since its size sets the scale for the marshmallows and steam that follow. Fill the top with a smooth brown wash for the cocoa, leaving a slightly uneven edge where it meets the rim.
Pile two or three marshmallow shapes on top, simple rounded squares with a soft toasted edge drawn in a slightly darker tan along one side of each. A dusting of tiny dot marks in cinnamon or cocoa powder color scattered across the marshmallows finishes the topping.
Add a few soft curling steam lines rising from one side of the mug, and a doodled whisk or spoon resting beside it on the page. Squiggled notes nearby can record a favorite cocoa recipe without spelling it out.
If marshmallows look too flat and square, round the top corners more and let one marshmallow overlap another slightly, which reads as a more natural, piled-up topping.
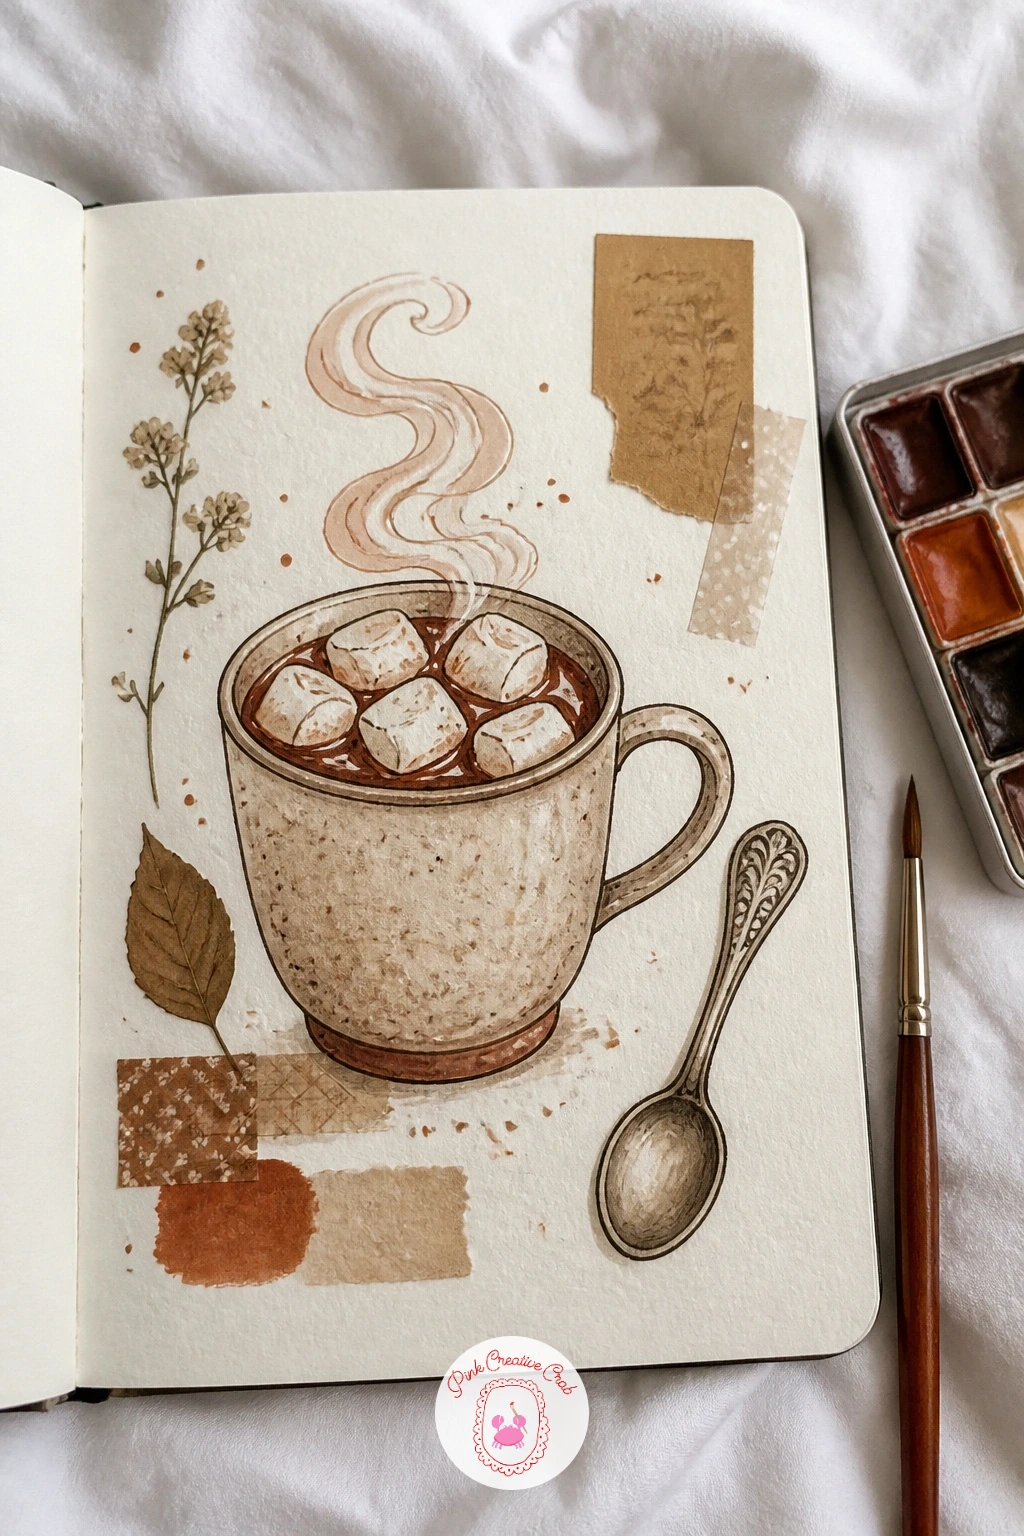
Palette: Chocolate Brown,Cream White,Cinnamon Tan,Warm Grey
Paint the sunset swatches before drawing any ground detail, since the color story above sets the mood for everything below it. Lay down a gradient wash across the top half of the page, warm orange near the horizon fading up into dusty pink and then pale blue-violet higher up, letting the colors blend wet into wet.
Once the sky wash is dry, draw a simple low horizon line of snowy fields, just a few gentle rolling shapes with a thin fence line or a single tree breaking the silhouette. Keep the fields in silhouette, nearly flat dark shapes against the glowing sky, since that contrast is what makes a sunset read as a sunset.
Leave one or two small bird silhouettes as simple V shapes crossing the sky, drawn last so they sit cleanly on top of the dry wash. Squiggled notes along the margin can record the date or the temperature that evening.
No large page for a full gradient: work the same colors into a narrow horizontal strip instead and let the fields fill more of the remaining page.
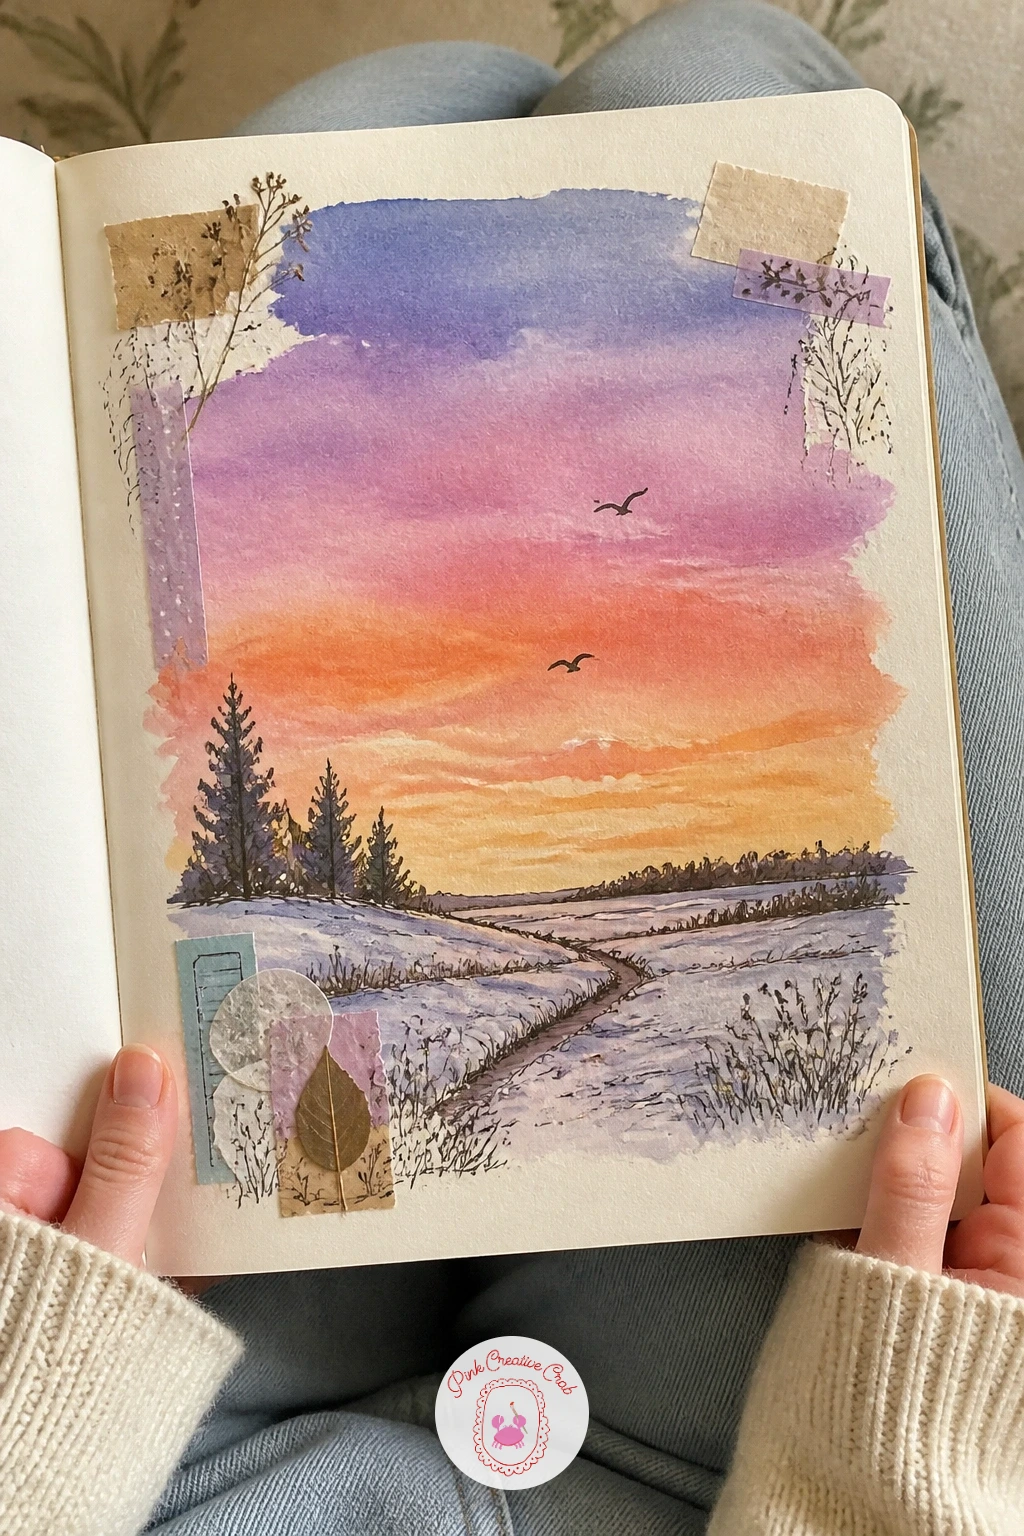
Palette: Sunset Orange,Dusty Pink,Blue Violet,Charcoal Grey
Sketch the reading room first, a few tall simple shelf shapes lining the back of the page, a long table in front with a single lamp casting a warm pool of light. Keep the shelves as plain vertical rectangles with a few horizontal lines for shelf edges, rather than drawing individual readable book titles.
Place a simple seated figure at the table, head bent over an open book, and let the lamp’s warm glow be the brightest spot on the page, washed in soft yellow fading into the cooler grey of the room around it. This contrast between warm lamp light and the cooler shadows of the shelves is what gives the page its quiet, late-afternoon feel.
Tape a small due date card near the table edge, the kind with a grid of squiggled lines standing in for stamped dates, or draw one if none is saved, a plain rectangle with a few horizontal rule lines.
For more themed page ideas to fill around this one, the retold scene sketchbook collection pairs nicely with a reading-themed run of pages.
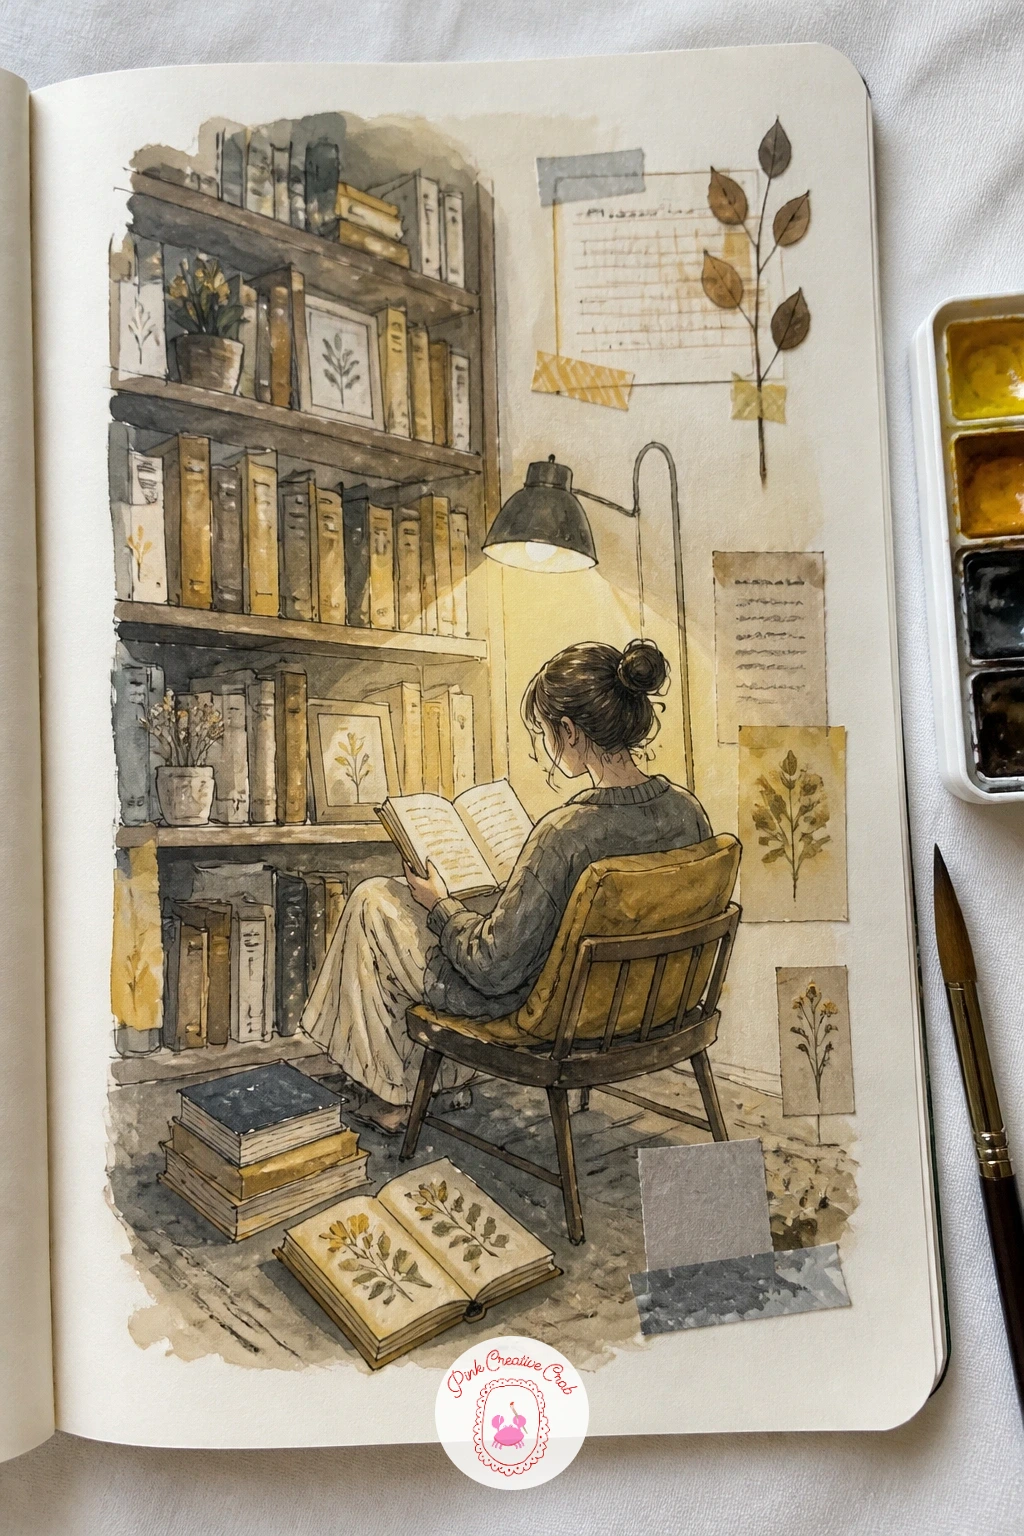
You Will Need
- due date card or paper scrap
Palette: Warm Yellow,Cool Grey,Deep Brown,Cream White
What to Do Next
Pick one spread that matches how your week actually looked, open your sketchbook to a clean page, and start with the main drawing before adding any swatches or keepsakes around it. One finished page today is worth more than a dozen planned ones, so let this one stay a little loose and move on to the next whenever you are ready.
Frequently Asked Questions
What paper works best for a mixed sketchbook art journal page like these?
A mixed media sketchbook with paper around 160 to 200 gsm handles fineliner, light watercolor washes and taped keepsakes without buckling badly. Thinner paper can warp or bleed through, so test a small wash first if you are unsure of your current book.
How do I keep handwriting looking like squiggles instead of real words?
Draw a wavy, slightly uneven line at a consistent height instead of forming actual letters, varying the length of each squiggle like real word spacing. Practicing a row of them on scrap paper first makes the rhythm feel natural fast.
What is the easiest way to attach pressed leaves or tickets to a sketchbook page?
A thin layer of glue stick along the back edges works well for pressed leaves and paper scraps without soaking through the page. Washi tape is even quicker for tickets and tags, since it lifts cleanly if you reposition it.
How long does one of these winter spreads usually take to finish?
Most of these spreads take between twenty and forty minutes depending on how much detail you add to the drawing and swatches. Several ideas above include a faster ten-minute version if you only have a short break.
What if I do not have real tickets, tags or pressed leaves to include?
Draw a simple stand-in shape instead, a torn rectangle for a ticket or a leaf outline with one vein line, and age it with a light wash of diluted brown. The drawn version often blends into the page even better than a real scrap.
Have any thoughts?
Share your reaction or leave a quick response — we’d love to hear what you think!
-
 0
-
0
-
0
-
0
-
0
-
0


