

A 3d painting on canvas tricks the eye into thinking something has slipped past the edge of the frame, and that small shock of surprise is exactly what makes these fun to paint. Every idea here uses shadow and a sharp understanding of the frame edge to pull a hand, a fish or a sunflower right off the surface and into your room.
You do not need a big canvas or a long weekend. Each illusion below is built for one sitting with ordinary acrylics, and the list moves from the simplest tricks to the more ambitious ones, so pick whichever grabs you and get started on the next blank canvas on your shelf.
Using these images: free for personal projects such as printing, coloring, cards, journals and gifts. Handmade items that include them may be sold up to 30 pieces per design. More than that is commercial use and is not permitted, and neither is selling or sharing the images themselves or passing them off as your own. Please ask before any other use.
Start with a hand reaching out of the canvas, the illusion that gets the strongest reaction for the least work. Pencil in a simple frame border first, a plain rectangle an inch or so inside the canvas edge, then draw the hand so the wrist sits inside that border and the fingers cross over it toward the viewer.
Block in the frame as flat cream or pale grey, then paint the hand in realistic skin tones with a round brush, keeping the knuckles and fingertips a touch lighter where they catch the light. The part that sells the whole trick is the cast shadow: paint a soft grey shadow falling from the fingers onto the painted frame, as if the hand is actually lifted above it.
The easiest way to go wrong here is a hand that looks flat and paper thin. Measure your own hand against the canvas before you draw, comparing finger length to palm width, so the proportions read as real rather than cartoonish.
If you do not want to paint skin tones, swap the hand for a pale glove shape, which needs far less blending and still breaks the frame convincingly.
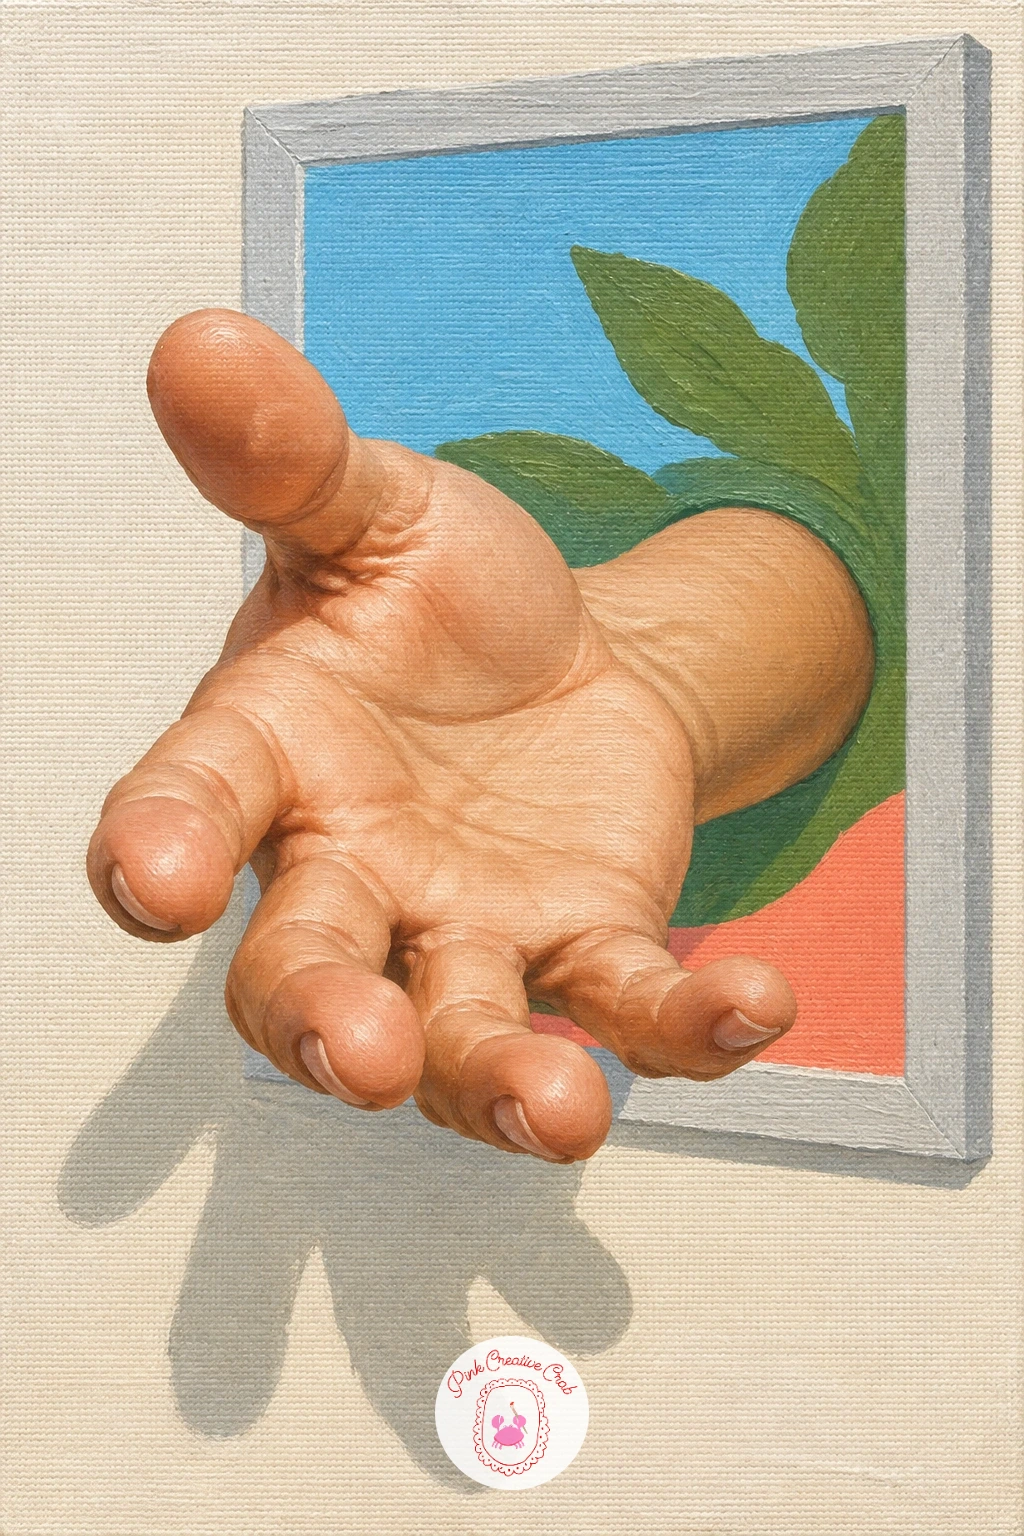
Palette: Raw Sienna,Titanium White,Payne’s Grey,Cream
Keep the energy going with a fish leaping out over the edge of the frame, a favorite because the curve of the body does most of the illusion work for you. Sketch a plain frame line near the bottom edge of the canvas, then draw the fish arching up and over it, tail still behind the frame, head and body already clear of it.
Paint the water and frame first in flat coral and cream blocks, let that dry, then layer the fish in sky blue and silver with a flat brush, keeping scales suggested rather than fussy. Add a crisp white highlight along the top curve of the body and a dark cast shadow where the fish crosses the frame line, since that shadow is what convinces the eye the fish is airborne.
Where this one usually falls flat is a fish that looks glued to the surface rather than leaping. Check that the eye level of your painted water sits lower than the leaping point, so gravity and arc feel believable.
A fine liner pen works well for the scale lines if your brush feels too clumsy for that detail.
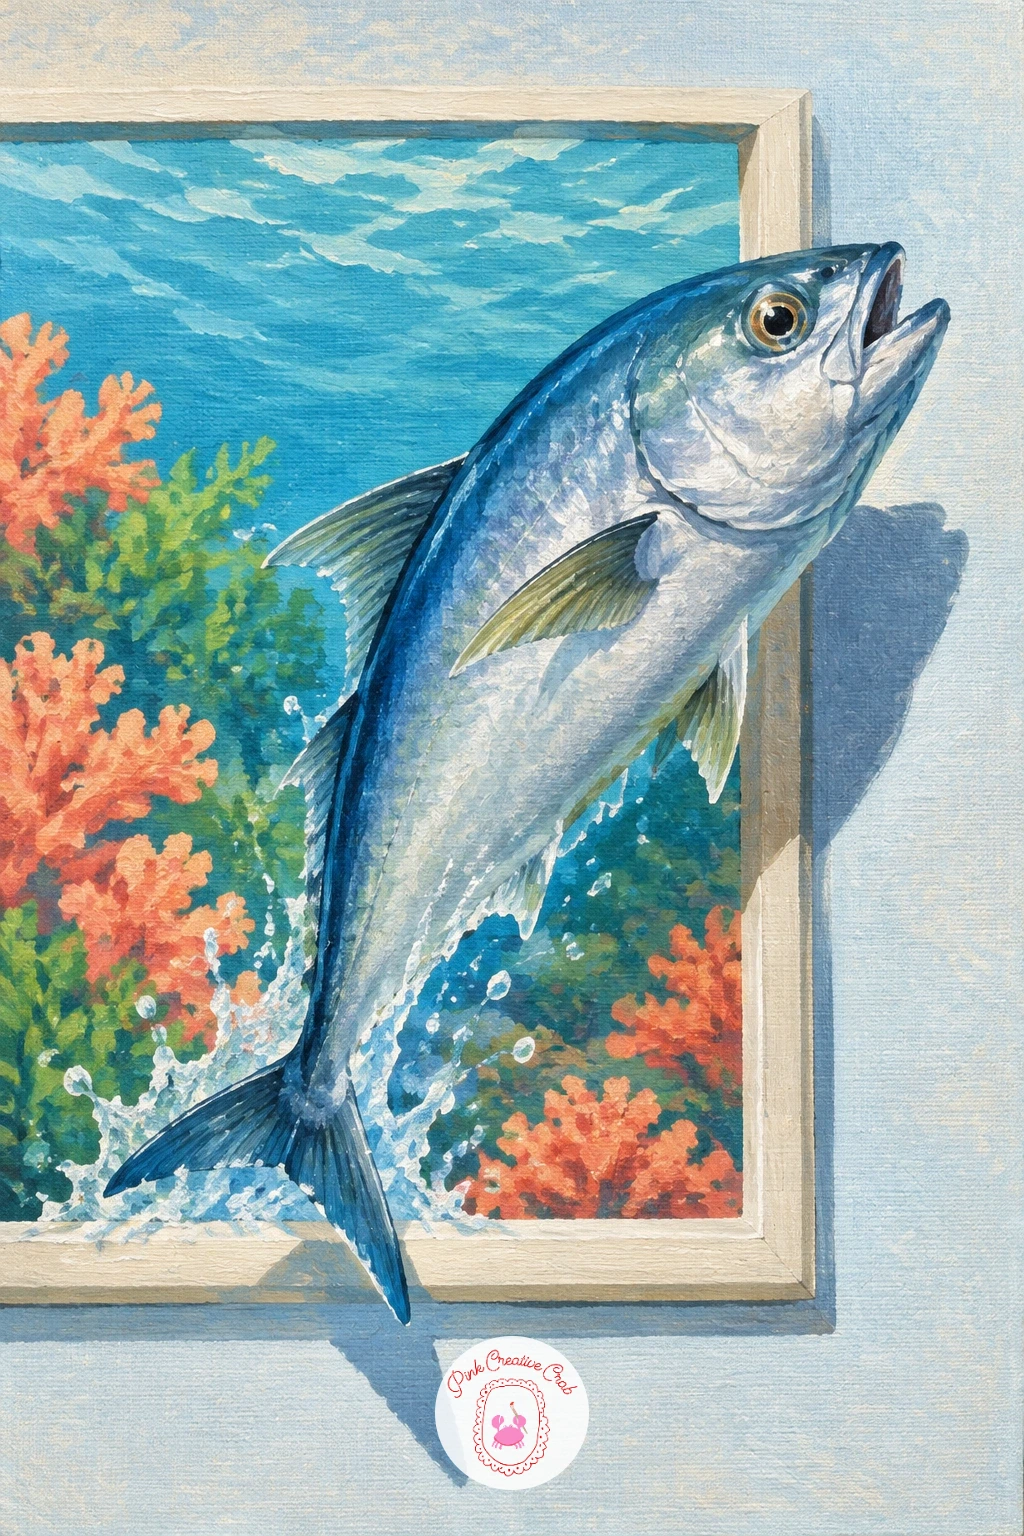
Palette: Sky Blue,Coral,Silver Grey,Titanium White
Move from a leaping fish to something quieter but just as tricky, layered flower petals that seem to lift off the canvas. Pick a simple flower like a rose or peony and paint the background bloom flat first, then let it dry completely before adding the top petals in slightly thicker paint.
Build each lifted petal with a rounded brushstroke, pale coral on top and a deeper shadow tucked underneath where the petal curls away from the canvas. The gap between the lifted petal and the flat painting beneath it only reads as real if that shadow is dark and sits close to the petal edge, not spread out.
The common mistake is making every petal the same size and angle, which flattens the whole effect instantly. Compare petal widths across the flower as you go, letting the outer ones sit larger and looser than the tight center ones.
If thick paint feels intimidating, a palette knife loaded with a little extra acrylic medium gives the same raised edge with less brush control needed. For more flower builds like this, the acrylic painting flowers ideas for beginners guide has gentler versions to practice petal shapes on first.
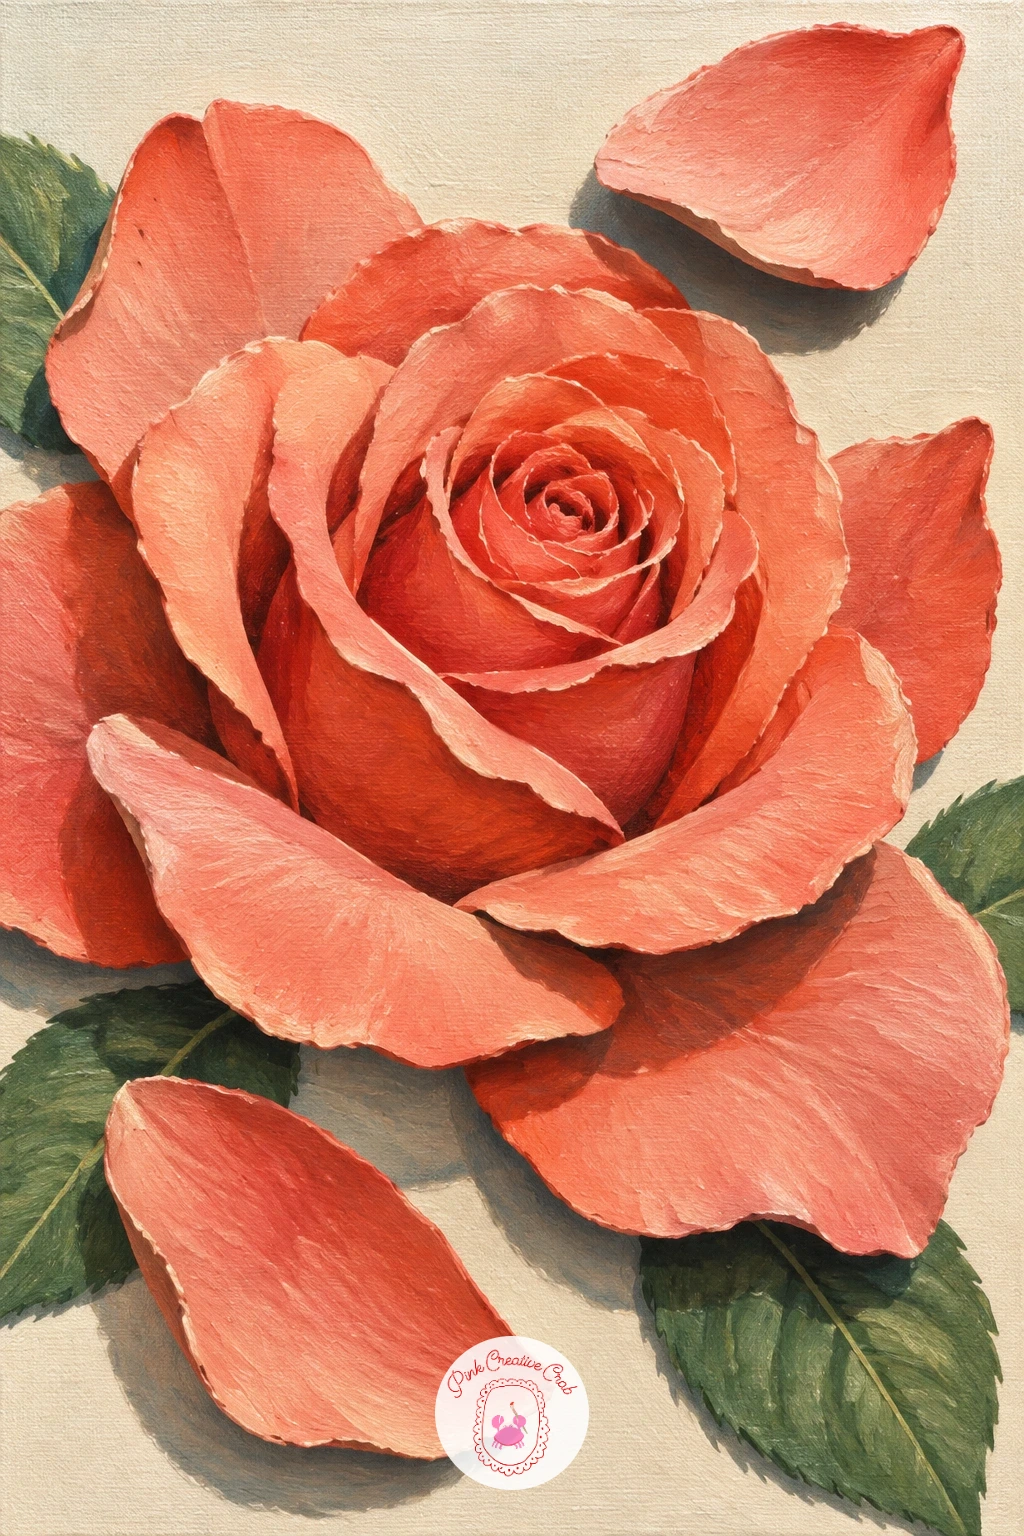
You Will Need
- palette knife
- acrylic gel medium
Palette: Coral,Leaf Green,Cream,Deep Rose
After all that petal work, a cat climbing out of a painted frame gives you a chance to paint something with personality. Sketch the frame as a plain rectangle, then pose the cat with its front paws already over the frame edge and its back half still inside the painted space, mid climb.
Paint the frame and background flat first, then build the cat in layered fur tones, starting with the darkest shadow shapes and adding lighter strokes on top for the fur direction. Keep the front paws, the part crossing the frame, slightly larger and more detailed than the rest of the body, since objects closer to the viewer read as bigger and sharper.
Cast a soft shadow under the paws where they rest on the frame edge, and a second faint shadow on the wall or background below, to push the whole cat forward in space. If the fur feels too fussy, a dry brush dragged lightly over the base coat gives a quick furry texture without painting each strand.
Swap the cat for a kitten if a full grown body feels like too much to tackle in one sitting.
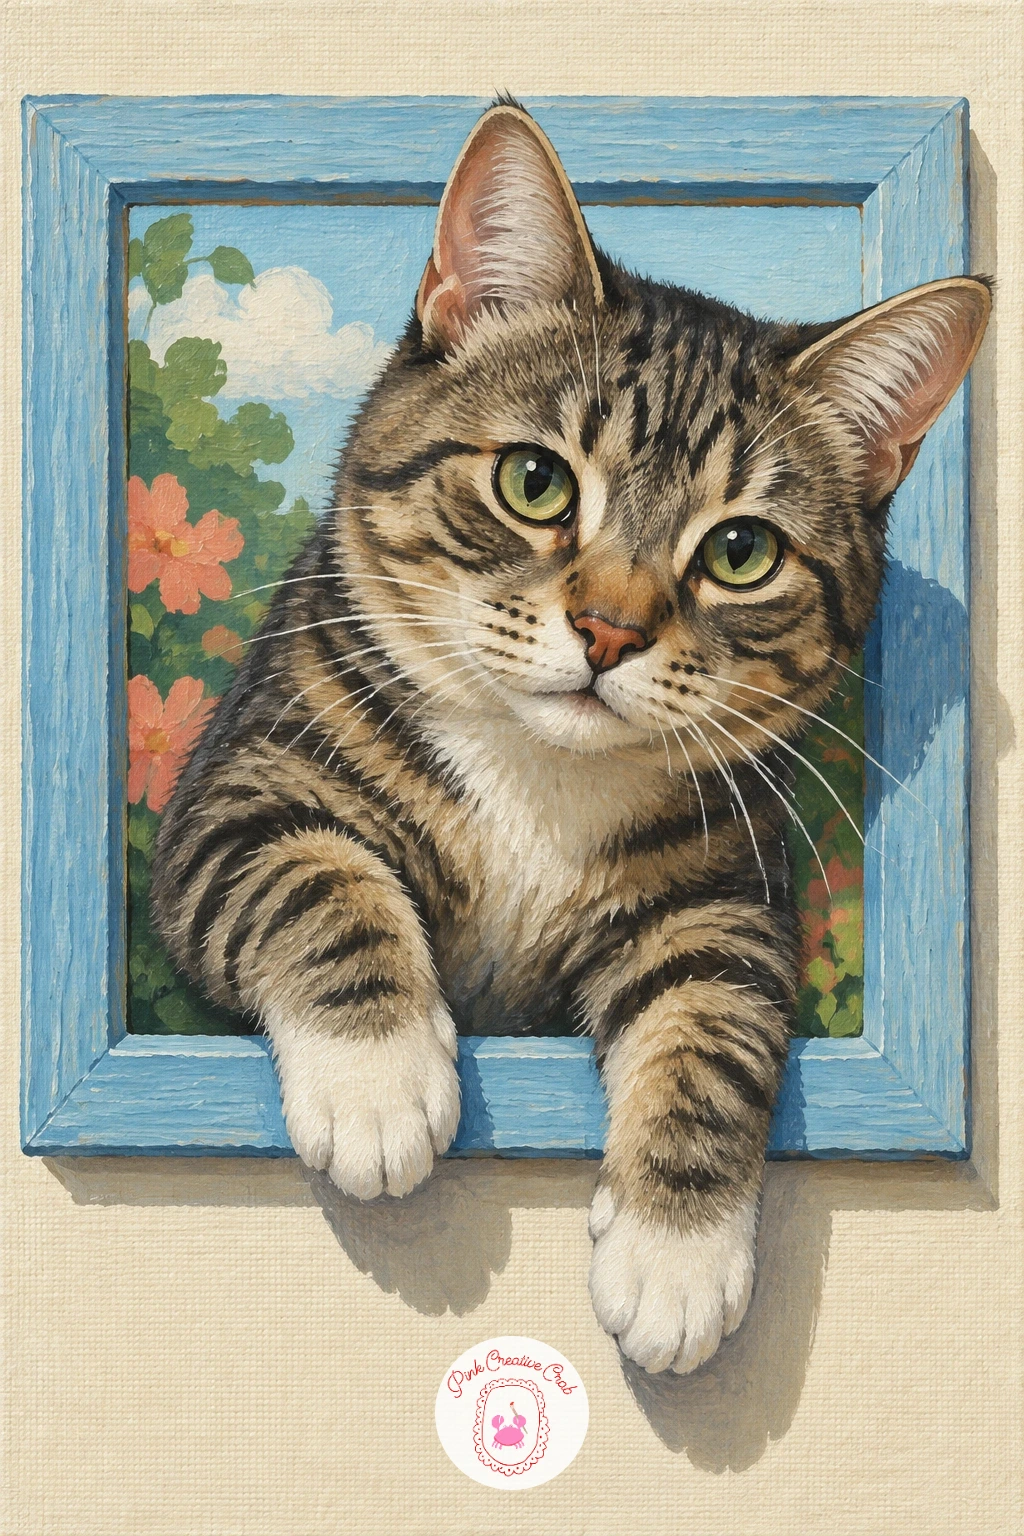
Palette: Burnt Umber,Cream,Titanium White,Payne’s Grey
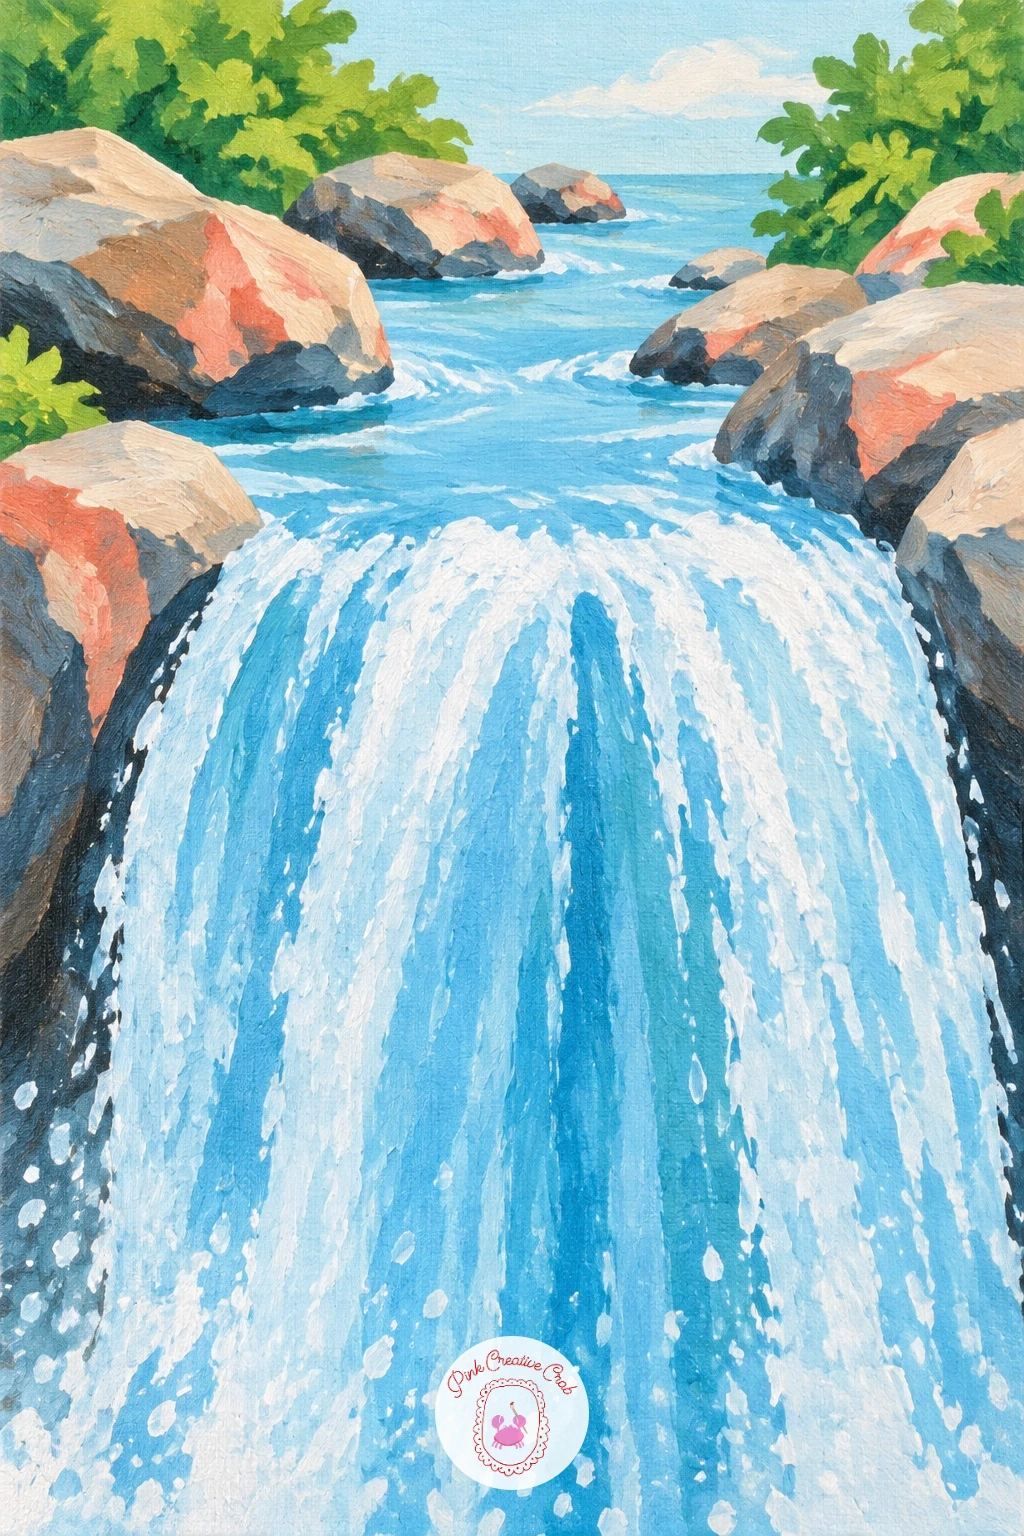
Shift from fur to flowing water with a waterfall spilling over the bottom edge of the canvas, one of the most satisfying illusions once the light is right. Paint the landscape above the frame line first, rocks and greenery in flat leaf green and grey, then bring the water down over a painted lip right at the canvas edge.
Work the falling water in long vertical strokes of white and pale blue, blending while wet so the streaks stay soft rather than striped. The illusion depends on the water seeming to pour past the frame onto nothing, so leave the very bottom strip of canvas as a flat shadow colour with a few white splashes, as if droplets are already falling into the room.
Where eye level sits matters here: if you paint the fall from slightly above, looking down into it, the water reads as plunging rather than just dribbling. A fan brush dragged through wet white paint gives a quick convincing spray if a round brush feels too controlled for the splash.
You Will Need
- fan brush
Palette: Sky Blue,Titanium White,Leaf Green,Payne’s Grey
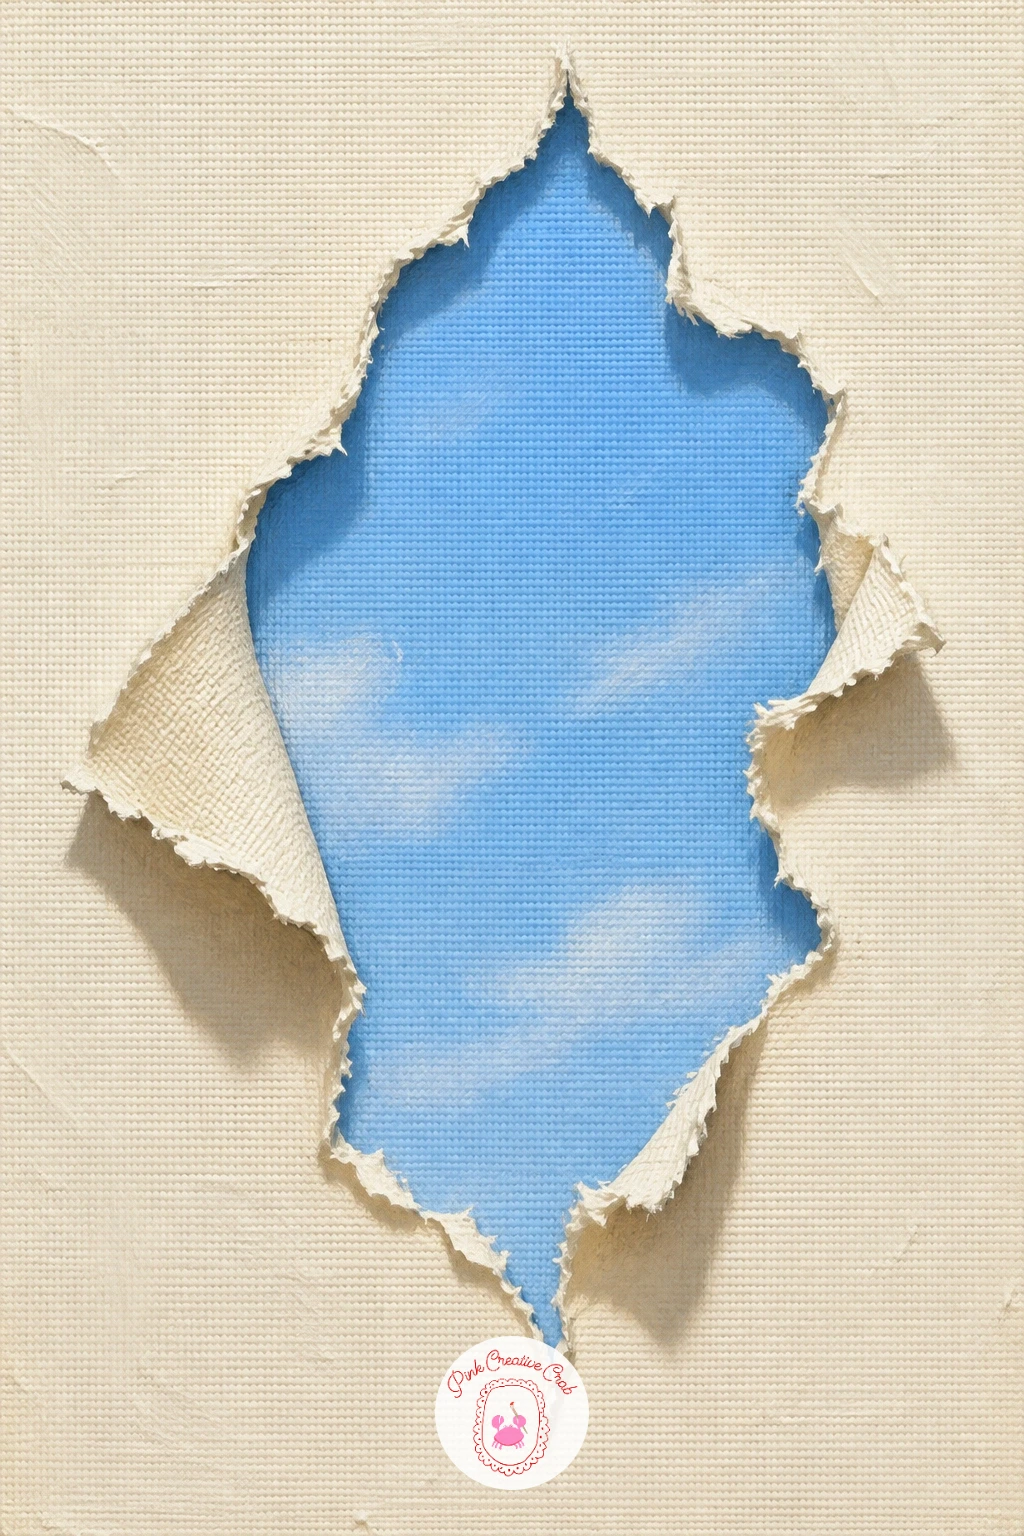
Give the canvas itself a story with a painted tear in the canvas showing blue sky behind, a trick that plays entirely with edges and shadow rather than any figure. Paint the main scene first, a plain wall colour or quiet landscape, then sketch a jagged tear shape somewhere off center, wider at one point and narrowing to a point.
Fill the tear itself with a soft gradient of sky blue and white, as though real sky sits behind the canvas, then paint the torn edges of the surrounding canvas curling slightly inward with highlights on the raised lip and shadow tucked just inside it. That inner shadow line is what convinces the eye there is real depth and not just a painted shape.
The easiest place this breaks down is a tear that looks too smooth and rounded, more like a hole punch than torn fabric. Keep the edge irregular, with two or three small frayed points rather than one clean curve.
A kneaded eraser works well if you sketch this in pencil first and need to lighten a line without smudging the surrounding paint.
You Will Need
- kneaded eraser
Palette: Sky Blue,Titanium White,Payne’s Grey,Cream
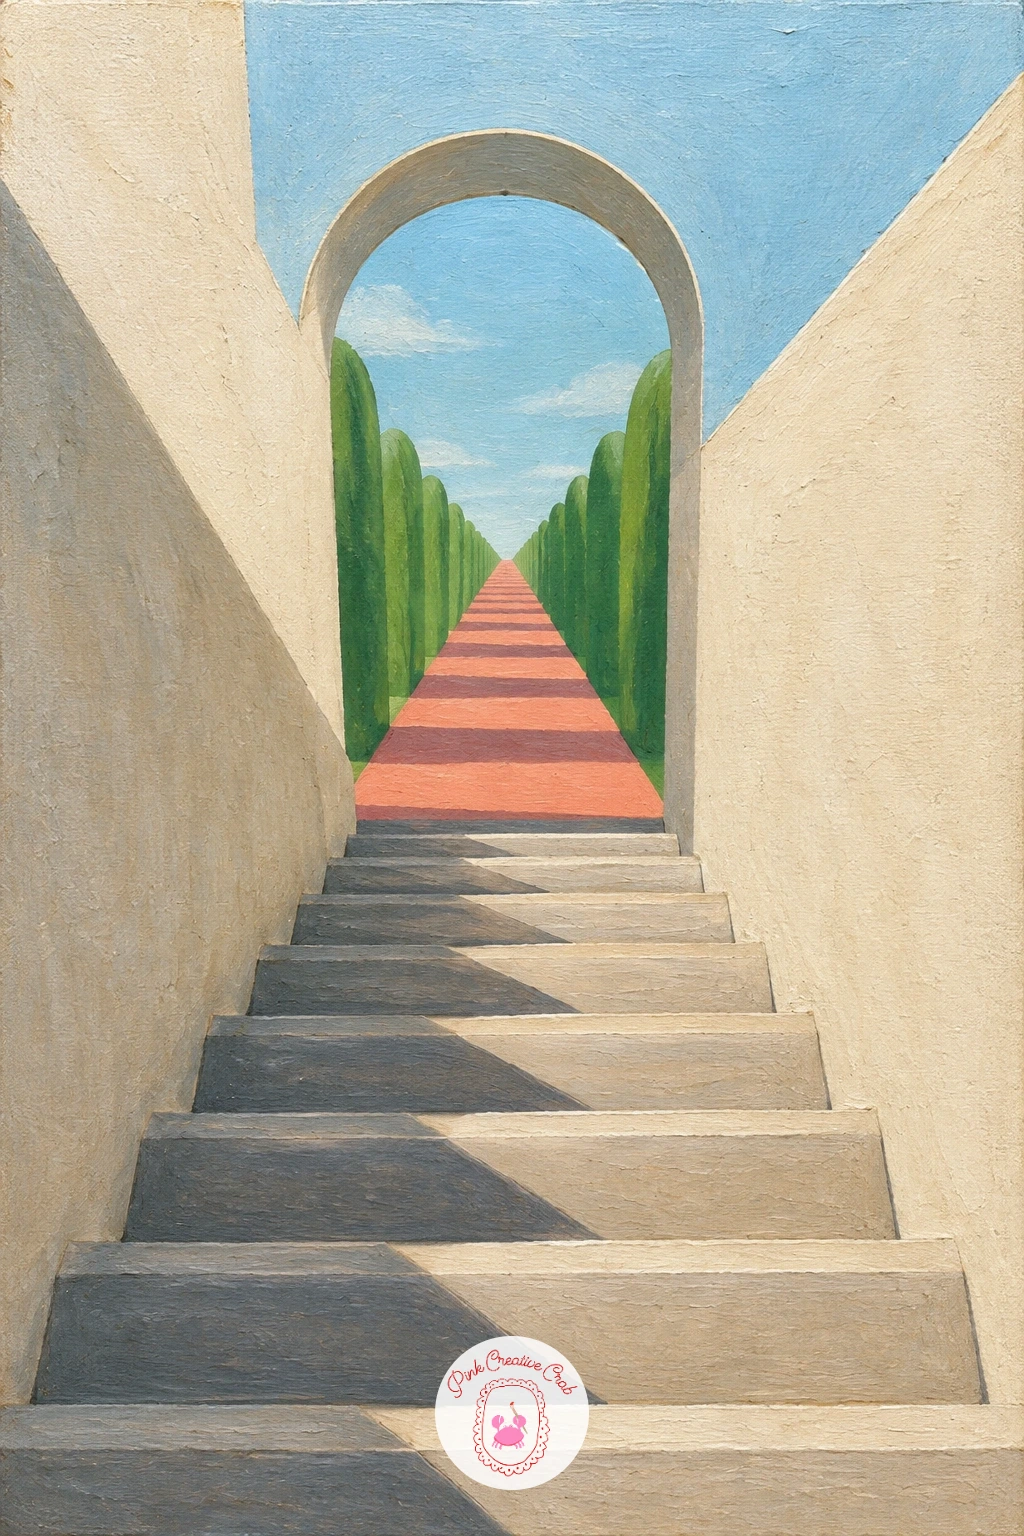
Take the depth trick further with a staircase leading down into the canvas, which relies entirely on where you place the vanishing point. Draw a single vanishing point low on the canvas, then build each stair step as a pair of lines angling toward it, getting smaller and closer together the deeper the stairs go.
Paint the stair treads in alternating light and shadow, cream on the lit surface and grey on the riser beneath, since that contrast is what makes each step read as a separate plane rather than a flat zigzag. Keep the walls on either side converging toward the same vanishing point so the whole tunnel feels consistent.
If the stairs look like they are sliding sideways instead of descending, check that every step line truly points back to that one vanishing point, nothing drifting off at its own angle. A ruler is worth using here even if the rest of the painting is freehand, since one crooked step throws off the whole illusion.
You Will Need
- ruler
Palette: Cream,Payne’s Grey,Burnt Umber,Titanium White
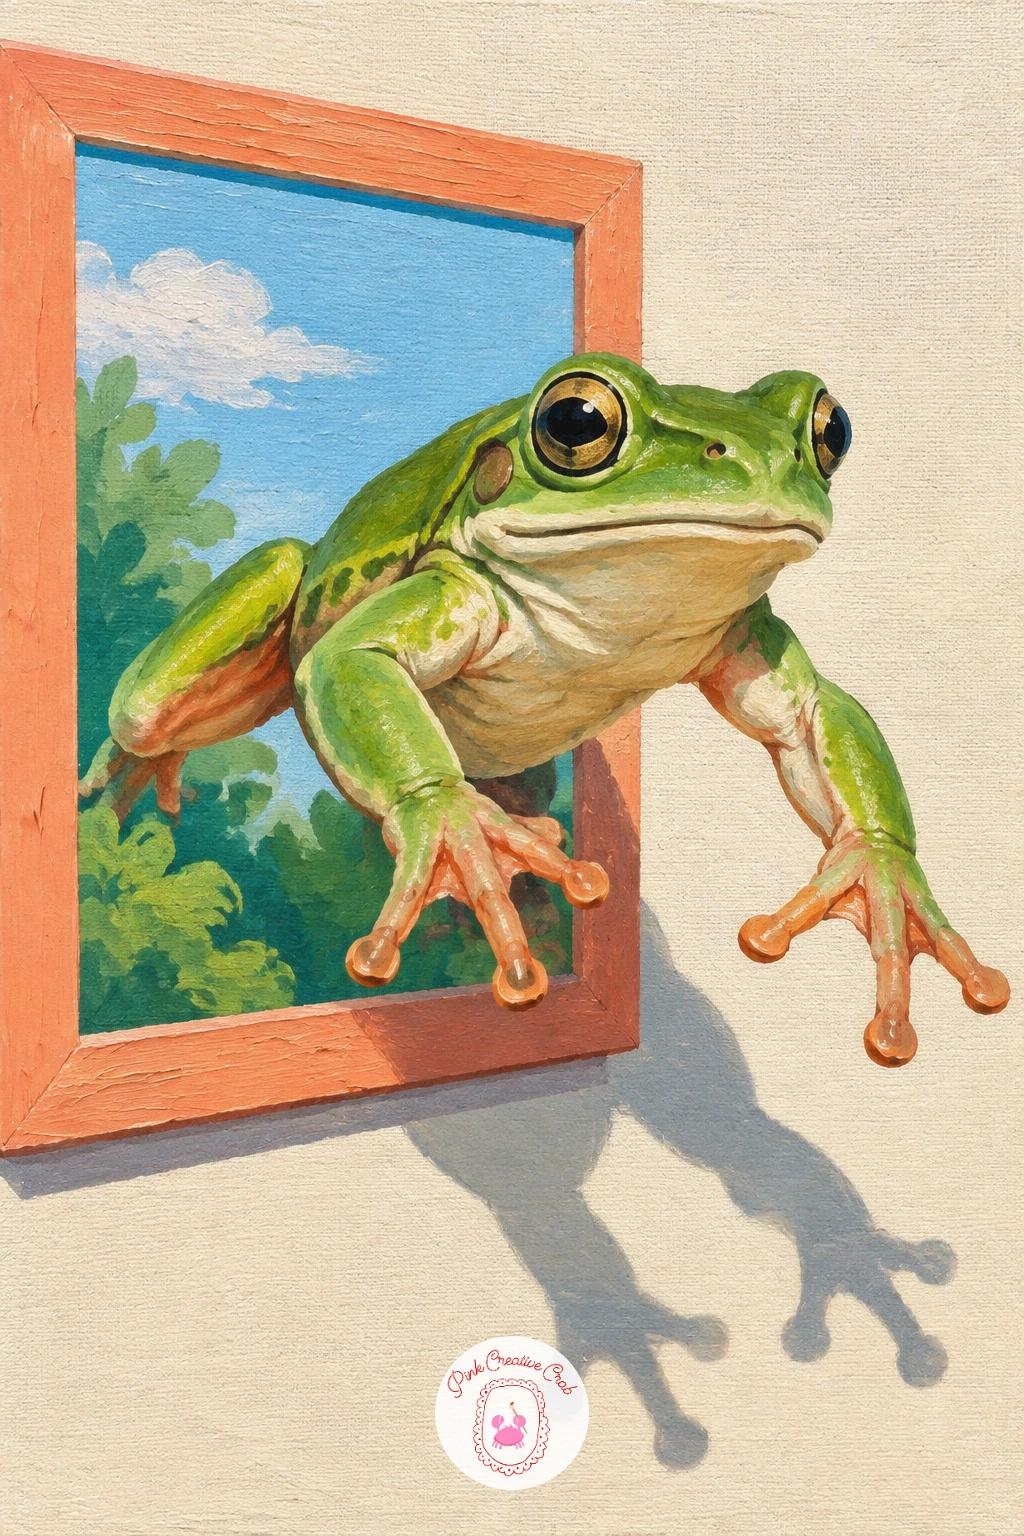
Lighten the mood after all that perspective work with a frog jumping out of the frame, a quick and cheerful subject with a simple body shape. Sketch the frame edge first, then pose the frog mid leap with its back legs still tucked behind the frame line and its front half already clear of it, arms stretched forward.
Block in the body with flat leaf green, then shade the rounded back and legs with a darker green mixed in while the paint is still workable, so the transitions stay soft. Paint a crisp cast shadow beneath the front legs on the surface in front of the frame, since that grounding shadow is what makes the jump convincing rather than just a frog glued near an edge.
This is a good one for the ten minute version: a simple green silhouette with one shadow shape already reads as a frog leaping out. Given forty minutes, add the mottled skin texture with a dry brush and a few white highlight dots on the eyes and back.
Palette: Leaf Green,Cream,Payne’s Grey,Titanium White
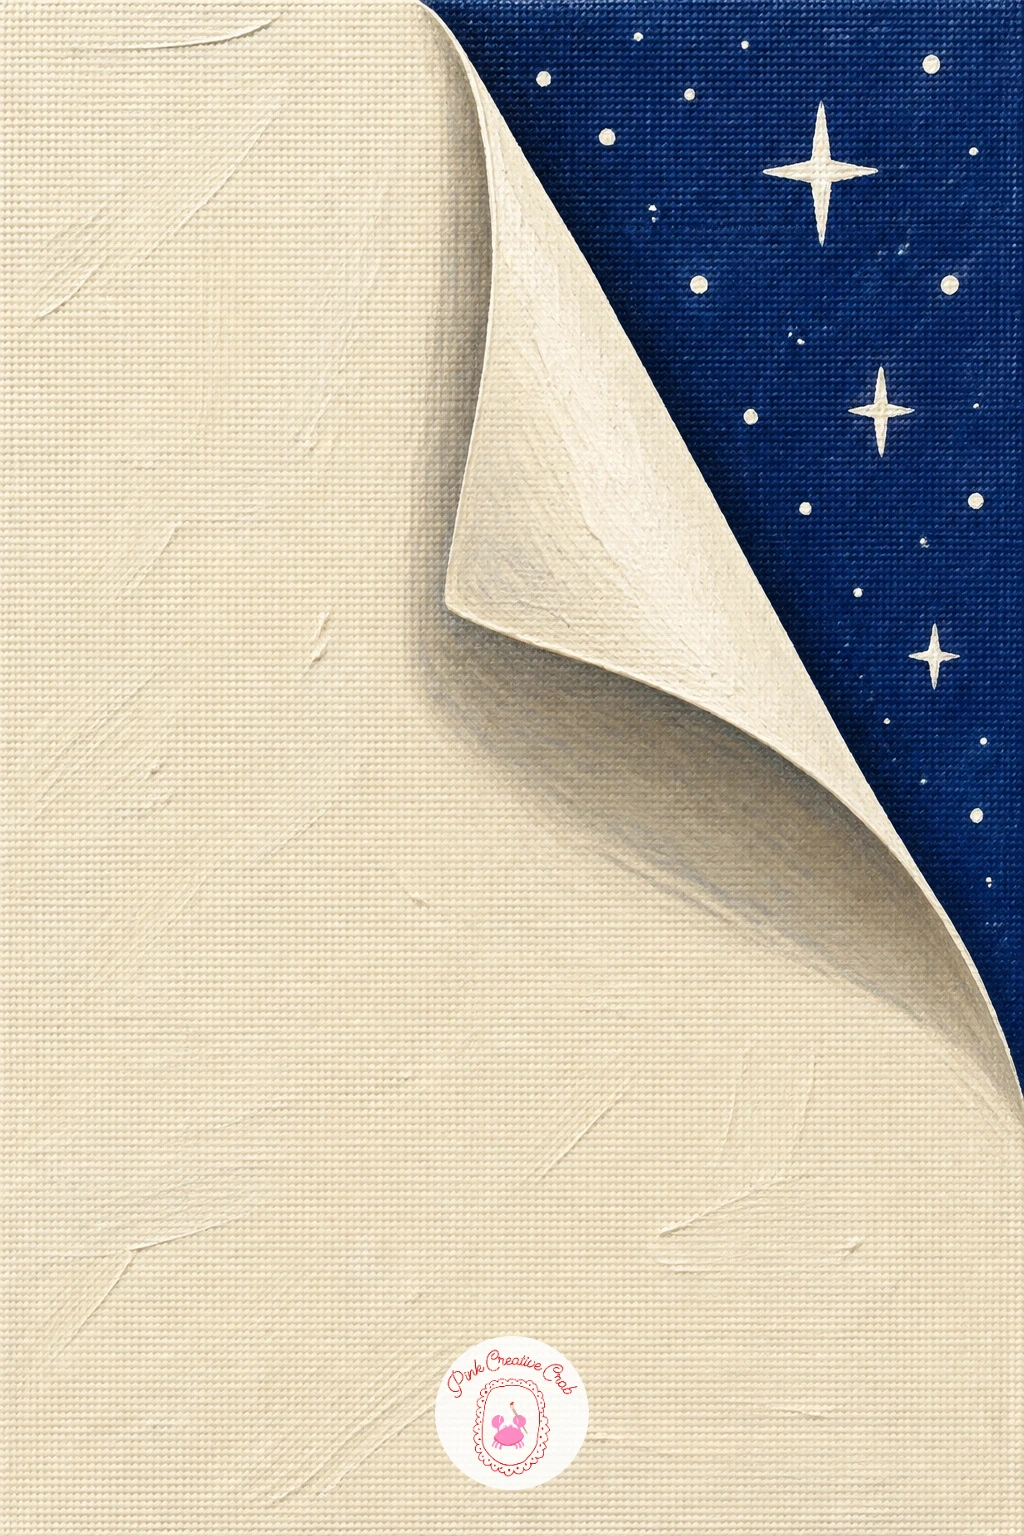
Bring back the torn canvas idea with a twist, a peeling corner of canvas revealing stars underneath, which works best in one corner rather than the middle. Paint the main scene first, something plain and pale, then sketch a curling triangle shape at one corner where the canvas appears to lift away.
Fill the revealed area underneath with a deep navy sky scattered with small white dots and a few slightly larger stars, then paint the curling flap itself with a highlight along the raised edge and a soft shadow where it folds back onto the painting. That shadow should hug close to the fold line, not spread wide, or the flap will look flat instead of lifted.
Where this idea usually disappoints is a flap that looks pasted on rather than peeled. Keep the curl gentle and slightly uneven, like real canvas fibers fraying, instead of one perfectly smooth curve.
A white gel pen is the fastest way to scatter the small stars once the navy background is dry.
You Will Need
- white gel pen
Palette: Navy,Titanium White,Cream,Payne’s Grey
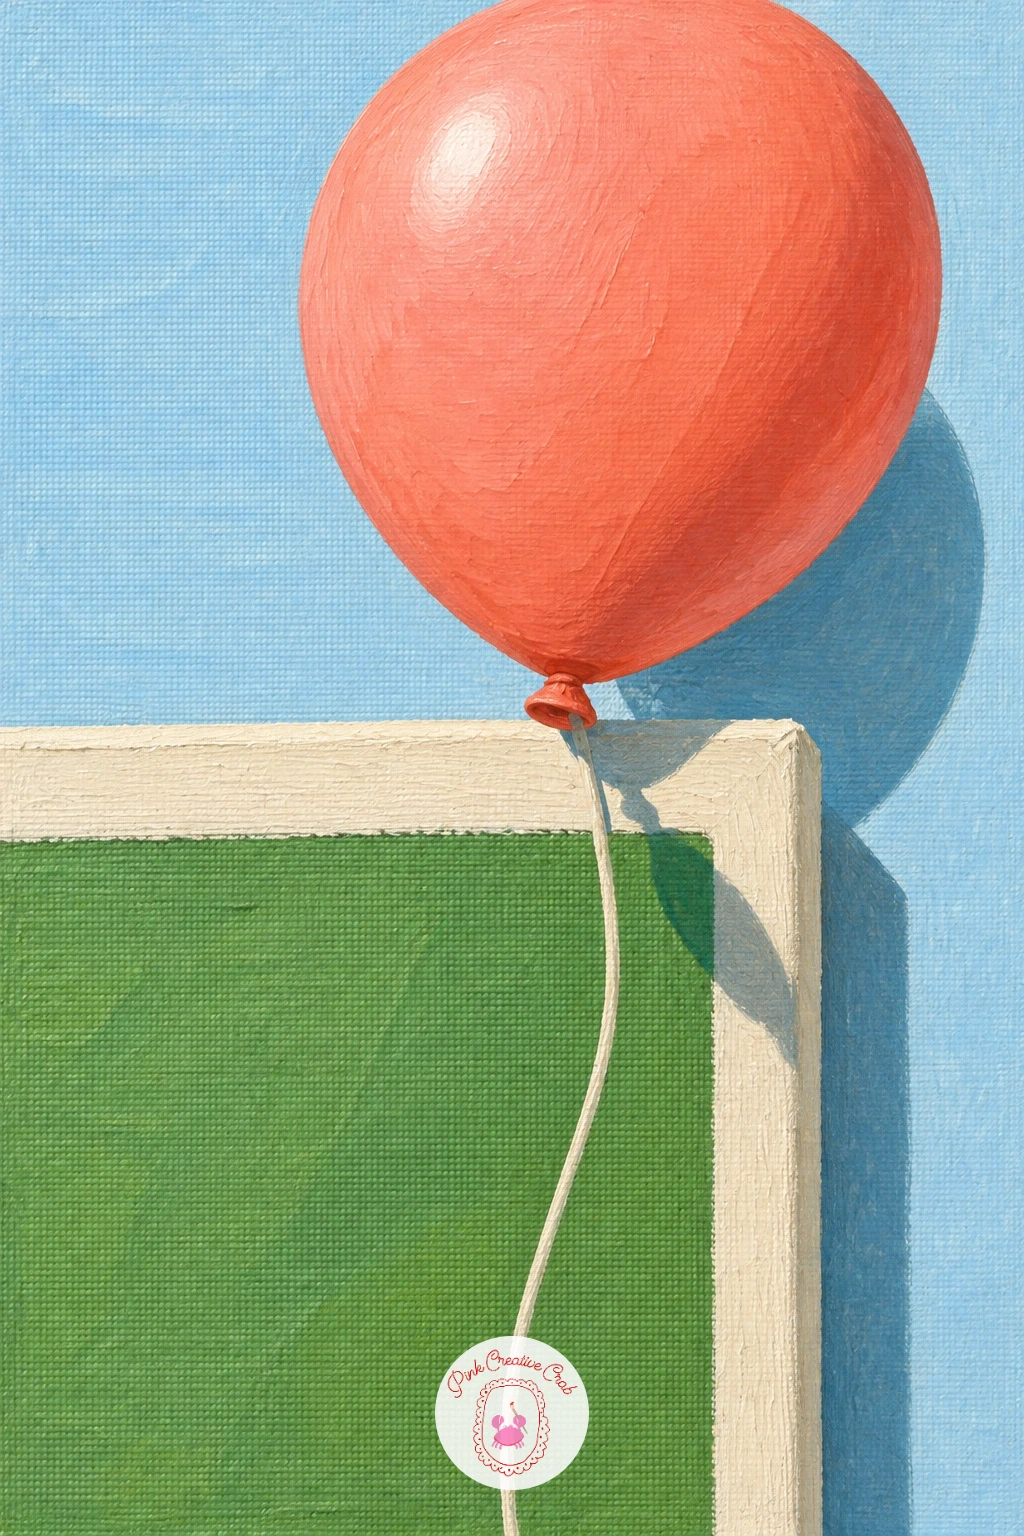
Lift the mood again with a balloon floating up and over the top edge, a simple round shape that teaches a lot about light direction in one go. Paint the frame and background first, then place the balloon so its top half crosses above the frame line, the string trailing down inside the painted space.
Decide where your light source sits before you shade the balloon, since a single consistent highlight is what makes a sphere look truly round rather than flat. Paint the main coral colour first, then add a tight white highlight on the side nearest your chosen light and a deeper shadow curve on the opposite side, blending softly between the two.
Cast a small soft shadow on the frame edge just below where the balloon crosses it, anchoring the floating shape in space. If a perfectly round balloon feels tricky freehand, trace a small plate or jar lid for the outline before you paint.
You Will Need
- small plate or jar lid to trace
Palette: Coral,Titanium White,Sky Blue,Cream
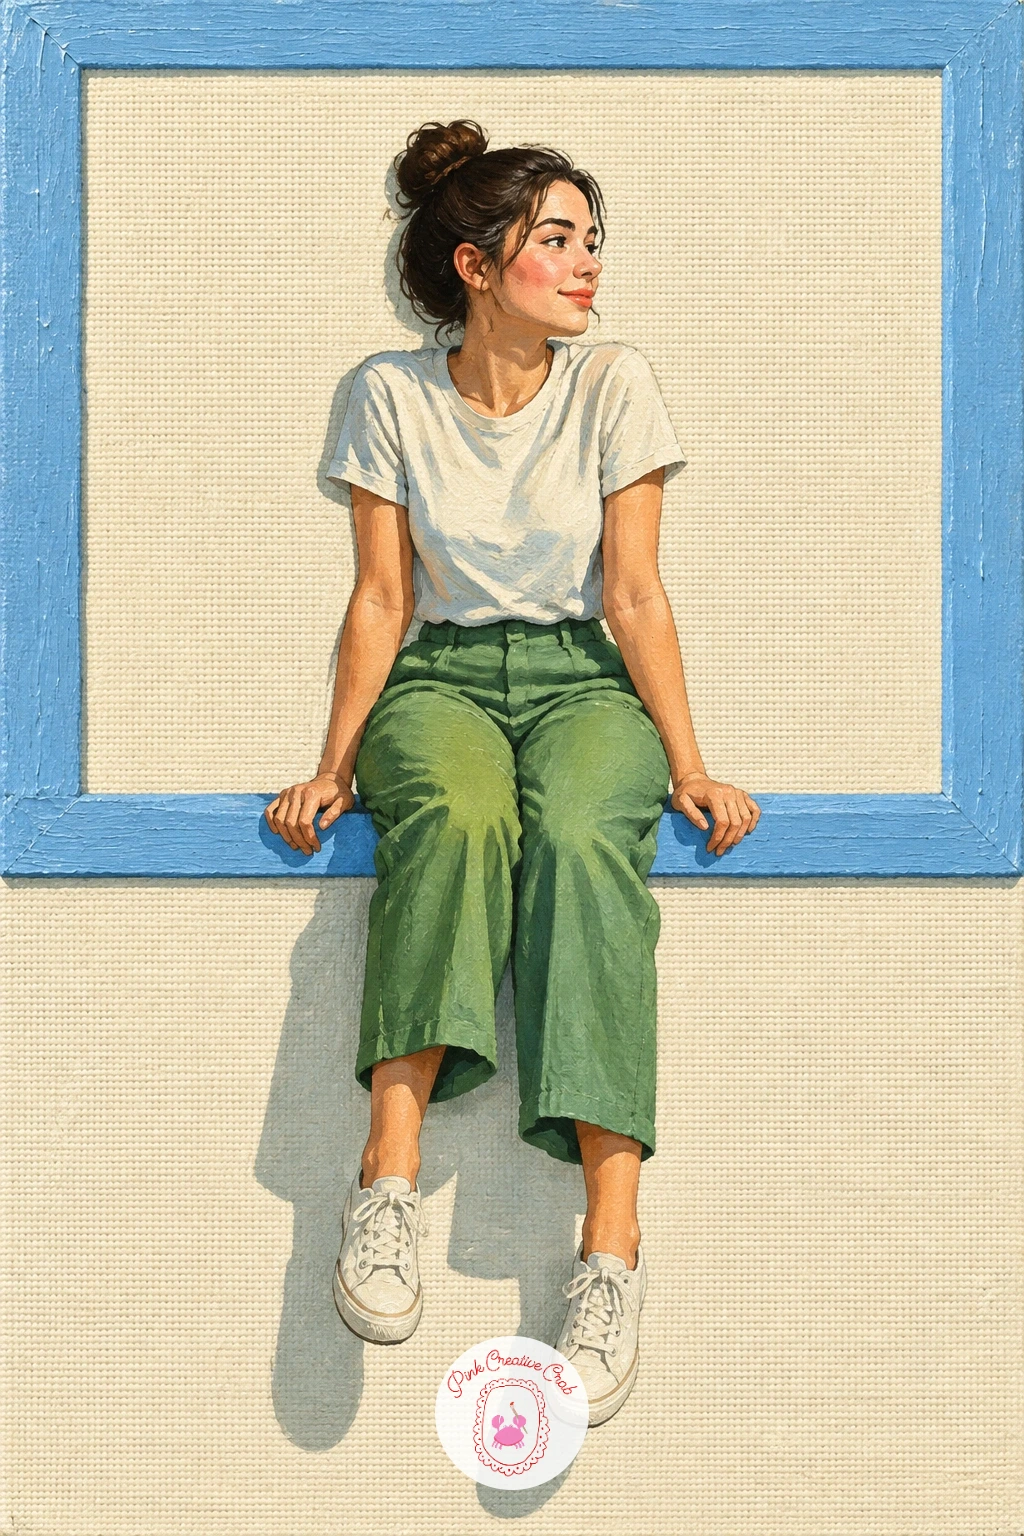
Give the illusion a human moment with a girl sitting on the bottom edge of the frame dangling her legs, which needs careful proportion more than anything else. Sketch the frame line first, then pose the figure sitting right on top of it, legs hanging down in front of the painted border toward the viewer.
Compare the length of her legs to her torso before committing to paint, since figures drawn from imagination often end up with legs too short to feel believable dangling in open space. Paint the background and frame flat, then build the figure in simple blocks of colour, keeping the clothing a solid coral or cream so the eye focuses on the pose rather than pattern.
Shadow does the heavy lifting again here: paint a soft cast shadow on the frame surface directly behind her legs, and a second faint shadow on the wall below if her feet hang past the frame entirely. If a full figure feels ambitious, simplify her to a loose silhouette with just enough shading on the legs to read as rounded.
Palette: Coral,Cream,Burnt Umber,Payne’s Grey
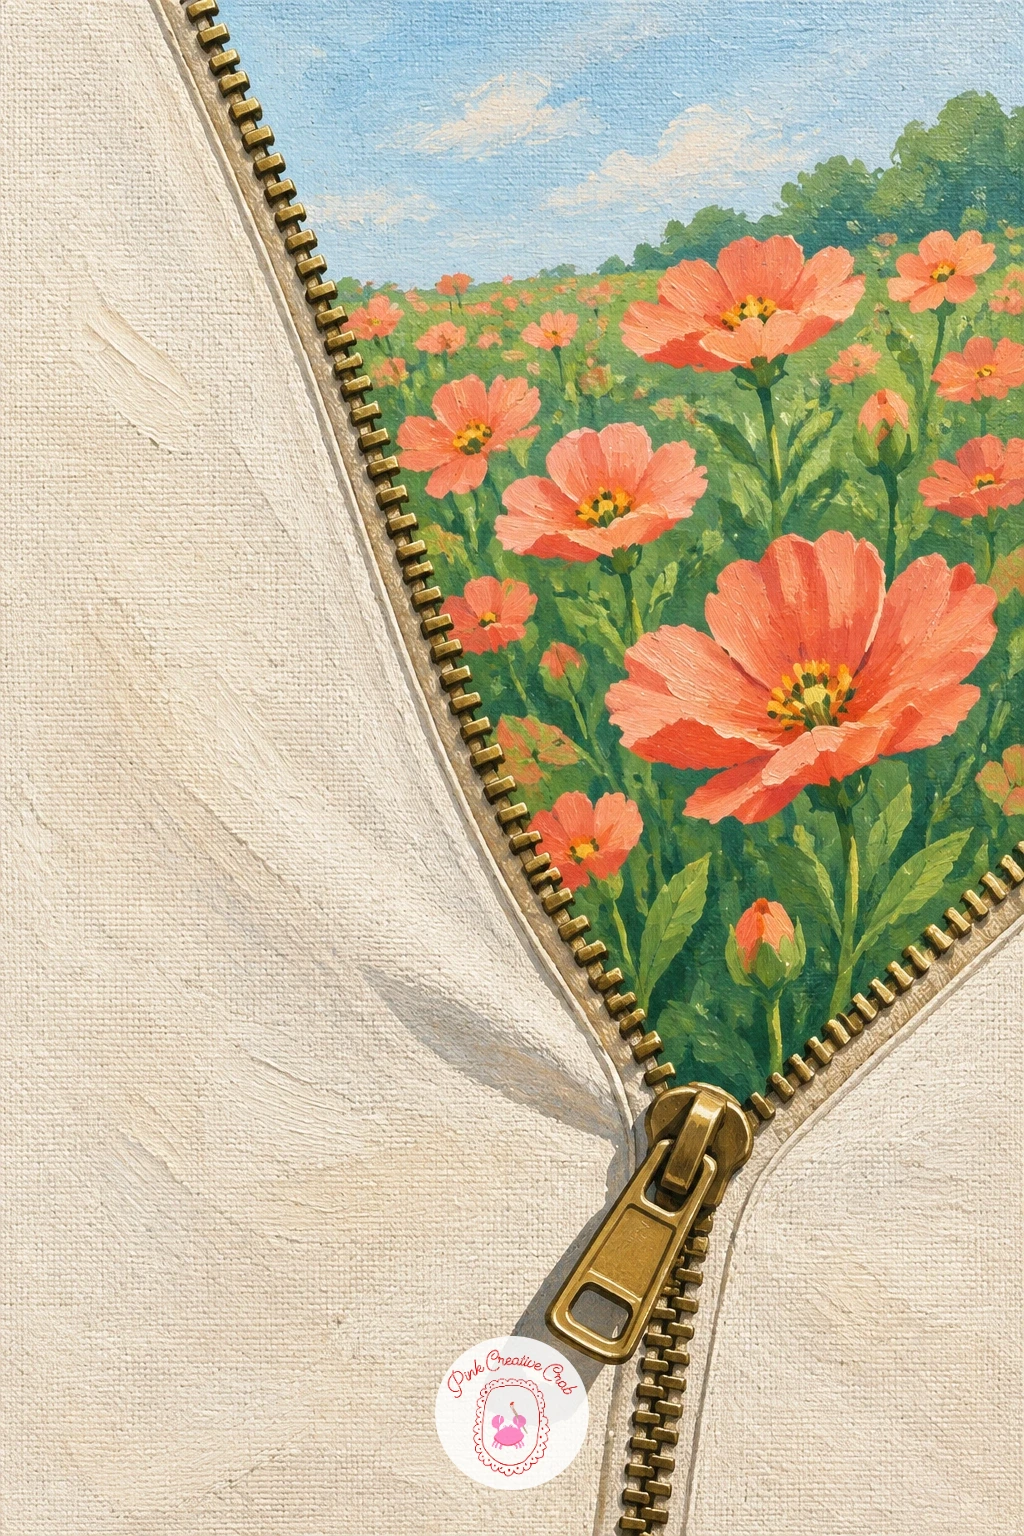
Have some fun with a zipper opening the canvas onto a field of flowers, a playful illusion built from two very different textures side by side. Paint one side of the canvas as a plain fabric colour, cream or soft grey, and the other side as a bright field of small flowers in coral and leaf green, with the zipper line running diagonally or vertically between them.
Paint the zipper teeth as small evenly spaced metallic shapes with a thin highlight down the center, then pull a few teeth open near the middle so the flower field appears to spill slightly past the fabric edge there. That small overlap, a petal or leaf just crossing the zipper line, is what sells the whole trick.
Keep the zipper teeth consistent in size as you go, since uneven spacing is the fastest way to flatten this illusion. A ruler or a strip of tape laid down as a guide keeps the teeth running in a straight line even if your hand is not perfectly steady.
You Will Need
- ruler or masking tape for a straight guide
Palette: Cream,Leaf Green,Coral,Silver Grey
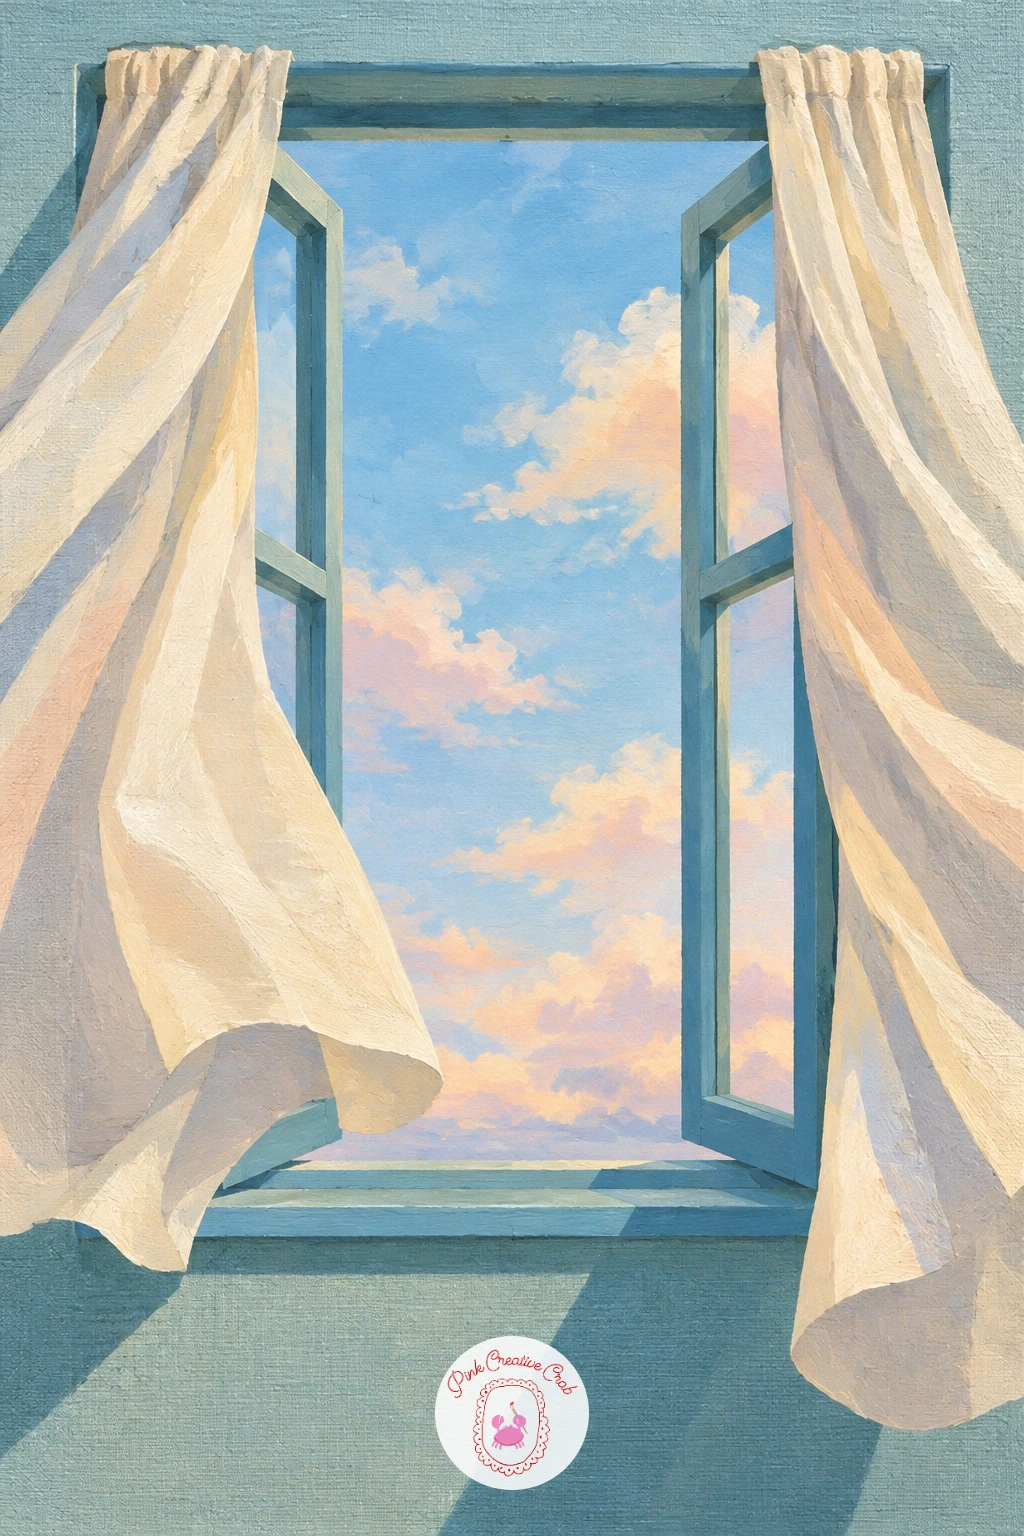
Move from fabric to glass with a window opening out of the canvas with curtains blowing outward, a classic trompe l’oeil subject that rewards careful edges. Paint the window frame first as a simple rectangle with a slight 3d lip, shading one side of the frame darker to suggest it standing proud of the flat wall around it.
Paint the sky or view inside the window flat and pale, then bring the curtains forward on either side, letting the fabric billow outward past the frame edge on one side as though a breeze is pushing it into the room. Shade the folds of the curtain with long soft strokes, keeping the fold shadows consistent with light coming from inside the window.
If the curtain looks stiff rather than blowing, loosen your brushstrokes along its outer edge and avoid a hard outline there, letting the fabric edge stay slightly soft and uneven instead. A damp flat brush dragged gently along a wet curtain edge helps soften it if it dries too crisp.
Palette: Sky Blue,Cream,Titanium White,Payne’s Grey
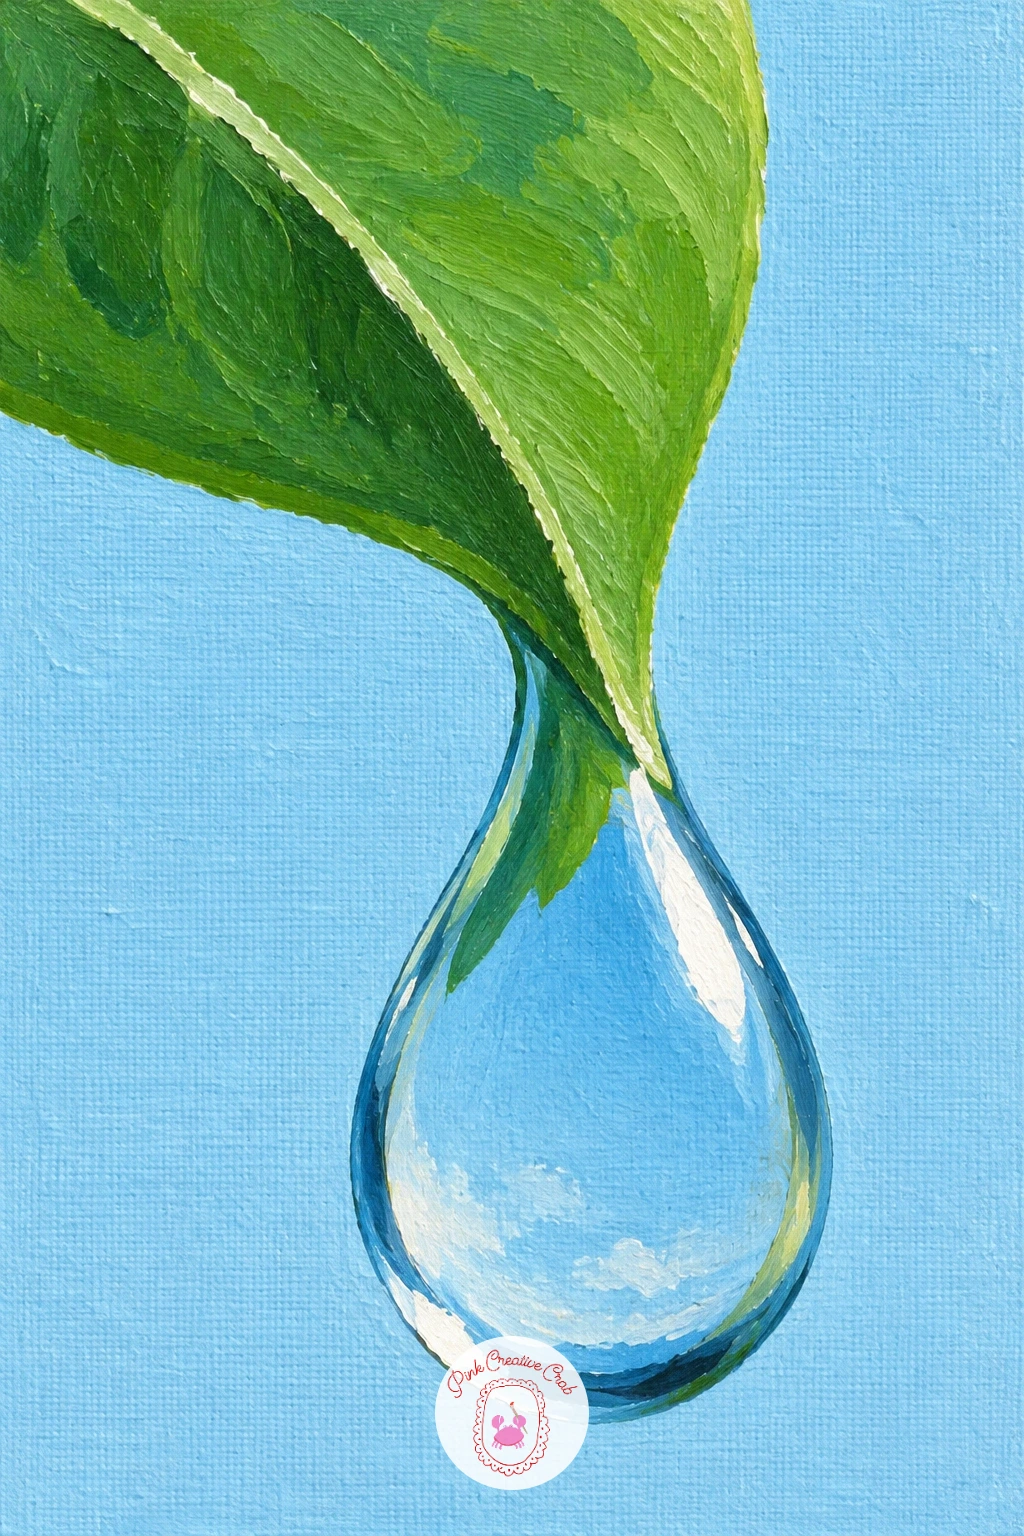
Slow down for a giant drop of water about to roll off the canvas, a small subject that teaches reflection and highlight in one focused study. Paint the background flat first, then build the drop as a simple rounded teardrop shape sitting right at the canvas edge, bulging slightly over it.
Shade the drop with a dark curve along its lower edge and a bright, tight white highlight near the top, since water reads as water mainly through that sharp little highlight rather than through colour. Paint a faint reflection of the background colour inside the drop too, a soft echo of whatever sits behind it, to suggest the surface is truly reflecting light.
The most common mistake is painting the drop as a flat circle with no weight. Let the bottom edge bulge slightly past the frame line with a thin shadow directly beneath it, as though it is genuinely heavy and about to fall.
Lifting a little wet paint with a dry brush right after you place the highlight keeps that bright spot soft rather than harsh.
Palette: Sky Blue,Titanium White,Payne’s Grey,Cream
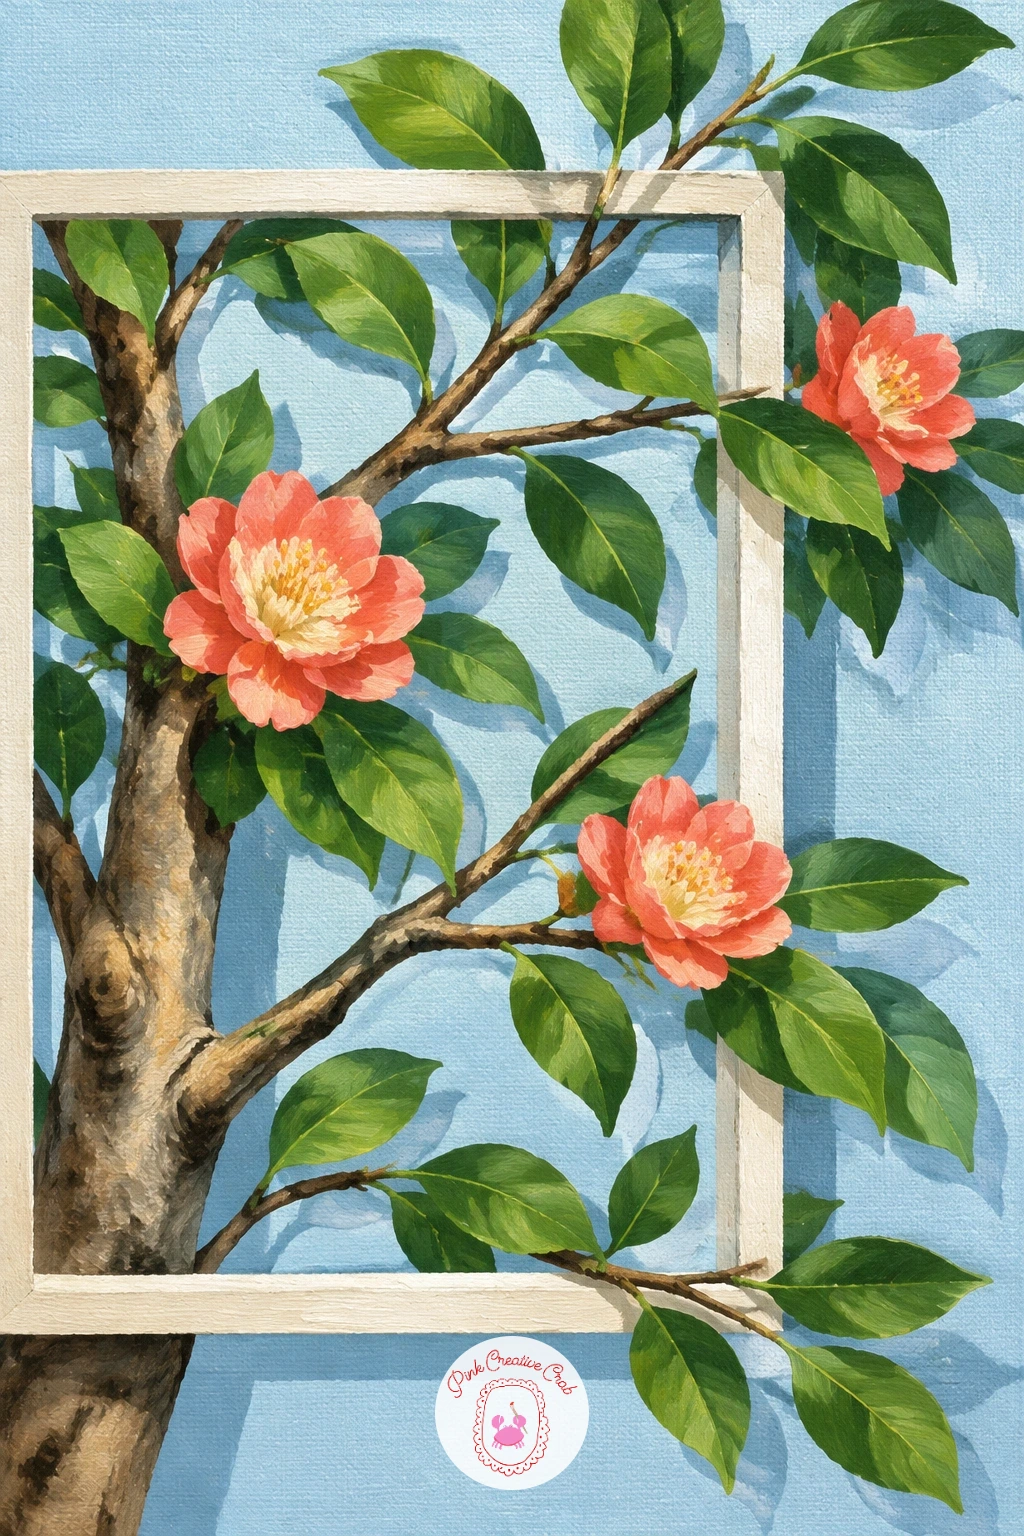
Return to landscape with a tree whose branches grow beyond the frame, an idea that stretches the painted scene literally past its own border. Paint the trunk and main canopy well within the frame first, then let two or three slim branches extend right to the canvas edge and appear to continue past it, their very tips painted slightly outside the main picture plane with a cast shadow on the frame edge beneath them.
Build the canopy in layered leaf green, darker underneath and lighter where sunlight hits the top, then thin your brush strokes as each branch nears the edge so it tapers naturally rather than stopping abruptly. A shadow cast onto the frame border just under the extending branch is what convinces the eye it has truly grown past the painted boundary.
If the branch looks stuck on rather than grown, check that it follows the same curve and thickness logic as the branches still inside the frame, nothing sudden. For more ways to build a tree canopy with depth, the acrylic painting scenery advanced techniques guide covers layered foliage in more detail.
Palette: Leaf Green,Burnt Umber,Sky Blue,Cream
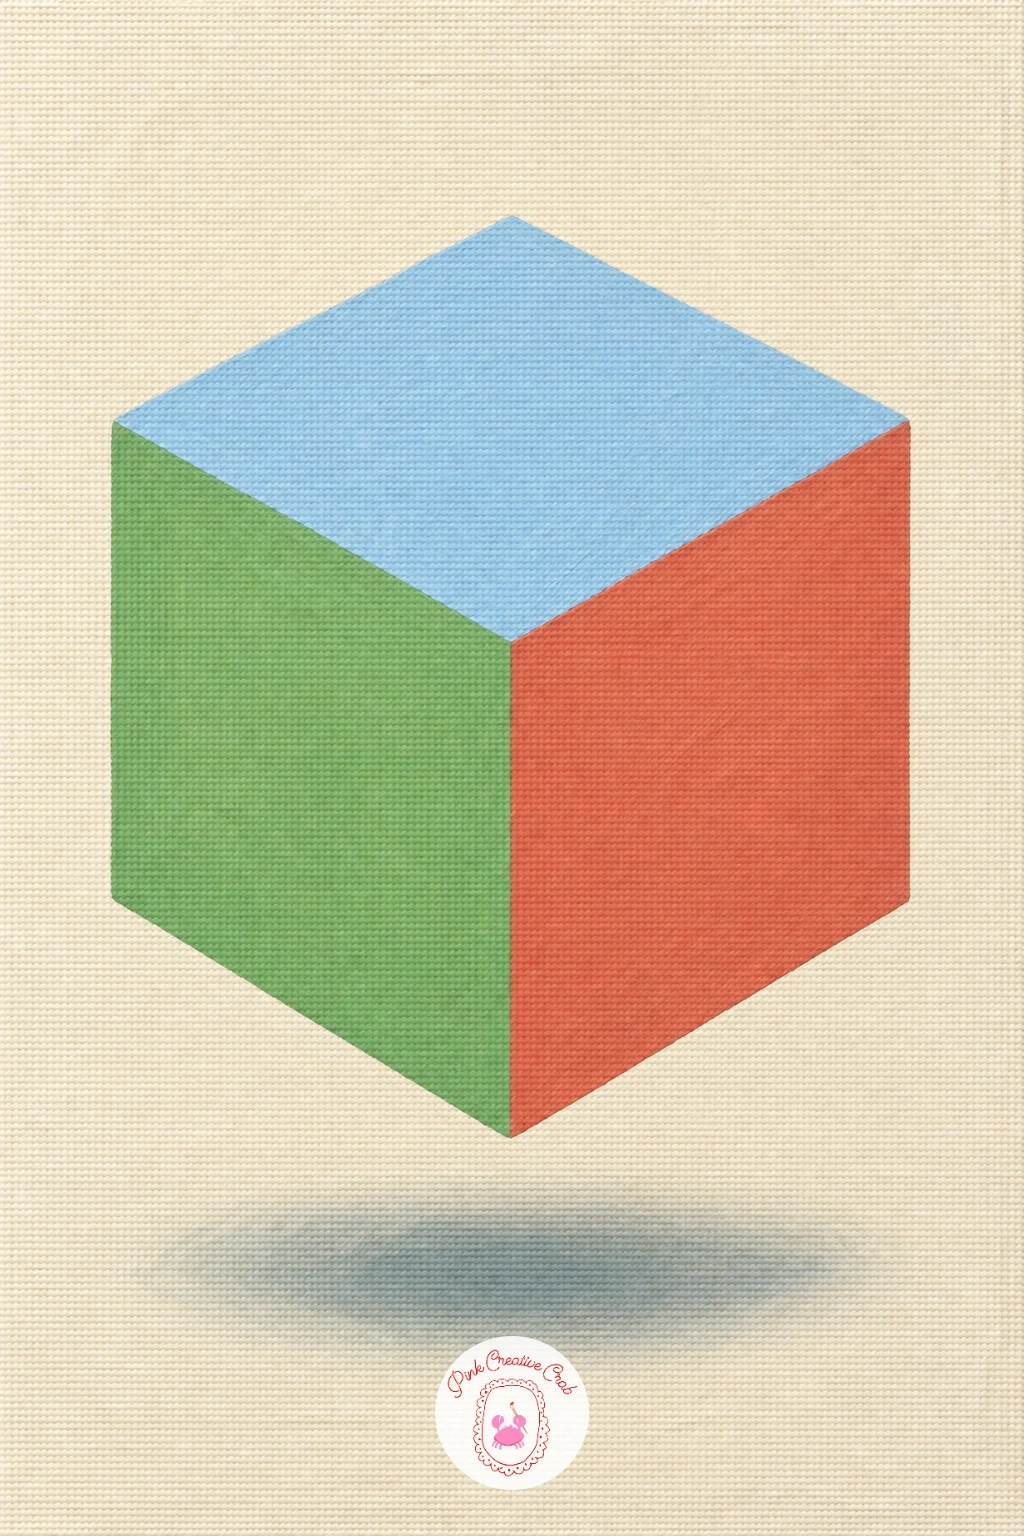
Give yourself a break from organic shapes with an illusion cube floating in space, a geometric subject built almost entirely on consistent perspective lines. Draw the front face of the cube as a simple square, then angle the back face slightly smaller and offset, connecting the corners with straight lines that all recede toward roughly the same imagined point.
Paint each visible face a different flat tone of the same colour family, lightest on the top facing the light, mid tone on the front, and darkest on the side in shadow, since that shift alone is what turns a flat drawing into a solid looking cube. Let the cube float clear of any ground line, with a soft shadow painted on the pale background beneath it to fix its height in space.
Once this basic cube works, vary it next time by stacking two or three cubes at different sizes, or tilting the whole shape onto one corner instead of sitting square to the frame. A ruler keeps every edge straight, which matters more here than in almost any other idea on this list.
You Will Need
- ruler
Palette: Sky Blue,Payne’s Grey,Titanium White,Cream
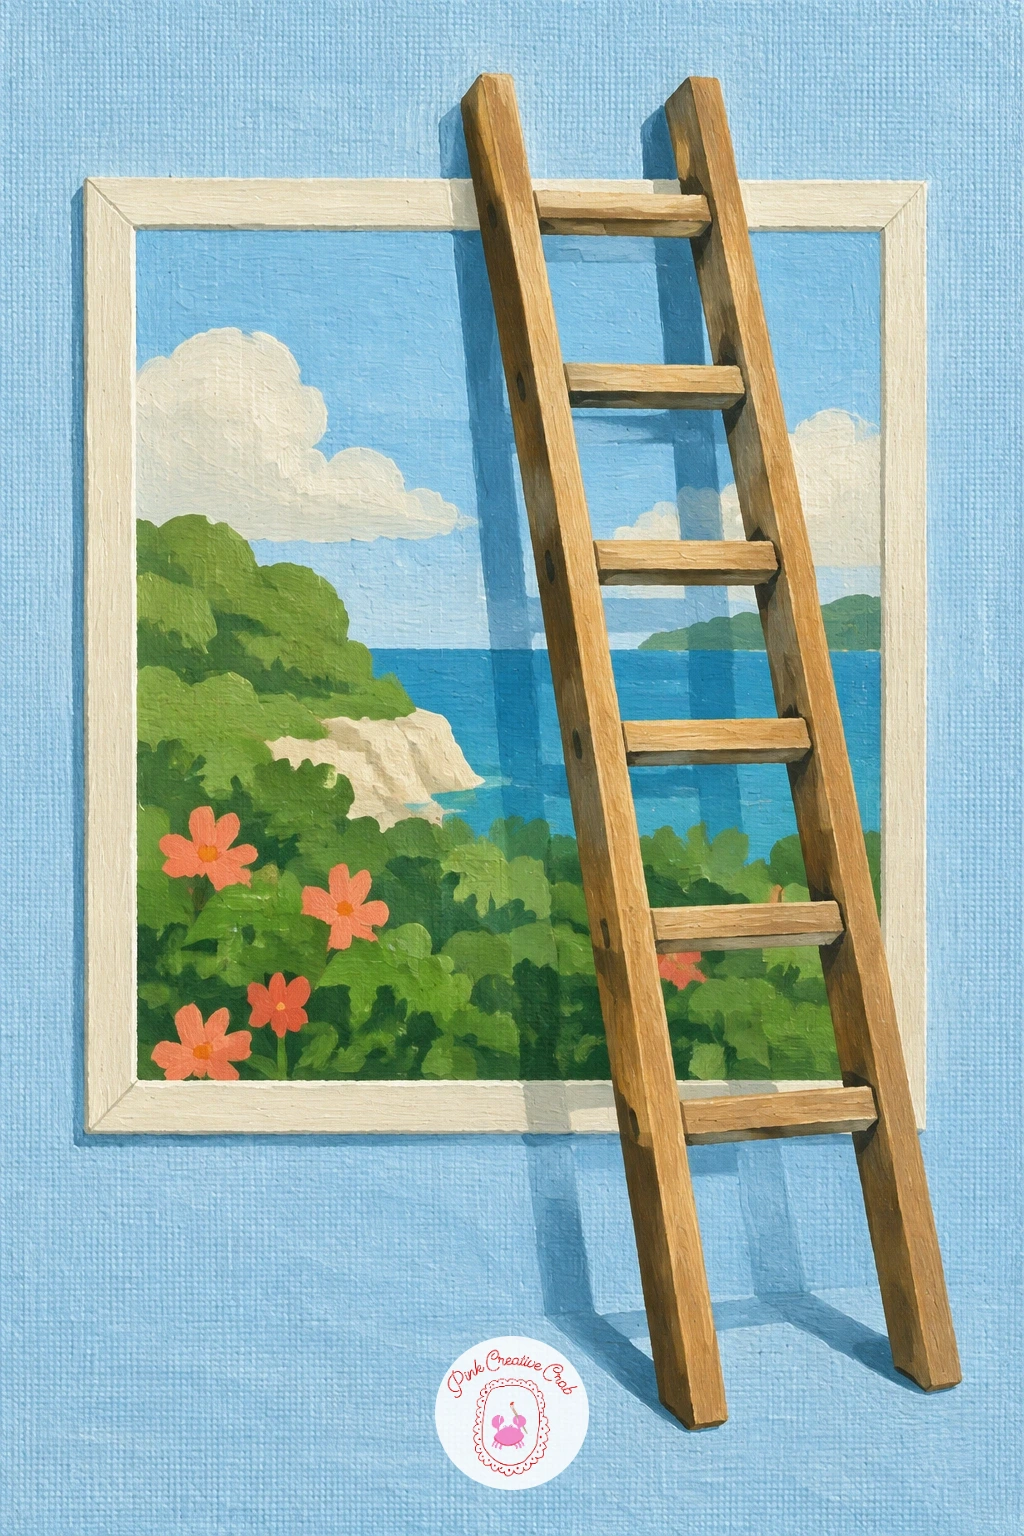
Pair that geometric cube practice with a ladder leaning out from inside the painting, another subject that depends entirely on straight converging lines. Paint the scene inside the frame first, then draw the ladder rising from somewhere inside that space and leaning forward so its top end crosses the frame edge, closer to the viewer than its base.
Keep the rungs evenly spaced near the base and slightly tighter together as they approach the top, since that subtle compression is what perspective looks like on a leaning form. Shade one side of each rung and the rail darker to give the wood some roundness, then paint a firm cast shadow where the ladder’s top end crosses the frame, grounding it in front of the painted scene.
If the ladder looks like it is floating rather than leaning, check the base sits convincingly on a surface inside the painting, with a small shadow pooling around its feet. A straightedge or the edge of a ruler helps keep both rails parallel as they travel toward the viewer.
You Will Need
- ruler or straightedge
Palette: Burnt Umber,Cream,Payne’s Grey,Sky Blue
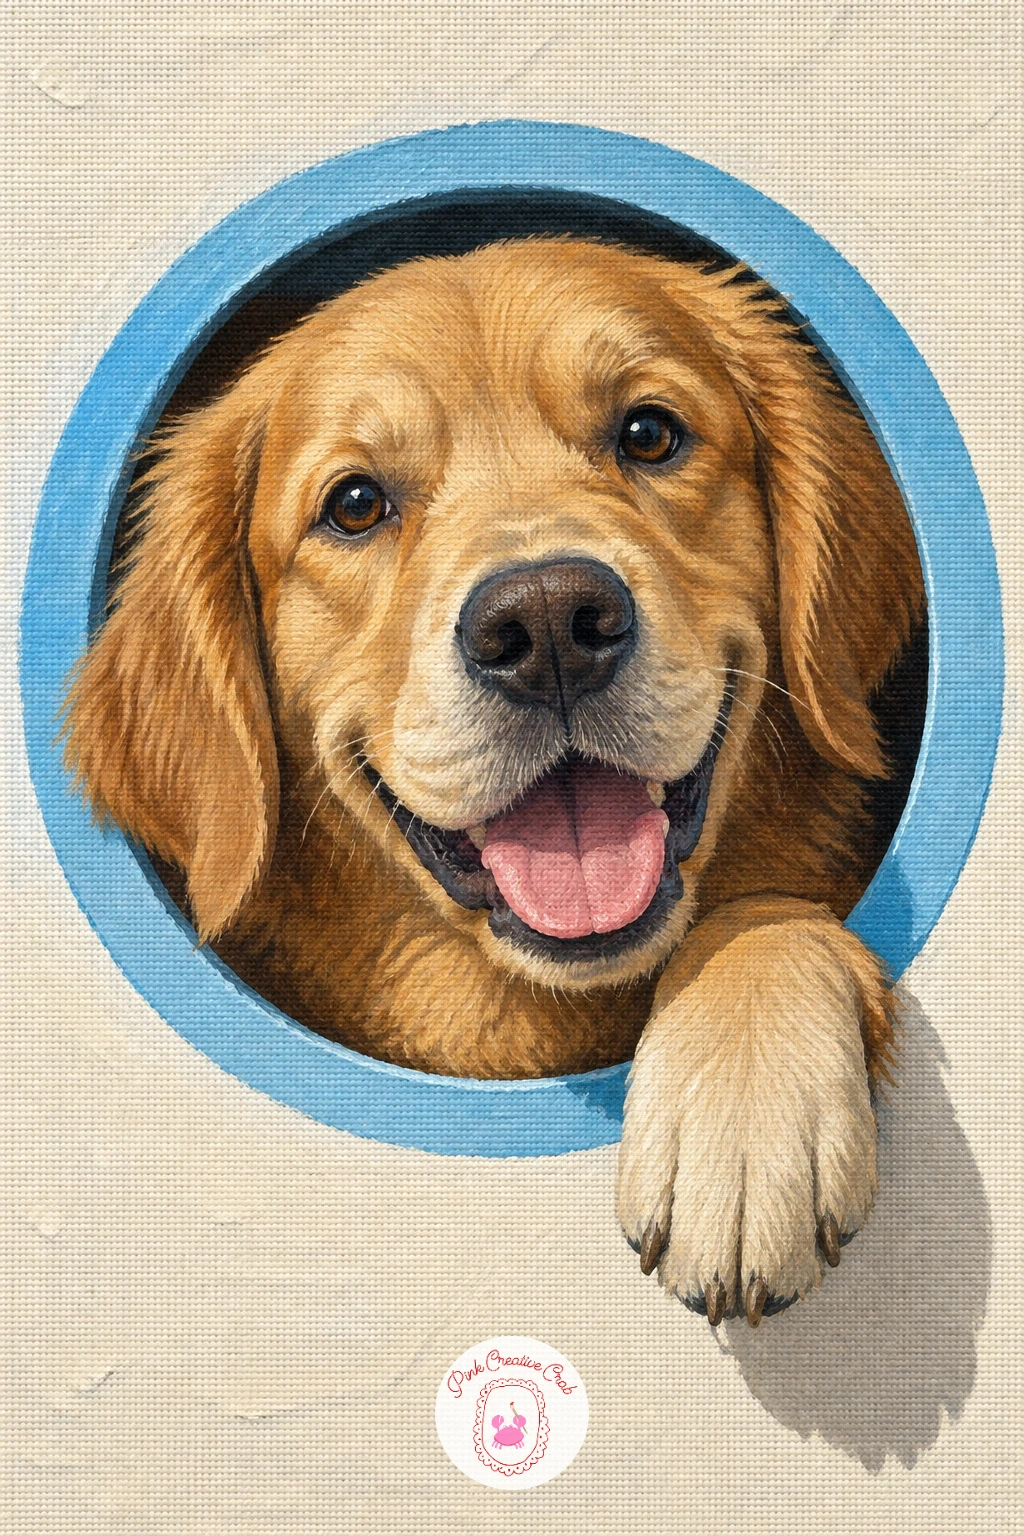
Bring some warmth back with a dog poking its head through a painted hole, a fun variation on the earlier torn canvas trick but centered on a face instead of empty sky. Paint the wall or background colour first, then cut in a rounded hole shape slightly smaller than the dog’s head, with the head and one paw pushing forward through it toward the viewer.
Shade the edges of the hole with a dark inner rim so it reads as a genuine opening rather than a flat circle, then build the dog’s face with layered fur strokes, keeping the muzzle and nose closest to the viewer slightly brighter and sharper than the ears further back inside the hole.
A soft dry brush dragged around the outer edge of the fur helps it blend gently into the hole’s rim rather than sitting on top of it with a hard line, which is where this idea most often looks pasted on. Simplify to just the head and no paw if a single sitting feels tight on time.
Palette: Burnt Umber,Cream,Payne’s Grey,Titanium White
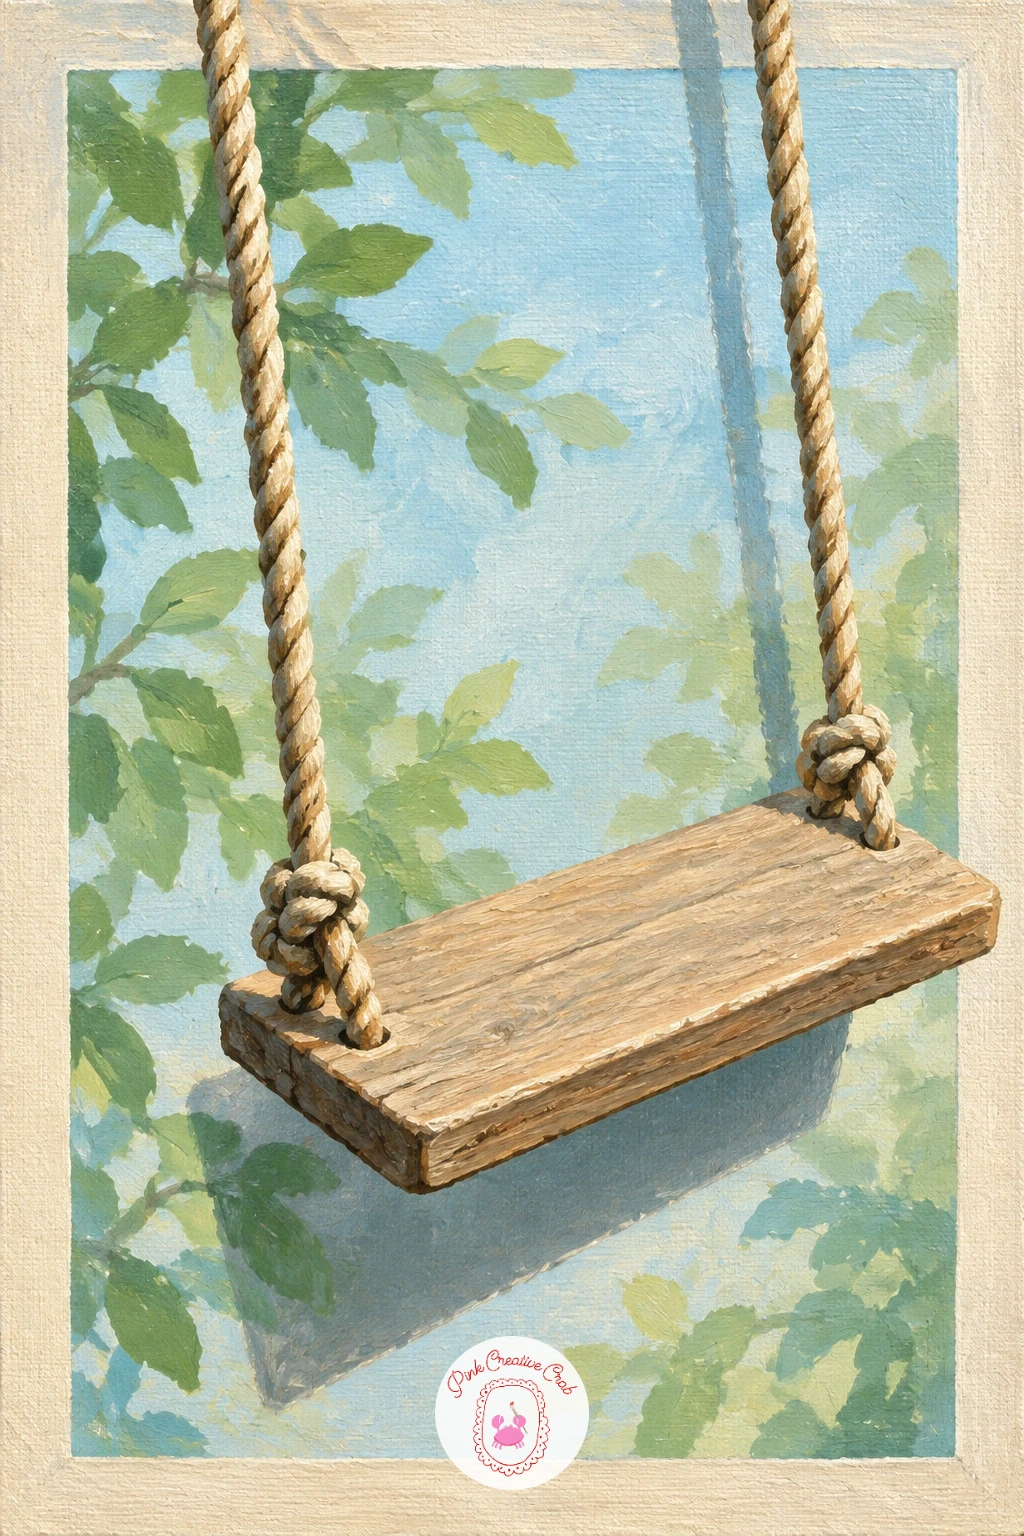
Keep the playful energy with a rope swing hanging out of the canvas, a subject built on just a few confident curved lines. Paint the background scene first, a tree branch or beam inside the frame, then let the rope drop down and the wooden seat swing forward so its front edge crosses past the frame line toward the viewer.
Paint the rope in two close shades of tan with a twisting texture suggested by short diagonal strokes rather than painted one strand at a time, then shade the wooden seat with a darker underside where it tilts forward. A cast shadow on the frame border directly below the swinging seat is what makes it feel like it has genuine weight and motion rather than sitting still.
If the rope looks stiff and straight, let it curve very slightly along its length instead of drawing it as one rigid line, since real rope under tension rarely sits perfectly straight. A dry brush loaded with a lighter tan adds a quick fibrous texture along the rope once the base colour is dry.
Palette: Burnt Umber,Cream,Leaf Green,Payne’s Grey
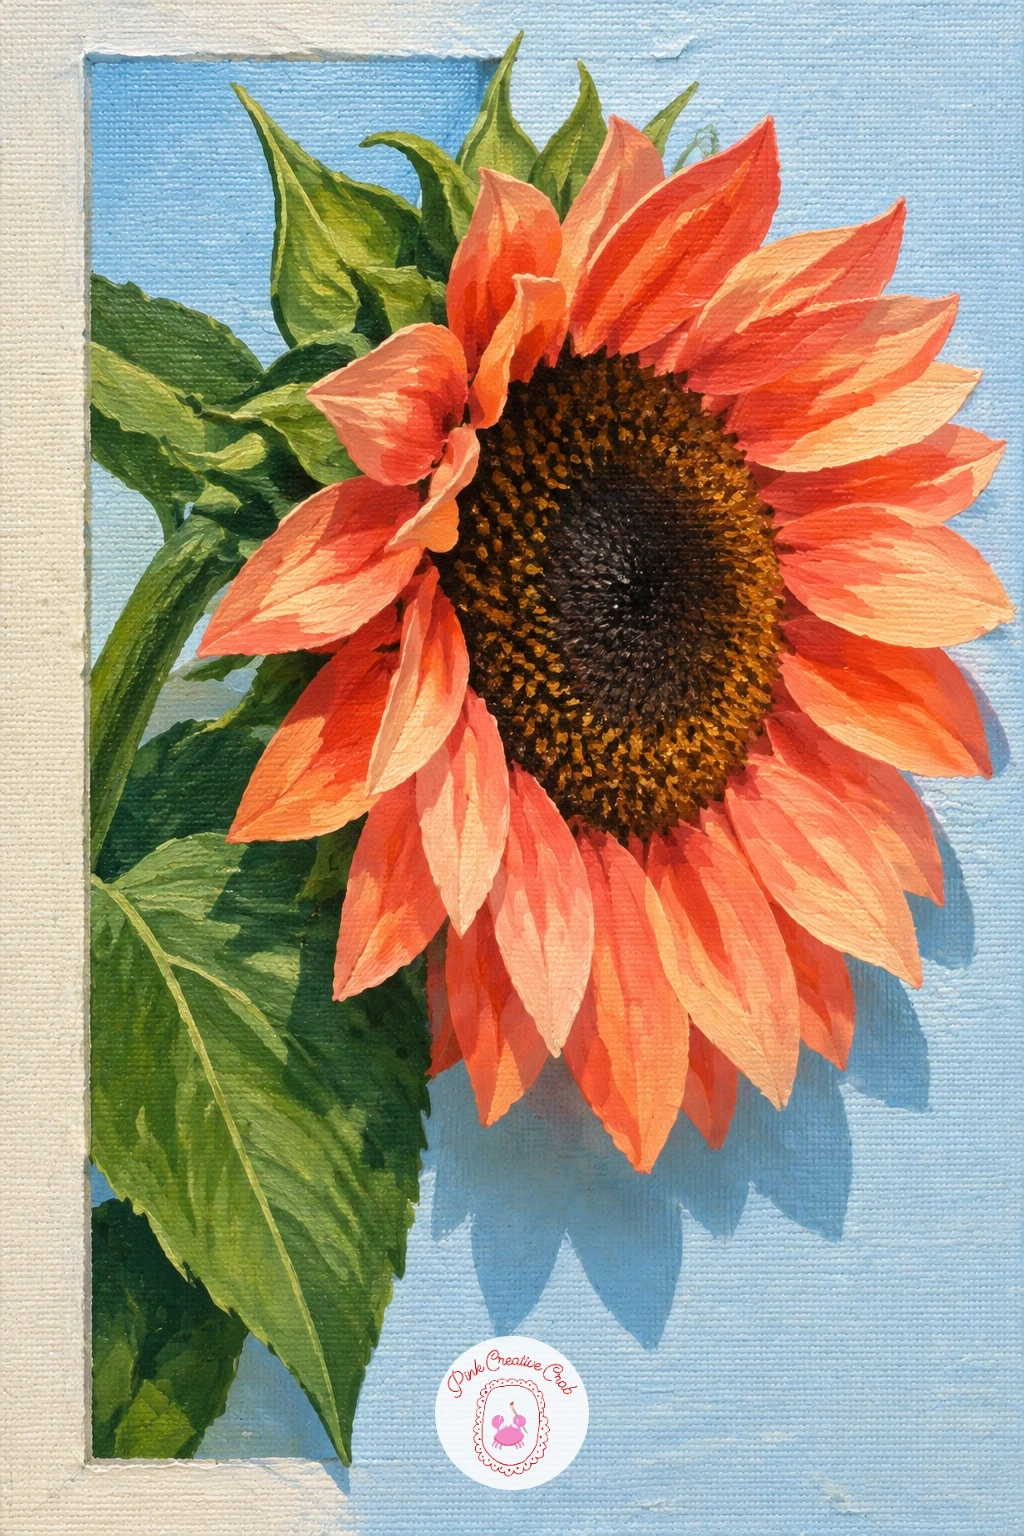
Return to flowers with a sunflower turning its head out of the frame, an idea that leans on the flower’s natural habit of following light. Paint the stem and leaves inside the frame as normal, flat leaf green with a darker shadow side, then turn the flower head itself so it faces slightly outward and tilts forward past the frame edge rather than sitting flat against the canvas.
Build the petals in two tones of coral and cream, radiating outward from a dark centre disc, and make the petals nearest the viewer slightly larger and sharper than the ones curving back toward the stem, since that size shift is what makes the head look like it has truly turned in space. Shade the underside of the tilted head darker where it falls away from the frame, and drop a soft shadow onto the frame edge beneath it.
Where this one goes flat is petals painted at a uniform size all the way round, which kills the turning effect instantly. A stiff dry brush stippled lightly over the centre disc gives a quick seeded texture without painting each seed by hand.
Palette: Coral,Leaf Green,Burnt Umber,Cream
If petals feel repetitive, look at a real sunflower photo from a low angle to see how the front petals genuinely overlap and foreshorten compared to the back ones.
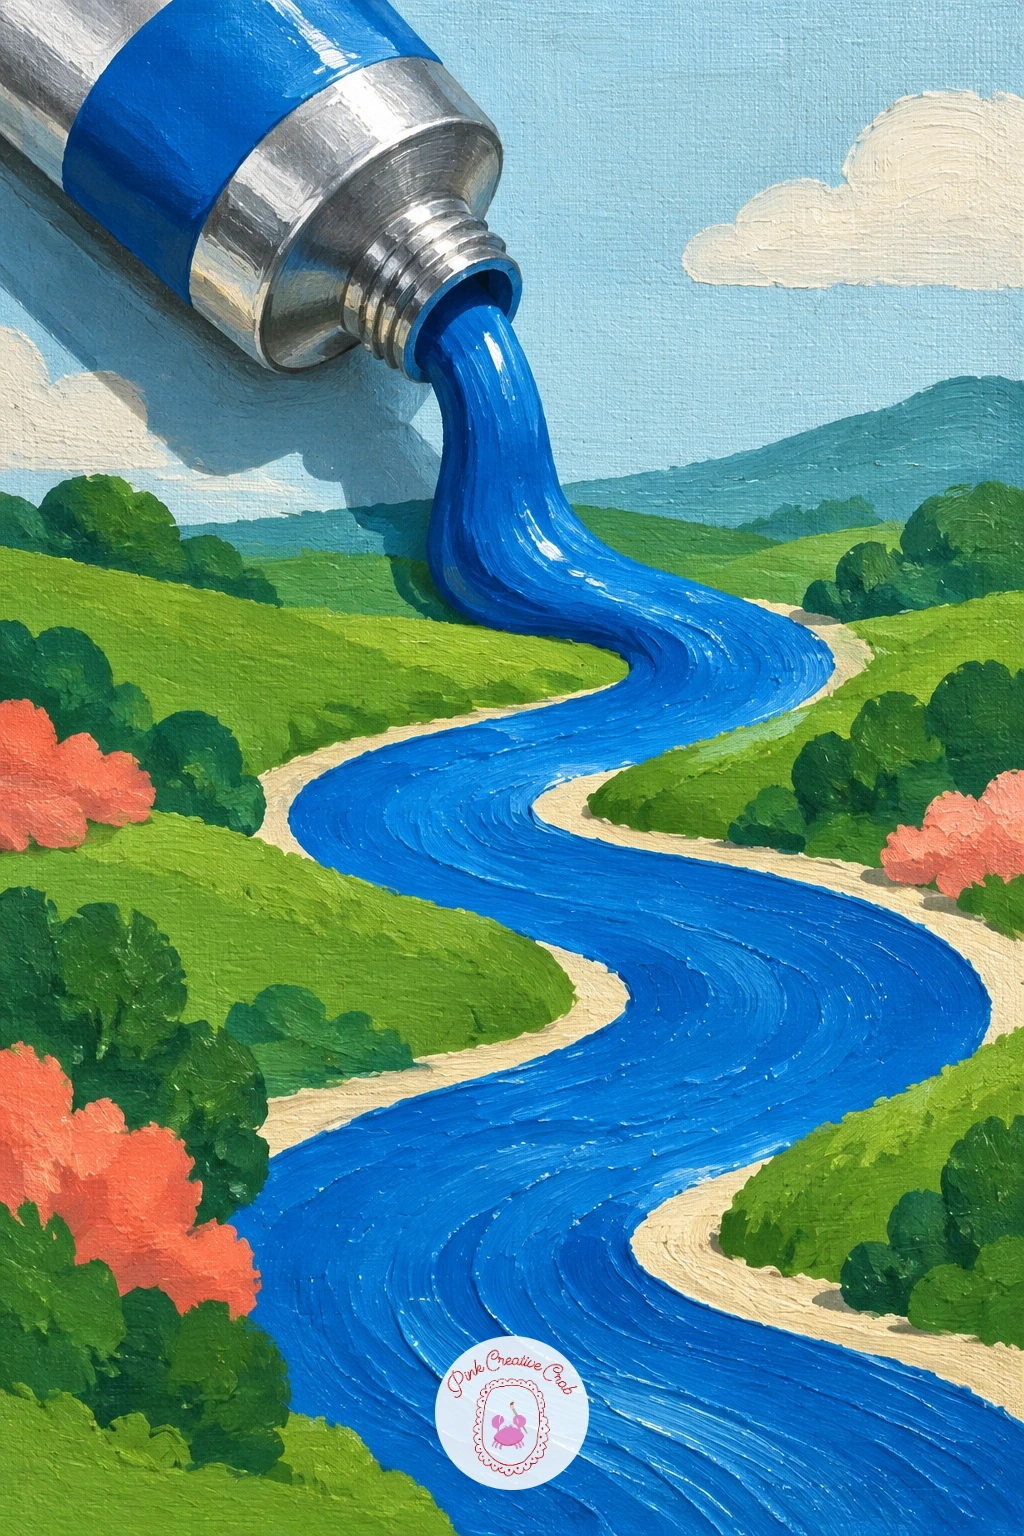
Have some fun with the medium itself in a paint tube squeezing out a river into a landscape, a clever idea that blends still life with scenery. Paint a simple metal paint tube resting at one edge of the canvas, its open end pointed into the painted space, then let a ribbon of blue paint spill from the tube and widen into a flowing river that winds through the landscape beyond it.
Shade the tube itself with the usual metallic highlights, a bright strip of white along its rounded edge and a darker tone where it curves away, then blend the paint spilling from its tip so the very end still looks thick and glossy before it thins out and becomes the painted river further into the scene.
The trick that makes this convincing is keeping the paint closest to the tube opening noticeably thicker and shinier, almost three dimensional, while the river further away flattens into normal painted water. A palette knife is useful for that thick near section, switching back to a soft brush once it becomes landscape.
You Will Need
- palette knife
Palette: Sky Blue,Silver Grey,Leaf Green,Titanium White
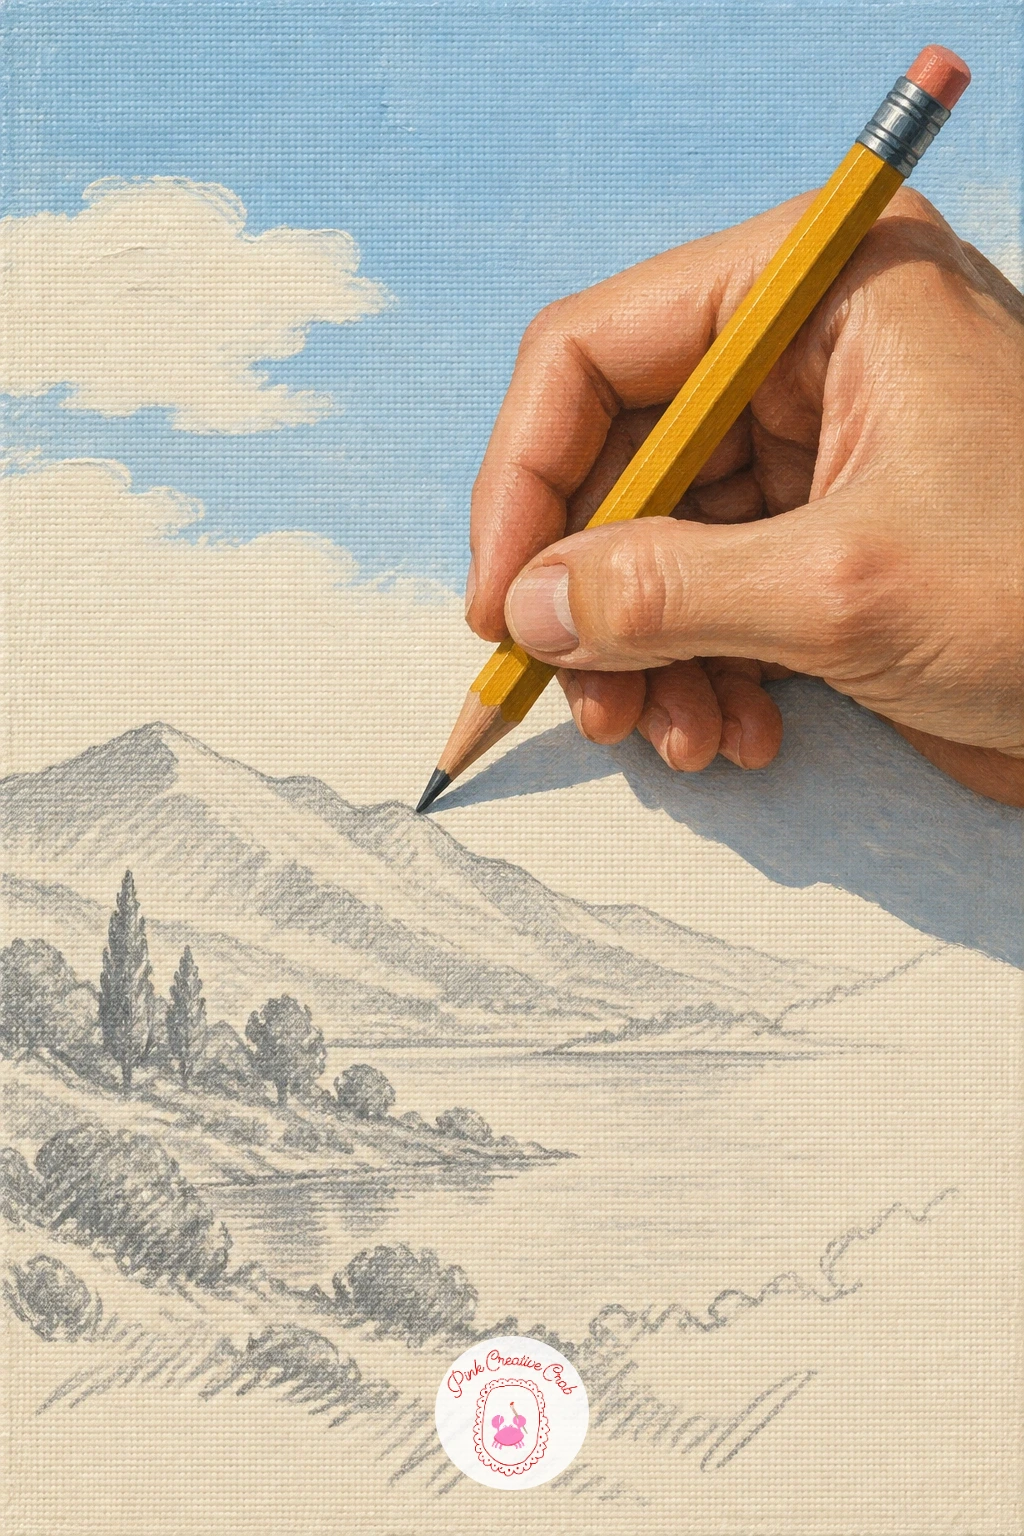
Build on that playful idea with a hand holding a pencil drawing its own landscape, where the drawn part of the scene looks noticeably flatter than the painted hand creating it. Paint the hand and pencil in full realistic shading first, rounded fingers and a crisp little highlight on the pencil’s metal tip, positioned at one side of the canvas as though reaching down to draw.
Then paint the landscape the pencil is sketching as a simpler, looser version, thin grey pencil lines suggesting hills or a tree rather than fully painted colour, as if it exists only as a drawing still in progress beneath the realistic hand.
That contrast between the fully rendered hand and the sketchy unfinished landscape is the whole illusion, so resist the urge to finish the landscape properly. Keep it as loose cross hatched pencil marks in grey, letting the canvas show through in places.
If shading the hand feels difficult, simplify it to a side profile view, which has far fewer tricky angles than a hand seen from above.
Palette: Burnt Umber,Payne’s Grey,Cream,Titanium White
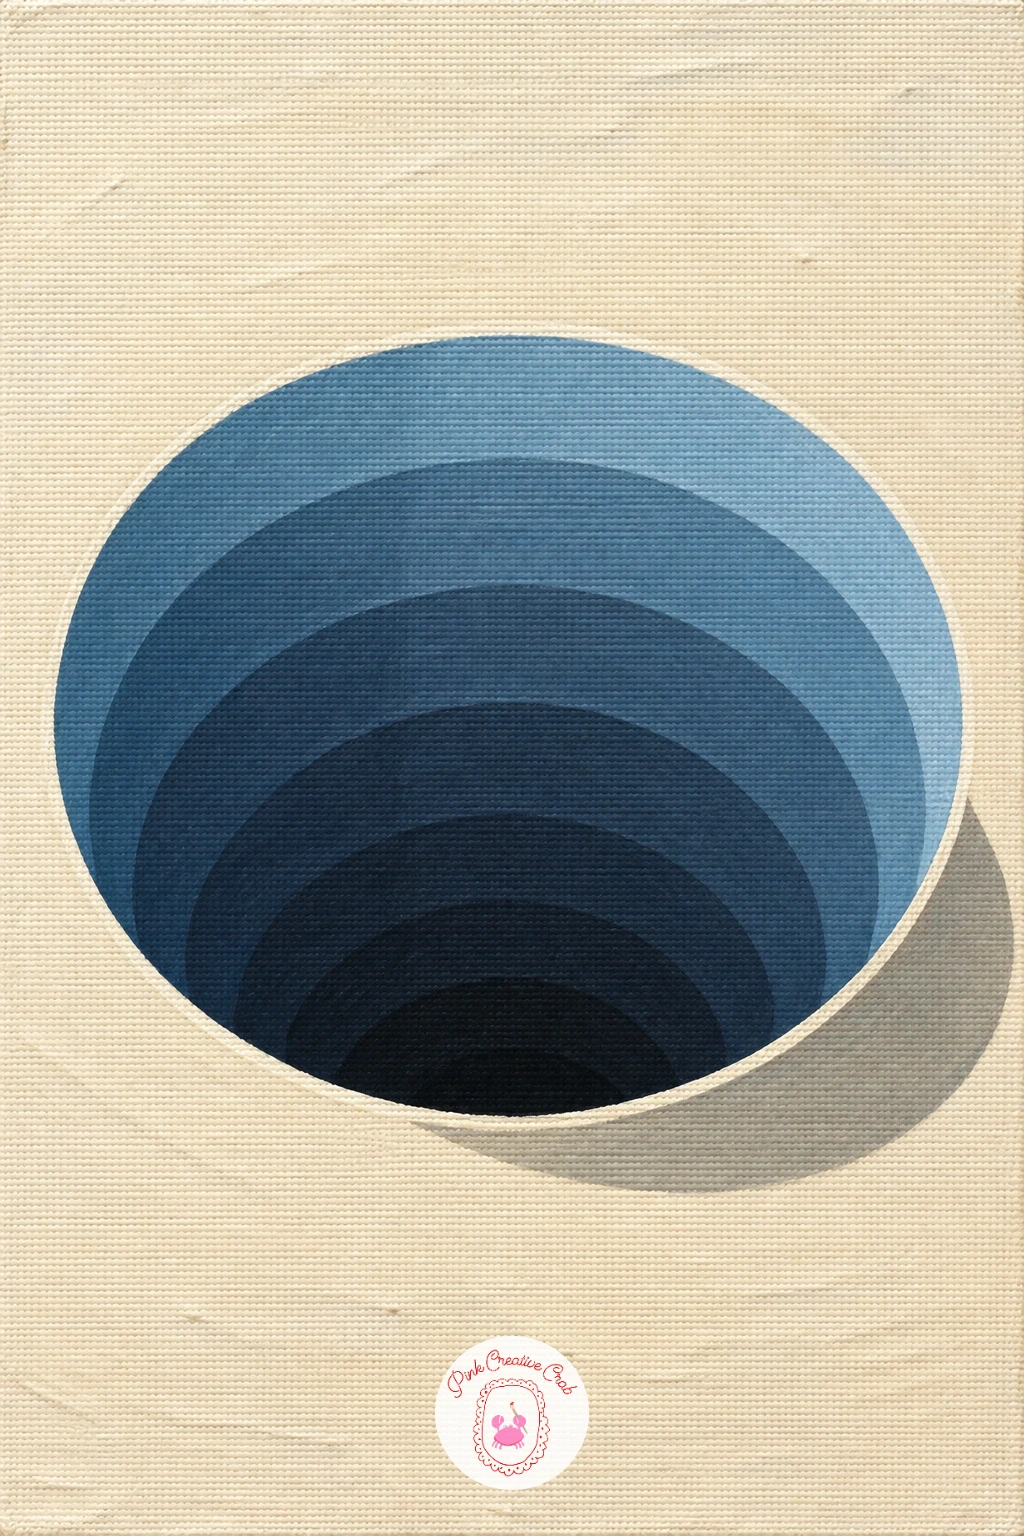
Go back to pure perspective with a deep hole in the floor painted to look real, one of the oldest trompe l’oeil tricks and still one of the most convincing. Paint the floor surface around the hole first in whatever flat tone you like, then sketch the hole’s opening as an oval or rounded rectangle, with the inner walls sloping down toward a single dark point near the bottom.
Shade the inner walls in bands, lighter near the opening and progressively darker as they descend, so the eye reads real distance rather than a flat dark shape. Keep the opening’s outer edge crisp and sharp against the floor colour, since a soft blurry rim undoes the illusion of a solid edge falling away beneath it.
If the hole looks like a flat dark stain instead of a drop, check your banding: there should be at least three visible value steps from the rim down to the bottom. A dry brush with very little paint works well for softening the transitions between those bands without losing the steps entirely.
Palette: Payne’s Grey,Cream,Burnt Umber,Titanium White
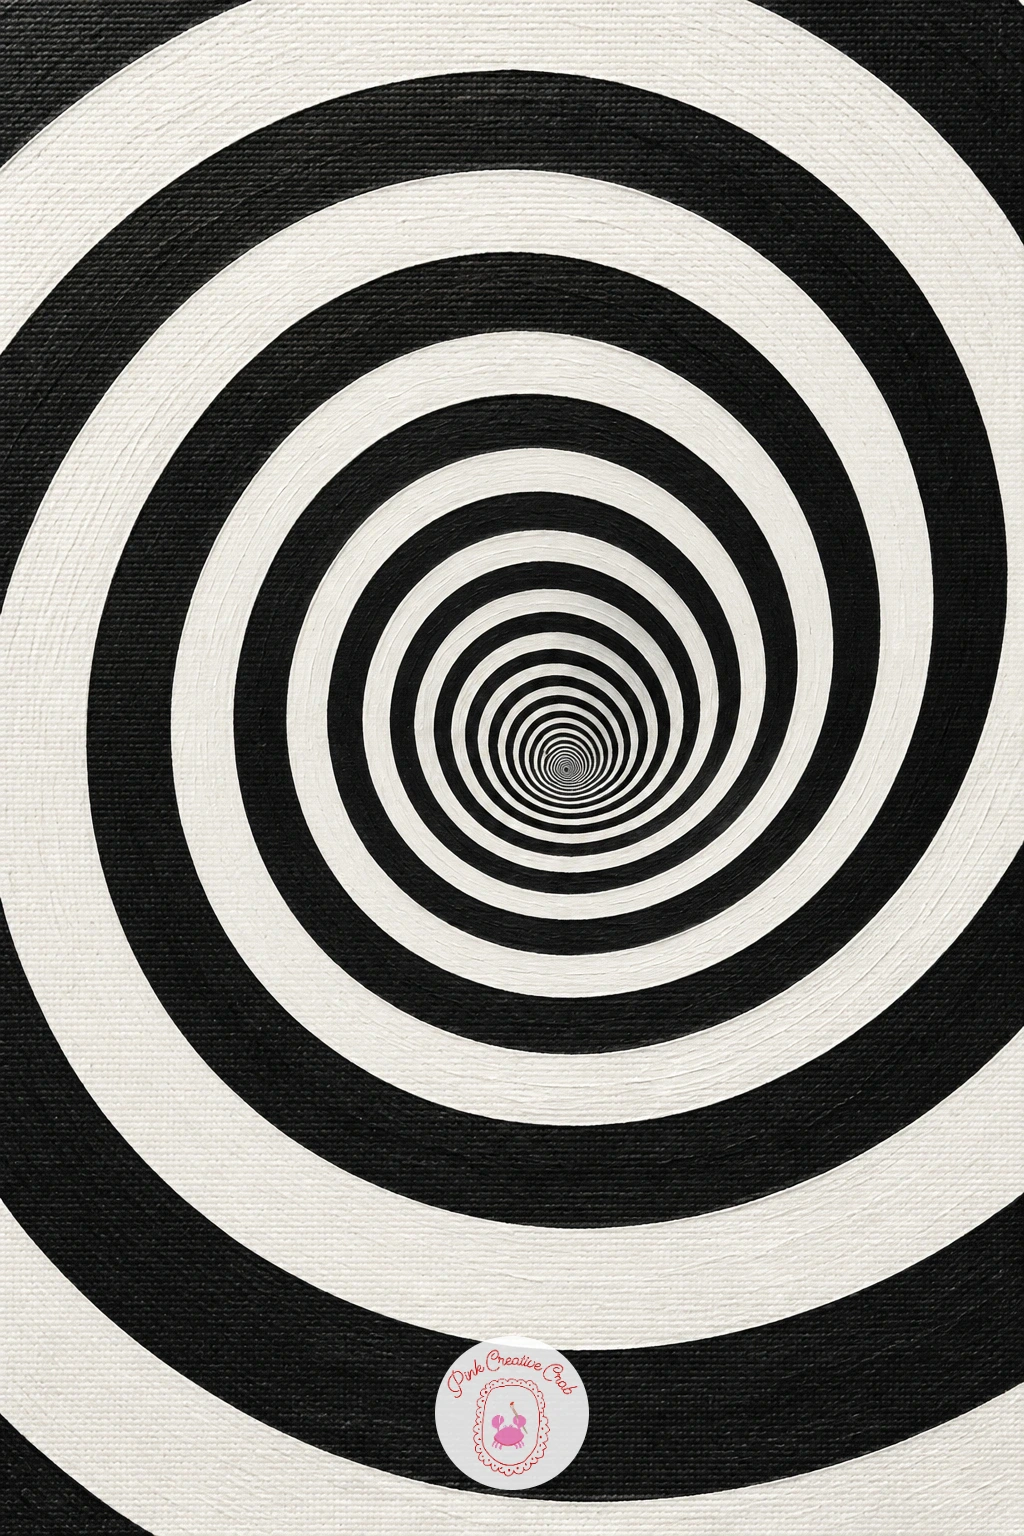
Strip away colour entirely for a spiral tunnel illusion in black and white, a hypnotic subject built from careful spacing rather than shading at all. Mark the centre point of the canvas, then draw a spiral starting there and winding outward to the edges, keeping the gaps between each loop slightly wider as the spiral grows.
Paint alternating sections of the spiral in flat black and white, following the spiral line like a ribbon rather than filling random shapes, so the pattern reads clearly as one continuous winding path. Keep the brushwork crisp and the edges clean here, since any wobble in the spiral line is very obvious against such a simple palette.
Given ten minutes, a loose hand drawn spiral with thick alternating bands already creates a strong effect. Given forty minutes, tighten the spacing near the centre and taper the bands so they feel like they are genuinely receding into depth, which makes the tunnel pull far more convincingly.
You Will Need
- ruler or compass for the spiral guide
Palette: Titanium White,Payne’s Grey
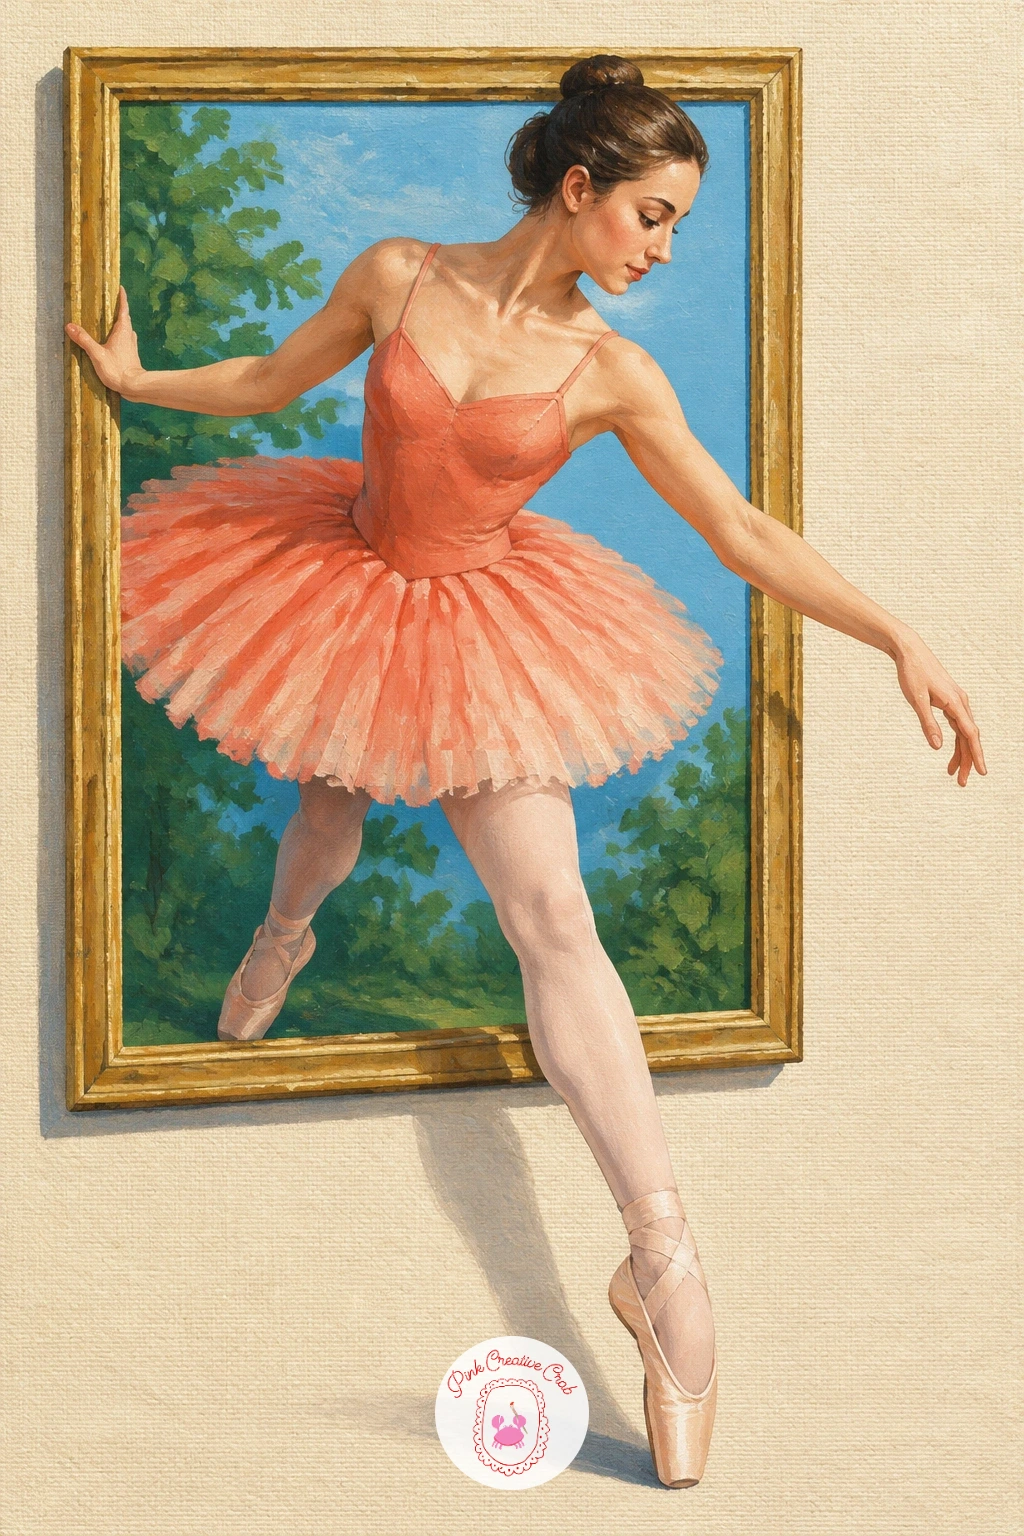
Bring a figure back into the mix with a ballerina stepping out of a picture frame, a pose that depends on balance more than any other idea on this list. Sketch the frame edge first, then pose the ballerina with one foot still inside the painted space and the other foot and her forward lean already crossing past the frame line.
Compare the angle of her raised leg to her standing leg before painting, since a believable stepping pose usually has the front leg bent and the back leg nearly straight, carrying her weight forward and out. Paint the costume in flat coral or cream, keeping the folds of the skirt simple, then add a soft cast shadow on the frame surface just beneath her leading foot to ground the step.
If the pose feels static rather than mid motion, tilt her torso very slightly forward over the frame line, since a perfectly upright figure rarely reads as stepping anywhere. A simplified stick figure sketch first, checking the balance line from her head through her supporting foot, saves a lot of repainting later.
Palette: Coral,Cream,Payne’s Grey,Titanium White
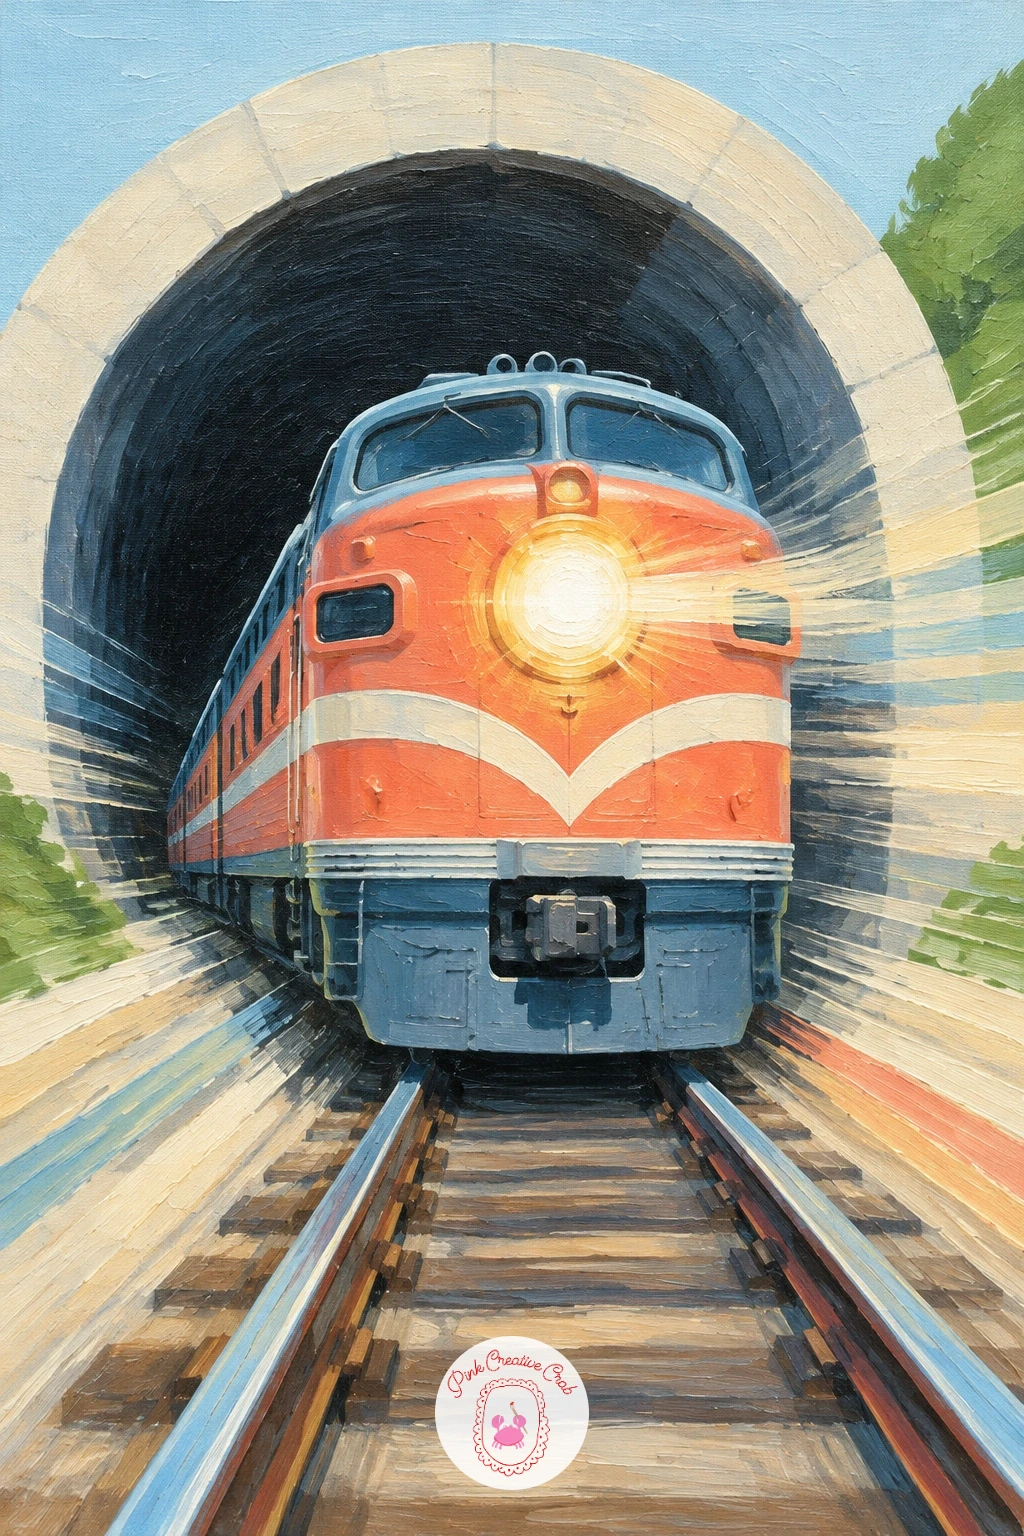
Build momentum with a train rushing out of a tunnel toward the viewer, an idea that uses strong perspective and a bold headlight to pull the eye forward. Paint the tunnel opening as a dark rounded arch set well back inside the frame, then bring the front of the train forward along converging track lines until its nose and front window cross close to the canvas edge, largest and sharpest point in the whole painting.
Paint a bright glowing headlight with a soft radiating halo of white and pale yellow around it, since that glow against the dark tunnel is what reads as speed and depth together. Keep every other edge on the train slightly softened with quick horizontal streaks trailing behind it, as though motion blur is already smearing the paint.
If the train looks parked rather than rushing, check that the track lines and tunnel edges all converge to the same vanishing point behind the train, with nothing drifting off at an odd angle. A ruler for the track and tunnel lines keeps that convergence honest even with a loose painted train on top.
You Will Need
- ruler
Palette: Payne’s Grey,Titanium White,Coral,Cream
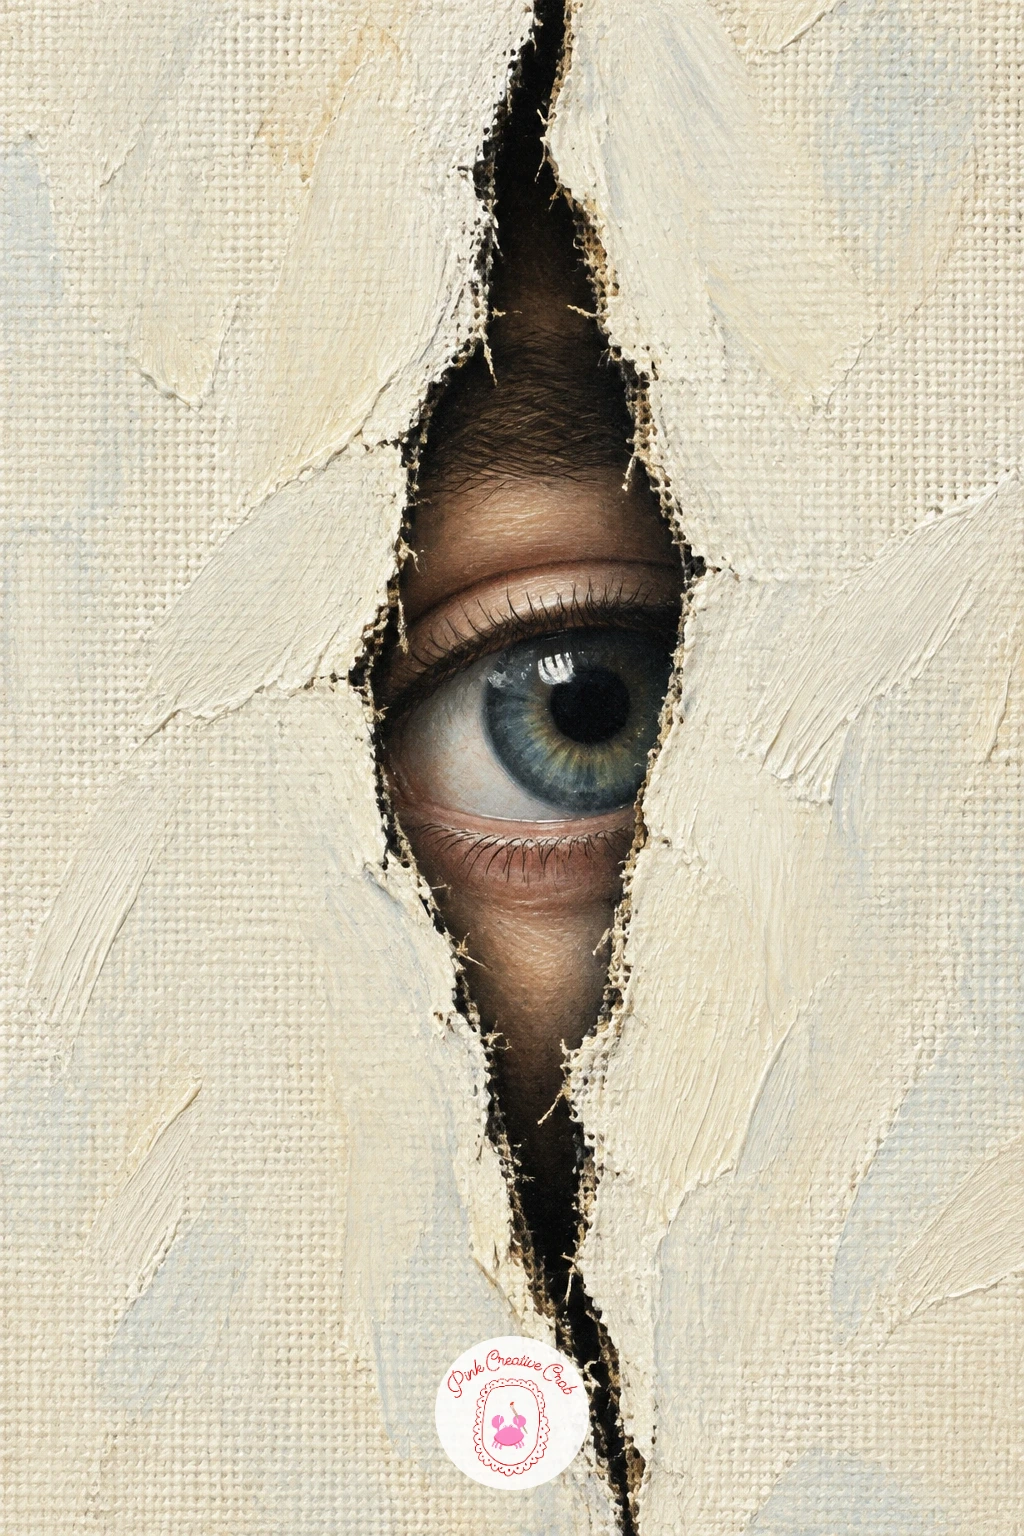
Make the viewer feel watched with an eye looking through a crack in the canvas, a quiet but unsettling little illusion built on a single jagged opening. Paint the main surface flat first, then sketch a narrow crack shape, wider in the middle and tapering to thin points at each end, with a single eye peering through the widest part.
Shade the crack’s edges dark and slightly raised, the same curling and frayed treatment used for the torn canvas idea earlier, then paint the eye itself with careful realistic shading: a bright catchlight in the pupil, a soft gradient across the iris, and the surrounding skin shadowed just inside the crack’s dark edge.
The detail that sells this one is scale: the eye should feel like it belongs to someone much larger than the crack itself, so keep the visible sliver tight and let only the iris and part of the white show, nothing more. A fine round brush is worth the extra patience for the catchlight, since that single bright dot carries most of the realism.
Palette: Burnt Umber,Cream,Payne’s Grey,Titanium White
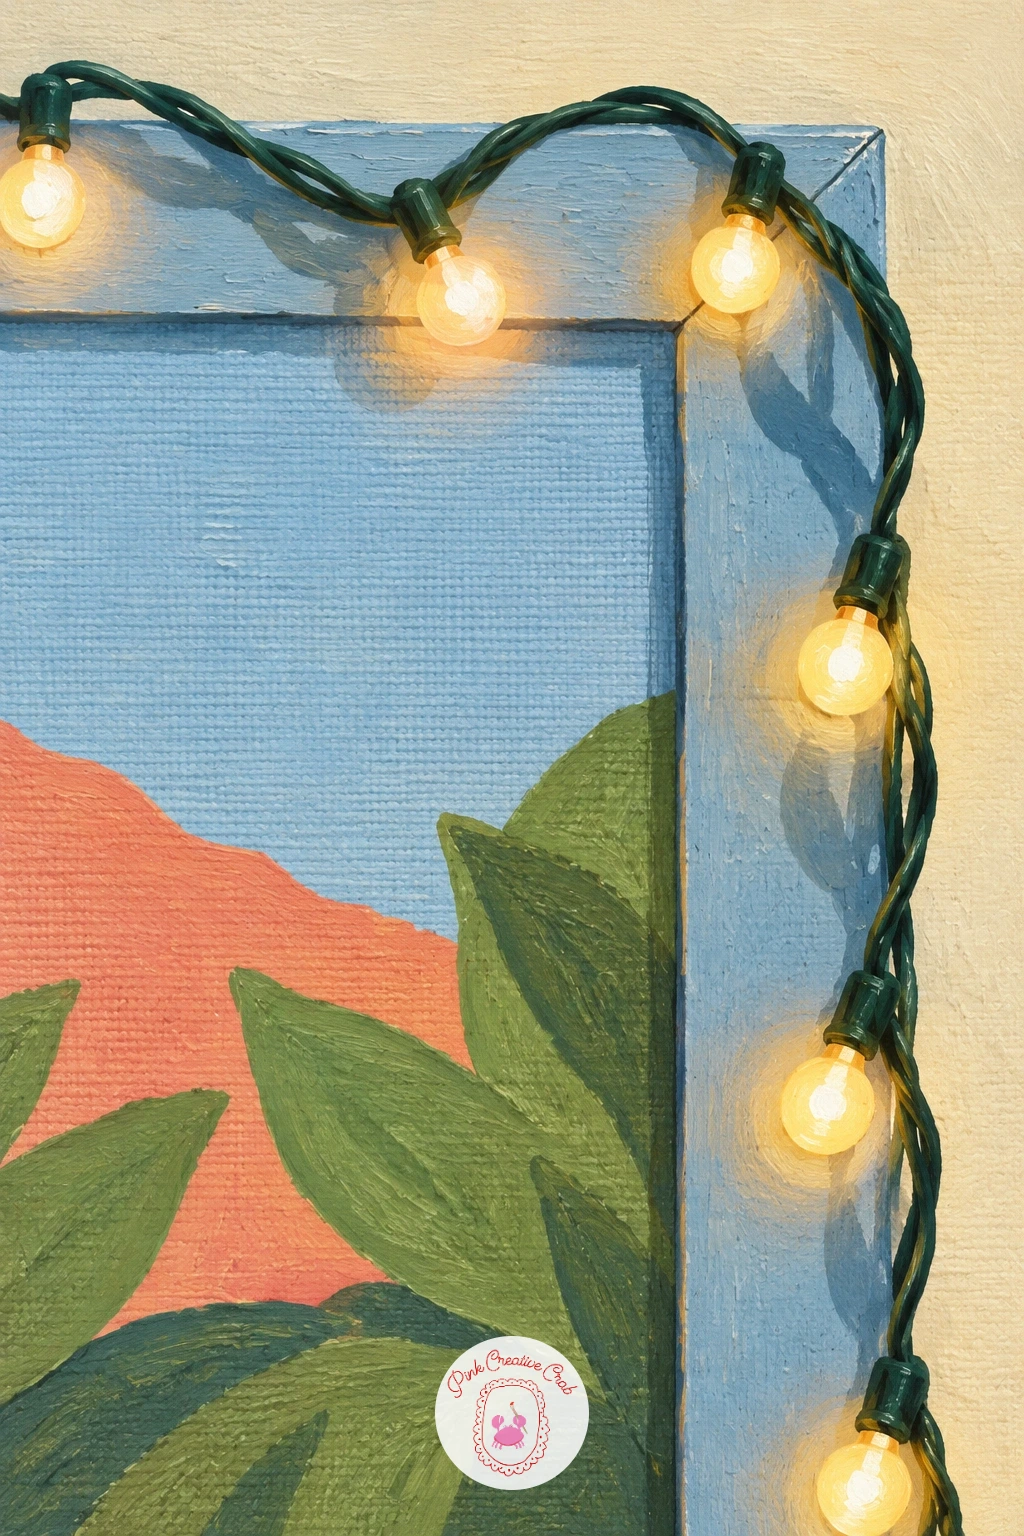
Close the series on a gentler note with a string of lights draped over the frame corner, a cosy finish after so many dramatic illusions. Paint the corner of the frame first with a slight raised edge and shadow, then let the light string dip down from inside the painted scene, loop once over the physical corner of the frame, and continue a little further down the side of the canvas itself.
Paint each bulb as a small warm glowing shape, coral or cream at the centre fading into a soft halo, with the wire connecting them sagging naturally between each bulb rather than running in a straight line. Keep the bulbs that hang past the frame edge slightly brighter and larger than the ones further back in the painted scene, since that size and brightness shift is what makes the string feel like it is draped forward into the room.
If the glow looks flat, add one more tiny bright dot right at the center of each bulb after the halo is dry, which gives a last convincing spark of light. For a cosy companion piece once this one is finished, the winter painting ideas for canvas list has more small scenes built around warm indoor light.
Palette: Coral,Cream,Payne’s Grey,Titanium White
What to Do Next
Pick whichever illusion caught your eye first, since enthusiasm for the subject carries you through the trickier shading steps. Start on a small primed canvas with a pencil sketch of the frame line and the crossing point, then build your flat colours before any shadow, and let today’s painting be the one that finally leaves the frame.
Frequently Asked Questions
What paint works best for a 3d painting on canvas illusion?
Acrylic paint works best because it dries fast and layers cleanly, which keeps shadow edges crisp. Build the flat background first, let it dry fully, then add the raised or crossing element on top so the shadow reads clearly against it.
How do you make a painting look like it is coming off the canvas?
A strong, carefully placed cast shadow is what sells the depth, more than detail or colour. Decide where the light comes from before you paint, then keep every shadow in the piece consistent with that one direction.
Do I need to prime the canvas differently for a 3d illusion painting?
No, a standard primed canvas works fine for every idea on this list. The illusion comes from shading and perspective choices, not from any special surface preparation.
What is the easiest 3d painting on canvas idea for a first attempt?
A simple floating object with one clear light source, like the balloon or the water drop, is the easiest starting point. Both rely on just one highlight and one shadow shape, which keeps the technique manageable while you learn how the illusion works.
How small can a canvas be for these trompe l’oeil ideas?
A small canvas around eight by ten inches works well for almost every idea here. Keep the subject large within that space, since a tiny illusion surrounded by empty background loses most of its impact.
Have any thoughts?
Share your reaction or leave a quick response — we’d love to hear what you think!
-
 0
-
0
-
0
-
0
-
0
-
0


