

Table of Contents
- Before You Start
- Cherry Tree in Spring Bloom
- Weeping Willow by a Pond
- Golden Maple in Autumn
- Snowy Pines by a Cabin
- Lemon Tree in a Pot
- Birch Grove
- Apple Tree in a Meadow
- Autumn Oak on a Hilltop
- Pink Magnolia by a Gate
- Lone Pine on a Cliff
- Orchard Row in Blossom
- Autumn Aspen Grove
- Fig Tree by a Terrace
- Dogwood in Early Spring
- Wind Swept Coastal Tree
- Old Olive Tree
- Frequently Asked Questions
If you have ever stood in front of a blank canvas wondering how to paint trees without ending up with a green lollipop on a brown stick, this collection is for you. I love this subject because every tree has its own personality: the willow droops, the birch stands pale and straight, the cherry explodes into pink, and acrylic with a dabbed sponge captures all of that foliage texture in minutes, not hours.
Below you will find sixteen worksheets, each one a different tree in its own little scene, moving from pencil sketch to finished painting in a handful of clear stages. Pick the one that matches the mood you are in today, set out your paints, and work through it panel by panel.
Using these images: free for personal projects such as printing, coloring, cards, journals and gifts. Handmade items that include them may be sold up to 30 pieces per design. More than that is commercial use and is not permitted, and neither is selling or sharing the images themselves or passing them off as your own. Please ask before any other use.
Before You Start
- Sketch the trunk and main branches very lightly in pencil first, since heavy lines will show through thin acrylic washes later.
- Load a dry brush with very little paint and drag it sideways over the canvas texture to get believable bark and twig marks.
- Keep a small natural sponge or a torn piece of kitchen sponge on hand, since dabbing it in paint is the fastest way to build soft, irregular foliage.
- Test every foliage color on scrap paper before touching the canvas, because acrylic dries darker and duller than it looks when wet.
- Mix your greens and autumn colors a little looser than you think you need, since a dry brush eats paint fast and you do not want to remix mid-tree.
- Let each background wash dry fully before adding the trunk, or the brown will bleed into the sky and muddy your colors.
Cherry Tree in Spring Bloom
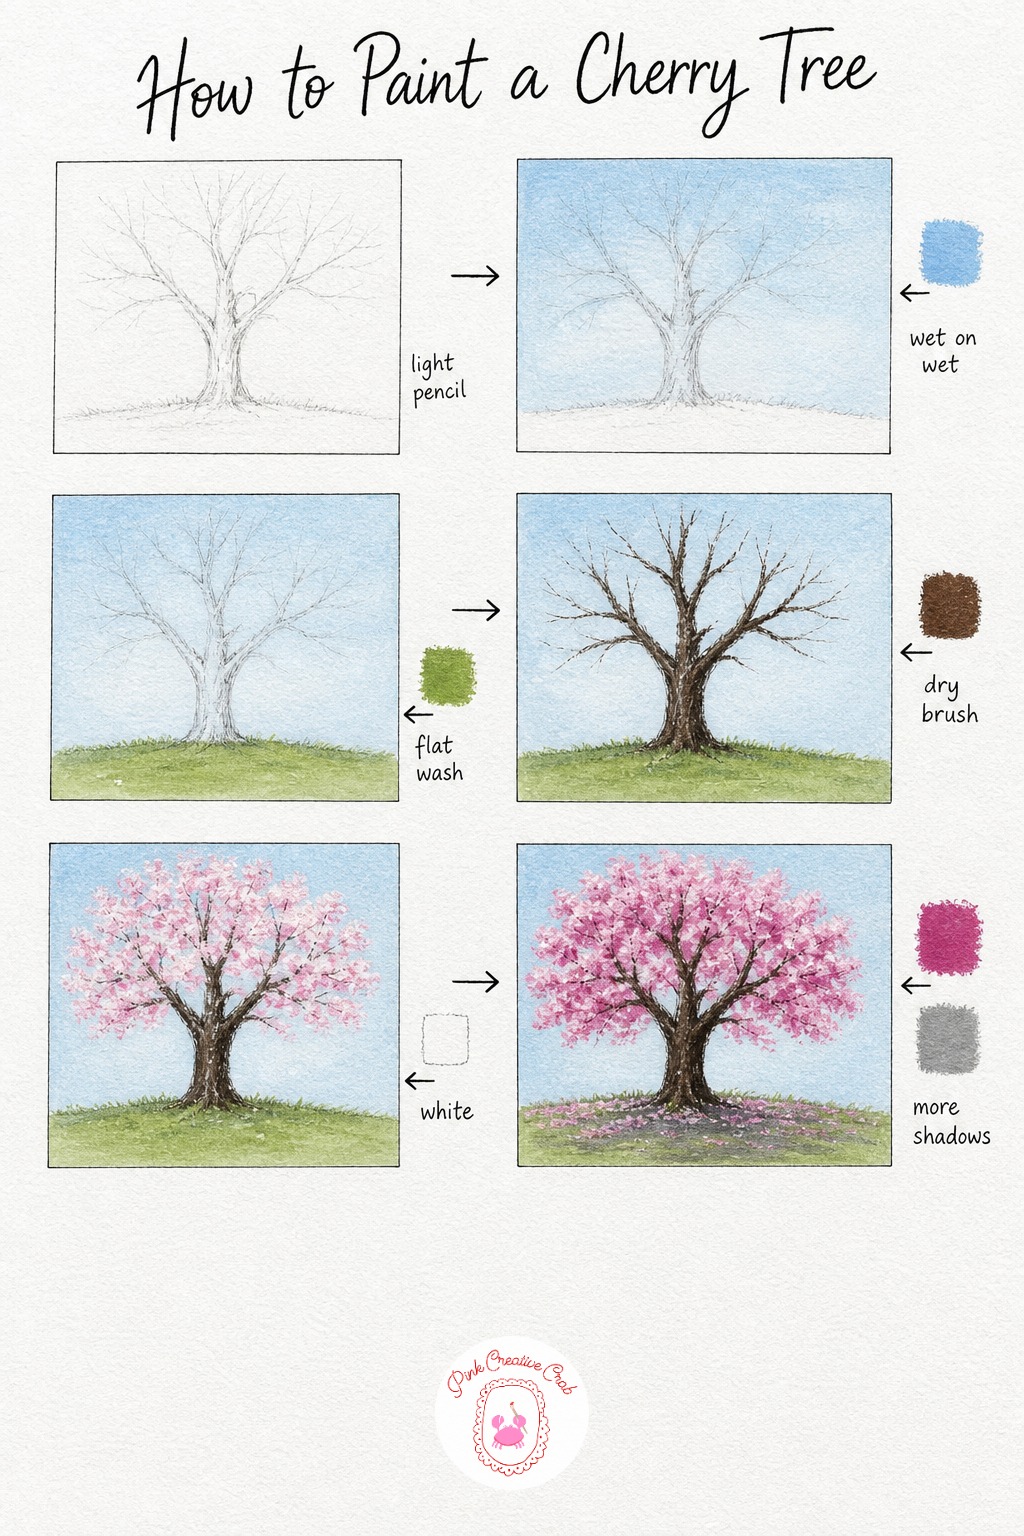
Start with a very light pencil sketch, just enough to show where the trunk forks and where the main branches reach out. You do not need every twig, since the blossoms will cover most of the fine detail anyway.
Paint the sky first with a loose, wet wash of sky blue so it dries soft and even behind the branches. Once that is dry, brush a quiet green wash along the ground, then switch to a dry brush loaded with burnt umber to drag in the trunk and branches, letting the bristles skip over the canvas for texture.
Now the fun part: dab a sponge in pale pink and white and press it in clusters all along the branch tips, turning your wrist so no two clumps look identical. Beginners often make the blossoms too round and too even, so vary the size and leave little gaps of sky showing through.
Finish with a deeper pink dabbed into the shadowed underside of the canopy and a soft gray shadow pooling on the ground. If you only have one pink, mix a touch of white into it for the highlights and leave it unmixed for the shadows. Tip: load the sponge, then dab it on scrap paper once before touching the canvas, so the first bloom is never overloaded.
Weeping Willow by a Pond
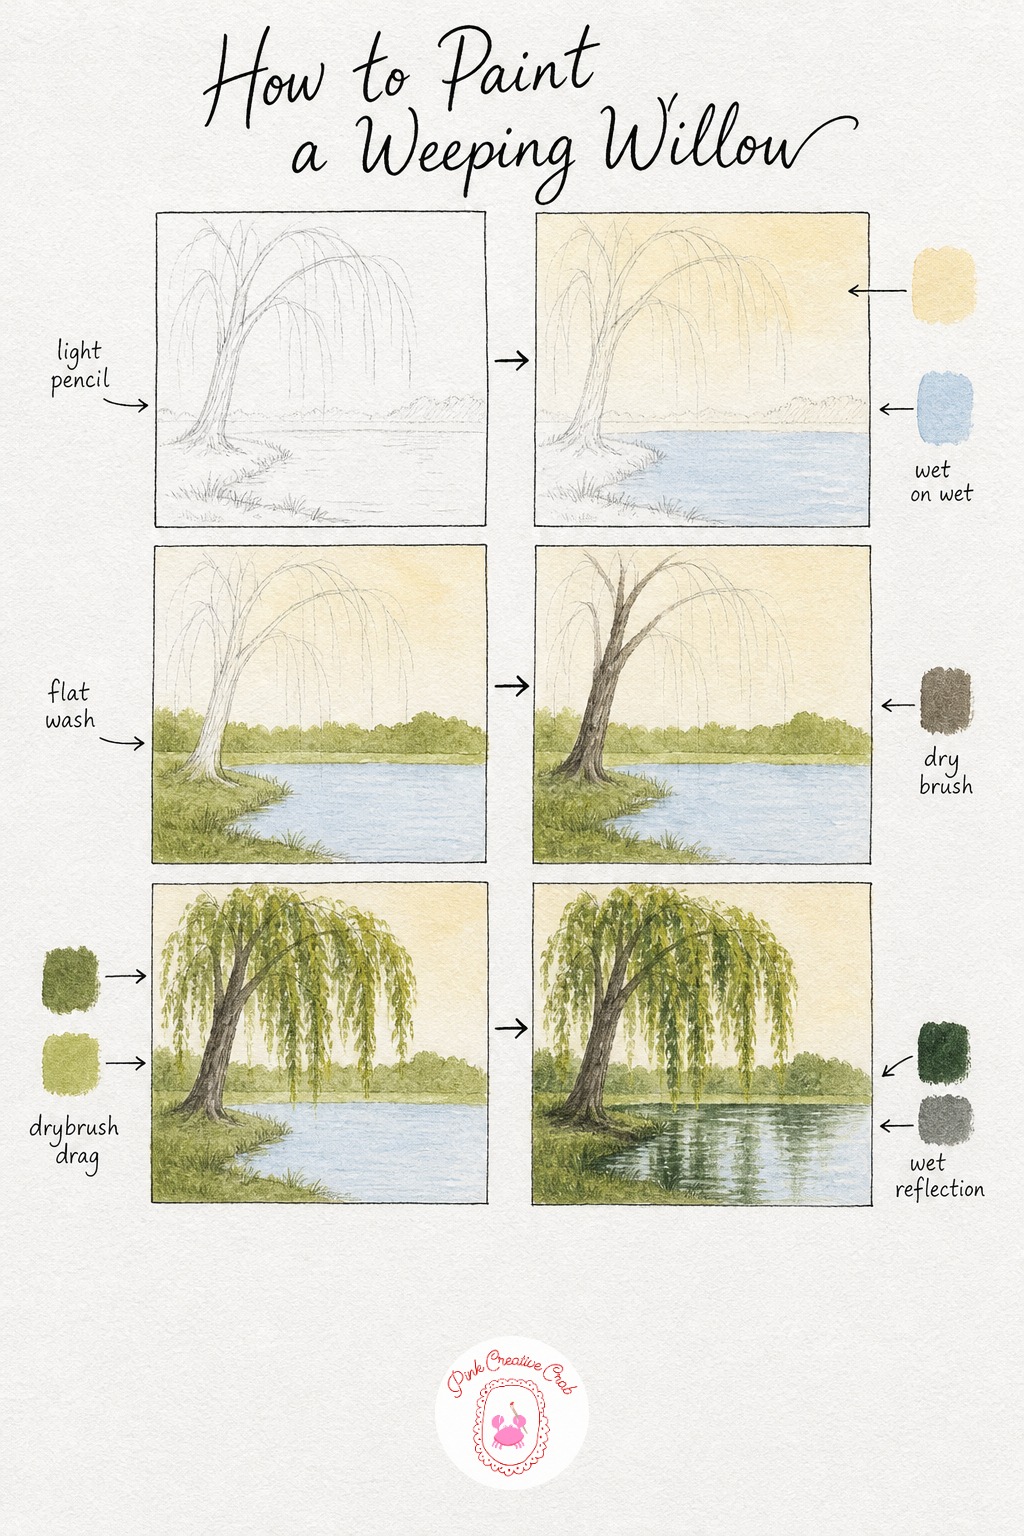
Sketch the trunk leaning slightly, with long curved lines sweeping down toward the water for the drooping branches. Keep the pond shape simple, just an oval or a gentle curve across the lower third of the canvas.
Wash the sky in a warm cream and the pond in a cool pale blue while both areas are wet, letting the colors settle softly. Once dry, add an olive green wash for the grassy bank, then dry brush the trunk in gray brown, pressing harder at the base where the bark is thicker.
For the willow’s hanging foliage, load your brush lightly and drag it downward in long, wispy strokes rather than dabbing round clumps, since this is what gives a willow its drooping shape. Beginners often paint the branches too stiff, so let your wrist stay loose and vary the length of each strand.
Finish by dragging a darker green reflection straight down into the pond under the canopy, and soften the base of the trunk with a gray shadow. If your dry brush strokes look too neat, scrub a slightly damp brush over them to break the edges. Tip: paint three or four longer “lead” branches first, then fill in shorter ones between them.
Golden Maple in Autumn
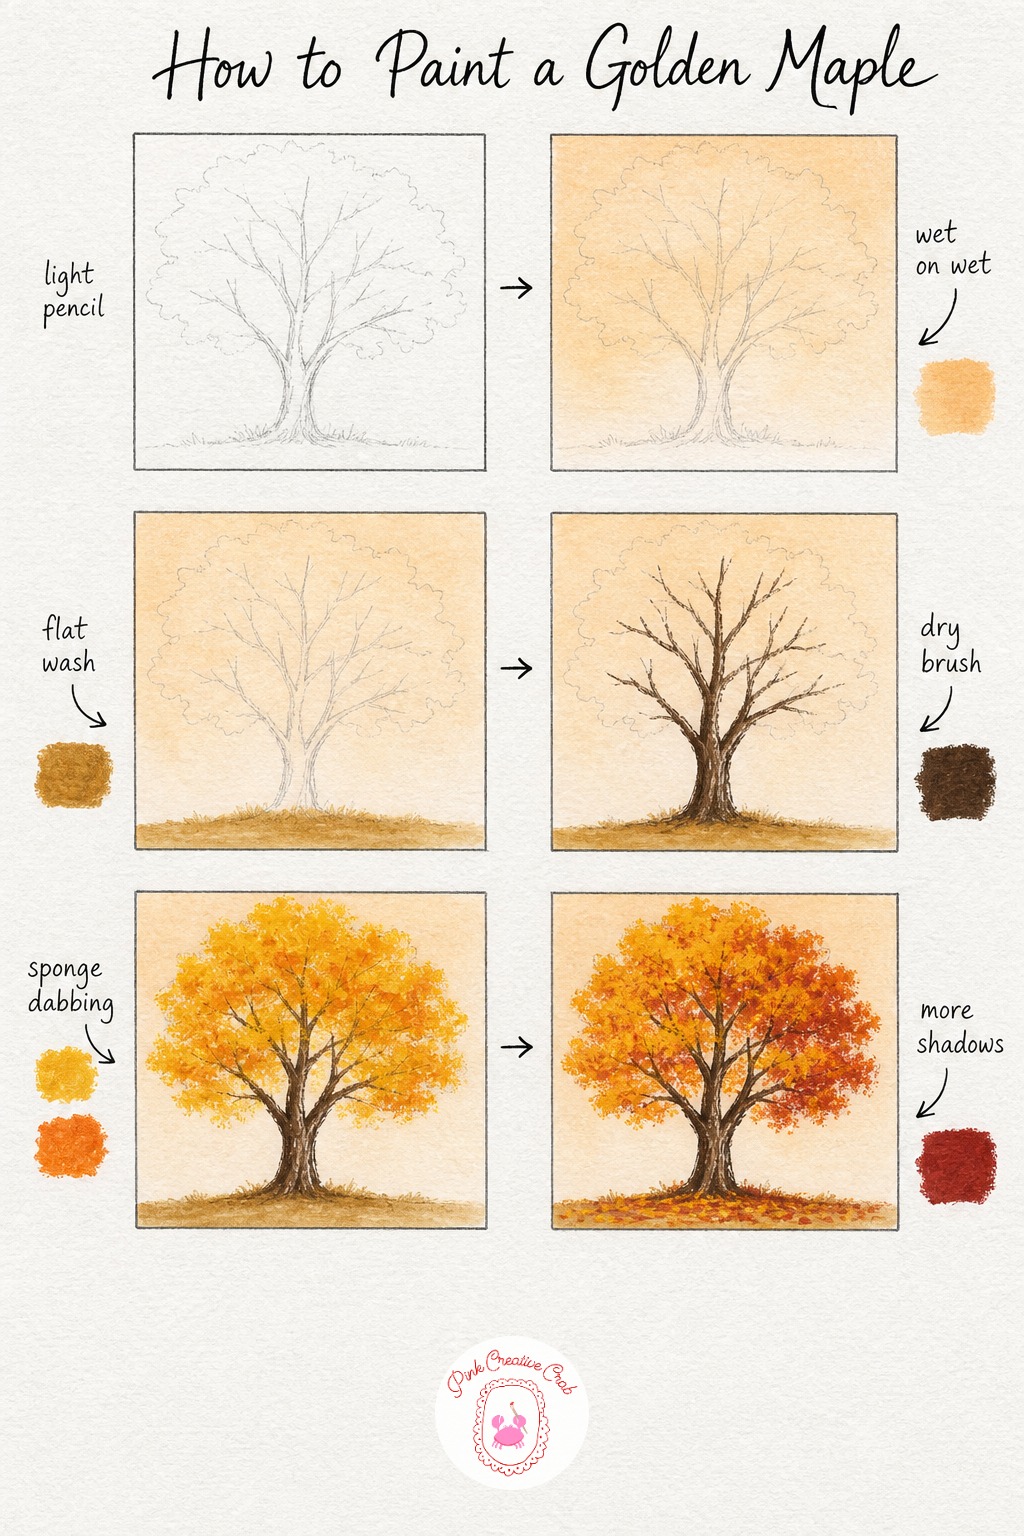
Sketch the trunk and the main branch forks lightly, then rough in the rounded shape the canopy will fill. Maples read as autumn trees mostly through color, so the sketch itself can stay simple.
Brush a warm pale orange wash across the sky so the whole scene feels like late afternoon, then let it dry before adding a thin raw sienna wash along the ground. Dry brush the trunk and branches in dark brown, keeping the lines a little crooked since maple bark is rarely straight.
Dab gold and orange across the entire canopy with a sponge, overlapping the colors so neither reads as one flat block. A common mistake is keeping all the foliage the same shade, which flattens the tree, so switch between the two colors as you move around the canopy.
Finish with brick red dabbed into the shadowed underside of the canopy for depth, and drop a few small red and gold marks at the base of the trunk for fallen leaves. If you only have orange and no gold, mix orange with a touch of yellow instead. Tip: dab the darkest red last and only in small patches, or the tree loses its golden glow.
Snowy Pines by a Cabin
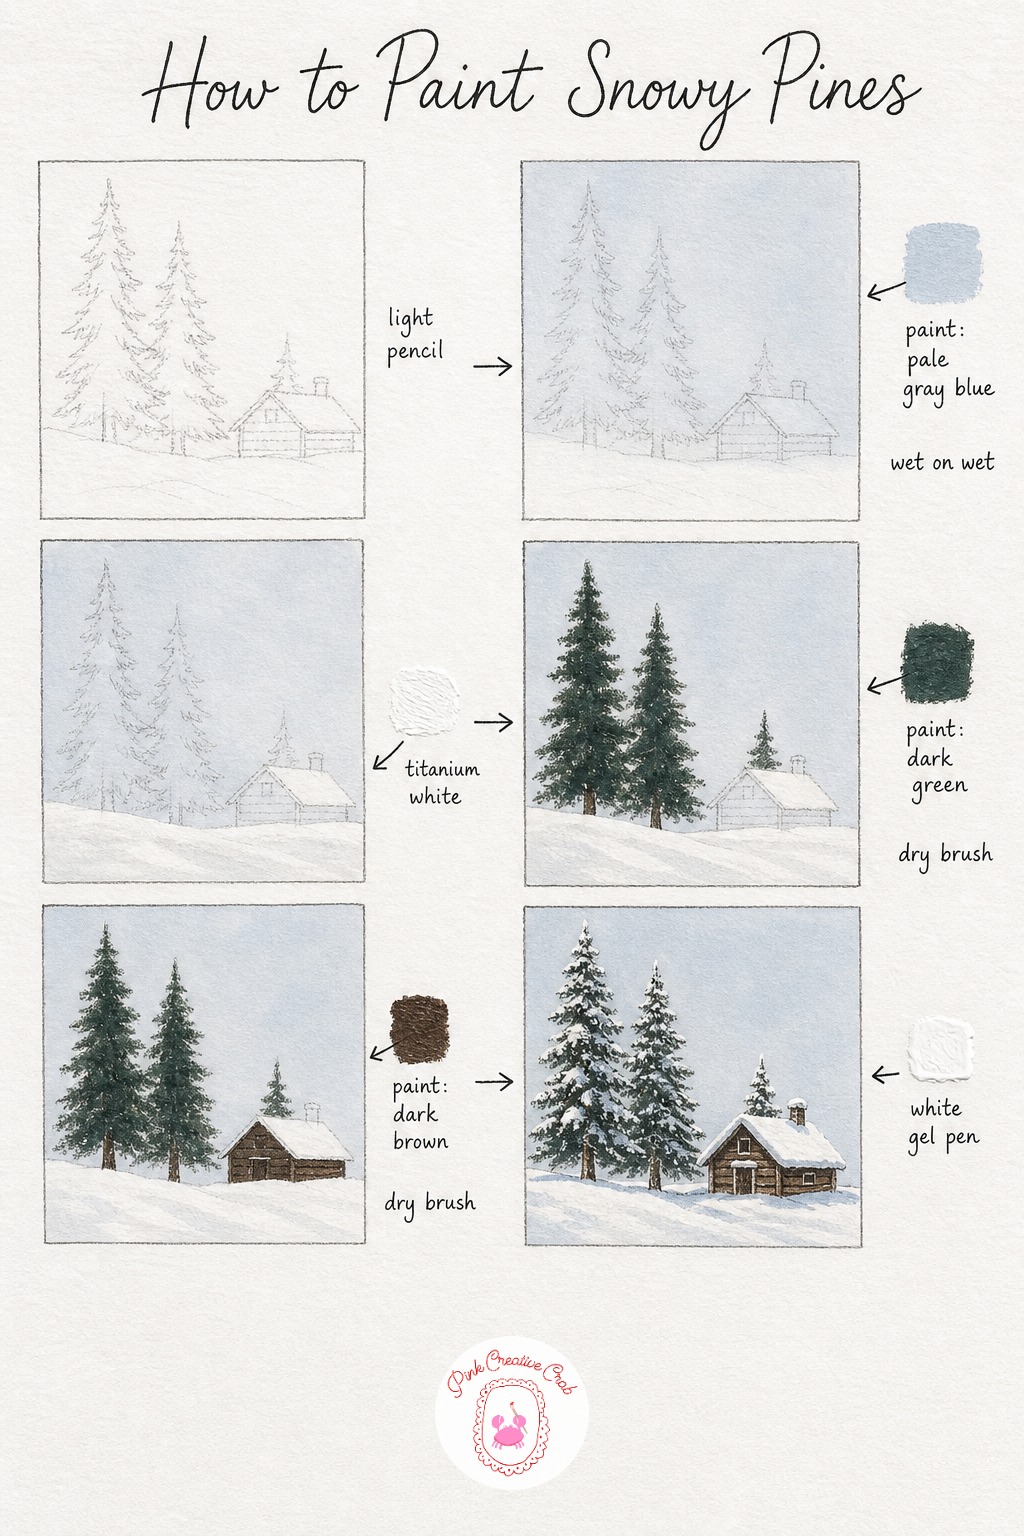
Sketch two or three pine silhouettes of different heights, keeping the branches as simple layered triangles, then add a small cabin roofline tucked beside them. This scene reads as winter mostly through the white highlights added last, so do not worry about detail now.
Wash the sky in a pale gray blue, loose and uneven so it feels like an overcast winter afternoon, and once dry, wash the ground in a mix of titanium white and gray. Build each pine with a dry brush loaded in dark green, stacking short upward strokes in layers from the base to the tip of each tree.
Add the brown trunks beneath the greenery and dry brush in the cabin walls, keeping the lines simple since the pines are the real subject here. A common beginner mistake is making the pines too smooth and rounded, so keep every stroke angular and pointed upward.
Finish with a white gel pen or a dry brush of white gouache dabbed lightly on branch tips, the rooftop and patches of ground, then add a soft blue gray shadow along one side of the cabin for depth. Tip: leave more bare canvas than you think you need before adding the white, since snow reads better with a little negative space.
Lemon Tree in a Pot
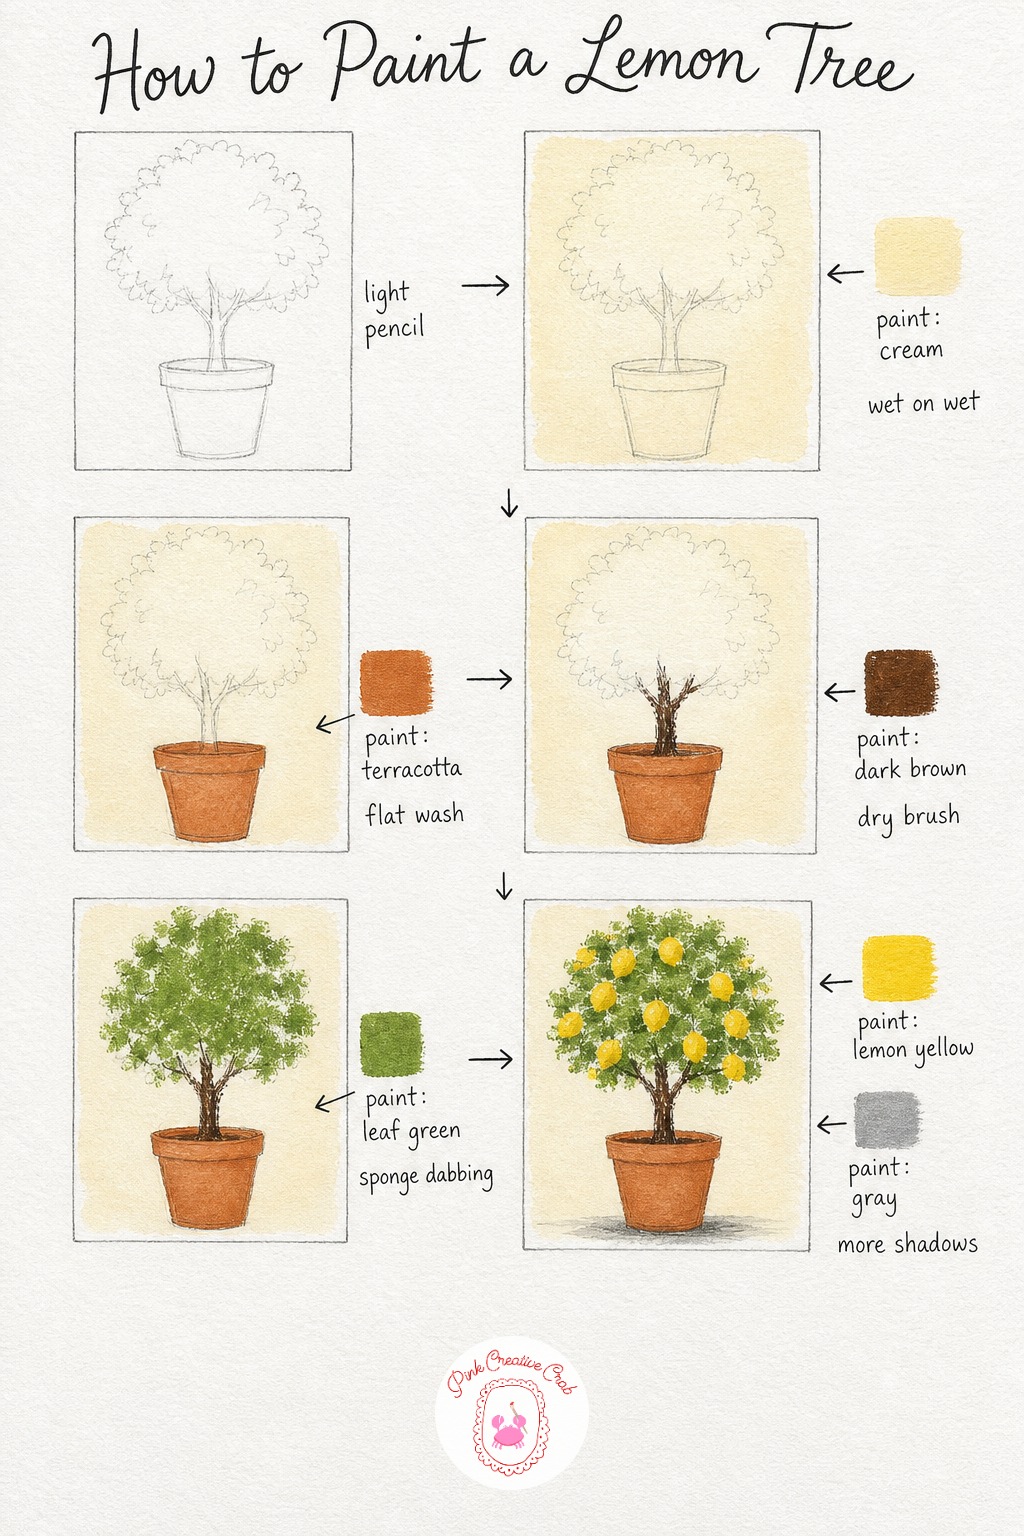
Sketch a simple round pot with a short straight trunk rising from it, then rough in a rounded canopy shape above, a little wider than the pot itself. This one works well as a cozy indoor scene for your blue and white painting collection too, since potted citrus pairs nicely with porcelain.
Wash the background in a soft cream so the pot and leaves stand out, then once dry, paint the pot in a flat terracotta wash. Dry brush the short trunk in dark brown just above the pot rim, keeping it narrow since potted lemon trees have slim trunks.
Dab leaf green across the canopy with a sponge, building it up in two or three light layers rather than one heavy one, so the texture stays soft instead of clumpy. Beginners often paint the canopy as a flat circle, so let the sponge marks spill slightly outside the pencil line for a looser edge.
Finish by dabbing small ovals of lemon yellow scattered through the leaves, then add a soft gray shadow beneath the pot to ground it. If you lack terracotta, mix burnt orange with a touch of white. Tip: paint the lemons last and keep them few, since three or four read better than a dozen crowded ones.
Birch Grove
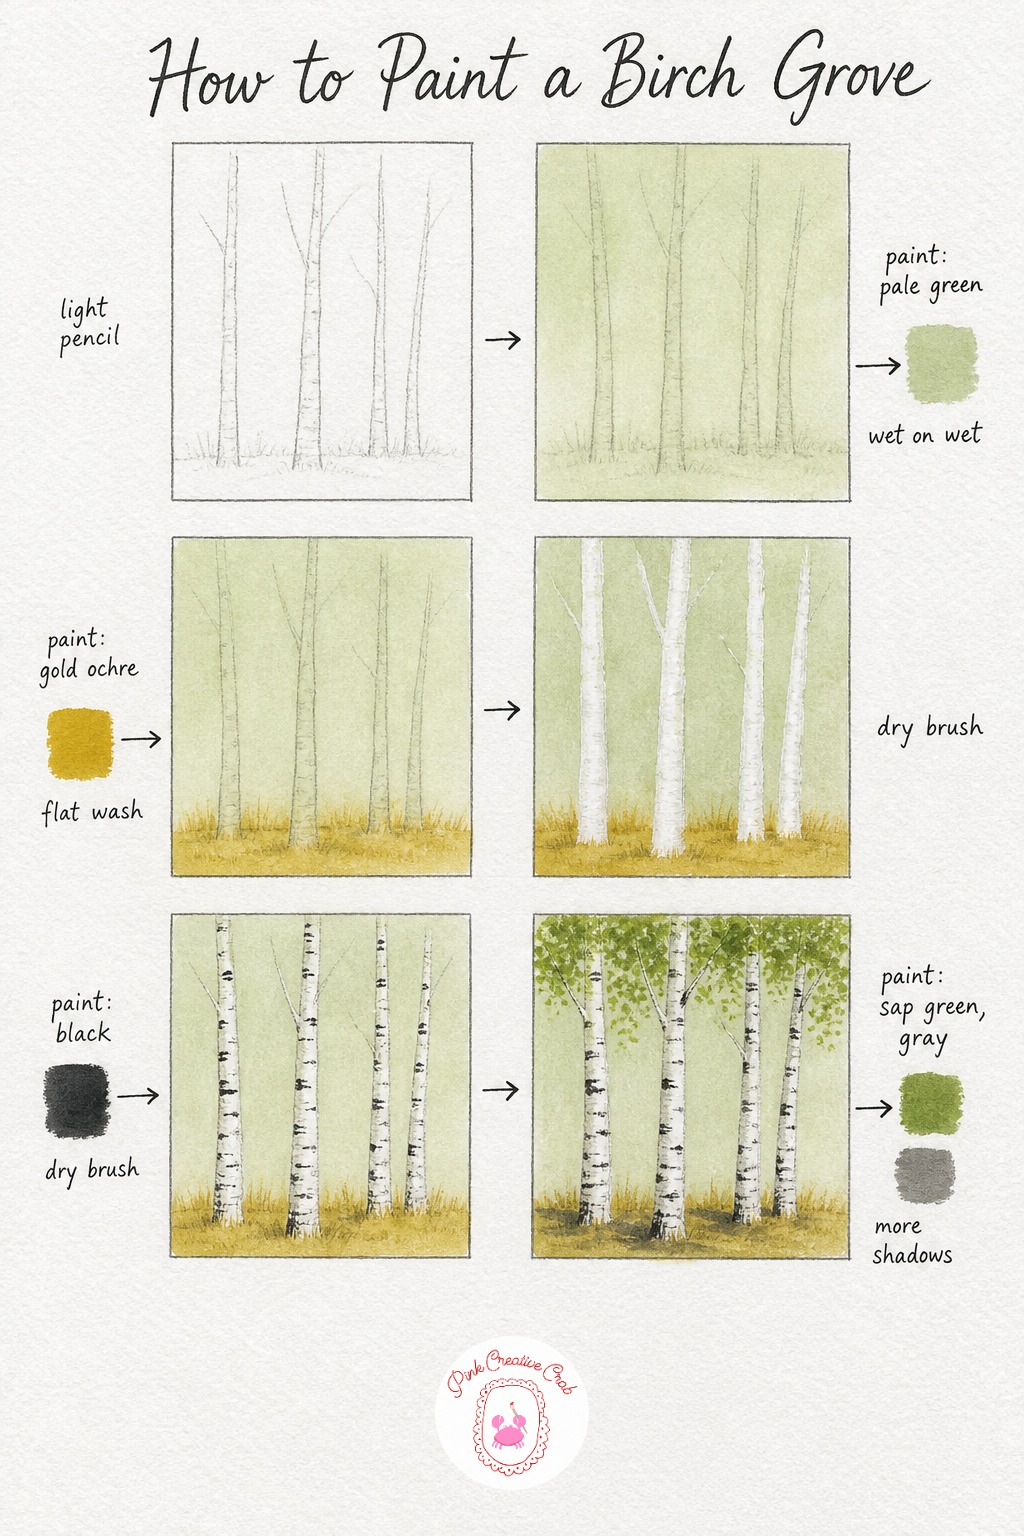
Sketch four or five thin vertical lines of slightly different heights and thicknesses, since real birches never stand perfectly even in a row. Keep the spacing uneven too, with some trunks closer together and one or two set apart.
Wash the background in a soft pale green so the white trunks will pop forward once painted, then once dry, add a warm gold wash along the ground to suggest fallen leaves or dry grass. Load a dry brush with titanium white and paint each trunk in one steady upward stroke, pressing lightly so a little background shows through.
Once the white trunks are dry, dab short black horizontal marks at irregular intervals up each trunk for the classic birch bark pattern. A common mistake is making these marks too even and ladder like, so vary their length, spacing and angle from trunk to trunk.
Finish with small clusters of sap green dabbed loosely at the top of each trunk for sparse foliage, then drop a soft gray shadow at the base of each tree. If you are short on patience, this scene also pairs beautifully with the loose shapes in watercolor zentangle trees. Tip: paint the white trunks before the black marks, never the other way around.
Apple Tree in a Meadow
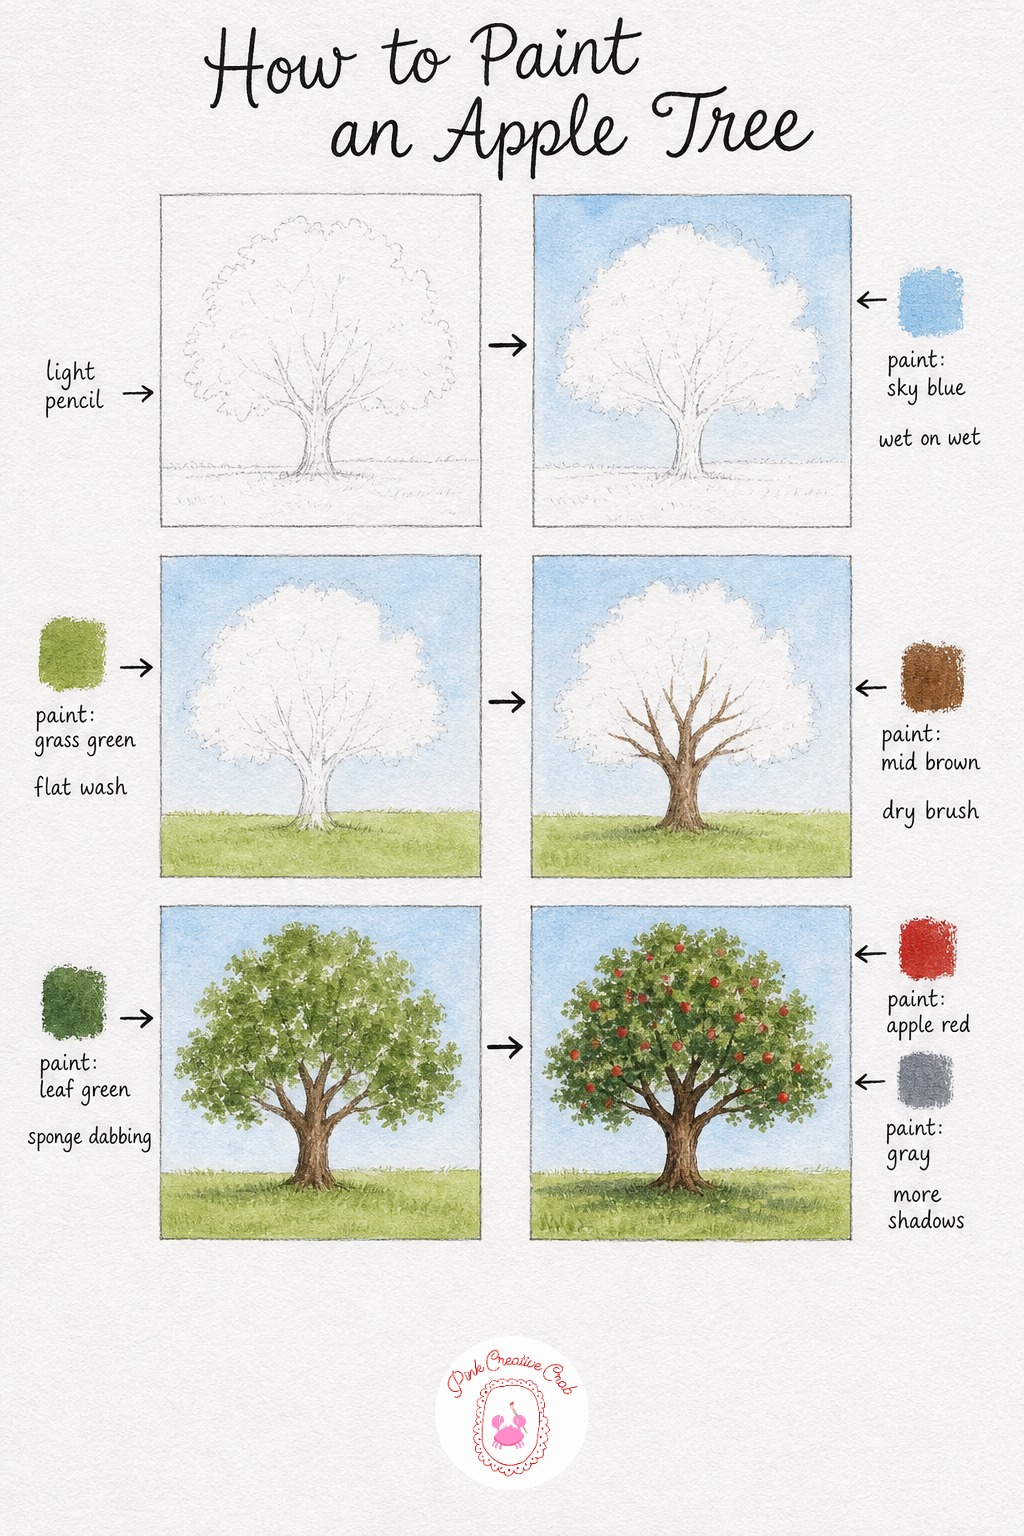
Sketch a short sturdy trunk topped with a wide rounded canopy, then add a simple horizon line for the meadow about a third of the way up the canvas. Apple trees tend to look squatter and bushier than other trees, so keep the canopy broad rather than tall.
Wash the sky in pale blue and let it dry fully before washing the meadow in a fresh grass green, keeping both layers loose and uneven. Dry brush the trunk and lower branches in mid brown, letting a few branch tips poke out past the edge of the canopy.
Dab leaf green generously across the whole canopy shape with a sponge, filling it in solidly since apple foliage is dense. Beginners often leave gaps that make the tree look patchy, so go back over thin spots with a second light dab once the first layer is dry.
Finish with small dots of apple red dabbed here and there through the leaves, keeping them scattered rather than symmetrical, then add a soft gray shadow pooling under the canopy on the grass. Tip: dab the apples with the very tip of the sponge corner for a neat small dot instead of a smear.
Autumn Oak on a Hilltop
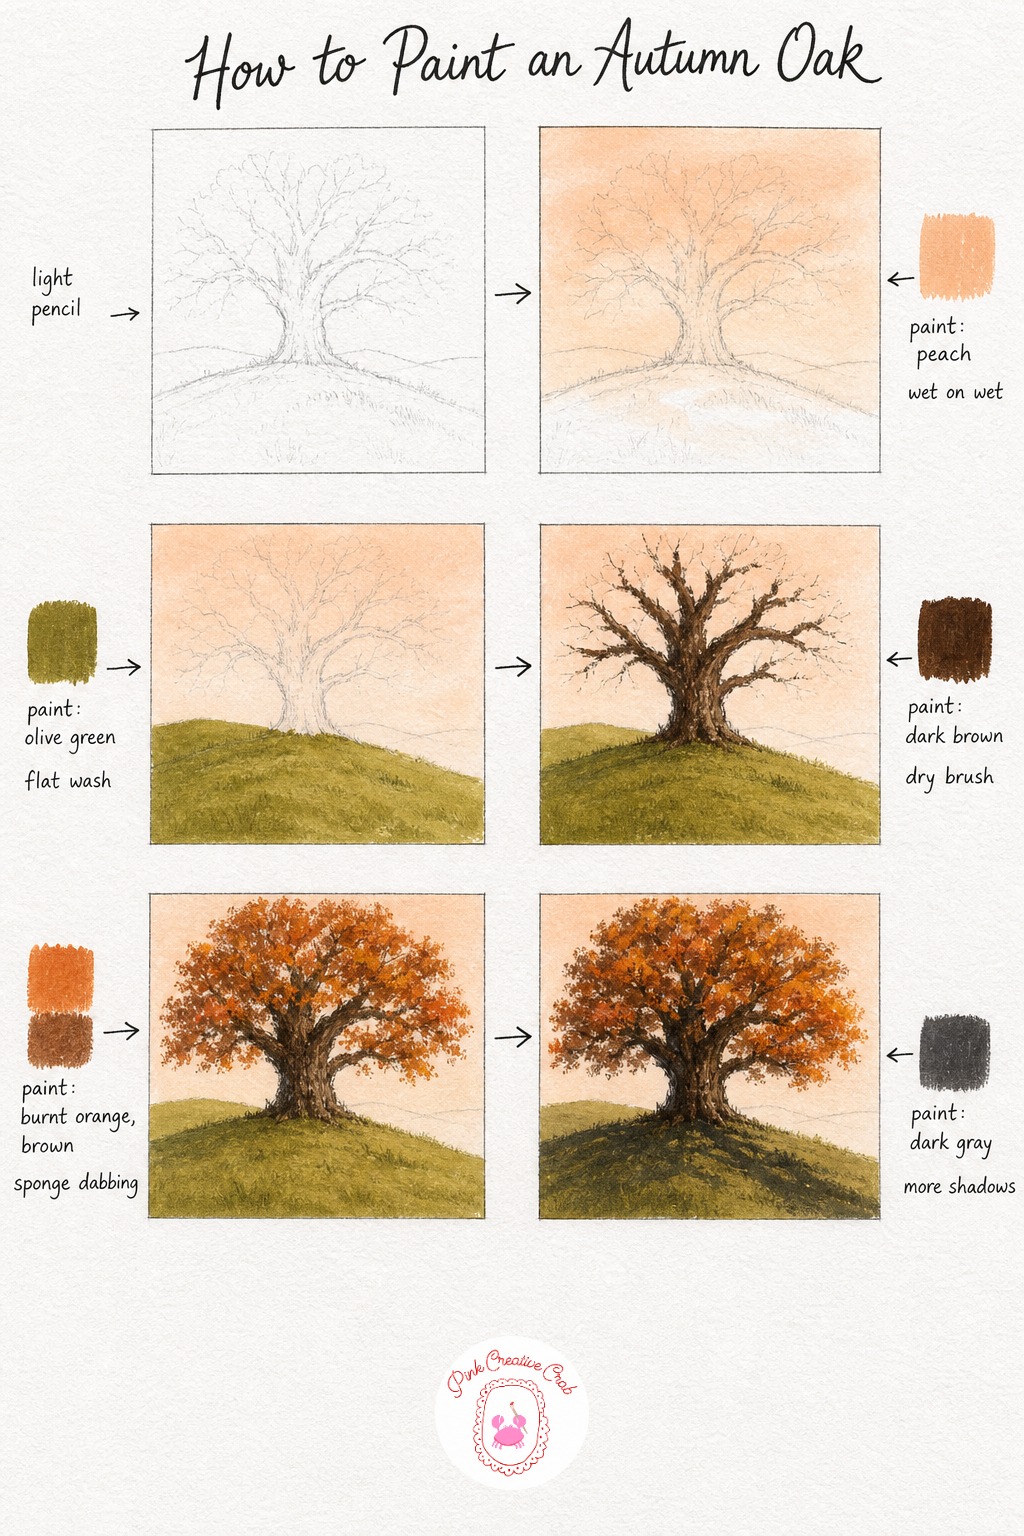
Sketch an oak with a noticeably thick trunk and heavy, wide spreading branches, since oaks read as sturdy and old compared to most other trees. Add a simple rolling hill line rather than a flat horizon for more interest.
Wash the sky in a soft peach to suggest late afternoon light, then once dry, wash the hillside in a warm olive green. Dry brush the trunk and branches in dark brown with firm pressure, since oak bark is rough and deeply grooved compared to a birch or cherry.
Dab burnt orange and brown across the wide canopy with a sponge, keeping the shape broad and slightly flattened at the top rather than a tall oval. A common mistake with oaks is making the canopy too small for the trunk, so let it spread generously to both sides.
Finish with a dark gray shadow dabbed under the densest part of the canopy, then drag a long soft shadow down the hillside away from the tree to show the direction of the light. Tip: keep your orange and brown slightly separate rather than blending them fully, since oak foliage in autumn is rarely one even color.
Pink Magnolia by a Gate
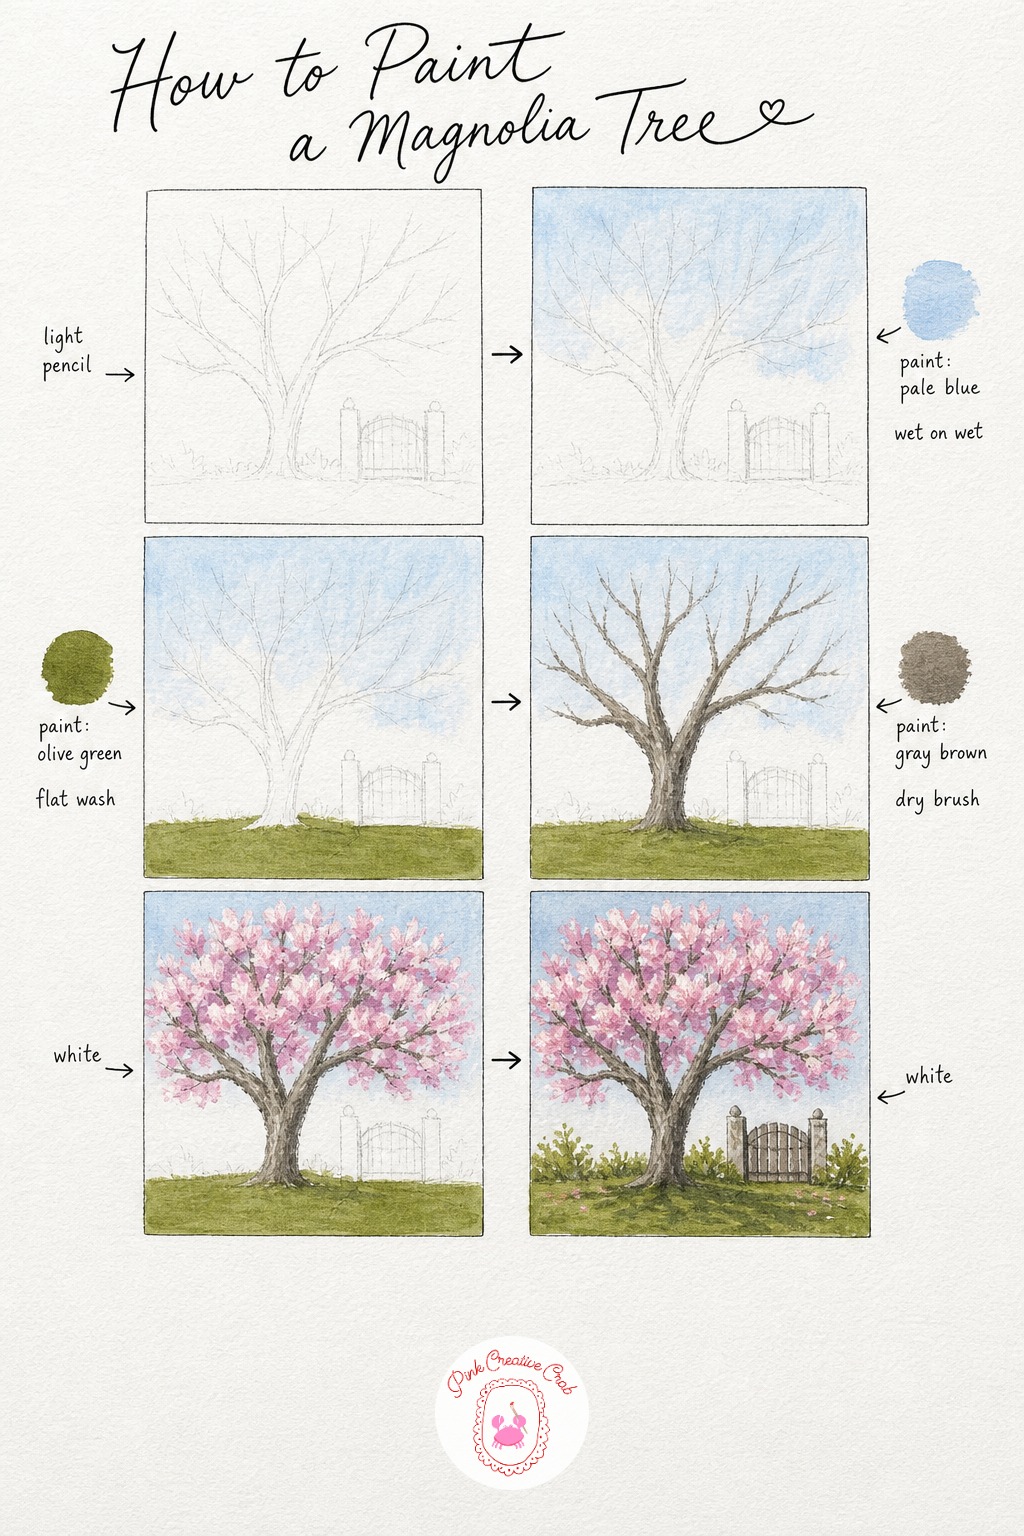
Sketch a trunk that splits early into several spreading branches, since magnolias tend to be wider than they are tall. Tuck a small simple gate into one corner of the scene to give the painting a sense of place.
Wash the sky in pale blue and let it dry before washing the ground in a warm olive green. Dry brush the trunk and branches in gray brown, following the spreading shape you sketched rather than painting straight up.
Dab large soft clusters of blush pink and white across the whole canopy with a sponge, pressing a little harder than you did for cherry blossoms since magnolia flowers are much bigger. Beginners often make magnolia blooms too small and scattered, so let the clusters overlap generously and leave only small gaps of sky between them.
Finish by dry brushing the gate in simple white strokes and adding a soft gray shadow beneath the tree and along the base of the gate. If pink feels tricky, this pairs nicely with ideas from easy watercolor flower for beginners for mixing soft petal tones. Tip: dab the white highlights into the pink blooms while they are still slightly damp so the colors blend softly at the edges.
Lone Pine on a Cliff
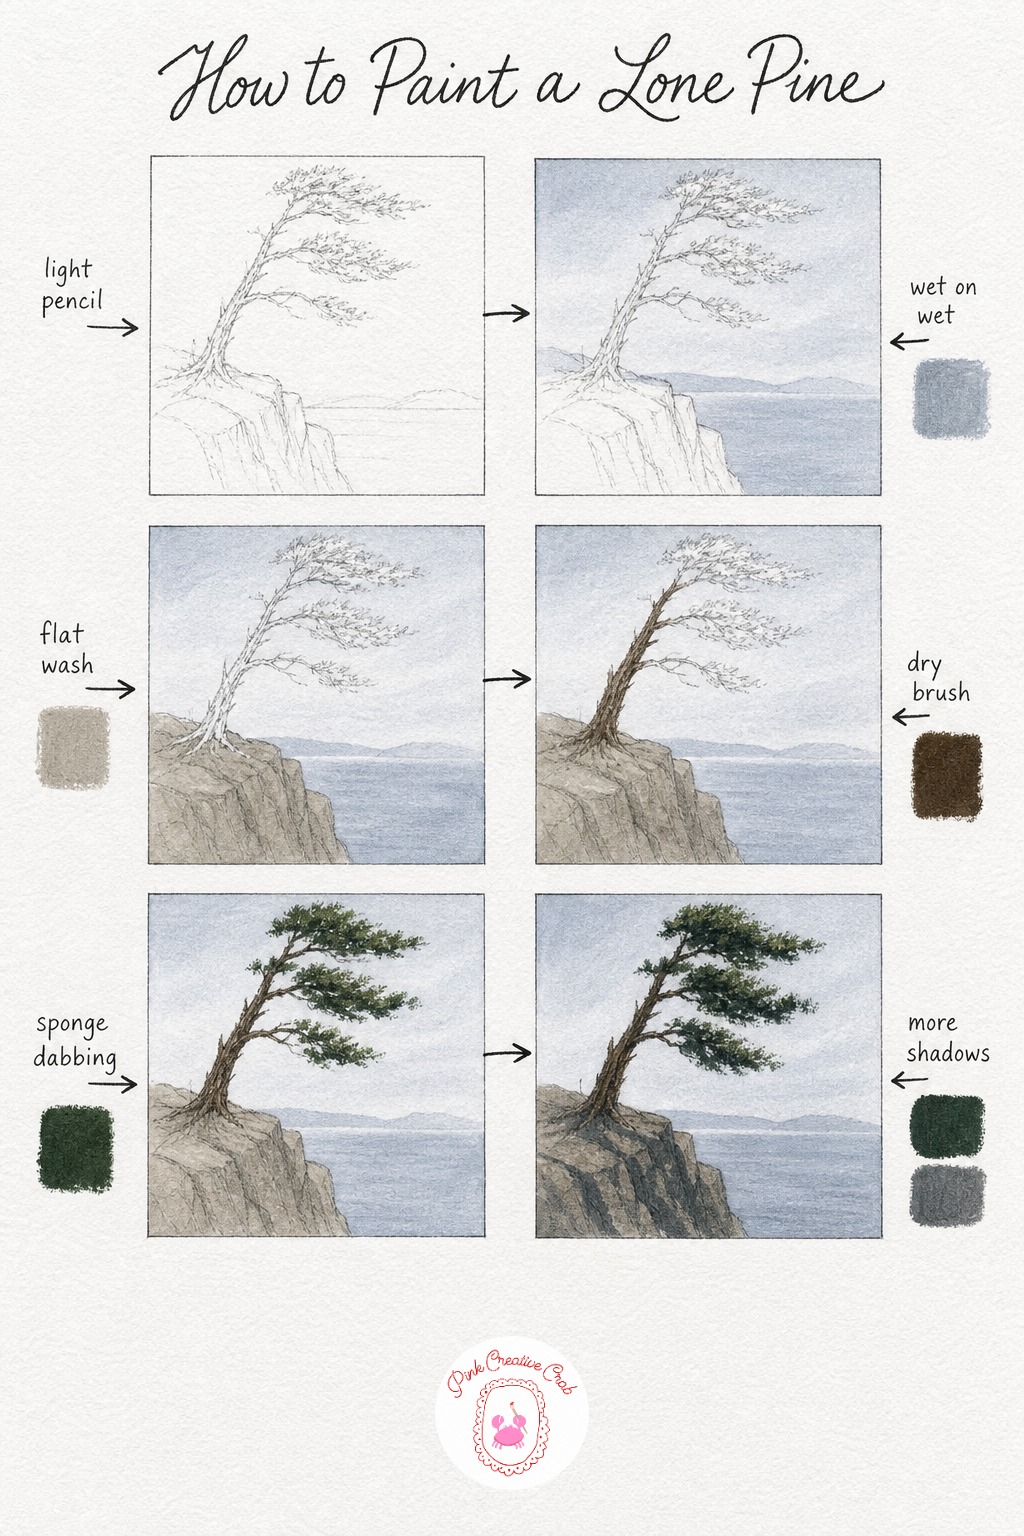
Sketch a trunk that leans noticeably to one side, as if shaped by years of wind, then add a simple cliff edge dropping away beneath it. This is a dramatic subject that pairs well with the mood of acrylic painting mountains if you enjoy coastal scenes.
Wash the sky and a sliver of distant sea in a soft gray blue, keeping the horizon line low and simple. Once dry, wash the cliff in a warm gray, then dry brush the leaning trunk in dark brown, letting the stroke itself curve slightly to show the wind.
Dab dark green foliage in layered clumps that all lean the same direction as the trunk, since a lone pine on a cliff is shaped entirely by wind on one side. A common mistake is painting a symmetrical, balanced canopy here, which loses the drama, so keep the foliage heavier on the sheltered side.
Finish with a deeper forest green shadow dabbed into the sheltered side of the canopy, and a soft gray cast shadow stretching across the cliff from the trunk. Tip: keep the whole palette muted and cool here, since one warm color will fight the windswept, salty feel of the scene.
Orchard Row in Blossom
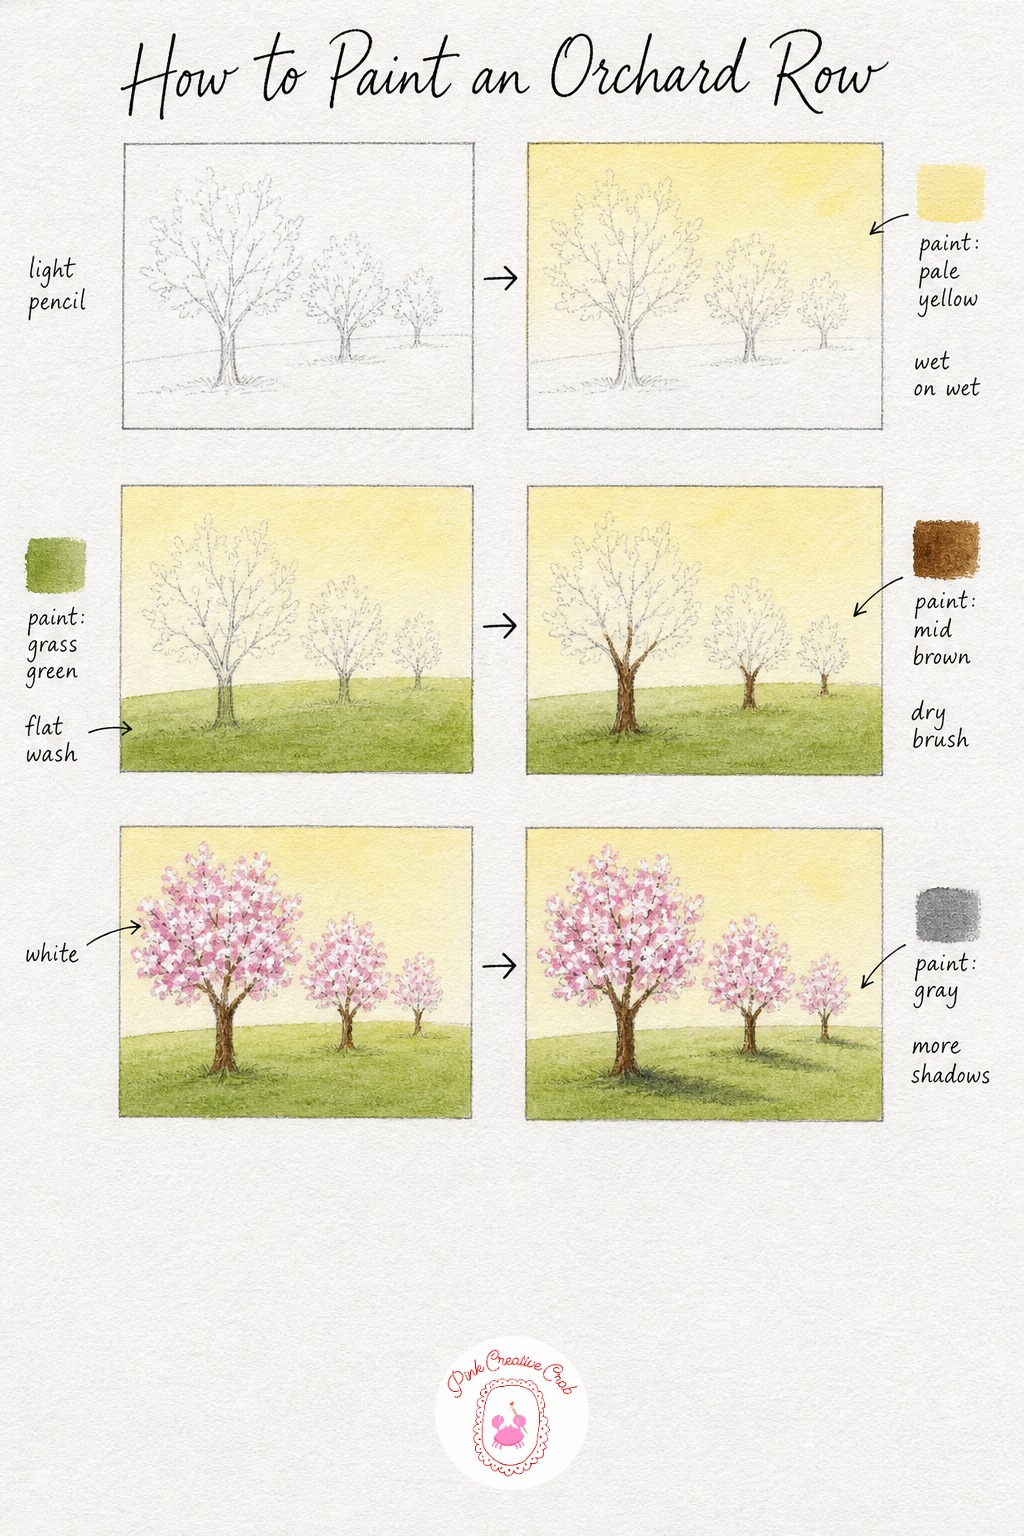
Sketch three simple trees of decreasing size, placed so they appear to recede into the distance, with the smallest tucked near the horizon line. This gentle sense of depth makes the row feel like a real orchard rather than three identical trees side by side.
Wash the sky in a pale buttery yellow for a soft spring morning feel, then wash the ground in grass green, keeping it a touch paler near the horizon to help the distance read correctly. Dry brush each trunk in mid brown, making the nearest trunk thickest and the farthest one noticeably thin and short.
Dab pale pink and white blossom across all three canopies with a sponge, but use less paint and a lighter touch on the farthest tree so it naturally looks softer and further away. Beginners often paint all three trees with equal detail, which flattens the sense of distance, so hold back on the smallest one.
Finish with a soft gray shadow beneath each tree, making the nearest shadow the longest and darkest. Tip: step back from the canvas after the trunks go in to check the spacing reads as a row before adding blossom.
Autumn Aspen Grove
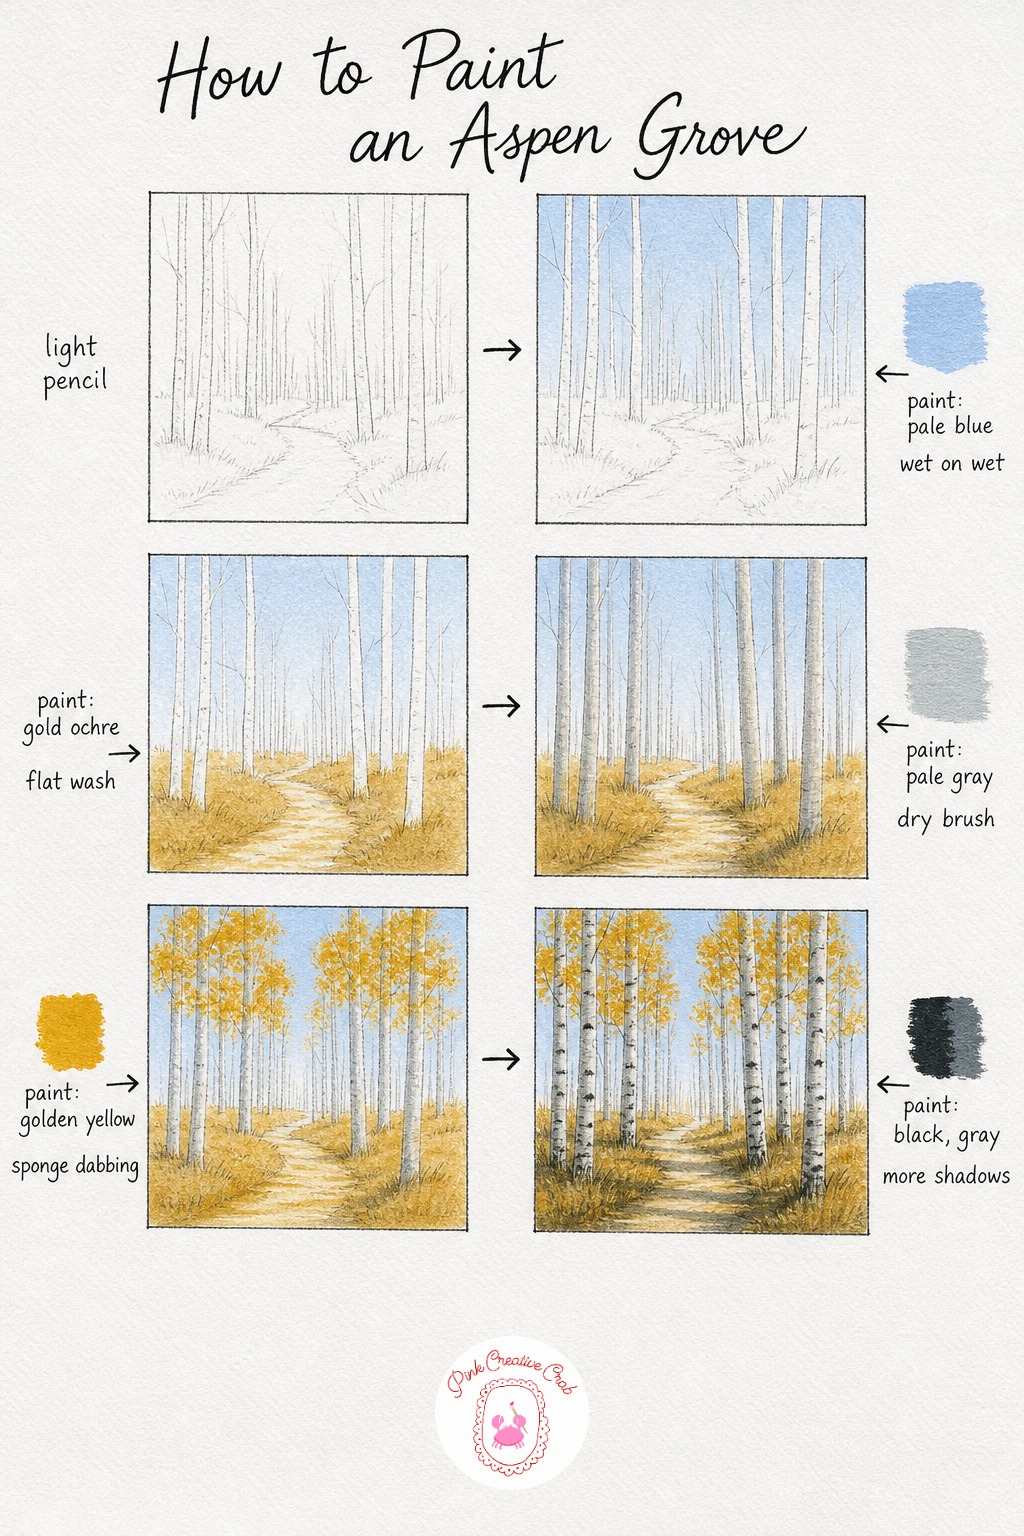
Sketch several slim, tall trunks at slightly different heights, with a simple curving path leading back between them. Keep the composition airy, with real gaps of sky visible between the trees rather than a solid wall of trunks.
Wash the sky in pale blue through the gaps between where the trunks will go, then once dry, wash the path and forest floor in a warm gold. Dry brush each trunk in pale gray with one clean upward stroke, pressing lightly so the strokes stay thin and elegant.
Dab small clusters of golden yellow foliage only at the top of each trunk with a sponge, since aspens have slender bare trunks with foliage concentrated high up, unlike a fuller tree like an oak or apple. A common mistake is adding too much foliage too low, which makes them look like ordinary round trees.
Finish with small dark dabs for knots along the trunks and a soft gray shadow drifting along the path. If pale gray feels too flat, warm it slightly with a touch of yellow ochre. Tip: vary the height of the gold foliage clusters so the grove does not look like a row of matching lollipops.
Fig Tree by a Terrace
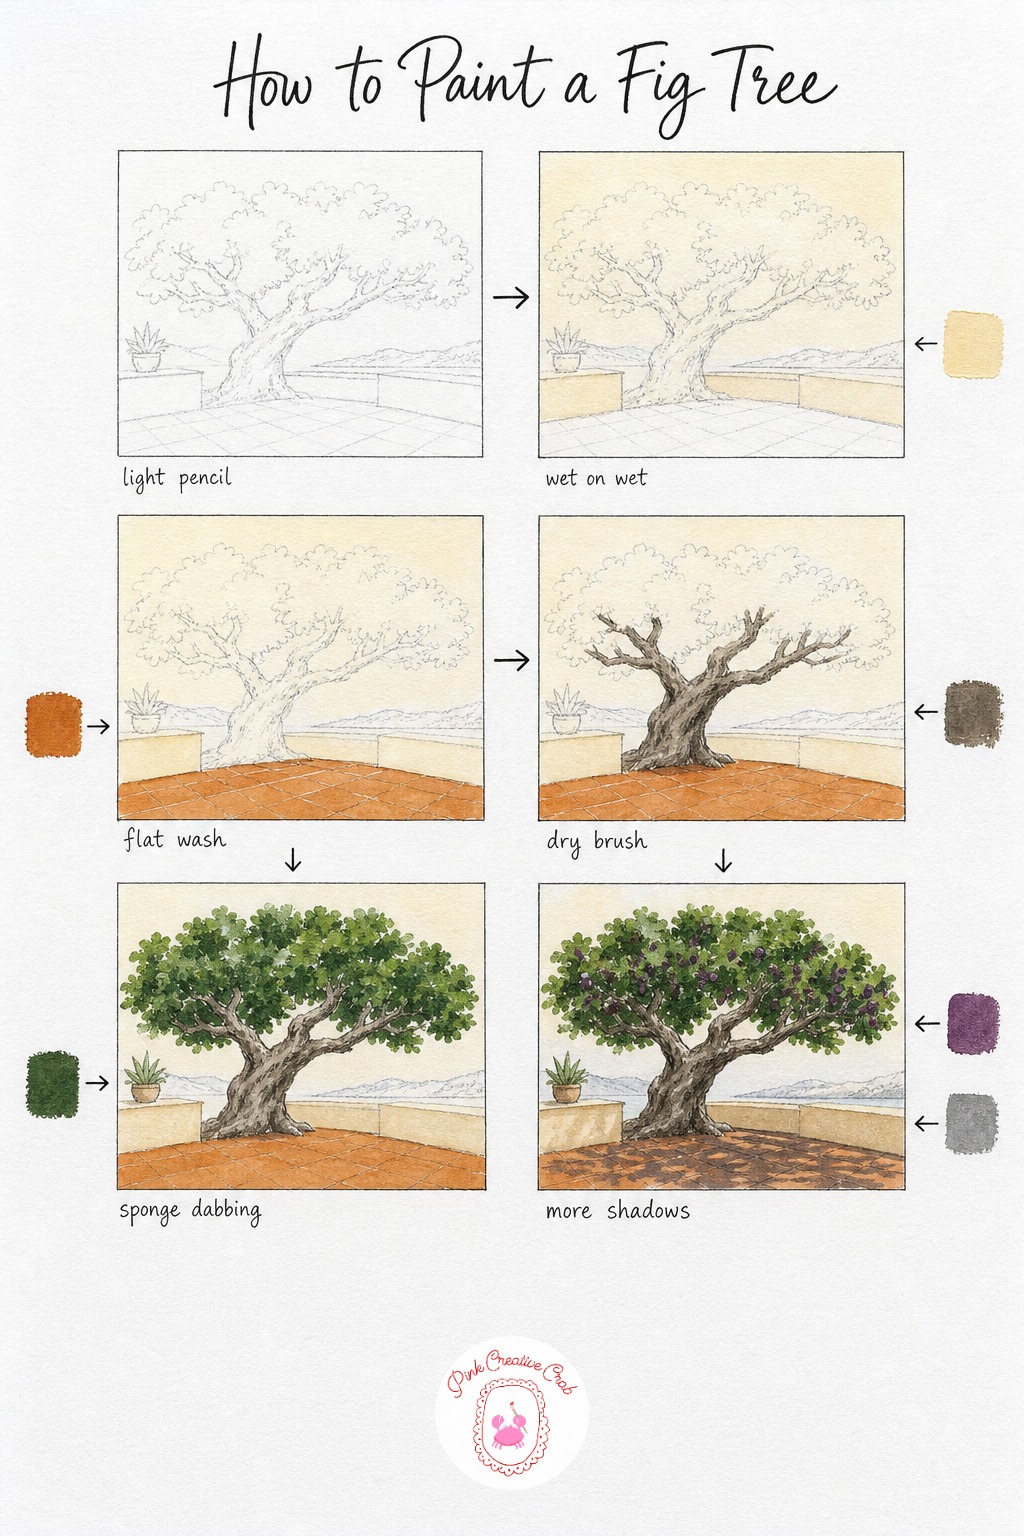
Sketch a fig tree low and wide rather than tall, with a thick trunk that branches close to the ground, and add a simple terrace edge or low wall beneath it. Fig trees have a relaxed, sprawling shape that is forgiving for a beginner to draw.
Wash the sky and terrace wall together in a warm cream for a sunny Mediterranean feel, then once dry, wash the terrace floor in terracotta. Dry brush the thick trunk and its low spreading branches in gray brown, keeping the branch lines short and close to the ground.
Dab deep green across the whole wide canopy heavily with a sponge, since fig leaves are large and the foliage should look dense and a little heavy rather than light and airy. Beginners sometimes under fill the canopy here, leaving gaps that read as thin, so build up two solid layers of green.
Finish with small plum purple ovals dabbed here and there among the leaves for ripening figs, and a soft gray shadow stretched across the terrace floor. Tip: keep the fig dabs irregular in size, since real fruit clusters at different stages of ripeness along the same branch.
Dogwood in Early Spring
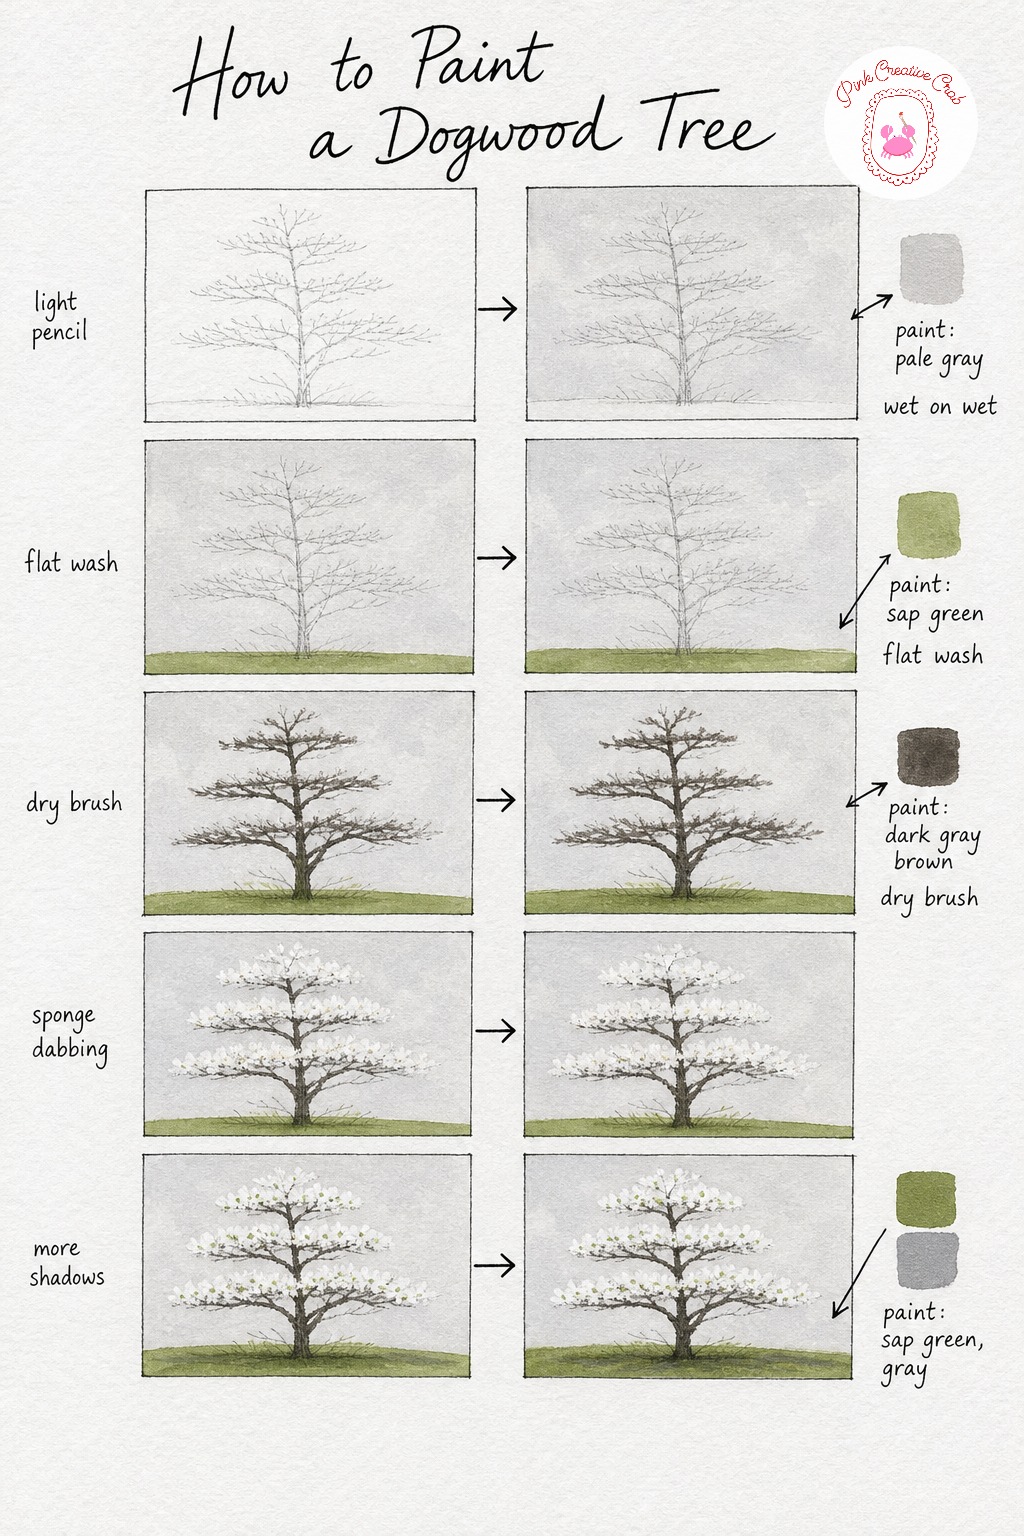
Sketch dogwood branches in distinct horizontal tiers or layers rather than one round canopy, since this tiered structure is what makes a dogwood instantly recognizable. Keep the layers a little uneven in spacing for a natural look.
Wash the background in a quiet pale gray so the white blossoms will stand out strongly later, then once dry, add a thin green wash along the base for grass. Dry brush the trunk and horizontal branches in a dark gray brown, keeping each tier distinct and slightly separate from the ones above and below it.
Dab white blossoms with a sponge along each horizontal branch layer, letting them cluster thickly in places and thin out in others. A common mistake is scattering blossoms evenly across the whole tree, which loses the tiered look, so follow the branch lines closely as you dab.
Finish with a tiny dot of sap green dabbed at the center of a few blossoms for that classic dogwood detail, and a soft gray shadow beneath the tree. Tip: keep the background behind the blossoms dark enough in contrast, since dogwood flowers nearly disappear against a pale sky.
Wind Swept Coastal Tree
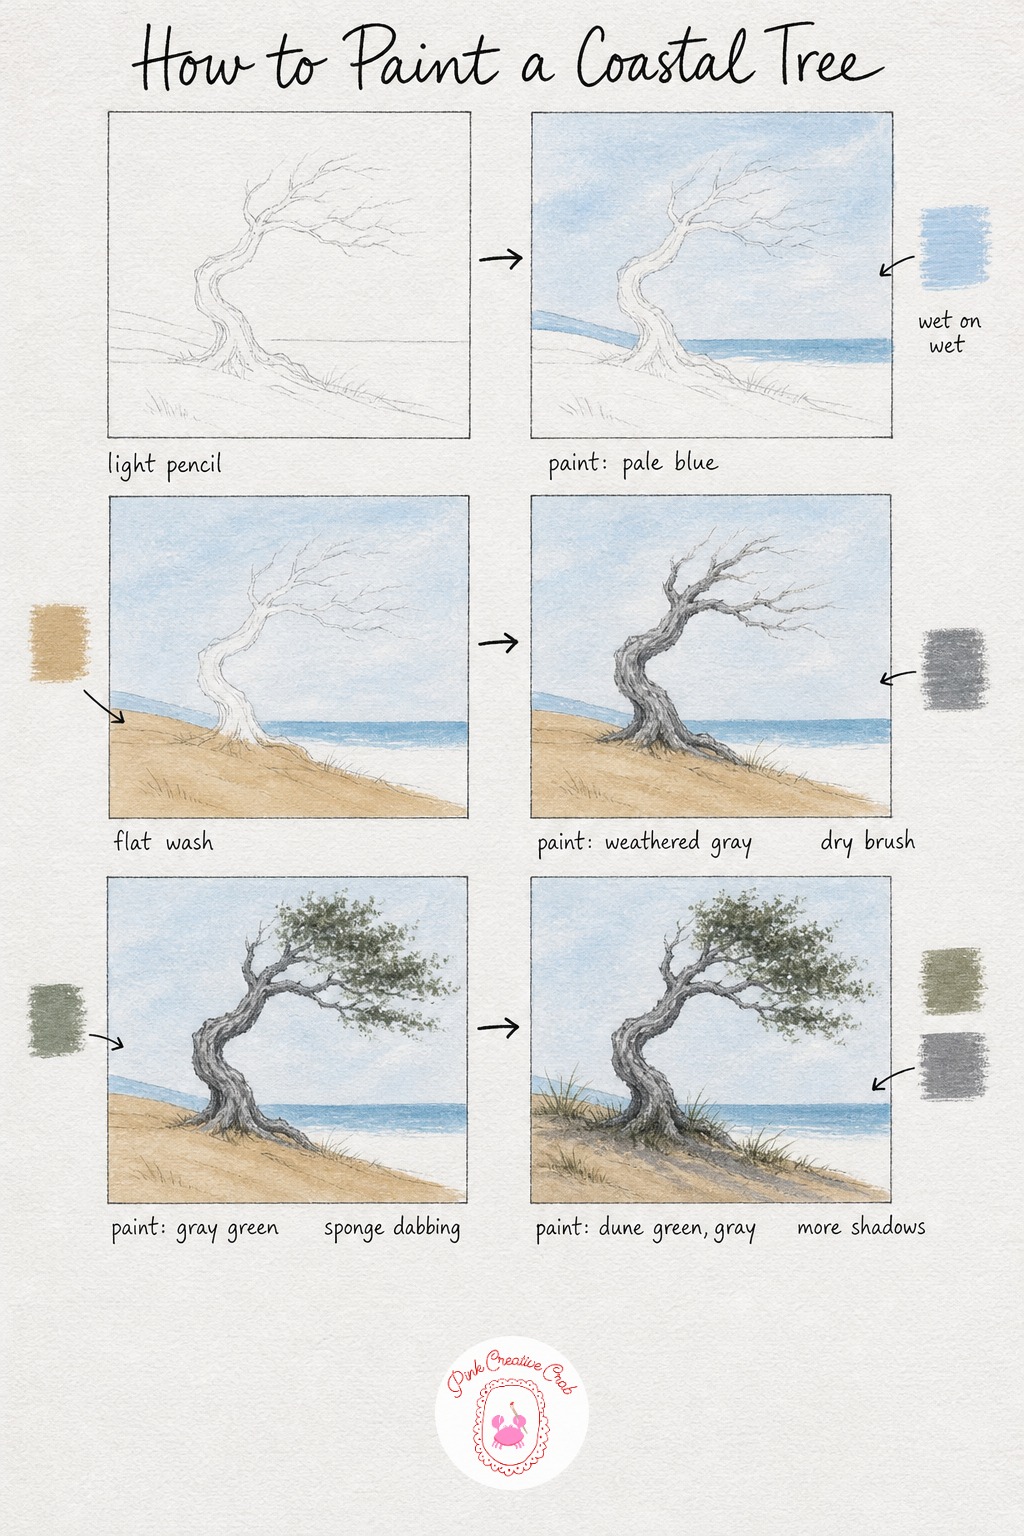
Sketch a trunk that bends dramatically, almost parallel to the ground in places, then add a simple sandy dune beneath it. These coastal trees are shaped entirely by the wind, so do not be afraid to make the trunk unusually crooked.
Wash the sky in pale blue with a thin strip of sea along the horizon, then once dry, wash the dune in a warm sandy tone. Dry brush the weathered gray trunk in one continuous twisting stroke, letting it thin out toward the tip.
Dab sparse gray green foliage with a sponge only on the sheltered side of the trunk, away from the direction the wind seems to be blowing. Beginners often give this tree a full, even canopy, which looks wrong here, so keep the foliage thin, patchy and lopsided.
Finish with a few dry brushed tufts of dune grass at the base and a soft gray shadow stretched along the sand. If you enjoy this kind of weathered, salty scene, it fits nicely alongside easy beach watercolor ideas for a coastal set. Tip: keep every stroke on this tree slanting the same direction to sell the windswept feel.
Old Olive Tree
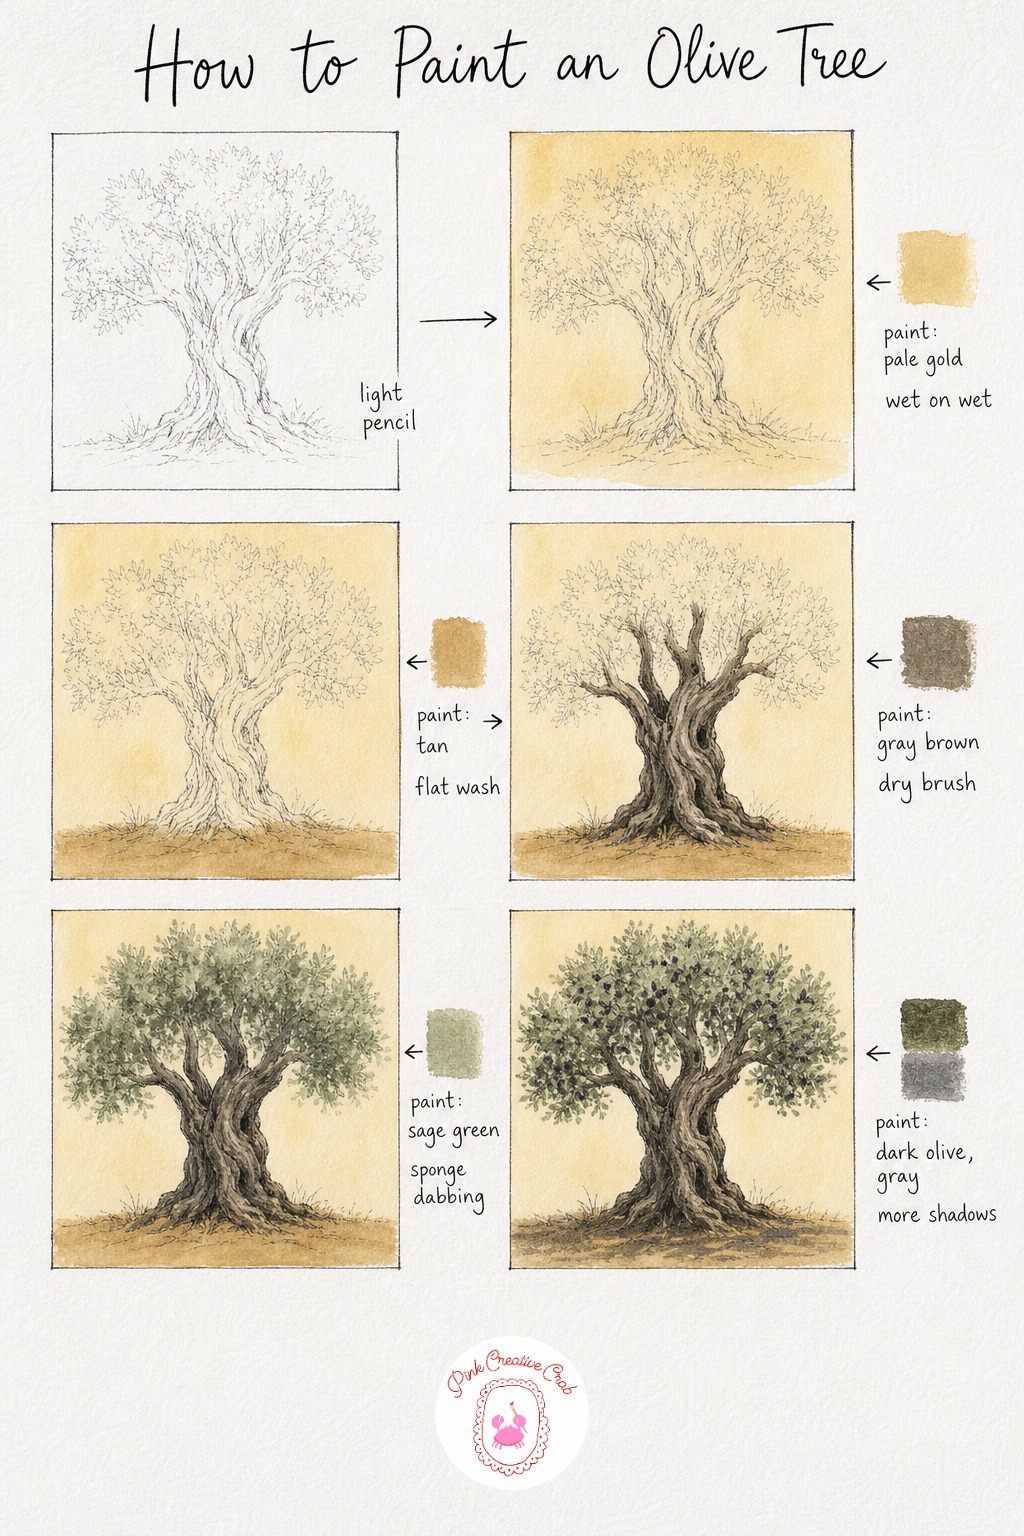
Sketch a short, very thick trunk with visible twists and knots, topped by a wide, somewhat flattened canopy. Olive trees look old and characterful even when young in a painting, so do not worry about making the trunk too gnarled.
Wash the background in a warm pale gold for that sun baked Mediterranean light, then once dry, wash the dry ground beneath the tree in a soft tan. Dry brush the thick trunk in gray brown, pressing the brush at odd angles to suggest the twisting grain and knots real olive bark has.
Dab sage green across the wide canopy with a sponge, using a lighter touch than you would for a cherry or apple tree, since olive foliage has a soft, silvery, almost dusty quality rather than a bright fresh green. A common mistake is painting olive leaves too vivid and glossy, so keep the green muted.
Finish with a scatter of small dark olive dabs tucked among the leaves and a soft gray shadow pooling beneath the thick trunk. Tip: mix a touch of gray into your green before loading the sponge, since that dusty undertone is what makes an olive tree recognizable.
What to Do Next
Pick whichever tree matches your mood today, set out your paints and sponge, and work through the stages one at a time without rushing the drying steps. Once you have a favorite or two, try painting the same tree again in a different season to see how much a simple color change can tell.
Frequently Asked Questions
What is the easiest tree to paint for a true beginner?
A simple pine or a potted lemon tree is easiest, since both use basic shapes and the sponge does most of the foliage work for you. Save the willow and the magnolia for once you feel comfortable with dry brush and sponge together.
How do I stop my tree foliage looking like a flat green blob?
Vary your sponge pressure and mix two shades of the same color before dabbing, switching between them as you move across the canopy. Leaving small gaps of background color showing through also breaks up the solid shape naturally.
What brush gives the best bark texture in acrylic?
A flat or filbert brush used almost dry, with the bristles slightly splayed, drags the most convincing bark texture. Load very little paint, wipe most of it off on scrap paper, then pull the brush along the trunk in short upward strokes.
Should I seal or varnish the painting once it is finished?
A light coat of acrylic varnish once the painting is fully dry protects the surface and evens out the sheen between matte and glossy areas. Wait at least a day or two before varnishing so the thicker dry brush areas cure properly.
Can I use watercolor instead of acrylic for these tree lessons?
These lessons are built around acrylic’s opacity for layering trunk over sky and dabbing solid foliage, so watercolor needs an adjusted approach with more transparent layering. If you prefer watercolor trees, lighter wash based techniques work better than heavy dry brush dragging.
Have any thoughts?
Share your reaction or leave a quick response — we’d love to hear what you think!
-
 0
-
0
-
0
-
0
-
0
-
0


