

Table of Contents
- Before You Start
- Oak Leaves With Acorns
- Maple Branch in Red and Orange
- Ginkgo Leaves on a Book Page
- Monstera Leaves in a Pot
- Eucalyptus Sprigs in a Jar
- Ivy Climbing a Brick Wall
- Birch Leaves With Catkins
- Fern Frond Unfurling
- Autumn Leaf Pile
- Grape Vine Leaves
- Hosta Leaves by a Stone
- Fig Leaf Study
- Frequently Asked Questions
Learning how to draw leaves is one of those quiet joys that never gets old, and I keep coming back to it every time the light turns golden outside my window. There is something so satisfying about layering colored pencil until a leaf stops looking flat and starts looking like it just fell off the branch.
Below you will find twelve small arrangements, from oak leaves with acorns to ginkgo fans on an open book, each broken into clear stages so you can follow along at your own pace. Pick the one that matches the mood of your day, sharpen your pencils, and let’s get those veins and colors down on paper.
Using these images: free for personal projects such as printing, coloring, cards, journals and gifts. Handmade items that include them may be sold up to 30 pieces per design. More than that is commercial use and is not permitted, and neither is selling or sharing the images themselves or passing them off as your own. Please ask before any other use.
Before You Start
- Use a smooth or lightly toothed paper made for colored pencil, since rough watercolor paper will eat your pencil tips and blur your lines.
- Keep your first pencil sketch very light, almost a ghost of a line, so it disappears under the colored layers instead of showing through muddy.
- Sharpen your colored pencils often and keep the points fine for veins, since a blunt tip cannot draw a crisp line no matter how you turn it.
- Build color in thin layers rather than pressing hard once, since three light passes blend smoother than one heavy one and leave room to fix mistakes.
- Always test a new color on a scrap of the same paper first, because colored pencil often looks darker or warmer on paper than it does in the barrel.
- Work from the lightest tone to the darkest in every stage, adding shadow and depth only after the base color sits down evenly across the leaf.
Oak Leaves With Acorns
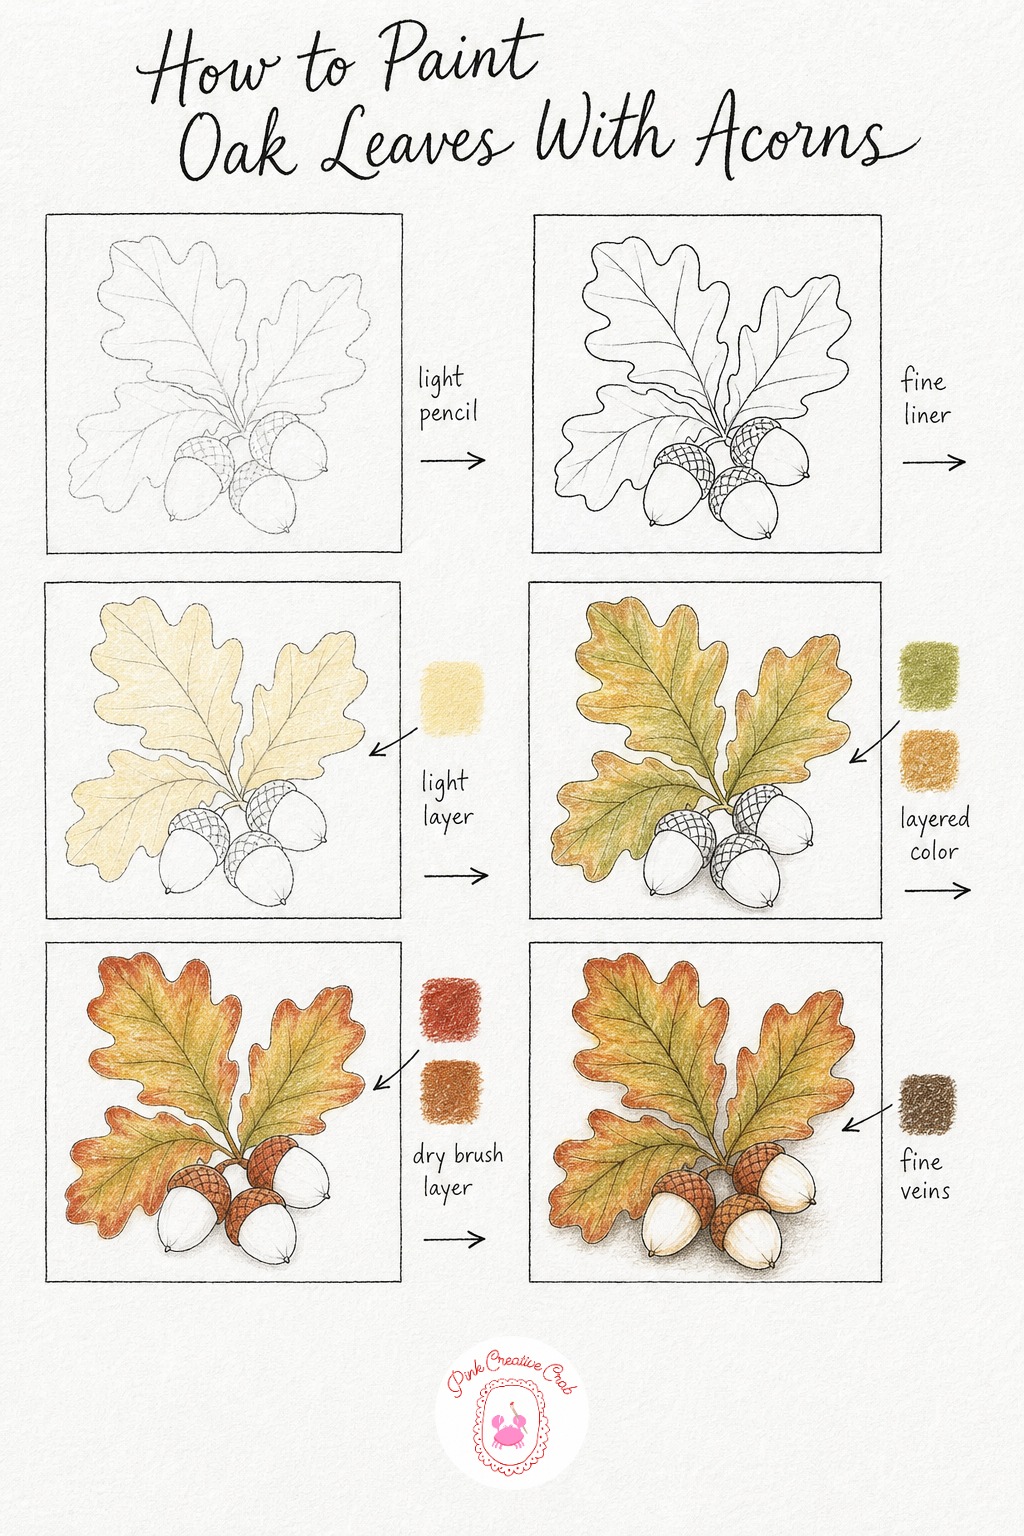
Start with a light pencil sketch of two overlapping oak leaves and a small cluster of acorns beneath them, keeping the lobed edges loose rather than perfectly symmetrical. Oak leaves are forgiving shapes, so do not worry if your lobes wander a little, that is exactly what makes them look real.
Once the ink line is dry, lay a pale cream yellow wash across both leaves as your base, pressing lightly so the paper still shows through. Layer olive green and golden brown on top while the yellow is still your undertone, letting the colors blend at the edges rather than mixing them on a palette.
Add rust red and burnt sienna at the tips and edges where oak leaves naturally turn first, using small circular strokes so the color feels textured rather than flat. Finish with fine dark brown veins drawn from the center rib outward, and a soft shadow line under each acorn so they sit believably against the leaves.
The common mistake here is pressing too hard on the first yellow layer, which blocks later colors from blending in. Keep that first pass whisper light and you will have room for every layer after it.
Maple Branch in Red and Orange
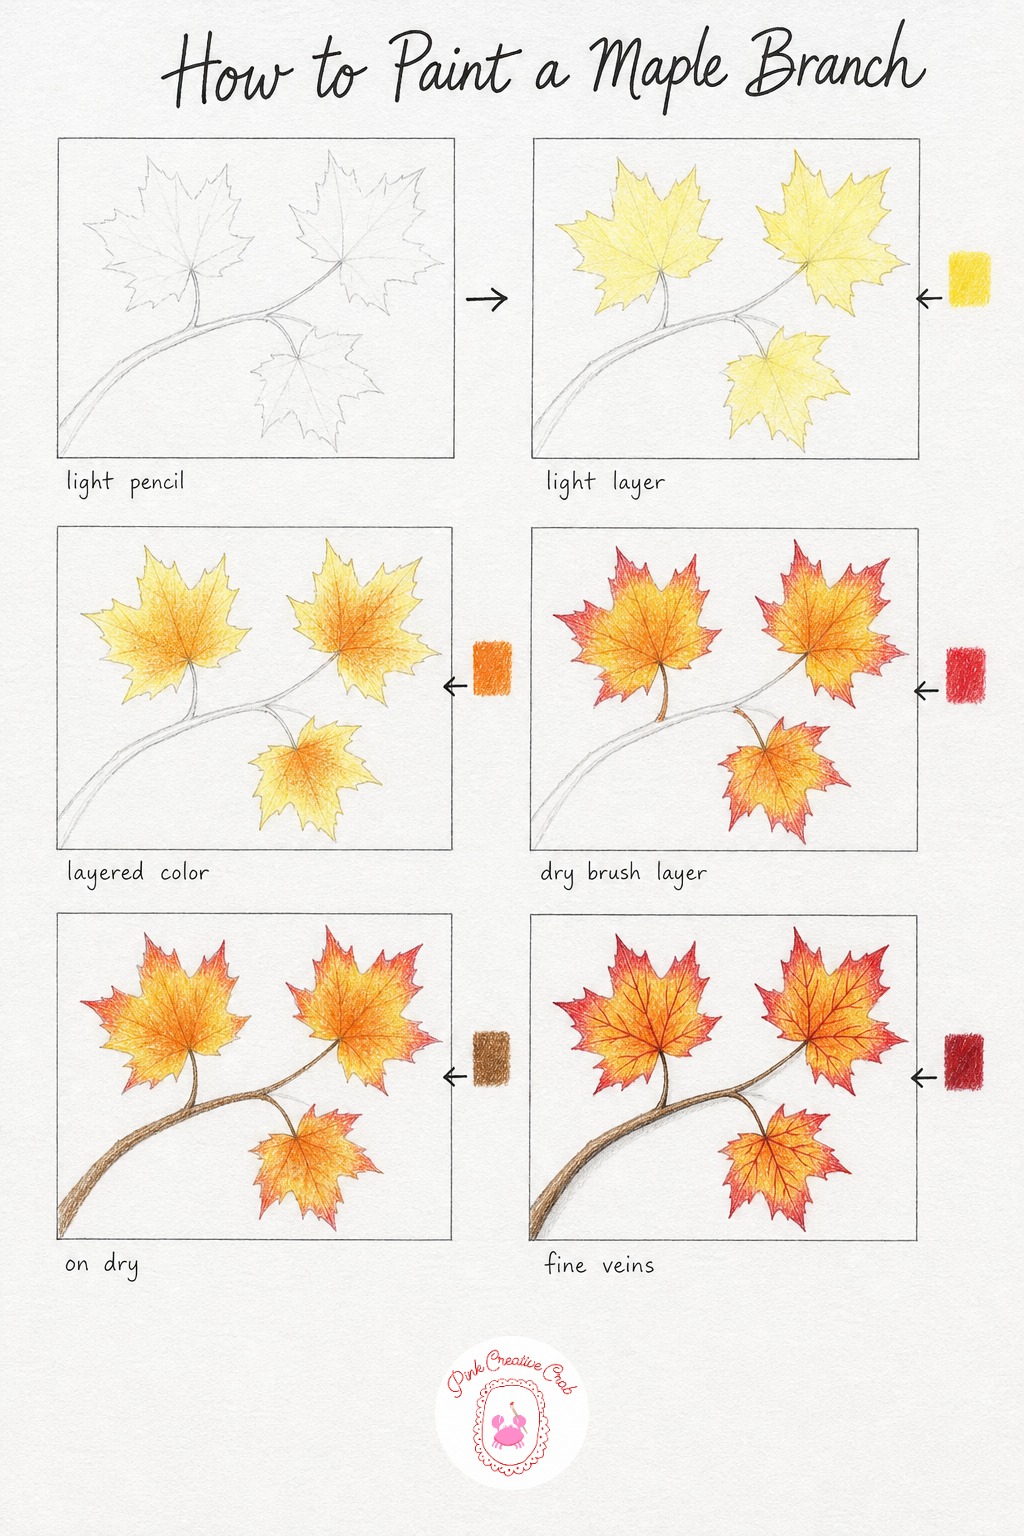
Sketch a gently curving branch first, then add three maple leaves at different angles along it, keeping the pointed lobes sharp in pencil. Maple leaves read as maple mostly because of those sharp points, so take your time getting the silhouette right before you add any color.
Lay a pale lemon yellow wash across every leaf as your undertone, since this warm base will glow through the reds and oranges you add next. Once that is dry to the touch, layer orange over the central part of each leaf, blending outward with light circular strokes.
Push scarlet red into the pointed tips where maple leaves turn most dramatically, letting it fade back into the orange rather than stopping in a hard line. Color the branch and stems in brown, then finish with fine dark red veins fanning out from each leaf’s center point, adding a touch of shadow where the leaves overlap the branch.
If your red looks too flat, try layering a thin line of orange back over it once dry, which softens the edge beautifully. For more layering technique like this, the drawing techniques encyclopedia is worth a look.
Ginkgo Leaves on a Book Page
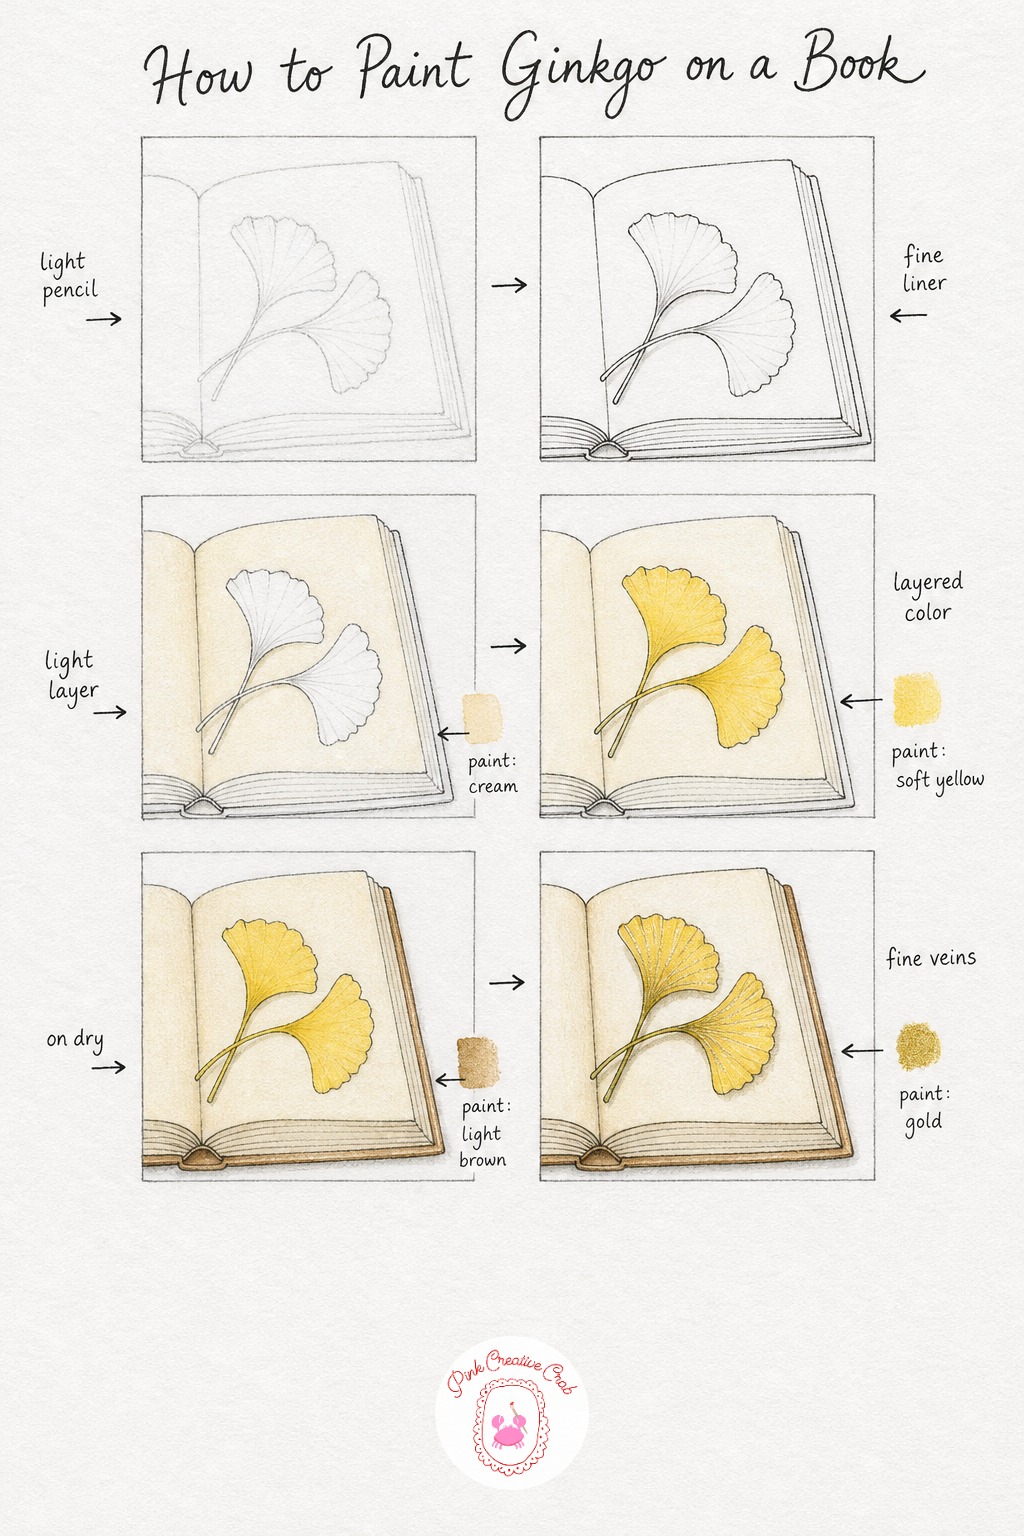
Draw an open book shape first, simple and slightly angled, then place two fan-shaped ginkgo leaves resting on its pages. Ginkgo leaves have that distinctive fan silhouette with a notched top edge, so keep your pencil line loose until that shape feels right.
Ink the book and leaf outlines once you are happy with the sketch, then erase any stray pencil marks. Wash a pale cream across the book pages only, keeping the leaves bare paper for now so the next color pops against it.
Layer soft yellow over both leaves, pressing a little firmer near the base where ginkgo color tends to deepen. Add light brown shading along the book spine and page edges to suggest the paper’s weight, then finish with fine gold lines radiating from each leaf’s base point, the way real ginkgo veins fan outward, with a soft shadow where each leaf touches the page.
Readers often rush the fan shape and make it too rounded. Keep the top edge gently notched, almost like a shallow V, and the leaf will read as ginkgo instantly.
Monstera Leaves in a Pot
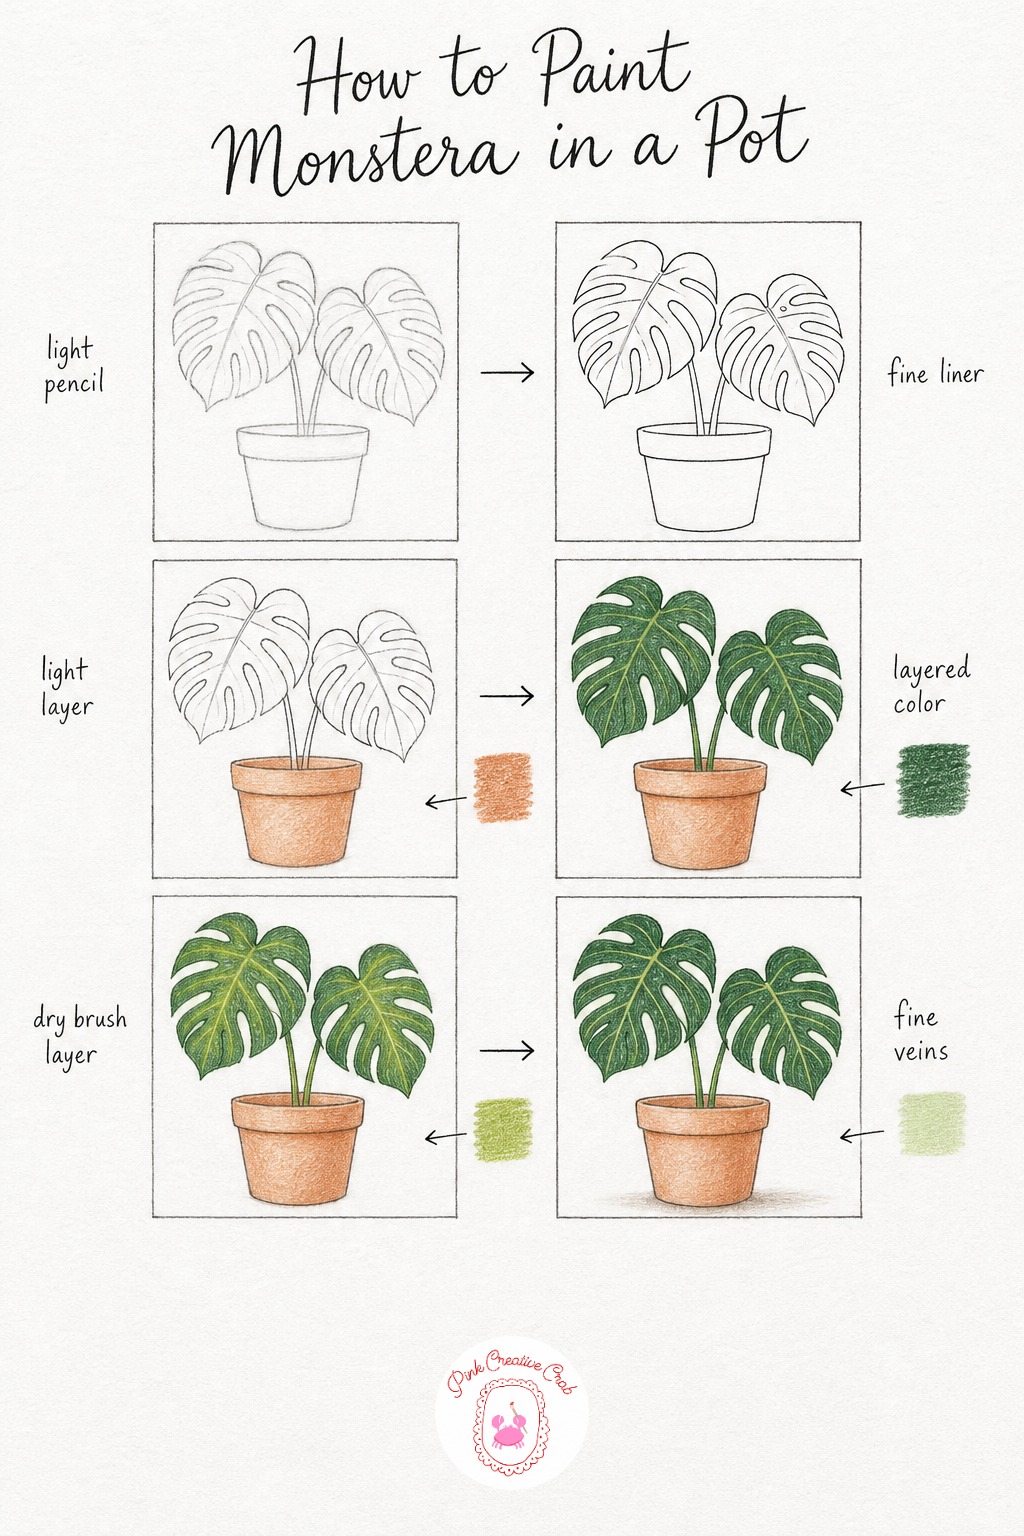
Sketch a simple terracotta pot first, then draw two large monstera leaves rising from it, making sure to include the characteristic splits and holes along each leaf edge. Those splits are what make monstera instantly recognizable, so sketch them as deliberate notches rather than smoothing them out.
Once inked, wash pale terracotta across the pot only, keeping your strokes even so the clay color looks smooth rather than streaky. Layer a deep forest green across both leaves as the main color, pressing with steady pressure so the tone feels rich and solid.
Add lighter apple green down the center of each leaf where light naturally hits a glossy monstera leaf, blending it softly into the darker green at the edges. Finish with fine pale green veins branching from the center rib, plus a soft shadow where the pot sits on the table to ground the whole arrangement.
If your green looks too uniform, layer a thin second coat of forest green only near the splits and edges, which adds instant depth. This arrangement pairs nicely with other potted botanical studies if you enjoyed the blue and white painting lessons.
Eucalyptus Sprigs in a Jar
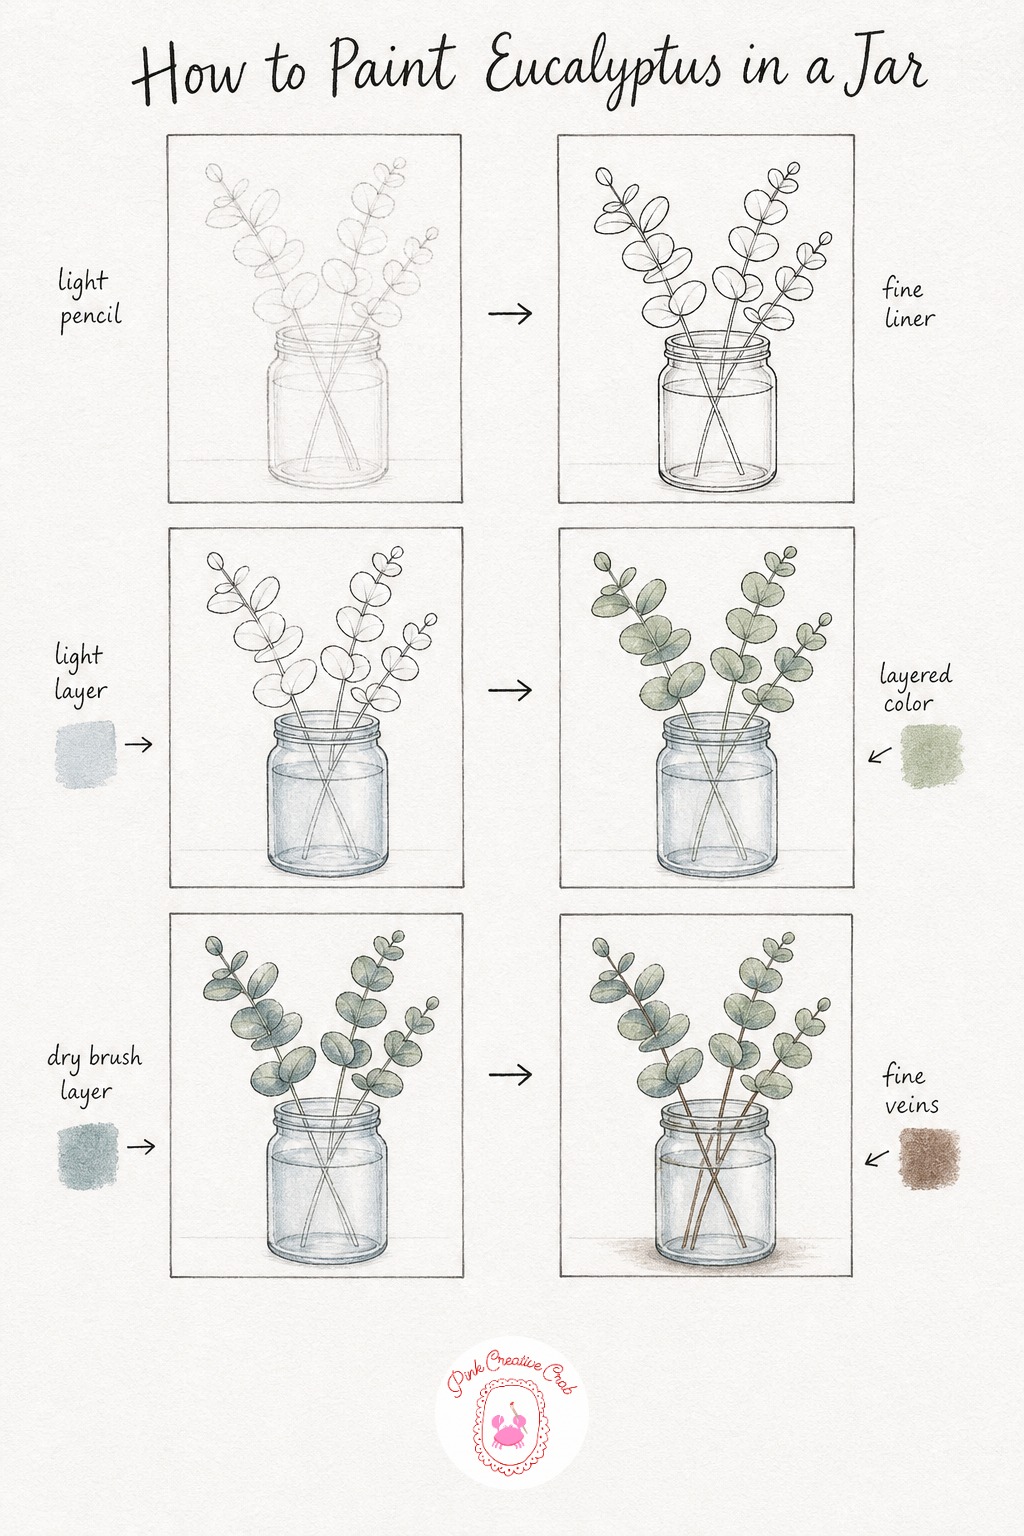
Sketch a small rounded jar first, then add three eucalyptus sprigs rising from it with their small round to oval leaves spaced along thin stems. Eucalyptus leaves are simpler shapes than oak or maple, so this is a relaxing one if you want a quieter sitting.
Ink the jar and stems lightly, then wash pale grey blue across the glass, leaving a thin bare strip near the edge to suggest where light catches the glass. Layer soft sage green across every leaf, keeping your strokes small and rounded to match the leaf shape.
Deepen the shaded side of each leaf with dusty blue green, which is the color that gives eucalyptus its signature silvery look. Finish with fine brown stems threading through the jar’s visible water line, and a soft shadow beneath the jar base to seat it on the table.
A common slip is making every leaf the exact same green. Vary the sage and dusty blue green ratio leaf by leaf, and the sprig will feel far more alive.
Ivy Climbing a Brick Wall
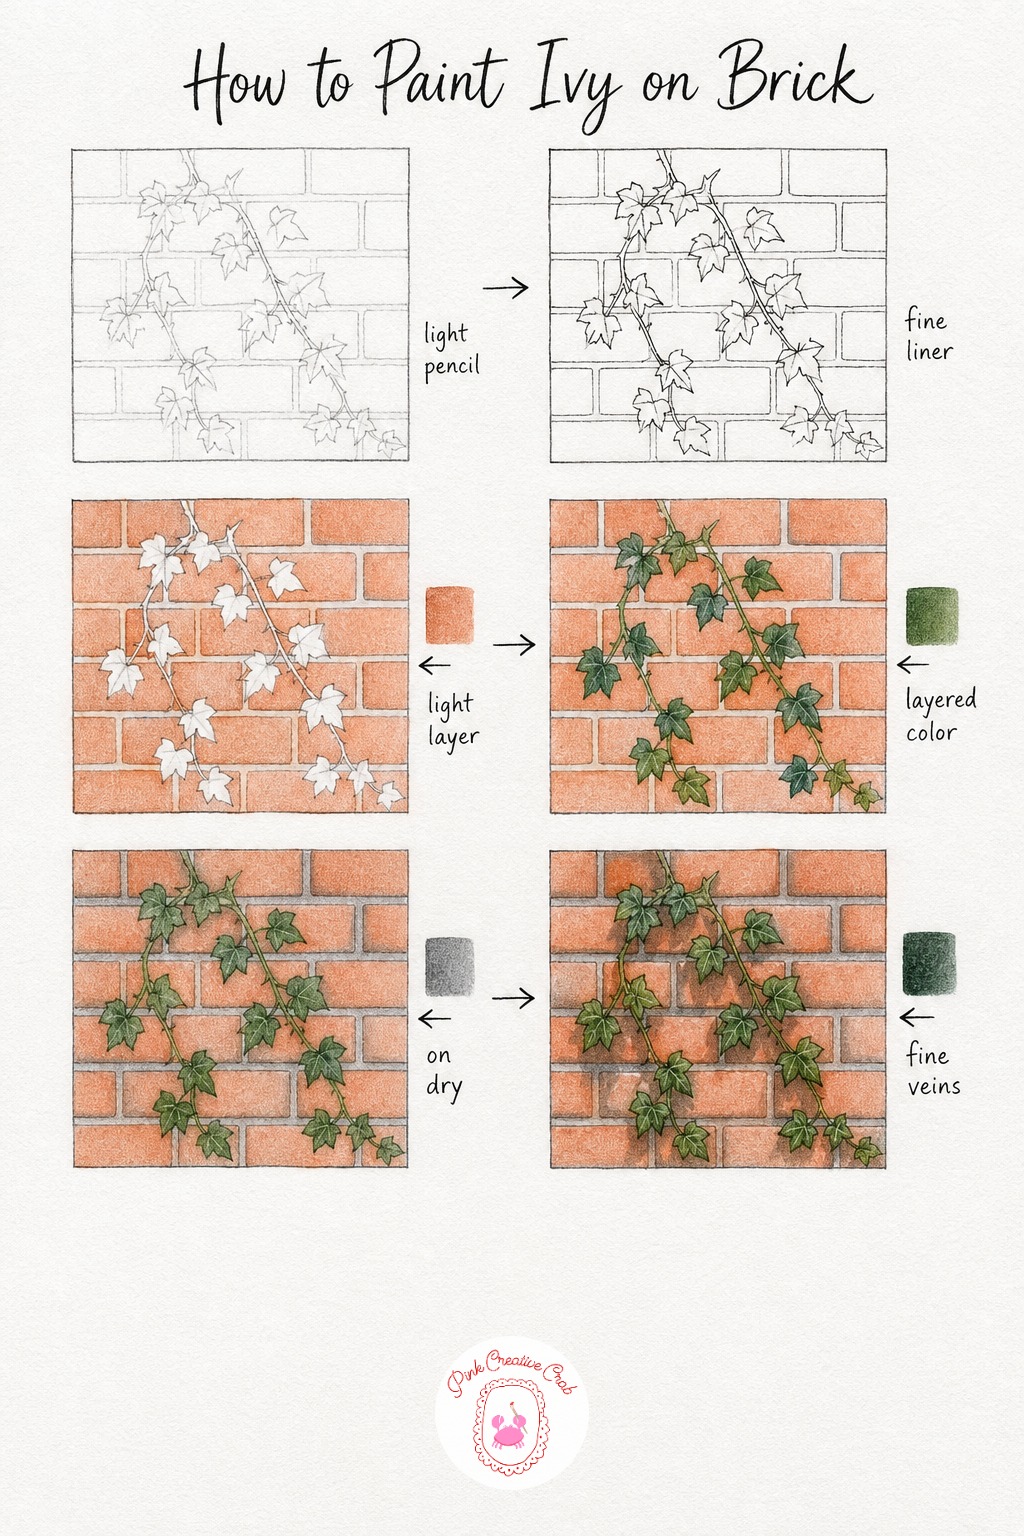
Sketch a loose grid of bricks first, then draw a climbing ivy vine weaving across them with small pointed leaves branching off at intervals. Keep the vine line curvy and irregular, since ivy never grows in a straight path.
Ink the brick grid and leaf shapes, then wash pale brick red across the wall section, letting the color pool slightly uneven for a worn, weathered look. Layer deep ivy green across every leaf, pressing firmly near the stem end where ivy leaves tend to be darkest.
Add grey into the mortar lines between bricks to give the wall real texture and depth, working carefully so the lines stay thin and straight. Finish with fine dark green veins on each leaf and a soft shadow wherever the vine crosses in front of a brick edge, which helps the ivy sit forward in space.
Beginners often draw ivy leaves too large for the vine. Keep them small and varied in size, and the whole wall reads far more natural. If you like architectural backdrops like this, the techniques encyclopedia has more texture tricks.
Birch Leaves With Catkins
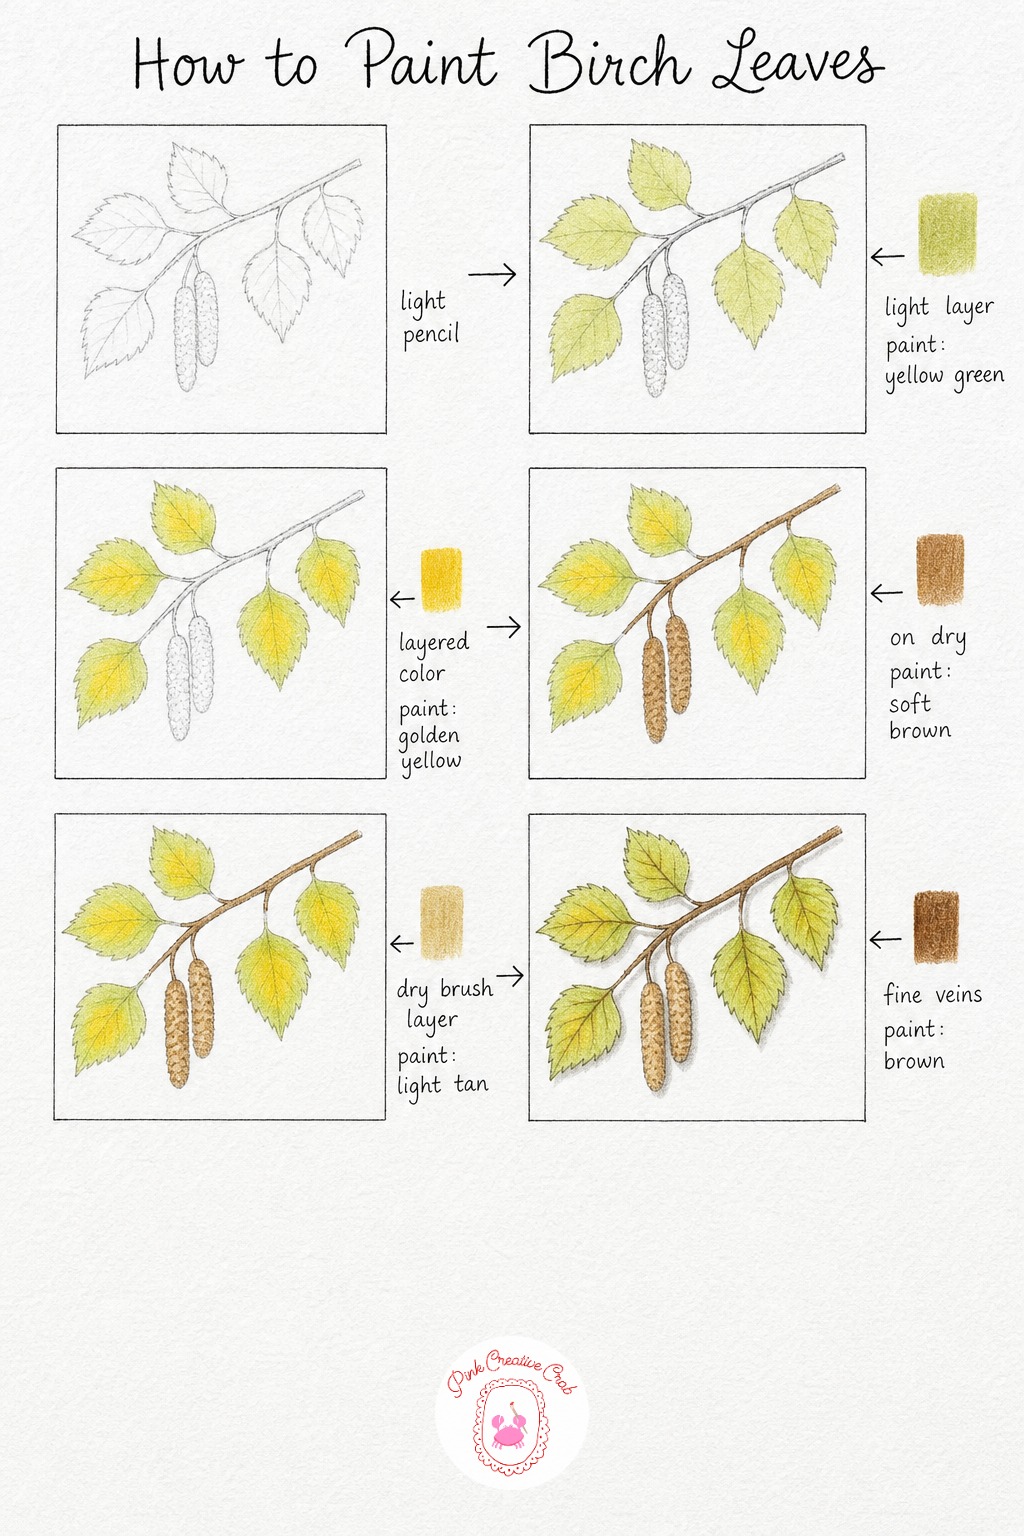
Sketch a slim birch twig first, then add several small oval leaves with finely toothed edges along it, plus one or two hanging catkins for a seasonal touch. Birch leaves are small and simple, which makes this a good warm up before a busier scene.
Wash pale yellow green across every leaf as your base, keeping strokes light since birch color tends to stay soft rather than saturated. Layer warm golden yellow over the leaf centers once dry, letting the green undertone peek through at the edges.
Color the twig and catkins in soft brown, then dry brush a touch of light tan over the catkins to suggest their fuzzy texture without overworking the detail. Finish with fine brown veins on each leaf, following the leaf’s natural center line, and a soft shadow along the underside of the twig to give it roundness.
If your catkins look too smooth, try a slightly dry pencil with broken, scratchy strokes rather than one solid fill. That texture reads as fuzzy from across the room.
Fern Frond Unfurling
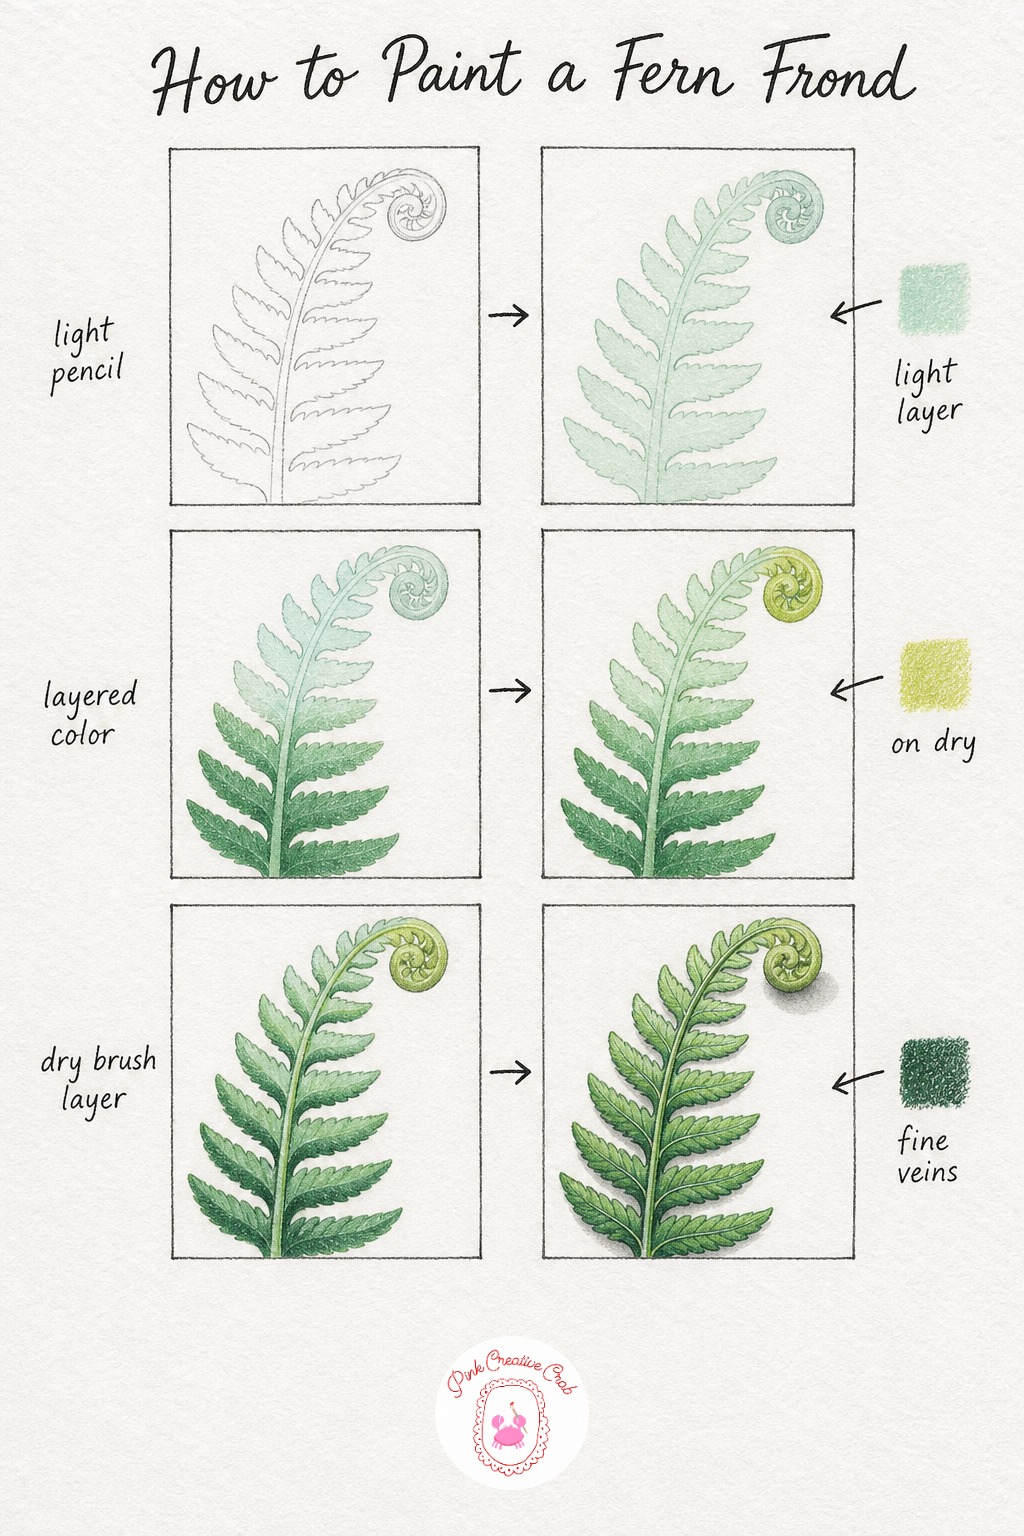
Sketch one long fern frond with its signature feathery leaflets branching off a central stem, letting the very tip curl inward like a small spiral. That curled tip, called a fiddlehead, is the most fun part of this drawing, so give it extra care in pencil before anything else.
Wash pale mint green across the entire frond as a unifying base coat, keeping it light enough that the pencil line still shows faintly underneath. Layer deeper forest green along the lower leaflets, which are older and more fully opened than the tip.
Keep the curled tip in soft yellow green, since new fern growth is always paler than the mature fronds below it. Add dark green shading along the underside of each leaflet to suggest their layered, feathery overlap, then draw one fine central vein running the length of the frond with a soft shadow tucked beneath the curled tip.
The trickiest part is the spiral tip. Draw it as a simple shrinking loop rather than trying to render every tiny leaflet inside the curl, and it will read perfectly from a normal viewing distance.
Autumn Leaf Pile
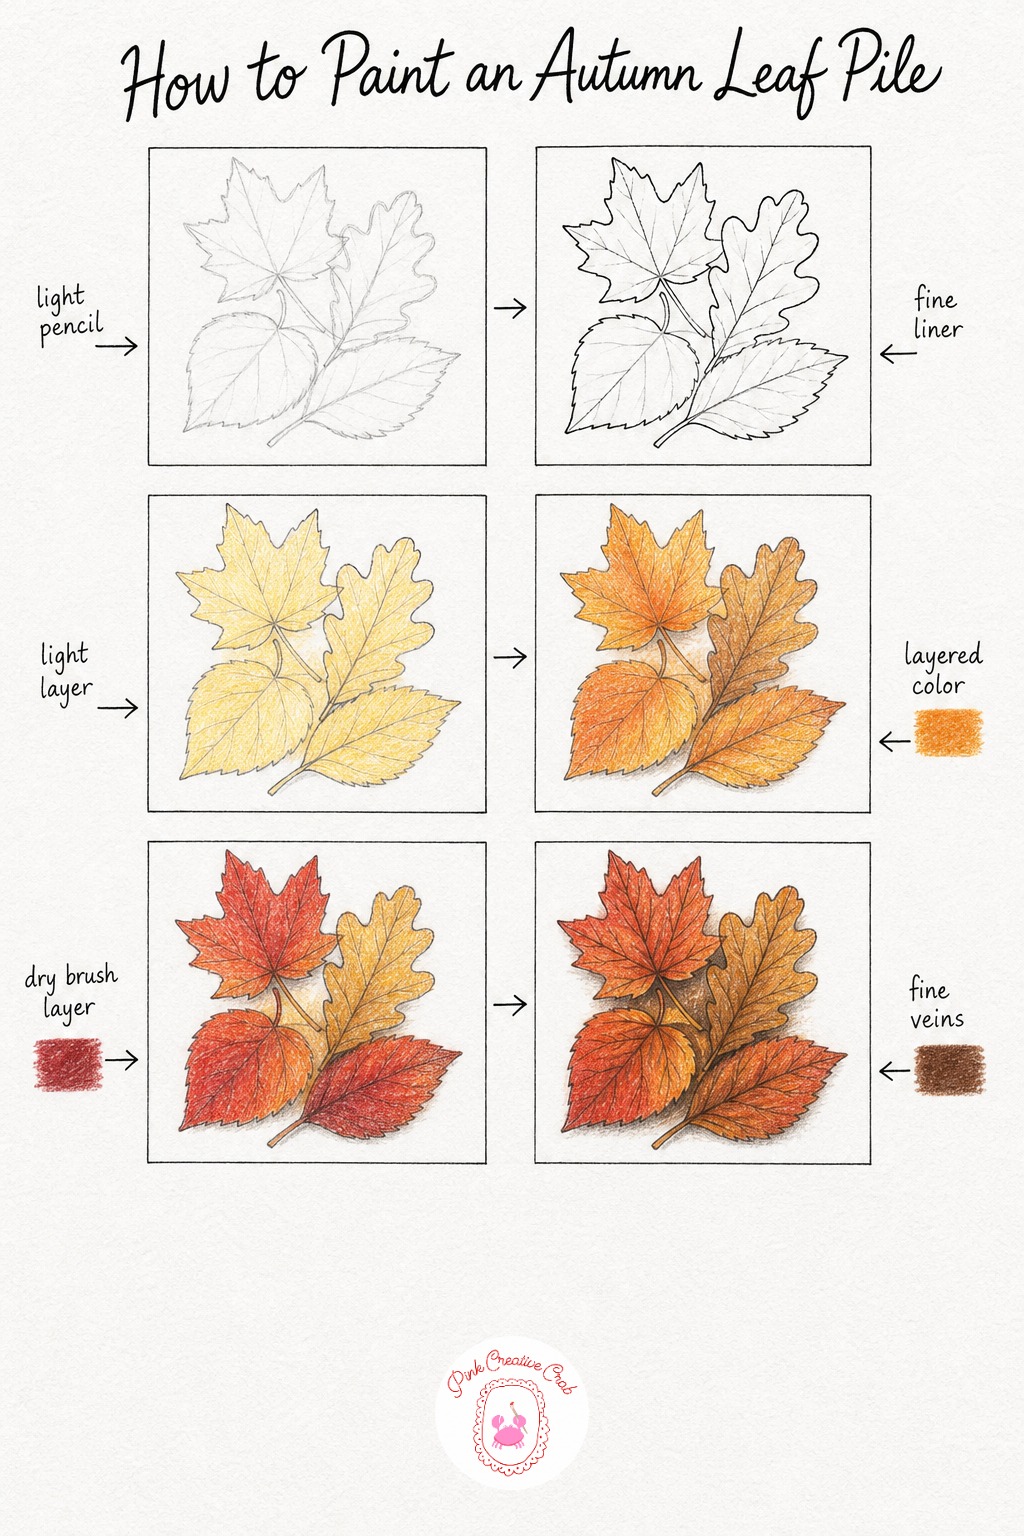
Sketch five or six different fallen leaf shapes overlapping loosely, mixing oak, maple and a simple oval shape so the pile feels varied rather than repetitive. Overlapping is the key move here, since it is what turns separate leaves into one believable pile.
Ink each leaf outline, paying attention to where one leaf’s edge disappears behind another. Wash pale yellow across every leaf first as a shared undertone, which helps tie the whole pile together in color even before the brighter tones go on.
Layer warm orange and brown across different leaves so no two look identical, then push deep red into two or three leaves for variety and visual interest. Finish with fine dark brown veins on each leaf and soft shadows exactly where one leaf overlaps another, since that small shadow is what sells the sense of depth.
Beginners sometimes color every leaf the same shade, which flattens the whole pile. Pick one dominant color per leaf and let them differ, and the pile will feel full of autumn variety instead of repetition.
Grape Vine Leaves
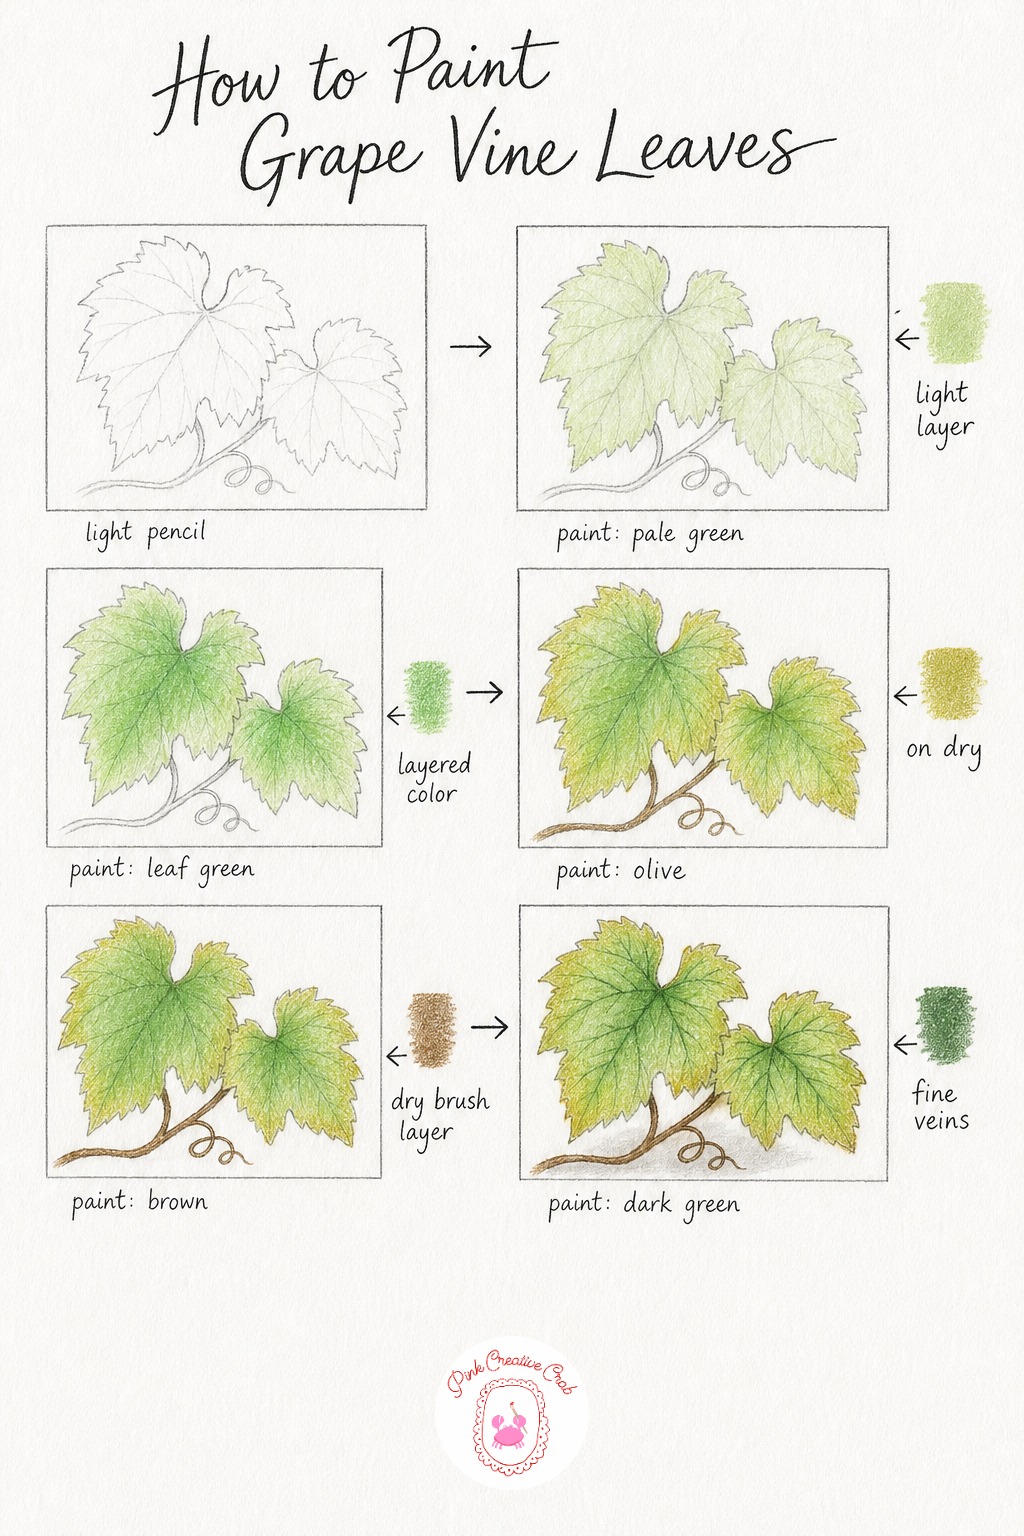
Sketch two large lobed grape leaves, which have a distinctive five point shape, along with one curling tendril reaching out beside them. Grape leaves are bigger and more deeply lobed than oak, so let the points come out sharp and clear in your pencil stage.
Wash pale green across both leaves as a base, then layer a medium leaf green over the center once dry, keeping the very edges a touch lighter. Add warm olive along the outer edges, especially if you want a late summer feel where the leaf has just begun to turn.
Color the stem and curling tendril in brown, using a light wavering line for the tendril so its spiral curl feels springy rather than stiff. Finish with fine dark green veins fanning outward from the base of each leaf toward its points, and a soft shadow beneath the tendril where it lifts off the page.
If the tendril curl looks too neat, loosen your hand and let the spiral wobble slightly. Real tendrils are never perfectly round, and that imperfection makes the drawing feel more alive.
Hosta Leaves by a Stone
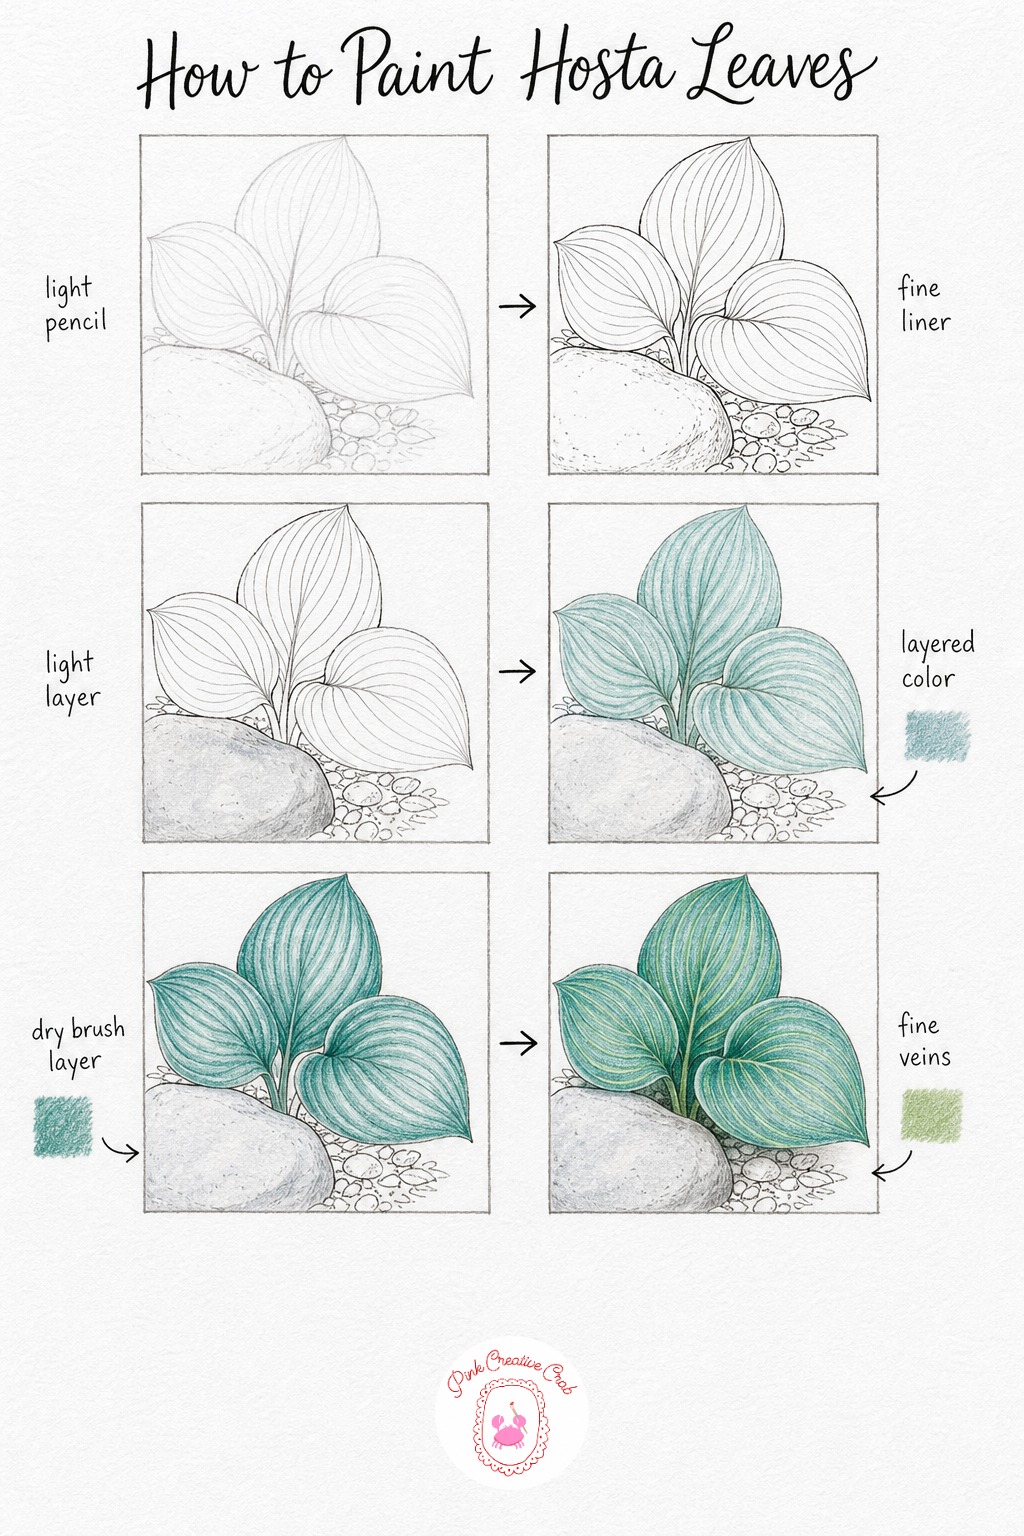
Sketch three large hosta leaves with their characteristic parallel ribs running from base to tip, placed beside a simple rounded garden stone. Hosta leaves are wide and gently cupped, so let the outline curve generously rather than drawing them flat and narrow.
Ink the ribs carefully since they are the most defining feature of a hosta leaf, then wash pale grey across the stone only, keeping the leaves bare for now. Layer soft blue green across all three leaves, which gives hosta its cool, slightly waxy color compared to a warmer garden green.
Deepen the leaf edges and the shadowed side of each rib with teal green, working in small side by side strokes to suggest the leaf’s gentle ripple. Finish with fine pale green lines retracing each rib on top of the darker green, plus a soft shadow where the leaves meet the stone to ground the whole scene.
The ribs are easy to overdo. Keep them evenly spaced and slightly curved, following the leaf’s natural cup shape, rather than drawing them perfectly straight.
Fig Leaf Study
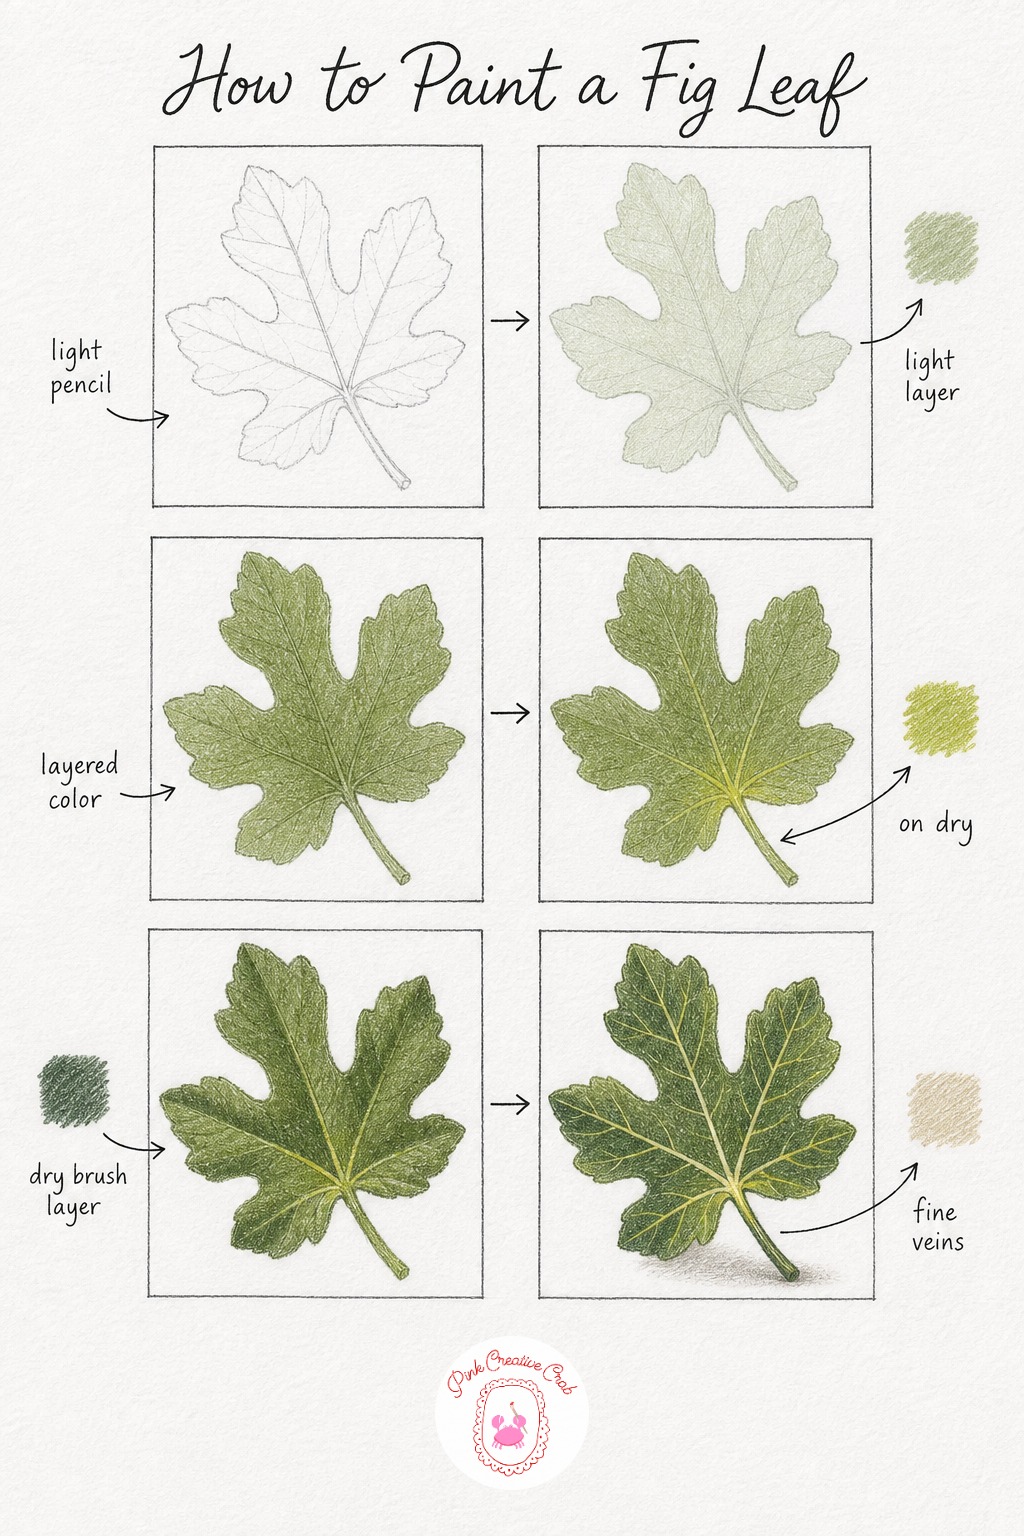
Sketch one large fig leaf with its bold, deeply cut lobes, which are wider and rounder than an oak leaf’s. Fig leaves are a satisfying single subject to study since their shape alone carries so much character.
Wash pale sage across the whole leaf as your undertone, then layer deeper olive green over most of the body once that first layer is dry to the touch. Add a touch of warm yellow green near the stem base, since fig leaves often shift lighter where the stem meets the blade.
Shade the lobe edges and any underside folds with dark green, using the edge of your pencil at a slight angle for a softer blended look. Finish with fine cream colored veins branching out from the stem through the leaf, drawn with a very light touch so they sit on top of the green rather than cutting through it, plus a soft shadow beneath the stem.
Cream veins can disappear if pressed too hard. Use your sharpest point and the lightest touch you can manage, almost just skimming the paper.
What to Do Next
Pick whichever leaf arrangement is calling to you today, sharpen a few pencils, and start with that first light sketch. Once you’ve worked through one or two, the layering and veins start to feel natural, and the rest of the collection goes even faster.
Frequently Asked Questions
What is the best paper for drawing leaves with colored pencil?
Smooth bristol or a fine tooth drawing paper works best for colored pencil leaves. It lets you layer thin coats of color and still draw crisp, fine veins without the paper texture breaking up your lines.
How do I stop my colored pencil leaves from looking flat?
Layer at least two or three colors on every leaf instead of one flat fill. Start pale, add a mid tone, then push a darker shade only into the shaded edges and veins to build real depth.
Should I draw the veins before or after the color?
Draw the main leaf outline in pencil or ink first, then add color, and save the fine detailed veins for the very last stage. Veins drawn last stay crisp and sit clearly on top of the layered color.
What colors do I need for an autumn leaf palette?
A warm range of lemon yellow, orange, rust red, burnt sienna and brown covers most autumn leaves. Add sage, forest and olive green for the botanical greens used in ivy, monstera and eucalyptus subjects.
How many colored pencils do I really need to start?
A set of twenty four to thirty six colors covers every leaf in this collection comfortably. You can always blend two existing colors to approximate a missing shade rather than buying a brand new pencil for one leaf.
Have any thoughts?
Share your reaction or leave a quick response — we’d love to hear what you think!
-
 0
-
0
-
0
-
0
-
0
-
0


