

Table of Contents
- Before You Start
- Ivy Window With Morning Light
- Blue Door With Geraniums
- Balcony Of Hanging Flowers
- Shop Door With Bicycle
- Arched Window With Lace Curtains
- Shuttered Window With Flower Box
- Cottage Door With Wisteria
- Round Attic Window
- French Doors Onto A Terrace
- Narrow Door With Lantern
- Window Box Full Of Pansies
- Half-Open Shutter With Peeling Paint
- Corner Balcony With Climbing Roses
- Door Knocker Close-Up
- Open Window With Birdcage
- Garden Gate Among Hollyhocks
- Stable Door With Horseshoe
- Frequently Asked Questions
Give me an old door with peeling paint or a window buried in ivy and I am happy for the rest of the afternoon. This watercolor tutorial step by step collection is built for exactly that love: the small architectural corners that make a house feel lived in, painted one at a time until you have a whole street of them.
Below you will find seventeen lessons, each one a single window, door or balcony taken from ink line to finished wash with labeled color swatches along the way. Pick the one that matches your mood today and paint along, no sketch of your own required.
Using these images: free for personal projects such as printing, coloring, cards, journals and gifts. Handmade items that include them may be sold up to 30 pieces per design. More than that is commercial use and is not permitted, and neither is selling or sharing the images themselves or passing them off as your own. Please ask before any other use.
Before You Start
- Stretch or tape down a sheet of cold press watercolor paper so it stays flat once the washes go on wet.
- Use a fine fineliner or a waterproof drawing pen for the ink lines so they do not smear when the water touches them later.
- Keep the pencil marks light under the ink, since any dark graphite will smudge gray into your pale first washes.
- Mix each color on a palette first and test it on a paper scrap, because wet paint always dries lighter than it looks.
- Load your brush with plenty of water for the first washes and let them dry fully before any darker layer goes over them.
- Save the whitest paper for highlights on purpose, on glass, petals or stone, rather than trying to paint white in at the end.
Ivy Window With Morning Light
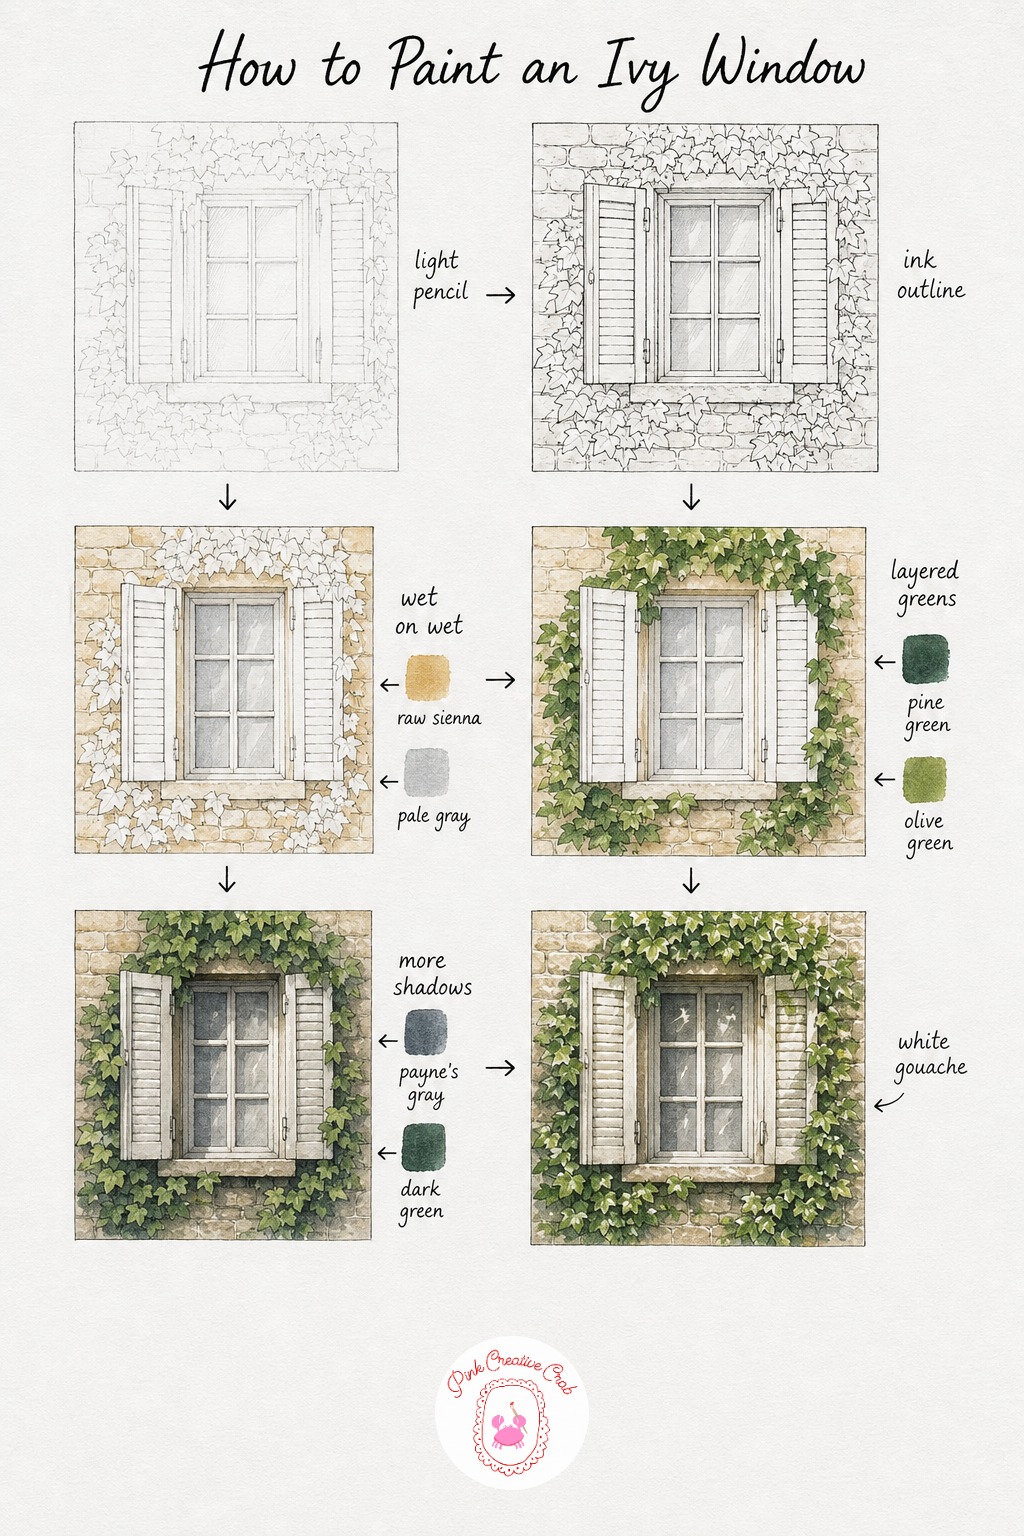
Start with a light pencil sketch of the window, just enough to place the frame and the rough shape of the ivy climbing across it. Go over the lines in ink once you are happy, keeping the pen loose on the leaf edges so they do not look stiff.
Once the ink is dry, wet the wall area and drop in a thin raw sienna wash, letting it pool unevenly for texture, with a faint gray on the glass. Let that dry completely before building the ivy in two green layers, pine green first for the shaded leaves, olive green over the sunnier ones, always on dry paper so the colors stay separate.
Add payne’s gray shadow under the frame and deep inside the leaf clusters last, since this is what gives the ivy its depth. Finish with a dry brush of light green and a touch of white gouache on the top left leaves where the light hits hardest.
Beginners often paint the ivy as one flat green mass. Keep at least two distinct green values and you will get the light from the top left to read properly.
Blue Door With Geraniums
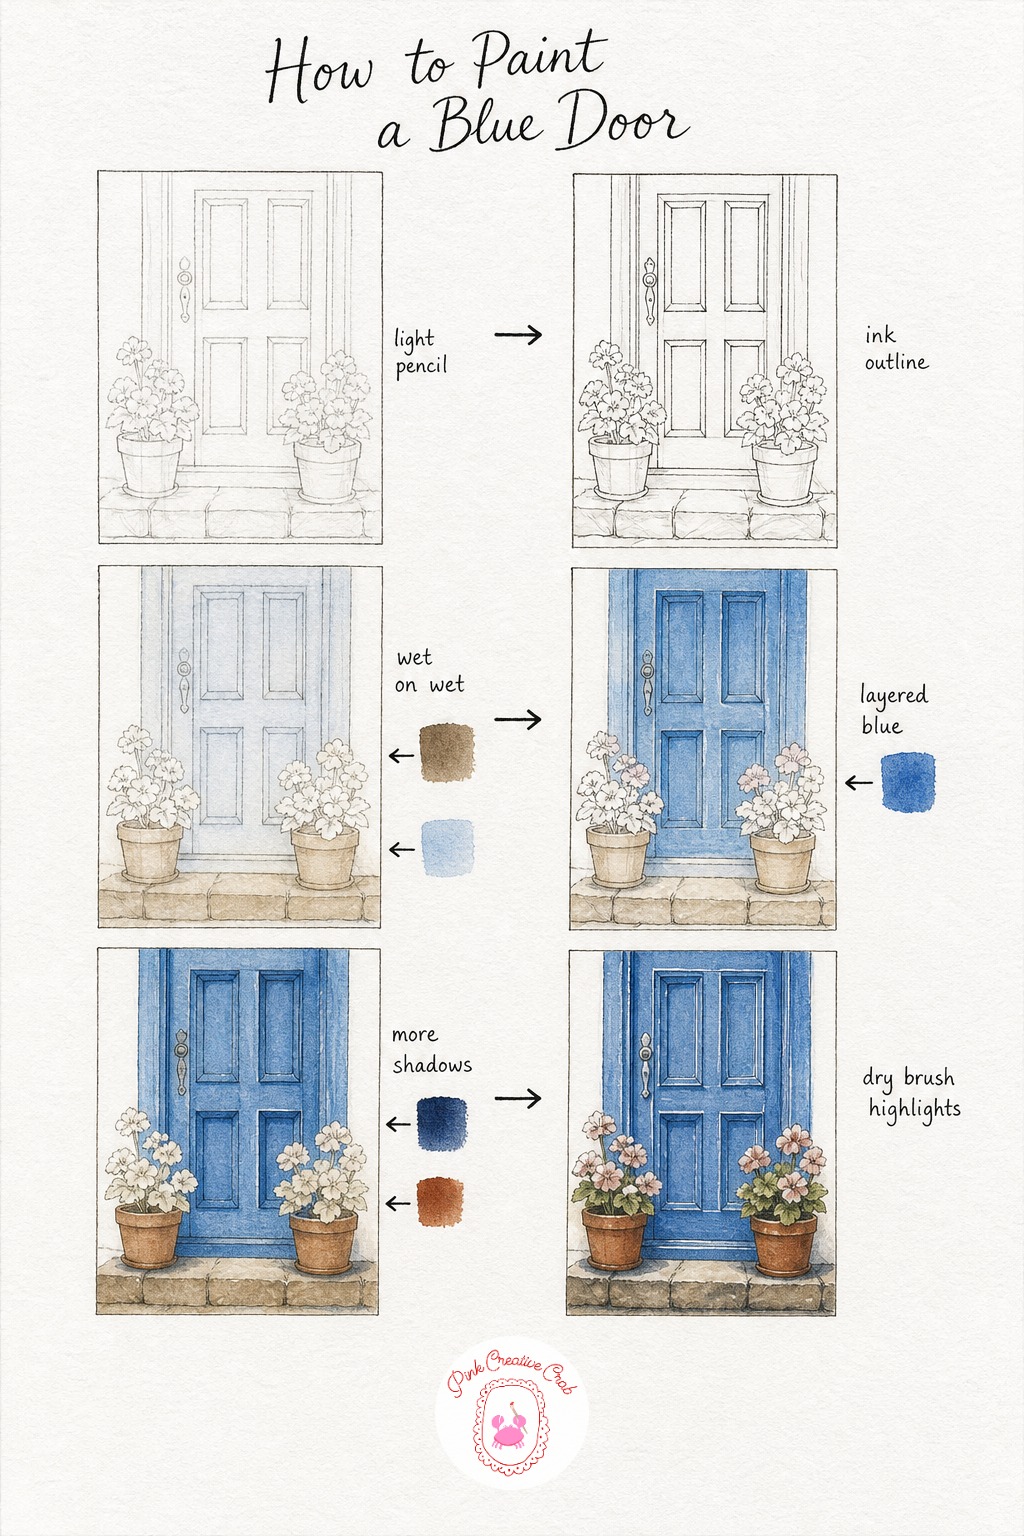
Sketch the door loosely in pencil first, marking where the panels sit and where the two geranium pots rest on the step. Ink the straight lines of the frame with a ruler if you need one, then ink the flowers freehand so they stay soft.
Lay a thin wash of raw umber on the stone step and a very pale blue undertone across the whole door while the paper is still damp. Once fully dry, build the door in cobalt blue, going over it two or three times to get real depth, letting each layer dry before the next.
Paint the geranium leaves in green and the petals in cadmium red once the door is dry, so no red bleeds into the blue. Add indigo shadow into the panel grooves and under the pots, then finish with white gouache dabbed on the handle and a few petal tips.
If you only have one blue, add a touch of burnt sienna to your shadow mix instead of buying indigo, it reads just as rich.
Balcony Of Hanging Flowers
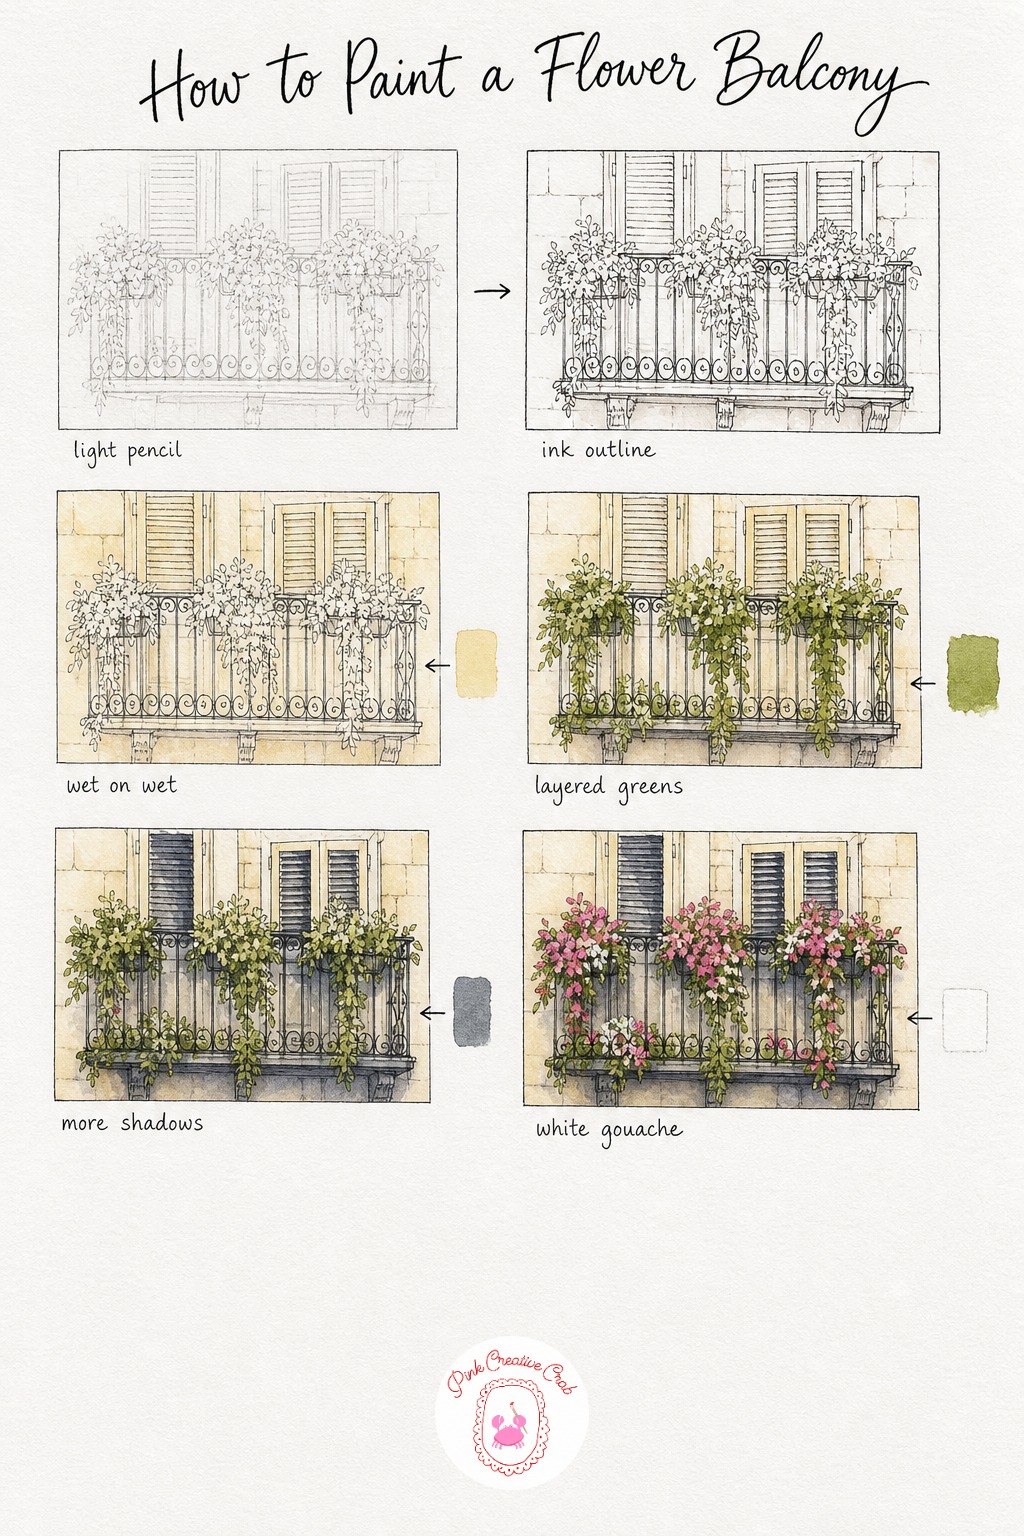
Sketch the balcony rail first since it anchors the whole scene, then add the shutters behind and the rough outline of the flower boxes below it. Ink the iron rail with careful small curves, it is worth taking your time here.
Wash the shutters in a pale yellow and the wall behind in thin raw sienna, letting both dry fully. Build the trailing leaves next in two greens, sap green close to the box and olive green further down where the vines thin out, working wet on dry so the leaf shapes stay crisp.
Paint the flower clusters in pink, red or violet depending on your mood, then drop payne’s gray shadow under the rail and behind the densest leaves to push the balcony forward. A dry brush of white gouache on the front-most blooms gives them that sunlit pop.
For more flower color ideas to mix into the boxes, this watercolor spring flower ideas collection pairs well with this scene.
Shop Door With Bicycle
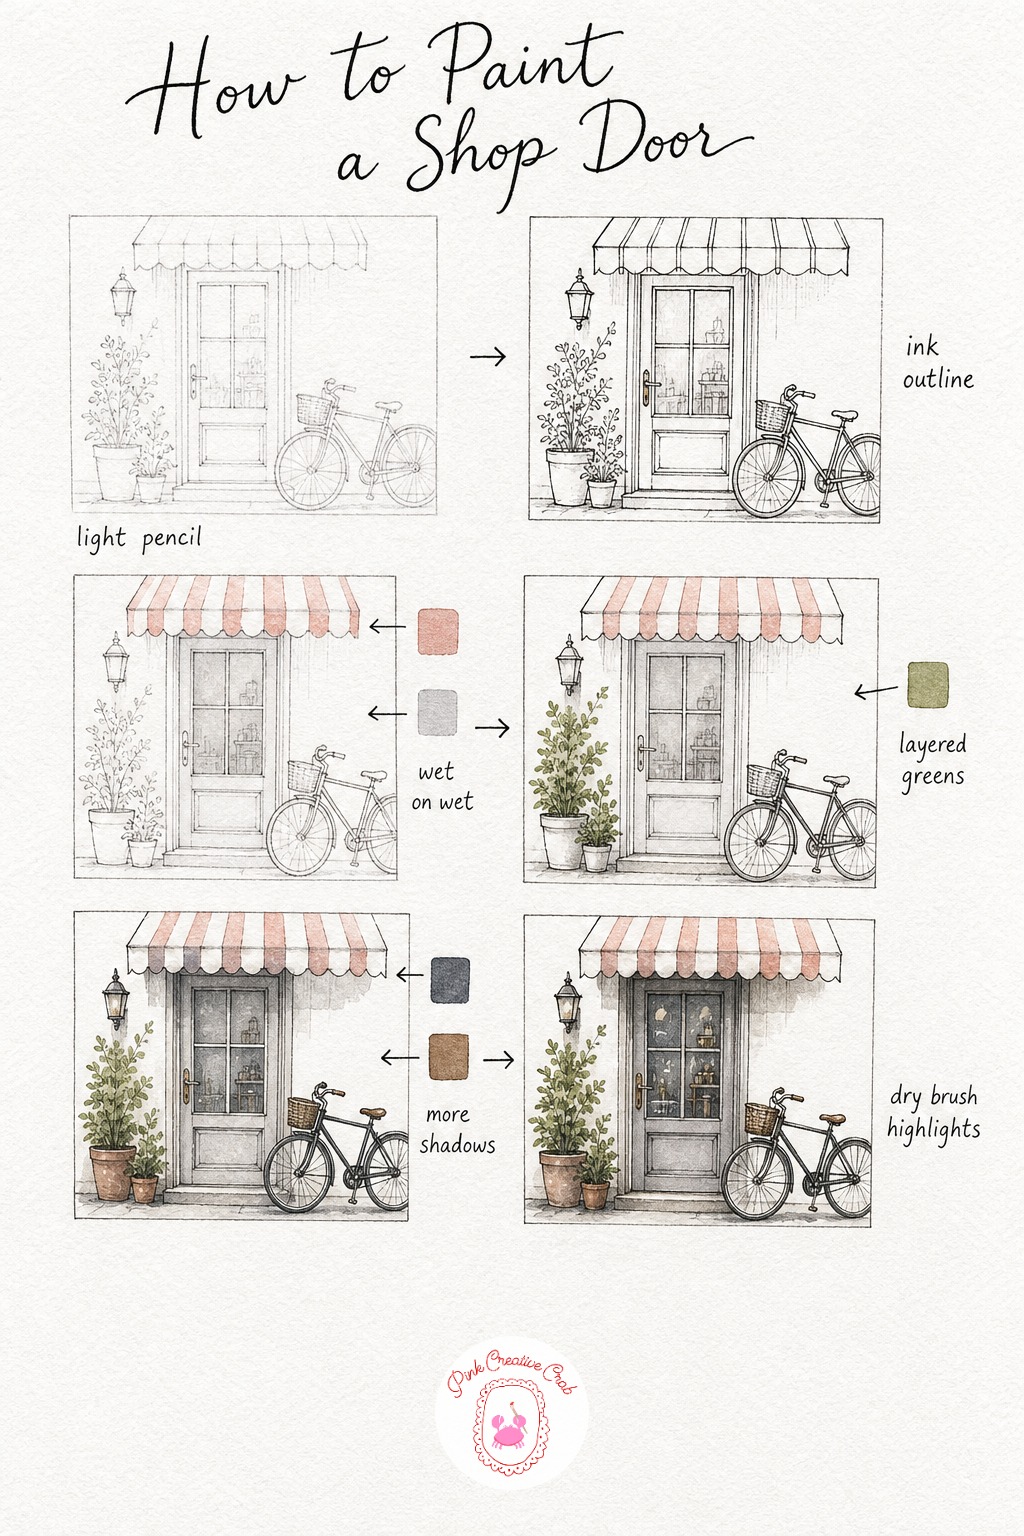
Pencil in the shop door and its glass panel, then the awning above and the bicycle leaning against the wall. The bicycle wheels are the trickiest part, so sketch them as light ellipses before you commit to any spokes.
Ink the awning stripes and the bicycle frame with a steady hand, keeping the wheel rims slightly uneven for charm rather than mechanical precision. Wash the awning stripes in pale red, alternating with bare white paper, and add a faint gray wash on the glass door.
If there is a potted plant by the door, wash it in sap green once the glass is dry. Deepen the shadows under the awning and along the underside of the bicycle in payne’s gray mixed with a little burnt umber, then come back with a dry brush and white gouache for the spoke highlights and a glint on the glass.
Keep the bicycle shadow pooling toward the lower right if your light source comes from the top left, it keeps the whole scene consistent.
Arched Window With Lace Curtains
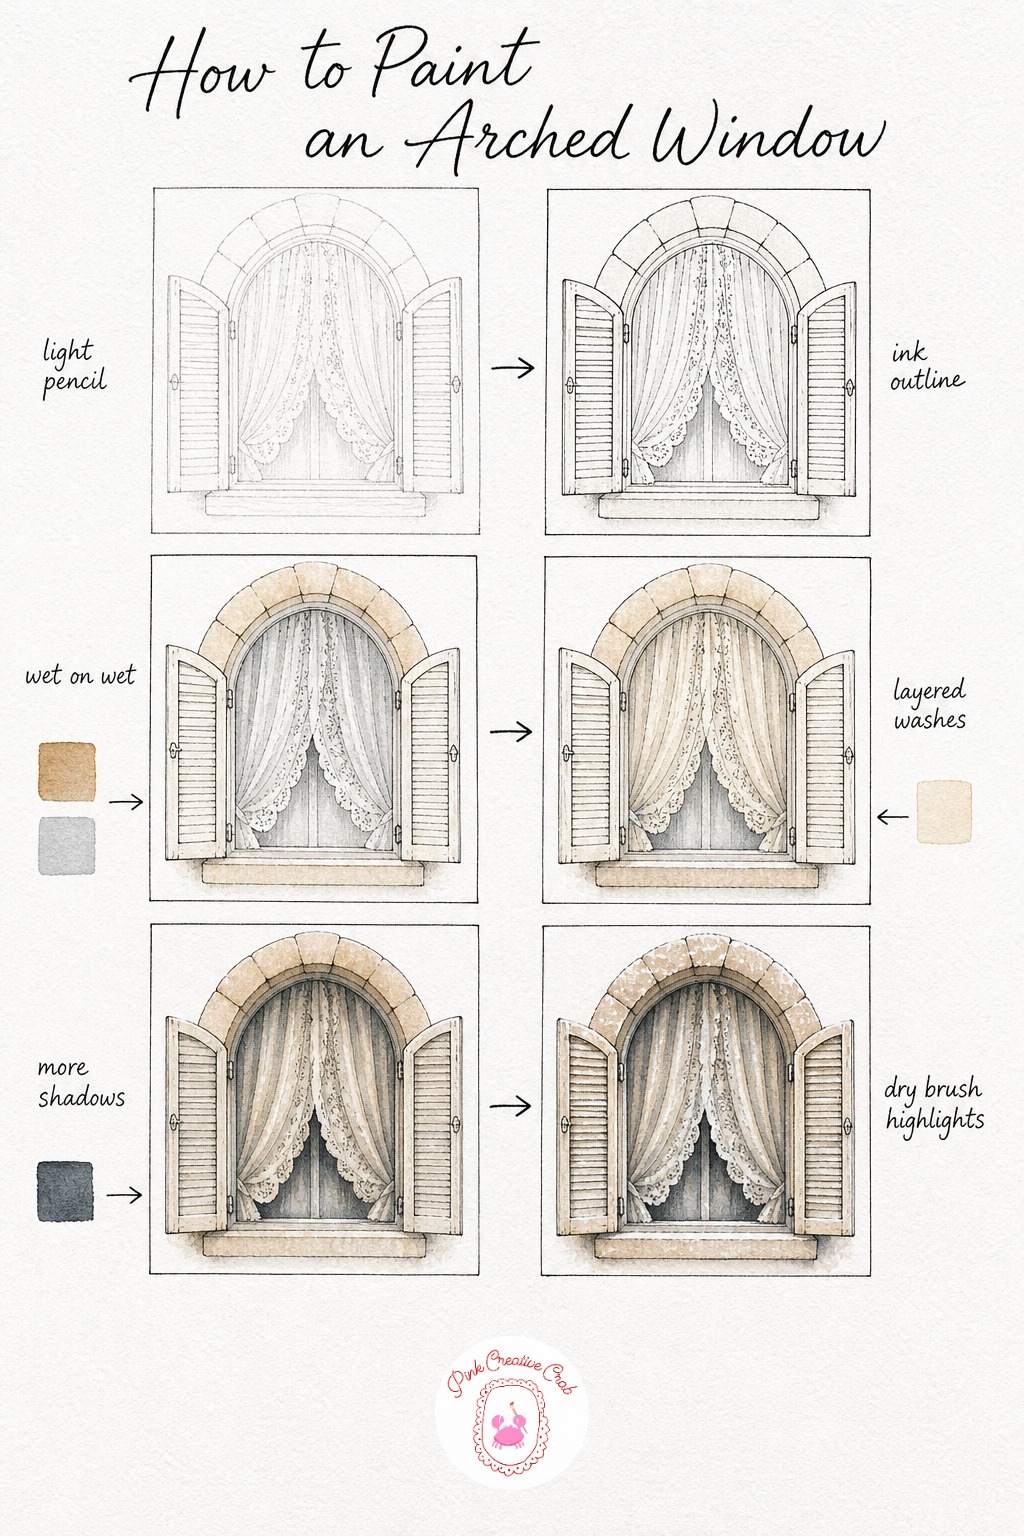
Sketch the arch shape carefully since a wobbly curve is more noticeable than a wobbly straight line, then add the curtain folds hanging loosely behind the glass. Ink the arch and frame first, then the curtain in soft wavy lines rather than hard edges.
Wash the stone arch in raw sienna and let a pale gray wash sit behind the curtain to suggest the dim room beyond. Once dry, paint the curtain itself in a thin cream wash, leaving some fold tops untouched as bare paper for the lace to glow.
Deepen the recess of the arch and the shadowed side of each curtain fold with payne’s gray, keeping your brush fairly dry so the gray does not flood the cream. Finish with a dry brush of white gouache catching the lit edges of the folds and the top curve of the arch.
If your lace looks too flat, flick a nearly dry brush loaded with pale gray across it for a scattered lace-like texture.
Shuttered Window With Flower Box
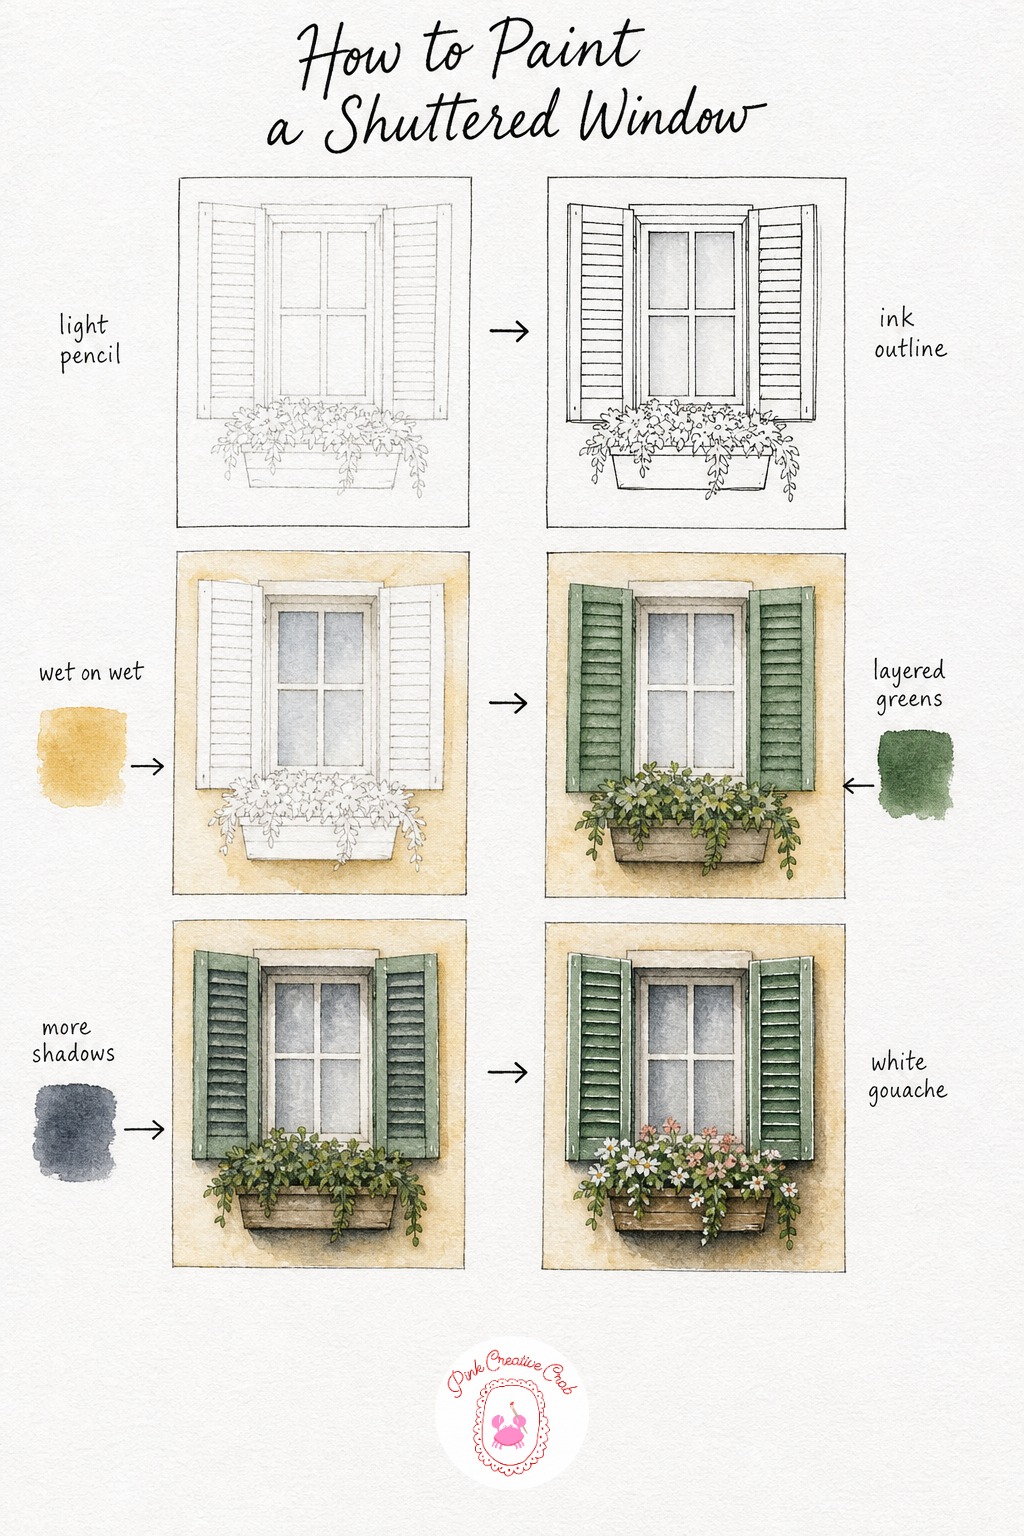
Sketch the shutters as two simple rectangles with evenly spaced slat lines, then the flower box sitting just under the sill. Ink the slats with short confident strokes, they read better slightly uneven than ruler straight.
Wash the wall in a thin raw sienna and the glass in pale gray, letting both dry before you touch the shutters. Paint both shutters in forest green in one pass, then add a second green layer only on the shadowed slats for depth.
The flower box leaves take the same forest green while the petals get a quick wash of pink or red once the green is dry. Push payne’s gray between the slats and under the box last, then dry brush white gouache along the lit edges and a few petal tips for sparkle.
Keep your slat shadows running the same direction across every shutter, it is a small detail that makes the whole window feel believable.
Cottage Door With Wisteria

Sketch the door shape and then the vine, letting its branches curl naturally across the top of the frame rather than in a straight line. Ink the door panels first, then the vine branches in a wavering, organic line.
Wash the door in a soft sage green and the wall in thin raw sienna, keeping both pale since the vine will carry most of the color. Once dry, layer olive green across the leaves and a loose lilac wash across each hanging wisteria cluster, letting the lilac pool slightly at the bottom of each bunch for a natural droop.
Shadow the door panels and the underside of the vine in payne’s gray, concentrating it where the growth is thickest. A dry brush with white gouache along a few vine edges and the palest wisteria clusters finishes the light.
If your wisteria clusters look too uniform, vary the lilac mix from cool to slightly pink across different clusters for natural variety.
Round Attic Window
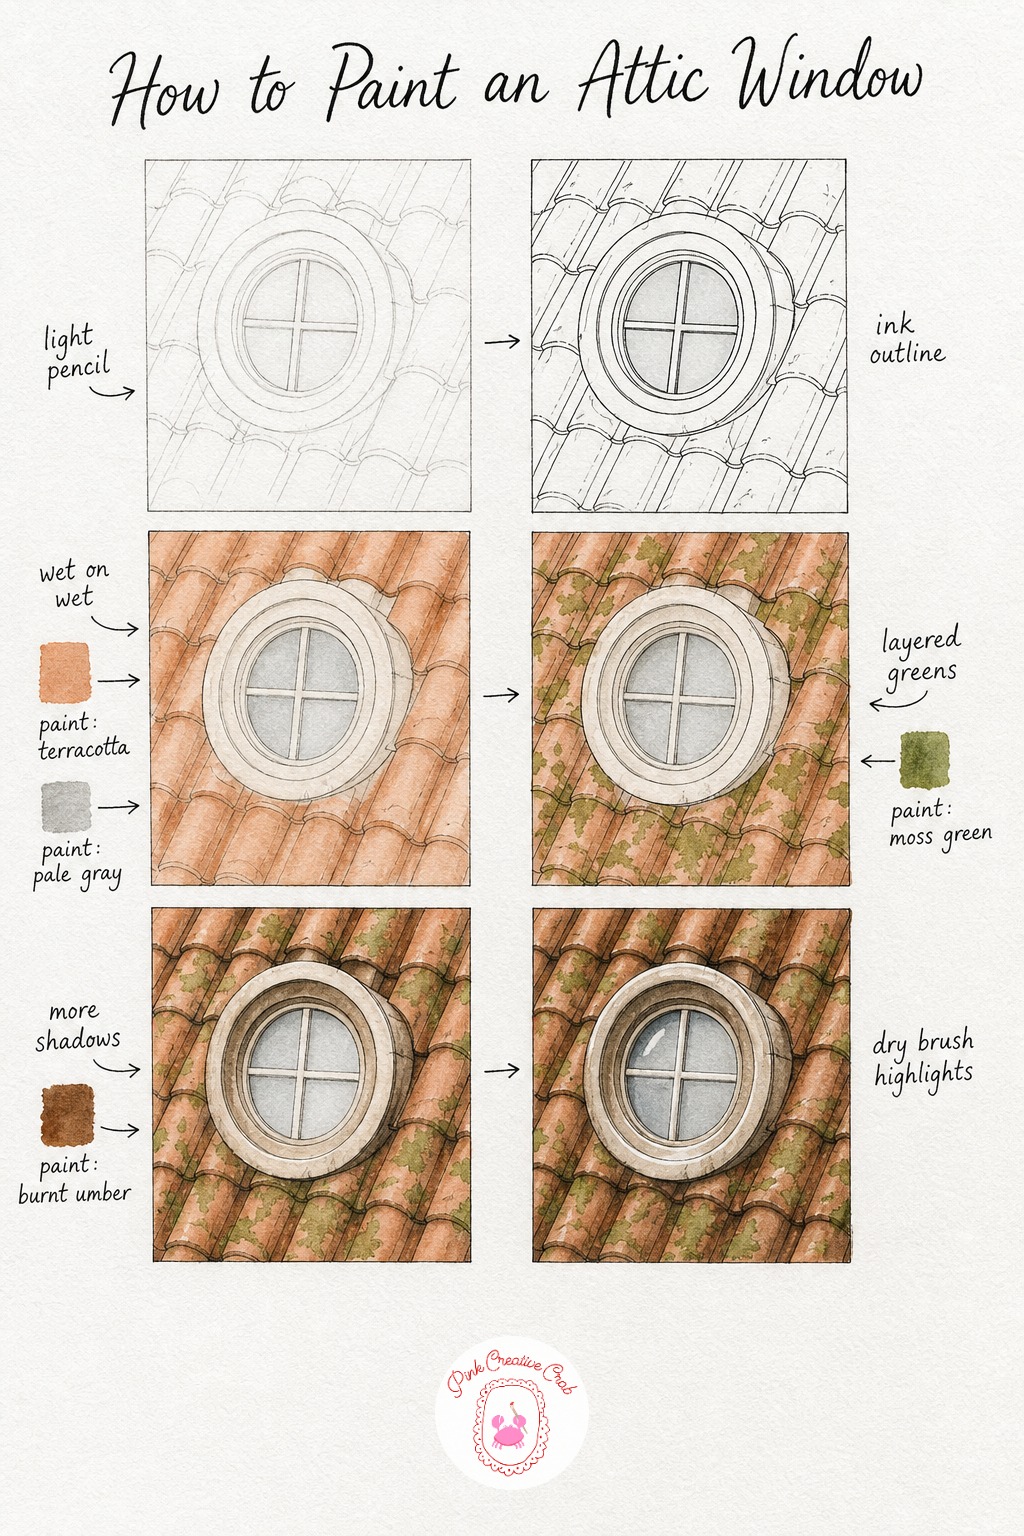
Draw the circle for the window first with a light touch, a compass or a coin works well if your freehand circles wobble. Add the surrounding roof tiles in loose rows before inking the whole thing, keeping the frame line slightly thicker than the tile lines.
Wash the tiles in a warm terracotta, letting the color break unevenly for a weathered look, and wash the glass in a soft gray. Once both are dry, dot in moss green patches here and there across the tiles for lichen, keeping it random rather than even.
Deepen the shadow around the window frame and along a few tile grooves with burnt umber, this is what gives the roof its texture and age. Finish with a dry brush of white gouache along the frame rim and a single diagonal reflection on the glass.
A round subject reads better with slightly uneven tile rows than perfectly straight ones, so resist the ruler here.
French Doors Onto A Terrace
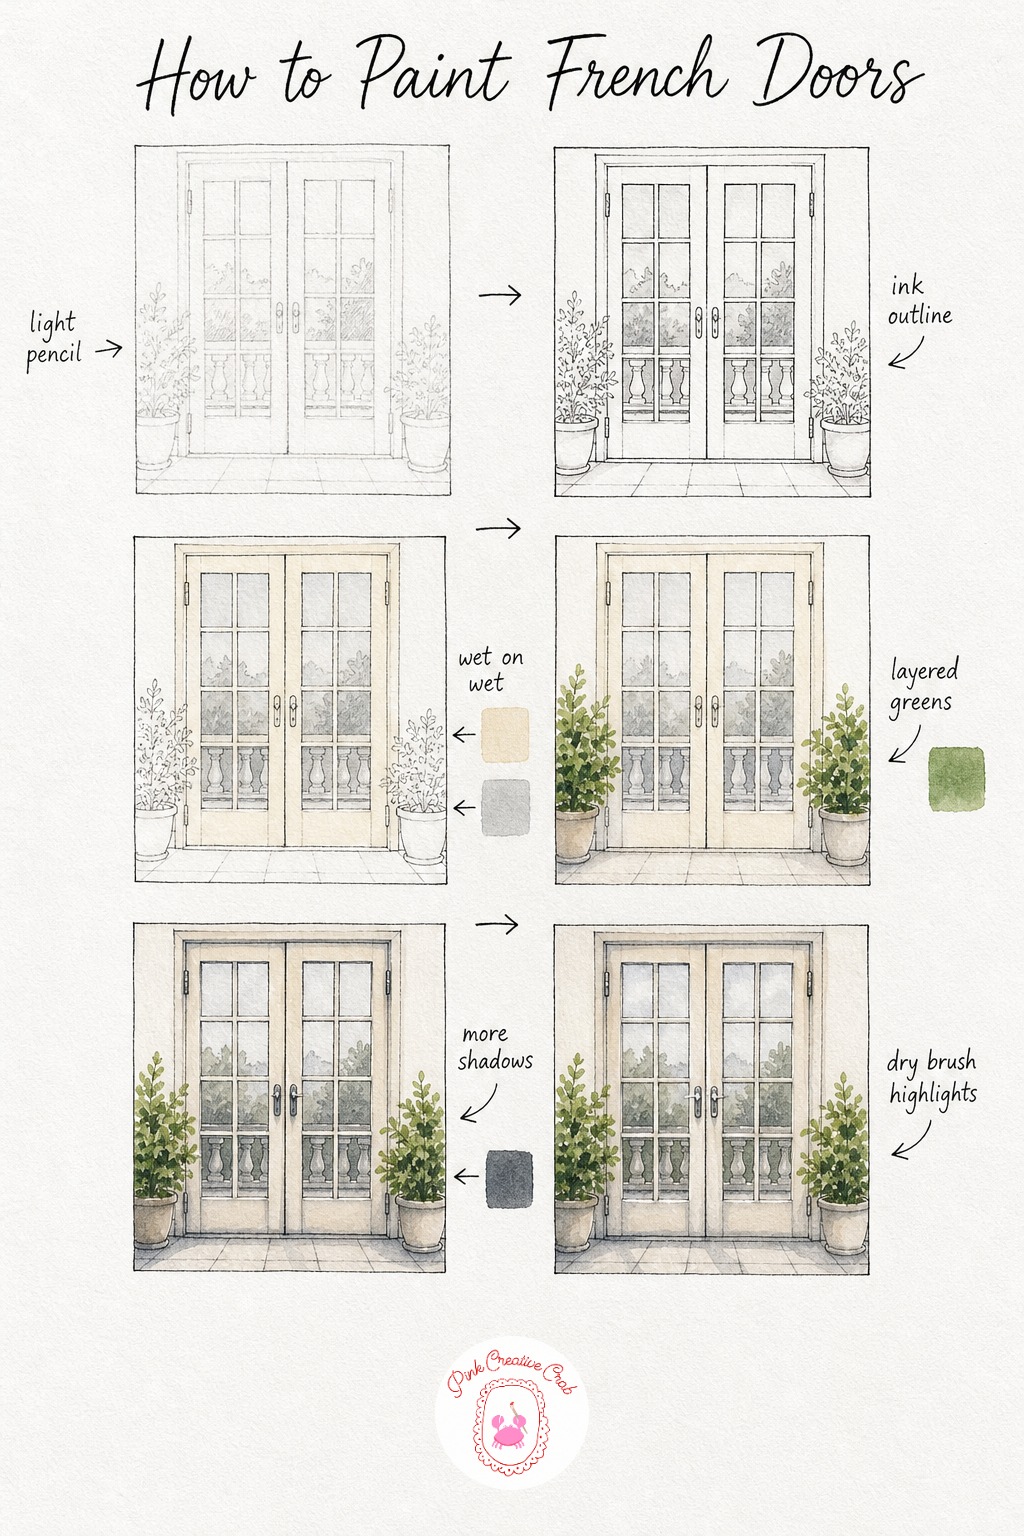
Sketch both doors symmetrically, with the railing beyond kept simple as a few horizontal and vertical lines suggesting distance. Ink the frames with a ruler if needed, but keep the railing lines looser so the terrace feels further away.
Wash both doors in a pale cream and all the glass panes in a thin gray, working wet so the gray settles unevenly like real reflections. Once dry, add any flanking potted plants in sap green, keeping them simple shapes rather than detailed leaves.
Shadow the door panels and pane dividers in payne’s gray, pushing it a touch darker where one door overlaps the other. Dry brush white gouache onto the door handles and one standout glass pane for a sense of outdoor light pouring through.
Two doors side by side can look flat, so make one door sit slightly in shadow compared to the other for depth.
Narrow Door With Lantern
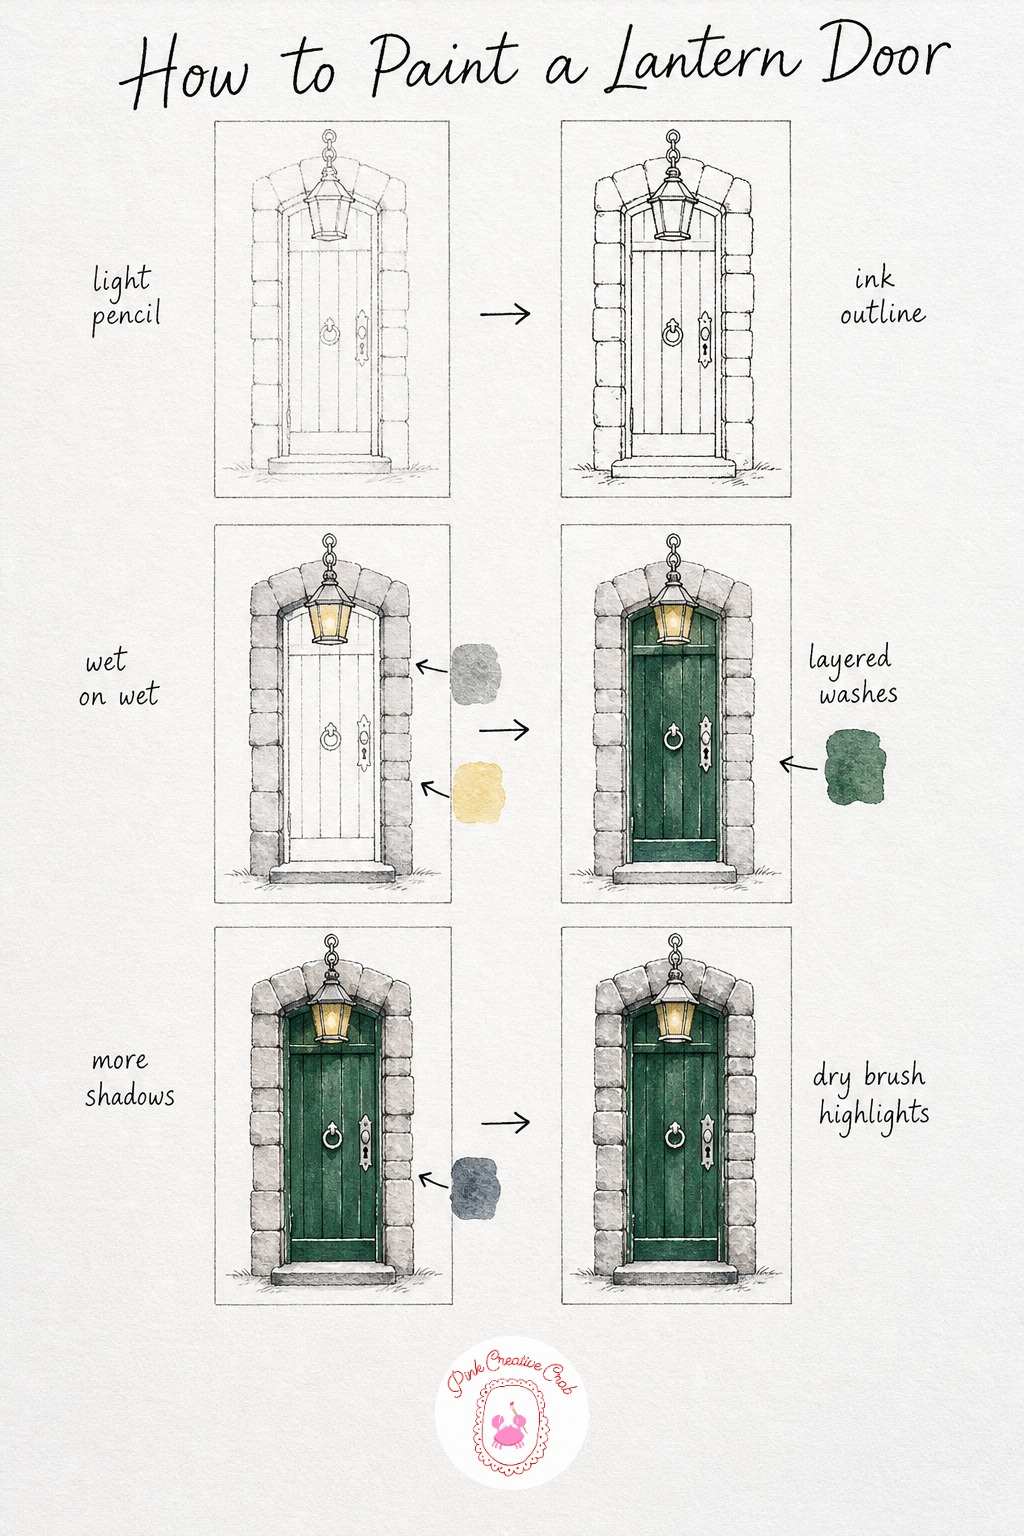
Sketch the narrow door and its stone surround first, then add the lantern hanging just above the frame, keeping its shape simple with a few glass panes. Ink the stone joints in short broken lines rather than one continuous outline, it reads more like real masonry.
Wash the stone in a cool gray and drop a touch of pale yellow into the lantern glass while it is still wet, so it glows faintly even unlit. Once dry, paint the door itself in one confident wash of deep green or a deep red if you prefer, letting it dry fully before any detail work.
Shadow the stone joints and the underside of the lantern in payne’s gray, keeping the darkest value right where the lantern meets the wall. Finish with dry brush white gouache on the lantern glass and any metal hardware on the door.
A single warm note inside a cool gray stone wash is what sells the lantern as lit, even in daylight.
Window Box Full Of Pansies
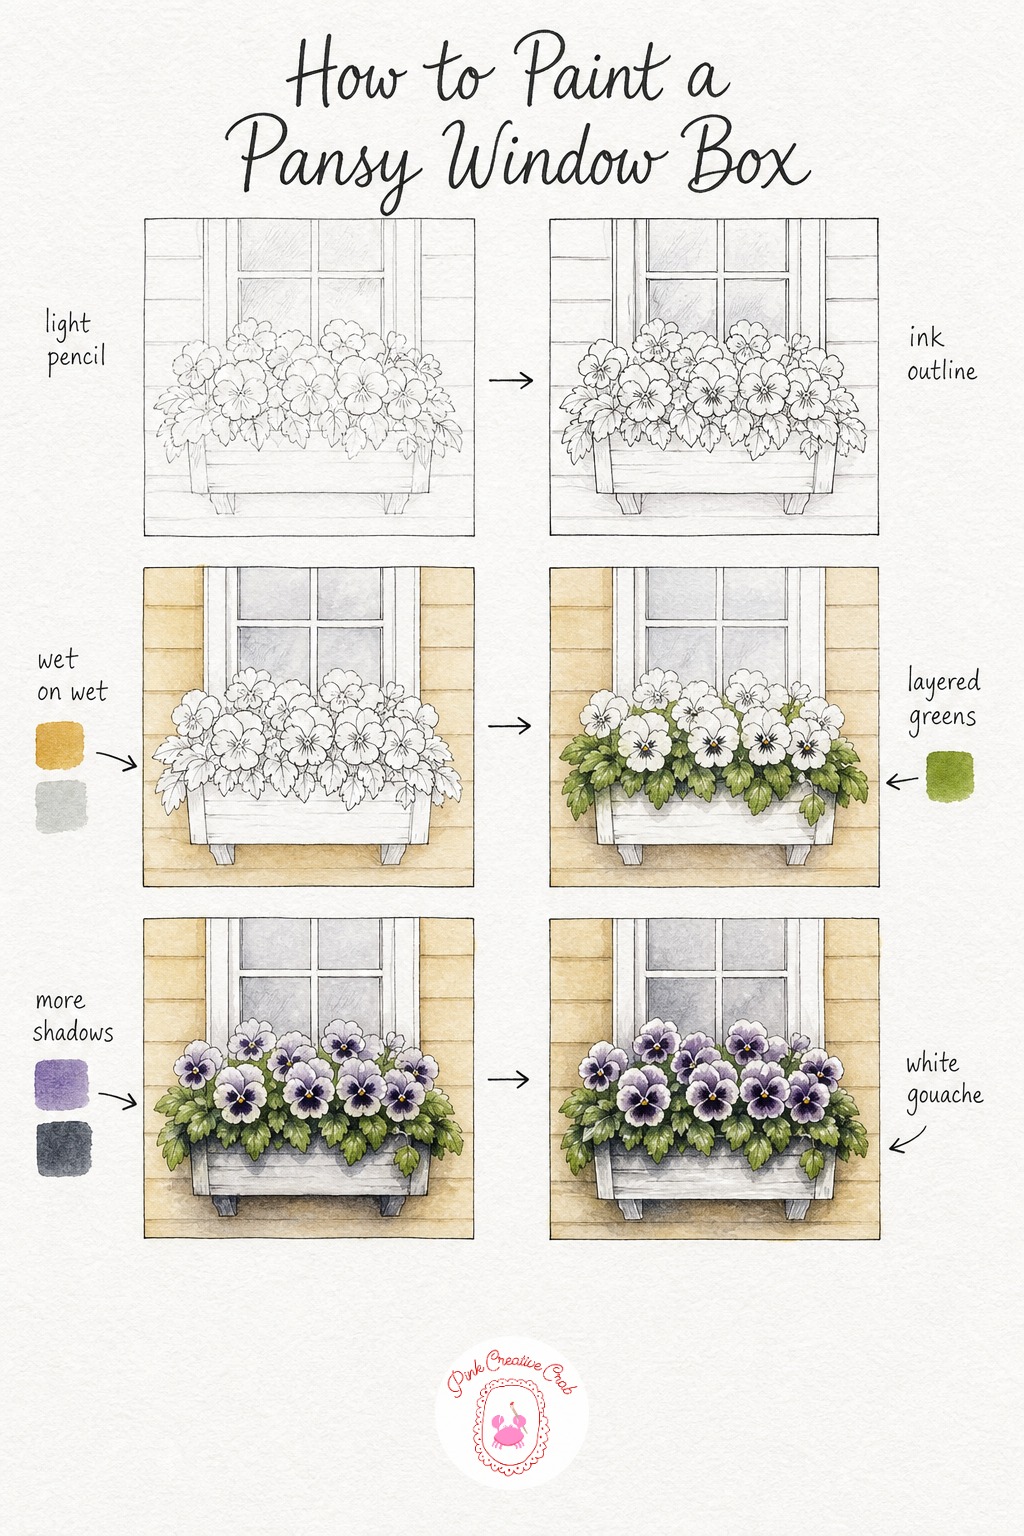
Sketch the window frame simply, then crowd the box beneath it with loose oval shapes for each pansy bloom and a scatter of leaves. Ink the frame cleanly, then the petals with a soft wavy line since pansies are never perfectly round.
Wash the wall and glass as always, pale and thin, letting them dry before the flowers take over the sheet. Layer sap green across the leaves next, working around the flower shapes so they stay crisp for color later.
Paint the pansies themselves in purple, yellow and deep violet, mixing wet on the palette rather than on the paper so the colors stay clean. Push purple and payne’s gray into each petal center for that classic pansy face, then dry brush white and yellow onto a few petal edges for sparkle.
If your petals bleed together, let each flower dry before painting its neighbor, pansies planted this close need patience more than most window boxes.
Half-Open Shutter With Peeling Paint
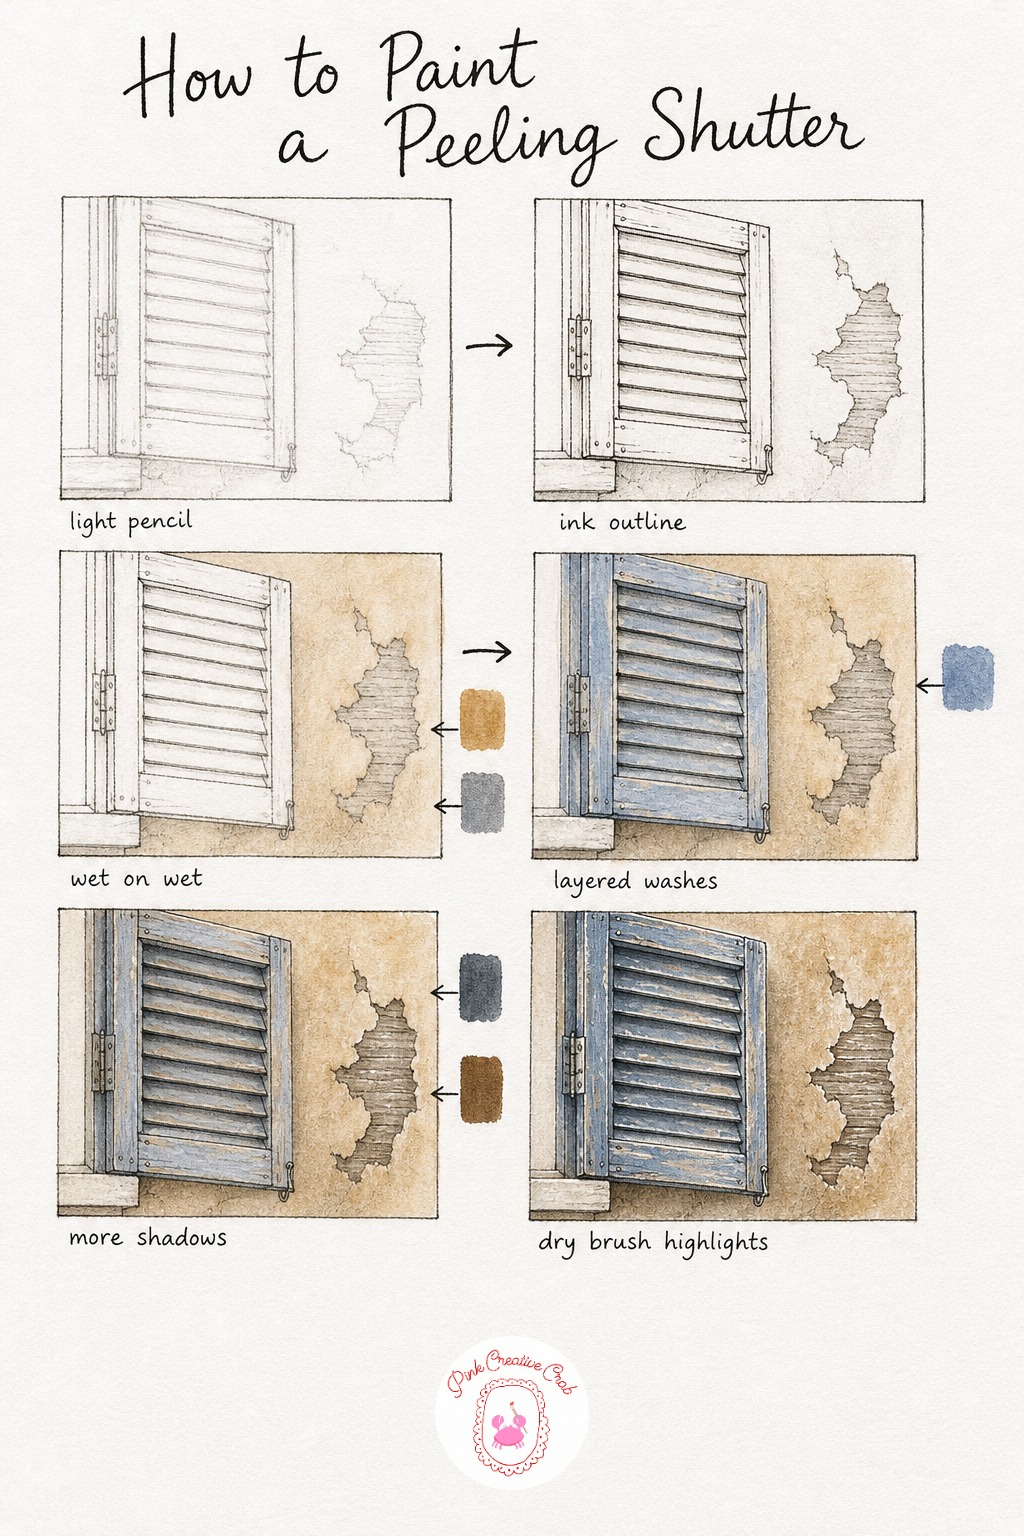
Sketch the shutter hanging slightly open from the wall, then mark a few rough patches where you plan to leave the wood bare under peeling paint. Ink the slats and the jagged edges of those bare patches with a slightly broken line rather than a smooth one.
Wash the wall in raw sienna and dab a cooler gray into the bare wood patches while still wet, letting the two blend softly at the edges. Once dry, paint the shutter in a faded blue, deliberately leaving gaps of bare paper or pale wash where the paint has worn thin, this is the whole character of the piece.
Shadow between the slats and along every rough edge in payne’s gray mixed with burnt umber for warmth. Dry brush white gouache along any raised wood grain and the metal hinge for a last touch of age and light.
Resist the urge to even out the blue, uneven coverage is what makes old paint look old.
Corner Balcony With Climbing Roses
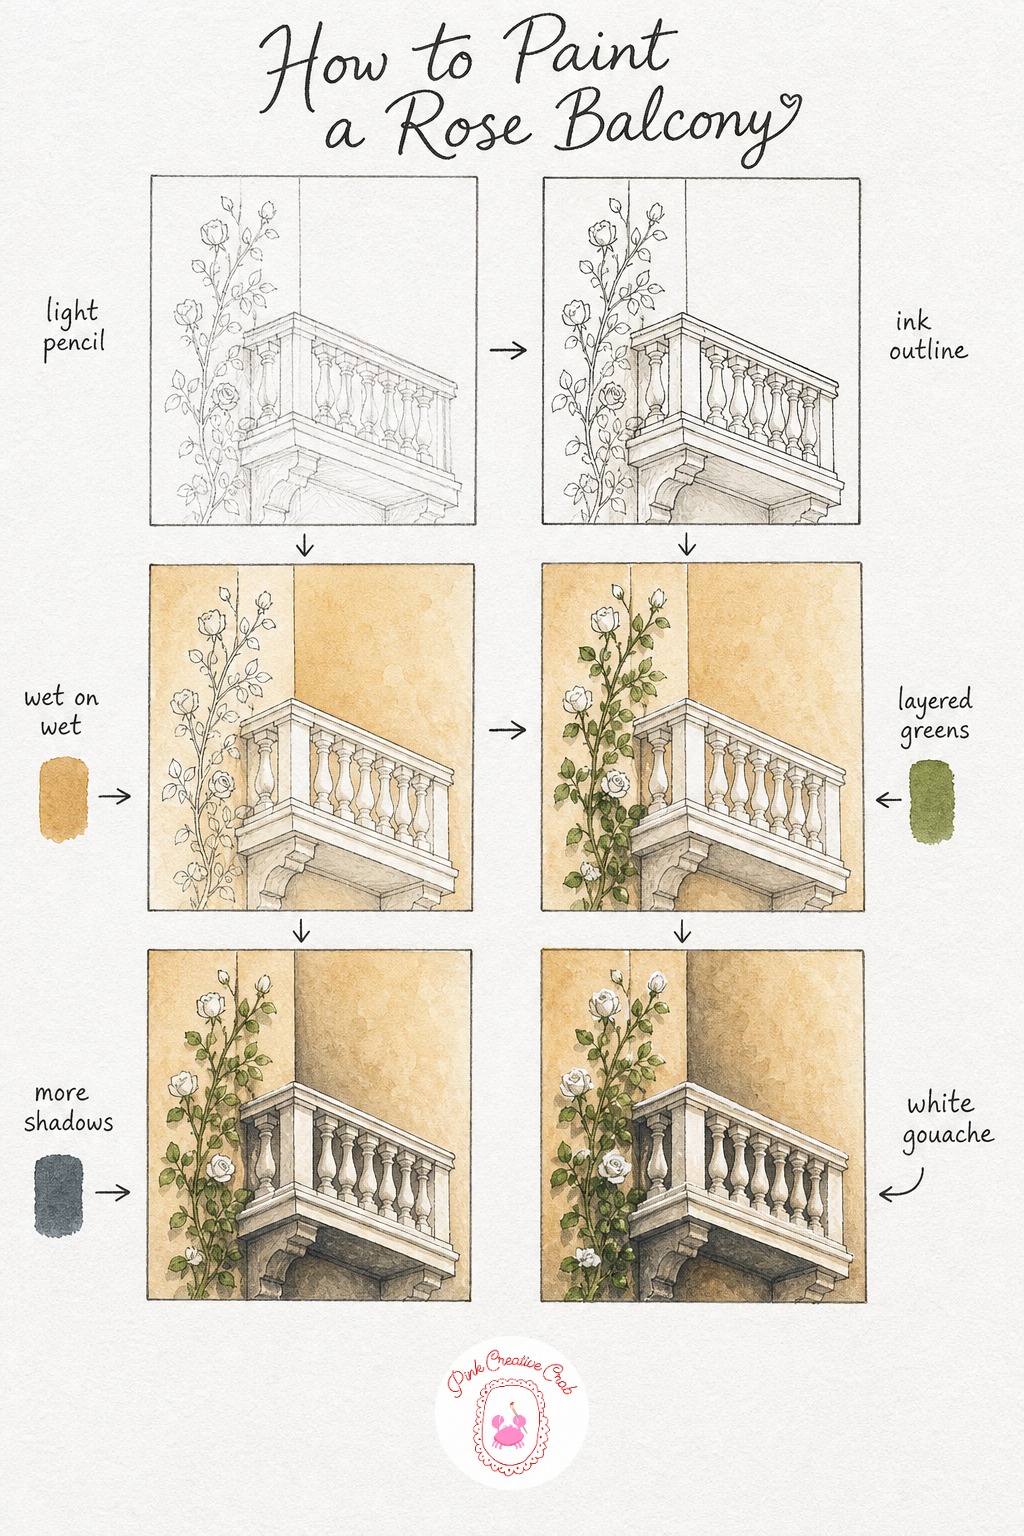
Sketch the corner where two walls meet first, since getting that angle right anchors the whole balcony. Add the iron rail and let the rose vine climb up from one corner, curling over the top rail here and there.
Ink the rail carefully, it is the most detailed part, then the vine in a looser scribbled line. Wash both wall faces in raw sienna, keeping one side slightly darker than the other to suggest the turn of the corner.
Layer sap green first across all the leaves, then a darker green into the shaded undersides once dry. Paint the roses in pink or red, then shadow the rail and the inside corner in payne’s gray, this is what gives the balcony its sense of turning in space.
Finish with white gouache dry brushed onto a few open roses and along the lit edge of the rail. A touch more pink and less green on the sunlit side keeps the light direction clear throughout.
Door Knocker Close-Up
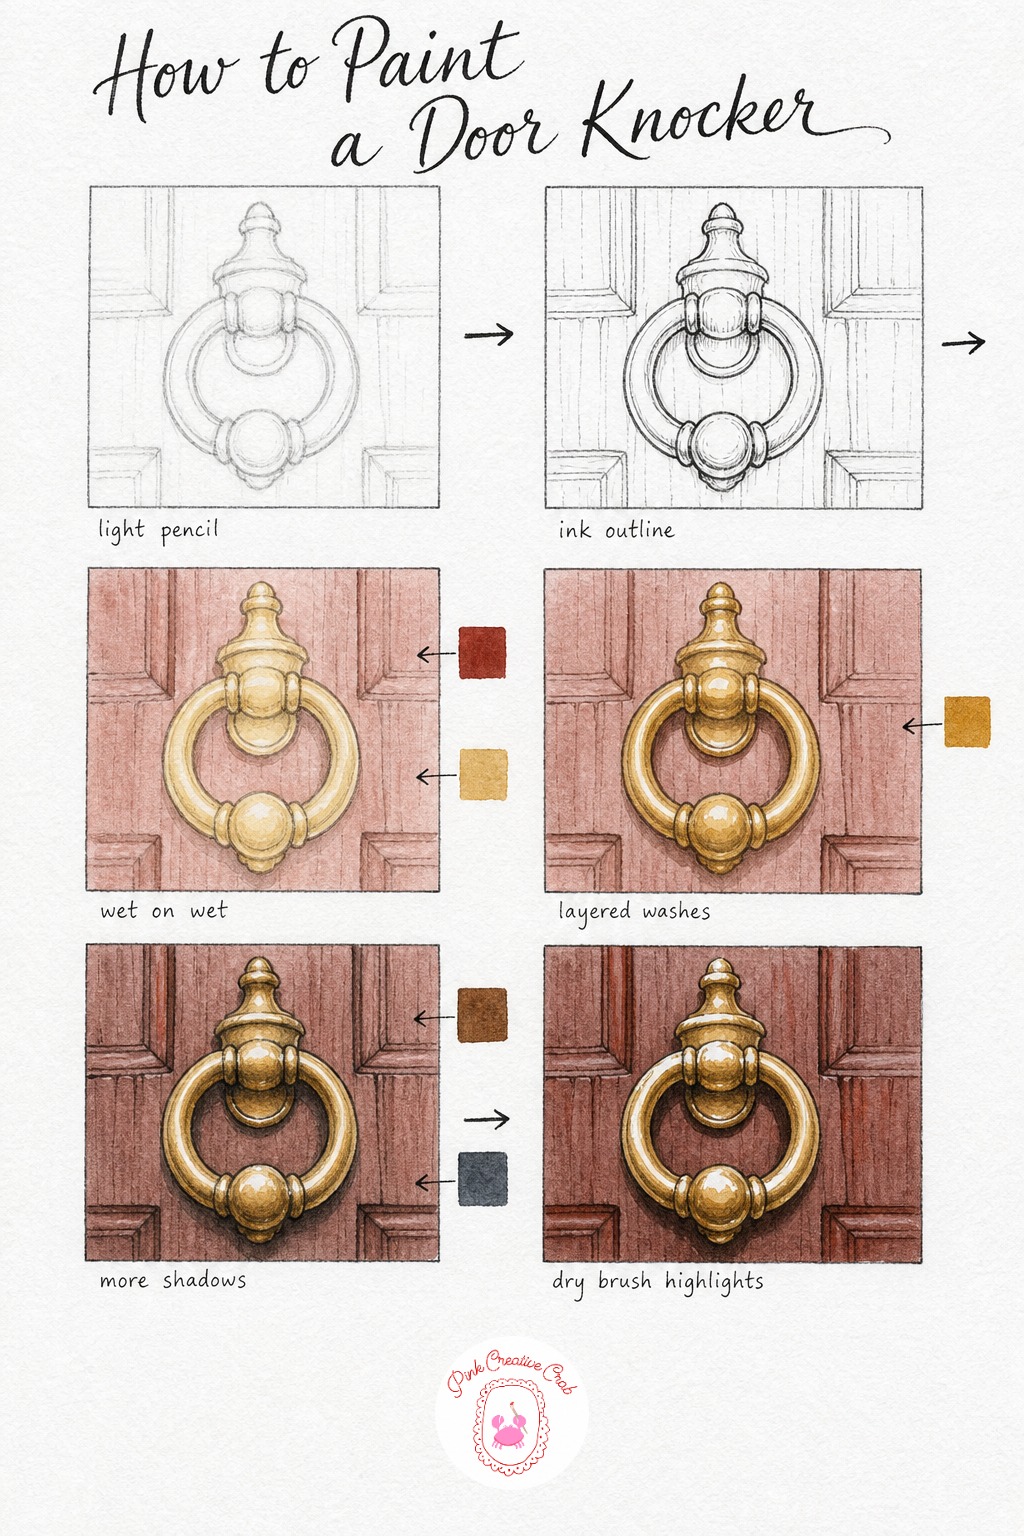
Zoom in for this one, sketching just the knocker and a small patch of door panel around it, large enough to show the wood grain. Ink the knocker’s curves slowly, a lion head or simple ring shape both work well, then add a few wood grain lines around it.
Wash the door panel in a deep red and let a pale gold tone settle onto the knocker itself while the paper is still a little damp. Once dry, build the brass in two layers of gold ochre, the second layer only on the rounder, shadowed parts of the metal.
Shadow the underside of the knocker and press some burnt umber and payne’s gray into the wood grain lines for depth. The final dry brush of white gouache should hit only the single brightest curve of the metal, resist adding more than one or two highlight strokes.
Metal highlights work best as a hard, small spark rather than a soft blend, so keep your brush nearly dry for that last stage.
Open Window With Birdcage
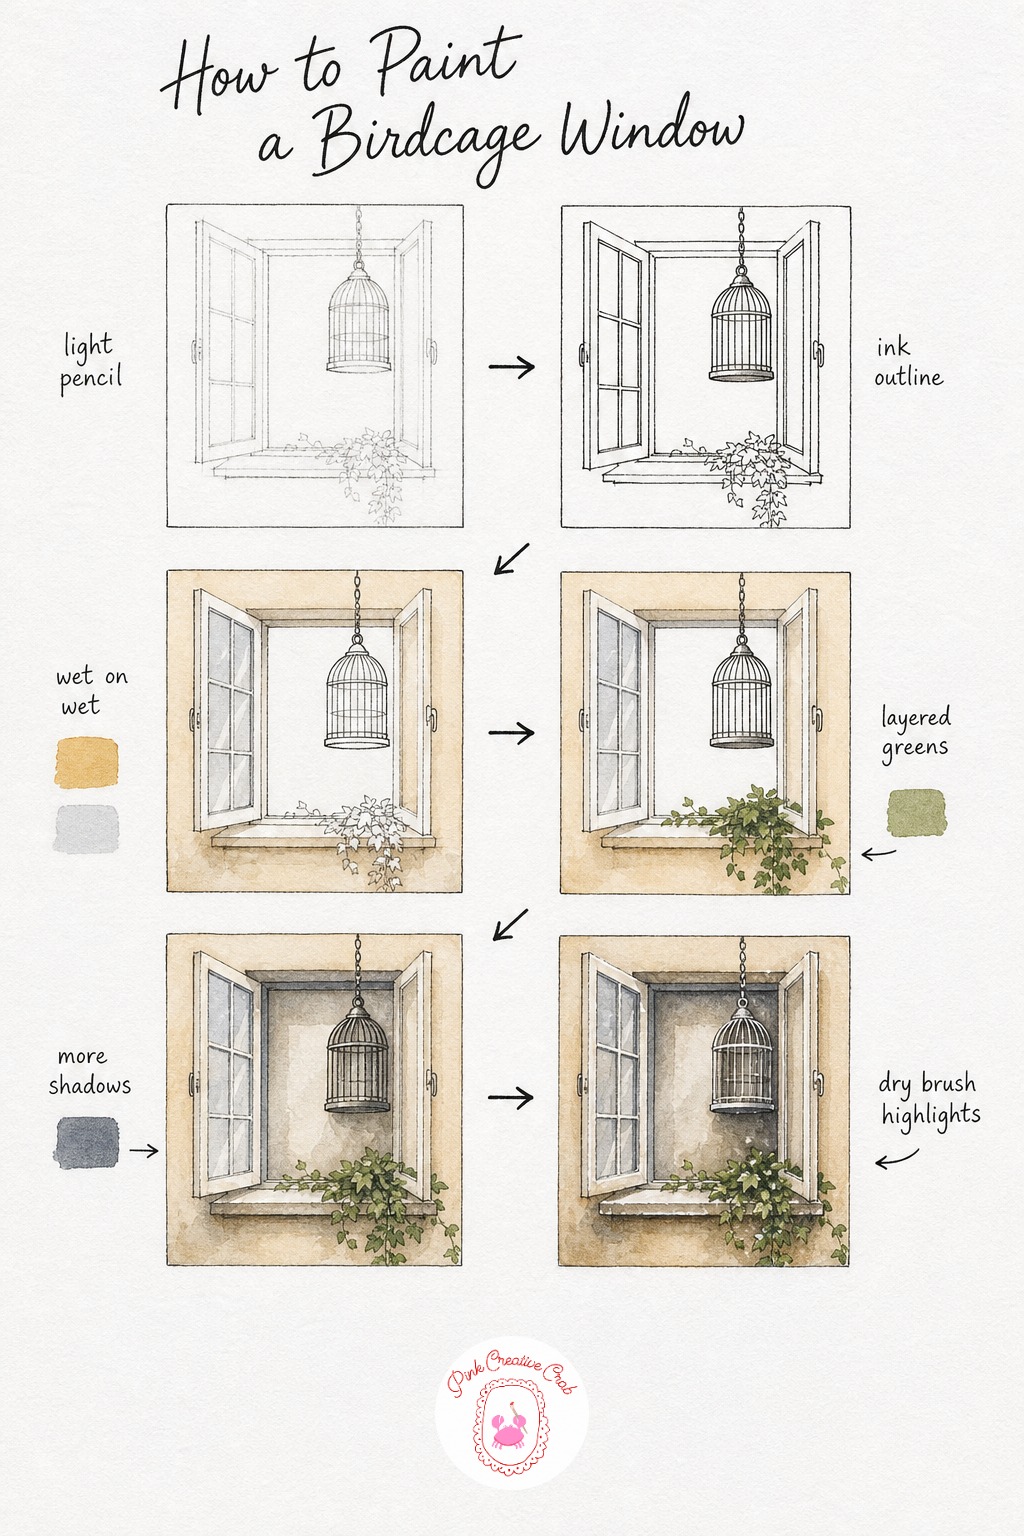
Sketch the window open slightly, with the sill extending out and the birdcage hanging just outside it or resting on the ledge. Ink the frame first, then the birdcage bars with careful even spacing since uneven bars look unintentional rather than charming here.
Wash the wall in raw sienna and the open glass pane in a cool pale gray, letting the gray pool a little darker in the corners for depth. Once dry, add a trailing plant near the sill in sap green if you like, keeping it a loose suggestion rather than detailed leaves.
Shadow the underside of the sill and the inside of the birdcage in payne’s gray, the cage interior should read noticeably darker than its bars. Dry brush white gouache along the lit side of each bar and the front edge of the sill for a crisp finish.
If the bars blur together, paint every other one in the shadow stage and leave the rest for the highlight stage, it keeps them distinct.
Garden Gate Among Hollyhocks
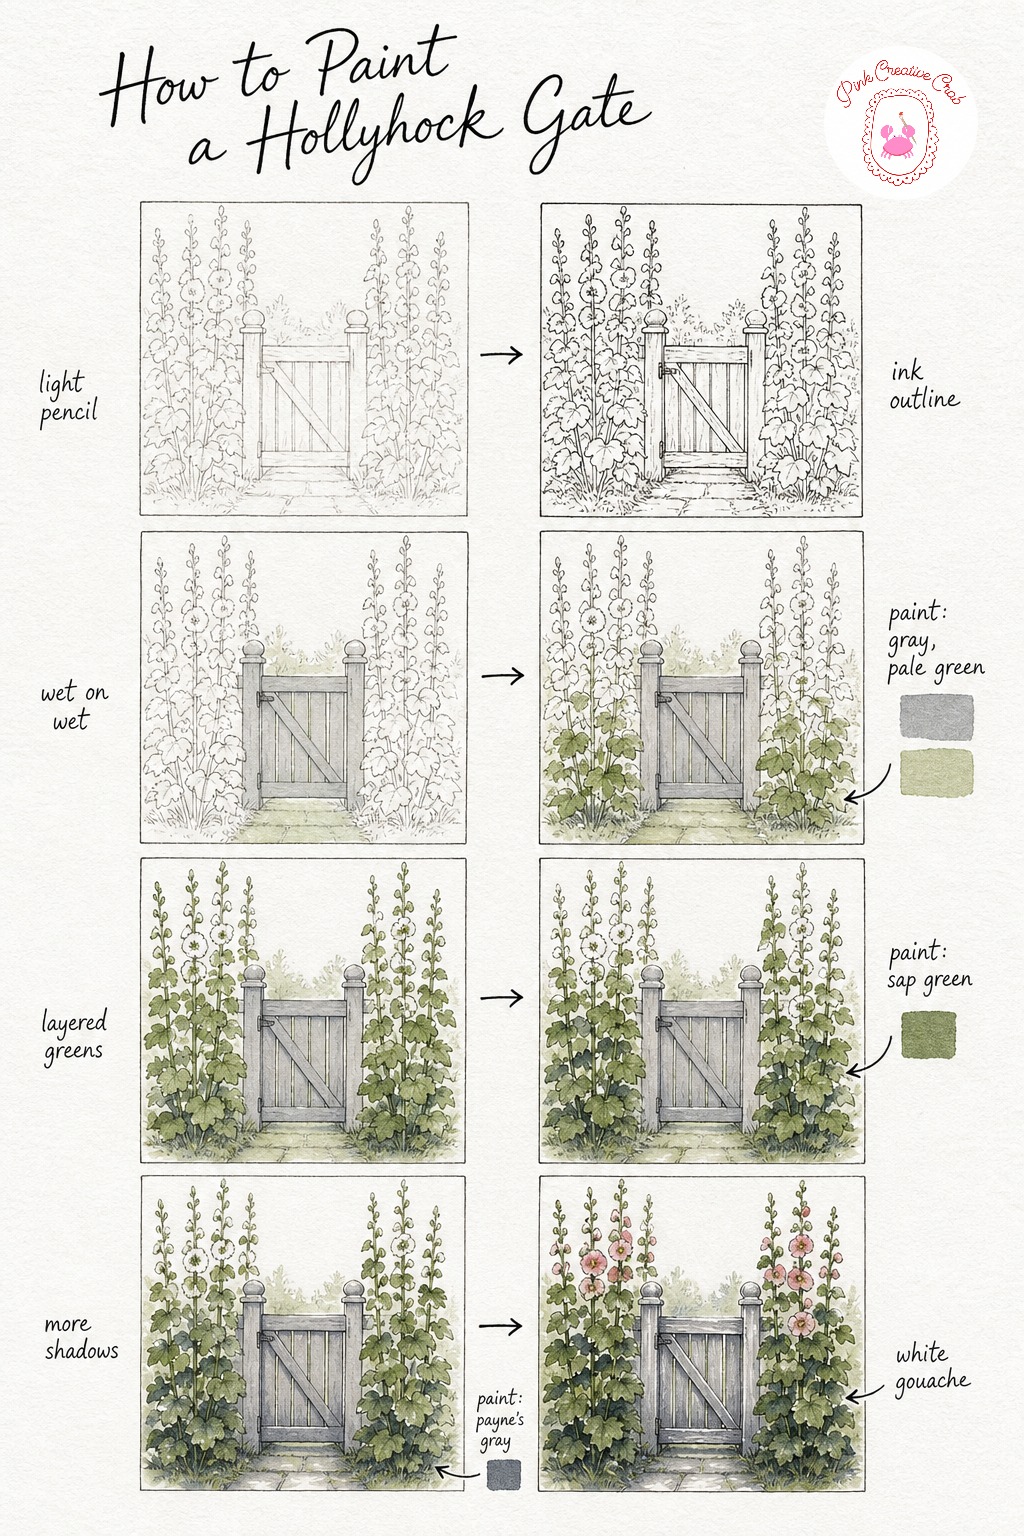
Sketch the gate centered on the page with hollyhocks rising tall on either side, their stems reaching above the top rail. Ink the gate boards and fence posts with straight careful lines, then the hollyhock stems and blooms in a freer, swaying line.
Wash the gate in a soft gray and let a pale green suggest the path or garden glimpsed beyond it. Once dry, layer sap green up each hollyhock stem and across the leaves, varying the pressure so the green is not perfectly even.
Paint the hollyhock blooms in pink, white or pale yellow clusters climbing the stems, then shadow the gate boards and the base of the leaves in payne’s gray. A final dry brush of white gouache and pink picks out the topmost blooms where the light hits strongest.
For more flower color pairings to try across the blooms, the simple watercolor flowers ideas collection is worth a look.
Stable Door With Horseshoe
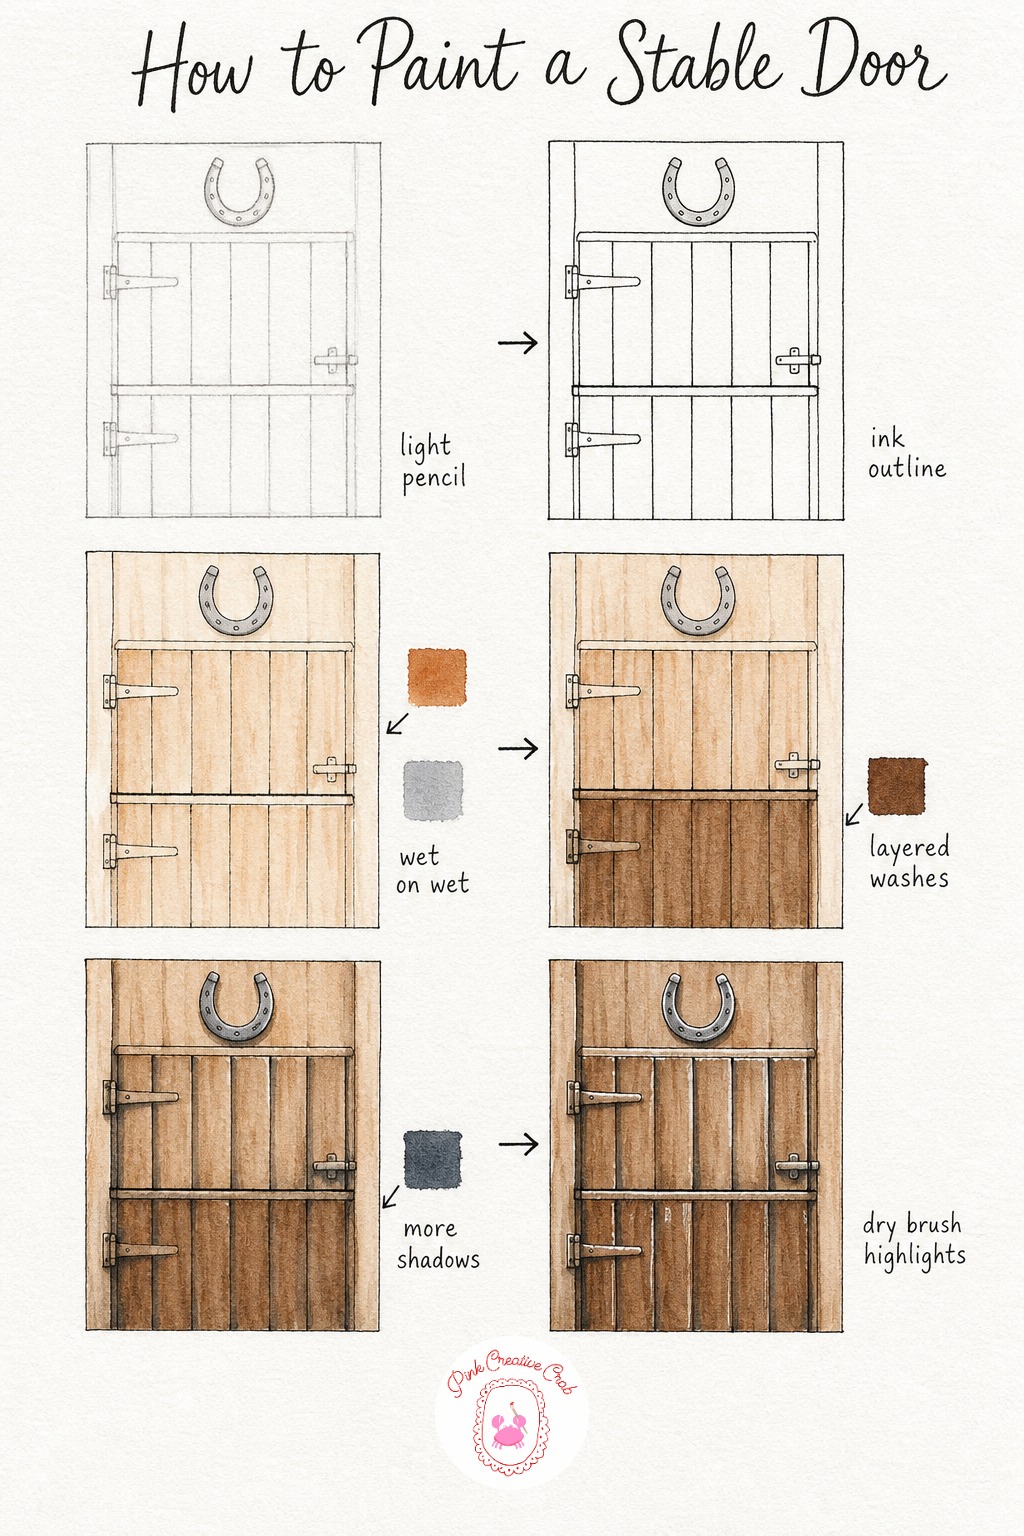
Sketch the door split into two halves, upper and lower, with the horseshoe placed just above the frame for luck. Ink each plank as a separate vertical line and the horseshoe as a simple curved band, nail holes optional but charming.
Wash the whole door in a warm burnt sienna and let a cool gray settle onto the horseshoe while the paper is still damp. Once dry, deepen the lower half of the door with a second burnt umber layer, since stable doors often show more wear low down where animals and weather reach it.
Shadow every plank groove and the horizontal split line between the two door halves in payne’s gray, keeping the line crisp and slightly uneven. Dry brush white gouache along a few plank edges and the brightest curve of the horseshoe to finish.
Vary your plank widths slightly rather than ruling them identical, real stable doors are rarely perfectly even.
What to Do Next
Pick whichever door or window caught your eye first, set out your paints and work through its six stages at your own pace, there is no wrong place to start this street of old houses.
Frequently Asked Questions
What paper is best for a watercolor tutorial step by step with this much ink detail?
Cold press watercolor paper around 300gsm works best, since it takes the water without buckling and still lets fine ink lines sit crisply on top without feathering.
Should I ink before or after the pencil sketch in these window and door tutorials?
Always ink after the pencil sketch, once you are confident in the proportions, then erase the pencil lightly before any paint goes on so graphite does not muddy your washes.
How do I keep my greens from looking flat on ivy and vine subjects?
Mix at least two distinct greens, one cooler and one warmer, and layer them in separate dry patches rather than blending on the paper, since this is what gives climbing plants real depth.
Why does my white gouache highlight look chalky instead of crisp?
Chalky highlights usually come from gouache mixed too thick or applied with a wet brush, so keep the brush nearly dry and the gouache only slightly loosened with water for a clean dry brush mark.
Can I paint these window and door tutorials without ink lines?
Yes, you can work in pencil alone and paint directly over it, but the ink gives these architectural subjects their crisp structural lines, which is part of what makes them read as old houses rather than loose shapes.
Have any thoughts?
Share your reaction or leave a quick response — we’d love to hear what you think!
-
 0
-
0
-
0
-
0
-
0
-
0


