

Table of Contents
- Before You Start
- Glass Bauble With Snowy Village
- Velvet Bow on Pine Branch
- Gingerbread House Ornament
- Vintage Bell With Ribbon
- Pearl Garland Star
- Candy Cane Striped Bauble
- Snowflake Medallion Ornament
- Plaid Ribbon Bauble
- Little Winter Cottage Bauble
- Acorn and Pinecone Cluster
- Holly and Berries Wreath Charm
- Nutcracker Face Ornament
- Angel Ornament With Gold Wings
- Mini Wrapped Gift Ornament
- Frequently Asked Questions
Christmas ornament drawing is my favorite kind of holiday art because every ornament is its own tiny world: a round shape, a bit of shine, and whatever pattern you feel like hiding inside it. I keep coming back to these little pages between card orders and sketchbook spreads, because each one finishes fast and still looks like something worth framing on a gift tag.
Below you will find fourteen ornaments, from a glass bauble with a snowy village painted inside to a velvet bow hanging on a pine branch. Pick whichever one matches your mug of tea tonight and follow the sheet from the first pencil circle to the last gel pen sparkle.
Using these images: free for personal projects such as printing, coloring, cards, journals and gifts. Handmade items that include them may be sold up to 30 pieces per design. More than that is commercial use and is not permitted, and neither is selling or sharing the images themselves or passing them off as your own. Please ask before any other use.
Before You Start
- Work on smooth marker paper or bristol, since cheap sketchbook paper will pill and dull your fineliner tip fast.
- Sketch every ornament in light pencil first and keep your lines loose, because markers forgive color but not a stray outline.
- Ink only once the pencil shape feels right, and let the ink dry fully before any eraser pass or marker touch.
- Test each marker color on a scrap corner before it touches the page, since alcohol ink dries a shade darker than it looks wet.
- Work your palest wash first and let it dry, then build the deep red, gold or emerald in thin layers rather than one heavy pass.
- Save the white gel pen for the very last stage, and shake it well so the first reflections do not drag or skip.
Glass Bauble With Snowy Village
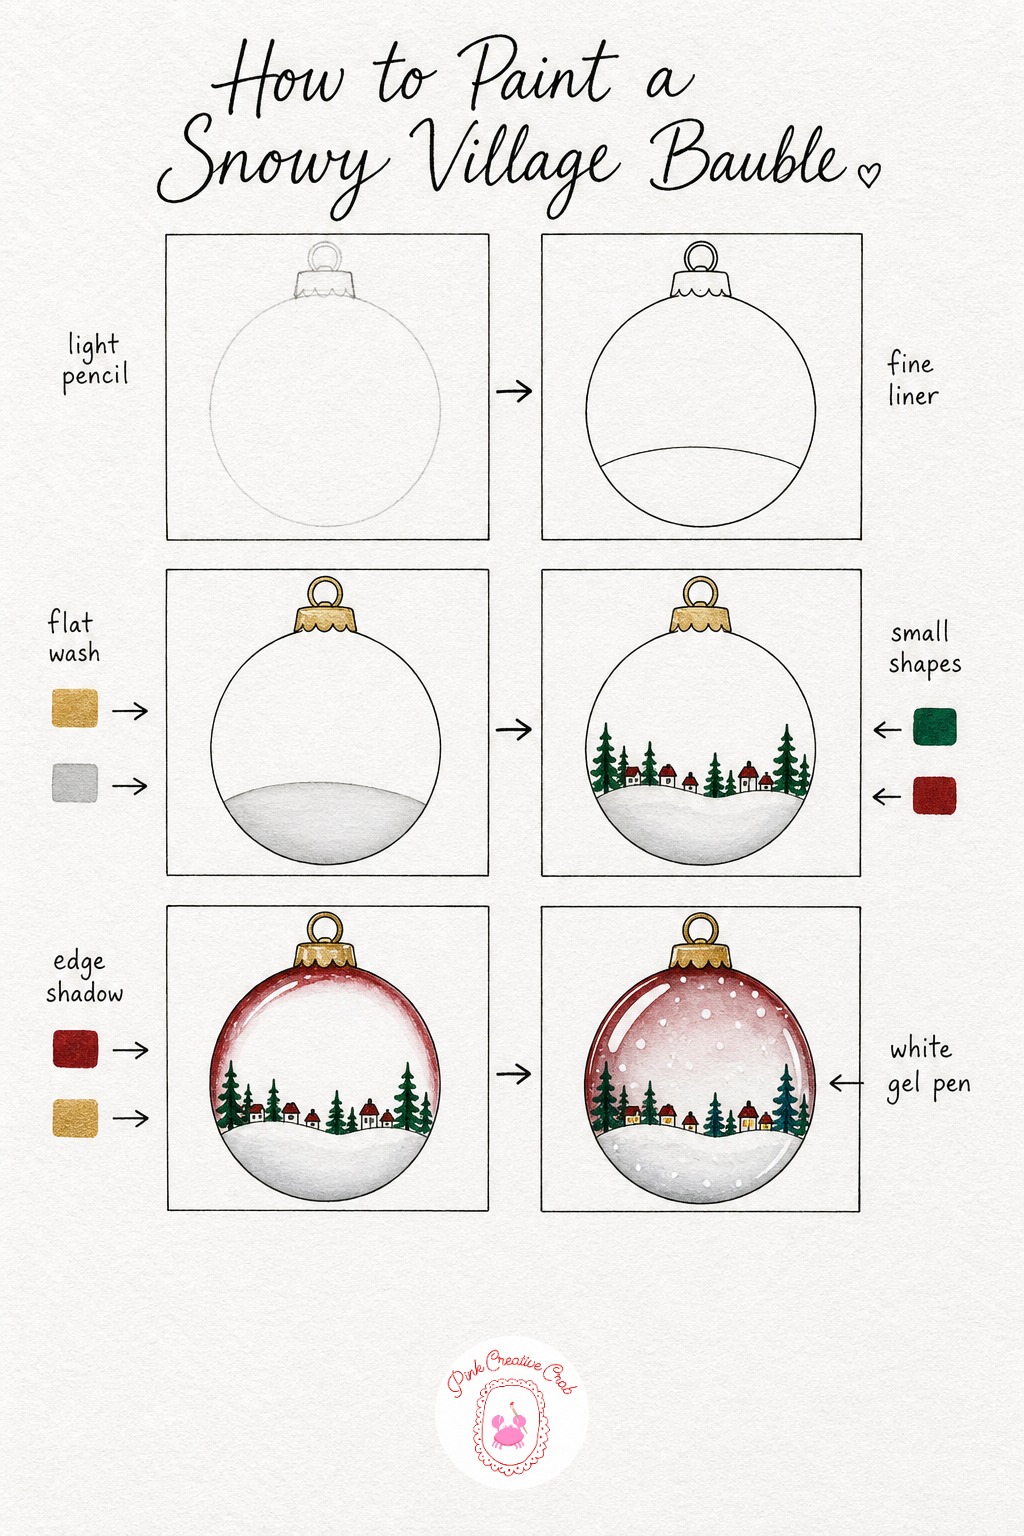
Start with one light pencil circle, the kind you would draw around a mug, and add a tiny cap shape at the top with a small loop. Keep the circle slightly uneven on purpose, since a perfect circle actually reads as stiff once the marker goes down.
Ink the outline in fine liner, then draw one gentle curved line inside the glass to suggest a horizon for your village. Once dry, lay a pale gold wash on the cap and a soft gray wash low inside the circle, both thin enough that you can still see the pencil horizon through them.
Add tiny emerald triangles for pine trees and small deep red dots for rooftops sitting right along that horizon line. Shade the outer edge of the glass in deep red marker to suggest curve and depth, then warm the cap with a second gold layer.
Finish with white gel pen: a few dots of snow falling, a soft glow in one tiny window, and two curved reflection lines on the glass itself. If your gray wash dries too flat, a light second pass in the same spot brings back the roundness.
Velvet Bow on Pine Branch
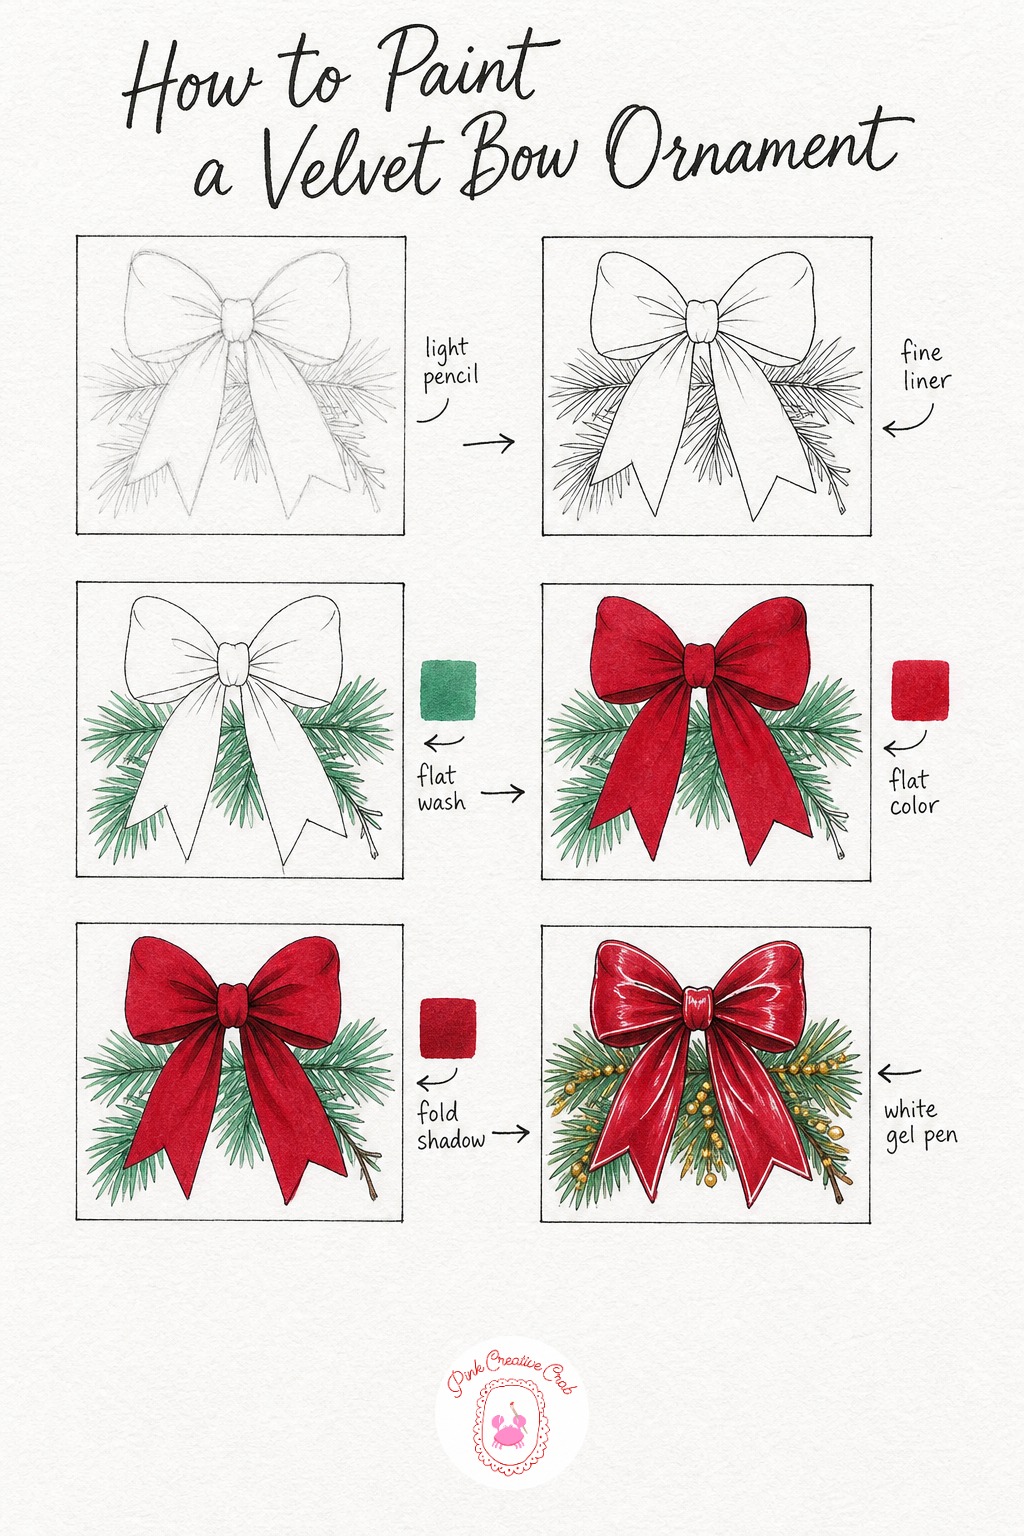
Sketch a looped bow shape in light pencil with two ribbon tails hanging below, then draw a simple pine branch crossing behind it with a scatter of short needle marks. Keep the loops slightly soft and rounded rather than symmetrical, since velvet never sits in a perfect shape.
Once the pencil feels balanced, ink every edge including each pine needle, then let it dry completely before any marker touches the page. Lay a pale emerald wash across the needles first so it has room to dry while you work on the bow.
Fill both loops and tails with a flat layer of deep red, then go back in with a second darker red pass right where the velvet would fold, at the center twist of the bow and along each tail crease. This is where most beginners stop too early: velvet needs that second shadow layer or it reads as flat satin instead.
Warm the branch with a touch of gold on the bark, then finish with white gel pen along the folded edges of the ribbon for that soft velvet sheen. For a card version of this one, this bow pairs nicely with ideas from these Christmas doodle ideas.
Gingerbread House Ornament
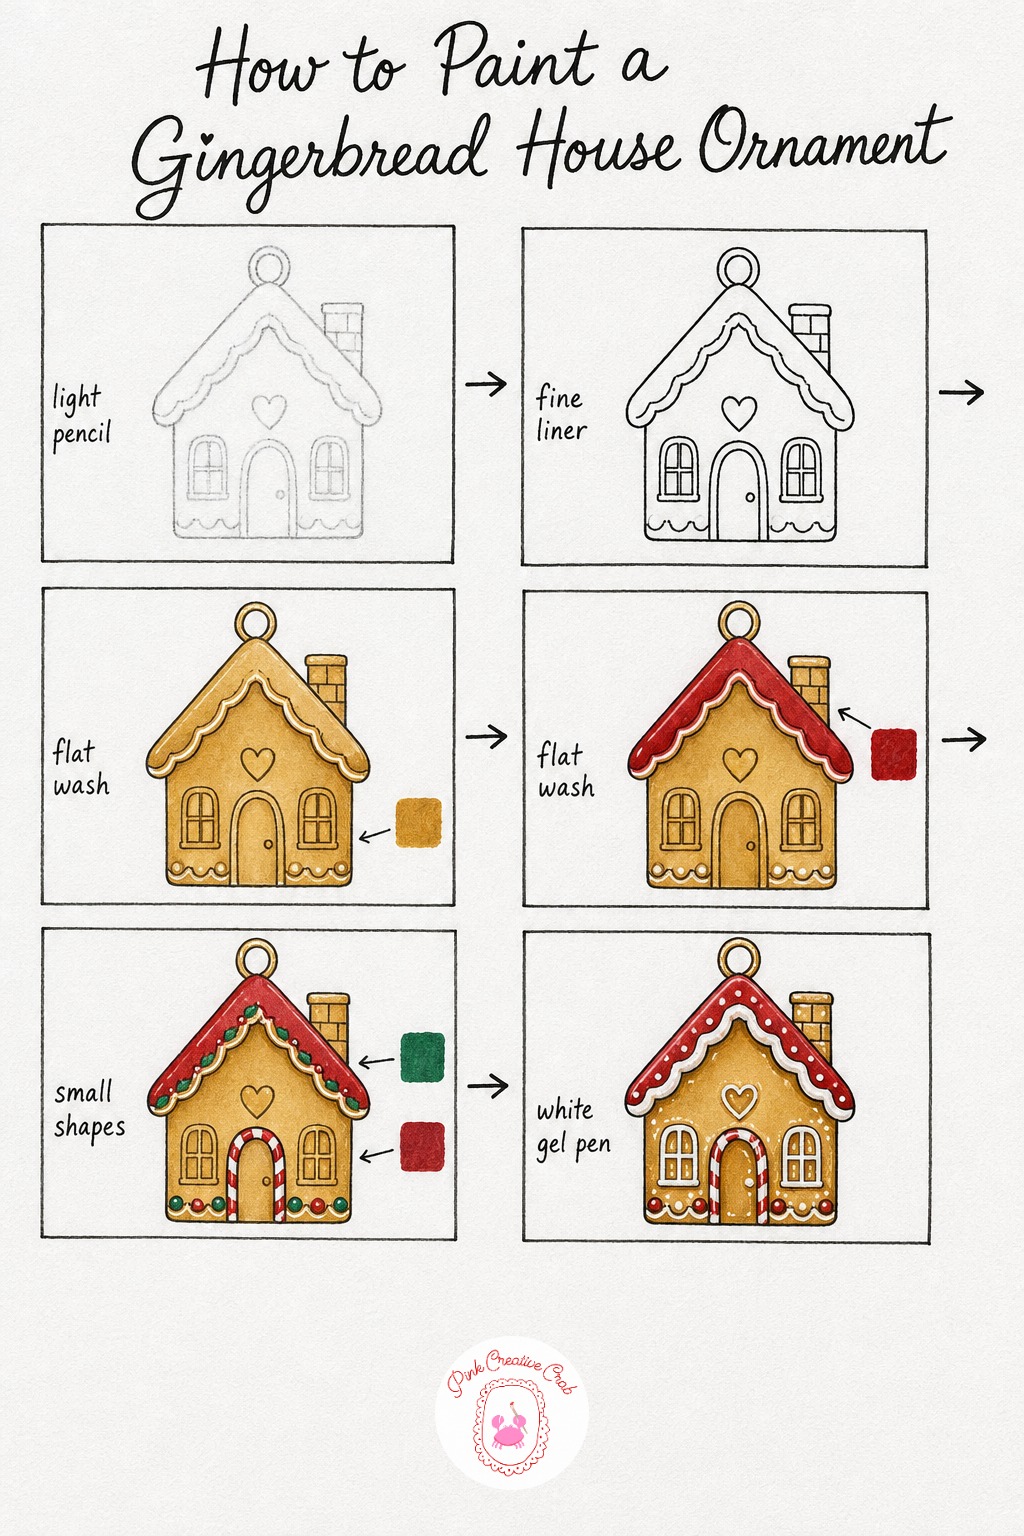
Draw a simple square house in light pencil with a triangle roof on top and a small loop above for hanging. One door and two small square windows are enough detail at the sketch stage, so resist adding more yet.
Ink the house outline along with the roofline, windows, door and loop, then let it dry before any marker touches the paper. Wash the whole house body in warm gold, keeping the marker strokes even and slightly overlapping so no pale streaks show through.
Fill the roof shape with deep red once the gold layer is fully dry, testing the edge with a cotton swab if the two colors want to bleed together. Add tiny emerald dots along the roofline for holly and small deep red dots near the door for candy, keeping them loose and a little uneven like real icing.
The final stage is the fun part: white gel pen icing lines along every roof edge, window frame and door trim, plus a few dots scattered like sugar on the walls. Keep your gel pen strokes slightly wobbly on purpose, since perfectly straight icing lines look computer-drawn instead of hand-piped.
Vintage Bell With Ribbon
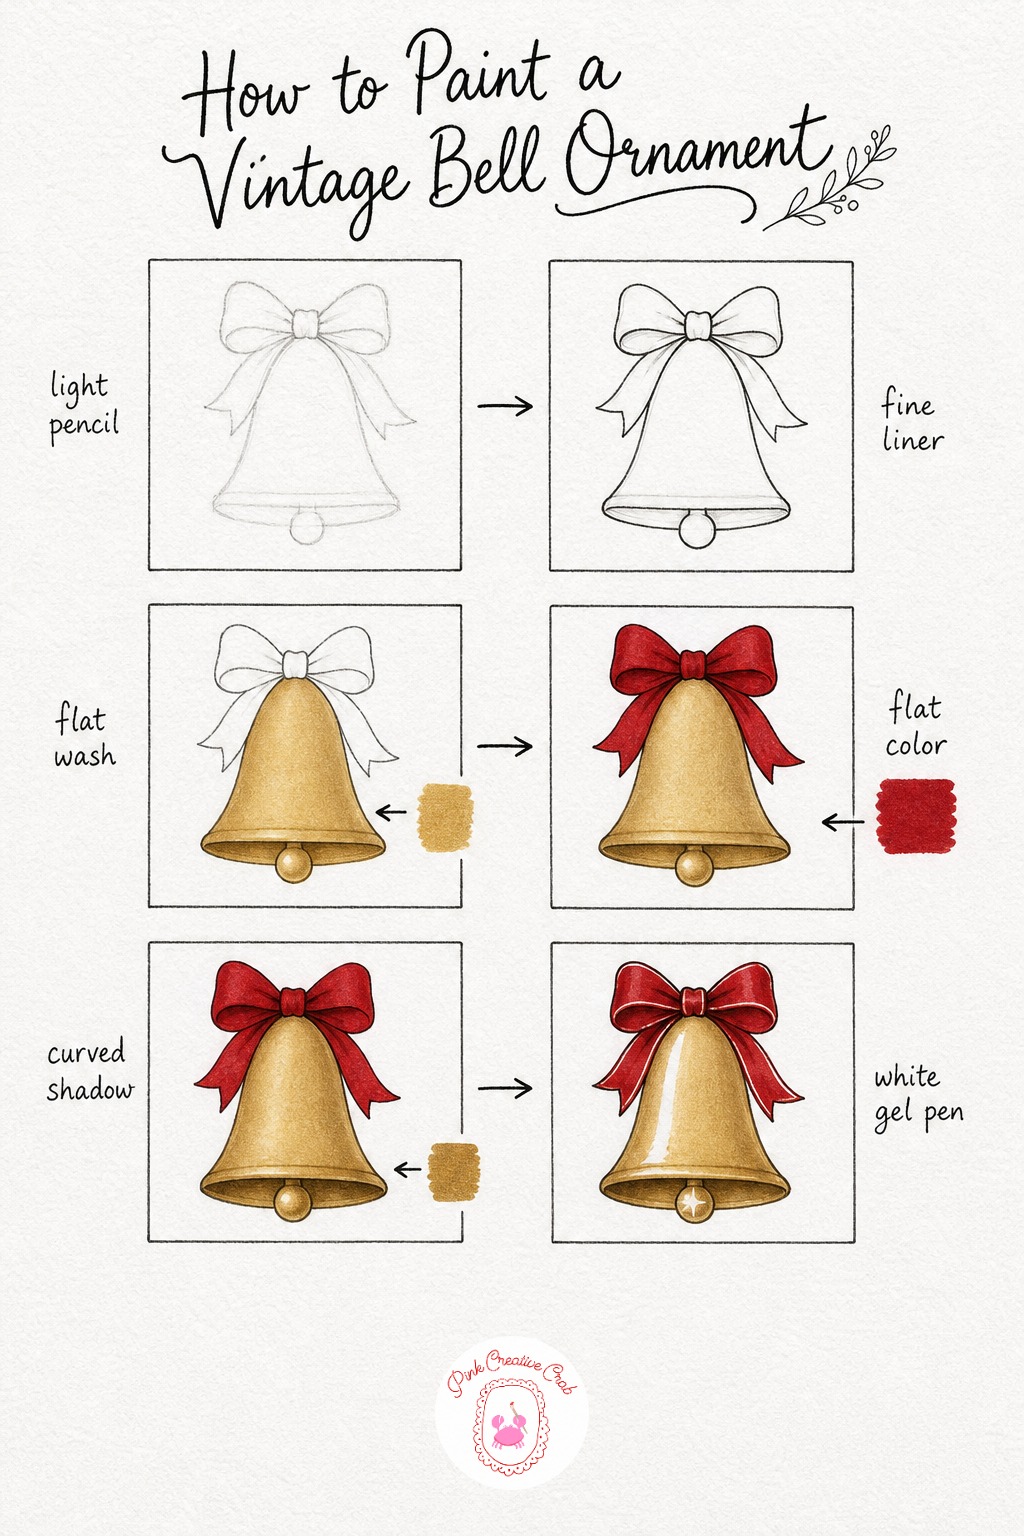
Sketch a rounded bell shape in light pencil, narrower at the top and flaring out at the bottom rim, with a small oval clapper hanging inside and a ribbon bow tied at the top. Keep the bell symmetrical by lightly folding your reference line down the center if your sketchbook paper is thin enough to see through.
Ink the bell outline, the clapper and the ribbon bow once you are happy with the proportions, then set it aside to dry fully. Lay a soft gold wash over the entire bell in one even pass, moving your marker in long strokes from top to bottom so no harsh lines form.
Fill the ribbon bow and its tails with deep red while the gold dries nearby, then return to the bell for a second, slightly heavier gold pass along the bottom curve and rim to suggest the metal catching shadow. This curved shading is what makes a flat gold shape read as a round bell, so do not skip it even if the first wash looks finished.
Finish with a single white gel pen stripe running down the bell’s shiniest side and a small sparkle dot on the clapper. A vintage bell like this sits beautifully among other cozy pencil Christmas sketches if you are filling a full page.
Pearl Garland Star
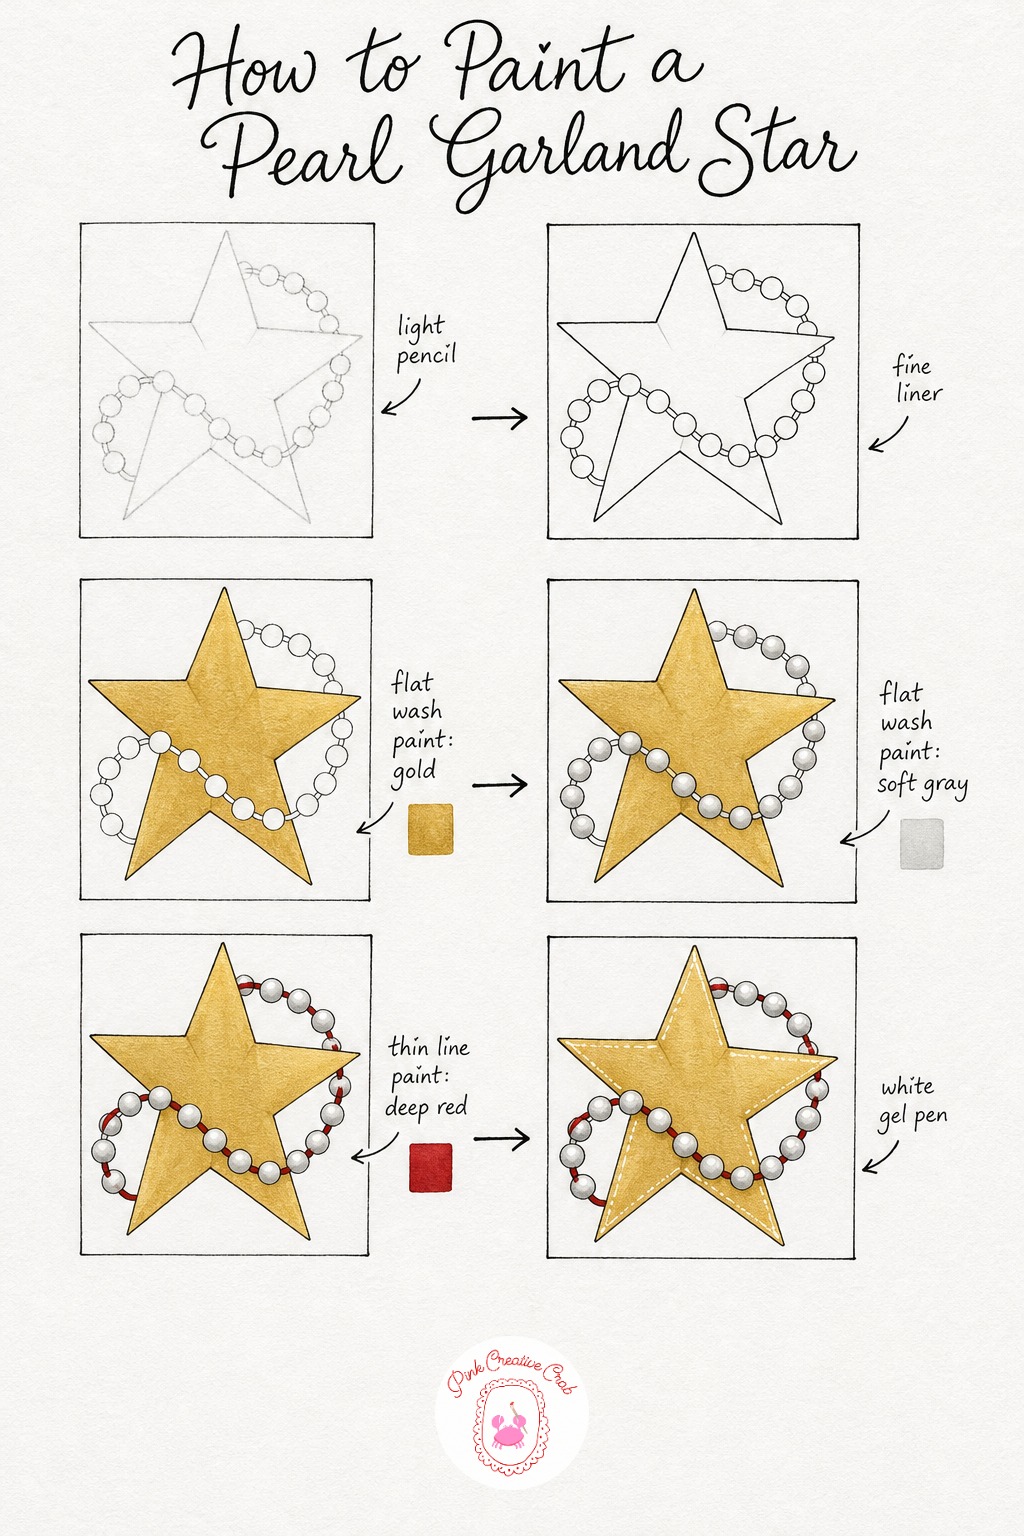
Draw a simple five point star in light pencil, then curve a looping line of small circles around and across it for the pearl garland. Space the circles evenly, about the width of a pencil eraser apart, so the garland feels like it drapes rather than floats randomly.
Ink every star point and each pearl circle once the spacing looks right, keeping your line slightly thicker on the star’s outer edge than on the pearls. Wash the whole star in gold, letting the marker pool very slightly at each inner point for a touch of natural depth.
Once the gold is dry, fill each pearl circle with a pale gray wash, leaving a small gap unmarked near the top of each pearl for the highlight to come. Thread a thin deep red line between the pearls to suggest a ribbon holding the garland together, keeping the line loose and slightly curved rather than ruler straight.
Finish with white gel pen: one bright dot on every pearl in the same spot you left bare, plus a few fine lines along the star’s edges for shine. If gray feels flat for the pearls, a pale lavender marker works just as well as a swap.
Candy Cane Striped Bauble
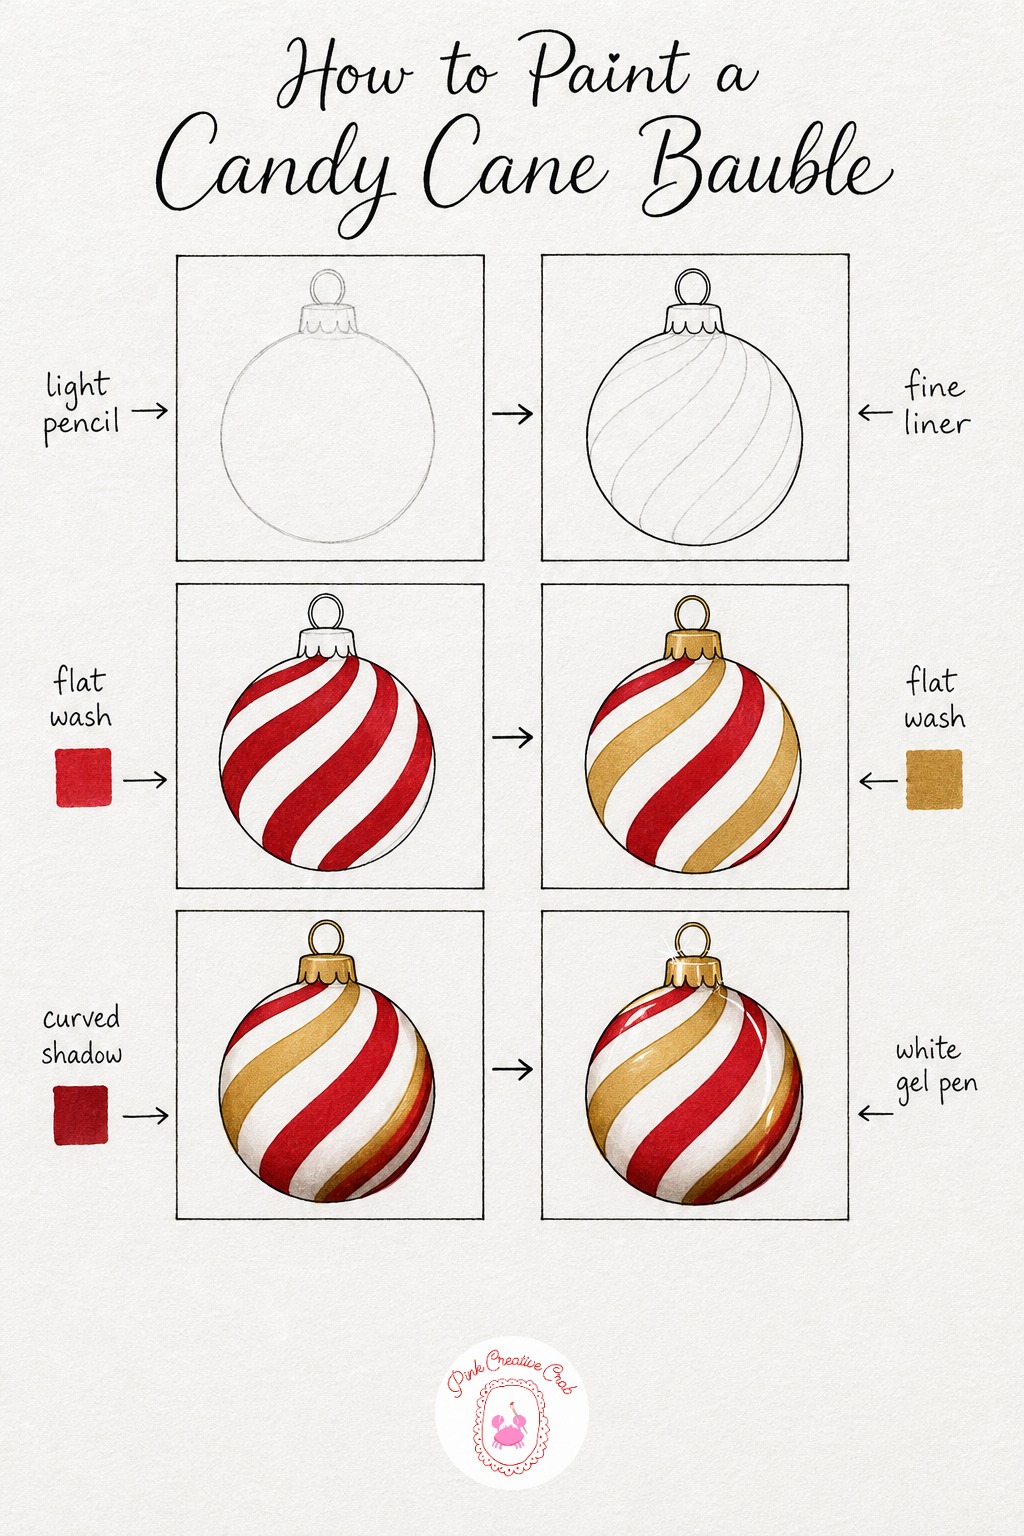
Sketch one light pencil circle with a cap and loop as you did for the other baubles, then add a few faint curved diagonal lines wrapping around the sphere to mark where the stripes will sit. These guide lines should follow the curve of the circle, bowing slightly rather than running straight across.
Ink the outer circle, the cap and each diagonal stripe line, then let everything dry before marker touches the page. Fill every other stripe with deep red, working around the circle and skipping a stripe each time so the pattern stays even.
Fill the remaining stripes and the cap with gold, letting the two colors meet right along your inked lines without overlapping. Once both are dry, add a second deep red layer along the lower curve of the whole bauble to pull the stripes into one rounded shape instead of flat bands.
Finish with one curved white gel pen stripe sweeping diagonally across the glass for the classic glass reflection, plus a small sparkle near the cap. If your stripes wobble slightly, that is fine, since real candy stripes are never perfectly straight either.
Snowflake Medallion Ornament
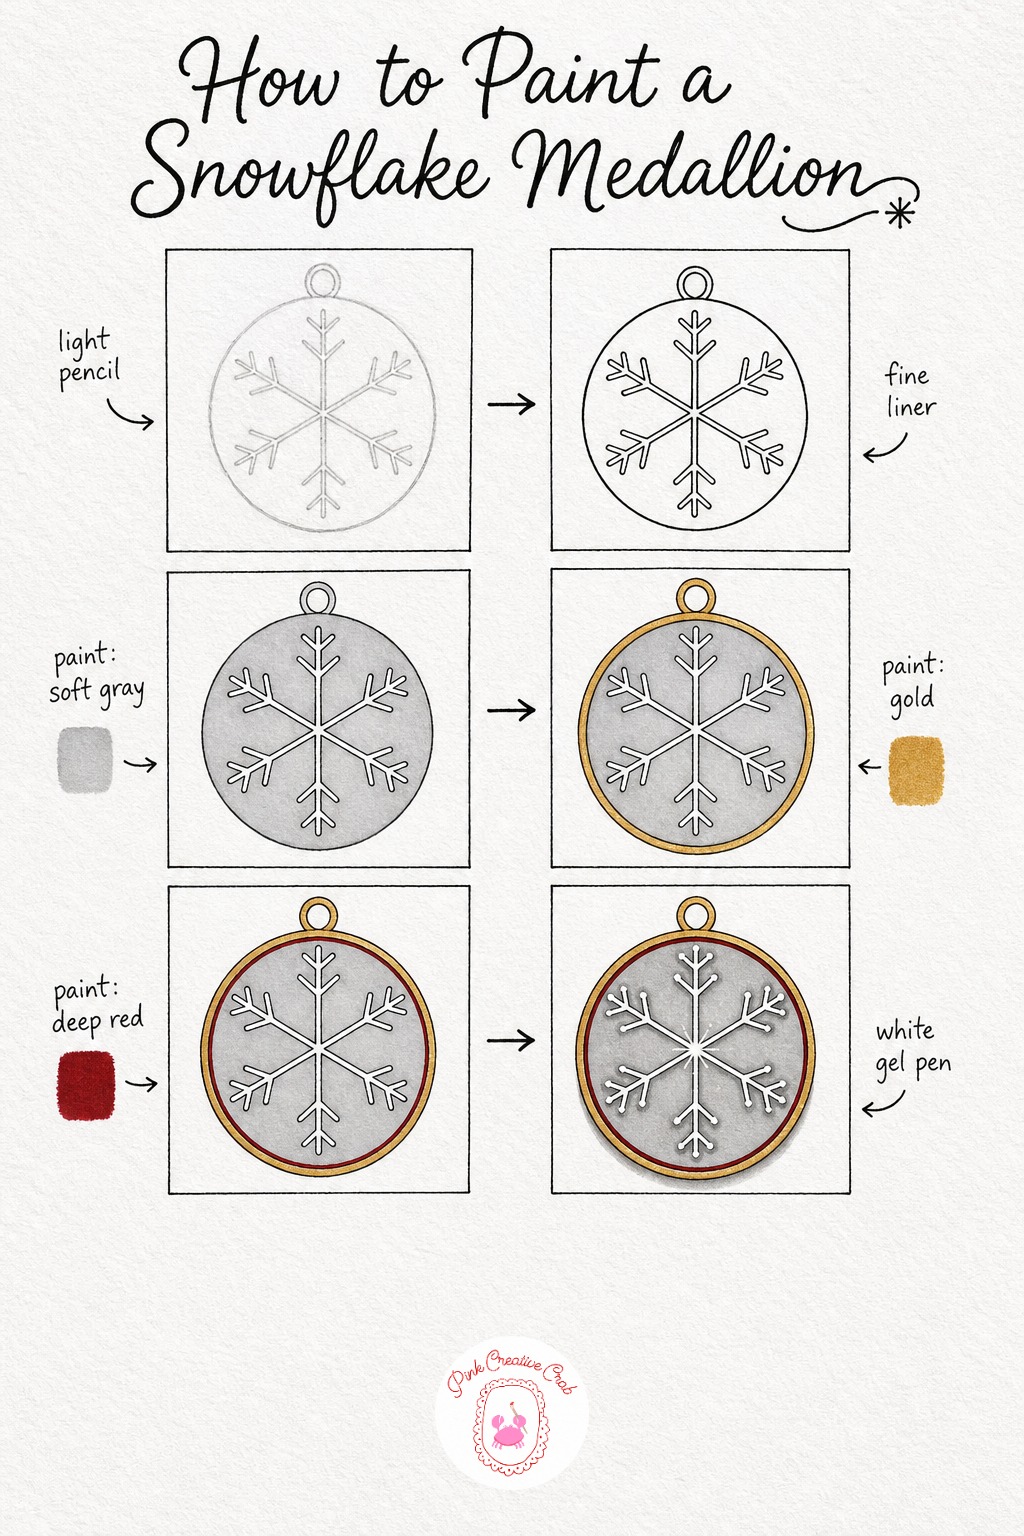
Draw a circle in light pencil first, then build a six point snowflake inside it by crossing three straight lines through the center and adding small branch marks off each one. A compass or the rim of a glass helps keep the outer circle clean if your hand feels shaky.
Ink the circle’s rim and every branch of the snowflake carefully, since this is the most detailed line work in the whole sheet, then set it aside to dry fully. Wash the background behind the snowflake in a pale soft gray, working around each branch rather than over it.
Once dry, color the rim and the small hanging loop in gold, then trace a thin deep red line just inside the rim as a neat decorative border. This red line is what lifts the piece from a plain snowflake sketch into something that reads as a finished ornament.
Finish with white gel pen tips on every branch end and one bright sparkle right at the snowflake’s center. If the gray wash dulls your ink lines, a very light second ink pass once everything is dry sharpens the whole medallion back up.
Plaid Ribbon Bauble
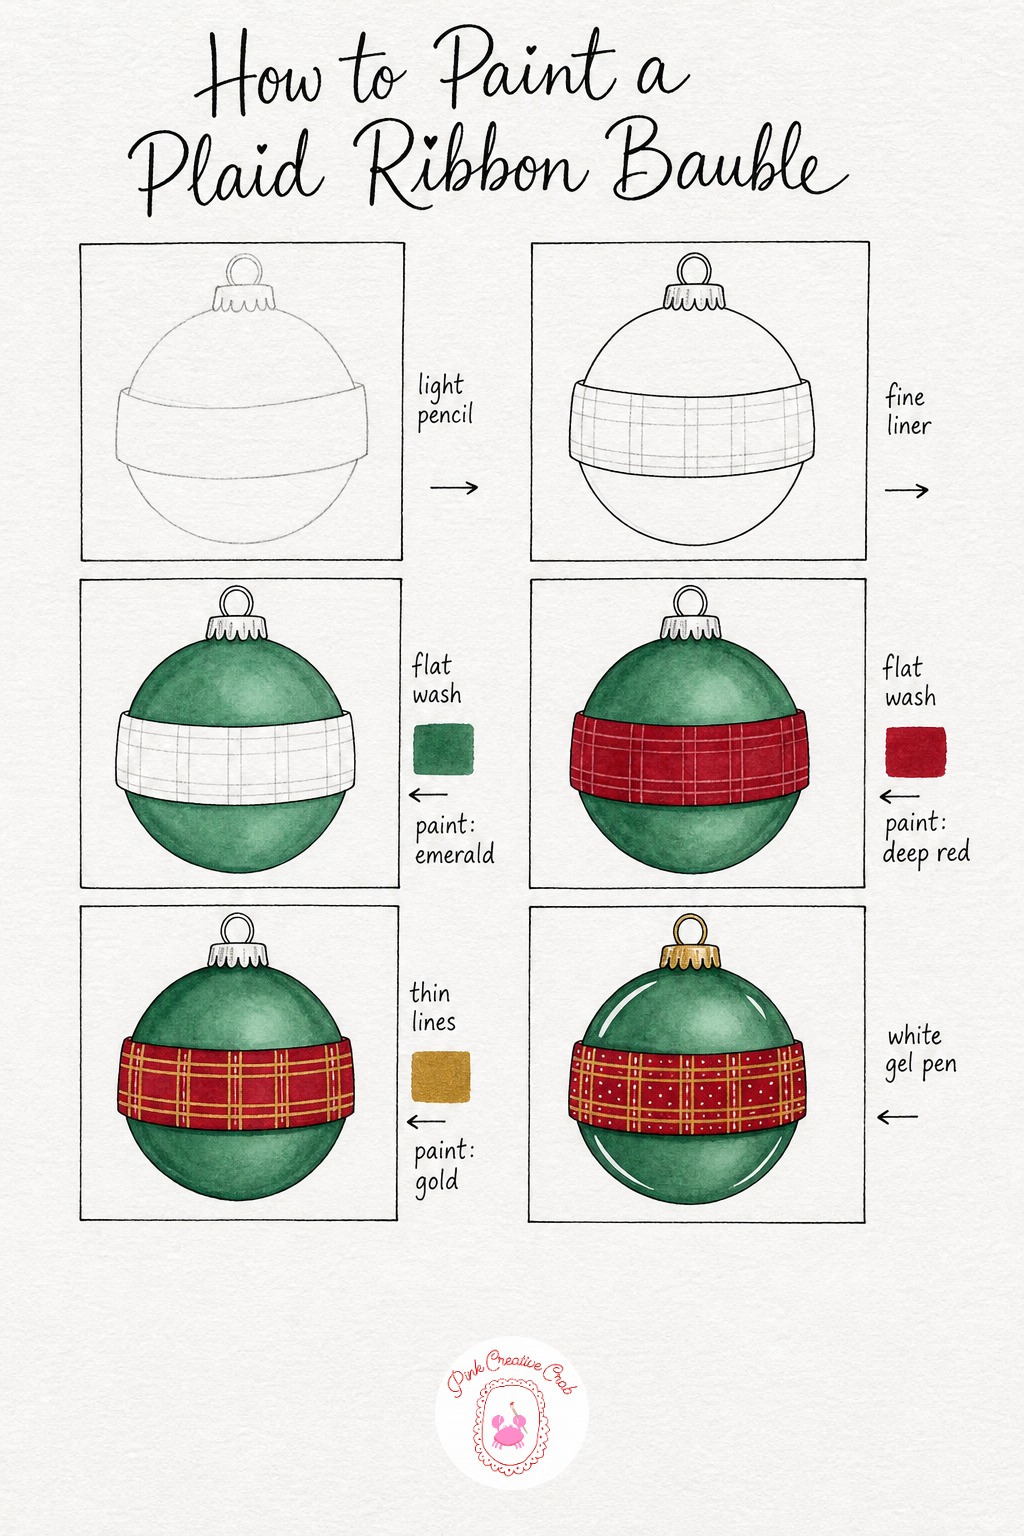
Sketch a circle with a small cap, then add a wide horizontal band wrapped around the middle like a ribbon tied around the bauble. Keep the band’s edges slightly curved to follow the roundness of the glass underneath it.
Ink the circle, cap and ribbon band, then lightly ink a few faint crossing guide lines within the band for your plaid pattern later. Wash the top and bottom sections of the bauble, above and below the ribbon, in a soft emerald, leaving the ribbon band itself untouched for now.
Once the emerald is dry, fill the ribbon band fully in deep red and let that dry completely before adding any pattern on top, since wet red under gold lines will smear badly. Draw thin gold lines crossing the ribbon both horizontally and vertically along your pencil guides to build the plaid.
Finish with a white gel pen arc sweeping across the glass sections for that classic reflection, plus a scatter of small white dots along the ribbon where the plaid lines cross. A fine paint pen can stand in for the gold marker if yours runs dry mid pattern.
Little Winter Cottage Bauble
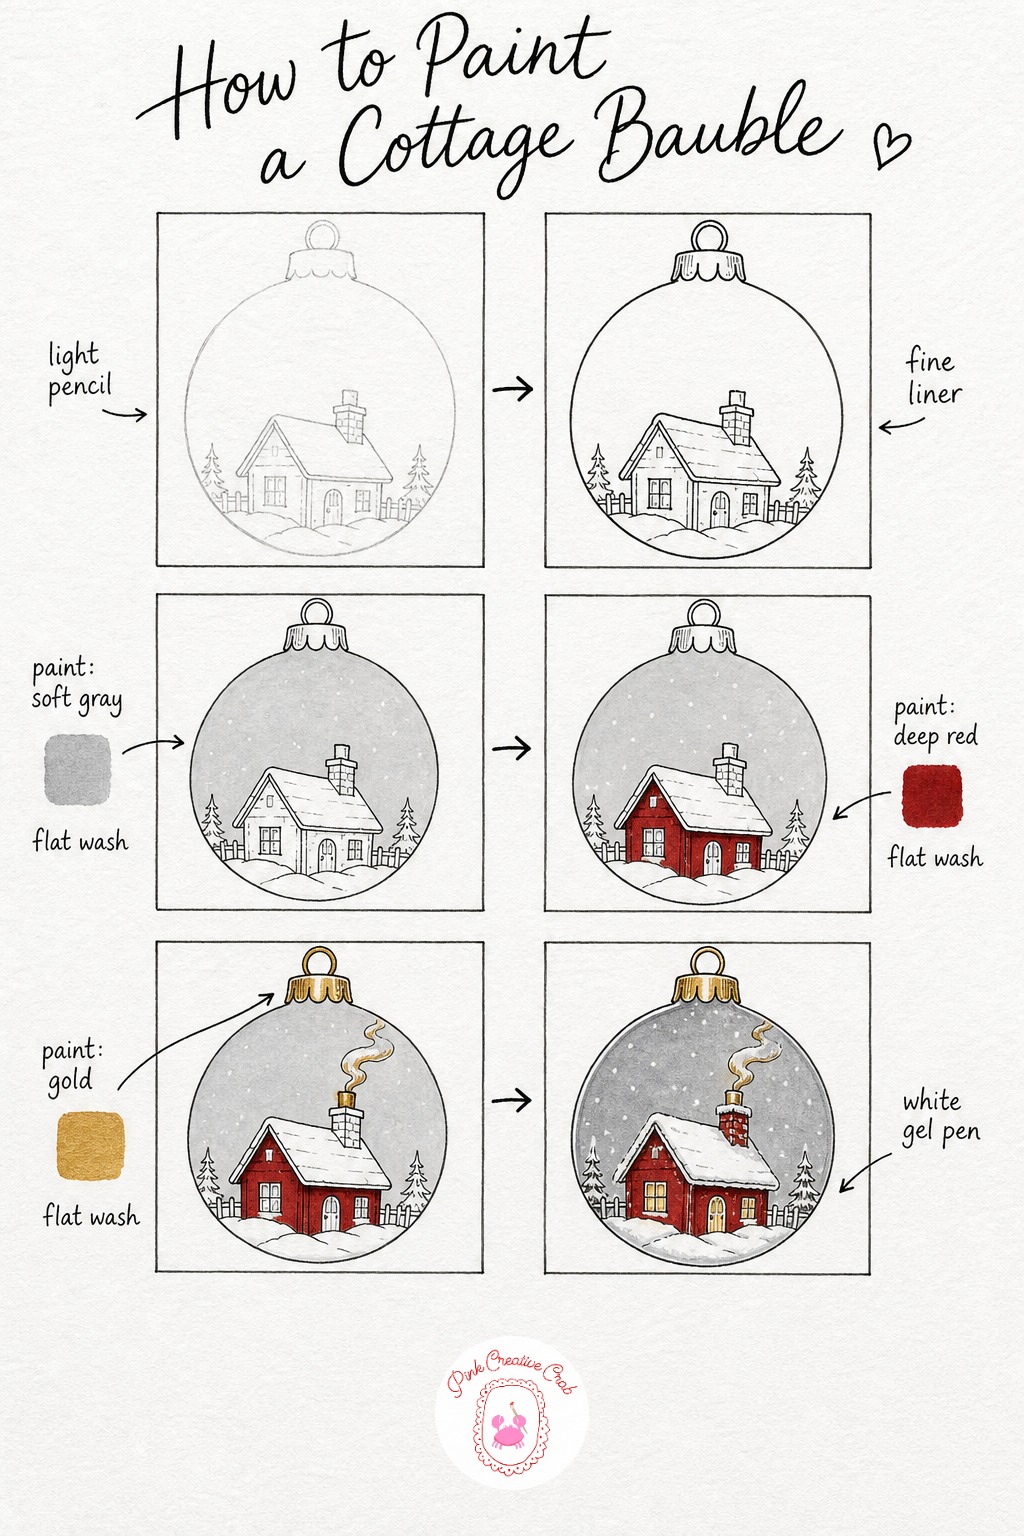
Sketch your glass circle as usual, then nestle a very small cottage into the lower half with a peaked roof and one thin chimney. Keep the cottage simple, just a box with a triangle roof, since the bauble’s small size means fine detail will disappear under marker anyway.
Ink the glass rim first, then the cottage, roof and chimney, letting everything dry before you reach for a marker. Wash the upper half of the glass in pale gray to suggest a snowy winter sky behind the little house.
Fill the cottage walls in deep red once the sky wash is bone dry, then color the roof and chimney in gold, adding a small curling line of gold smoke drifting from the chimney top. Keep both washes thin here, since a tiny scene like this reads better pale than heavy.
Finish with white gel pen: a light dusting of snow on the roofline, a few floating snowflake dots in the gray sky, and one warm glowing dot in a cottage window. This one pairs nicely on a page with full scenes from these snowy street drawing ideas if you want a two page spread.
Acorn and Pinecone Cluster
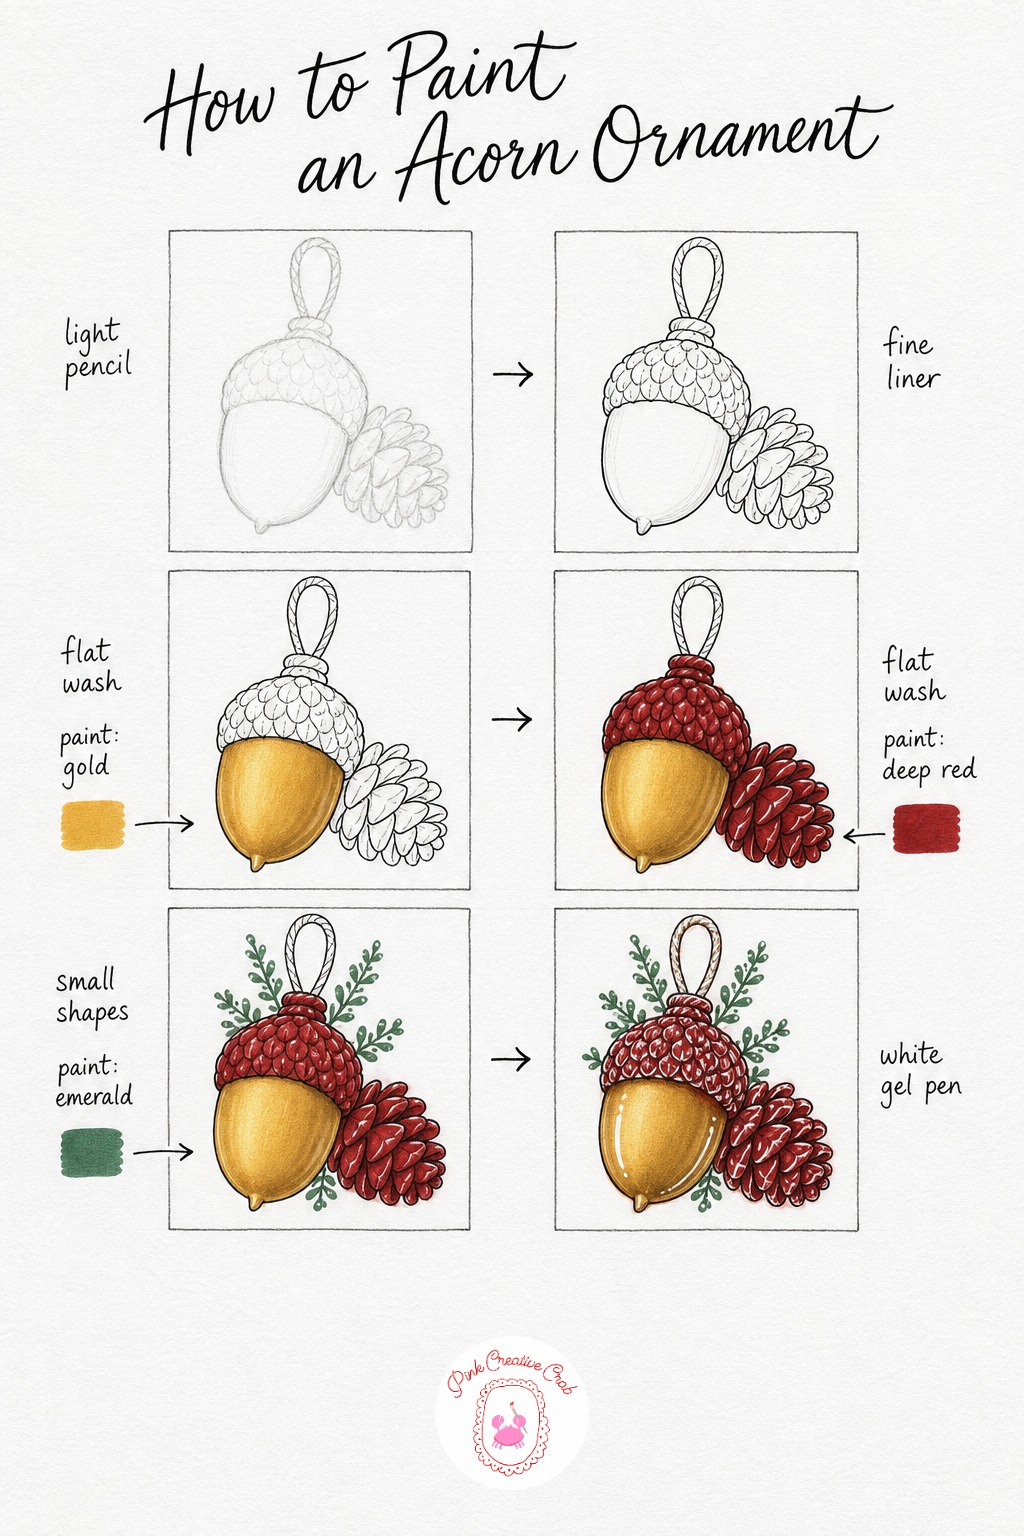
Draw the acorn as a rounded teardrop shape with a small bumpy cap on top, then add a simple oval pinecone just beside it with a few short lines suggesting scales. A small loop sits above both shapes to tie the ornament together.
Ink the acorn body, its textured cap, the pinecone scales and the loop, keeping your pinecone lines short and slightly irregular since real pinecones are never perfectly even. Wash the acorn’s lower body in warm gold, letting the color sit rich and a touch darker toward the bottom.
Once dry, fill the acorn’s cap and the pinecone’s base in deep red, working carefully around the ink lines so the texture marks stay visible underneath. Scatter a few soft emerald dots near the loop to suggest tiny pine sprigs tucked into the cluster.
Finish with white gel pen texture lines across the cap’s bumps and along each pinecone scale, plus a small sheen if you have given your acorn a glossy varnished look. Keep the gel pen lines short and following the curve of each scale rather than straight across, since that is what sells the texture.
Holly and Berries Wreath Charm
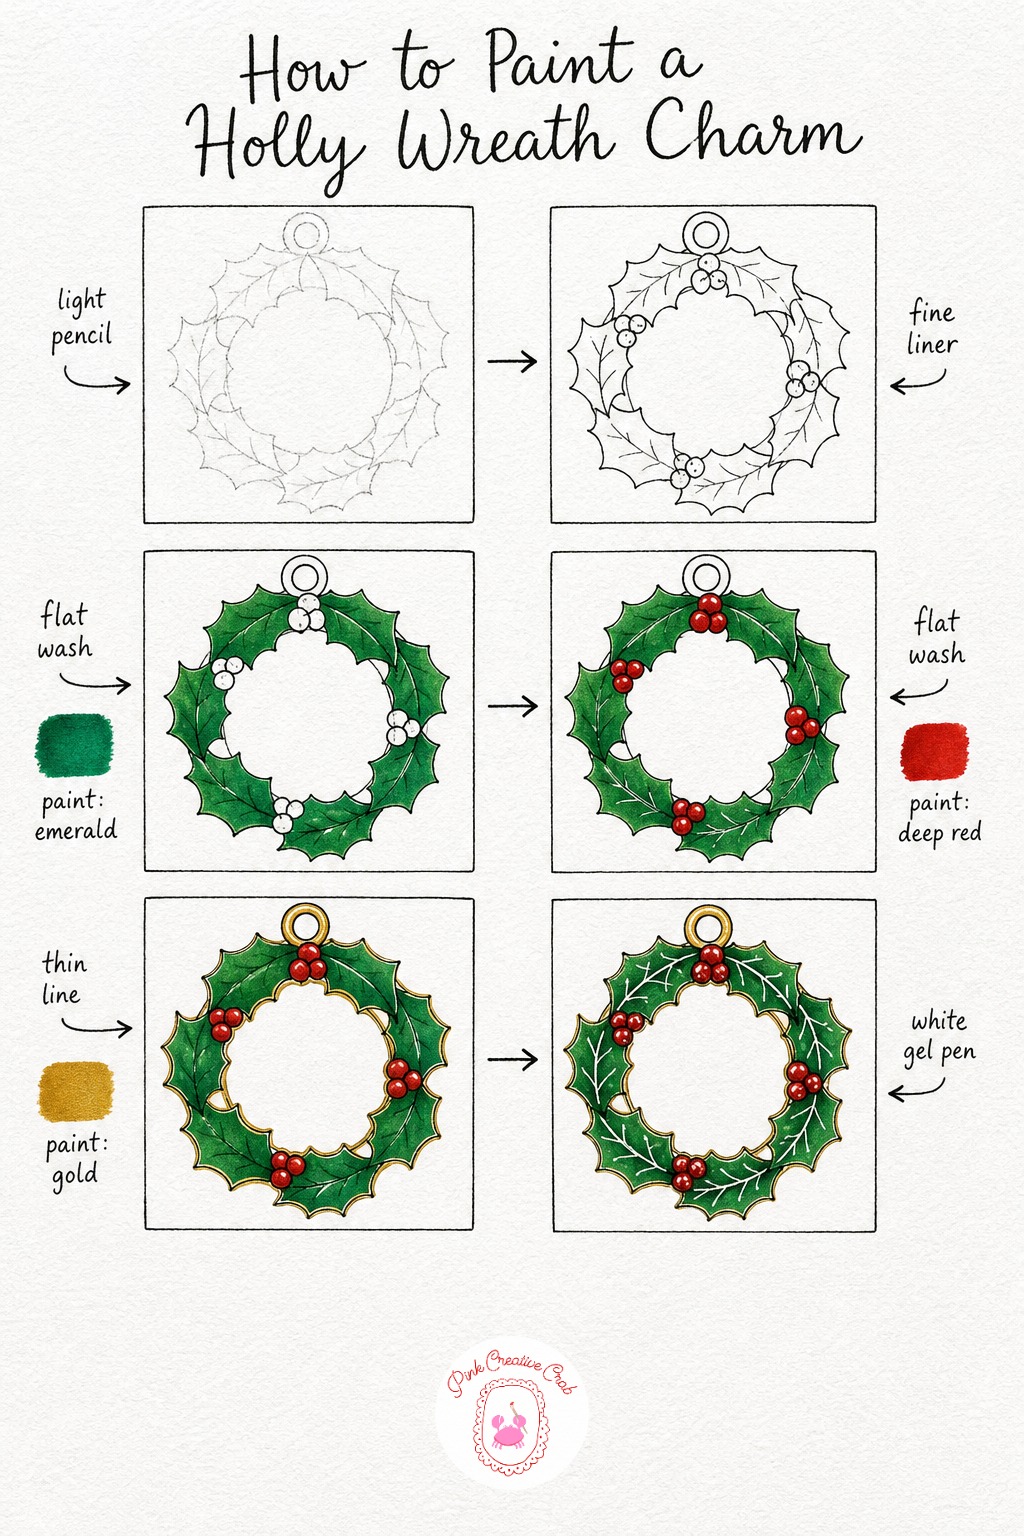
Sketch a simple ring shape for the wreath base, then build small pointed holly leaves all the way around it, pointing outward like a sunburst. Tuck in a few small berry clusters, three little circles grouped together, between some of the leaves.
Ink every leaf point and each berry carefully, along with the wreath’s inner and outer circle, then let it dry fully since this piece has a lot of small ink detail close together. Wash each holly leaf in emerald, working leaf by leaf rather than trying to cover the whole wreath in one sweep.
Fill every berry cluster in deep red once the leaves are dry, keeping the little circles neat and close together. Trace a thin gold line along both edges of the wreath circle to give the whole shape a finished, framed look.
Finish with white gel pen veins down the center of each holly leaf and a small sparkle dot on every berry. If your leaves start to look too uniform, vary a few in size slightly, since a hand drawn wreath should never look stamped from a template.
Nutcracker Face Ornament
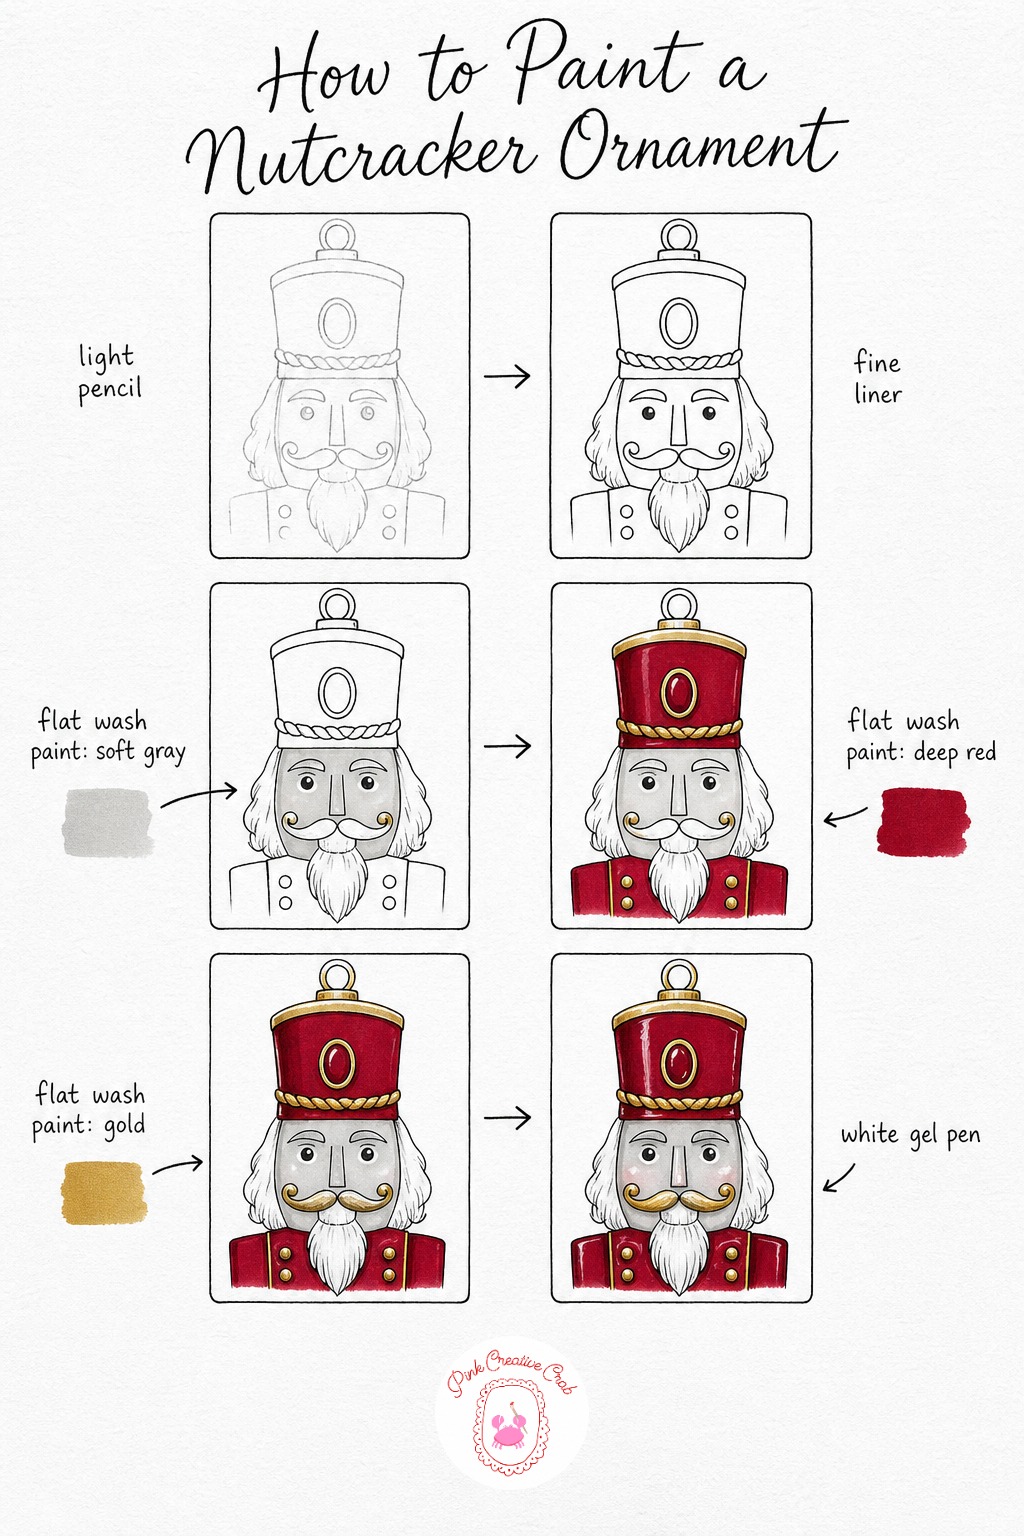
Sketch a tall rectangular head shape topped with a tall hat, then add simple facial features and a small curved mustache beneath the nose. Keep the proportions a little exaggerated and toy like, since a realistic face actually feels out of place on an ornament.
Ink the face outline, hat shape, mustache and a row of small buttons down the front, letting the ink dry fully before moving to marker. Wash the face area in a pale soft gray to give it a carved wooden look rather than plain white paper.
Fill the hat and jacket collar in deep red once the face wash is dry, keeping the edges crisp along your ink lines. Color the buttons, hat trim and mustache details in gold, which instantly reads as the classic nutcracker uniform trim.
Finish with white gel pen along the hat’s trim edge, a few texture strokes through the mustache, and a small sheen if the ornament itself looks glass or lacquered. This playful character fits well alongside the softer pieces in these merry Christmas drawing ideas if you are building a full holiday spread.
Angel Ornament With Gold Wings
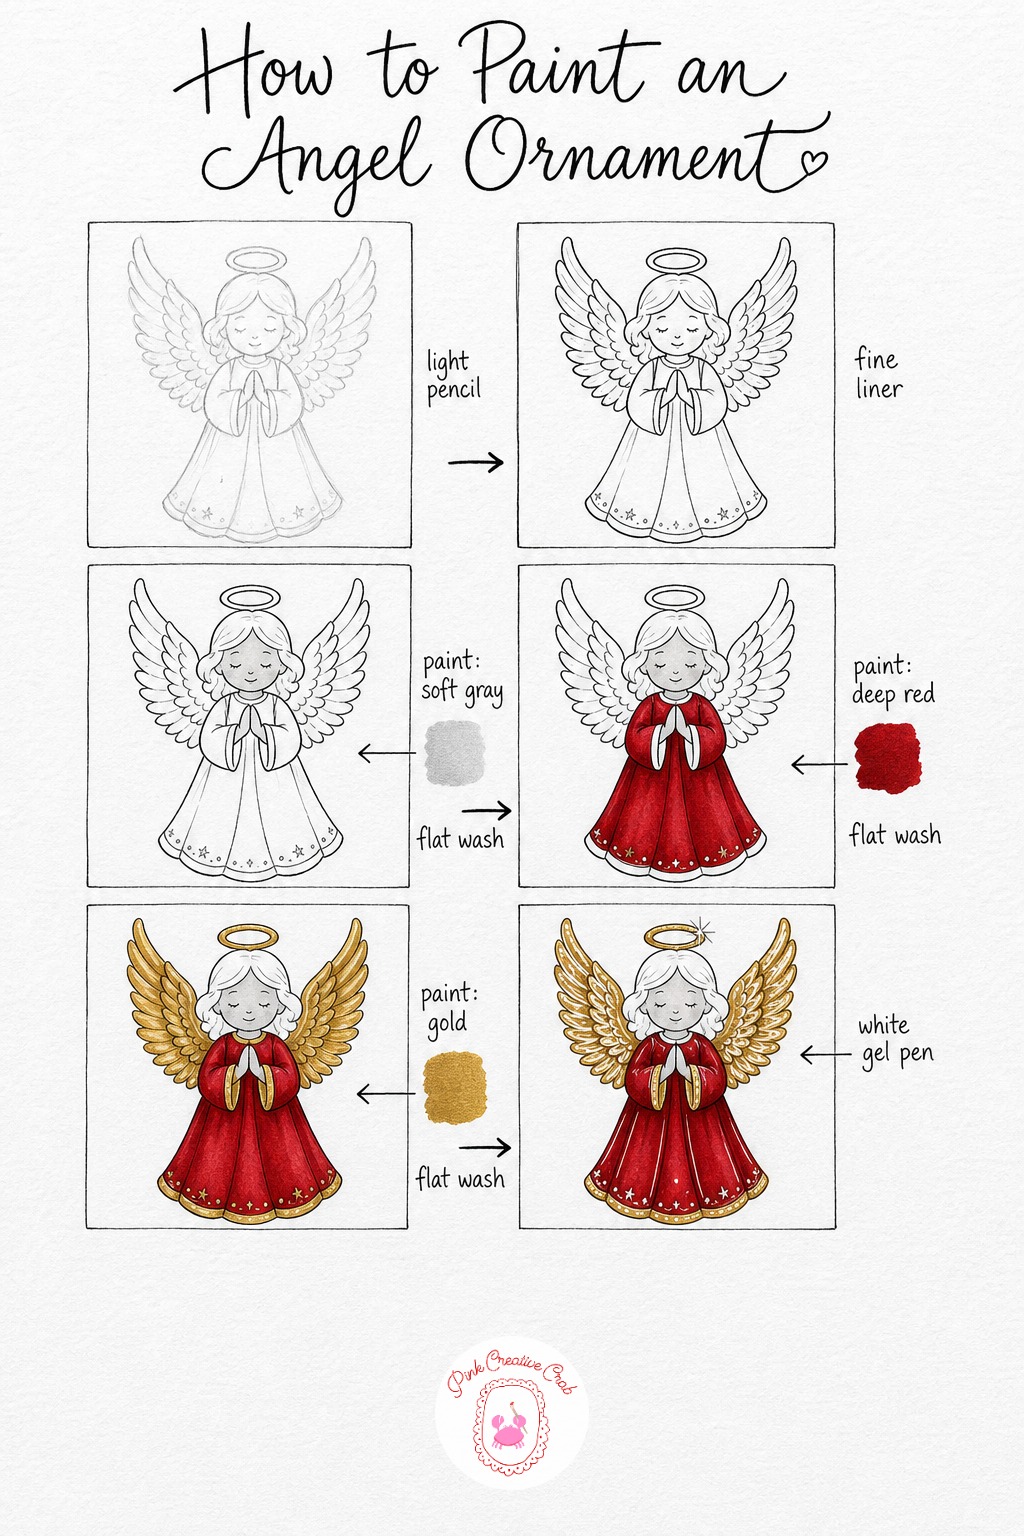
Draw a simple standing figure in light pencil, a long robe shape tapering to the ground, two raised wings behind the shoulders, and a small circle halo above the head. Keep the pose still and symmetrical, since a calm straight on angel is easier to color evenly than one with a twisting pose.
Ink the robe, both wings, the halo and simple facial features, then let the whole sheet dry before any marker goes down. Wash the face and hands lightly in soft gray so they do not stay stark white against the rest of the colored figure.
Fill the robe body in deep red, working top to bottom in one smooth direction so the marker does not streak. Once dry, color both wings, the halo and the robe’s trim in gold, letting the marker pool slightly at the base of each wing feather for natural shading.
Finish with white gel pen feather lines running down each wing and a soft sparkle ring around the halo. If gold marker feels too warm for your wings, a pale yellow works as a lighter swap for a softer angel.
Mini Wrapped Gift Ornament
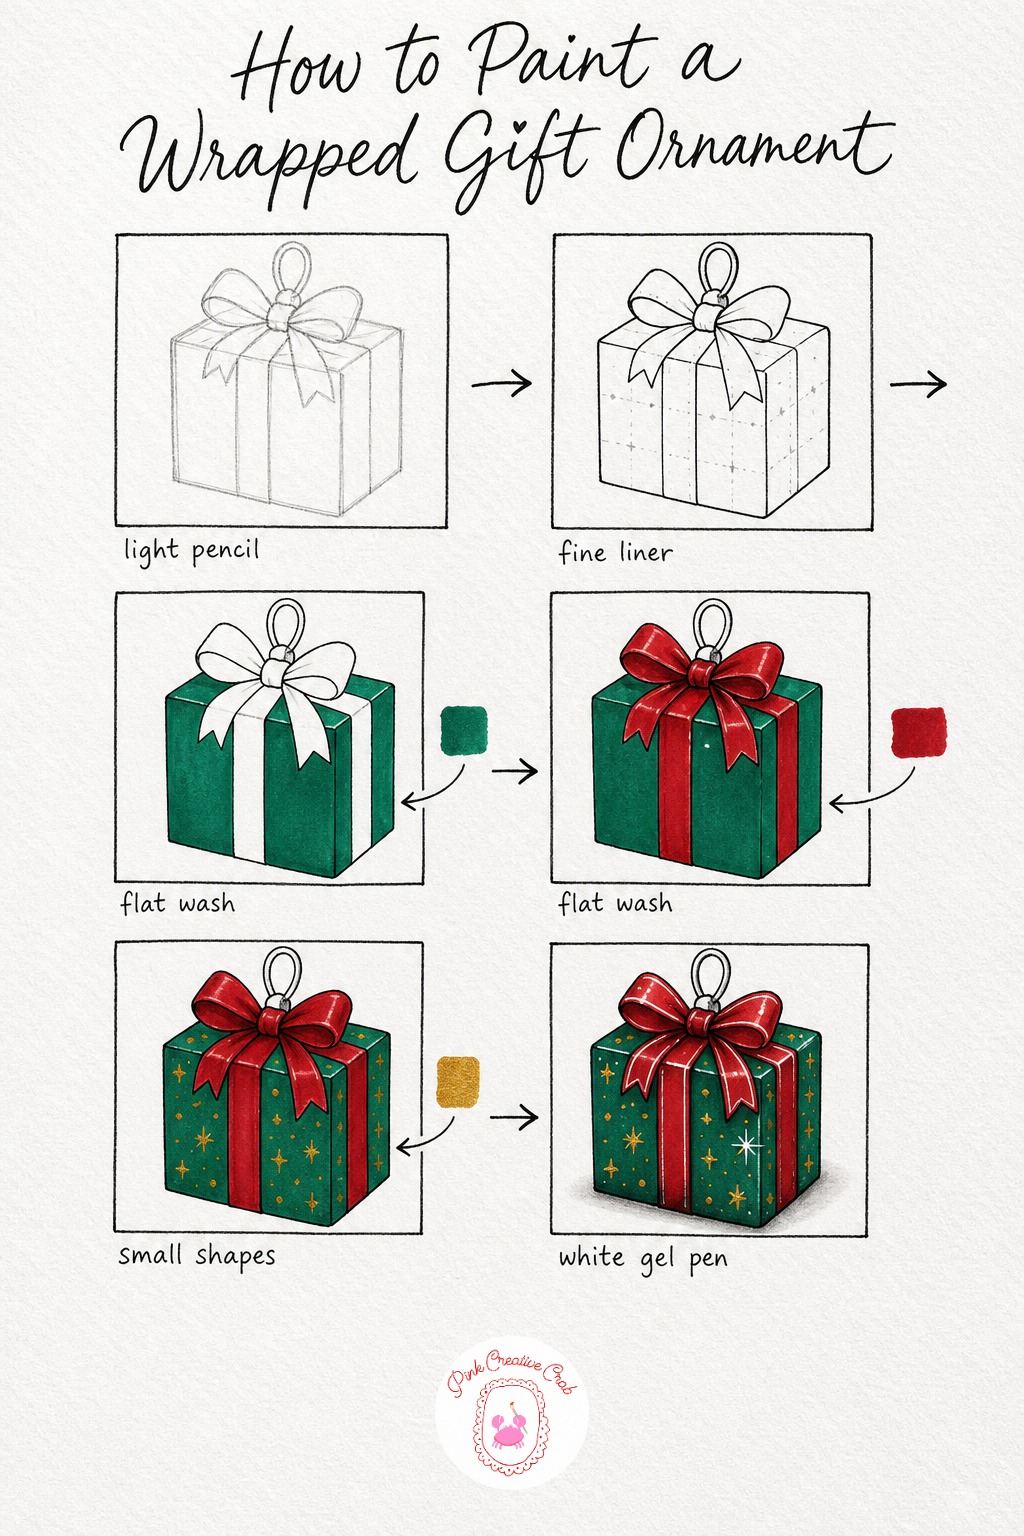
Sketch a simple square box shape in light pencil, then wrap a ribbon band around it both vertically and horizontally, tying it off in a small bow on top with a loop above for hanging. Keep the box’s corners soft rather than perfectly sharp, since ornaments are rarely geometrically precise.
Ink the box, ribbon and bow, adding a few faint guide marks on the box body if you plan a dotted or starred wrapping pattern. Wash the box body in emerald, working carefully around where the ribbon crosses so the two colors stay separate.
Once dry, fill the ribbon band and bow in deep red, keeping the bow’s center twist slightly darker to suggest the fold. Scatter small gold dots or tiny stars across the emerald box body for a festive wrapping paper pattern, spacing them loosely rather than in a strict grid.
Finish with white gel pen along the ribbon’s folded edges and one sparkle dot on a box corner for shine. If your gold dots start looking too even, nudge a few off center, since real wrapping paper patterns always have a little natural variation.
What to Do Next
Pick one ornament, set out your markers in deep red, gold and emerald, and follow the sheet stage by stage from pencil to that last white gel pen sparkle.
Frequently Asked Questions
What paper works best for christmas ornament drawing with alcohol markers?
Smooth marker paper or bristol works best, since it resists bleeding and keeps fineliner lines crisp under layers of alcohol marker ink.
Do I need to ink every ornament before adding marker color?
Scenes and detailed ornaments benefit from ink first, but a simple object can go straight from light pencil into marker if you prefer a looser look.
How do I stop my alcohol markers from bleeding past the fineliner lines?
Let the fineliner dry fully before any marker touches it, work in thin layers rather than one heavy pass, and keep a cotton swab nearby to soften stray edges.
Which colors do I really need for christmas ornament drawing?
A deep red, a warm gold, an emerald green and a soft gray cover almost every ornament here, with a white gel pen for all the final reflections and highlights.
Can I use these ornament drawings on handmade Christmas cards?
Yes, each ornament finishes in one small sitting and fits neatly onto a folded card front, making this a quick way to personalize a whole batch of cards.
Have any thoughts?
Share your reaction or leave a quick response — we’d love to hear what you think!
-
 0
-
0
-
0
-
0
-
0
-
0


