

Fairy watercolor is the perfect excuse to paint something small, soft and a little magical in a single afternoon. Each fairy here lives inside one tiny moment of garden life, tucked under a mushroom cap or riding a dragonfly, so you never need a big composition or a long plan to get something finished and charming.
Below you will find thirty two tiny scenes, ordered from the easiest poses and simplest washes up to the ones with more detail and story. Pick whichever one catches your eye on your phone, mix the palette you already own, and let the wings glow.
Using these images: free for personal projects such as printing, coloring, cards, journals and gifts. Handmade items that include them may be sold up to 30 pieces per design. More than that is commercial use and is not permitted, and neither is selling or sharing the images themselves or passing them off as your own. Please ask before any other use.
Start with the easiest pose in the whole set: a fairy curled up asleep inside a tulip cup. Pencil a simple oval bloom first, then sketch the fairy as a small comma shape tucked into its base, knees drawn up, wings draped over the petal edge.
Paint the tulip first in one wet-in-wet wash of blush pink fading to a deeper magenta at the base, then let it dry fully before adding the fairy so the skin tone stays clean. Keep her dress a pale lilac and her wings almost white with just a hint of color at the tips.
The usual snag is making the fairy too big for the flower. Hold your pencil up against the tulip sketch and check that her whole curled body is no taller than the petal cup itself before you commit to ink or paint.
If you do not have a magenta, mix a little red into your pink for the same warm glow. Try this one first if fairy watercolor is new to you, since the pose asks for almost no anatomy at all.
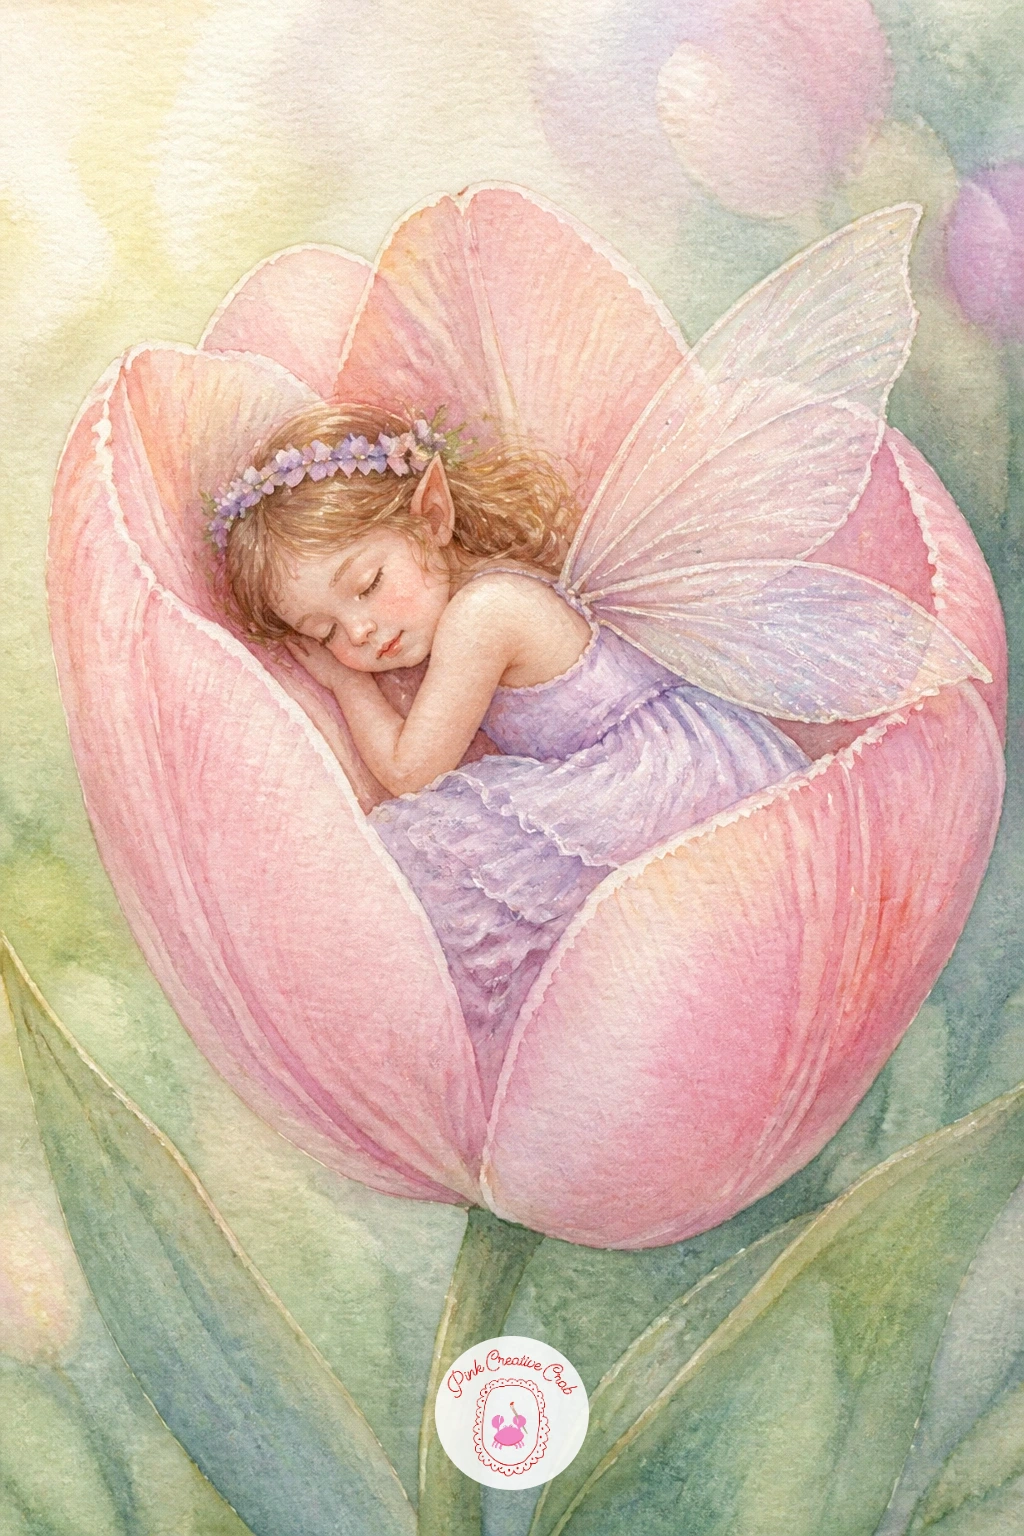
Palette: Opera Pink,Quinacridone Magenta,Lilac,Titanium White
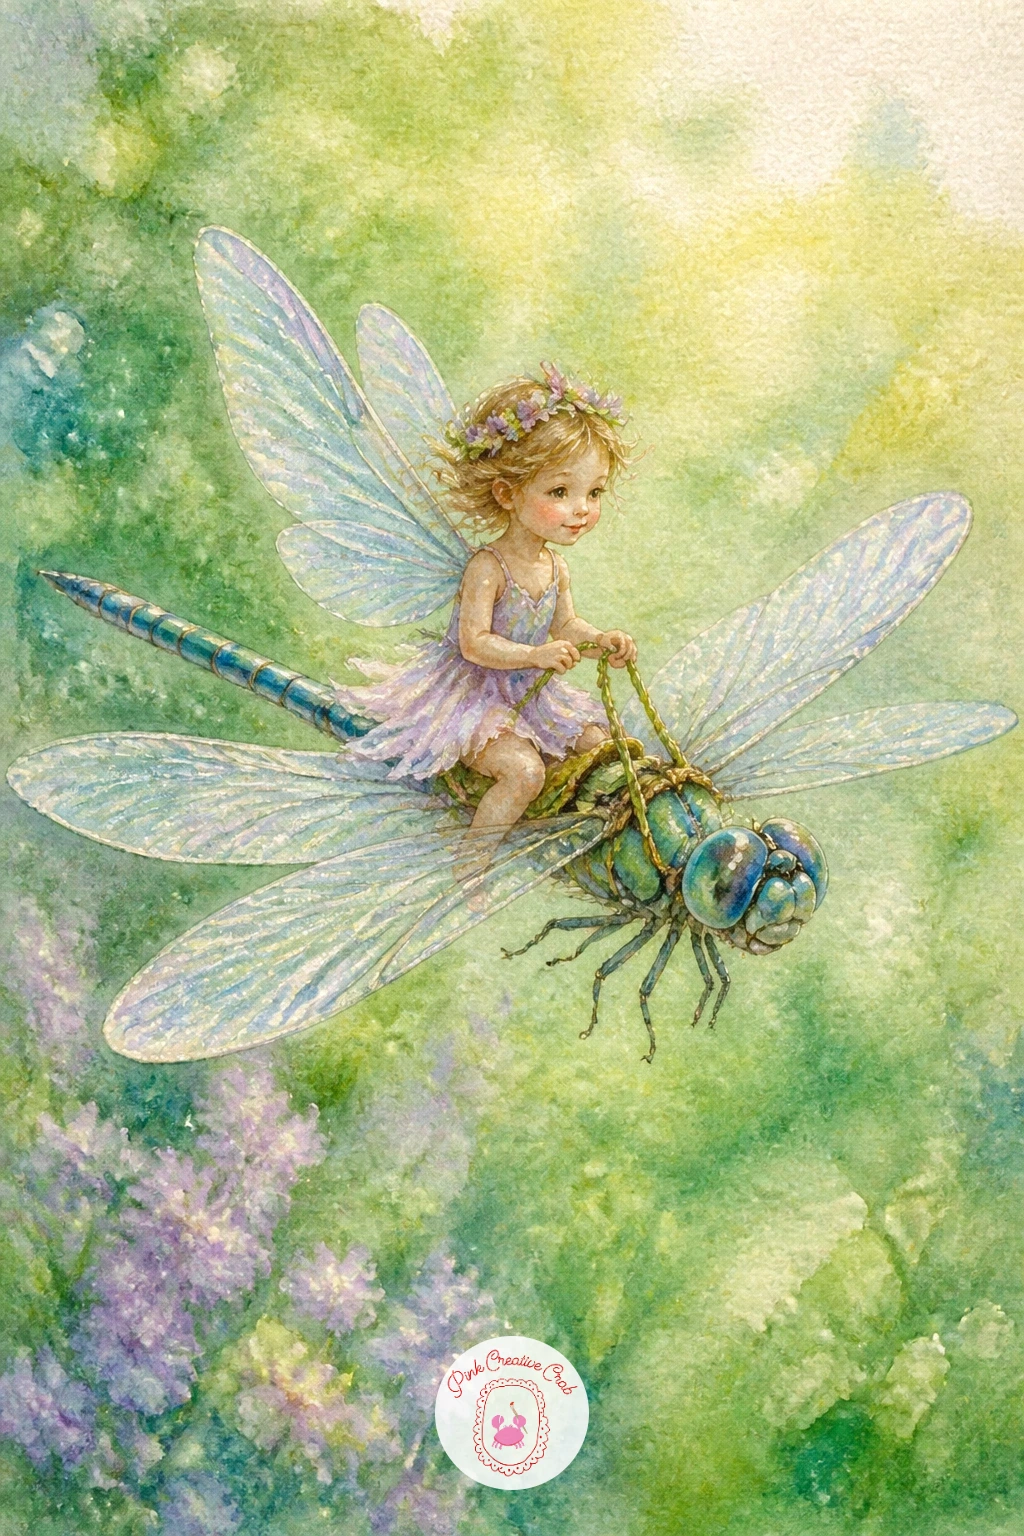
Once sleeping poses feel comfortable, try movement with a fairy perched astride a dragonfly in flight. Sketch the dragonfly body first as a long thin oval with a narrow tail, then place the fairy sitting just behind its head with her legs wrapped around the thorax.
Paint the dragonfly’s wings in the thinnest wash you can manage, almost clear with just a streak of pale blue and a few fine ink lines once dry, so light seems to pass through them. Work the fairy’s own wings in the same way so the two wing pairs echo each other.
Here proportion matters most: the dragonfly’s body should run longer than the fairy is tall, otherwise she looks like she is riding a toy rather than an insect. Measure the two shapes against each other in pencil before any paint goes down.
No fine liner for the wing veins? A sharpened watercolor pencil in grey does the same job once the wash is dry. Keep the sky behind them loose and pale so the dragonfly stays the clear focus.
You Will Need
- fine liner pen
Palette: Cerulean Blue,Payne’s Grey,Sap Green,Blush
Bring the scene down to ground level with a fairy kneeling on a leaf to sip a drop of dew. Draw a single curved leaf shape first, veins included, then place the fairy crouched at one edge with her hands cupped around a bead of water.
Paint the leaf in sap green with a darker green pooled along the central vein while it is still wet, so the color settles naturally into the grooves. Leave the dew drop itself as untouched white paper and only add a thin crescent of shadow along its lower edge once everything else is dry.
Eye level is what sells this one: sit the “camera” low, almost at leaf height, so the dew drop looms large and catches the light like a tiny lens. A light source from one side lets you drop a bright highlight on the drop and a soft shadow opposite it.
If your green paint looks flat, mix in a touch of yellow ochre for warmth where sunlight would hit the leaf. This is a good one to pair with the florals in this easy watercolor flower guide if you want more leaf and petal practice afterward.
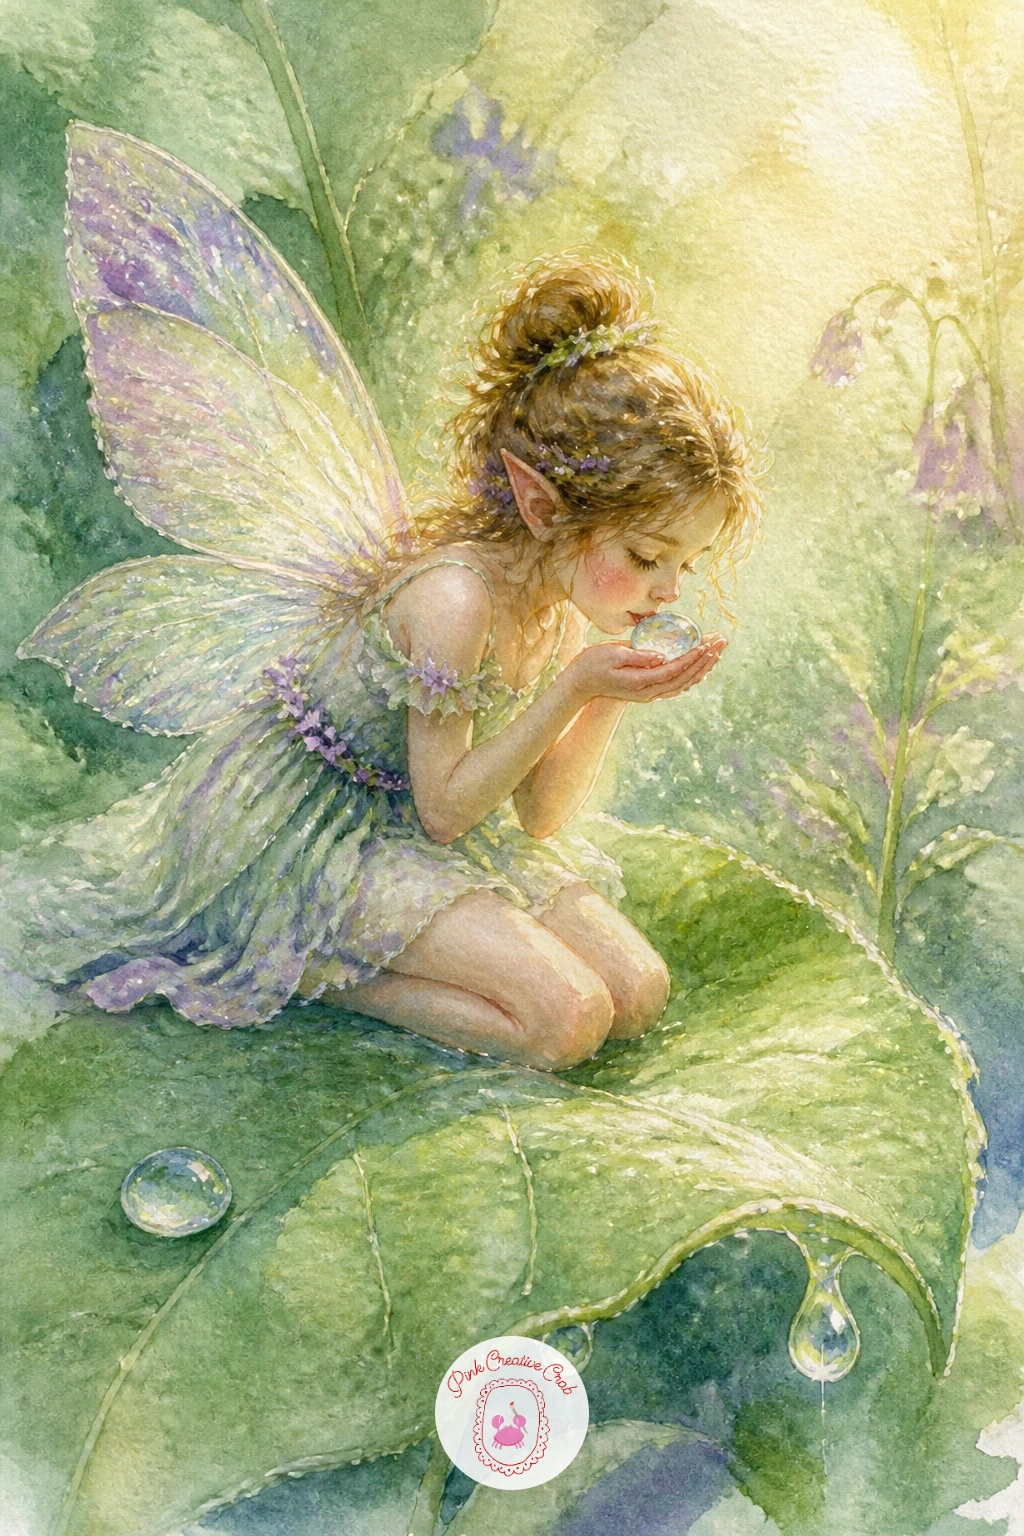
Palette: Sap Green,Yellow Ochre,Hooker’s Green,White
Give your fairy a quiet moment with one reading a tiny book while sheltered under a red and white mushroom cap. Block in the mushroom first as a simple dome on a thick stem, spotted while the cap wash is still damp so the white dots bloom softly rather than sitting as hard circles.
Once that is dry, paint the fairy sitting cross legged beneath it, book open on her lap, wings folded flat against her back so they do not compete with the mushroom shape above her. A warm little glow around the book, suggested with a pale yellow wash, makes it read as a source of light even without a lantern.
The edges of the mushroom cap are where this one can go wrong if you paint them too crisp. Lift a little color out along the rim with a damp brush or a folded tissue while the wash is still wet, so the cap edge softens the way real mushroom caps do.
Swap the red cap for a soft brown one if you do not have a cadmium red to hand, the mood stays just as cozy. Ten minutes gets you the basic shapes, forty minutes lets you add the fine texture of grass and tiny spots around the stem.
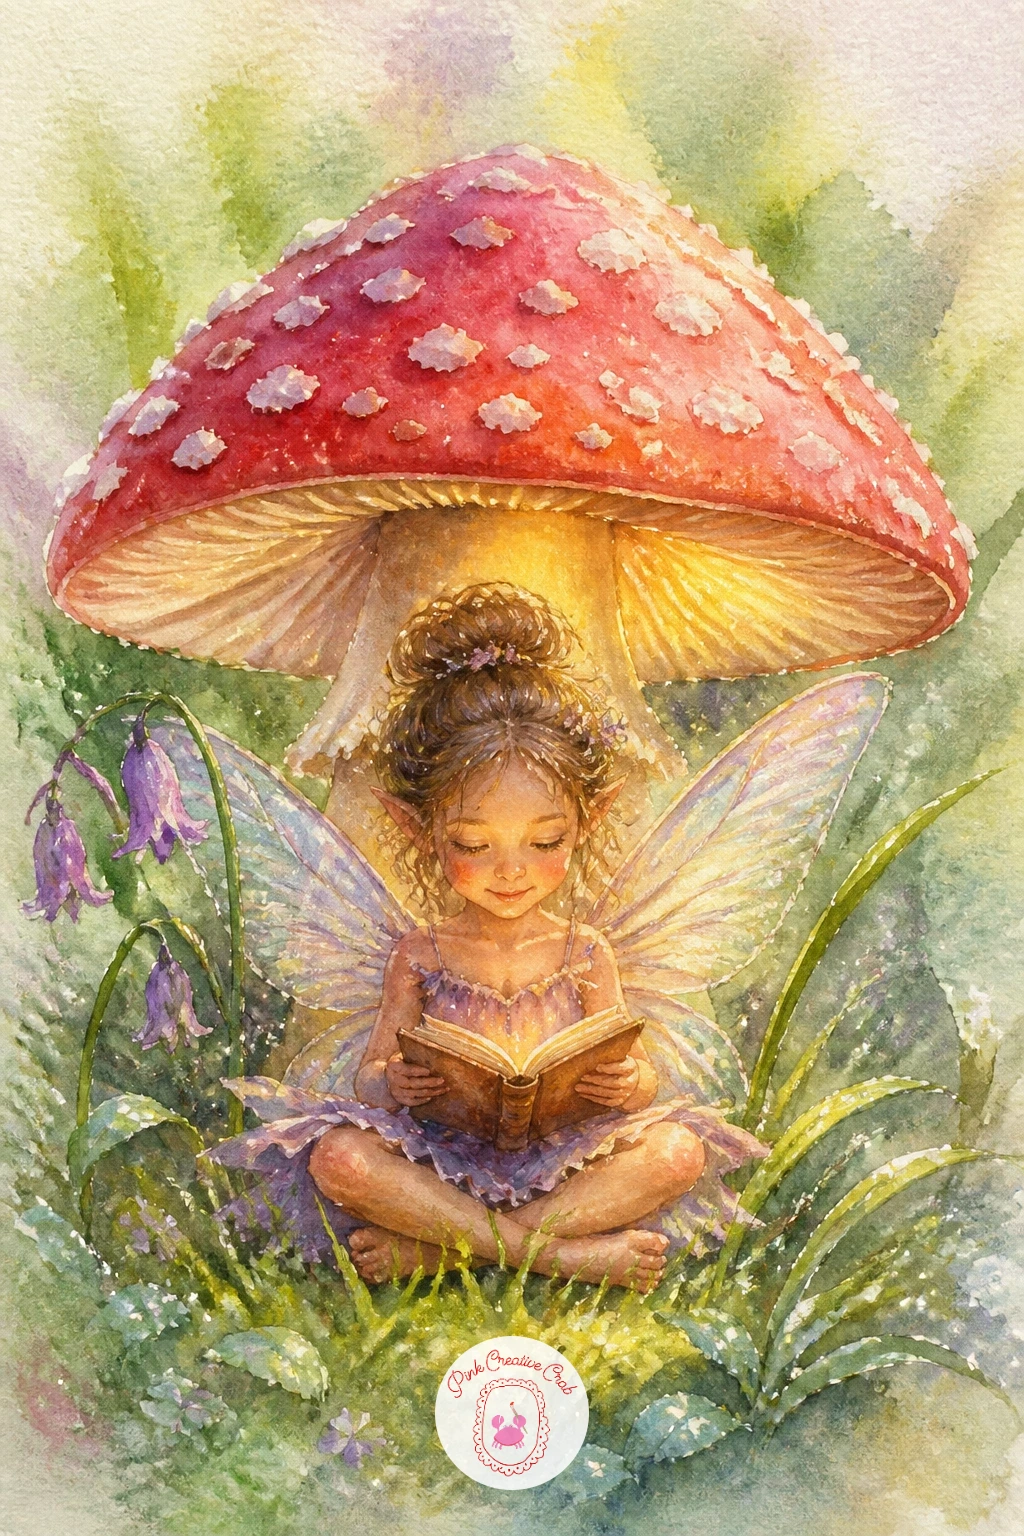
Palette: Cadmium Red,Titanium White,Naples Yellow,Sap Green
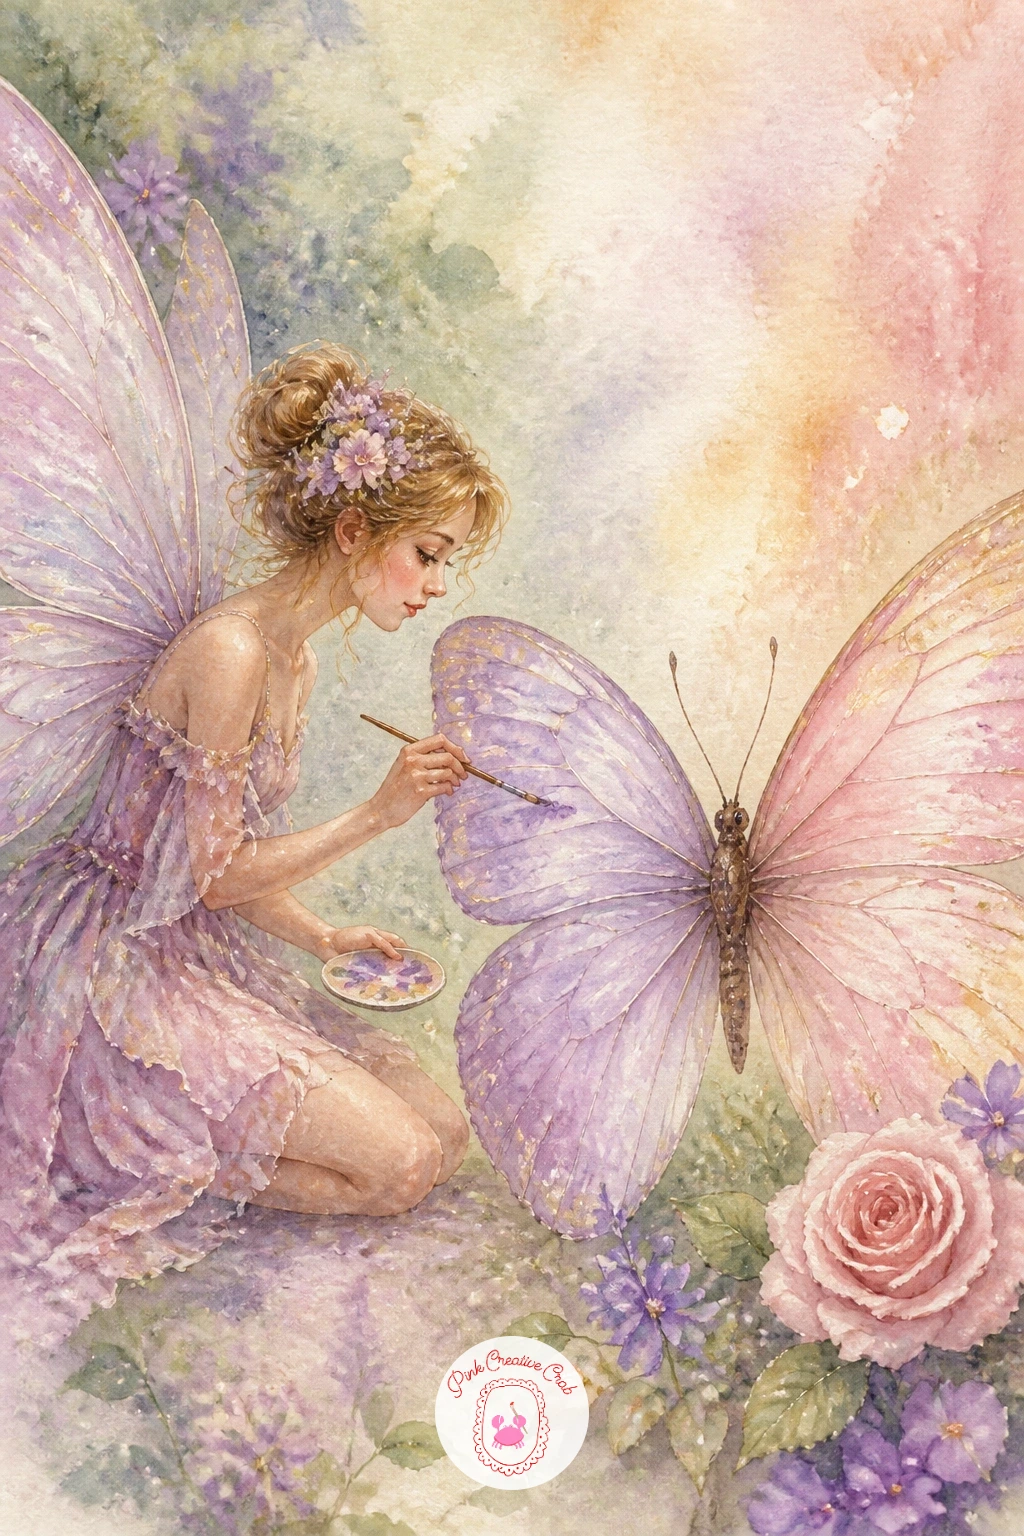
Lean into the whimsy with a fairy caught mid brushstroke, actually painting color onto a butterfly’s wing with a tiny brush of her own. Sketch the butterfly first with its wings spread flat and symmetrical, then add the fairy standing or kneeling beside one wing, arm extended toward it.
Paint the half of the wing she has “finished” in bright color, lilac and blush with a thin gold line along the vein, and leave the other half pale and mostly unpainted, a clever way to show the magic happening in front of the viewer. Her own wings can stay simple and translucent so the butterfly’s wings carry the color story.
Getting the two sets of wings to feel different in texture is the trick here: keep the butterfly’s wing edges sharp and patterned, dry brushed in places for a dusty look, while the fairy’s wings stay soft, wet-in-wet and glowing. That contrast makes the scene read clearly even at a glance.
If gold paint is not in your kit, a gold gel pen traced along the dry wing veins gives the same shimmer. Try this one when you are ready for a slightly more involved sitting.
You Will Need
- gold gel pen or paint
Palette: Lilac,Blush,Gold,Payne’s Grey
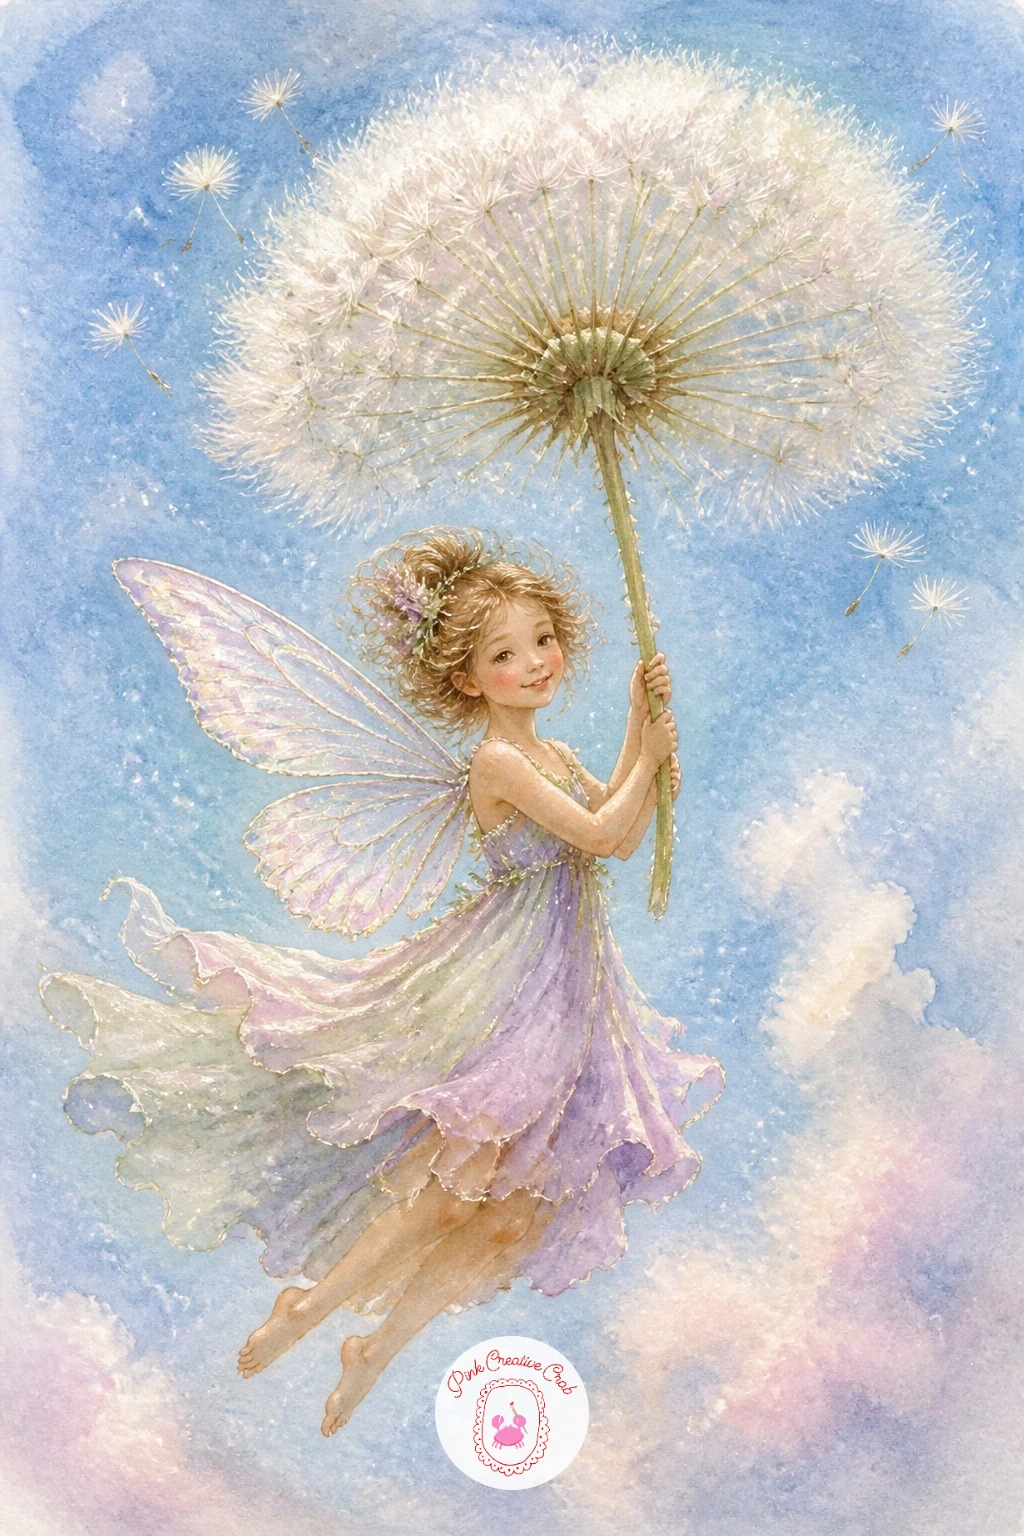
Float your fairy through the air holding a dandelion seed head like a tiny umbrella. Start with the dandelion puff as a soft round cloud of fine lines, pencil only at first, then paint it with the thinnest possible wash of grey white so the paper itself does most of the work.
Add the fairy hanging just below the stem, legs trailing, dress billowing slightly to suggest the drift of falling. Her wings angled slightly upward help sell the floating motion more than any added speed lines would.
The seed head is where patience pays off: once the pale wash is dry, use a fine brush or the tip of a cocktail stick dipped in white gouache to flick in individual fluffy lines radiating from the center. Too few lines looks sparse, too many looks heavy, so build it up gradually and stop while it still feels light.
A toothbrush loaded with pale grey paint and lightly flicked gives a quick textured alternative if fine linework feels fiddly today. Either way, keep the background behind her almost empty so the whole piece feels airy.
You Will Need
- white gouache or fine brush
- toothbrush for splatter (optional)
Palette: Pale Grey,Titanium White,Blush,Sky Blue
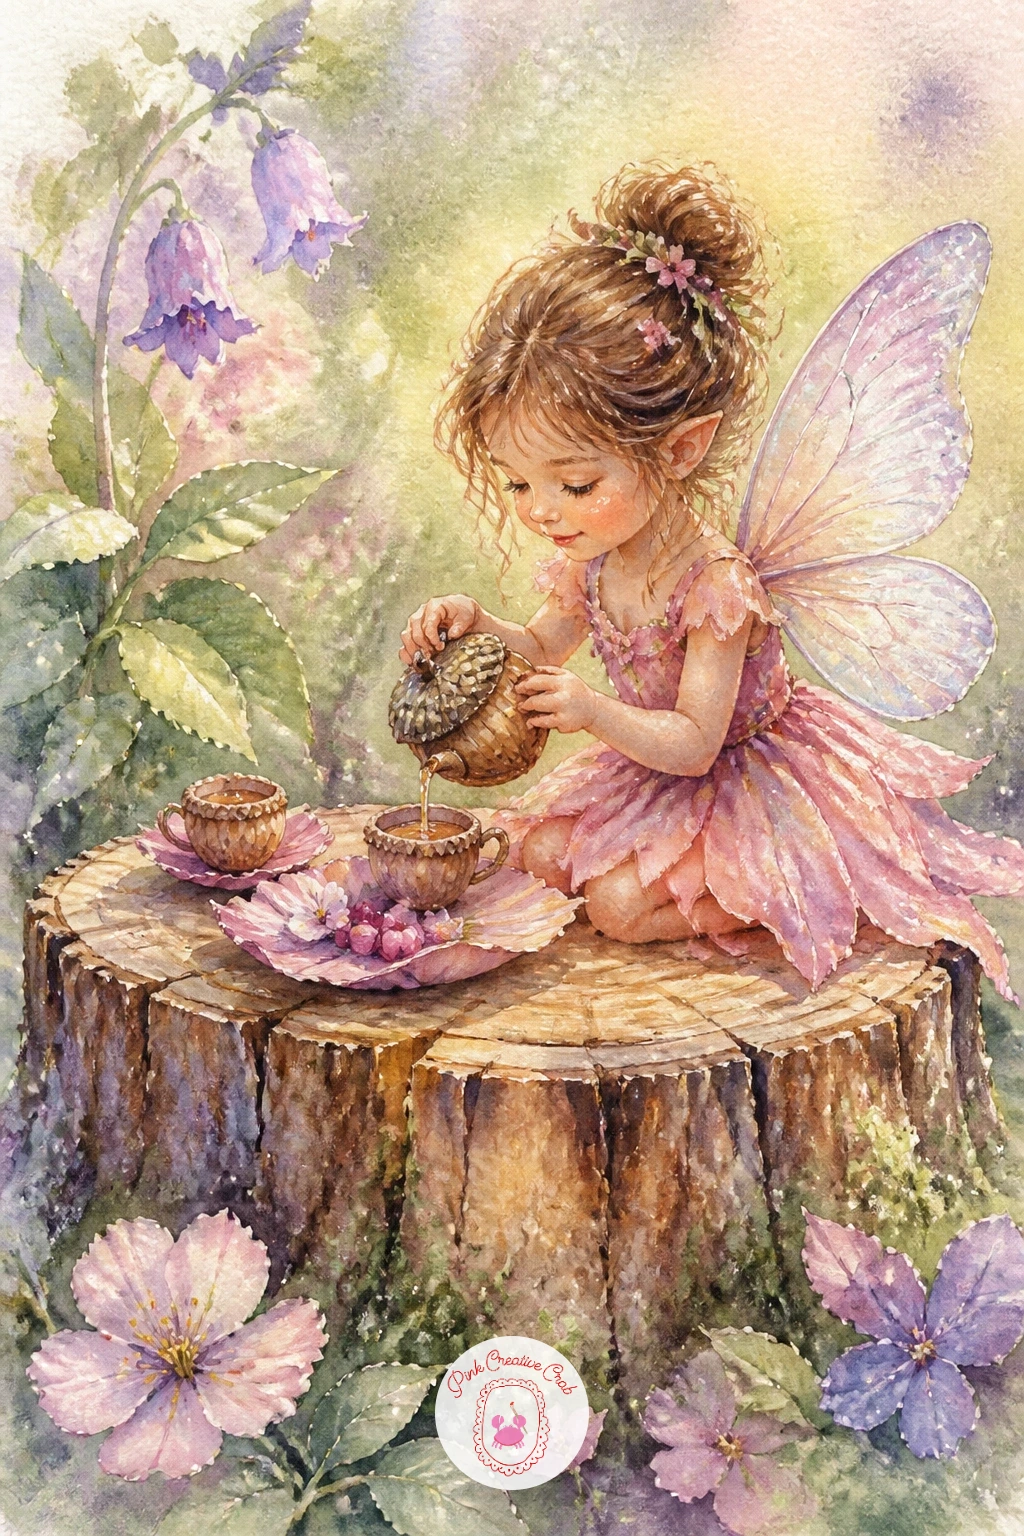
Build a little scene rather than a single figure with a tea party laid out across a flat tree stump, a fairy seated at its edge with an acorn cap cup in hand. Paint the stump first as a wide circle with visible growth rings, warm brown fading to a darker edge, and let it dry completely before adding any small objects on top.
Once dry, dot in a few tiny props: an acorn cap teacup, a petal for a plate, perhaps a second cup across from her to suggest a guest just out of frame. The fairy herself sits small against this busy surface, so keep her colors a little brighter than the stump so she does not get lost in all that brown.
Scenes like this tend to get cluttered fast. Limit yourself to three or four props on the stump and leave real gaps of plain wood between them, the empty space reads as calm rather than bare.
No brown paint that satisfies you? Mix burnt sienna with a touch of its complementary blue for a richer, less flat wood tone. If you enjoy composing little still life moments like this, the ideas in this easy watercolor food list use the same instinct for small arranged objects.
Palette: Burnt Sienna,Raw Umber,Blush,Sap Green
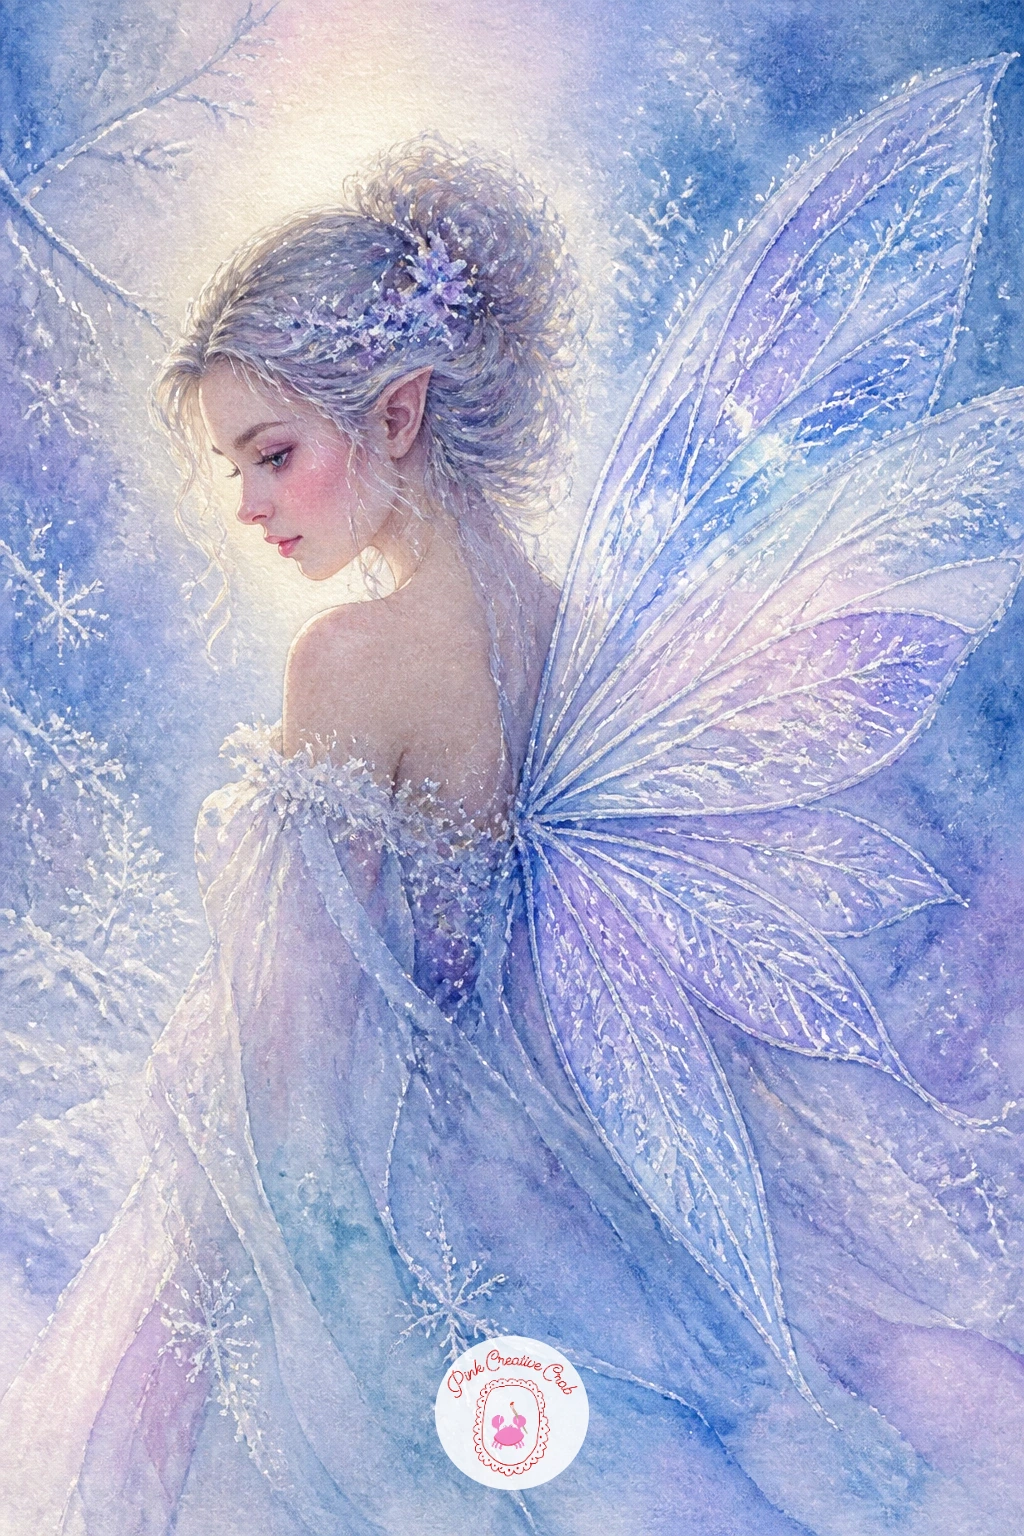
Shift the season with a winter fairy whose wings look dusted in frost rather than glowing with summer light. Paint her dress and hair in the usual soft tones first, then work the wings last in the palest blue white wash you can mix, almost colorless.
While that wing wash is still just damp, not soaking wet, sprinkle a pinch of table salt across it and leave it undisturbed until fully dry. The salt pulls the pigment into small blotchy crystals as it dries, giving a convincing frosted texture you cannot get with a brush alone.
Brush away the dried salt grains gently once everything is bone dry, never while damp or you will smear the effect. If salt is not in your kit, stippling tiny white gouache dots with a dry brush tip gives a similar frosty sparkle, just more controlled.
Keep her background a cool pale blue-lilac rather than the warmer tones used elsewhere in this list, since that color shift alone signals winter before the viewer even notices the frost.
You Will Need
- table salt
Palette: Pale Blue,Lilac,Titanium White,Payne’s Grey
Try this one alongside the cool palettes in this winter landscape painting roundup if you want more frosty color mixing practice.
Move into evening light with a fairy reaching out to touch a cluster of fireflies as dusk settles around her. Paint the background first as a deep wash of dusky blue and violet, graded darker toward the top of the page, and let that dry completely before anything else goes on top.
Add the fairy next in silhouette-leaning tones, just a touch lighter than the background so she still reads clearly, then save the brightest color in the whole piece for the fireflies themselves. A small dab of masking fluid on the paper before you start the background keeps those firefly spots pure white underneath the dark wash.
Once the masking fluid is peeled away, drop a tiny bit of warm yellow into each white dot and let it bloom just slightly at the edges, that soft bleed is what makes them glow rather than just look like white specks. Light direction matters here: let the glow from the fireflies be the only light source, casting a faint warm tint onto the nearest part of her hand and face.
Skip the masking fluid if you prefer and simply paint around small circles freehand, it just asks for more patience with the background wash.

You Will Need
- masking fluid
Palette: Indigo,Violet,Naples Yellow,Titanium White
Bring the scene to a pond’s surface with a fairy mid-twirl on a floating lily pad, skirt flared out from the turn. Paint the lily pad first as a simple flat circle with a notch cut from one edge, in a cool green that fades slightly toward its outer rim.
Add the fairy standing just off-center on the pad rather than dead center, since a slightly asymmetrical pose reads as far more alive and mid-motion than one planted squarely in the middle. Her skirt can flare in a soft arc of color, blush fading to lilac, to suggest the spin without needing any extra linework.
Reflections sell this setting: once the lily pad and water around it are dry, add a faint echo of her skirt color in the water just below the pad’s edge, softened and slightly distorted. That single reflected shape does more work than detailed ripples would.
If your water area looks too busy, simplify it to one flat wash of blue green with just that one soft reflection, plain water reads as calmer and more elegant than a fussy one.
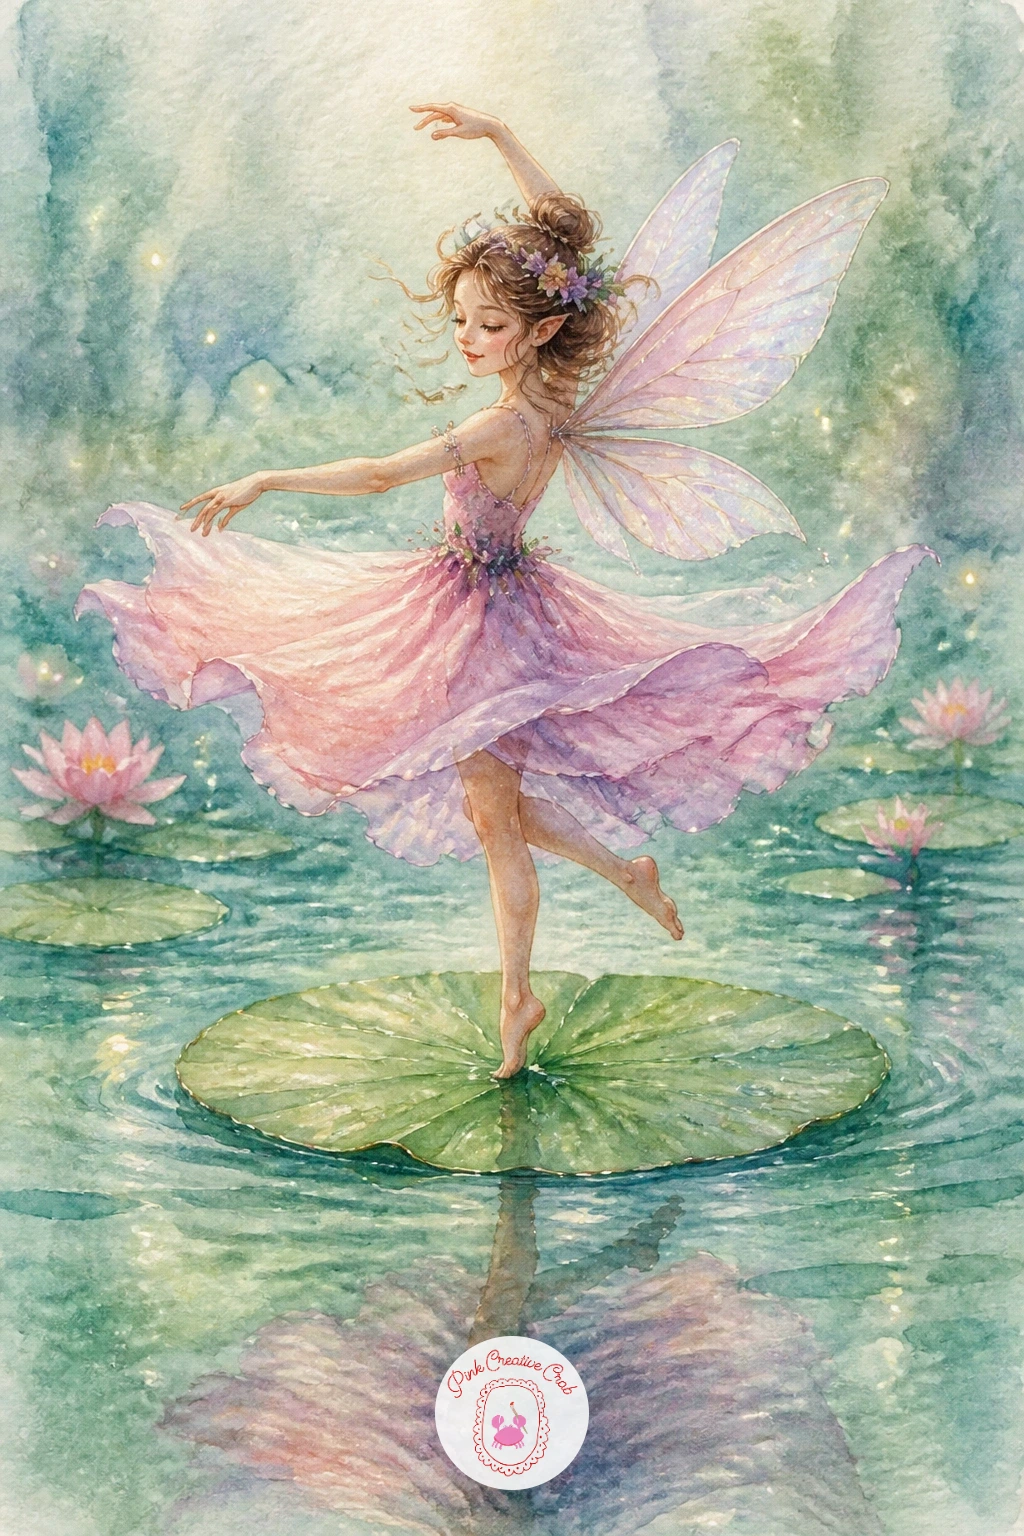
Palette: Sap Green,Blush,Lilac,Teal
Give the whole scene a cozy architectural twist with a tiny fairy house built inside an old teapot, little windows glowing from within. Paint the teapot’s basic shape first, rounded body and curved spout, in a soft vintage floral pattern or a plain warm cream, then let it dry before adding any doors or windows.
Cut in a small round door near the base and one or two round windows along the body, each window filled with a warm yellow glow rather than flat paint so it looks genuinely lit from inside. A fairy can perch on the spout or stand at the open lid, tiny beside the teapot’s bulk, which is exactly the scale contrast that makes this idea charming.
Patterns on the teapot are where it is easy to overdo things. Pick one simple motif, a few small flowers or stripes, and repeat it sparingly rather than covering the whole surface, so the eye still finds the fairy first.
No floral teapot reference handy? A plain cream teapot with just the glowing windows works just as well and paints faster. This pairs nicely with the architectural detail in these watercolor building paintings if you enjoy painting tiny structures.
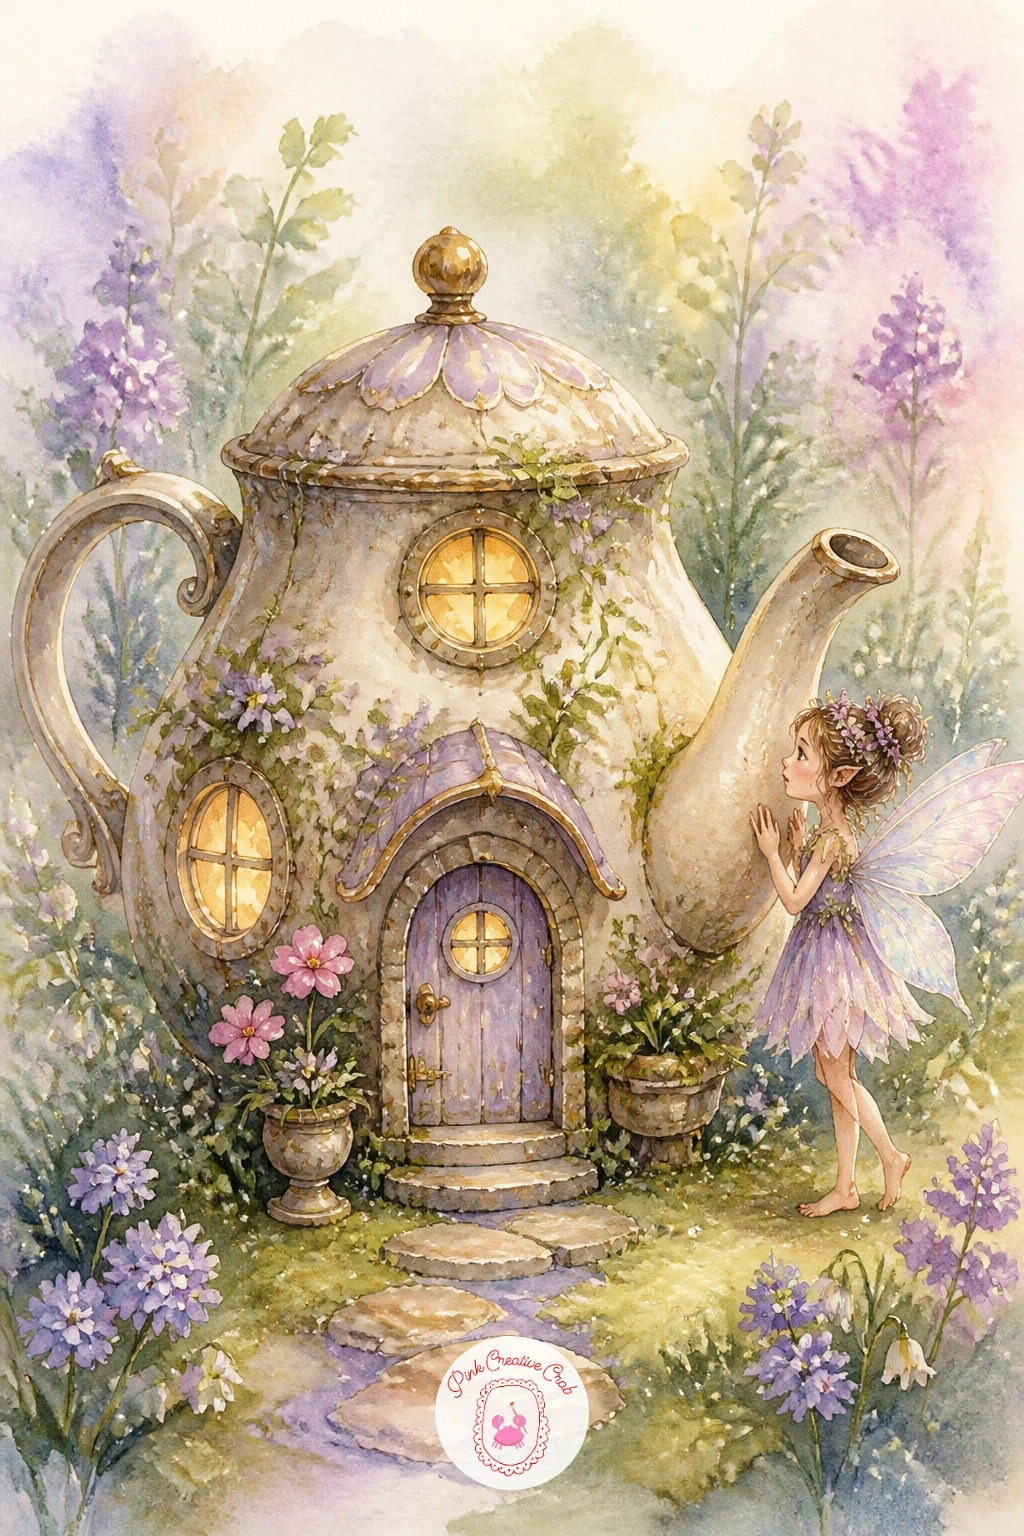
Palette: Cream,Naples Yellow,Dusty Rose,Sap Green
Keep the mood playful with a fairy reaching up to pick a cluster of wild berries taller than she is. Sketch the berry stem first with several round berries grouped unevenly, since perfectly spaced circles read as artificial, then place the fairy reaching with one arm toward the lowest berry.
Paint the berries in rounds of color, deep red or near-black for berries like blackberries, leaving a tiny white highlight dot unpainted on each one to suggest their glossy skin. Work from the furthest berries back to the nearest so the closest ones, painted last, stay the most vivid and crisp.
Compare her hand size to a single berry before you paint: in most of these little scenes a berry sits close to the size of her whole fist, and getting that scale right is what makes the moment feel believable rather than cartoonish.
If your reds run flat, deepen the shadowed side of each berry with a touch of Payne’s grey mixed in rather than plain black, it keeps the color alive. Leave her wings pale so they do not compete with all that saturated berry color.
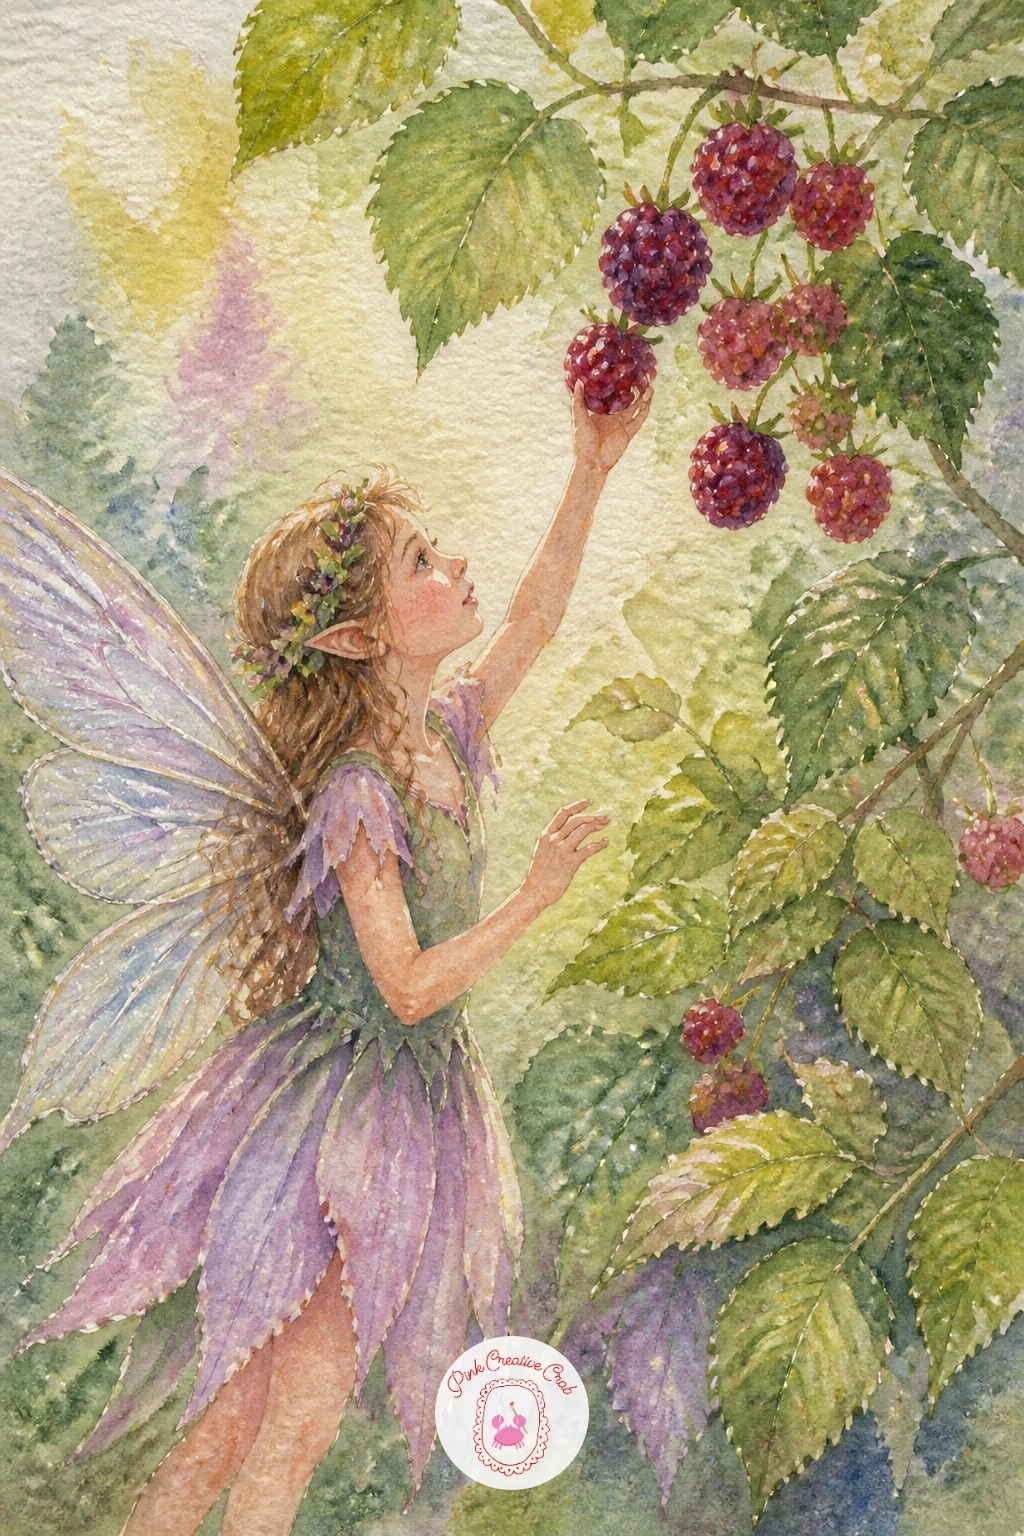
Palette: Alizarin Crimson,Payne’s Grey,Sap Green,Titanium White
Slow the pace down with a fairy perched comfortably on the curved shell of a garden snail, as if hitching a ride. Draw the snail’s spiral shell first using one continuous curving line that winds inward, then build the soft body and two small eye stalks beneath it.
Paint the shell in warm bands of ochre and brown that follow the spiral, letting each band fade into the next while still damp so the pattern feels organic rather than ruled out with a straight edge. The fairy sits astride the shell’s highest point, legs tucked to one side, small enough that the snail still reads as the larger, slower creature carrying her.
Spiral shapes are easy to get lopsided. Lightly pencil a loose spiral guide first and check it curls evenly in one direction before you commit any paint, since a wobbly spiral is the single thing most likely to throw this whole picture off.
Swap the ochre banding for a plain soft grey shell if you prefer a quieter look, the fairy and her pose still carry the charm either way.
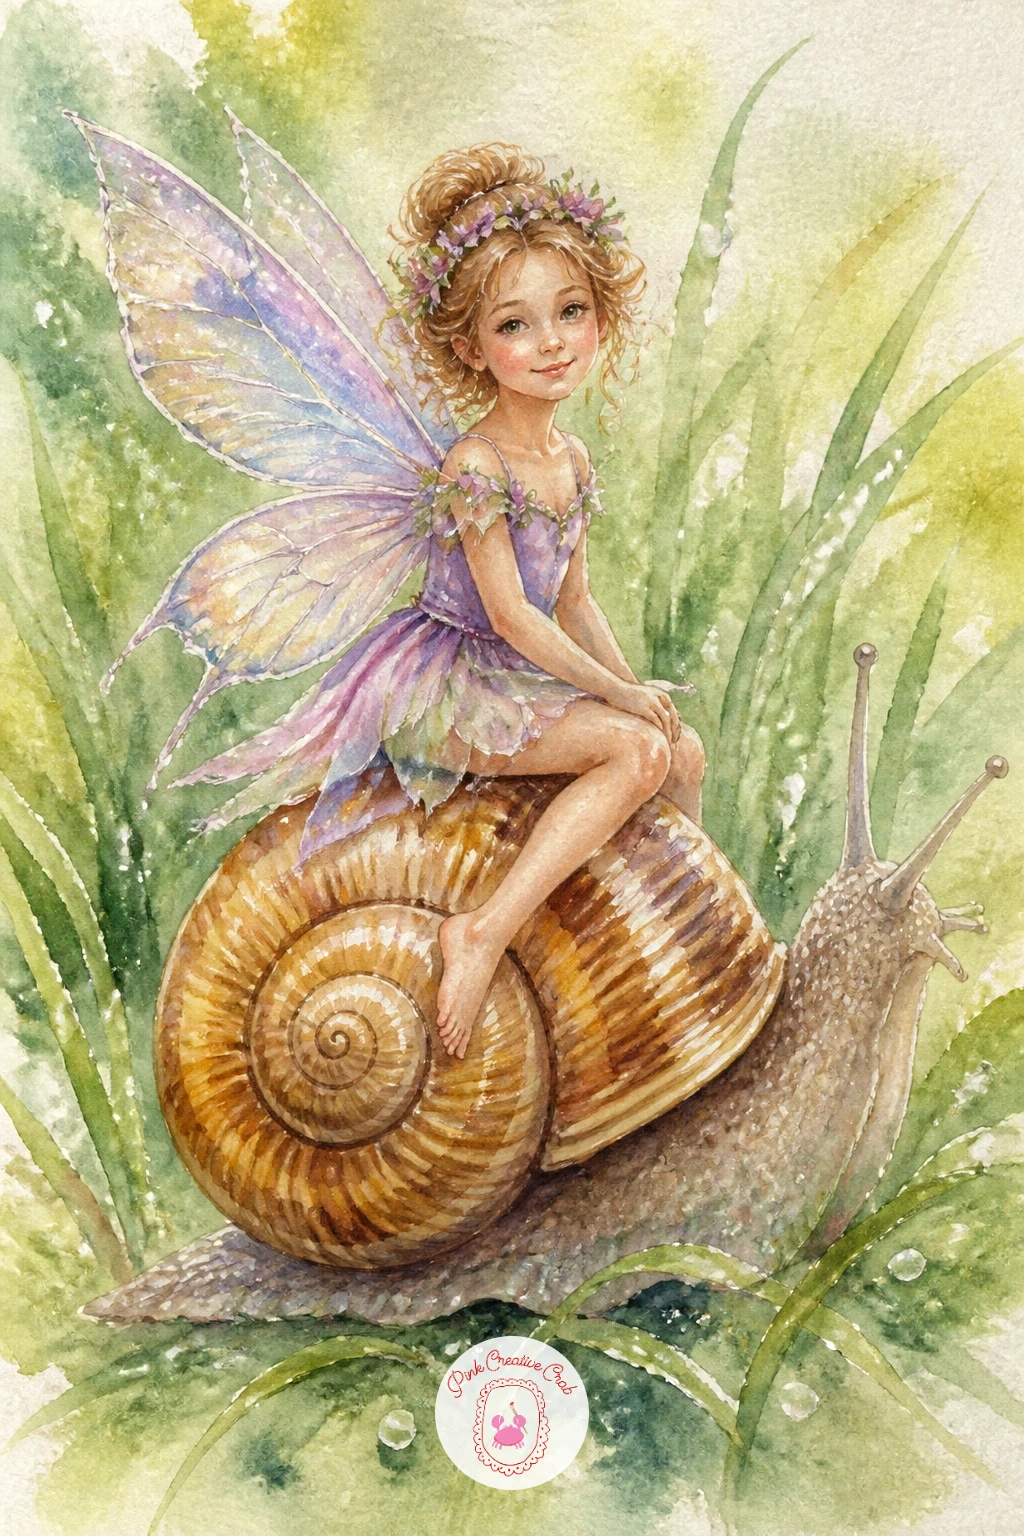
Palette: Yellow Ochre,Burnt Sienna,Sap Green,Blush
Nestle your fairy into a small woven bird’s nest alongside a couple of speckled eggs. Build the nest first from loose, overlapping curved strokes of brown and grey, layering darker lines into the shadowed inner curve while the wash is still slightly wet so the twigs blend rather than sit as separate hard marks.
Once dry, add two or three pale eggs tucked beside the fairy, each with a scatter of tiny darker speckles flicked on with a nearly dry brush. She can sit curled among them, one arm draped over an egg as if they were all nest-mates together.
The texture of woven twigs is what carries this whole piece, so work it with a dry brush dragged lightly across the paper’s texture rather than smooth, fully loaded strokes, that broken, scratchy quality reads as woven material at a glance.
If speckled eggs feel fussy, plain pale blue eggs with no spotting still read clearly and paint much faster. For more nest and egg reference, this spring birds and nests collection is worth a look.
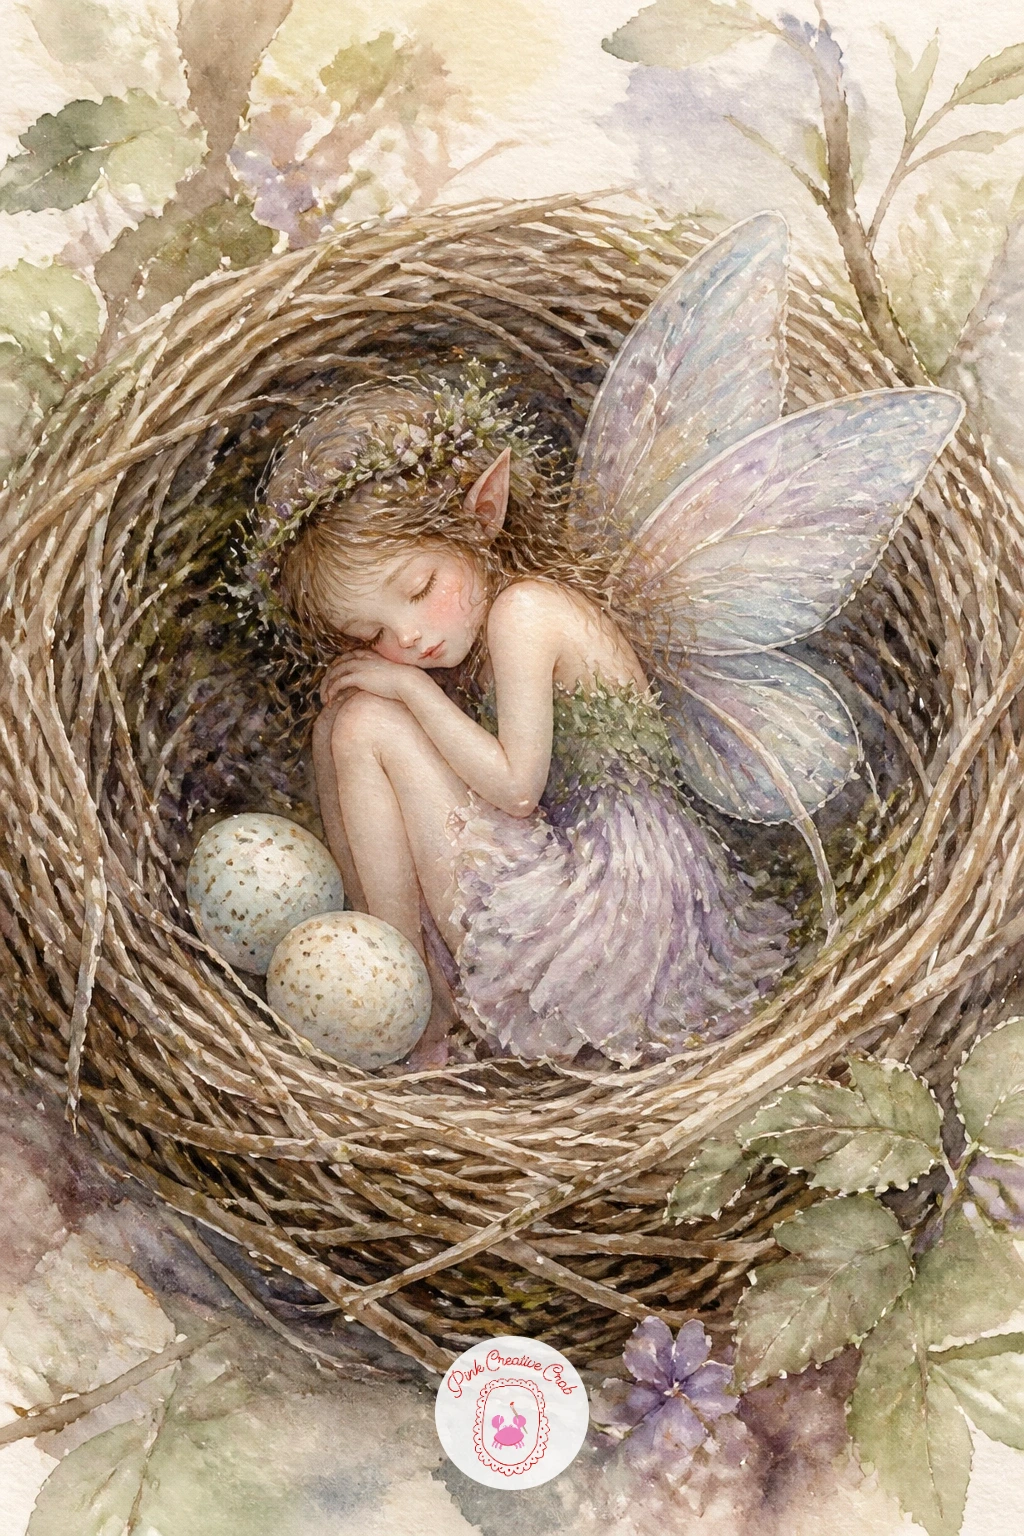
Palette: Raw Umber,Payne’s Grey,Sky Blue,Blush
Add a quiet bit of storytelling with a fairy using a strand of spider silk as thread while she sews, a needle in one hand. Paint her seated pose first, a small bundle of petal fabric across her lap, then once dry, use a very fine brush or a dip pen with grey ink to add the thin silvery thread trailing from her needle toward a half-built web nearby.
The web itself is the real test of patience here: build it from a few straight spokes first, then add the spiral thread connecting them in one continuous looping line rather than many short disconnected strokes, which keeps it looking like genuine silk rather than scribble.
This is a good subject for the ten minute version if you are short on time, since a simple seated pose with just a few web lines behind her still tells the whole story. The forty minute version adds the petal fabric folds and a fuller, more detailed web radiating further across the background.
A fine liner pen works just as well as a dip pen for the web threads if ink and nib feel like too much setup today.
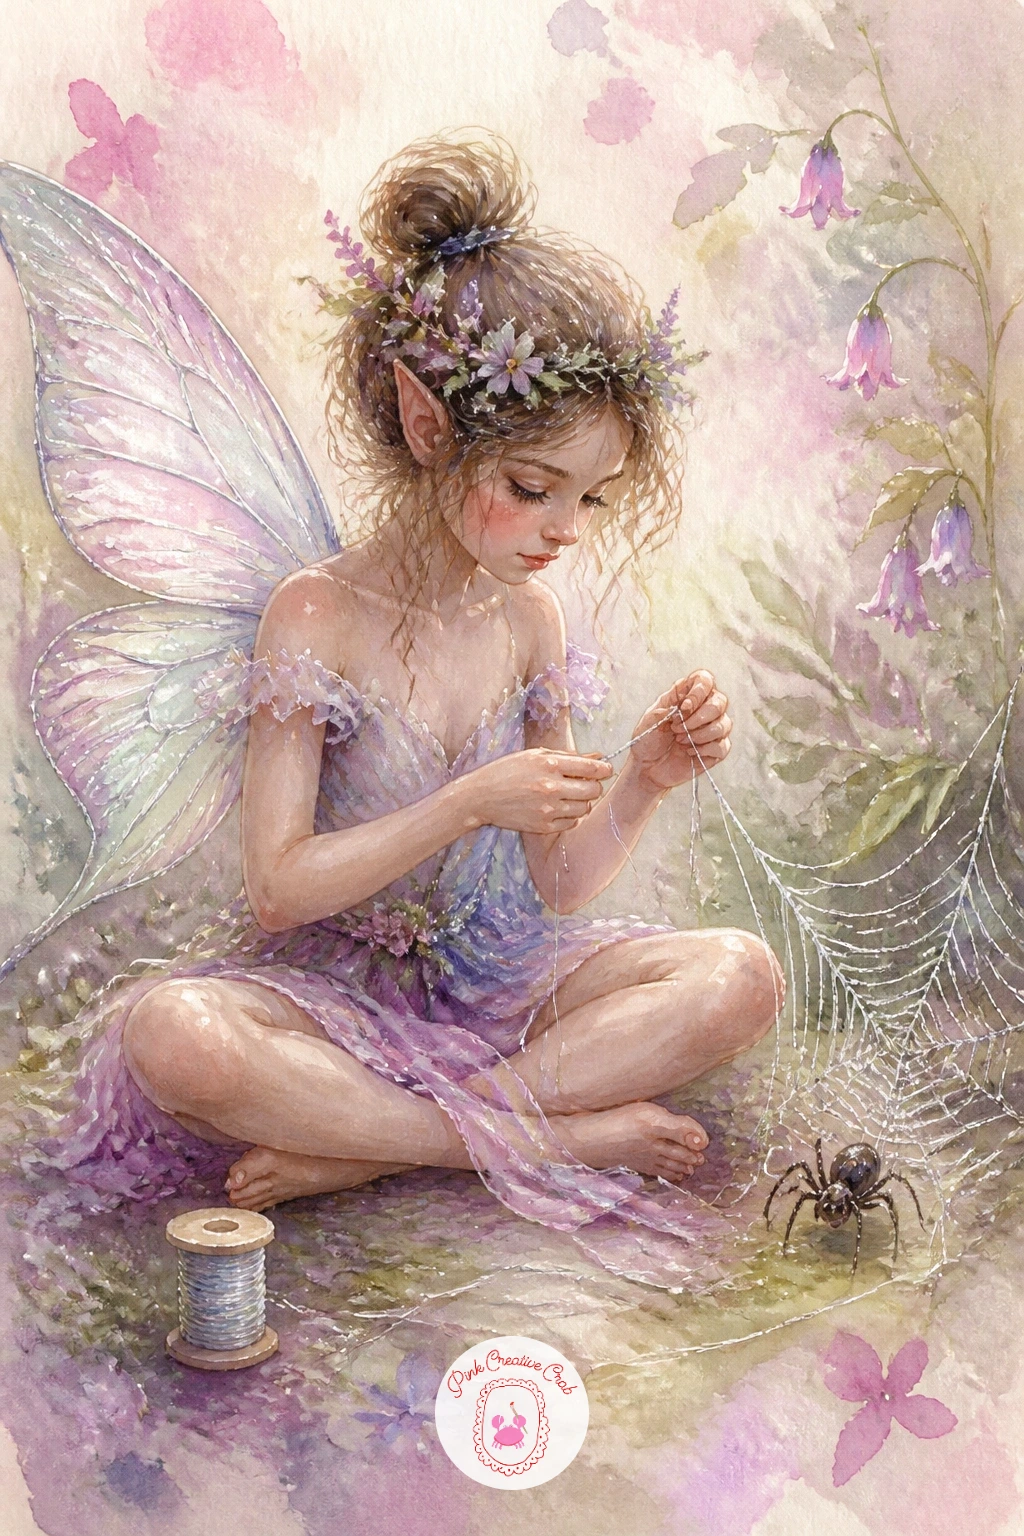
You Will Need
- fine liner pen or dip pen
Palette: Blush,Payne’s Grey,Lilac,Sap Green
Return to flight and motion with a fairy riding tucked low against the back of a hummingbird mid hover. Sketch the hummingbird’s body first, a compact teardrop shape with a long thin beak and wings blurred into a soft arc rather than drawn as crisp separate feathers, since real hummingbird wings read as a blur to the eye.
Paint that wing blur using a dry, almost empty brush dragged quickly across the paper, letting the pigment catch only on the paper’s raised texture, which gives a convincing sense of speed without any hard edges to clean up. The fairy sits low along the bird’s back, arms forward as if holding on, her own wings folded flat so they do not clutter the composition.
Scale is everything here, since a hummingbird is tiny and your fairy needs to be even smaller again: hold the two pencil sketches side by side and check she is clearly shorter than the bird’s own body before adding any color.
Iridescent throat feathers are a lovely extra touch if you have a shimmering paint or ink, a few streaks of teal and magenta at the throat catch the eye without extra effort anywhere else.
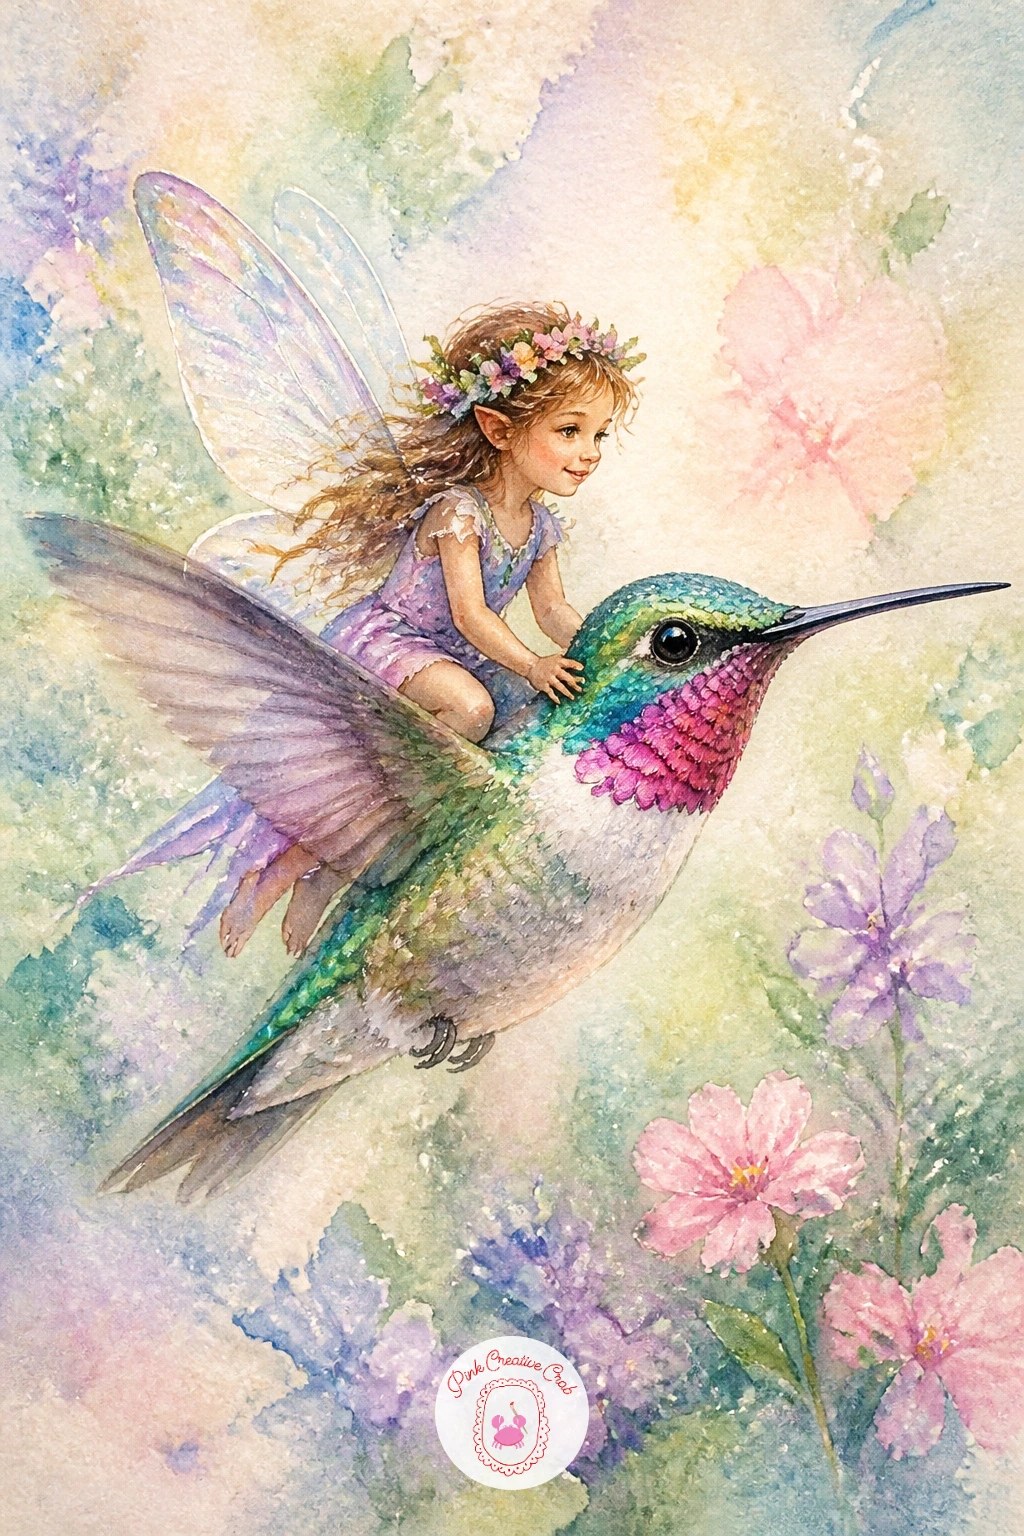
Palette: Emerald Green,Magenta,Teal,Blush
Widen the scene slightly with a fairy standing waist deep in a field of bluebells stretching off behind her. Lay the field in first as a loose wash of blue-violet across the lower half of the page, scattering in small bell-shaped clusters with a slightly thicker mix while everything is still damp so they soften into the background rather than standing apart from it.
Once that base layer is dry, add a handful of closer bluebells with crisper detail nearer the fairy, each a small cluster of drooping bell shapes on a thin green stem, and let the distant ones stay soft and unfocused. That shift from sharp up close to blurry further back is what gives this small scene real depth despite its size.
The fairy herself stands small against all this blue, so give her a contrasting warm dress tone, blush or soft gold, so she does not disappear into the field around her.
If violet-blue is not sitting right in your palette, ultramarine with a touch of alizarin crimson mixed in gets you there. Readers who enjoy painting whole fields of flowers may also like these watercolor garden paintings for summer.

Palette: Ultramarine Blue,Violet,Sap Green,Blush
Shift to a gentler, quieter gesture with a fairy tipping a tiny watering can over one small seedling just breaking through the soil. Paint the seedling first, just two small curved leaves on a thin stem rising from a patch of dark earth, kept simple so it does not compete with the fairy above it.
Work the fairy next, tipping forward slightly at the waist with the watering can held low, and add a thin stream of water falling from its spout in the palest blue, almost transparent wash so it reads as water rather than a solid line. A few tiny dark dots of splashed soil where the water lands finish the gesture nicely.
Getting that water stream to look wet rather than like a ribbon is mostly about restraint: keep it one single thin, slightly wavering line rather than a thick solid band, and leave gaps of white paper within it to suggest movement and light.
If a toy watering can reference is hard to picture, a simple acorn cap with a tiny spout poked through works just as well and keeps the whole scene in scale with her.
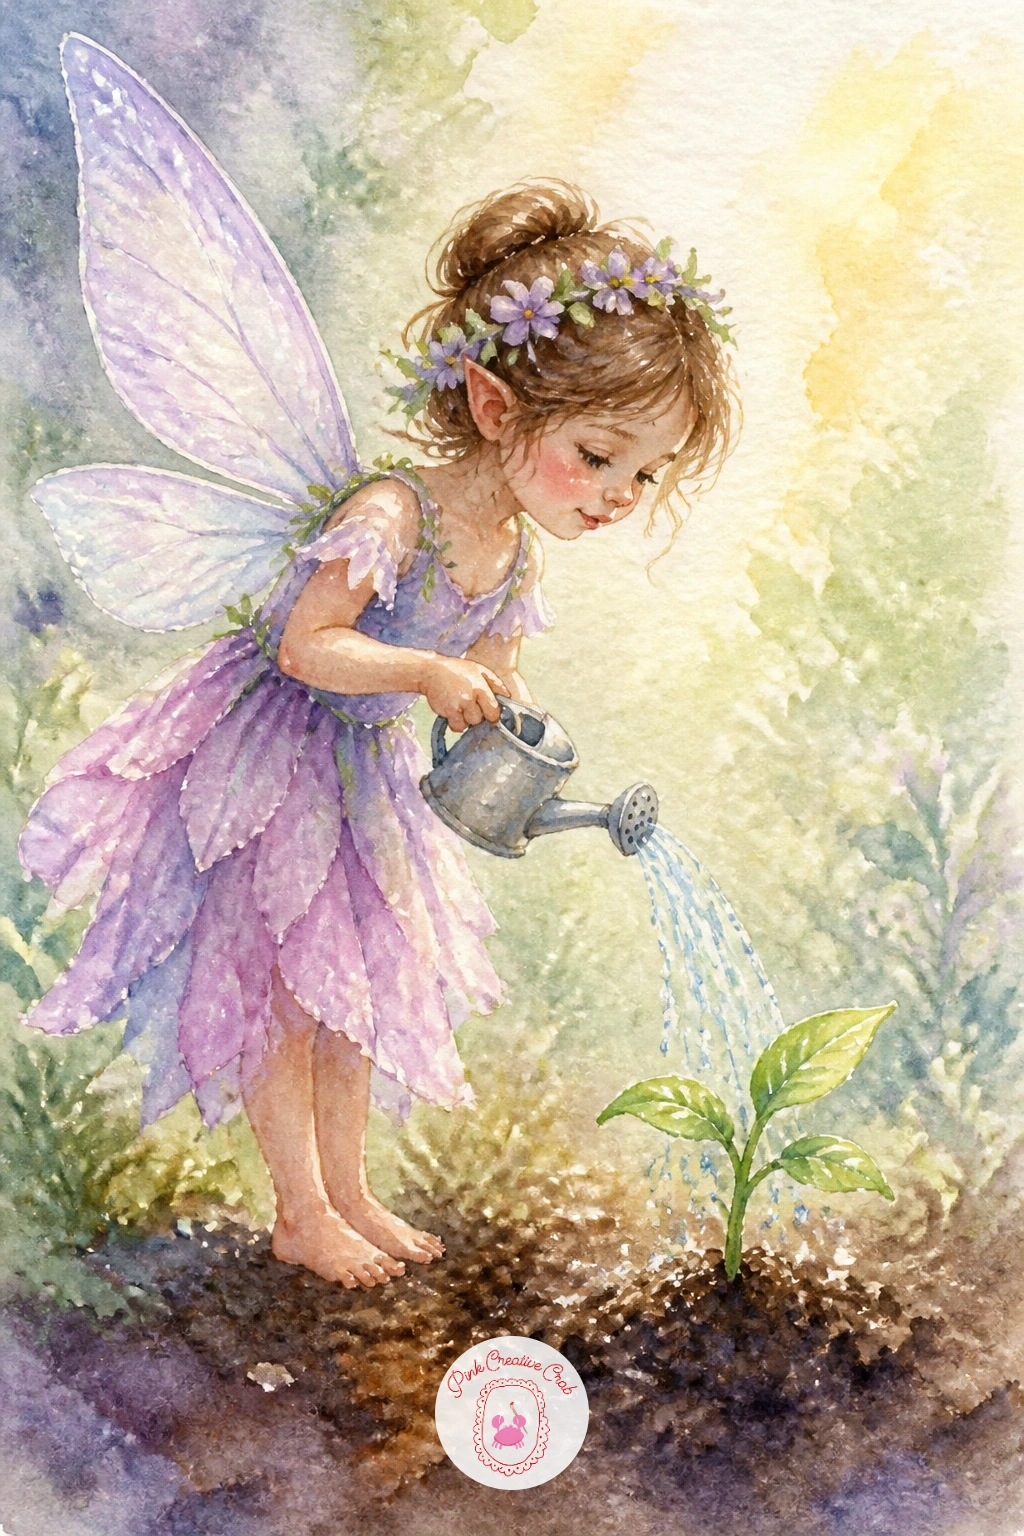
Palette: Sap Green,Burnt Umber,Sky Blue,Blush
Give your fairy a bit of character with a simple portrait-style piece: one wearing an acorn cap as a tiny hat, tilted jauntily to one side. Paint her face and shoulders first in a simple three-quarter view, then add the acorn cap afterward sized carefully against her head so it reads as a perfect snug fit rather than an oversized prop.
The cap’s texture is what sells the whole idea: once its base brown wash is dry, stipple in the small bumpy scale pattern with the tip of a dry brush loaded with a slightly darker brown, working in short dabbing motions rather than long strokes.
This is an easy one to vary once it works: try the same pose with a different natural hat next time, a flower petal folded over, a snail shell cap, or a single curled leaf, keeping everything else about her the same so you build a small series.
Keep her expression simple, a soft closed smile and small dot eyes read as plenty of personality at this scale, there is no need for detailed facial shading.
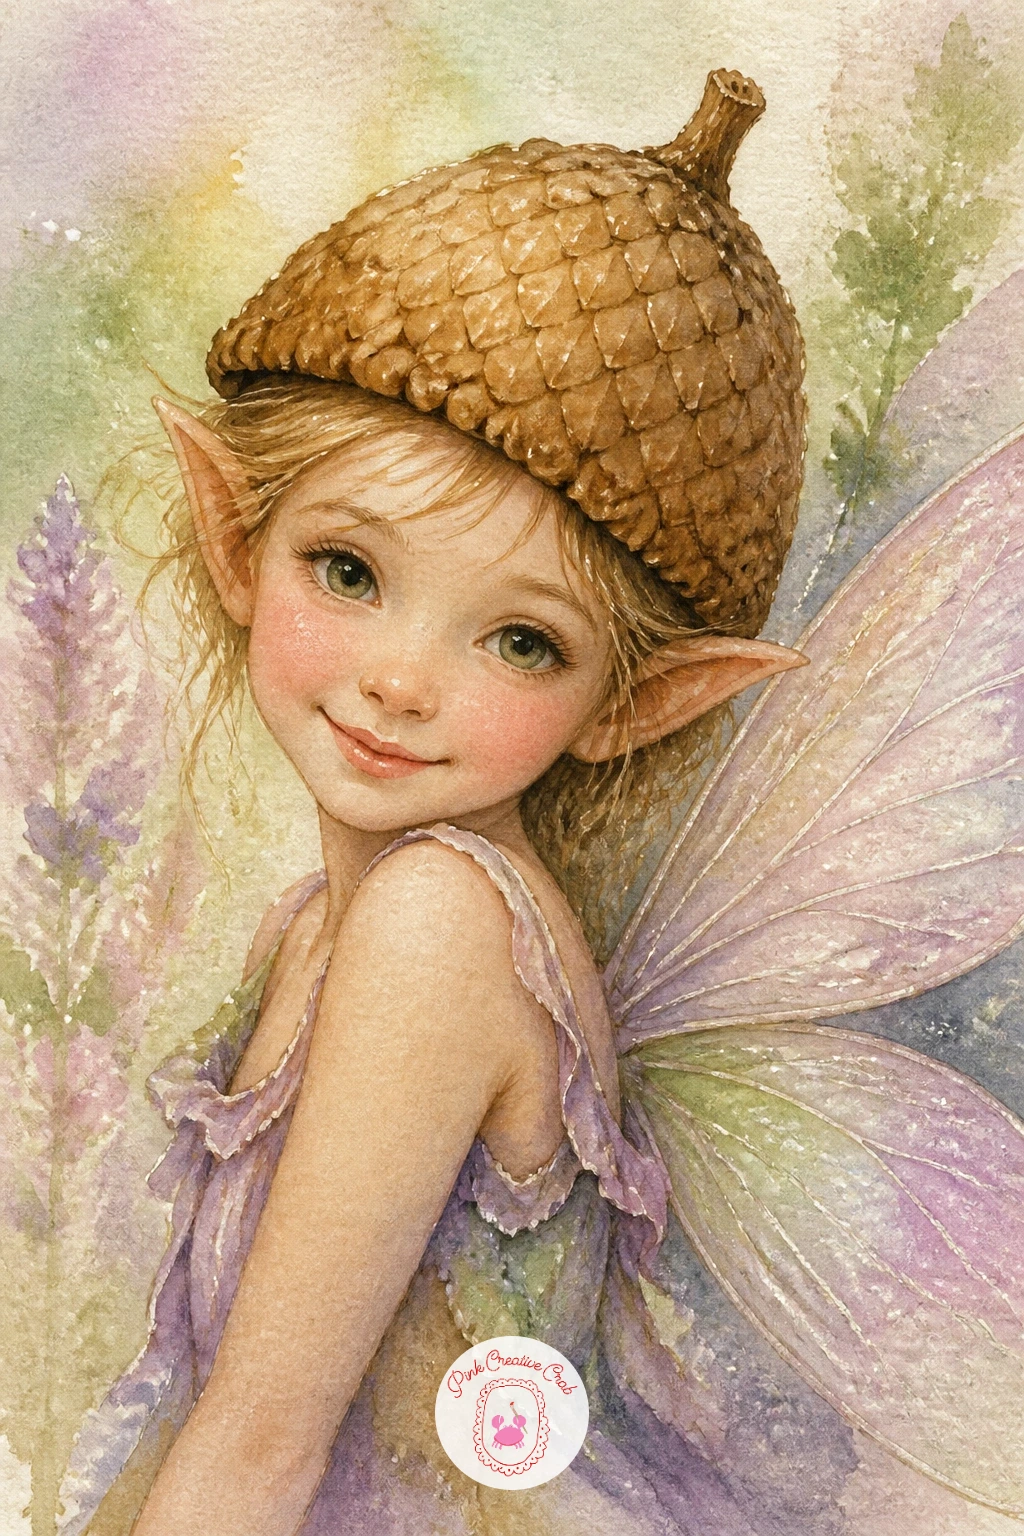
Palette: Burnt Sienna,Raw Umber,Blush,Titanium White
Return to a restful pose with a fairy asleep, stretched along the length of a large curved feather as if it were a bed. Draw the feather first with one long central shaft and soft angled barbs fanning out from it on both sides, kept loose rather than ruled out with a straight edge.
Paint the feather in long, flowing strokes that follow the direction of the barbs, letting the color feather out literally at the edges with a barely damp brush so it looks soft rather than stiff. The fairy lies curled along its central shaft, using one soft fold of her dress as a blanket, small and peaceful against the larger shape beneath her.
Working from the first marks to the last, lay the feather’s base wash down first, let it dry, then add the darker barb lines, and paint the fairy last so her pale skin stays clean against the already-finished feather.
If a single large feather reads as empty, add one or two smaller feathers drifting nearby to fill the space without crowding her.

Palette: Cream,Payne’s Grey,Blush,Lilac
Celebrate a lighter, joyful mood with a fairy wearing a small crown woven from daisies, hands raised as if she just placed it. Paint her face and raised arms first, then work the crown as a simple ring shape sitting just above her hairline, leaving small round gaps around it for the daisy heads to come later.
Each daisy needs only five or six quick white petal strokes around a small yellow center, and painting them slightly uneven in size and spacing reads as far more natural and handmade than a perfectly even ring would. Let a couple of daisies sit slightly askew or half hidden by her hair for the same reason.
Keep the background behind her soft and plain, a pale wash of green or sky blue, so the white daisy crown stays the brightest, clearest shape in the whole piece and does not get lost against anything busy.
No white paint handy for the petals? Leave the paper itself unpainted for each petal and just add the yellow centers and a thin grey shadow line between petals, the bare paper reads as bright white daisies on its own.
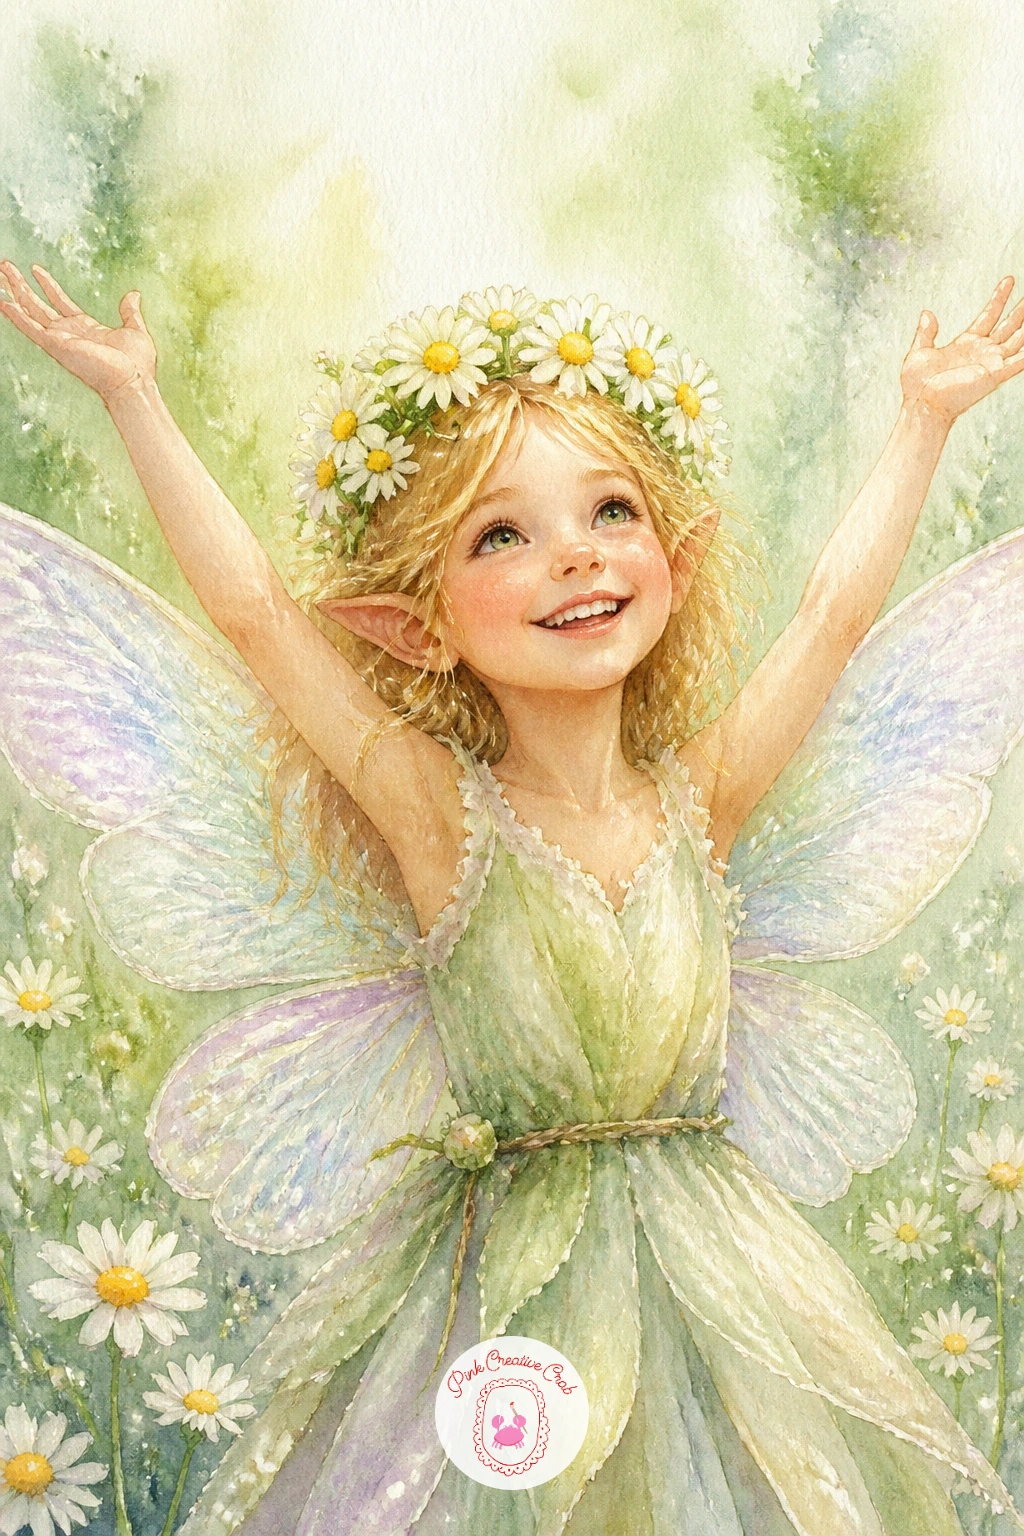
Palette: Titanium White,Naples Yellow,Sap Green,Blush
Add a little tension and humor with a fairy peeking out from behind a leaf, wide eyed, while a large cat’s face looms nearby. Paint the cat first and keep it soft-edged and only partially in frame, perhaps just the curious face and one paw, so it reads as an enormous presence without needing the full body worked out in detail.
The fairy herself sits small against one edge of a leaf or flower stem, body angled as if caught mid-duck, one hand pressed close to her chest. Her wide eyes and slightly open mouth do most of the storytelling work, so keep that part of her face a touch more detailed than usual even though everything else stays simple.
Scale contrast is the whole point of this idea: measure the cat’s head sketch against the fairy’s entire body and make sure the cat’s face alone dwarfs her completely, that size gap is what makes the hiding moment feel believably urgent rather than casual.
If cat fur texture feels tricky, a few soft dry-brushed strokes along the cheek and ear are enough, you do not need to render every whisker for the scene to read clearly.
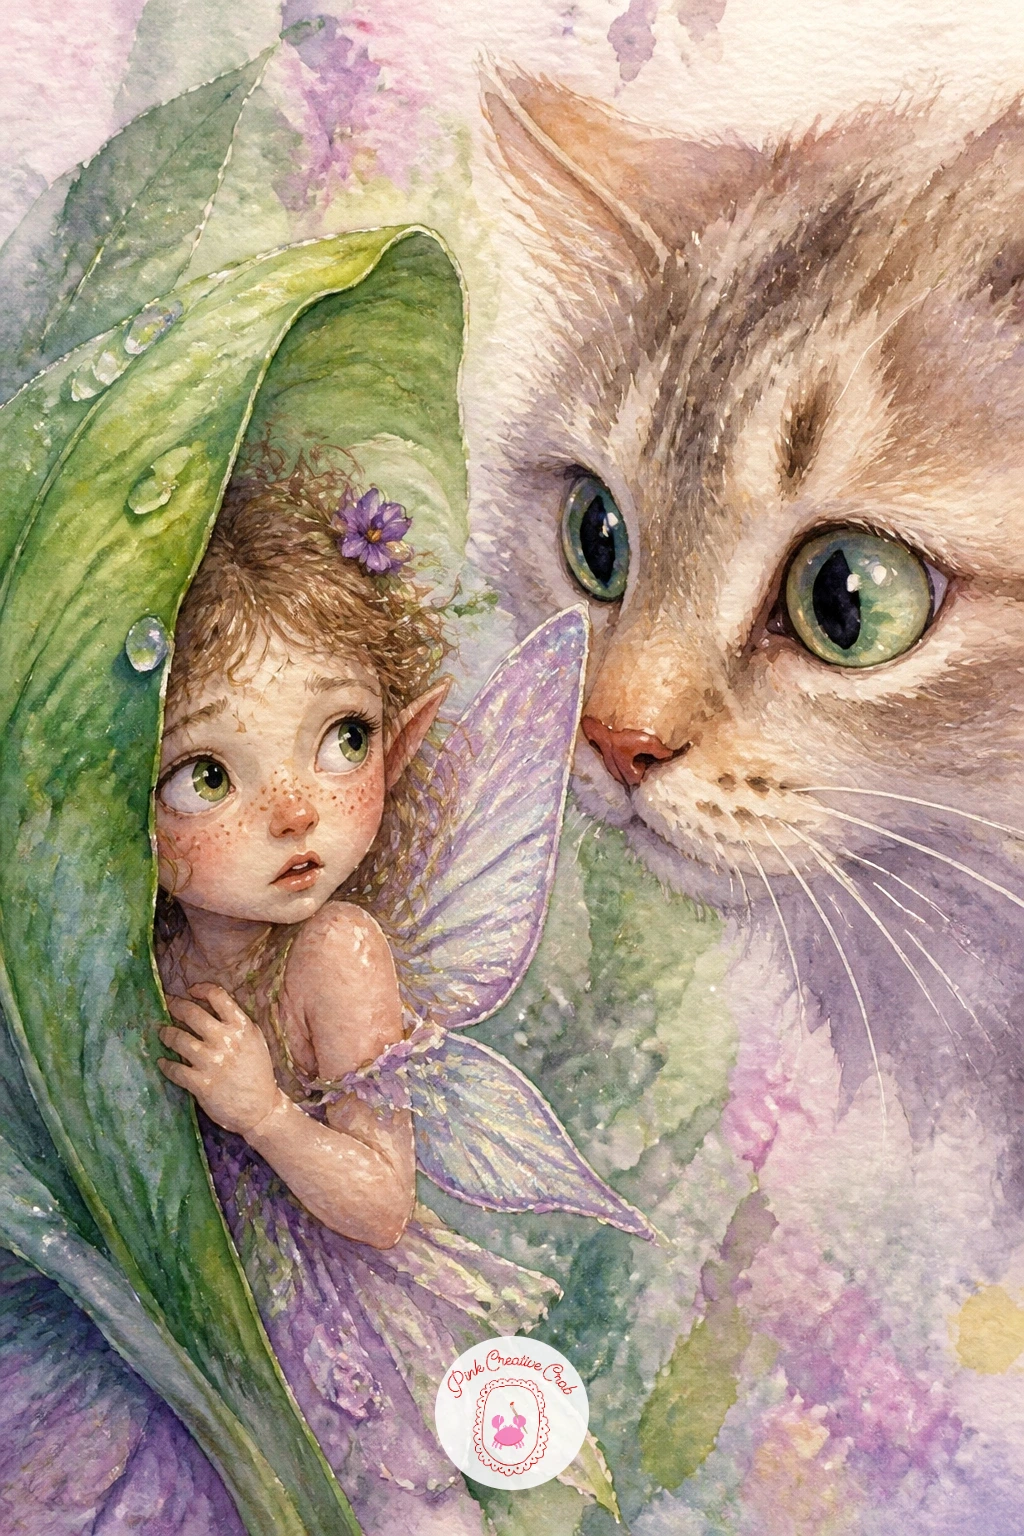
Palette: Orange Ochre,Titanium White,Blush,Sap Green
If you enjoy painting animal expressions like this, the playful poses in this cat watercolor ideas list are worth a look too.
Work with light itself as the main subject in a fairy sitting curled inside a glass jar, her whole body softly glowing. Paint the fairy first in warm, saturated tones, since she is acting as the light source here rather than being lit by something outside her.
Once she is dry, paint the jar around her using a very pale, slightly warm grey for the glass, leaving a crisp streak of unpainted white paper down one side to suggest the curved highlight glass always catches. A soft golden halo painted just outside the jar’s glass, blurring outward with a damp brush, finishes the glow convincingly.
Getting glass right is mostly about restraint: paint it far more faintly than you think you need to, since too much color on the jar itself competes with the glow and flattens the whole effect. A kneaded eraser can lift back any area that ends up too heavy once the wash has dried.
If a clean lid shape feels fiddly, a simple loop of twine around the jar’s neck reads just as charmingly and is far easier to paint than metal hardware.
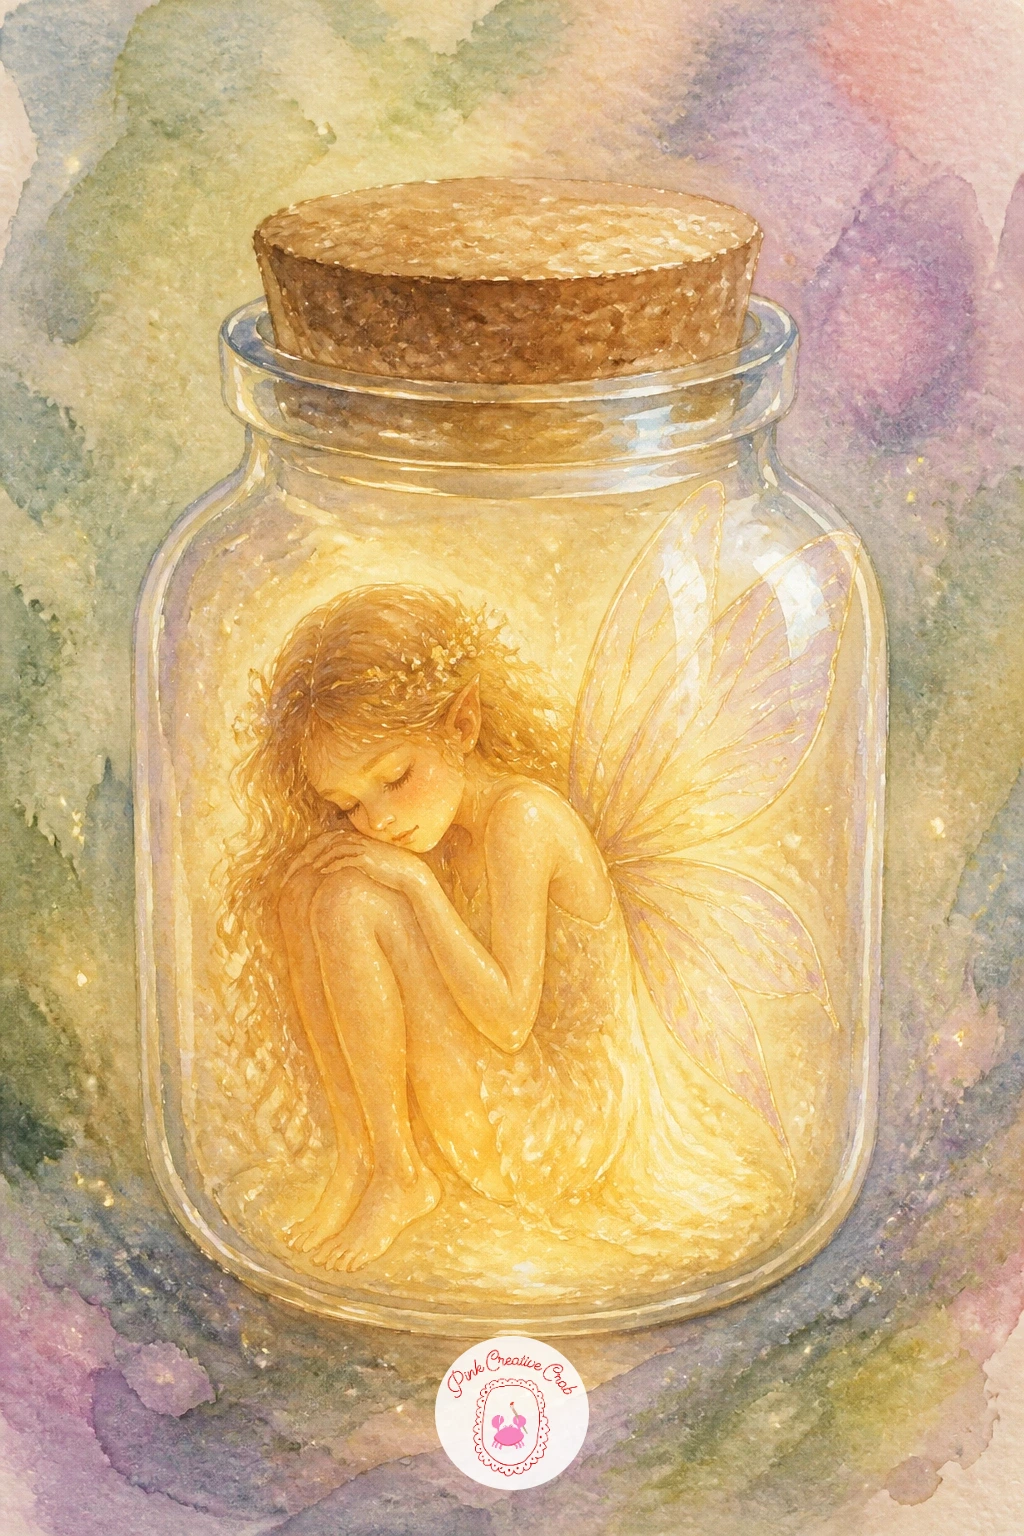
You Will Need
- kneaded eraser
Palette: Naples Yellow,Warm Grey,Blush,Titanium White
Add a small errand to the story with a fairy riding a bee, a tiny rolled letter tucked under one arm as she delivers mail. Paint the bee’s body first in bands of warm yellow and black, keeping the stripes slightly uneven and soft-edged rather than ruled out perfectly straight, which keeps it looking painted rather than printed.
The bee’s wings need the lightest touch in your whole kit, a near-transparent wash with just a hint of grey along the outer edge, since real bee wings are mostly see-through and too much color there flattens the sense of flight. Add the fairy sitting forward near the bee’s head, letter held firmly, wings angled back to suggest forward motion.
Eye level matters for a flying pair like this: place them slightly above the horizon line of your composition, with the ground or flowers suggested only faintly below, so the viewer reads them as genuinely airborne rather than standing on something unseen.
A rolled scrap of pale paper shape for the letter, with a tiny wax-seal dot of red, adds a nice detail without much extra painting time.
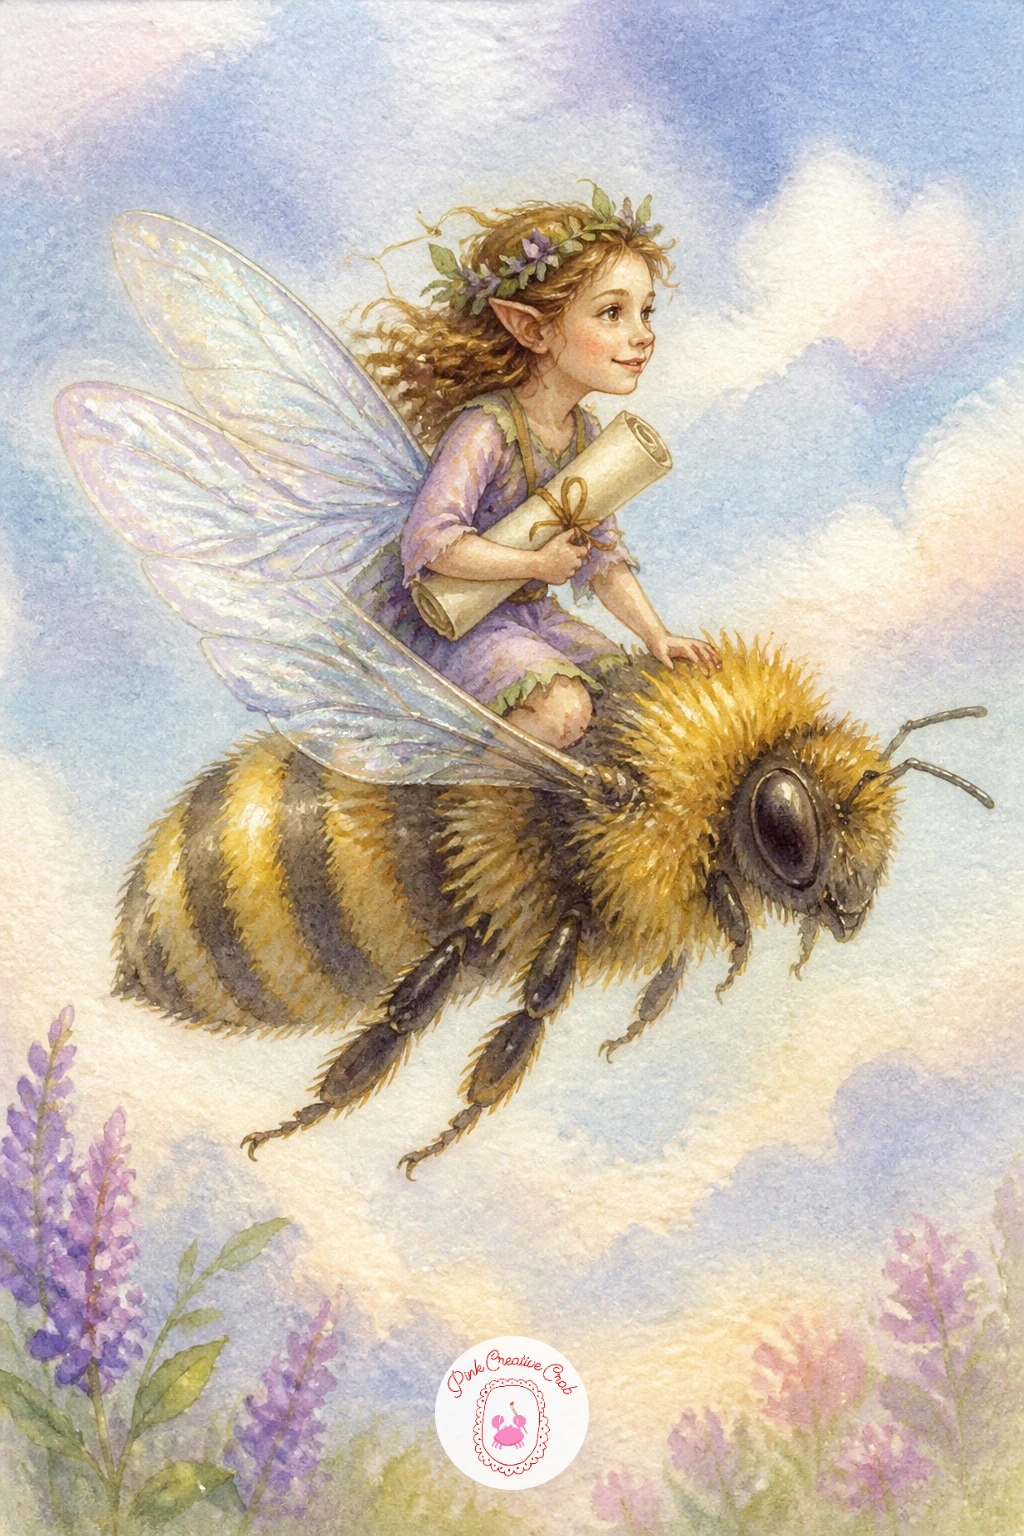
Palette: Naples Yellow,Payne’s Grey,Blush,Cadmium Red
Build the most layered scene in the whole set with a tiny wedding taking place inside the open petals of a full rose. Paint the rose first as a large, loosely layered bloom, working from the darkest inner petals out to the palest outer ones while each layer is still slightly damp so the petal edges blend softly into each other.
Once the rose is fully dry, add two small fairy figures standing together near its center, kept deliberately simple and a touch smaller than you might first guess, since the rose itself should remain the star of this composition rather than the figures.
The quick version here focuses on just the rose and the two central figures, finished well within ten minutes once the petal wash is down. The longer version adds tiny guest fairies tucked into the outer petals and a scatter of petal confetti drifting through the air, worth the extra forty minutes if the mood takes you.
If a full rose feels like too much petal work today, a half-open rosebud with the same two tiny figures keeps the romance with far less painting.
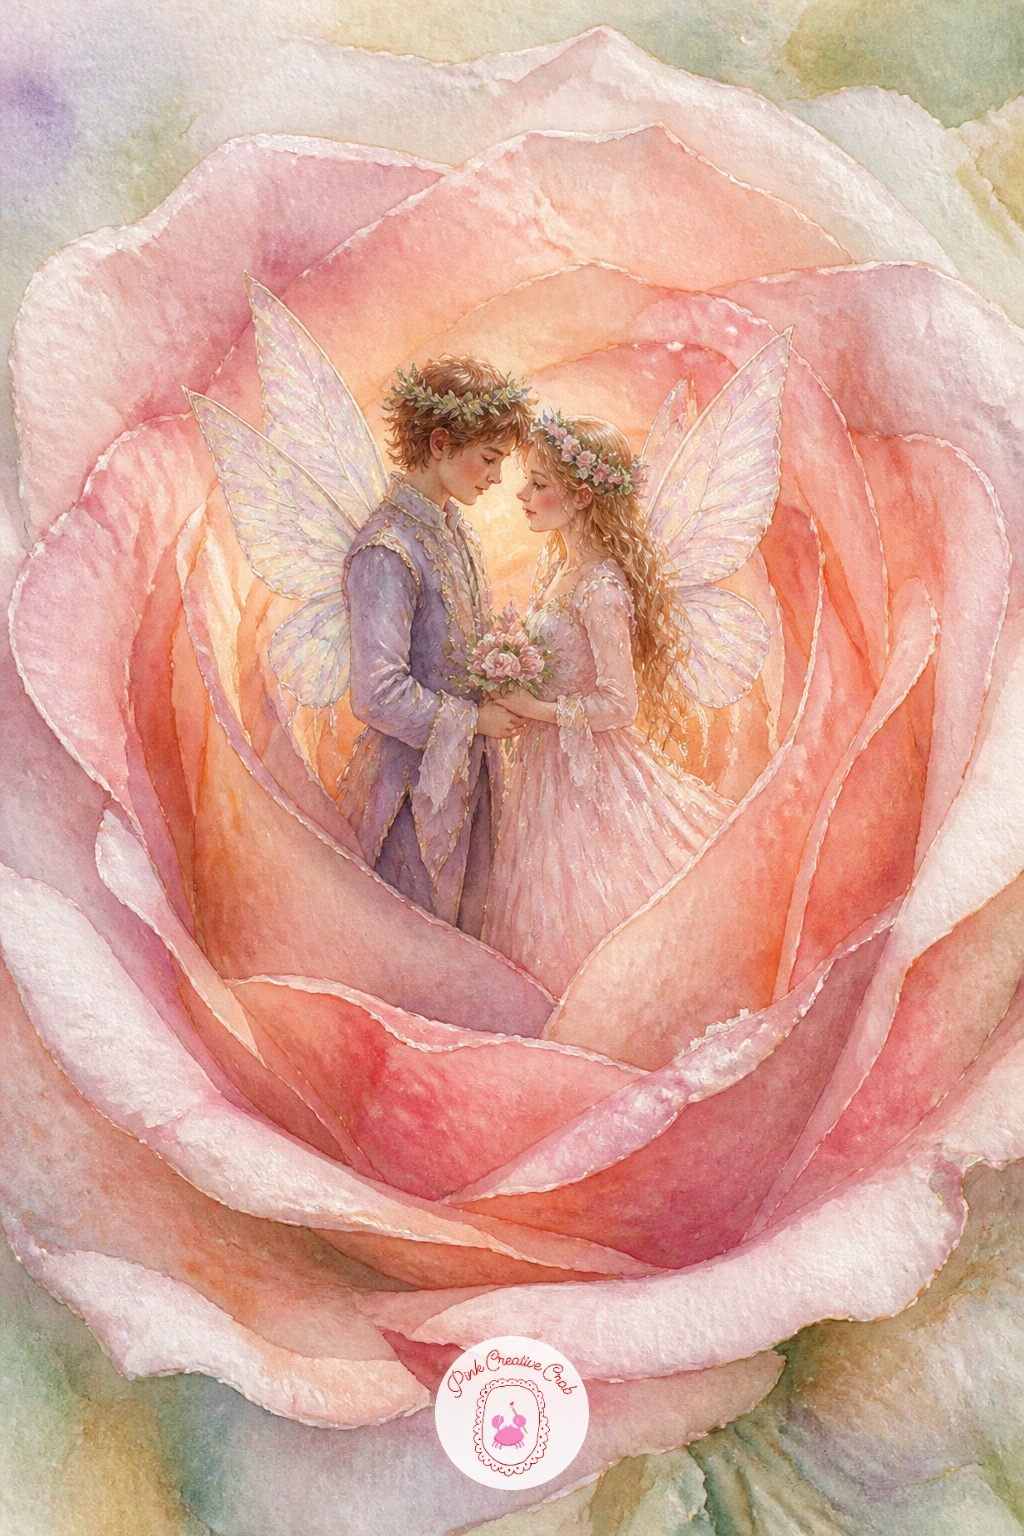
Palette: Alizarin Crimson,Blush,Titanium White,Sap Green
Let your fairy play with a swing made from a bent, flexible flower stem, legs kicked out mid-swing. Sketch the stem first bowed into a gentle arc, anchored at the top by a flower head and curving down to where the fairy sits, since getting that curve believable is what makes the whole swing read correctly before any paint touches the page.
Paint the flower head anchoring the swing in whatever color you like best from this palette family, blush or lilac both work beautifully, then bring the stem down in one confident green stroke rather than several shaky shorter ones.
Compare the stem’s curve against a coin or a round lid if the bend looks stiff in your sketch: tracing around a small circular object for just the top arc of the curve keeps the swing looking springy rather than bent at an awkward angle.
Add her hair and skirt trailing slightly behind the direction of the swing’s motion, that one small detail does more to suggest movement than anything else in the piece.
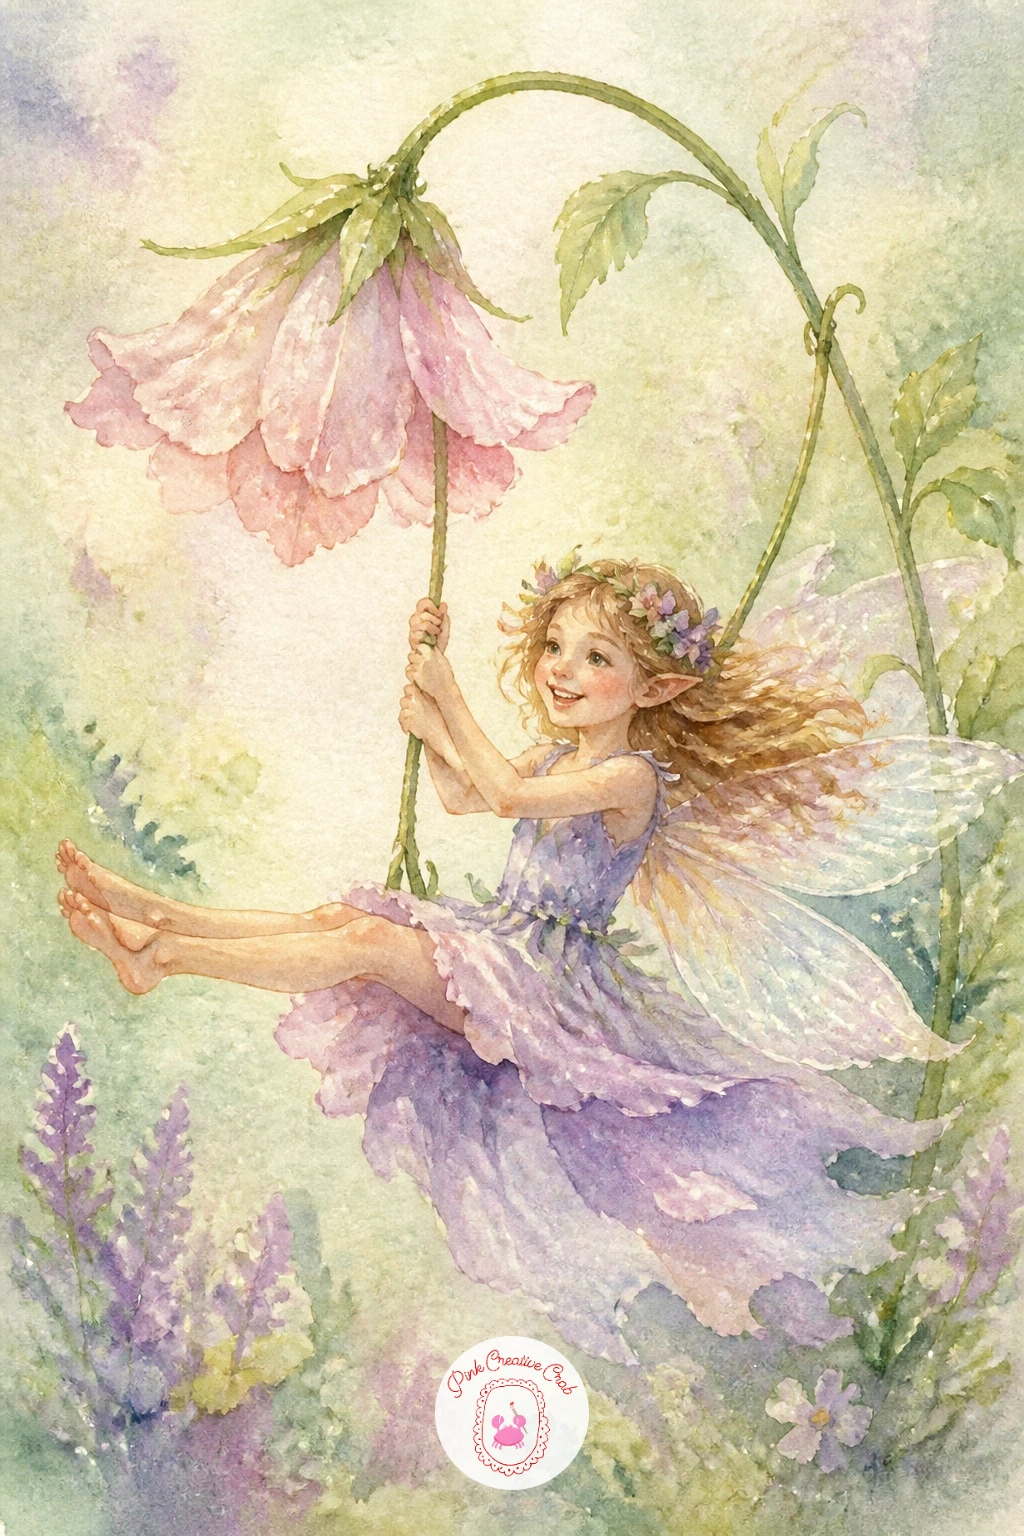
You Will Need
- small round object to trace
Palette: Blush,Lilac,Sap Green,Titanium White
Turn inward for a quieter moment with a fairy leaning over a single large raindrop, studying her own small reflected face within it. Paint the raindrop itself first as a simple teardrop shape, left mostly as untouched white paper with just a thin curved shadow along its lower edge to suggest its rounded surface.
Inside that raindrop, paint a tiny, slightly distorted copy of her face and wings, a touch smaller and softer than the real fairy leaning over it, since a reflection should always feel a shade less solid than the thing it is reflecting.
This is a good subject to return to later and vary: next time, try the same pose reflected in a puddle instead, or a dewdrop on a spider’s web, each surface gives the reflection a slightly different shape and distortion to play with.
If painting a convincing distorted reflection feels daunting, a simple soft-edged silhouette of her colors inside the drop reads just as clearly as a full detailed reflection.
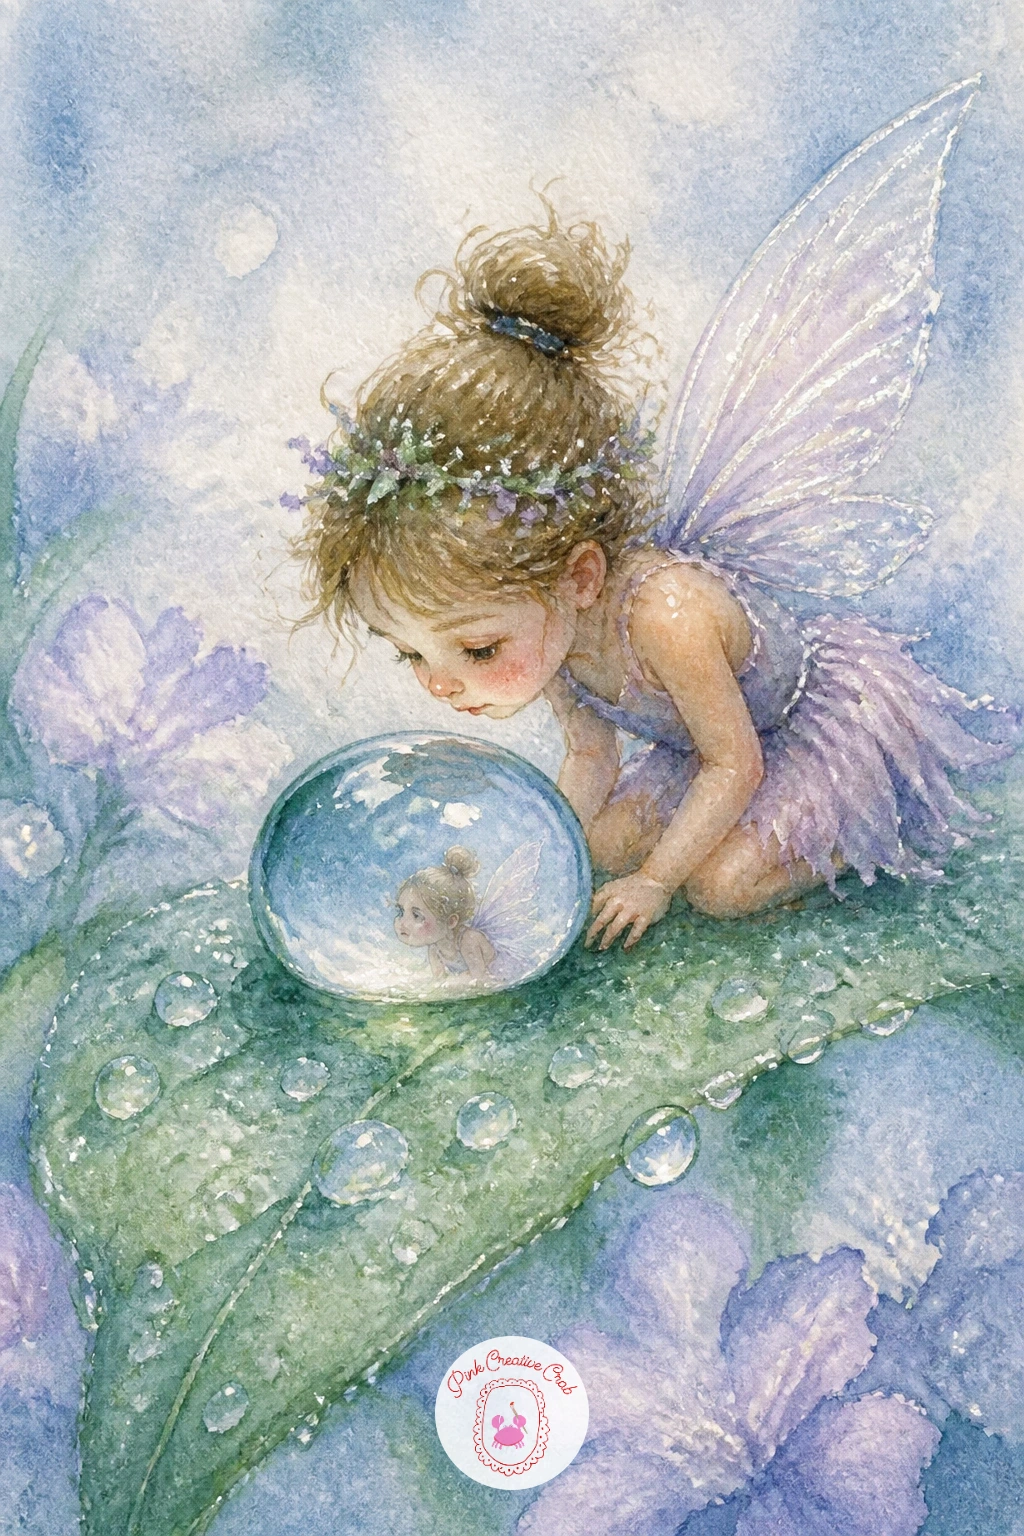
Palette: Titanium White,Blush,Payne’s Grey,Sky Blue
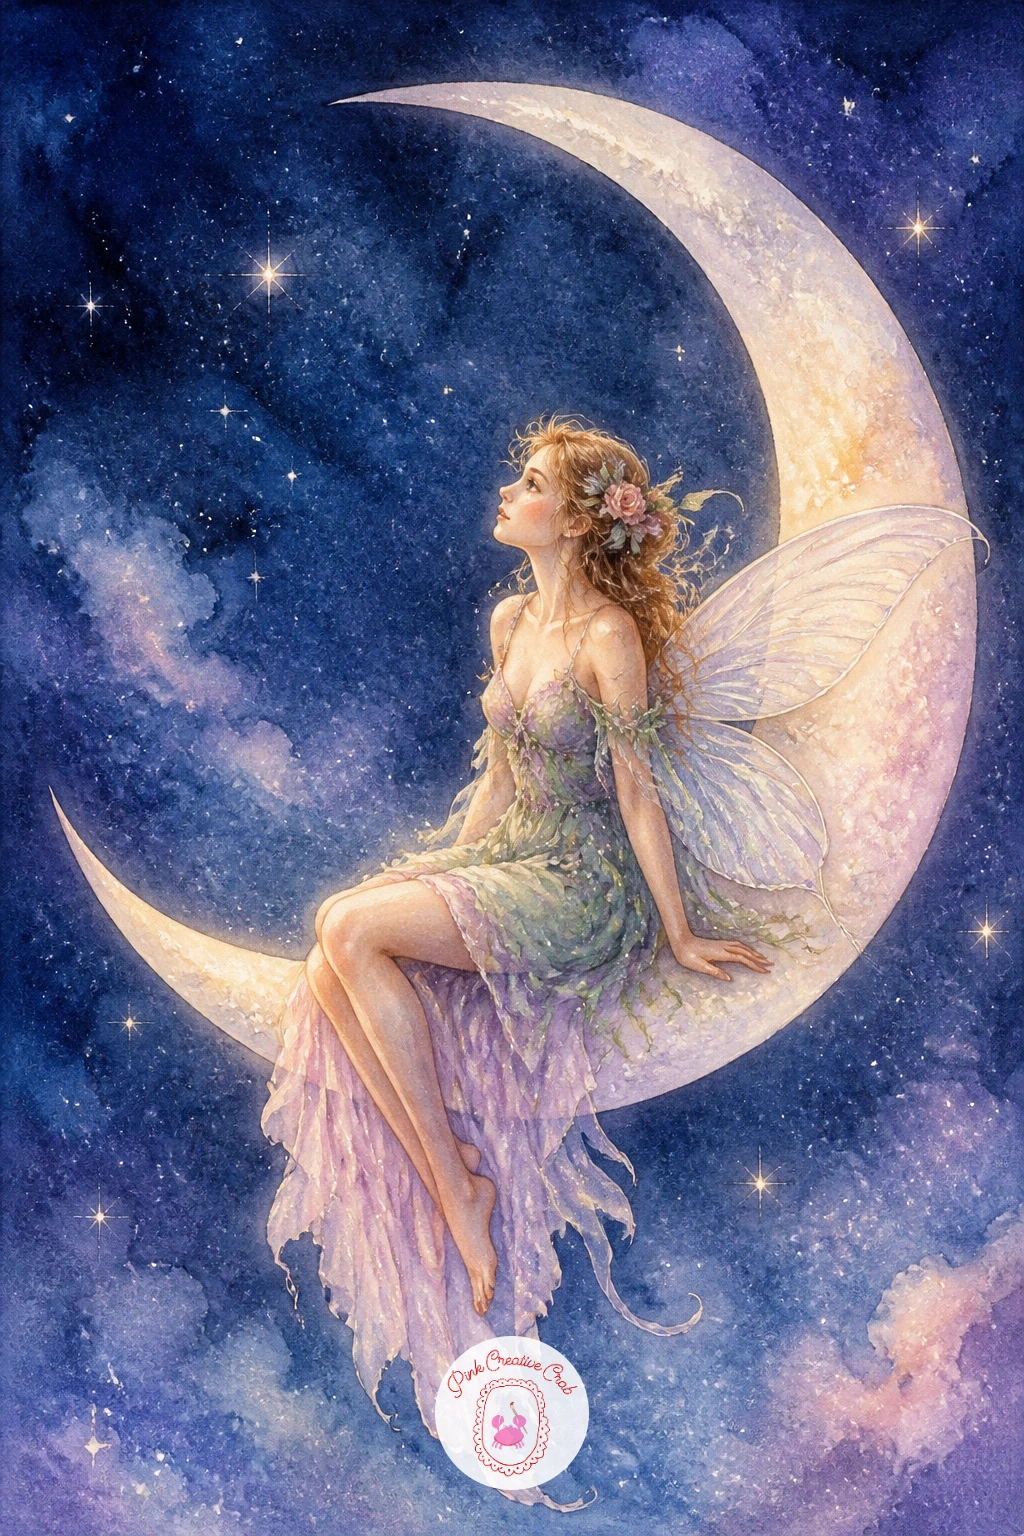
Take the scene up into the night sky with a fairy seated comfortably along the curve of a crescent moon. Paint the night sky background first in a deep wash of indigo fading to near black at the corners, scattering in a few small stars with the tip of a dry brush or a flick of white gouache once the sky wash has dried.
Leave the crescent moon itself as untouched white or the palest cream paper, outlined only with a thin warm shadow along its inner curve to give it roundness, then add the fairy sitting along its lower arc, legs dangling over the edge.
Light direction flips here compared to most of this list: the moon itself becomes the main light source, so add a faint warm glow radiating from it onto the nearest side of the fairy’s face and dress, while the side facing away from the moon stays in cooler shadow.
If deep indigo looks muddy in your mixes, layer a thin wash of ultramarine first and let it dry before glazing a touch of violet over the top for real depth. The night sky lessons in this watercolor skies guide are worth exploring if this kind of deep wash appeals to you.
You Will Need
- white gouache for stars
Palette: Indigo,Violet,Cream,Titanium White
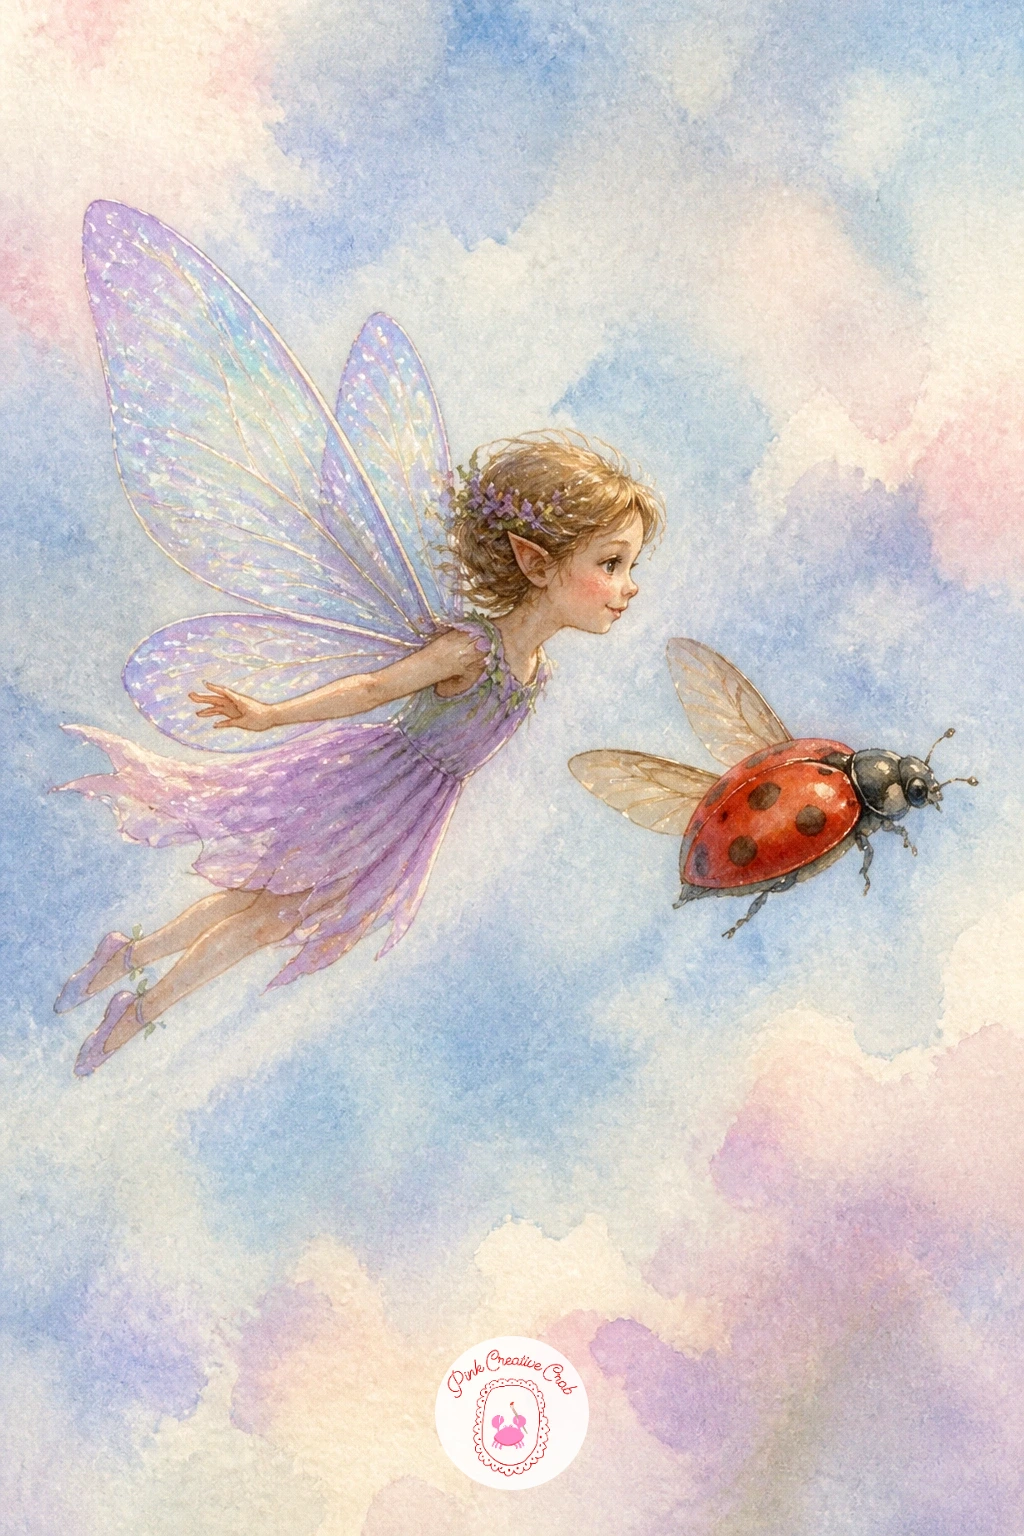
Pair your fairy with another small flying companion, this time a bright red ladybird flying just alongside her rather than carrying her. Paint the ladybird’s rounded shell first in a bold cadmium red, letting it dry fully before adding its black spots and head so the spots stay crisp rather than bleeding into the red.
Place the fairy flying in formation just beside it, her own wing beat angled to match the ladybird’s wing position, since echoing their poses is what makes the pairing feel like two creatures moving together rather than two unrelated figures placed near each other.
The ladybird’s glossy shell benefits from one confident trick: while the red wash is still slightly damp, lift a small curved highlight out with a clean, barely damp brush along its upper curve, that single lifted streak suggests a hard shiny shell far better than painting a highlight on top ever would.
If cadmium red feels too orange in your set, a touch of alizarin crimson mixed in cools it toward a truer ladybird red.
Palette: Cadmium Red,Payne’s Grey,Blush,Titanium White
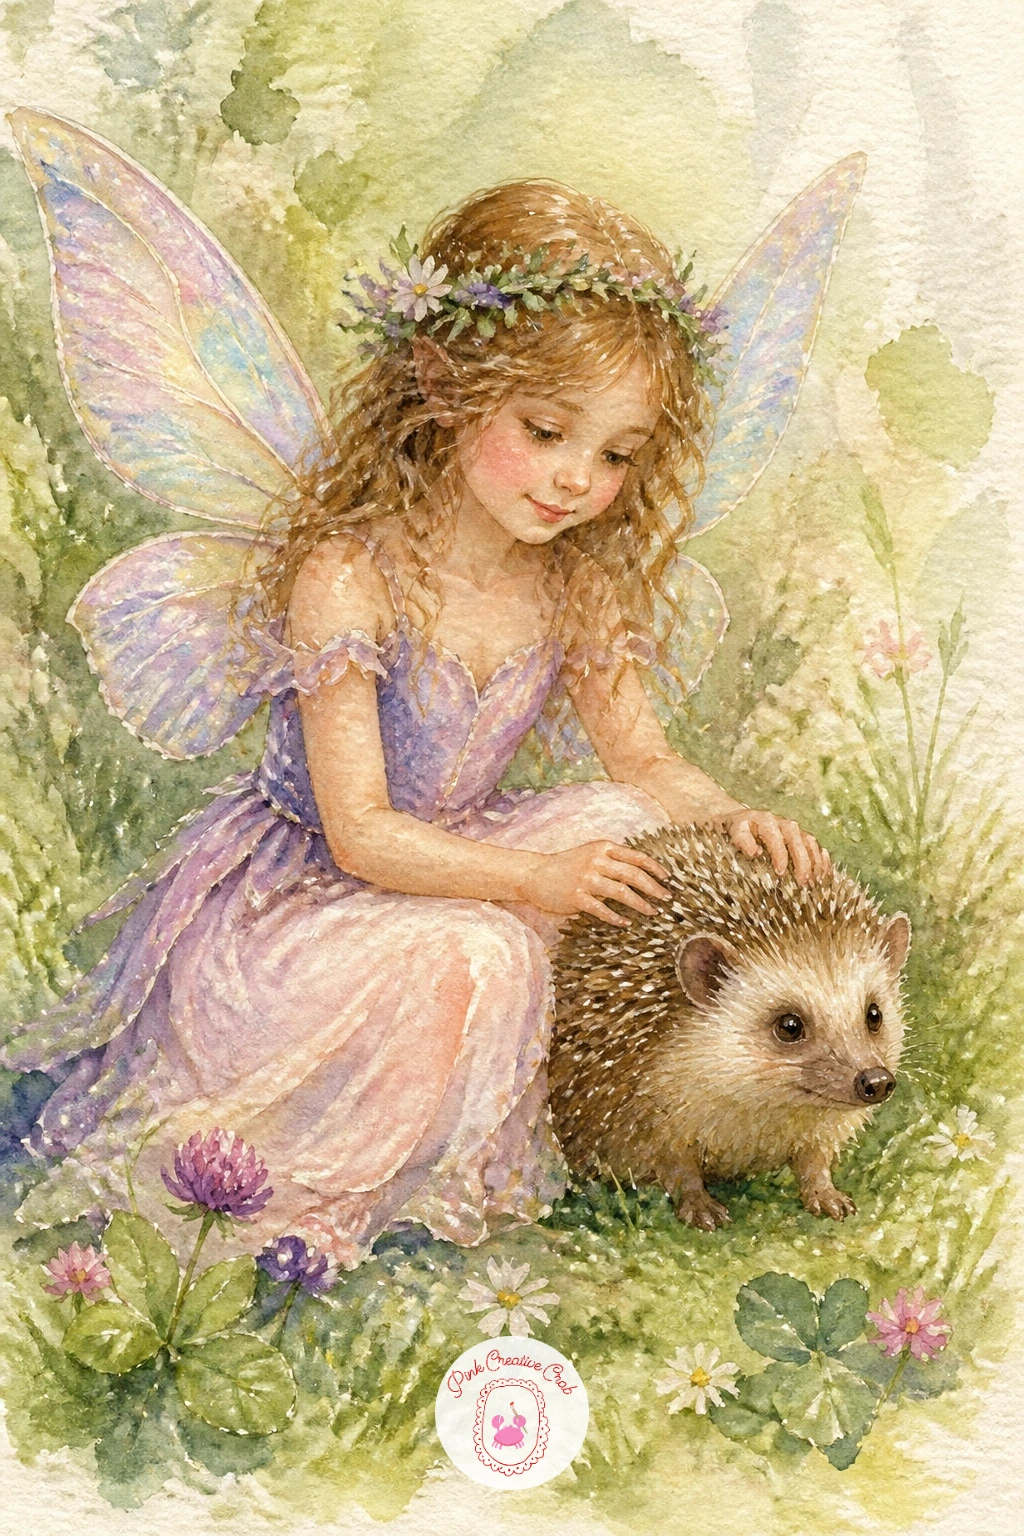
Add warmth with a quiet friendship moment, a fairy sitting beside a small hedgehog, one hand resting gently on its back. Paint the hedgehog’s rounded body first, using short flicked strokes of brown and cream to suggest its spines rather than smooth shading, working from the darker strokes underneath up to lighter ones layered on top once the first pass has dried.
The fairy sits close beside it, knees drawn up, her hand resting lightly on the hedgehog’s back rather than gripping it, a small gesture that reads as trust and affection between the two of them. Keep her expression soft and calm to match the gentle mood of the whole scene.
Spiky texture is the heart of this one: use a slightly dry, flat brush and short quick strokes radiating outward from the hedgehog’s back, varying the pressure so some strokes are thicker and darker than others, which keeps the spines from looking like a uniform pattern.
If flicking individual spine strokes feels slow, a fan brush dragged lightly across the still-damp base coat gives a similar textured effect in far less time.
You Will Need
- fan brush (optional)
Palette: Raw Umber,Cream,Blush,Sap Green
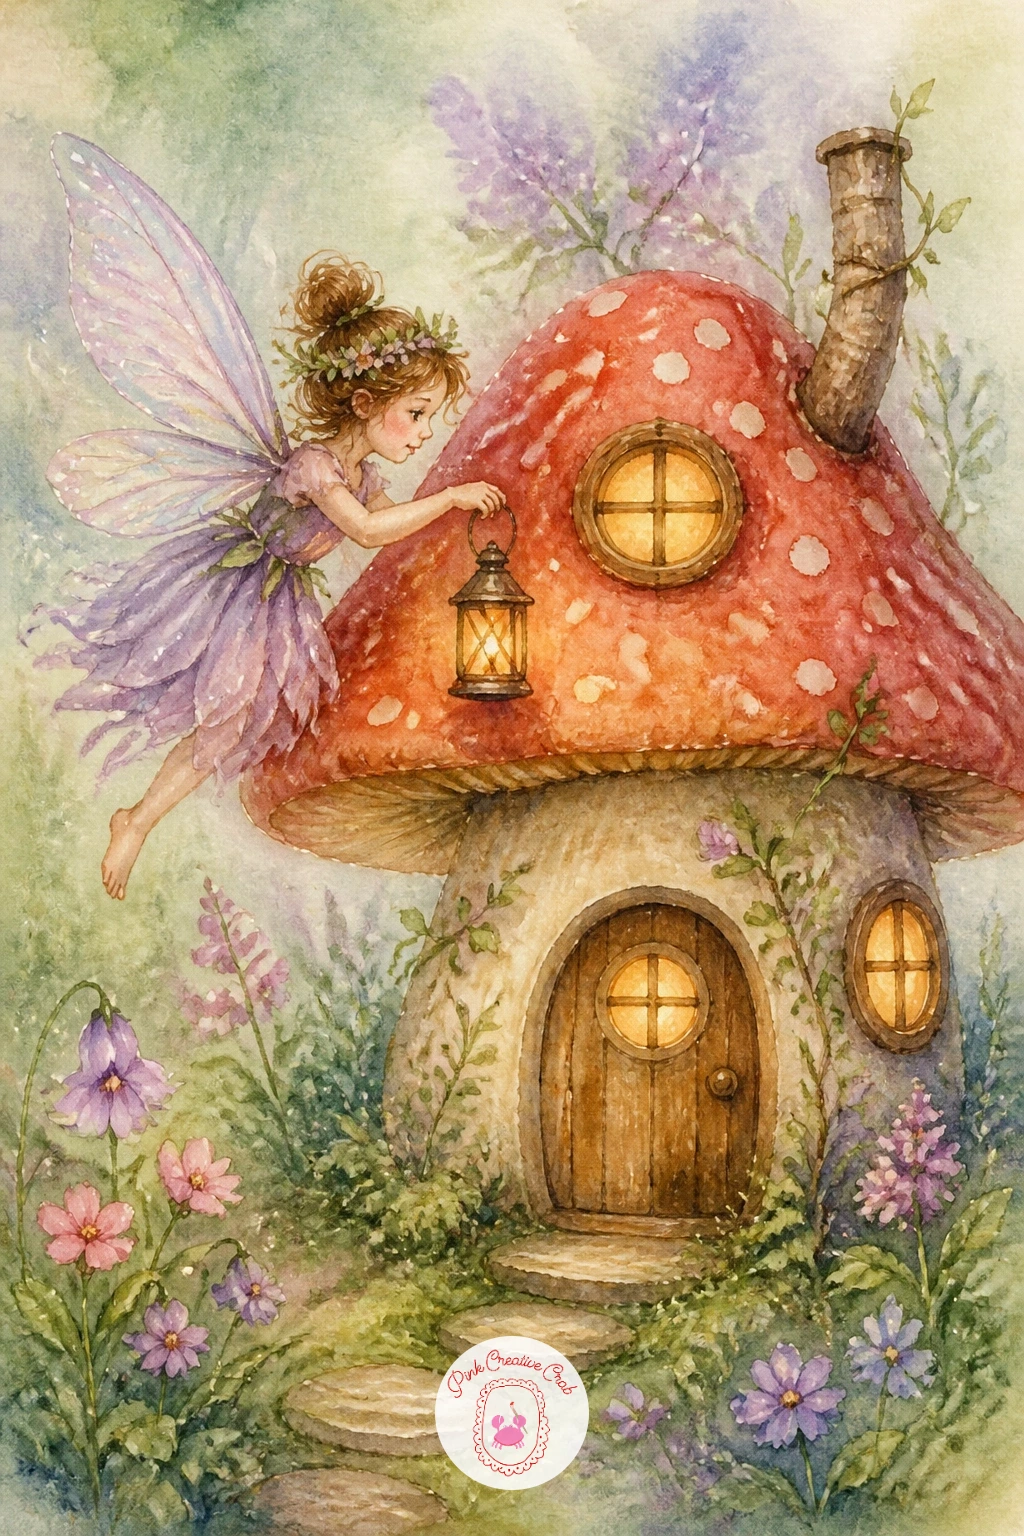
Bring back the mushroom theme with more detail this time, a fairy busy decorating a whole mushroom house with tiny lanterns and vines. Paint the mushroom house shape first, a dome cap over a thick stem fitted with small round windows, in the same spotted red and white style as an earlier idea but built up with more architectural detail this time, a little door, a chimney made from a twig.
Once that structure is dry, add the fairy mid-task, perhaps hanging a small lantern from the eaves or trailing a vine of tiny flowers along the doorway, tools or materials in hand to show she is actively working rather than just posing beside the house.
This idea rewards variation: next time, try the same house decorated for a different season, berries and pine for winter, fresh blossoms for spring, keeping the house structure itself consistent so you build a small set of the same home through the year.
If full architectural detail feels like a lot for one sitting, limit yourself to the cap, stem, one window and one string of tiny lanterns, that alone tells the story clearly.
Palette: Cadmium Red,Titanium White,Naples Yellow,Sap Green
Close the set on the water again with a fairy drifting along a stream aboard a curled leaf shaped like a tiny boat. Paint the water first as a loose horizontal wash in blue green, dragging the brush in gentle wavering strokes rather than a flat even band, so the surface already feels like it is moving before the boat goes in.
Once that dries, add the leaf boat sitting low in the water with a slight tilt to one side, as real small boats always ride a touch unevenly, then place the fairy standing or sitting within it, perhaps holding a small twig as a makeshift oar.
A faint trailing wake behind the leaf, just a few soft curved lines fading out toward the back of the composition, finishes the sense of forward movement across the water without needing to paint any extra detail into the boat itself.
If blue green water looks too uniform, drop in a slightly darker shadow color along one side while the wash is still wet, letting the two colors merge loosely, that single variation is often all a calm stream needs to feel like real water rather than a flat tint.
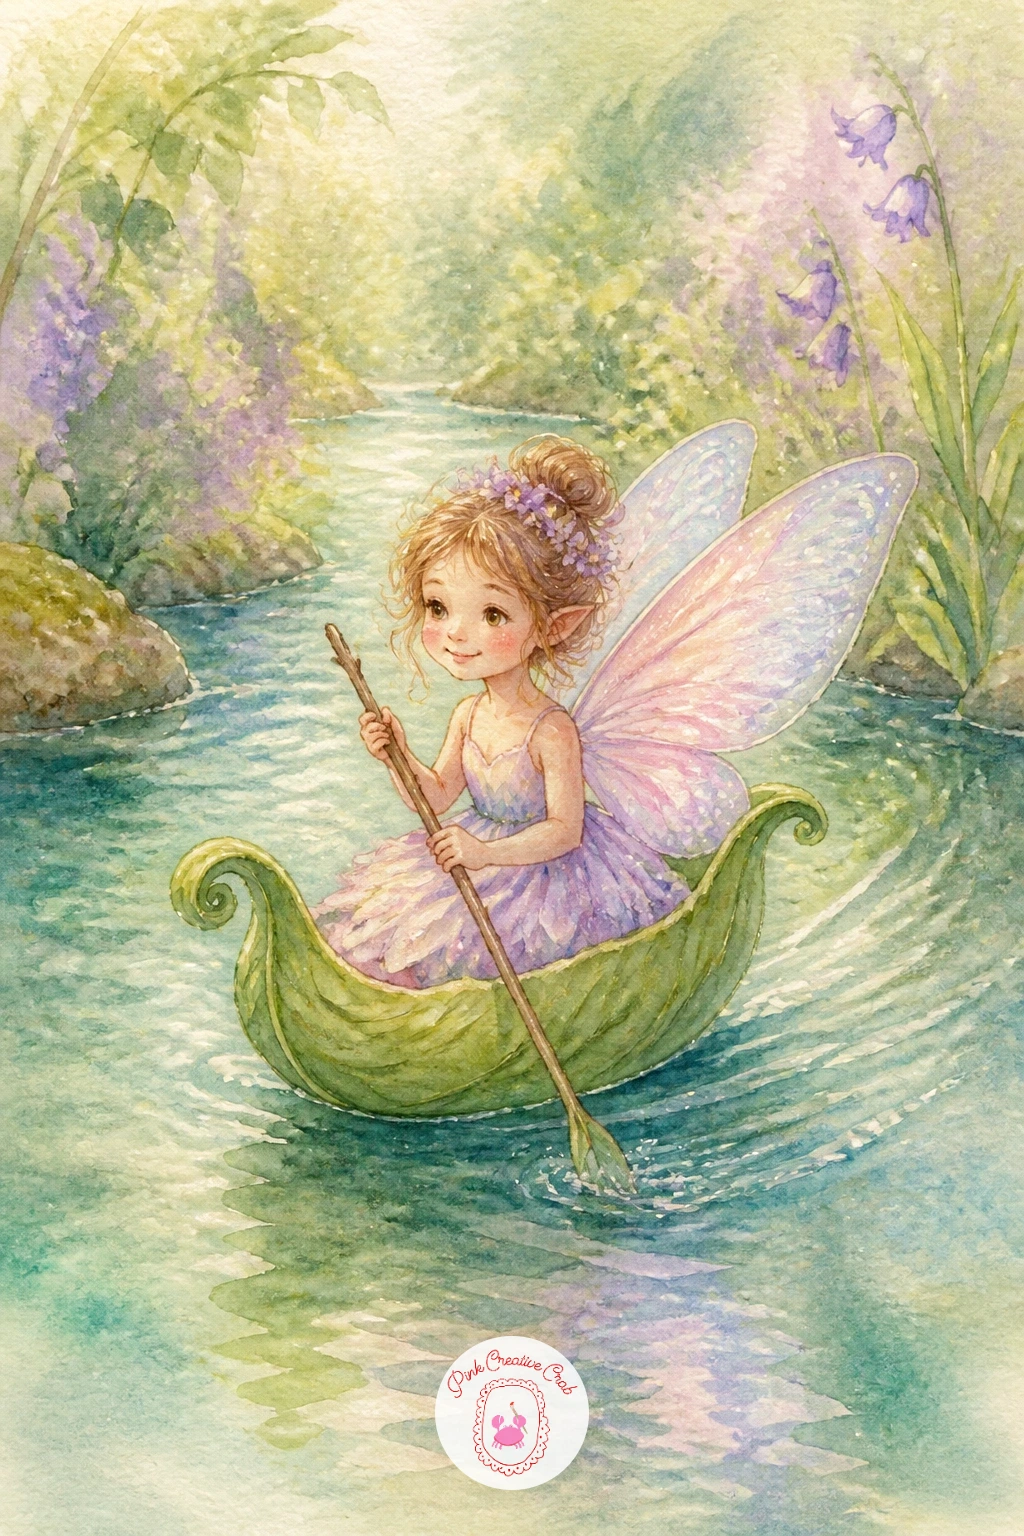
Palette: Teal,Sap Green,Blush,Payne’s Grey
What to Do Next
Pick whichever fairy caught your eye first, sharpen a pencil, and start with a loose sketch on a scrap of paper before committing to your good watercolor sheet. One small enchanted moment, finished today, is plenty.
Frequently Asked Questions
What paper works best for fairy watercolor?
Cold press watercolor paper around 140 lb works best, since it holds enough texture for soft wing glazes while still letting fine detail sit cleanly on top without the paper buckling or pilling.
How do you paint iridescent fairy wings?
Paint wings in the thinnest possible wash first, almost clear, then glaze a second pass of color only along the edges and add a few streaks of white gouache or a pearlescent medium once dry for the shimmer.
What palette gives that enchanted storybook look?
A soft mix of pastel green, lilac and blush with warm golden highlights gives that enchanted feel, since keeping the whole piece in related soft tones lets any glowing light or detail stand out clearly.
How do you keep a fairy’s face simple at a small scale?
Keep features to a few small dots and curves, since at this tiny scale a soft closed smile and two dot eyes read as a full expression without needing detailed shading or precise proportion work.
Can beginners paint fairy watercolor scenes convincingly?
Yes, beginners can manage these easily by starting with the simplest sleeping or sitting poses, since a small still fairy needs far less anatomy confidence than a complex flying or dancing pose.
Have any thoughts?
Share your reaction or leave a quick response — we’d love to hear what you think!
-
 0
-
0
-
0
-
0
-
0
-
0


