

Table of Contents
- Before You Start
- French Bakery Shopfront
- Window Full of Cakes
- Counter With Bread and Cat
- Baker Pulling Loaves From the Oven
- Bicycle With Bread Basket
- Croissant Basket on the Counter
- Pastry Shop Door and Bell
- Stack of Macarons in a Box
- Tiered Cake Stand
- Chalkboard Menu Sign
- Pain au Chocolat Close-Up
- Bakery Alley With Hanging Sign
- Frequently Asked Questions
A good bakery drawing always smells like something, even on paper. There is the striped awning catching the morning light, the fogged up window stacked with cakes, the little bell over the door you can almost hear. I love drawing these scenes because every shopfront lets you invent a new mood: sleepy and golden at dawn, or busy with a cat weaving between bread baskets.
Below you get twelve complete scenes, each one built from loose perspective lines up to inked detail and warm marker color. Pick the one that matches how much time you have today, sharpen your fineliner, and let’s fill some pages with cozy little shops.
Using these images: free for personal projects such as printing, coloring, cards, journals and gifts. Handmade items that include them may be sold up to 30 pieces per design. More than that is commercial use and is not permitted, and neither is selling or sharing the images themselves or passing them off as your own. Please ask before any other use.
Before You Start
- Start every scene with very light pencil guidelines, since perspective mistakes are much easier to fix before the fineliner goes down.
- Use a ruler for the main shopfront lines but draw window grids and shelf edges freehand, so the final ink keeps a warm, slightly wobbly charm.
- Test your alcohol markers on scrap paper first, since cream, pink and warm brown can bleed differently depending on the paper weight.
- Let each marker layer dry fully for a minute or two before adding a second layer on top, or the colors will drag and streak.
- Keep a small swatch of your palette on the side of the page as you work, so every scene stays inside the same cream, pink and brown family.
- Save your darkest brown marker for the very last stage, since adding shadows too early can make the whole drawing look muddy.
French Bakery Shopfront
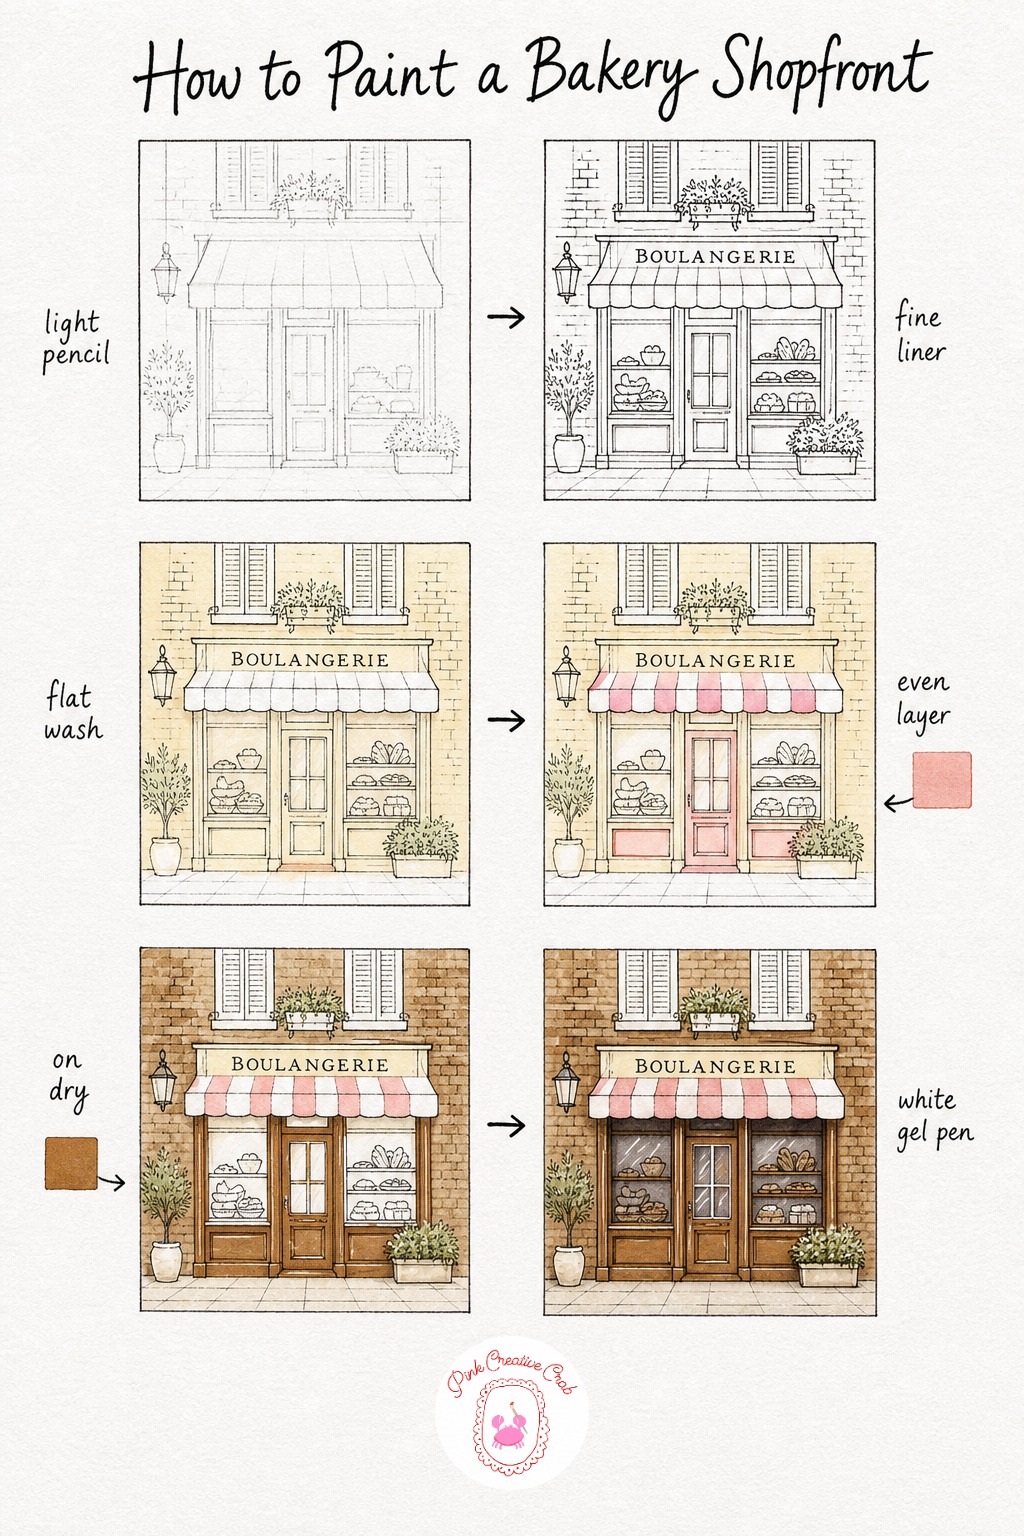
Begin this bakery drawing with the loosest pencil lines you can manage: a rectangle for the shop, a vanishing point somewhere off to the side so the window and door recede naturally. Keep it light, since you will ink over the final shapes and erase the rest once it dries.
Trace the shopfront in fineliner, letting the awning stripes curve slightly with the fabric and the brick lines stay a little uneven. Once the ink is dry, lay a thin cream wash across the whole wall and sky so nothing stays stark white, then let that dry fully before touching it again.
Pink goes into alternating awning stripes and the door trim, warm brown fills the bricks and window frames on top of the dry cream. If you only own one brown, mix in a touch of your pink marker along the mortar lines for variety.
Finish with a dark brown shadow tucked under the awning and down the doorway, then a few dots of white gel pen for the glass shine. Keep that shadow soft rather than sharp, since it is what makes the awning feel like it is really casting shade.
Window Full of Cakes
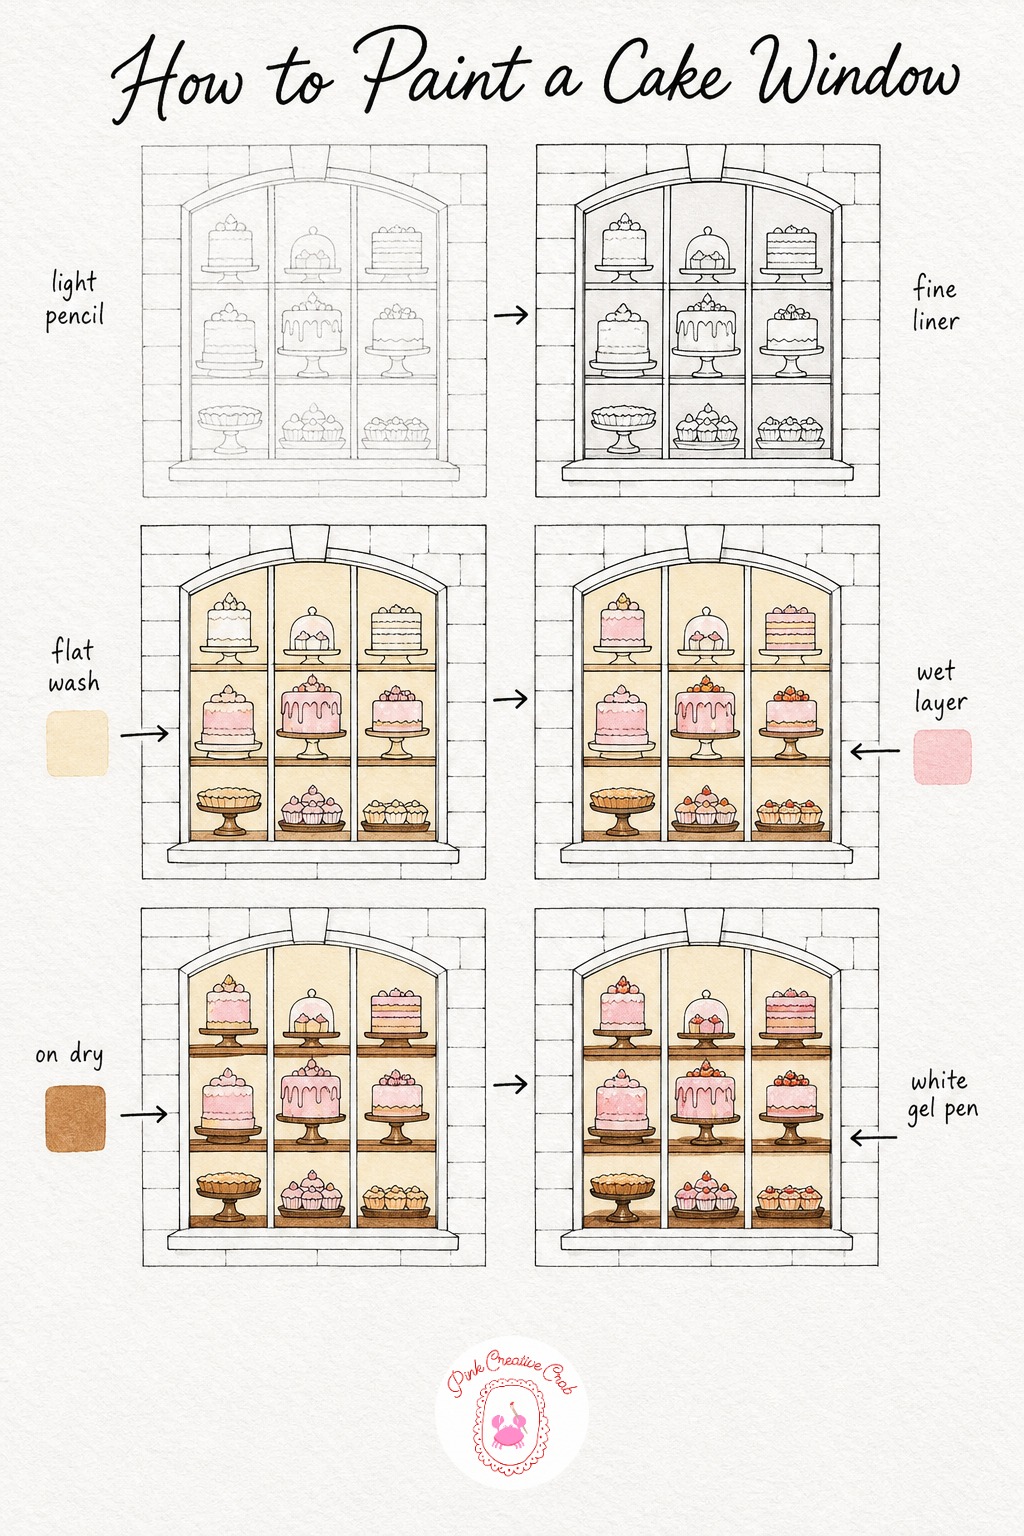
Sketch a simple window frame in light pencil, then two or three shelves inside holding rounded cake shapes of different sizes. Beginners often crowd the shelf, so leave a little breathing room between each cake so the ink lines don’t merge.
Ink the window grid first, then the shelf edges, then each cake outline, working from back to front so nothing gets lost. Let the cream wash settle into the glass and background before adding any pink, checking it is fully matte before the next layer.
Pink builds up the frosting on the main cakes while warm brown handles the wooden shelves and any tart crusts peeking through. If your pink marker looks too loud, go over it once with your blending marker to soften the tone before it dries completely.
Add dark brown shadow beneath every cake stand to ground them on the shelf, then a scatter of white gel pen dots for sugar shine. This window pairs nicely with other dessert scenes if you enjoy drawing sweets, so take a look at these food doodles for more small ideas.
Counter With Bread and Cat
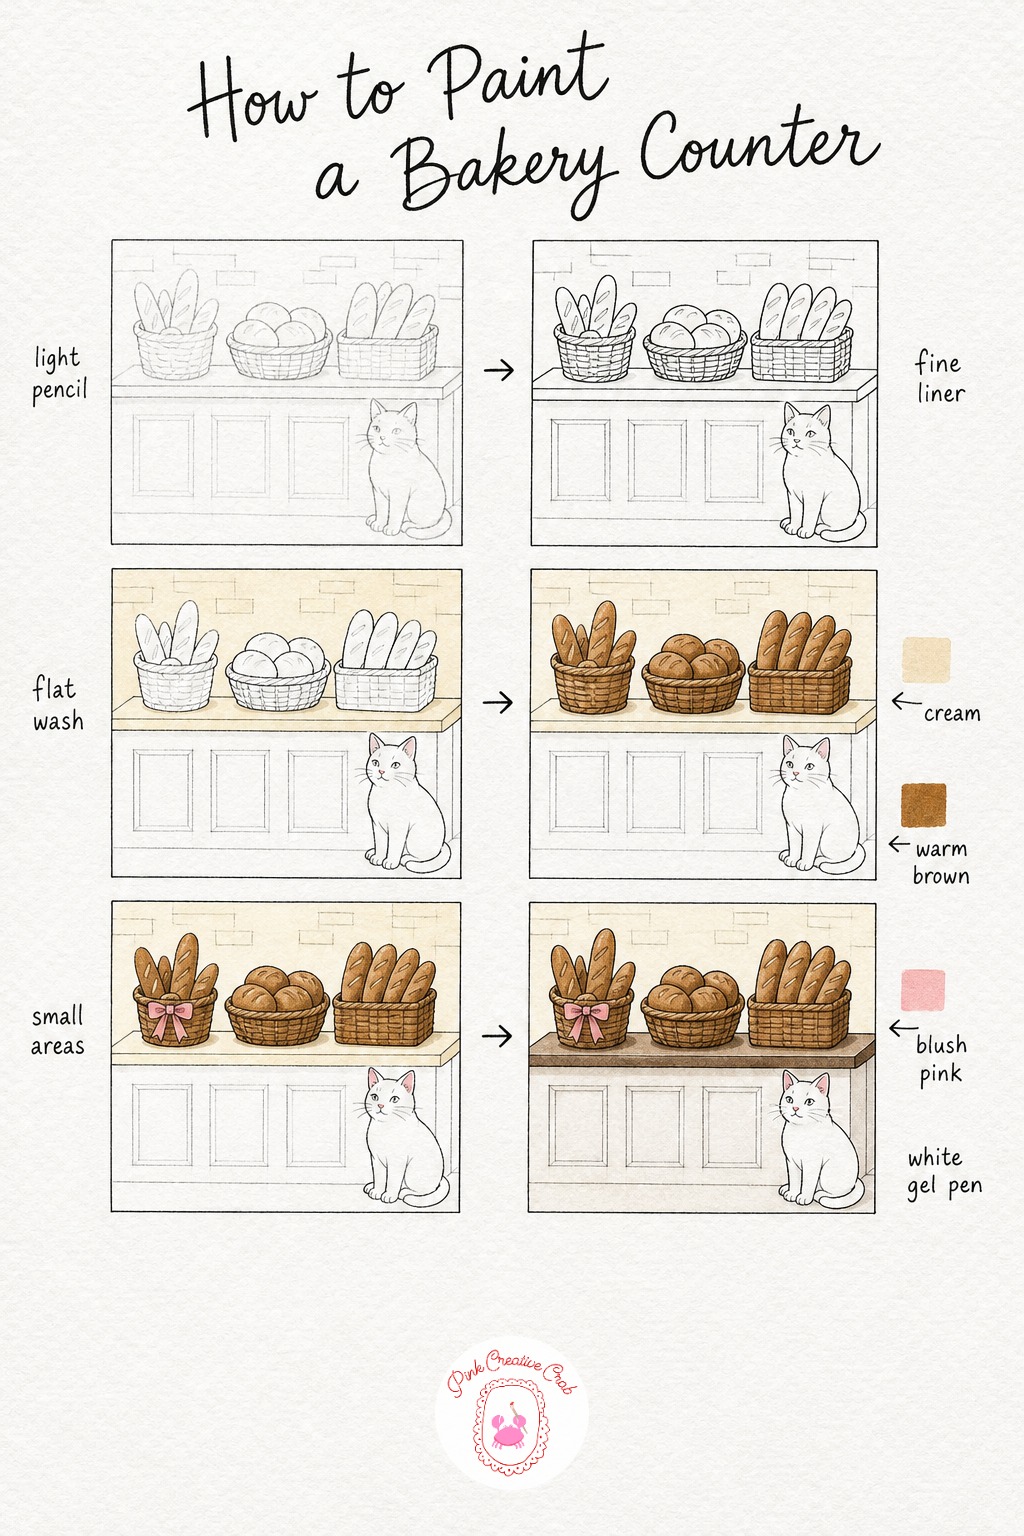
Draw a simple counter line in pencil, then rounded basket shapes sitting on top with a small cat curled or sitting beside them. Keep the cat’s proportions soft and rounded rather than anatomically precise, since a slightly chunky cat reads as cozier here.
Ink the counter edge first, then each basket’s weave lines, then the cat’s outline and whiskers last so they stay crisp. Wash the counter top and wall in cream and let it dry completely, since any dampness will make the brown bleed oddly into it later.
Warm brown fills every loaf and the basket weave, working in small circular strokes rather than one flat layer for texture. Pink stays reserved for tiny details only, the cat’s ears and nose, maybe a ribbon tied on one basket handle.
Shadow the counter edge and under each basket in dark brown so everything feels like it is resting on a real surface. Finish with white gel pen whiskers and a highlight along the cat’s back for a little shine.
Baker Pulling Loaves From the Oven
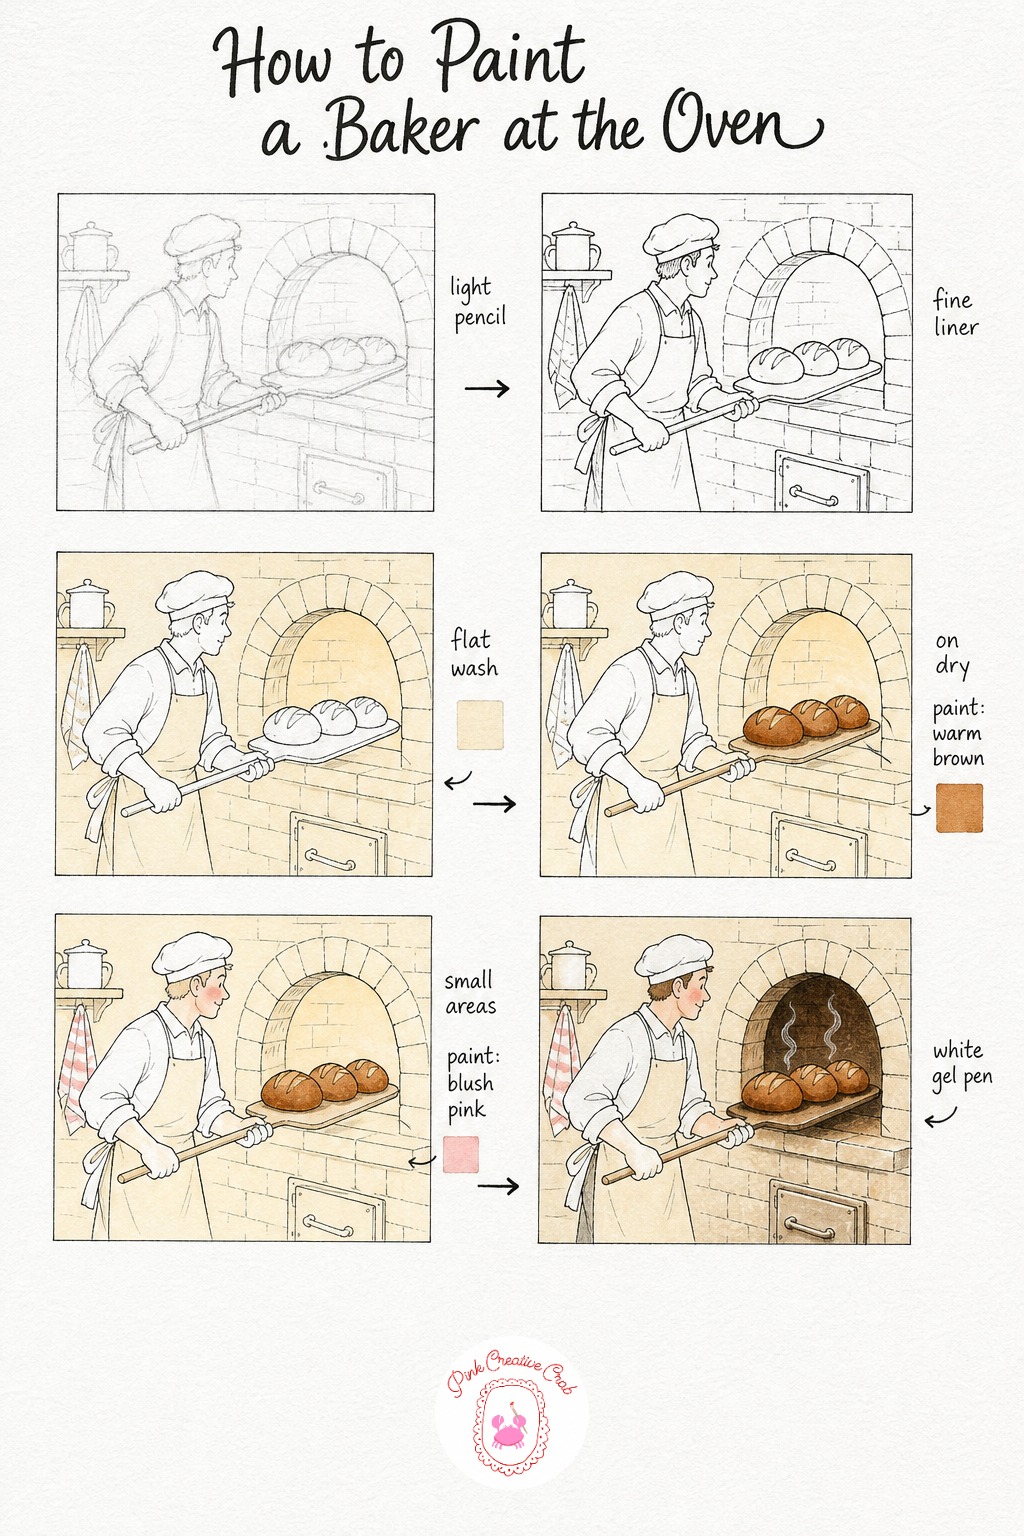
This one has more moving parts, so sketch the baker’s pose first: one arm extended holding a long wooden peel, the oven arch low in the frame. Keep the figure simple, a rounded hat, an apron, no need for detailed hands.
Ink the apron folds, the oven arch and the row of loaves on the peel, letting the loaf shapes overlap slightly for a natural stack. Wash the apron and the oven interior in cream, leaving a touch more white near the oven mouth to suggest heat and light.
Each loaf gets warm brown on top of the dry cream, varying the pressure so some loaves look darker and more baked than others. A little pink warms the baker’s cheeks from the oven heat and can shade a folded cloth hanging on a nearby hook.
Finish with dark brown deep inside the oven arch for real depth, plus soft shadow beneath the loaves on the peel. White gel pen adds a few curling steam lines rising off the bread, which brings the whole scene to life.
Bicycle With Bread Basket
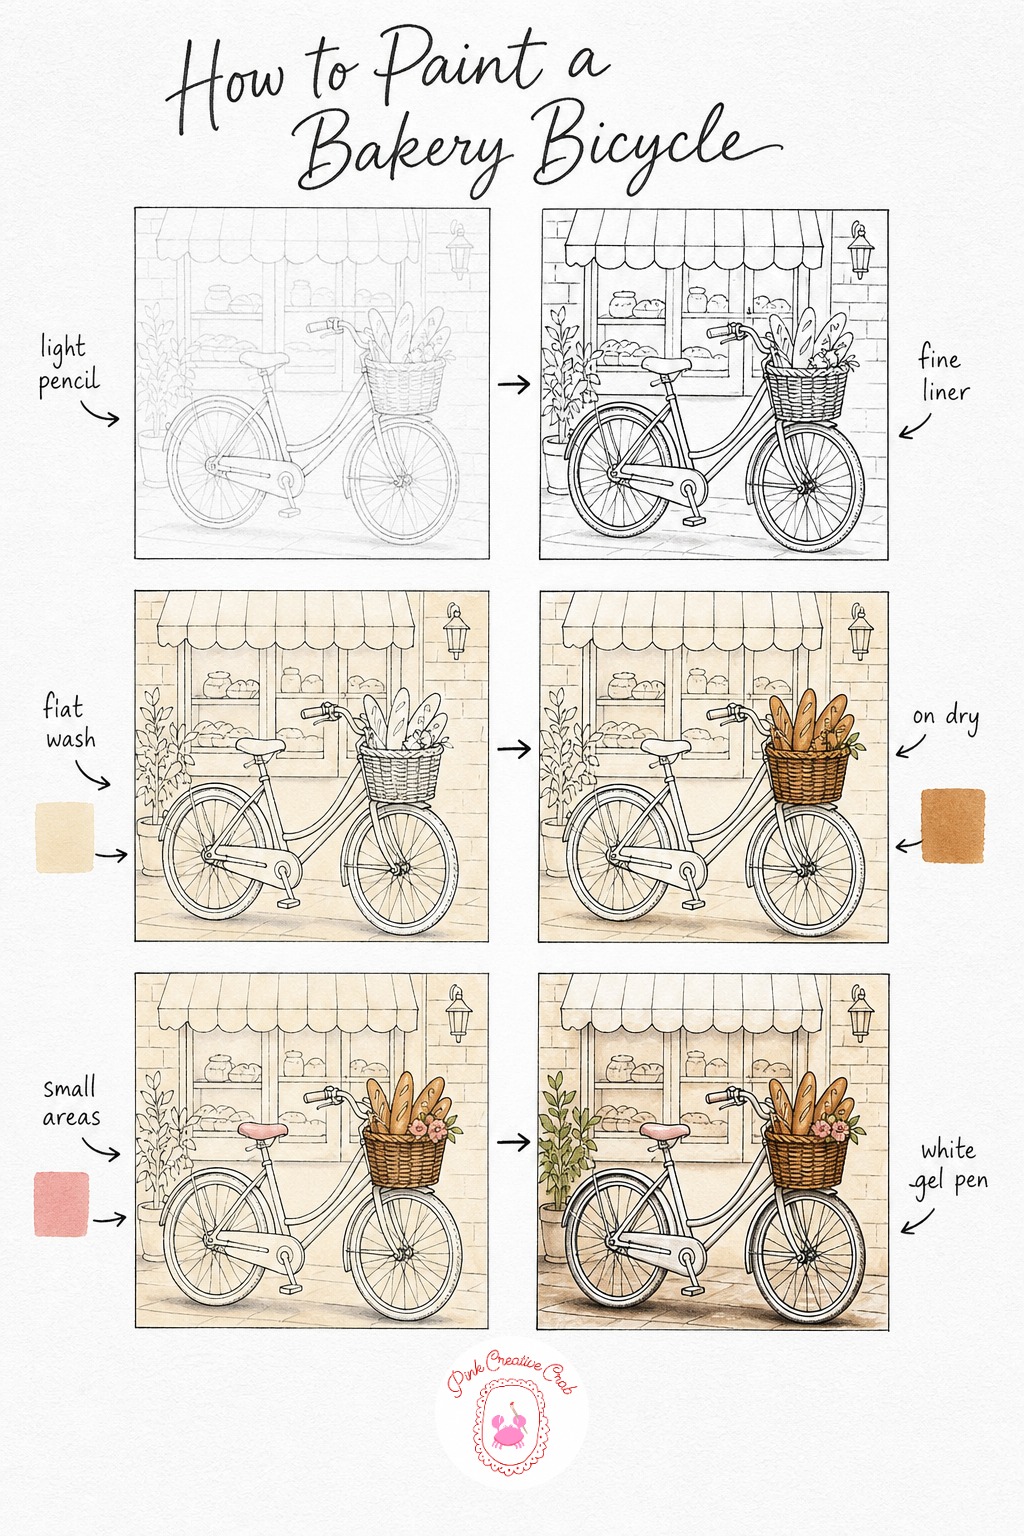
Sketch the bicycle in light pencil using two circles for the wheels and simple straight lines for the frame, then a rounded basket up front. Beginners often make the wheels uneven, so a small coin or lid traced lightly can keep both circles matching.
Ink the frame, spokes and basket weave, letting the baguettes poke out at slightly different angles for a natural, just-bought look. Once dry, wash the ground shadow and any background wall in cream so the bicycle has somewhere to sit.
Warm brown fills the basket weave and every baguette, using short strokes along the bread to suggest its ridged crust. A touch of pink can shade a small flower tucked in the basket or warm up the leather seat.
Shadow beneath both wheels and the basket in dark brown grounds the whole bicycle on the pavement. White gel pen catches the spokes and handlebar for a bit of metallic shine, finishing the scene nicely. If you enjoy drawing small everyday scenes like this, the village scene drawing ideas make a lovely companion set.
Croissant Basket on the Counter
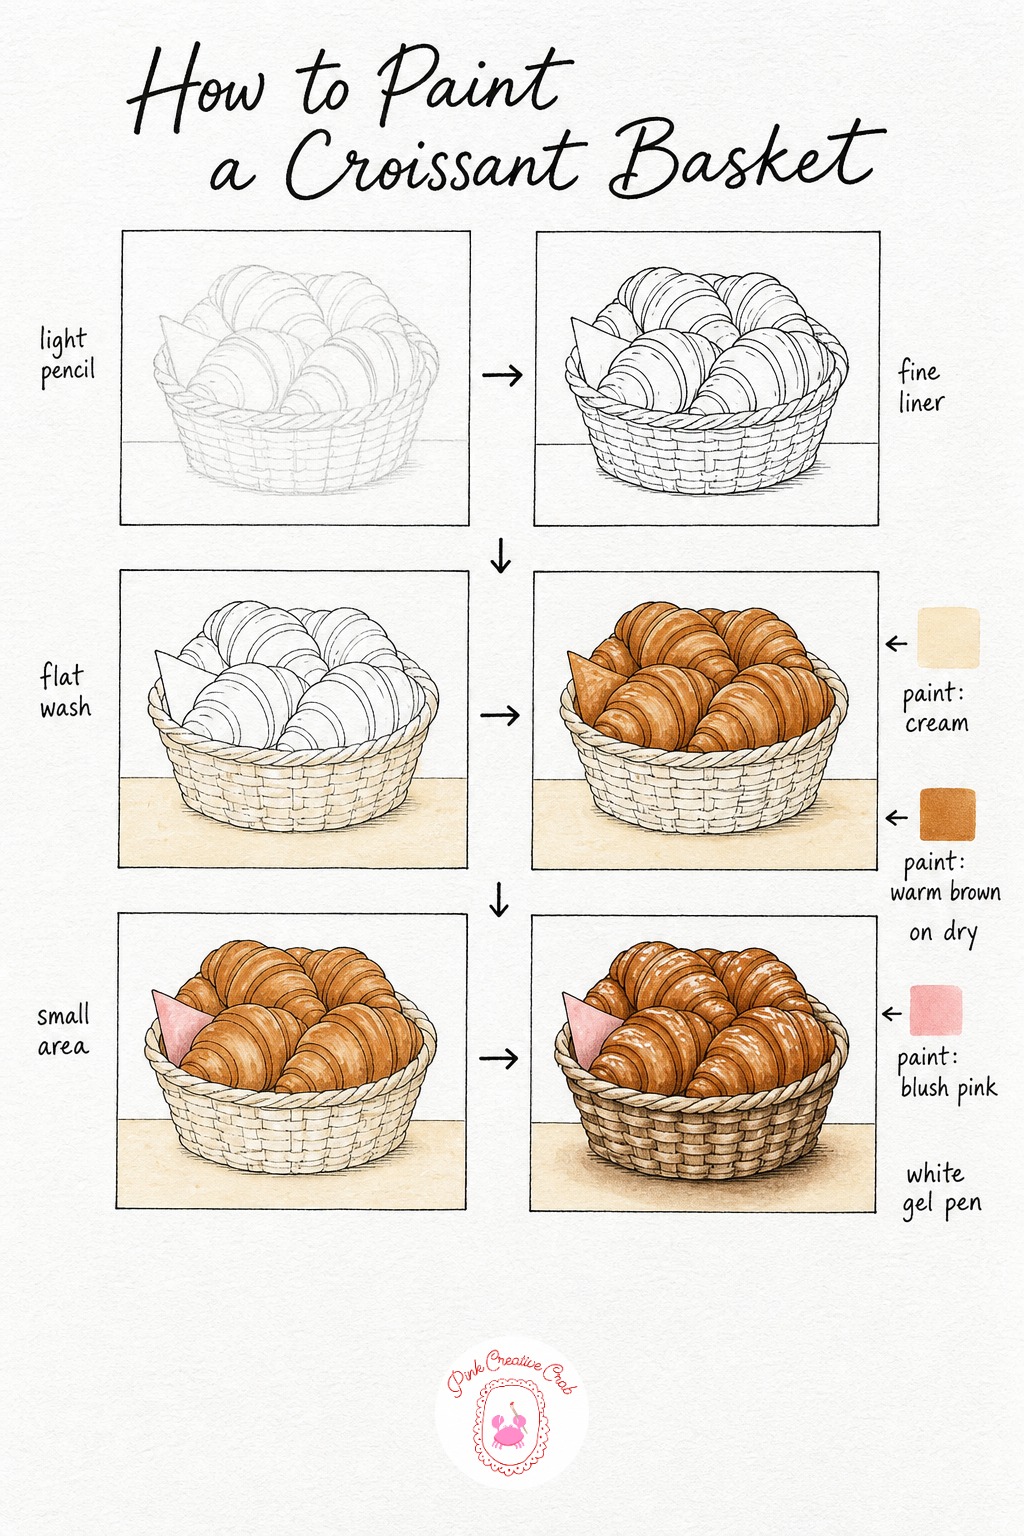
Draw the basket first as a simple curved bowl shape in pencil, then pile in crescent croissant shapes of varying sizes leaning against each other. Keep the pile a little uneven, since perfectly even croissants look stiff and less appetizing on paper.
Ink the basket weave in small overlapping strokes, then each croissant’s curve and the little ridges along its top. Let the ink dry fully, since any smudge here will blur the delicate crescent lines you worked hard on.
Wash the counter and basket interior in cream, then layer warm brown over every croissant once that first wash is dry. Varying your brown pressure gives some croissants a darker, more baked look near the tips, which reads as realistic texture.
A folded paper wrapper beside the basket takes a little pink for warmth. Finish with dark brown tucked into the basket weave and beneath the whole pile, then white gel pen flicked lightly along the croissant ridges for that flaky shine.
Pastry Shop Door and Bell
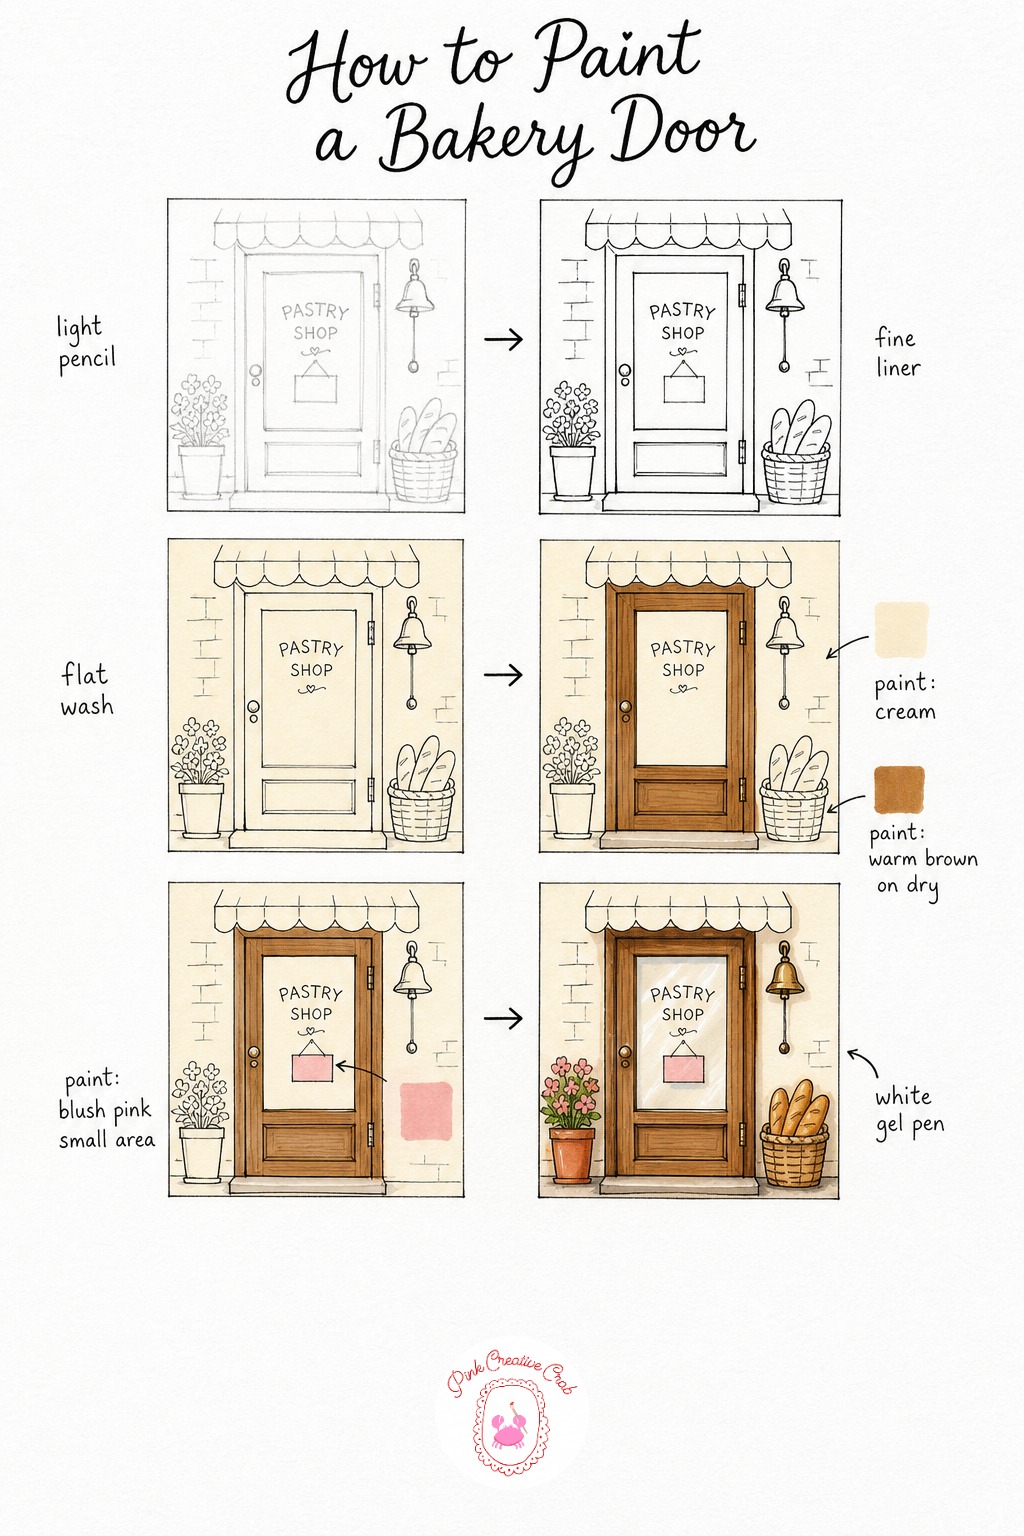
Sketch a tall rectangular door in pencil with a glass panel set into the upper half, then a small bell hanging just above the frame on a short cord. Keep the door’s perspective straight by using a ruler for the frame edges only.
Ink the frame, the glass panel lines and the bell with its little clapper, keeping the cord thin and slightly curved. Once dry, wash the glass panel and any wall visible around the door in cream, letting it dry before the next layer.
Warm brown fills the wooden panels and frame, using slightly darker strokes near the hinges and base for natural wear. A small paper sign taped inside the glass can take a touch of pink to suggest handwritten lettering without drawing actual words.
Shadow the frame edges and hinge areas in dark brown, then dot white gel pen along the glass for a believable shine. This small scene pairs beautifully with a full shopfront if you want to draw the door as its own close-up study.
Stack of Macarons in a Box
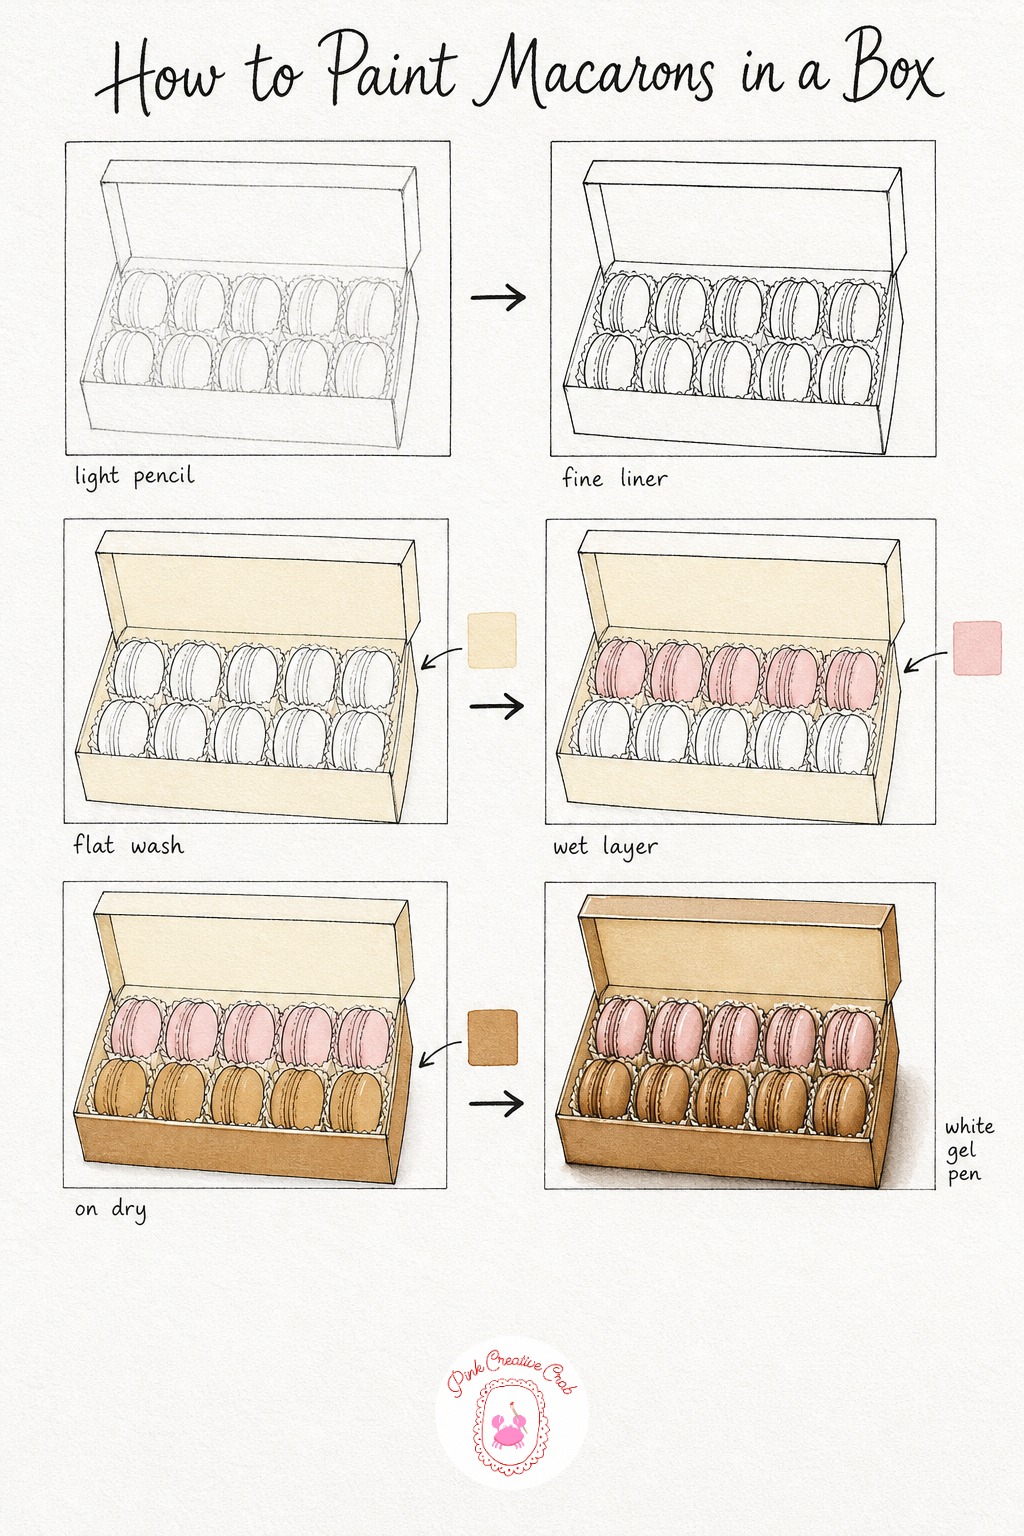
Sketch an open box shape in pencil, then arrange small circles in neat rows inside it for the macarons, leaving the thin filling line visible on each one’s edge. Keep the circles slightly uneven in size, since perfectly matched rows look more like clip art than a drawing.
Ink the box first, then each macaron shell with its characteristic ruffled foot at the base, then the thin filling line through the middle. Wash the box interior and any paper liners in cream and let it dry completely before adding color to the shells.
Pink fills most of the macaron shells for a classic bakery look, while warm brown covers the rest and the box exterior itself. If you want more variety, swap one row to a deeper rose by layering pink twice in the same spot.
Shadow between each macaron and beneath the whole box in dark brown brings real weight to the stack. White gel pen along the filling lines suggests a soft, creamy texture, finishing the box nicely.
Tiered Cake Stand
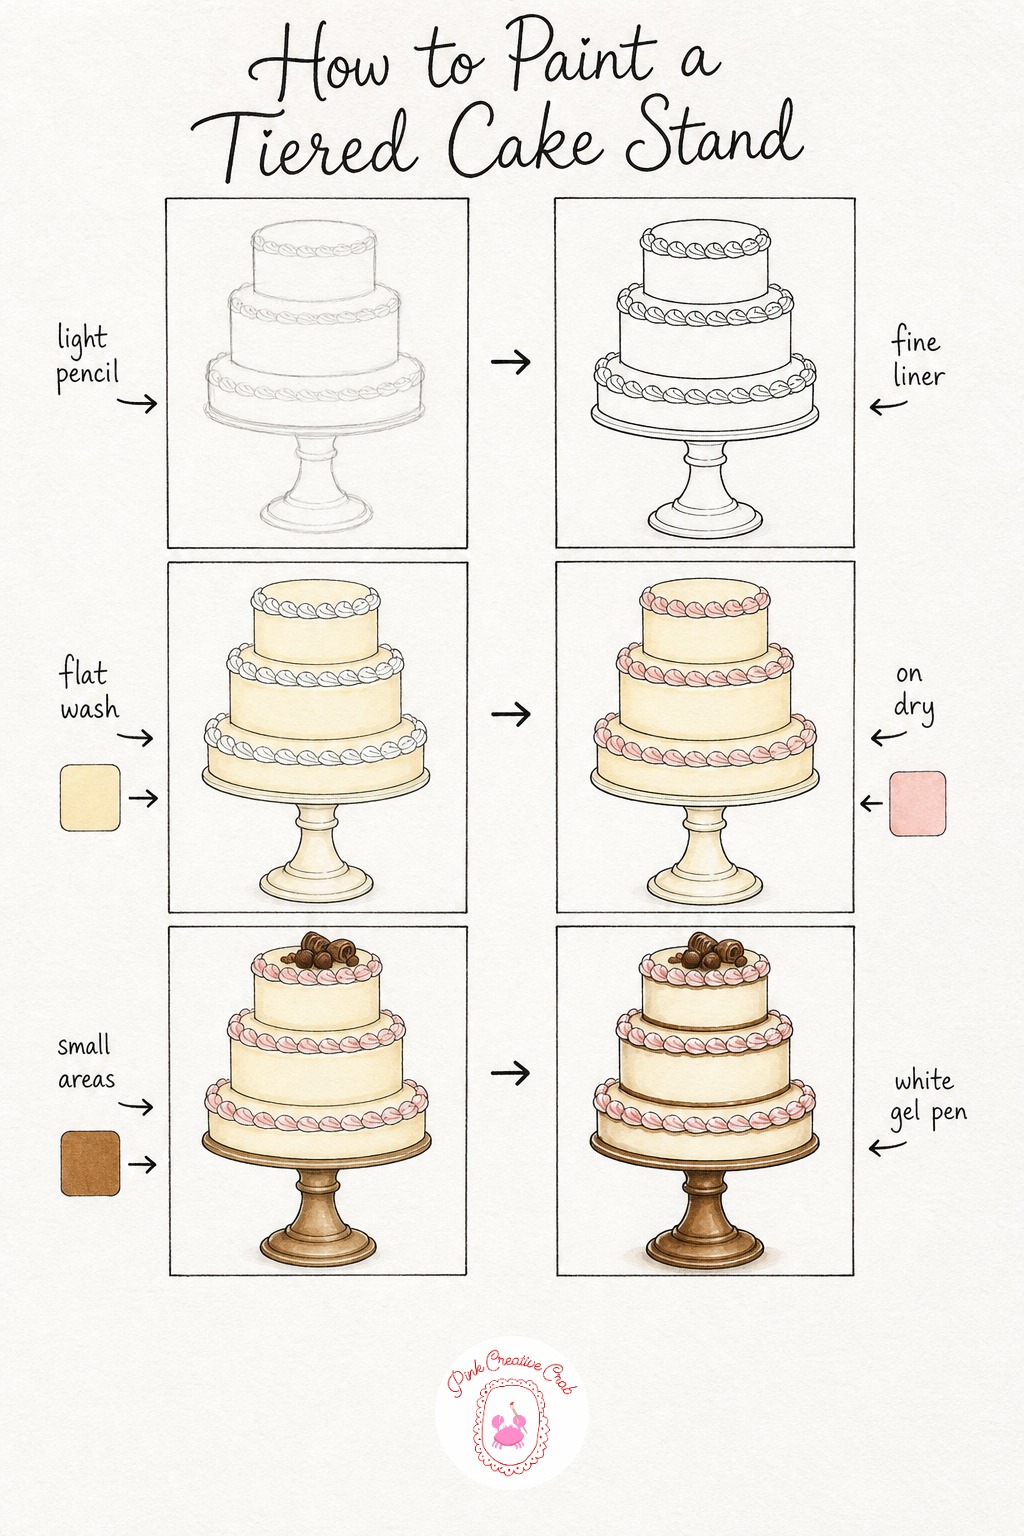
Draw three stacked circles of decreasing size in pencil, connected by a thin pedestal stand, so the whole shape reads as a tiered cake display. Keep the tiers centered over one another so the stand looks balanced once inked.
Ink the stand’s curved pedestal first, then each tier’s edge, then small swirl marks around the top of every layer to suggest piped frosting. Wash the sponge sections and the stand itself in cream, letting the metal parts stay a touch lighter than the cake.
Pink fills the frosting swirls once the cream layer is fully dry, building it up in two light passes rather than one heavy one for a softer look. Warm brown can shade the stand’s base and any small chocolate curls or decorations placed on the top tier.
Shadow beneath each tier where it meets the one below, plus under the whole stand, using dark brown for real depth. White gel pen dabbed along the frosting swirls finishes it with a believable sugary sheen.
Chalkboard Menu Sign
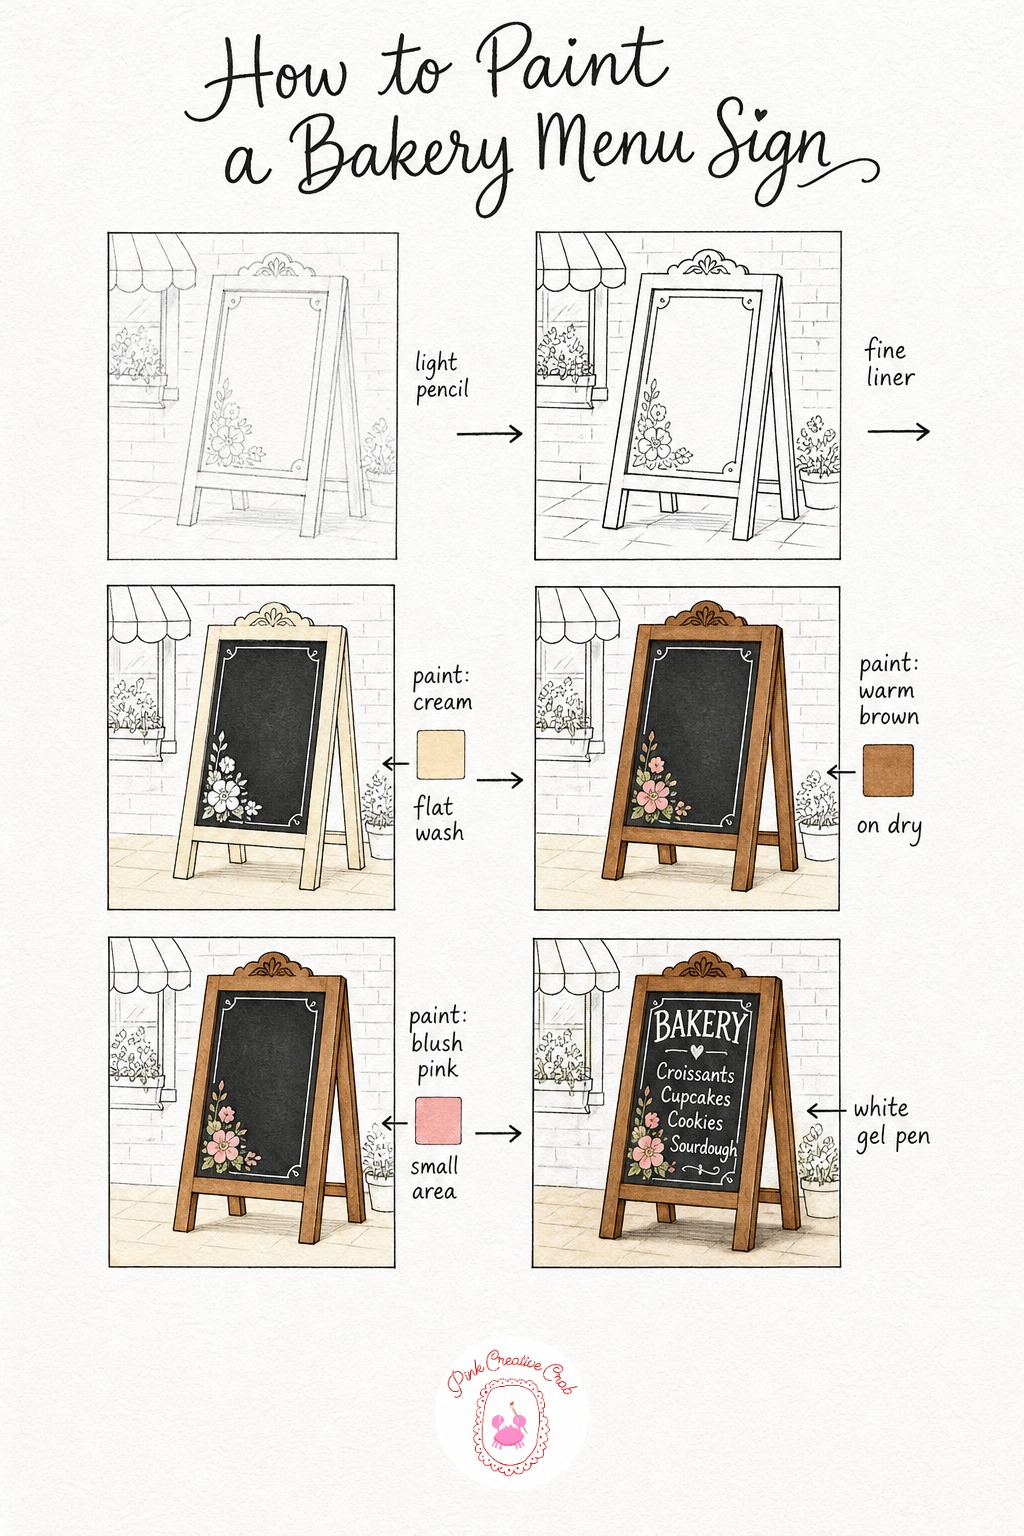
Sketch a simple standing easel shape in pencil, a rectangle board held up by two angled legs, keeping the whole thing slightly tilted for charm. This is a quieter subject, so it works well as a filler page between larger scenes.
Ink the frame and easel legs, then a thin decorative border around the chalkboard itself, maybe a few small drawn flowers in one corner. Once dry, wash the wooden frame and the ground shadow beneath the easel in cream.
Warm brown fills the frame and legs fully once that first layer has dried, and pink can shade any small flower decoration you added in the corner. Leave the chalkboard surface itself bare or very lightly toned, since white gel pen lettering reads best on a dark, flat background.
Shadow along the frame edge and beneath the easel legs in dark brown grounds the whole sign. White gel pen writes a short line or two of pretend menu text, and a wobbly, handwritten feel works far better here than neat lettering.
Pain au Chocolat Close-Up
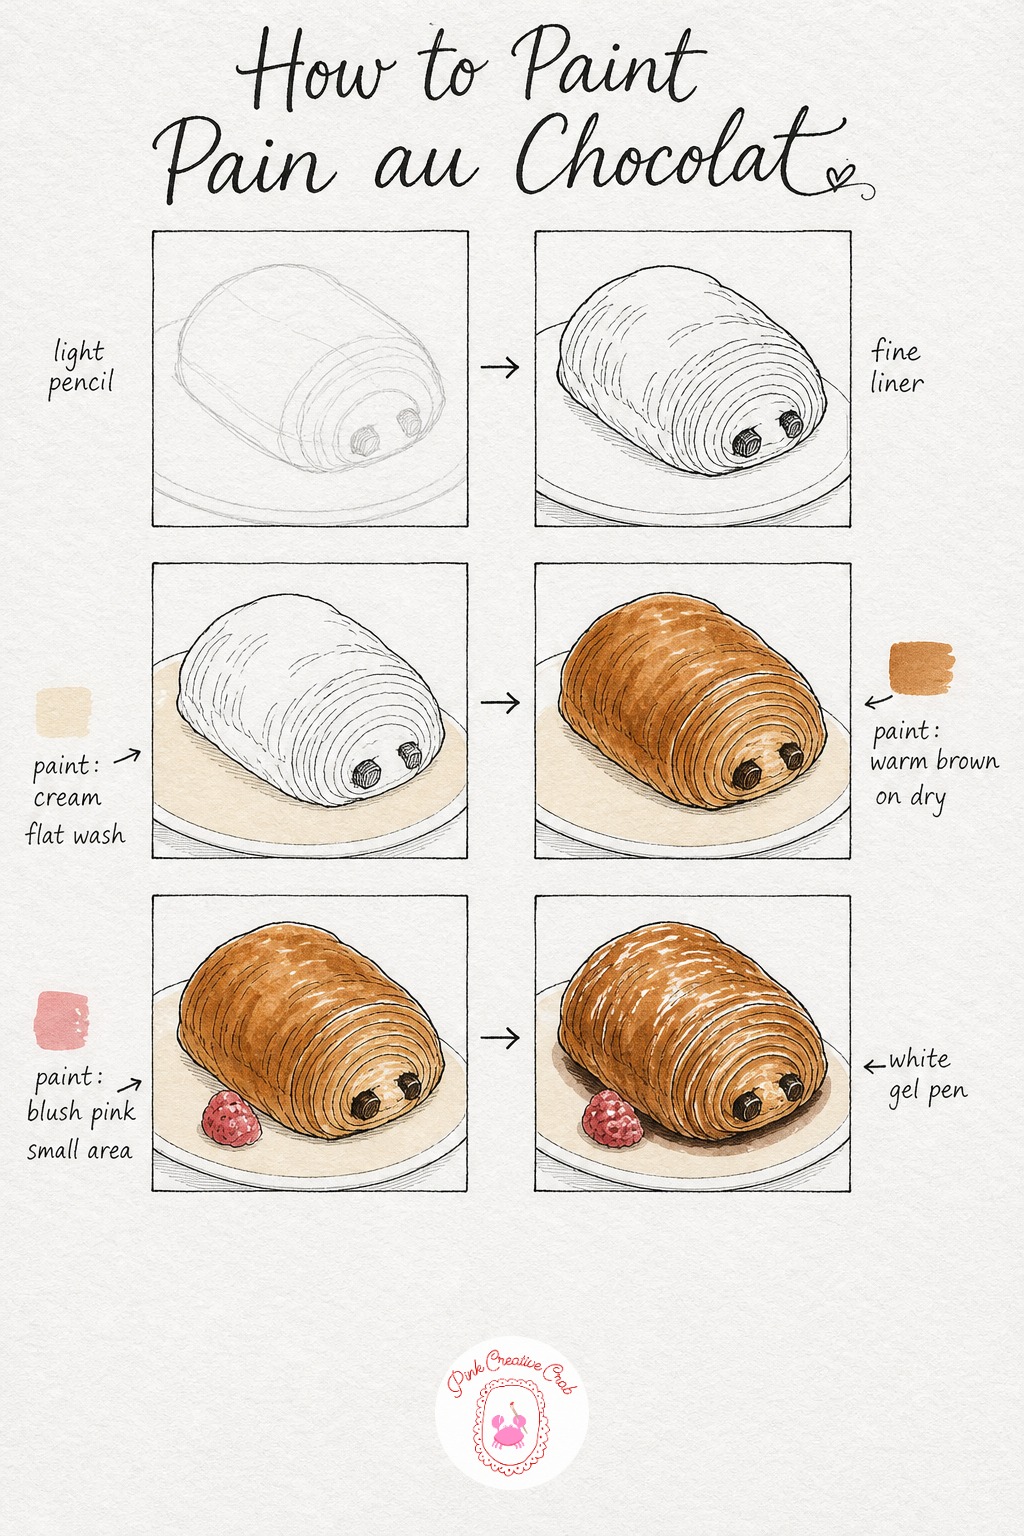
This is a lovely quick subject for a single sitting: sketch one long pastry shape in pencil, slightly curved, sitting on a small plate. Keep the ends rounded rather than pointed, since pain au chocolat has a soft, pillowy shape.
Ink the outline first, then a series of short curved lines along the top to suggest the flaky, torn texture of the crust. Wash the plate beneath it in cream and let that dry fully before touching the pastry itself.
Warm brown covers the whole pastry once the plate wash is dry, building up slightly darker tones near the ends where the dough browns more in the oven. A small berry or dollop of jam beside the pastry takes a touch of pink for color contrast.
Finish with dark brown tucked between the visible pastry layers and beneath it on the plate, then white gel pen flicked along the crust ridges for that flaky shine. Pair this close-up with a food doodles page if you want more small bakery treats to practice.
Bakery Alley With Hanging Sign
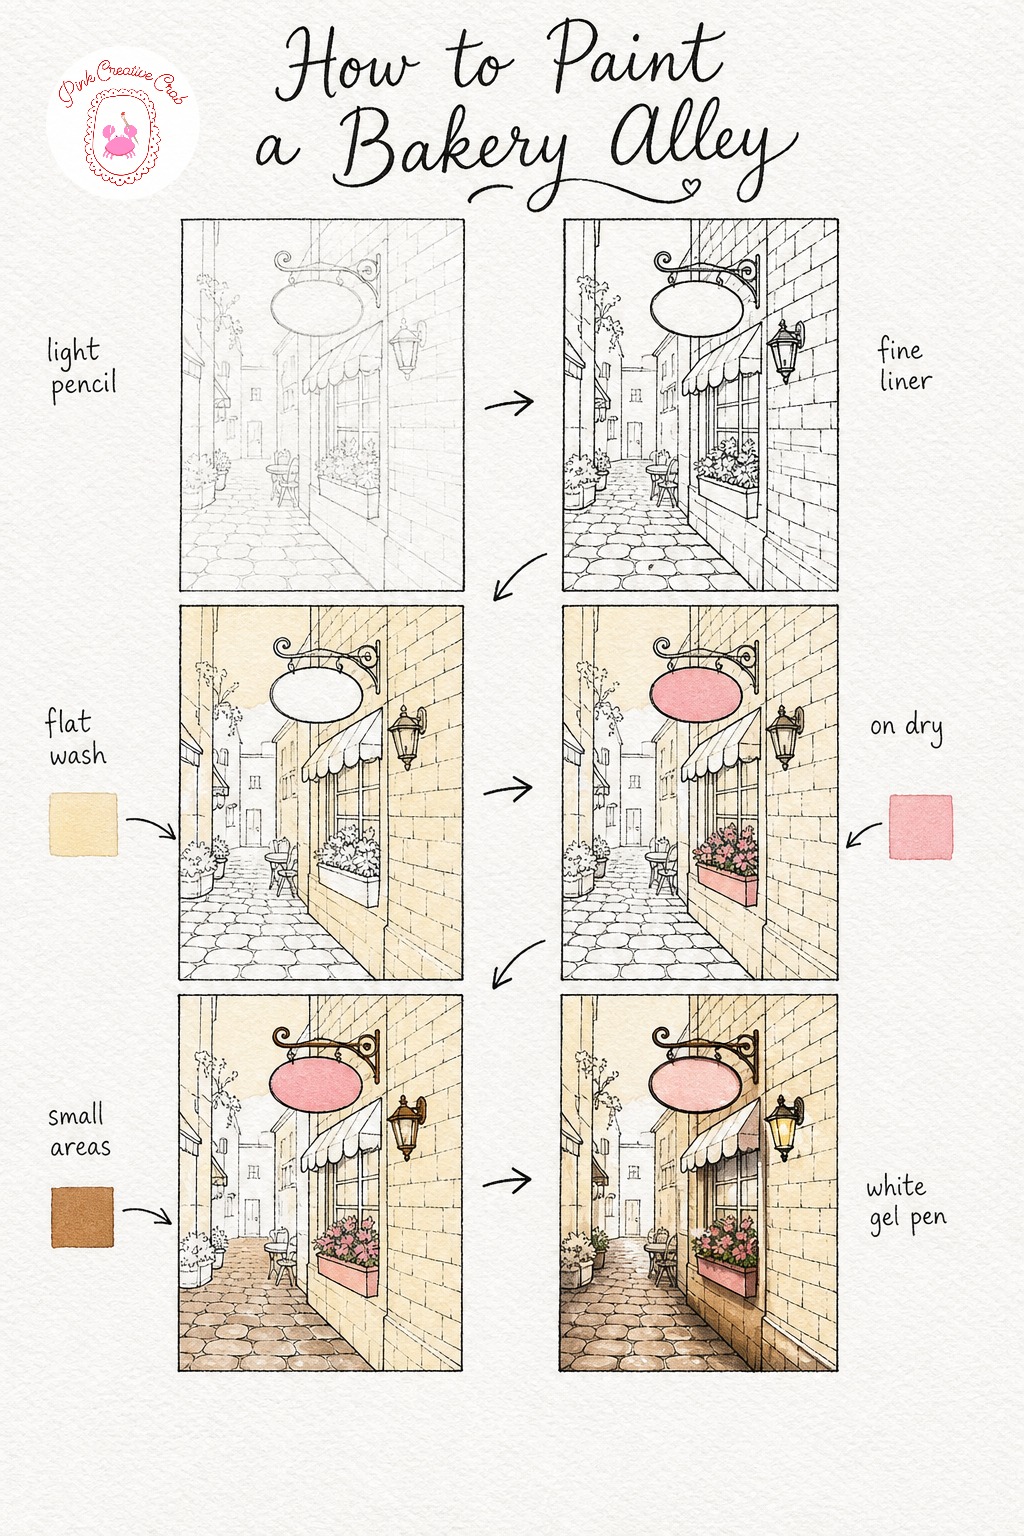
Sketch a narrow alley in perspective, a tall wall on one side with a bakery window, a hanging sign jutting out on a bracket, and cobblestones leading the eye forward. Keep the vanishing point close so the alley feels tight and cozy rather than wide open.
Ink the cobblestones with short varied marks, then the wall bricks, the sign shape and a small lamp hanging nearby. Let the ink dry completely, since this scene has more linework than most and smudging here is easy to do by accident.
Wash the sky strip above the wall and the wall itself in cream, then add pink to the hanging sign board and any flower box tucked under the window. Warm brown handles the cobblestones and the lamp fixture, keeping the stone color slightly uneven for texture.
Shadow the base of the wall and beneath the sign in dark brown, then a soft glow of white gel pen around the lamp for evening light. For more cozy architectural scenes like this one, the village scene drawing collection is worth a look.
What to Do Next
Pick whichever scene is calling to you most today, set your cream, pink and brown markers within reach, and start with the lightest pencil lines you can manage. One cozy shopfront at a time, you will have a whole little bakery street drawn before you know it.
Frequently Asked Questions
What paper works best for bakery drawing with alcohol markers?
A smooth, slightly heavier mixed media or marker paper works best, since it prevents the alcohol ink from bleeding through or fuzzing at the edges. Thin printer paper will warp and the color will feather unevenly.
Do I need a ruler for the perspective lines?
Yes, for straight architectural edges like the shopfront, counter or table, but keep smaller details like bread, cakes and foliage freehand. Mixing ruled structure with loose hand drawn detail is exactly what gives these scenes their cozy feel.
How do I stop my alcohol markers from streaking?
Work in quick, even strokes in one direction and keep the marker moving rather than pausing on the page. Let each layer dry for a minute before adding more color on top, since layering over wet ink causes most streaking.
Can I use watercolor instead of alcohol markers for these scenes?
Yes, watercolor works fine as a substitute, though the color will sit softer and more translucent than alcohol marker. Keep your washes light in the early stages either way, since both mediums darken fast once layered twice.
What if I only have a few marker colors?
Three colors are genuinely enough: a cream, a warm brown and a soft pink cover almost everything in these scenes. Mix pink and brown lightly for a dusty rose tone, or layer cream under brown for a warmer glow.
Have any thoughts?
Share your reaction or leave a quick response — we’d love to hear what you think!
-
 0
-
0
-
0
-
0
-
0
-
0


