

Table of Contents
- Before You Start
- Cinnamon Roll
- Blueberry Muffin
- Latte with Foam Art
- Pizza Slice
- Croissant on a Napkin
- Pancake Stack with Berries
- Chocolate Chip Scone
- Avocado Toast
- Iced Coffee
- Strawberry Tart
- Hot Chocolate with Marshmallows
- Lemon Bar
- Bagel with Cream Cheese
- Cafe Window with Pastry Display
- Breakfast Tray by the Window
- Tea Cup and Biscuit Corner
- Frequently Asked Questions
Watercolor food is the fastest way I know to turn a plain sketchbook page into something that feels like a little cafe window. Warm golden washes, a puddle of melted butter, a dusting of sugar caught in afternoon light: it is all small and forgiving and done in one sitting.
Below you will find sixteen cafe treats, each painted in four clear stages from the first pale wash to the final sugar highlights. Pick the one that matches what you are craving today, keep your palette warm and your brush a little wet, and paint along.
Using these images: free for personal projects such as printing, coloring, cards, journals and gifts. Handmade items that include them may be sold up to 30 pieces per design. More than that is commercial use and is not permitted, and neither is selling or sharing the images themselves or passing them off as your own. Please ask before any other use.
Before You Start
- Stretch or tape down a sheet of cold press watercolor paper so it stays flat once the washes go on wet.
- Keep your pencil lines light and loose, since dark graphite will smear into pale washes and muddy your golden tones.
- Mix more water than you think you need for the first wash, it should look like weak tea on your palette.
- Test every new mix on a scrap corner before it touches the paper, warm browns turn muddy fast if overloaded.
- Let each layer dry fully between wet on wet and wet on dry stages, touch the paper lightly to check it is cool and matte.
- Save your white gel pen or white gouache for the very last stage, it reads best against fully dry, darker washes.
Cinnamon Roll
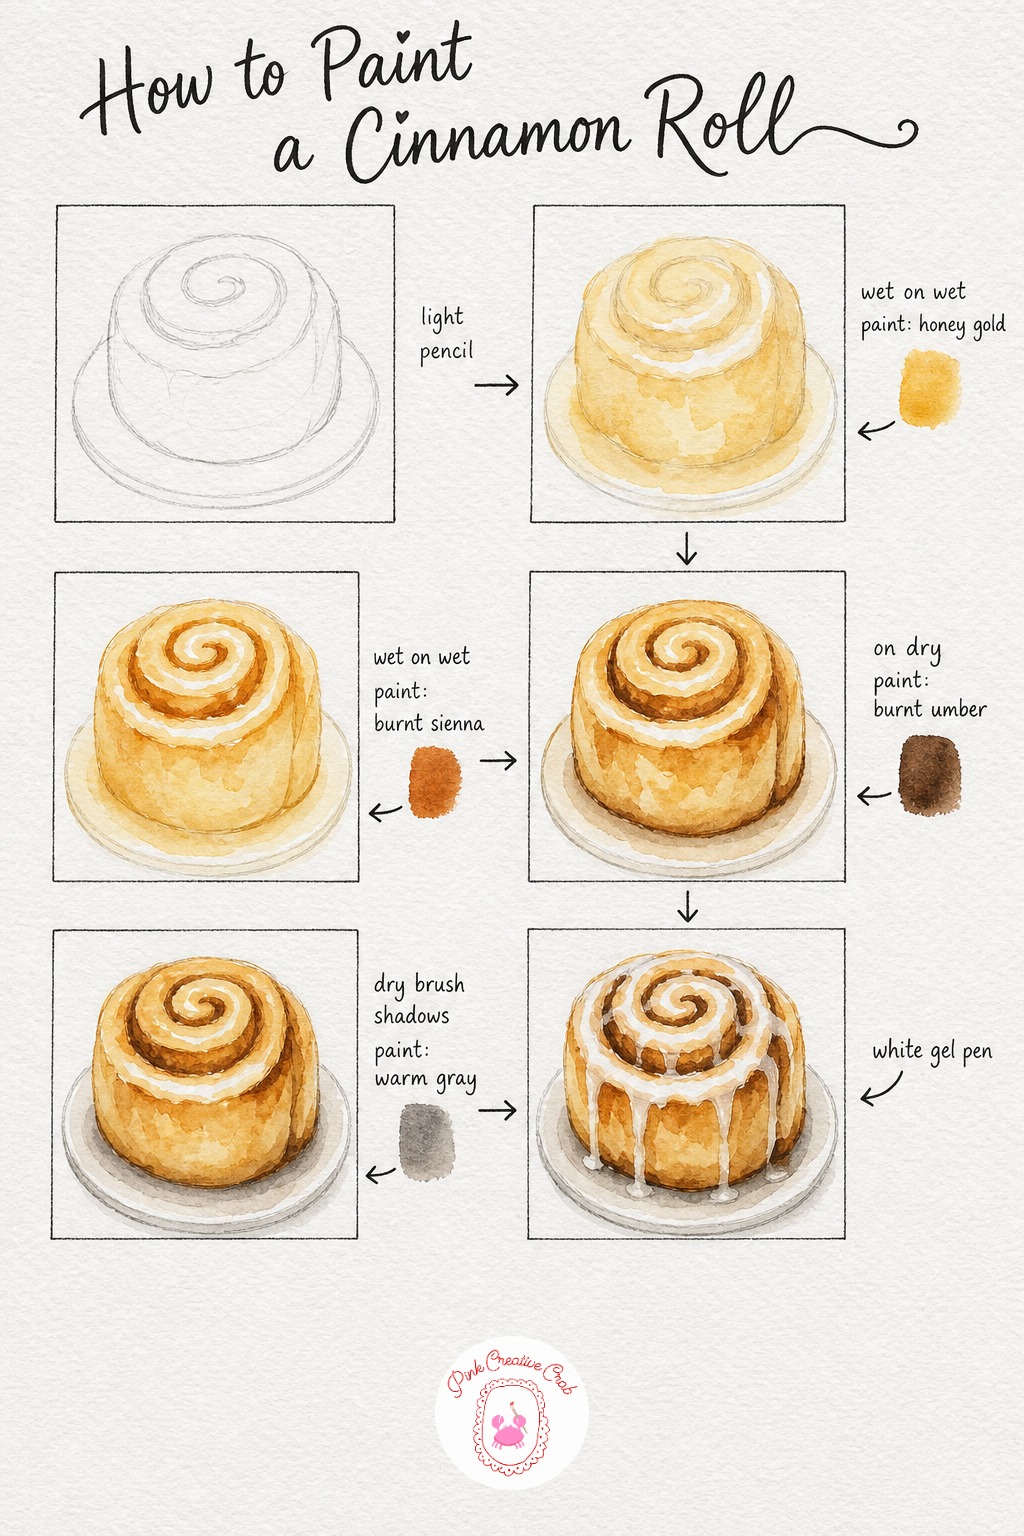
Start with a light pencil spiral, just the outer curve and a loose coil inside, no need to get every twist perfect. Wet the whole shape with clean water first, then drop in a pale honey gold wash and let it settle into the paper, this is your base tone for every warmer color that follows.
While that wash is still damp, touch burnt sienna into the grooves of the spiral so the color blooms softly along the coil instead of sitting in a hard line. Once the paper is fully dry and matte, go back with burnt umber on dry paper to sharpen the outer swirl and the shadowed base, this is where the roll starts to feel three dimensional.
Mix a soft warm gray for the cast shadow under the roll, keep it thin and dry brushed so it reads as shade rather than a dark blob. Finish with white gouache or a white gel pen for the icing drizzle, dragging it loosely over the swirl so it catches the golden brown underneath.
Tip: if your spiral grooves look too neat, soften one or two with a damp brush right after painting, real icing never drips in perfect lines.
Blueberry Muffin
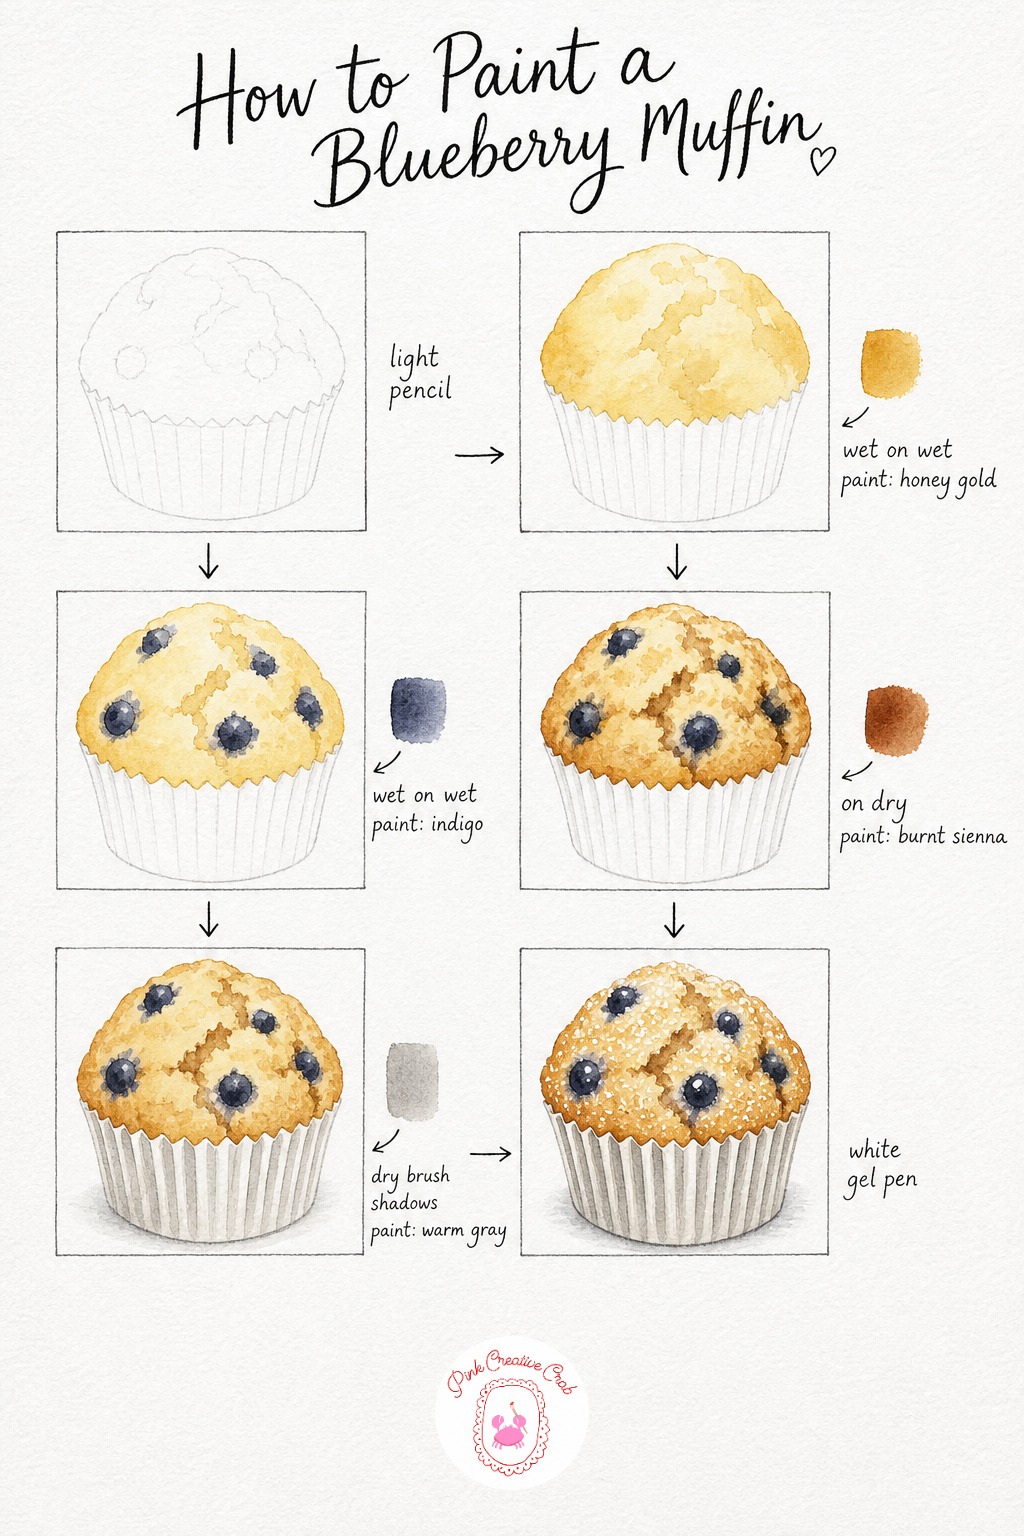
Sketch a simple dome shape sitting in a fluted paper liner, keep the cracks on top loose and irregular since muffins never crack the same way twice. Lay a pale honey wash over the dome only, leaving the liner paper white for now, and let the color pool naturally into the little cracks.
While the dome is still wet, drop in small indigo dots for the blueberries so each one blooms a soft dusky edge instead of a hard circle. Once fully dry, work burnt sienna into the deeper cracks and around the dome edges on dry paper for definition and warmth.
Mix a thin warm gray for the pleats of the paper liner, dry brushing short vertical strokes to suggest its folds and the shadow it casts on the table. Finish with a white gel pen for scattered sugar flecks across the top and one clean highlight dot on a blueberry to make it glisten.
Tip: vary the size of your blueberry dots, three or four small ones and one larger one reads far more natural than evenly spaced circles.
Latte with Foam Art
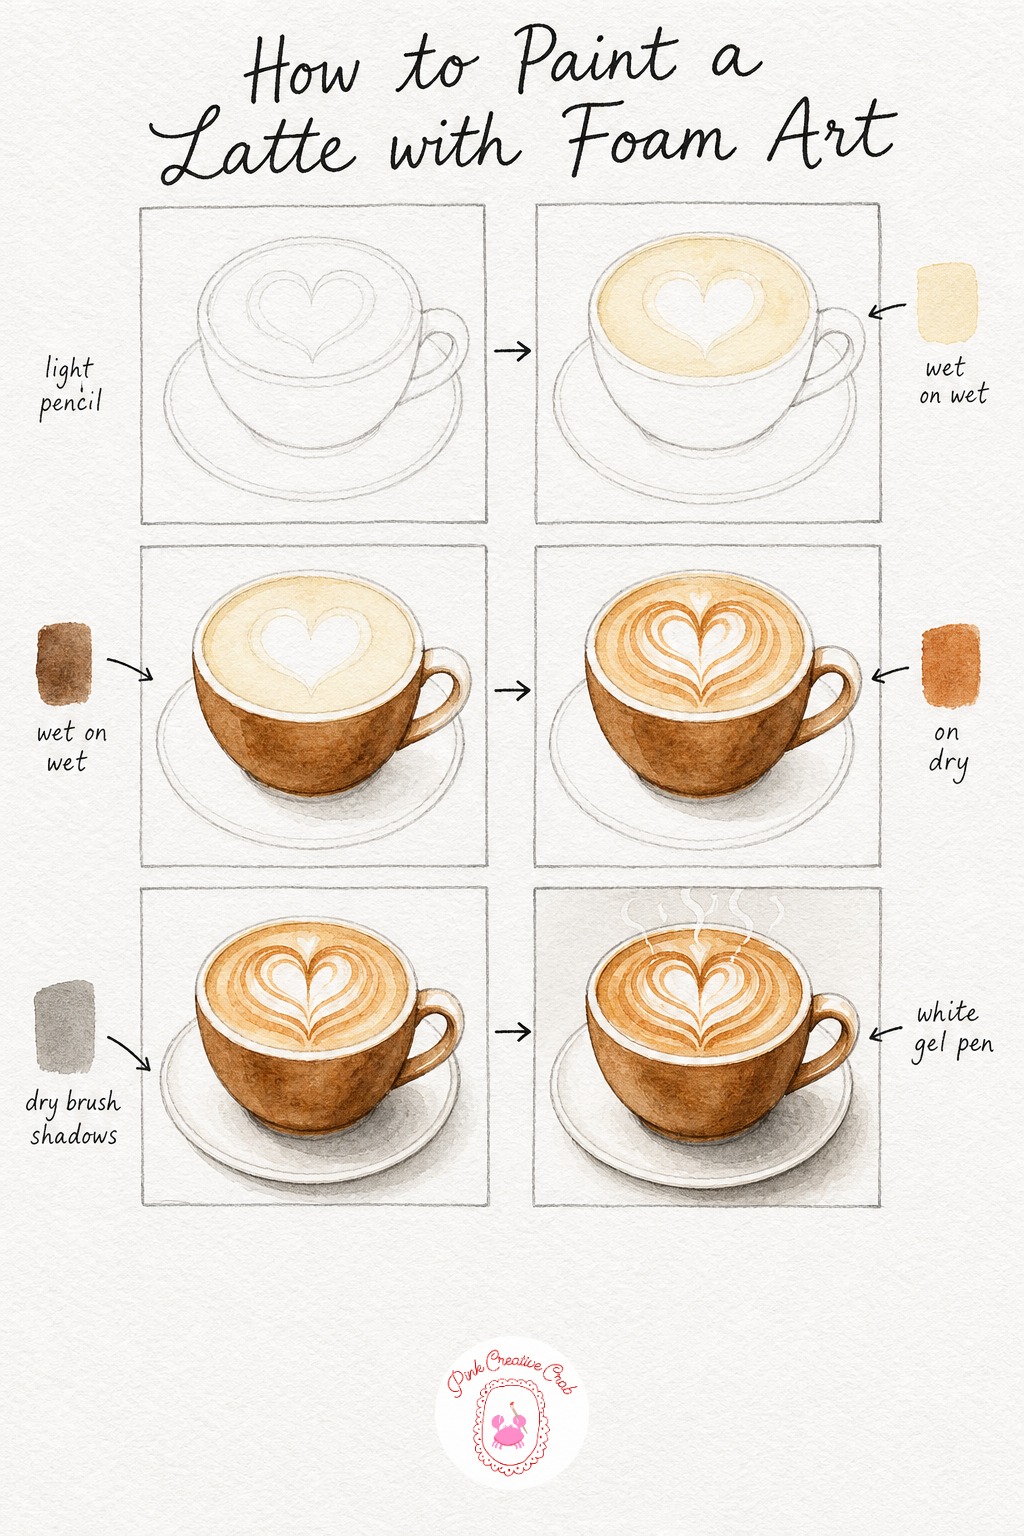
Draw a simple cup shape on a saucer, with a rounded heart or leaf outline sitting inside the rim for the foam art. Wash the entire foam surface with a very pale cream first, keeping it soft and even so it reads as milky foam rather than flat white paper.
While that cream wash is still slightly damp, brush burnt umber onto the visible sides of the cup below the foam line, letting the two tones meet softly where cup meets foam. Once dry, use a fine brush with burnt sienna to trace the swirl pattern inside the heart shape, a few curved lines is plenty, foam art is loose by nature.
Shadow the cup’s base and the saucer with a thin warm gray wash, dry brushed so the saucer feels like it is sitting on a table rather than floating. Add a few curling steam lines above the cup and a single bright highlight along the rim with white gouache or a gel pen to finish it warm and inviting.
Tip: keep your foam swirl lines thin and a little shaky, a too perfect spiral looks printed rather than poured.
Pizza Slice
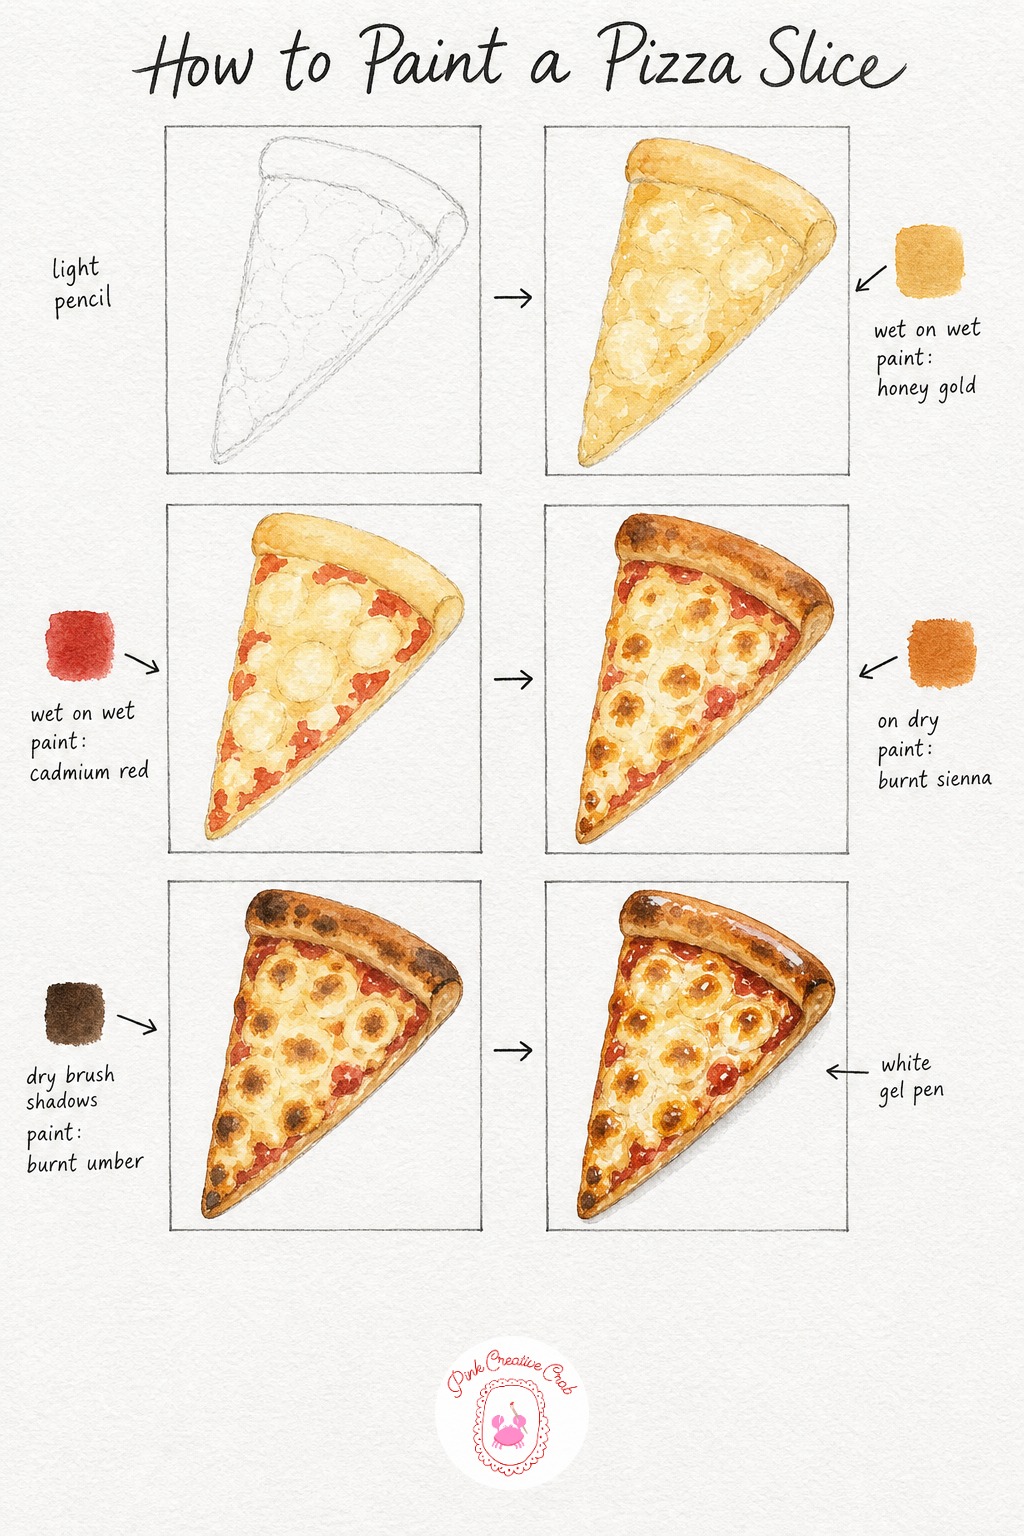
Sketch a simple triangle slice, rounding the crust edge slightly rather than drawing it razor straight, pizza crust is always a little uneven. Wash the whole cheese and crust area with a pale honey gold first, this becomes the base tone under both the melted cheese and the baked crust.
While still damp, drop small touches of cadmium red where sauce peeks through the cheese, letting the red soften and spread into the gold rather than sitting as a hard shape. Once dry, use burnt sienna on dry paper to paint the cheese bubbles and the deeper tone along the crust’s outer ridge.
Add burnt umber in small dabs for char spots on the crust and in the shadowed folds where the cheese pools thicker, this is what makes it look fresh from the oven. Finish with white gouache dabbed lightly for the glossy sheen on the cheese and one clean highlight along the crust’s puffed edge.
Tip: leave tiny flecks of the pale gold wash showing between your red and brown touches, those gaps read as melted cheese catching the light.
Croissant on a Napkin
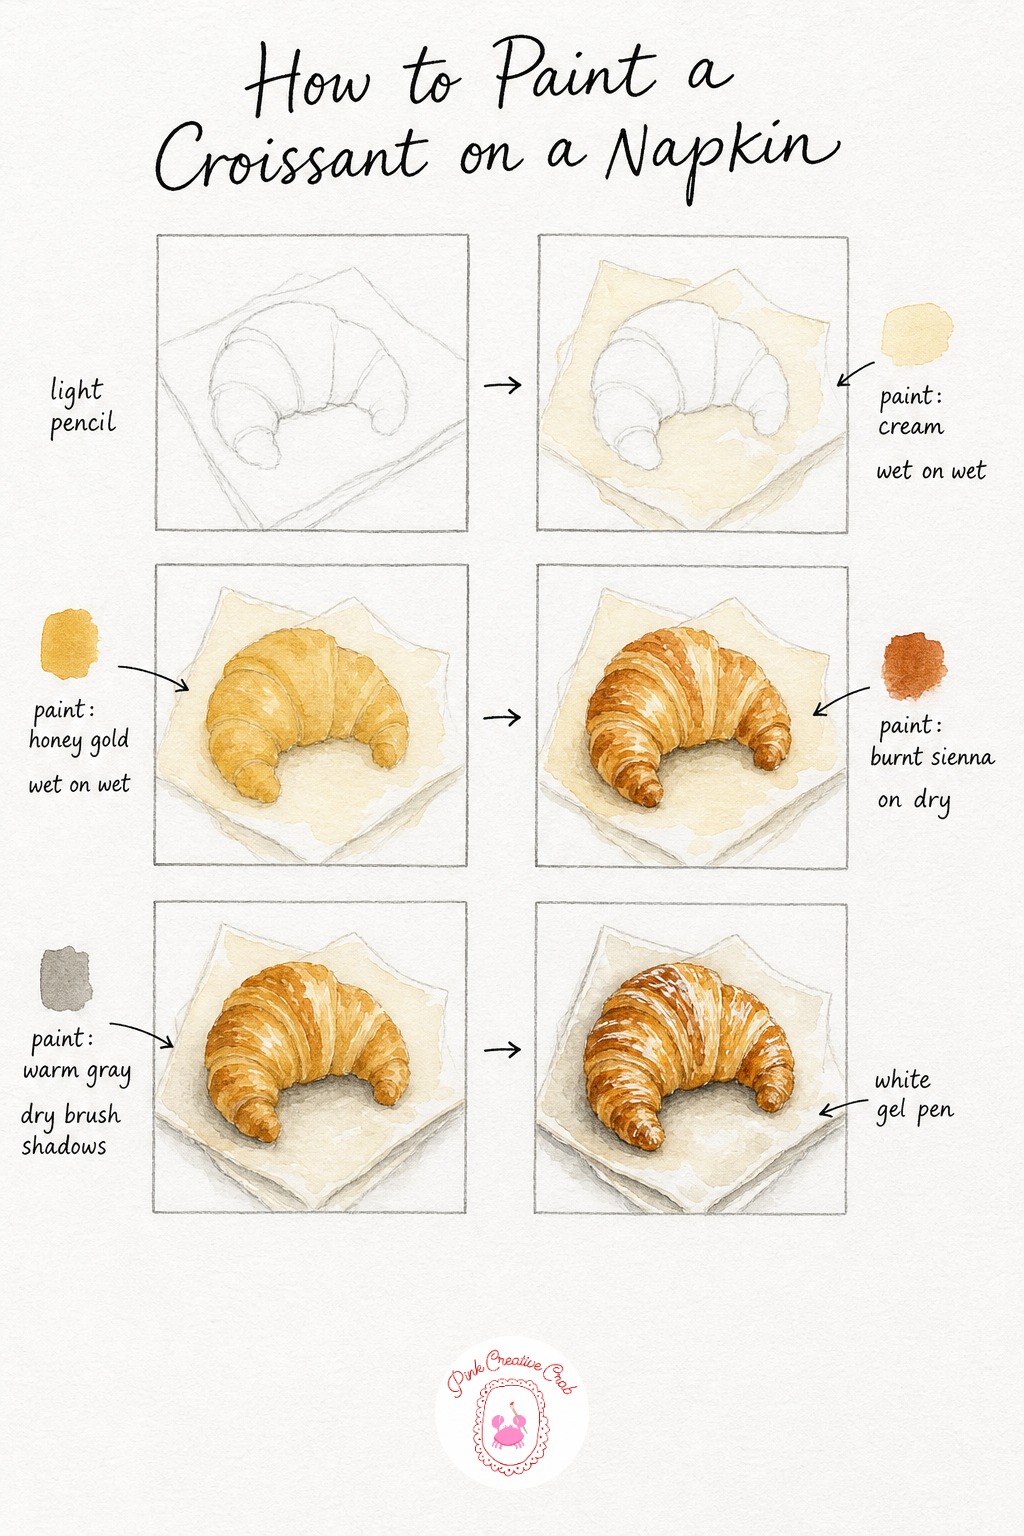
Draw the crescent shape with a few gentle ridge lines running along its curve, then sketch a simple folded napkin underneath, a soft rectangle with a couple of loose creases. Wash the napkin area first with pale cream, keeping the edges a little uneven so it feels like soft cloth rather than paper.
Once that dries, wash the whole croissant shape with honey gold, letting it pool slightly darker near the curled tips. While it is dry, go back with burnt sienna along each ridge line to build up the flaky layered texture, short confident strokes work better than long careful ones here.
Mix a thin warm gray for the napkin’s folds and the shadow the croissant casts onto the cloth, dry brushing so the shadow stays soft edged. Finish with a white gel pen or white gouache flicked along the top ridges for that dry flaky shine, and one line along the napkin’s crease to lift it off the page.
Tip: if you love painting cozy still life corners like this one, the watercolor European cafe scenes collection pairs nicely with a plate of pastries.
Pancake Stack with Berries
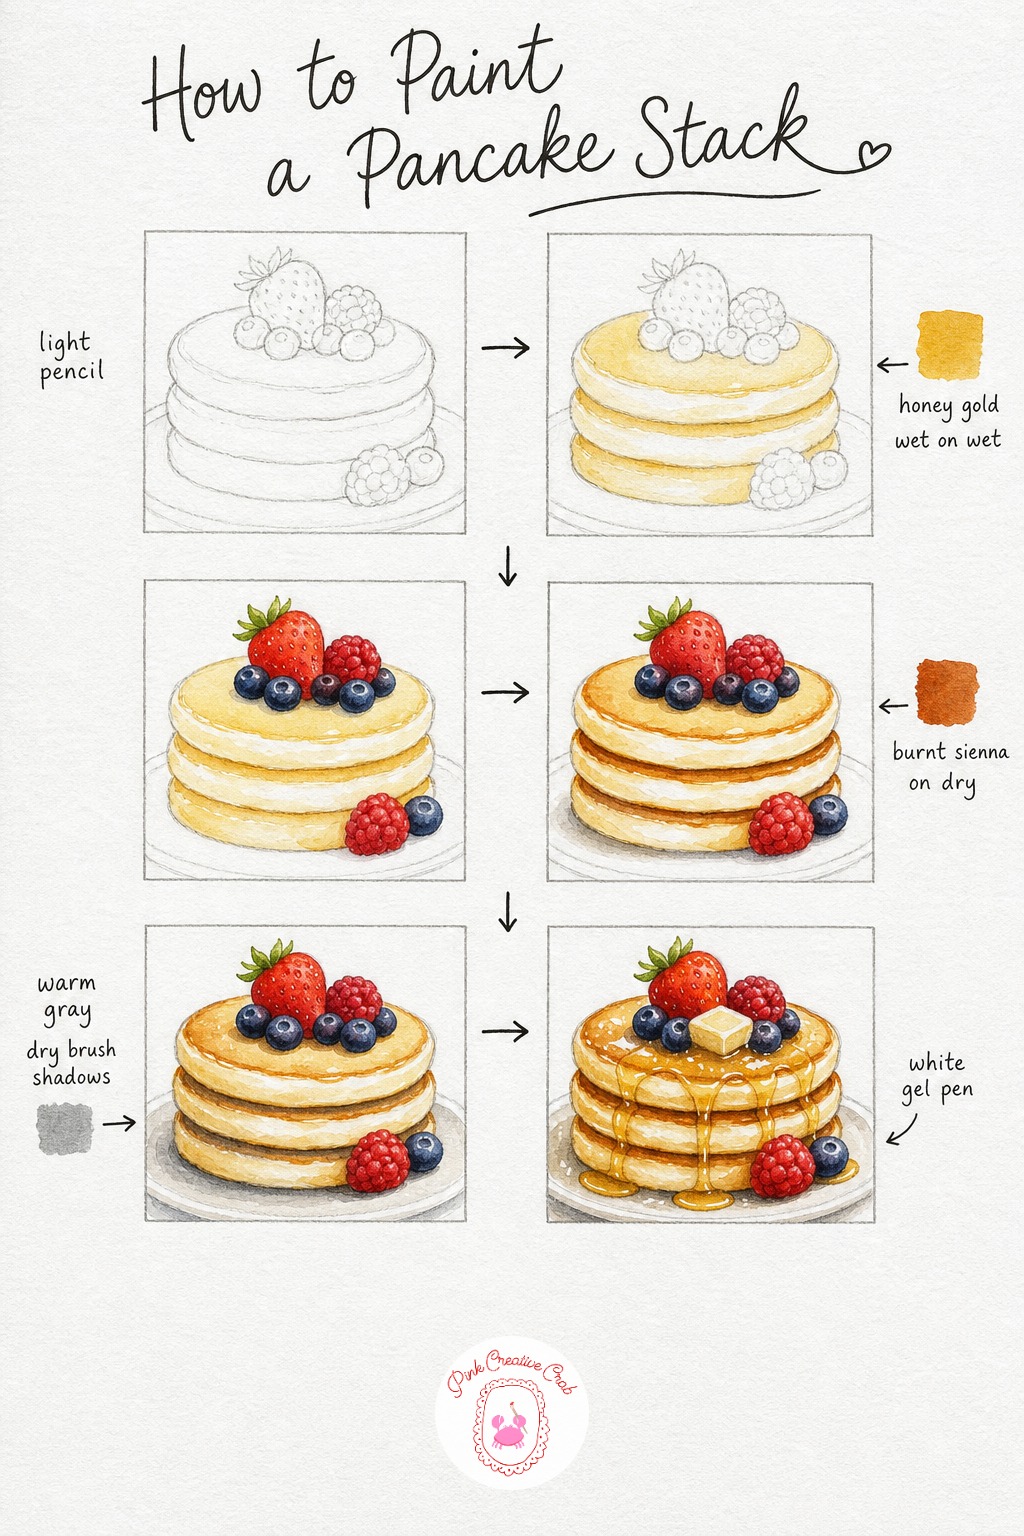
Sketch three slightly uneven circles stacked on top of each other, with a few small berry shapes piled on top, pancakes look better a little lopsided than perfectly round. Wash all three pancake edges at once with honey gold, keeping the wash pale so the layers still read as separate.
While that wash is damp, drop cadmium red and a touch of indigo into the berry shapes on top, letting the colors bleed softly into each other for a juicy look. Once everything is dry, use burnt sienna on dry paper to deepen the line between each pancake layer and darken the top pancake’s edge where it toasted longest.
Shadow the gaps between pancakes and the base of the stack with a thin warm gray, this is what separates the layers visually more than any line could. Finish with white gouache for a little melting butter square on top and a thin syrup drip running down one side, plus a scatter of sugar sparkle dots.
Tip: paint the bottom pancake slightly darker overall than the top one, it sits under more shadow and reads more convincingly as the base of the stack.
Chocolate Chip Scone
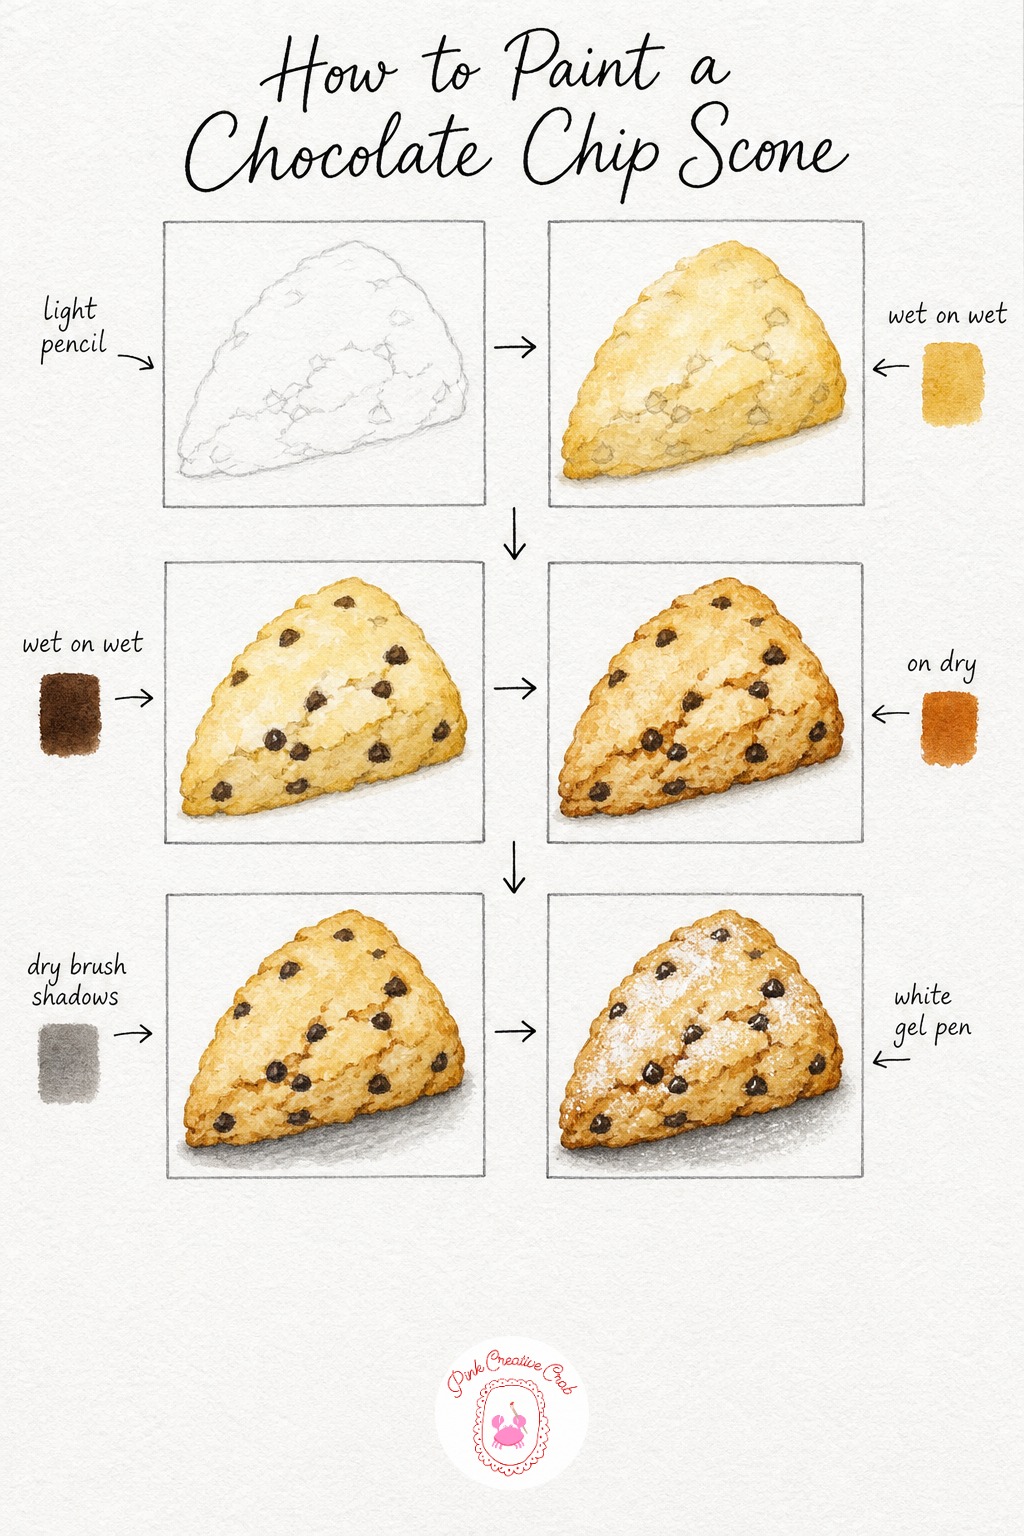
Draw a simple wedge shape with a slightly domed top and rough, crumbly edges rather than a clean triangle. Wash the whole surface with pale honey gold first, let it sit uneven so some spots look lighter and flakier than others.
While that wash is still wet, drop small dots of burnt umber across the top for chocolate chips, letting a few bleed softly so they look melted rather than printed on. Once dry, use burnt sienna on dry paper along the cracked edges and the underside to show where the scone broke apart when baked.
Mix a soft warm gray for the shadow cast beneath the scone, keep it dry brushed and slightly uneven to match the scone’s rough base. Finish with a white gel pen for a light flour dusting across the top and one or two glossy highlight dots on the darkest chocolate chips.
Tip: let a few chip dots touch the scone’s edge and break the outline slightly, it keeps the shape from looking too tidy.
Avocado Toast
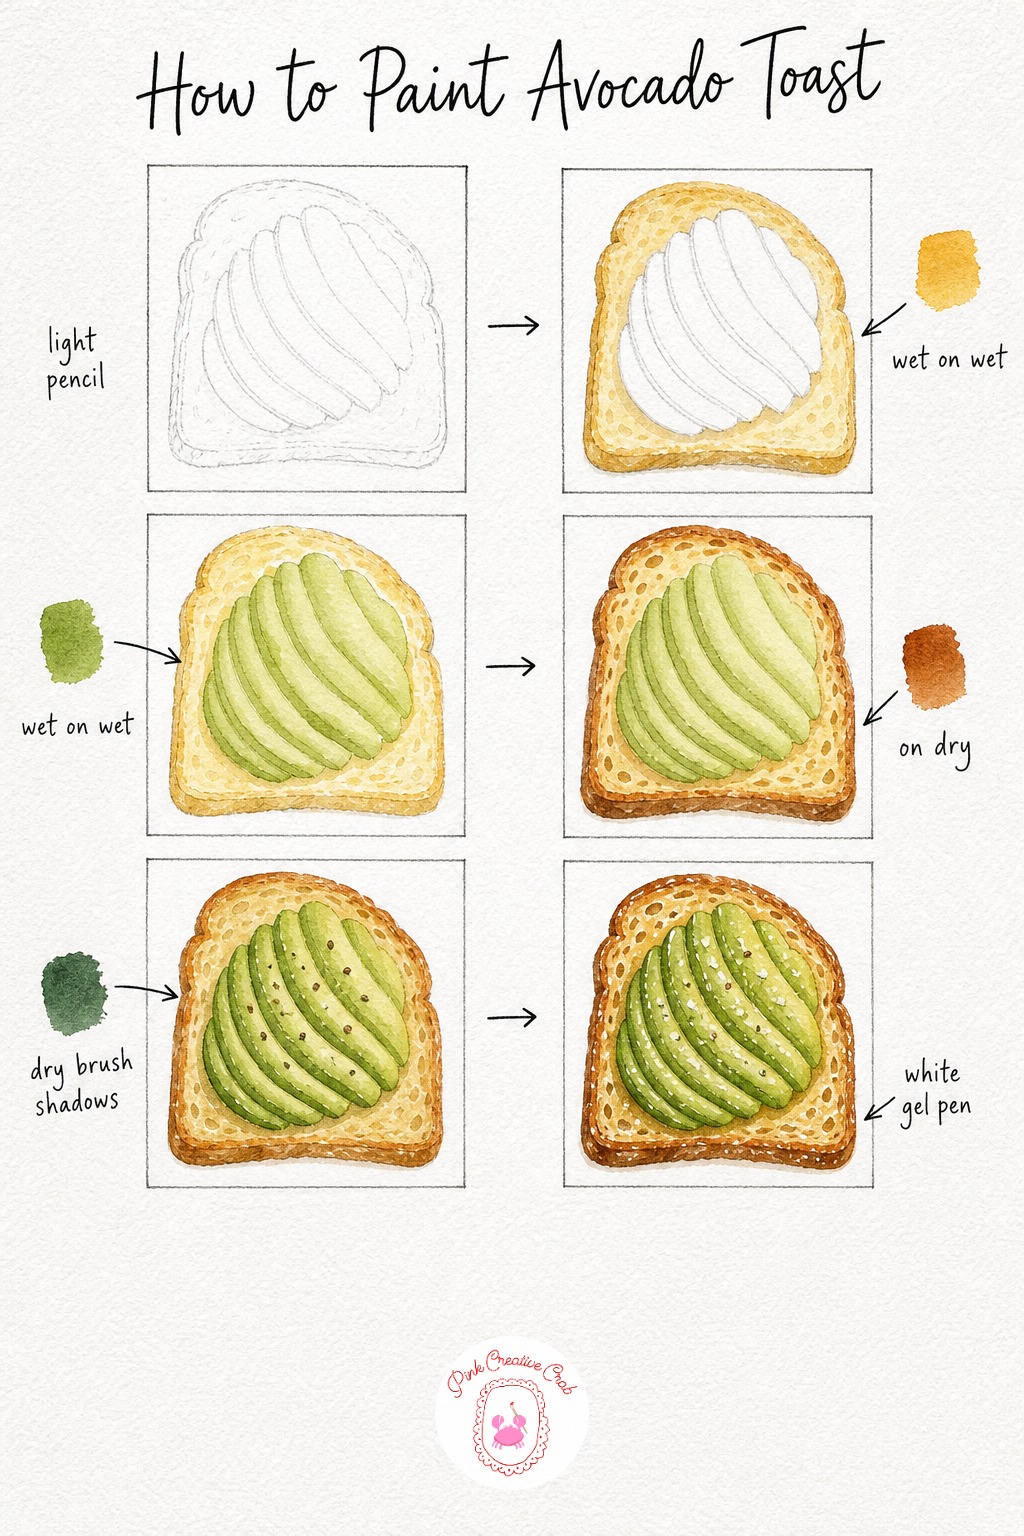
Sketch a rough rectangle of toast with a fan of thin avocado slices laid across it, a few cracks in the toast add character. Wash the toast area first with pale honey gold, keeping the crust a touch darker than the soft crumb in the middle.
Once that is dry, wash the avocado fan with a soft sap green, let the color pool unevenly across the slices for a natural look. While still slightly damp you can gently deepen one or two slices for variety. Once fully dry, work burnt sienna along the toast’s crust and into its little air pockets on dry paper.
Add a darker green between each avocado slice and a scatter of tiny flecks for chili or seeds using dark green, this separates the fanned pieces clearly. Finish with white gouache dotted for sea salt flakes across the avocado and one bright streak along the crust for a toasted shine.
Tip: for more cafe breakfast inspiration beyond this one, the easy watercolor food ideas list is worth a look.
Iced Coffee
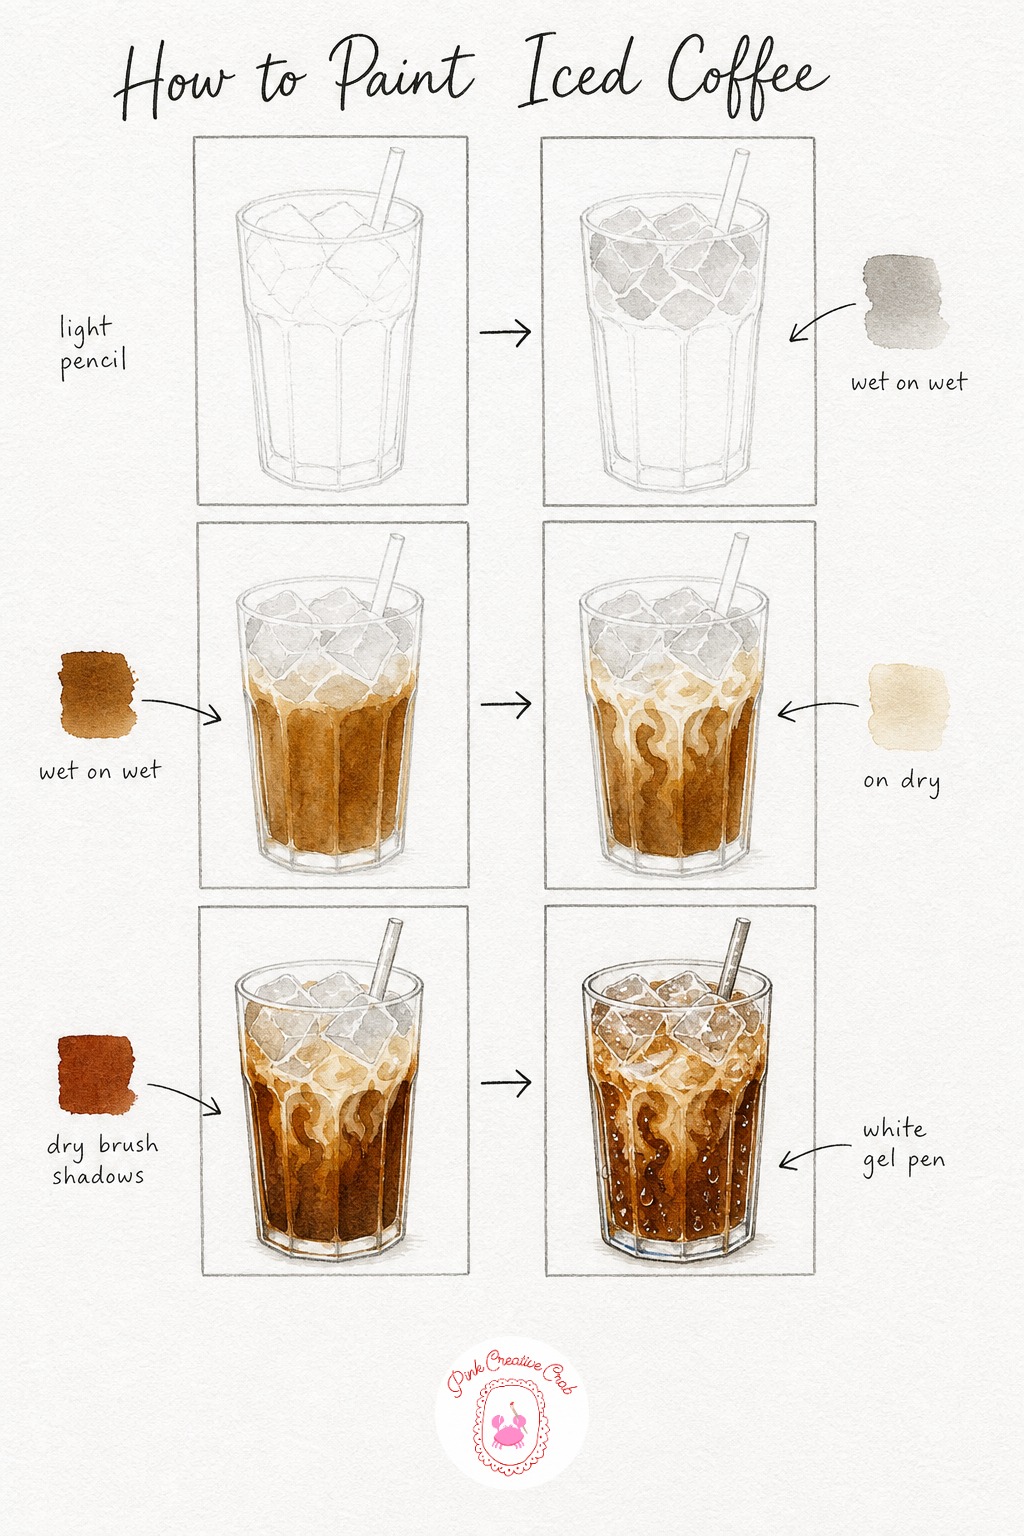
Draw a tall straight sided glass with a few overlapping ice cube shapes and a straw leaning against one side. Wash the ice cubes with a very pale gray, leaving thin white lines along their top edges unpainted so they catch light like real glass.
While the lower glass is still clean paper, wash it with burnt umber for the coffee, stopping short of the ice cubes so some stay paler where the cold water dilutes the coffee. Once dry, paint soft cream colored swirl lines where milk pours in and meets the dark coffee, a classic wet on wet cloud if you touch it in before the brown fully sets, or soft edged strokes if done after.
Deepen the glass edges and the straw’s shadow with burnt sienna on dry paper for a glassy, rounded feel. Finish with a white gel pen for the glass’s shine, sparkle on an ice cube edge, and a few small condensation drops running down the outside.
Tip: leave more white paper showing around the ice cubes than feels natural at first, it is what convinces the eye the glass is really cold.
Strawberry Tart
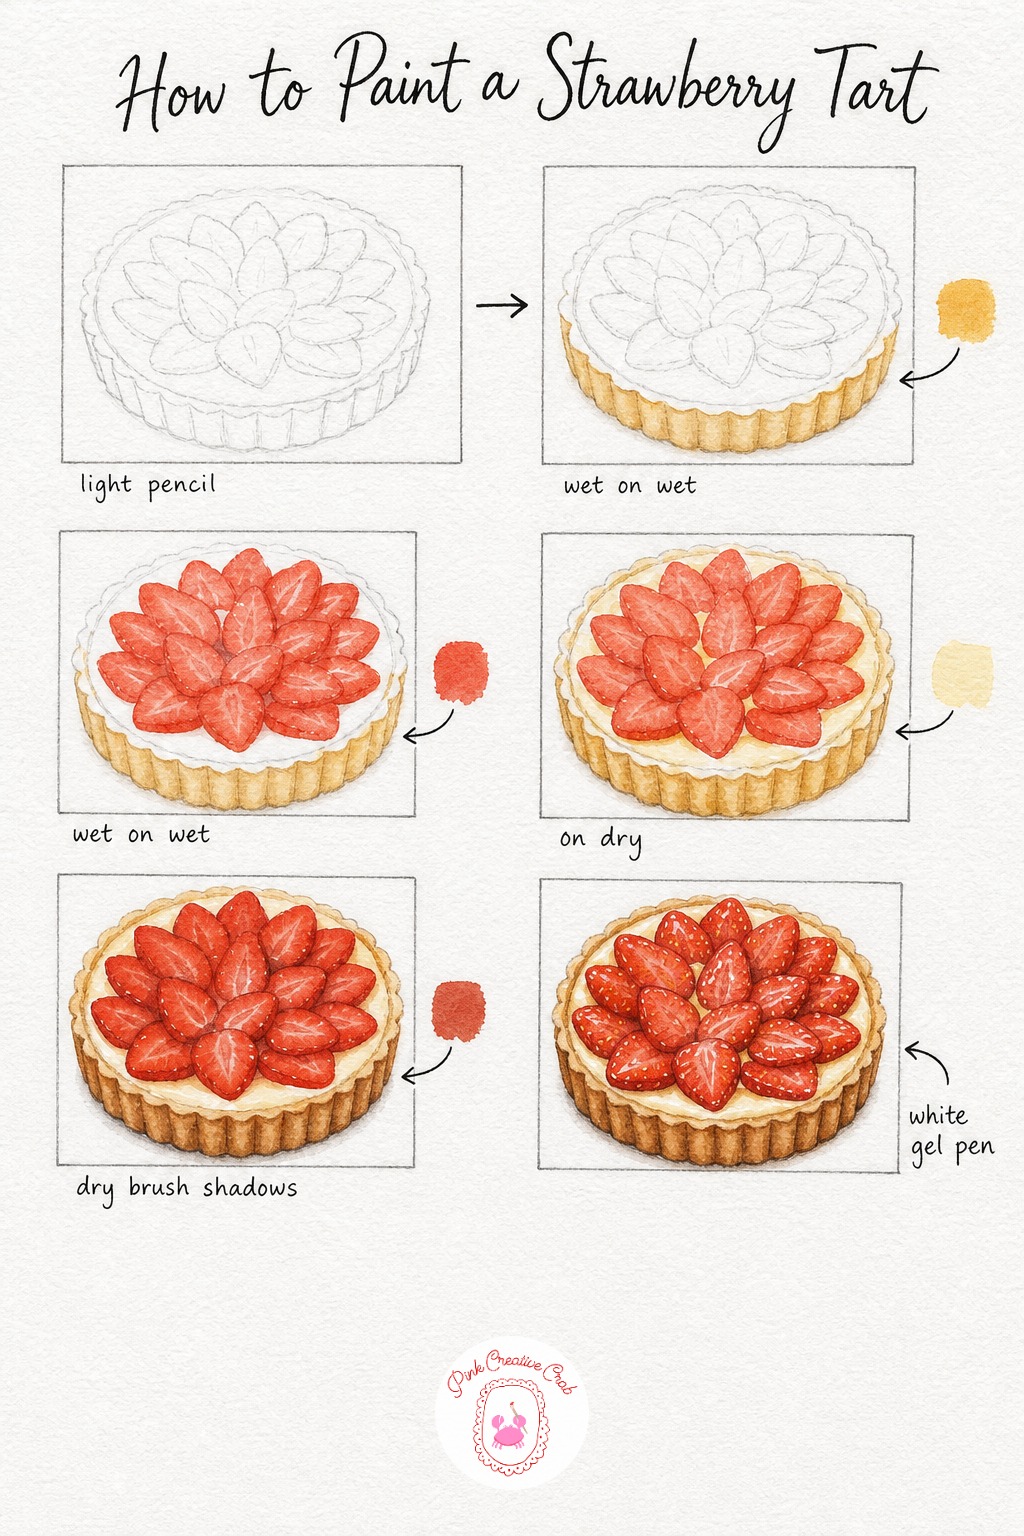
Sketch a round tart shell with sliced strawberries arranged in a loose circle or overlapping row on top. Wash the visible rim of the pastry shell with pale honey gold first, keeping it thin since pastry edges are usually quite pale.
While that dries, wash all the strawberry slices together with cadmium red, letting the color pool a little darker near each slice’s pointed tip. Once fully dry, add a soft cream wash into the gaps between berries for the custard filling peeking through, this grounds the fruit into the tart rather than floating above it.
Deepen the outer edge of each strawberry slice with burnt sienna and shade the underside of the tart shell where it casts shadow onto the plate. Finish with a white gel pen for a glossy glaze shine across the berries and tiny dotted seeds scattered over each slice.
Tip: if fruit filled treats are your favorite subject, the watercolor fruit tutorial collection has plenty more juicy practice.
Hot Chocolate with Marshmallows
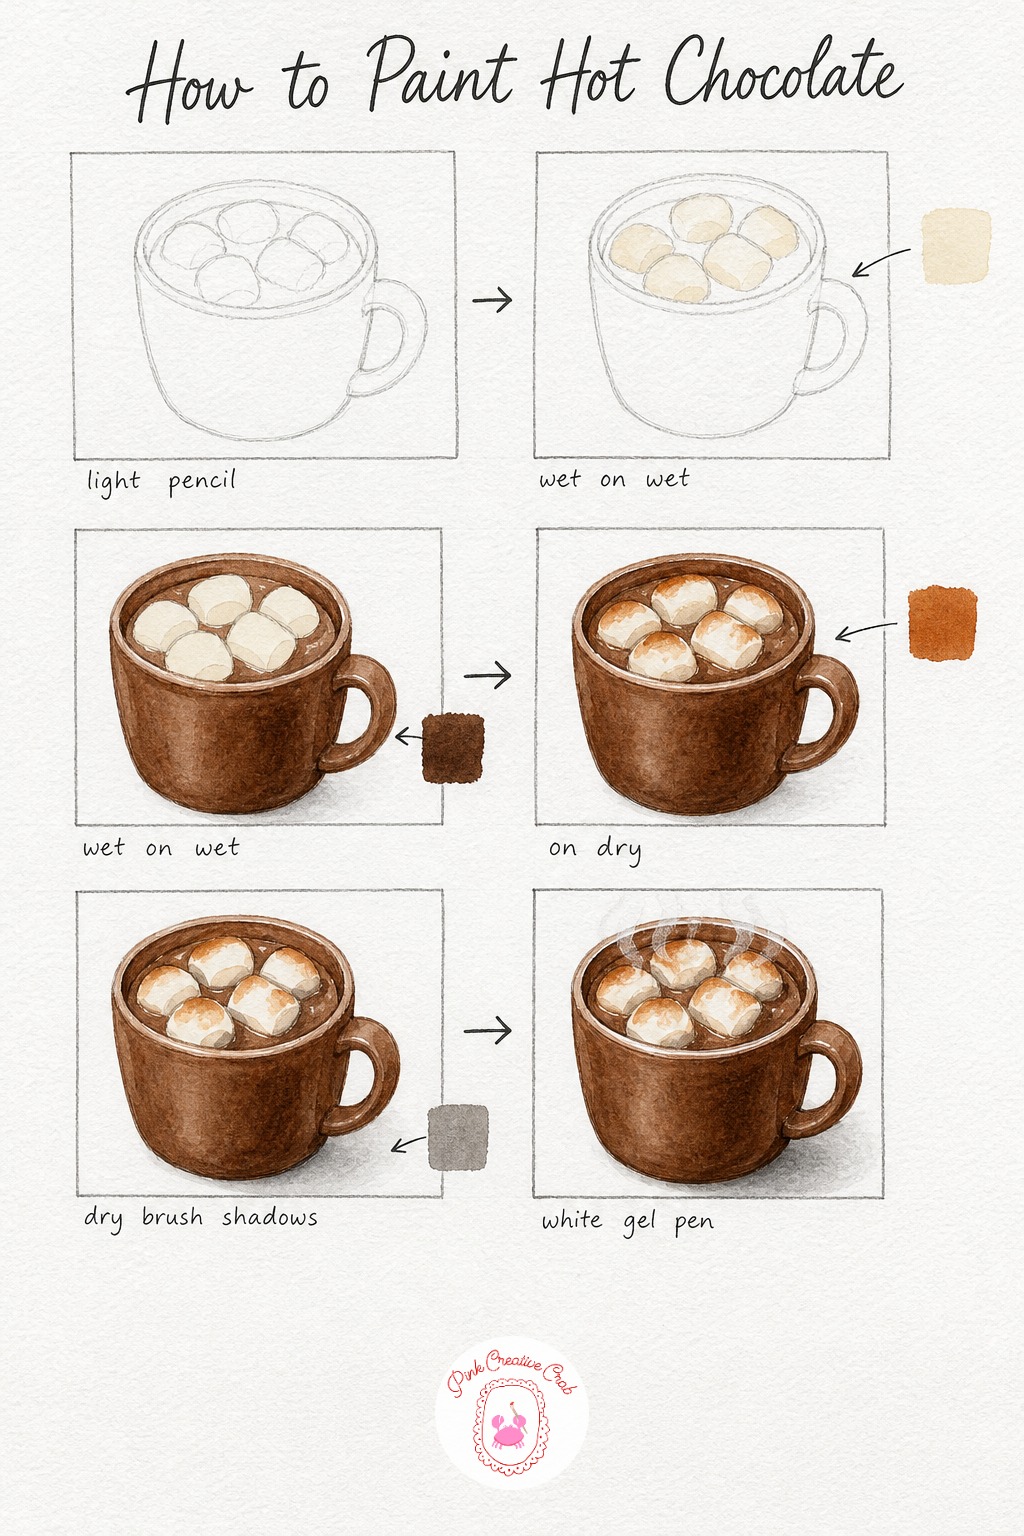
Draw a simple round mug with a few puffy marshmallow shapes bobbing on the cocoa’s surface. Wash the marshmallows first with the palest cream, almost clear, so they stay soft and bright against the dark drink to come.
Once that is dry, wash the visible cocoa and mug body with a deep burnt umber, working around the marshmallow shapes carefully so they stay pale. While still slightly damp near the edges you can soften where cocoa meets marshmallow for a melted look.
On dry paper, add burnt sienna in small toasted patches along each marshmallow’s edge for that slightly browned, torched look. Shadow the mug’s base and the gaps between marshmallows with warm gray, dry brushed so it stays soft. Finish with white gouache for curling steam above the mug and one clean highlight along its rim.
Tip: keep at least two marshmallows nearly untouched by brown, pure contrast between dark cocoa and bright marshmallow is what sells the whole mug.
Lemon Bar
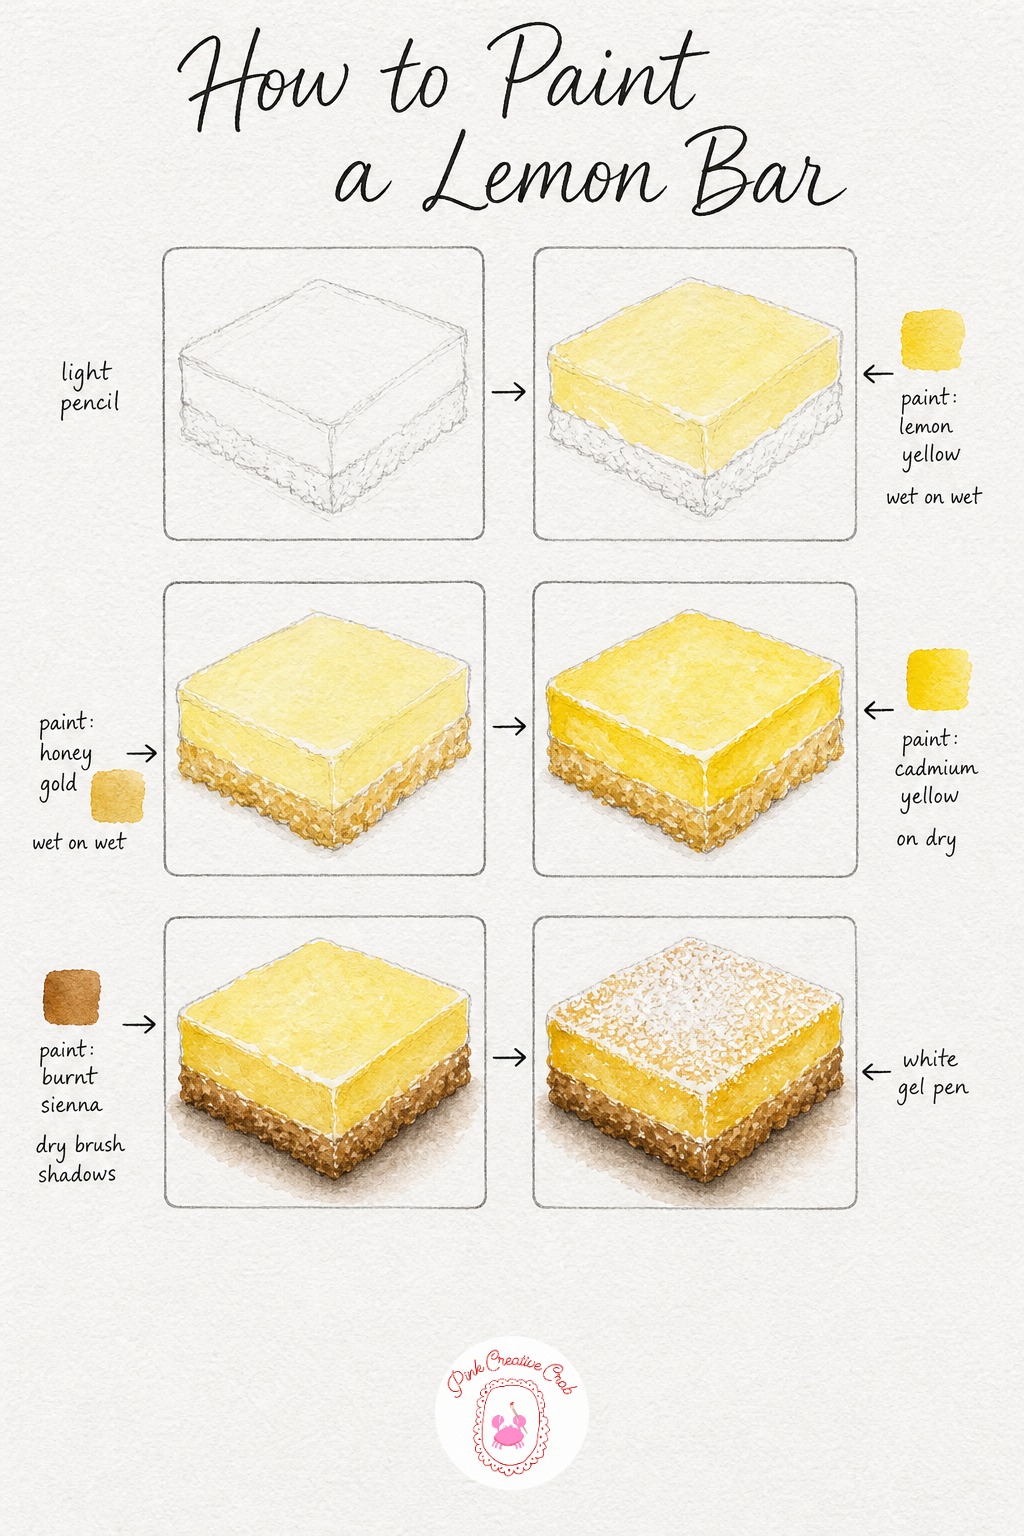
Sketch a simple square or rectangle with a thin band at the bottom for the shortbread base and a thicker top layer for the curd. Wash the curd layer with pale lemon yellow first, keeping it bright and clean since lemon bars are meant to glow.
Once that dries, wash the shortbread base beneath it with honey gold, this warmer tone contrasts nicely against the citrus layer above. While still dry, add cadmium yellow in a thin band along the curd’s top edge to suggest its slightly firmer, set surface.
Shade the base’s underside and a soft cast shadow beneath the whole bar with burnt sienna, keeping the brush fairly dry so the shadow stays controlled. Finish with a white gel pen tapped lightly across the top for a powdered sugar dusting, uneven clusters look more convincing than an even sprinkle.
Tip: keep your yellow mixes on the thin side, lemon curd should glow translucent rather than look like a flat painted block.
Bagel with Cream Cheese
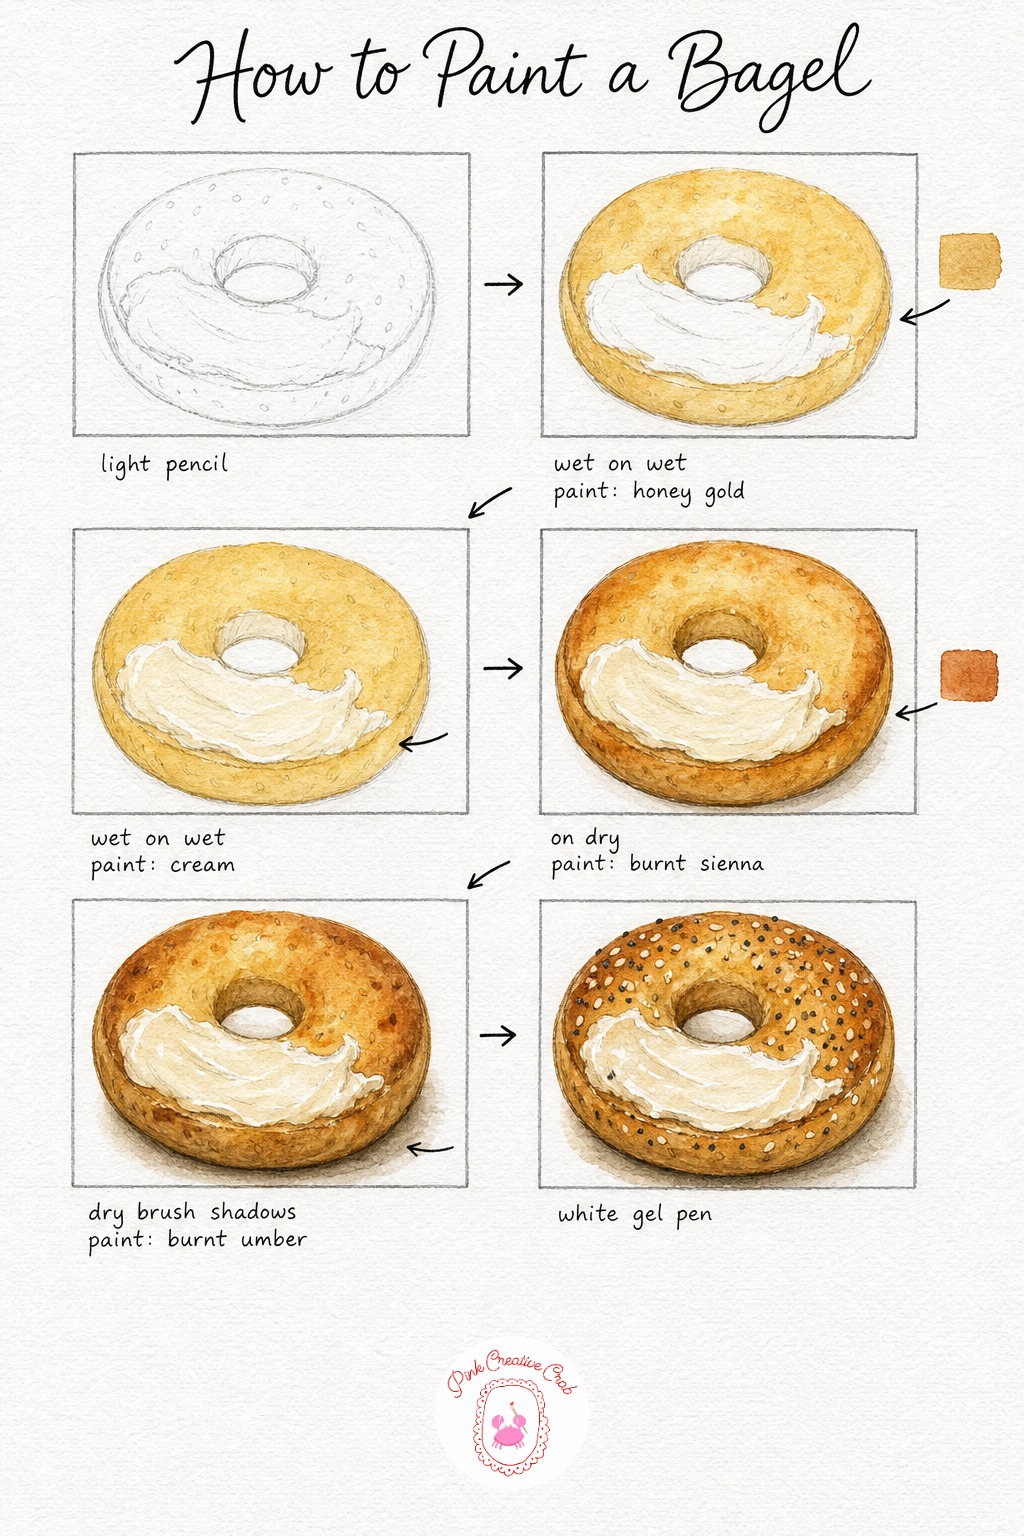
Draw a ring shape sliced in half with a swipe of cream cheese across the top half, keeping the hole in the middle slightly irregular. Wash the whole bagel ring with pale honey gold first, this becomes the base under both the toasted crust and the soft interior.
While still damp, wash the cream cheese swipe with a pale cream color, letting it meet the gold softly along its edge rather than with a hard line. Once dry, add burnt sienna on dry paper around the outer crust and inside the center hole where it baked darkest.
Deepen a few toasted patches with burnt umber and add a soft shadow beneath the bagel where it rests on the plate. Finish with a white gel pen for scattered poppy and sesame seeds across the crust and a small shine on the cream cheese swipe to make it look freshly spread.
Tip: vary your seed dots in size and spacing rather than lining them up, real bagels scatter their seeds unevenly across the crust.
Cafe Window with Pastry Display
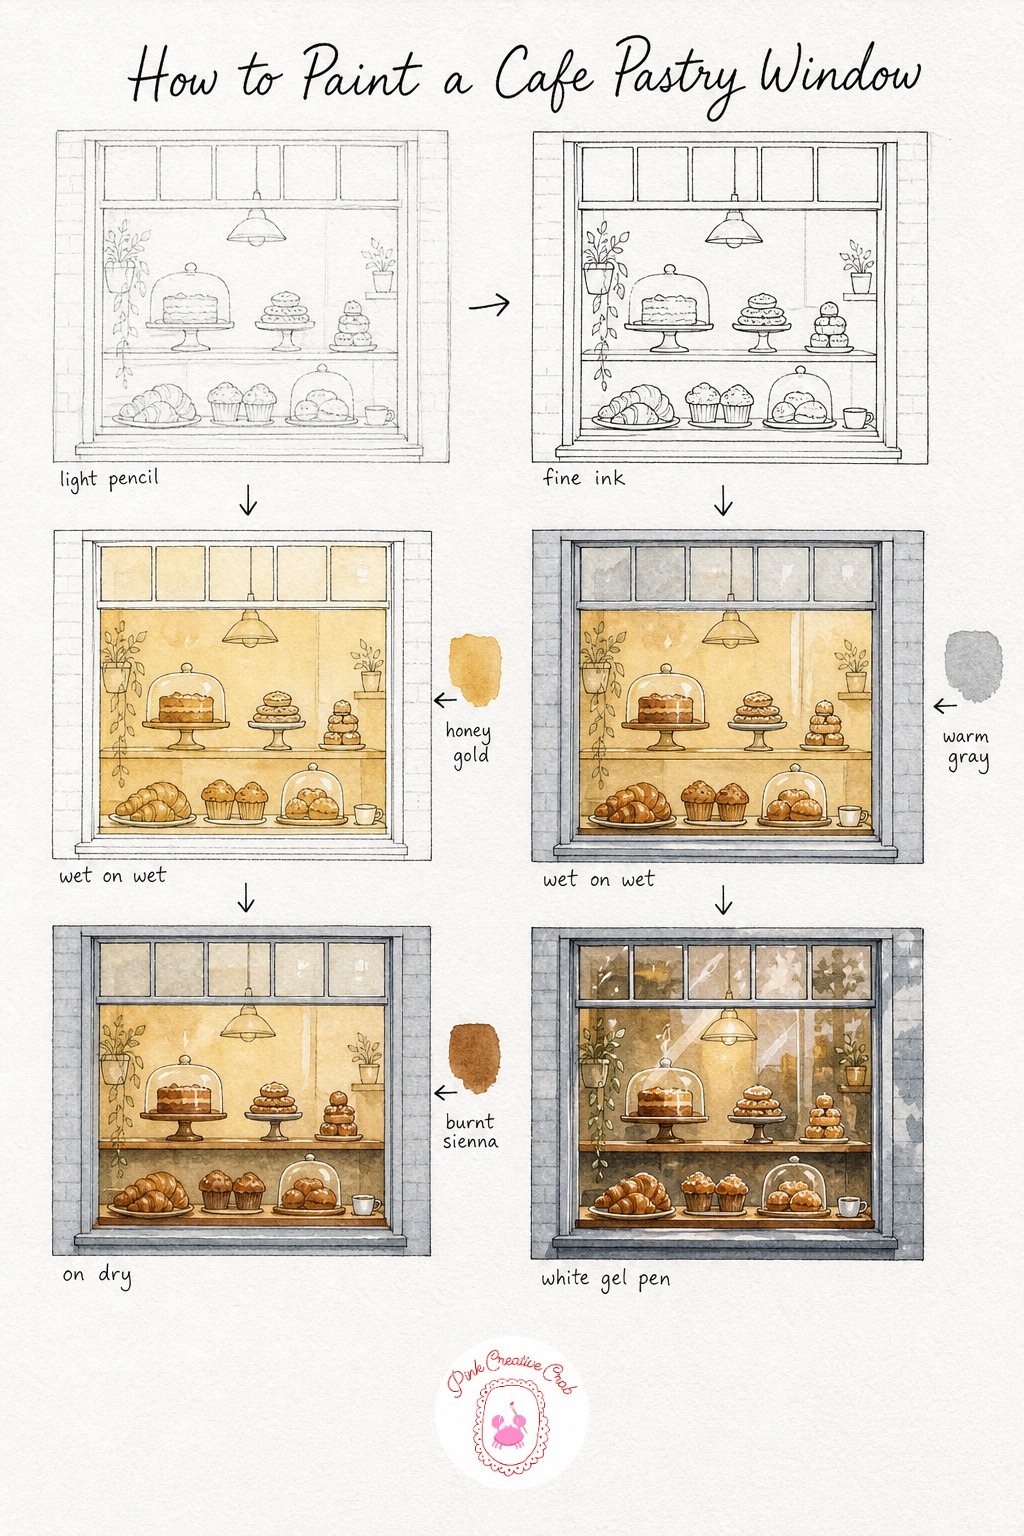
Sketch a simple window frame with a shelf inside holding a loose row of pastry shapes, rounds and crescents are easiest to suggest without detail. Once the pencil feels right, trace the window frame, shelf line and each pastry’s outline in fine black ink, letting the pencil disappear underneath.
Wash the whole shelf area with pale honey gold first, this unifies all the pastries under one warm base tone before any individual color goes in. While that is drying, wash the window glass and frame with a soft gray blue, keeping it loose so the glass reads as reflective rather than flat.
Once everything is dry, deepen each pastry shape individually with burnt sienna, a little variation between them keeps the display looking handmade rather than uniform. Add a soft shadow beneath the shelf and a few light reflection streaks across the glass with gray. Finish with a white gel pen for crisp highlights on the glass and a sugar dusting across the pastries.
Tip: for more cafe atmosphere to paint after this one, watercolor European cafe scenes is a natural next stop.
Breakfast Tray by the Window
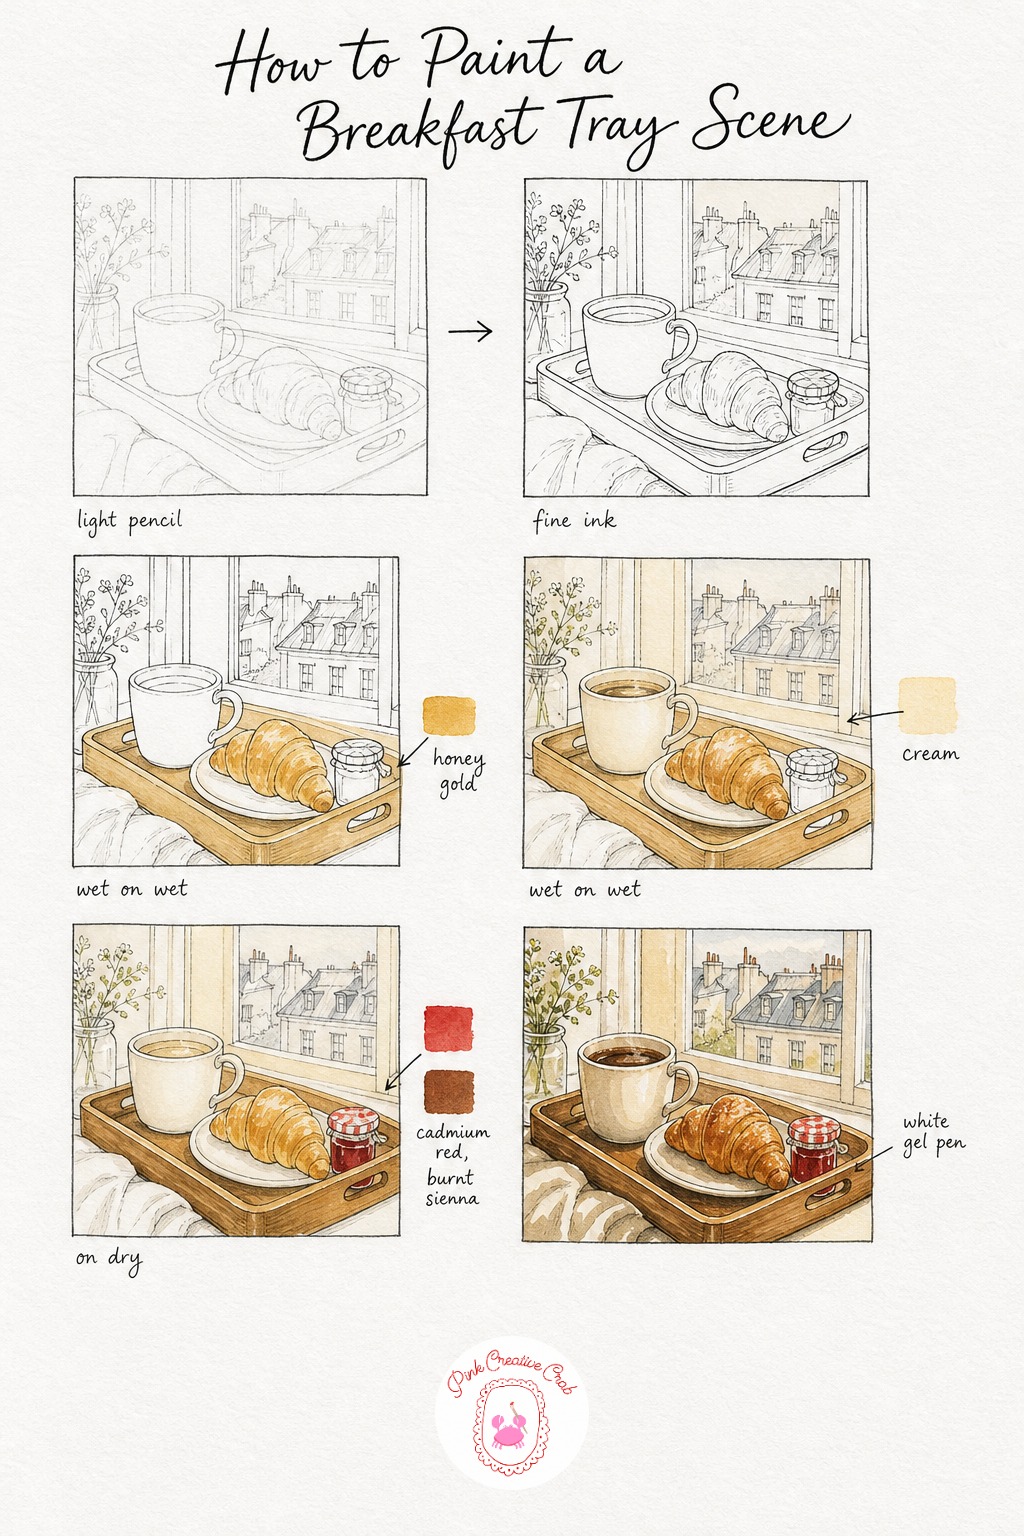
Sketch a simple wooden tray holding a cup, a croissant and a small jam jar, keeping the whole arrangement loose and slightly overlapping for a natural morning feel. Trace the tray’s edges, the cup and each food item in fine black ink once the pencil composition feels balanced.
Wash the croissant and the tray’s wood surface with pale honey gold together, since both share that warm toasted tone. While nearby areas stay clean paper, wash the coffee cup and the soft light behind the whole scene with a gentle cream, keeping the background airy rather than filled in solidly.
Once dry, drop cadmium red into the jam jar for its bright preserve color, and deepen the tray’s wood grain with burnt sienna in loose streaky strokes. A soft shadow across the tray where each item sits grounds the whole scene. Finish with a white gel pen for shine on the cup’s rim, the jar’s glass, and one fresh highlight along the croissant’s ridge.
Tip: this gentle tray scene also works as a warm up before trying a full picnic drawing spread later in your sketchbook.
Tea Cup and Biscuit Corner
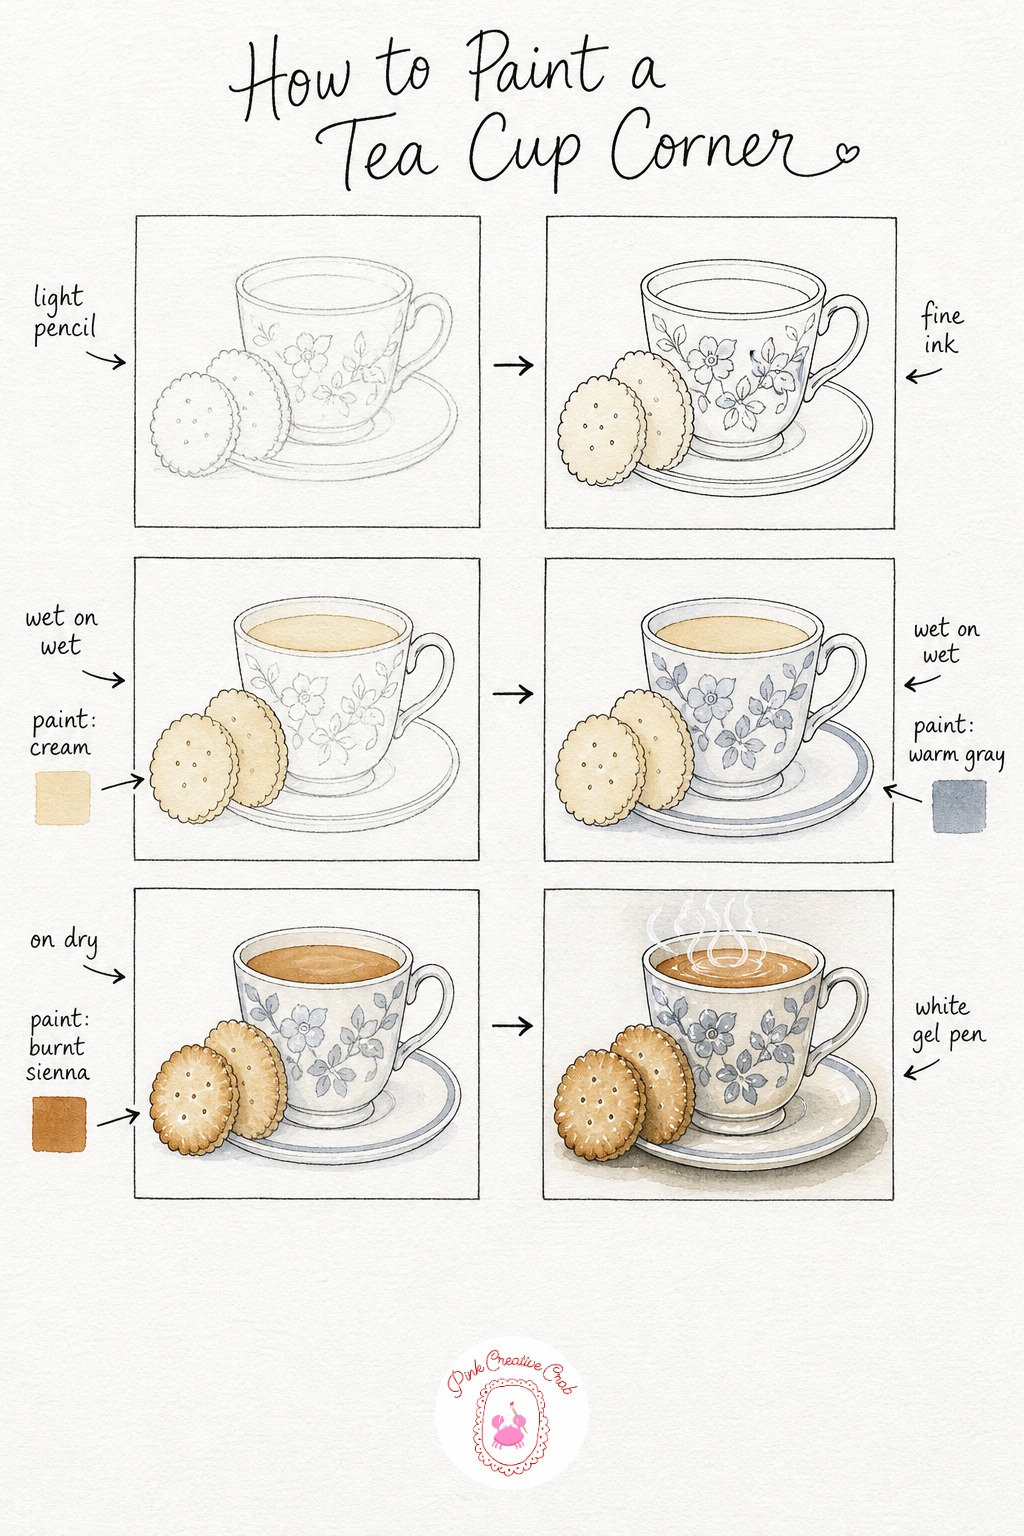
Sketch a simple teacup on its saucer with two biscuits leaning against the cup’s side, a cozy little corner rather than a full table. Once the pencil feels settled, trace the cup, saucer and biscuits in fine black ink, keeping the lines light and a little wobbly for charm.
Wash the visible tea surface and both biscuits with a pale cream first, this unifies the warm tones before any pattern or shading goes in. While that dries, wash the cup’s painted pattern and the saucer’s rim with a soft gray blue, letting it stay loose rather than following every curve precisely.
Once dry, deepen the biscuit edges with burnt sienna for that toasted look, and darken the tea’s visible surface slightly where it meets the cup’s inner wall. Add a soft shadow beneath the saucer to ground the whole corner, then finish with a white gel pen for rising steam, a shine along the cup’s rim and a crumb or two beside the biscuits.
Tip: keep your ink lines thinner on the biscuits than on the cup, it helps the eye read the china as the sturdier object in the scene.
What to Do Next
Pick whichever treat you are craving most today, keep your washes pale and patient, and let the shadows do the real work at the end. Paint one a week and your sketchbook will fill with a whole cozy cafe menu before you know it.
Frequently Asked Questions
What paper works best for watercolor food sketches?
Cold press watercolor paper around 140lb works best for watercolor food sketches. Its slight texture holds pale washes nicely without buckling, and it dries quickly enough to move between wet on wet and wet on dry stages in one sitting.
How do I keep my warm browns from turning muddy?
Keep warm browns from turning muddy by mixing fewer colors together and letting each layer dry before adding the next. Burnt sienna and burnt umber alone can build most cafe tones, so reach for a third color sparingly.
When is a wash dry enough to paint over?
A wash is dry enough once the paper feels cool to the touch and looks matte rather than shiny. Touch a corner lightly with a clean finger, if it feels damp or cool, give it another few minutes before adding darker detail.
What if I do not have white gouache for highlights?
A white gel pen works just as well as white gouache for final highlights and is often easier for beginners to control. Both sit nicely on fully dry, darker washes, just test the pen on scrap paper first to check it flows smoothly.
How do I make icing or steam look soft instead of hard edged?
Soften icing or steam by using a slightly damp brush right after applying white gouache, or by keeping gel pen lines loose and broken rather than continuous. Hard, perfectly even lines rarely occur in real pastries or rising steam.
Have any thoughts?
Share your reaction or leave a quick response — we’d love to hear what you think!
-
 0
-
0
-
0
-
0
-
0
-
0


