

Table of Contents
Wet-on-wet watercolor is where the magic happens. It’s that dreamy, flowing technique where colors bloom and blend on their own, creating effects you literally can’t achieve any other way. Watch paint spread across wet paper and you’ll understand why watercolorists get addicted to this medium.
But here’s the thing – wet-on-wet also frustrates more beginners than any other watercolor technique. The paint goes where it wants, colors mix into mud, everything bleeds together into chaos. One minute it’s beautiful, the next it’s a disaster, and you have no idea what changed.
This guide teaches you to control wet-on-wet watercolor instead of just hoping for the best. You’ll learn the science behind why paint behaves the way it does on wet paper, master the different wetness levels that create different effects, and develop the timing instincts that separate random results from intentional artistry.
What you’ll learn:
- How water and paint interact on paper
- The four wetness levels and what each creates
- Step-by-step wet-on-wet techniques
- Common problems and exactly how to fix them
- Stunning effects unique to wet-on-wet
- When to use wet-on-wet vs other techniques
- How to combine wet-on-wet with controlled techniques
Who this guide is for:
- Beginners frustrated by unpredictable wet-on-wet results
- Artists wanting to add atmospheric effects to their work
- Watercolorists ready to move beyond tight, controlled painting
- Anyone who loves loose, expressive watercolor styles
- Painters struggling with timing and water control
By the end, you’ll understand wet-on-wet at an intuitive level. You’ll know what’s happening on your paper and why, letting you create intentional beauty instead of accidental chaos.
Understanding Wet-on-Wet: The Science
What Actually Happens
Wet-on-wet means applying wet paint to wet paper or wet paint. When paint hits wet surface, water on the paper carries the pigment particles along with it, spreading the color. The wetter the paper, the more the paint spreads. Simple physics, but the results feel like magic.
This is completely different from wet-on-dry, where you apply paint to dry paper. Wet-on-dry gives you control and crisp edges. Wet-on-wet gives you soft edges and spontaneous blending – the signature watercolor look that makes people say “wow, that’s beautiful.”
According to Winsor & Newton’s technical guides, understanding moisture levels is the single most important factor in controlling wet-on-wet technique.
Why Paint Spreads
Water flows from wetter areas toward drier areas, carrying pigment with it. This is called “capillary action” and it’s why:
- Paint spreads more on very wet paper
- Paint stops spreading when paper wetness equals paint wetness
- Paint flows toward puddles and away from dry spots
- Adding more water to an area pulls paint toward it
You’re not directly controlling the paint – you’re controlling the water, and the water moves the paint.
The Role of Paper
Paper isn’t just a surface – it’s an active participant. Quality watercolor paper has “sizing” (a substance that controls absorbency) that lets water sit on the surface briefly before absorbing. This gives you working time.
Cold press paper (medium texture) is the wet-on-wet standard. Enough texture (tooth) to hold water and create interesting effects, smooth enough for some control.
Rough paper holds more water in its valleys, creating very unpredictable wet-on-wet effects and longer working time.
Hot press paper (smooth) has less tooth, so water sits on surface longer but also runs more freely. Wet-on-wet is trickier but creates unique effects.
Paper weight matters hugely. Lightweight paper (90-140 lb) buckles when wet, creating unintended puddles and runs. Use 140 lb minimum, ideally 200-300 lb for wet-on-wet work. See our watercolor paper guide for detailed recommendations.
Pigment Behavior
Different pigments behave differently in wet-on-wet:
Staining colors (phthalo blue, alizarin crimson, sap green) penetrate paper fibers quickly. They spread fast and don’t lift easily. Great for backgrounds, challenging for corrections.
Non-staining colors (cerulean blue, raw sienna, cadmium colors) sit more on paper surface. They spread slower and lift more easily. Better for learning wet-on-wet.
Granulating pigments (ultramarine blue, burnt sienna, cerulean blue) settle unevenly, creating textured effects enhanced by wet-on-wet. The paint particles separate and settle into paper valleys.
This isn’t just trivia – knowing your pigment characteristics helps you predict and control wet-on-wet results.
The Four Wetness Levels
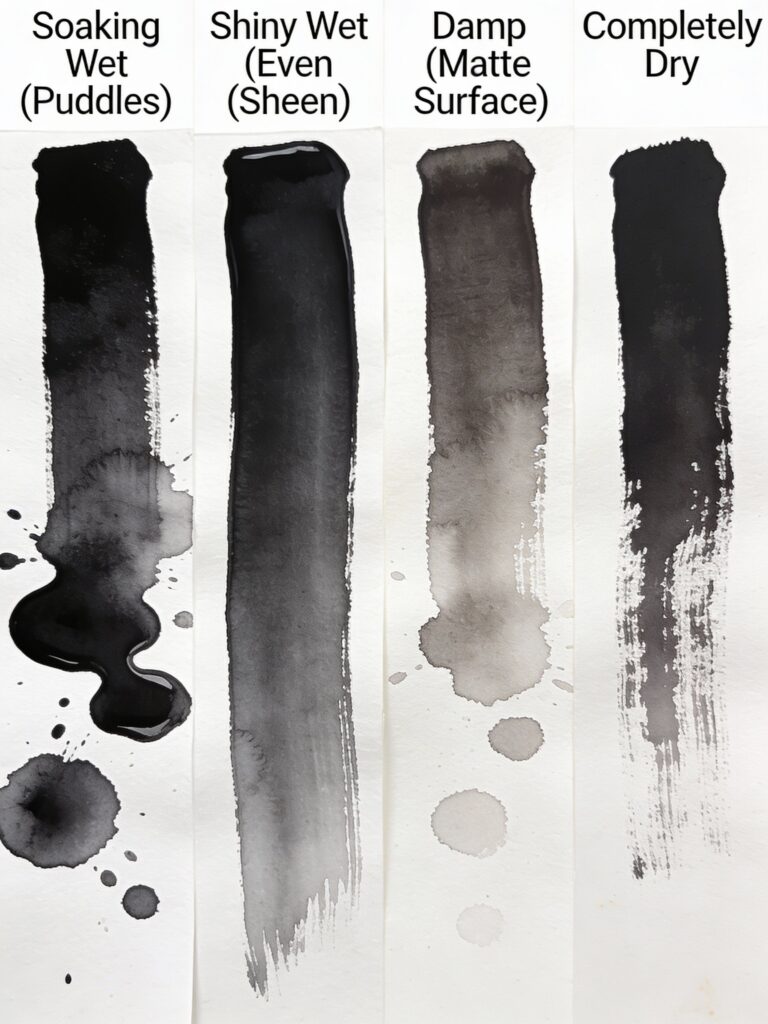
This is the secret to wet-on-wet mastery: there aren’t just “wet” and “dry” – there are four distinct wetness levels, and each creates completely different effects.
Level 1: Soaking Wet (Puddles)
What it looks like: Visible sheen with pooled water. Shine visible from any angle. If you tilt paper, water moves.
What happens: Paint spreads dramatically and uncontrollably. Colors flow everywhere, blend completely, create backruns and blooms. Maximum unpredictability.
Best for:
- Initial paper wetting before starting
- Very soft, diffused skies
- Extremely loose atmospheric effects
- When you want total spontaneity
Problems at this level:
- Colors become too pale as they spread
- Backruns and cauliflowers (unwanted blooms) everywhere
- No control over where paint goes
- Impossible to create any defined shapes
How to achieve: Apply water generously with large brush or spray bottle. Let it sit briefly so sheen is even across surface.
Level 2: Shiny Wet (Even Sheen)
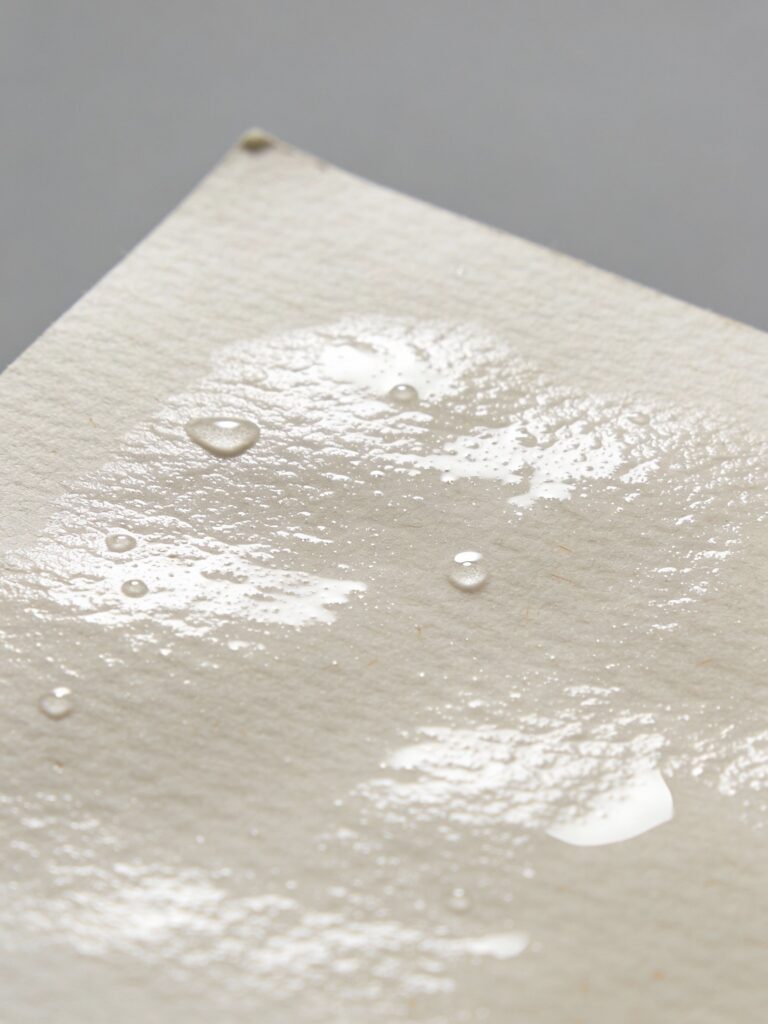
What it looks like: Uniform sheen across paper. Looks wet but no pooling. This is the “perfect” wetness level most instructions refer to when they say “wet-on-wet.”
What happens: Paint spreads in controlled way. You can guide where it goes but edges stay soft. Colors blend beautifully without becoming unrecognizable. The sweet spot.
Best for:
- Skies with soft clouds
- Smooth color gradations
- Gentle background washes
- Flower petals with soft edges
- Controlled wet-on-wet work
Problems at this level:
- Short working time (2-5 minutes)
- Easy to miss this stage as paper dries
- Hard to maintain even wetness across large areas
How to achieve: Wet paper with clean water, let excess absorb briefly (10-30 seconds), check for even sheen. No puddles, but clearly wet all over.
Pro tip: This level requires practice to recognize. Tilt paper and watch – at shiny wet stage, there’s sheen but water doesn’t run.
Level 3: Damp (Matte but Cool)
What it looks like: Lost the shine. Looks almost dry but paper feels cool to touch. Color appears darker than when paper was shinier.
What happens: Paint spreads only slightly. Soft edges but more controlled. Colors stay closer to where you place them. Transition zone between wet-on-wet and wet-on-dry.
Best for:
- Adding details to wet-on-wet areas
- Soft shadows on objects
- Semi-controlled blending
- Layering with soft edges
- Correcting or adding to nearly-dry wet-on-wet work
Problems at this level:
- Timing is critical – dries quickly
- Easy to misjudge and accidentally go wet-on-dry
- Can create unwanted hard edges if too dry
How to achieve: Wait as shiny wet stage dries, or lightly dampen dry paper with barely-wet brush. The hardest stage to hit intentionally.
Level 4: Dry
What it looks like: Paper back to original color and temperature. Touch it – feels room temperature, not cool.
What happens: This is wet-on-dry. Paint creates hard edges and doesn’t blend. Total control but no soft effects.
Best for:
- Details and definition
- Hard edges and crisp shapes
- Layering without colors mixing
- When you need precision
How to know it’s truly dry: Touch paper to your lips (most sensitive skin). Cool feeling = still damp. Room temperature = dry.
Basic Wet-on-Wet Technique: Step by Step
Let’s walk through the fundamental wet-on-wet process with a simple gradient wash – the foundation of all wet-on-wet work.
What You Need
Essential supplies:
- Watercolor paper (140 lb cold press minimum)
- Large flat or mop brush for wetting
- Medium round brush for painting
- Two water containers (one clean for wetting, one for rinsing)
- Watercolor paint (start with one color)
- Paper towels
- Spray bottle (optional but helpful)
- Board or surface that tilts slightly
Step 1: Prepare Your Workspace
Set up before wetting paper – you’ll need to work quickly once paper is wet.
Mix your paint to desired consistency in palette. For wet-on-wet, slightly more concentrated than normal since it will dilute on wet paper.
Have clean water ready for wetting paper. Don’t use your paint-contaminated rinse water – use fresh clean water.
Position paper on slight angle (5-10 degrees) propped against something. This helps paint flow gently downward in controlled way.
Step 2: Wet the Paper
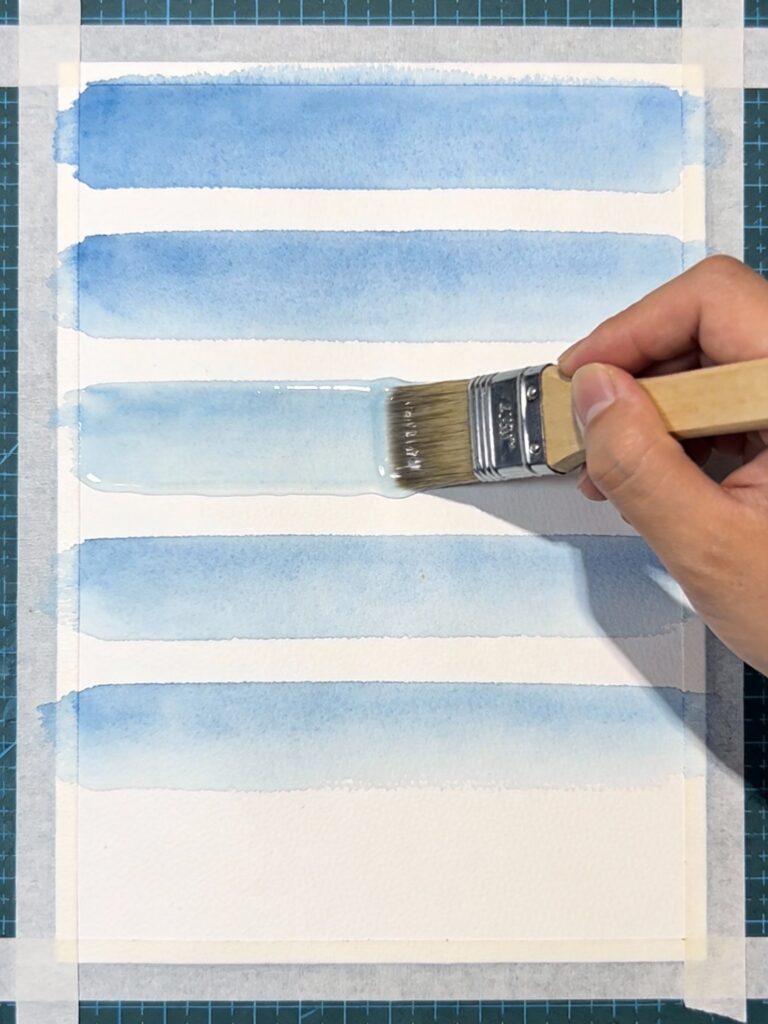
Using large flat brush or mop brush loaded with clean water, wet your paper area with horizontal strokes. Work systematically – top to bottom or side to side – ensuring even coverage.
Key technique: Don’t scrub. Gentle, overlapping strokes. Let water sit on surface rather than forcing it into paper.
Watch for even sheen. If you see puddles, tilt paper to let excess run off or blot with barely-damp paper towel.
If areas dry while wetting (happens on hot days or with rough paper), re-wet them quickly.
Wait 10-30 seconds. Let water absorb slightly so wetness is even. Paper should be shiny wet (level 2) but not soaking (level 1).
Step 3: Apply First Color
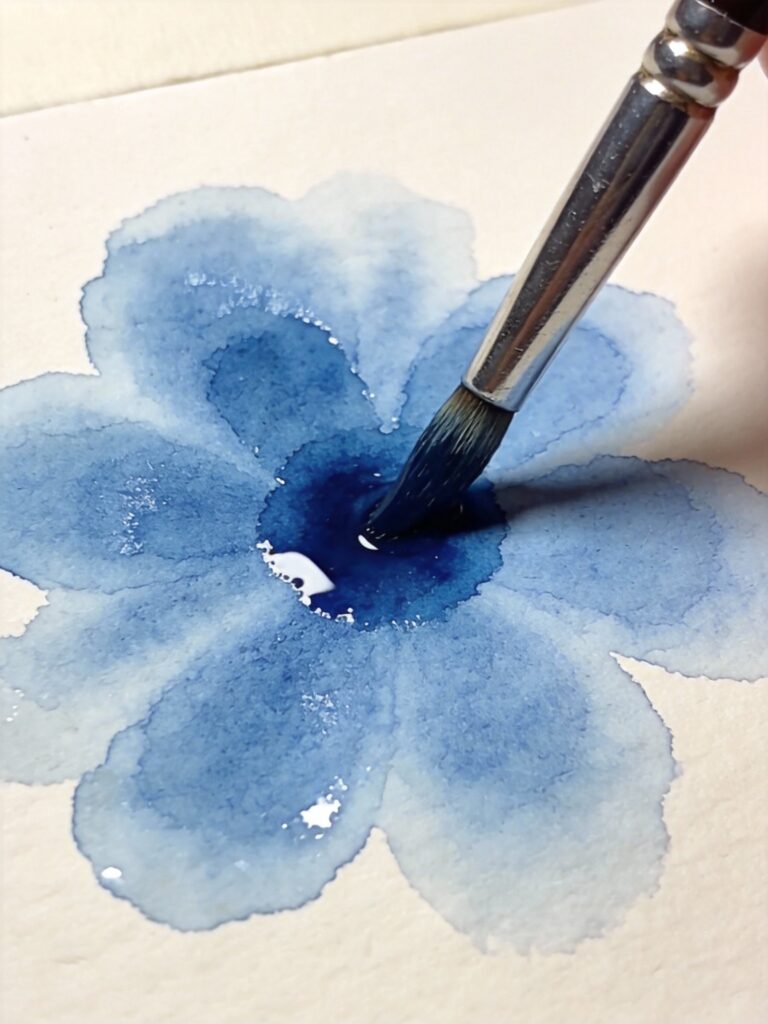
Load brush with paint – more paint than water on brush. Touch loaded brush to wet paper.
Watch the magic: Paint spreads gently from where your brush touched. The color flows and softens at edges.
If you’re creating gradient, apply more paint to one area (say, top of paper), less to another area. Paint will naturally graduate as it spreads.
Don’t panic if it spreads more than expected. Wet-on-wet is about controlled spontaneity. Let it do its thing.
Timing is everything: Work while paper is at shiny wet stage. Once it starts losing sheen, your window is closing.
Step 4: Add Variation (Optional)
While first color is still wet, you can:
Drop in second color: Load brush with different color, touch to wet area. Colors will blend where they meet. Beautiful, unpredictable transitions.
Tilt paper: Encourage paint to flow in specific direction.
Lift color: Touch area with clean damp (not wet) brush to lift paint, creating lighter spots.
Add more water: Drop clean water into area to push paint away, creating blooms (more on this later).
Step 5: Leave It Alone
This is the hardest step. Once you’re satisfied (or paper is drying), stop touching it.
As paper dries, colors settle and edges form. Messing with it during drying creates mud or unwanted backruns.
Let it dry completely flat. Tilting or moving paper while drying causes paint to pool unevenly.
Drying time: Depends on humidity, paper weight, how wet paper was. Usually 5-15 minutes. Test with your lips (weird but works) – cool = damp, room temp = dry.
Step 6: Evaluate
Once dry, colors will be lighter than when wet – watercolor always dries lighter.
Edges should be soft and diffused. If you see hard lines, those areas dried before paint reached them (too dry) or you added paint after paper started drying.
Successful wet-on-wet has beautiful gradations, soft transitions, and painterly quality impossible to achieve other ways.
Advanced Wet-on-Wet Techniques
Once you’ve mastered basic wet-on-wet, these techniques expand your possibilities.
Variegated Wash

Multiple colors flowing together in single wet-on-wet area.
Technique:
- Wet paper to shiny wet stage
- Apply first color to one area
- Quickly apply second color to adjacent area
- Let colors meet and blend at boundary
- Optionally add third, fourth colors
- Tilt to encourage blending or leave flat for less mixing
Uses: Dramatic skies, colorful backgrounds, abstract effects, flower petals with color variation.
Pro tip: Use analogous colors (next to each other on color wheel) for harmonious blending. Complementary colors can create mud if they blend too much.
Wet-on-Wet Glazing
Applying wet-on-wet layer over dried wet-on-wet layer for depth.
Technique:
- Complete first wet-on-wet layer and let dry completely
- Re-wet specific area with clean water
- Apply new color while wet
- New color blends with underlayer optically but doesn’t lift it
Uses: Building atmospheric depth, adding shadows with soft edges, enriching colors without losing luminosity.
Caution: Some pigments (staining colors) lift when re-wet. Test your colors first.
Dropping Colors
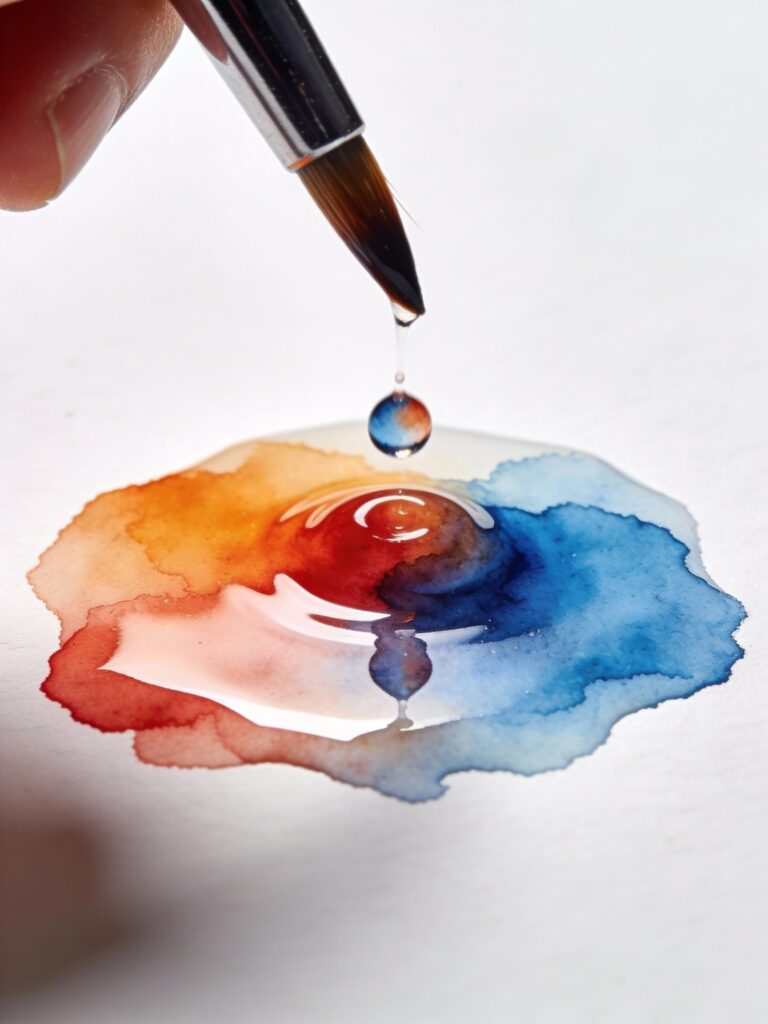
Letting loaded brush touch wet surface so paint drops and spreads on its own.
Technique:
- Wet area to shiny wet stage
- Load brush heavily with paint
- Hold brush just above paper
- Touch tip to surface and lift immediately
- Paint drops and spreads organically
Uses: Tree foliage, flower masses, texture, spontaneous organic shapes.
Variation: Drop in multiple colors while first is wet. They’ll push against each other creating beautiful edges.
Negative Painting on Wet-on-Wet
Painting the background wet-on-wet while leaving shapes dry.
Technique:
- Lightly sketch shapes you want to preserve
- Wet only background areas (paint around shapes with clean water)
- Apply color to wet background
- Color stops at edges of dry shapes, creating soft-edged negative space
Uses: Flowers with soft backgrounds, trees against sky, creating depth.
Advanced version: Pre-wet shapes with clean water, then wet background. As you paint background, color will bleed slightly into shapes, creating natural integration.
Charging In
Adding concentrated color to wet wash, creating intensity variation.
Technique:
- Lay initial wet-on-wet wash
- While very wet, touch loaded brush (thick paint, minimal water) to areas you want darker
- Pigment spreads but stays more concentrated than initial wash
Uses: Creating focal points, adding depth, suggesting form, preventing flatness.
Key: Do this while paper is still shiny wet. Wait too long and you get hard edges instead of soft intensification.
Blending Two Edges
Creating seamless transition between two wet-on-wet areas.
Technique:
- Paint first area wet-on-wet
- While still wet, wet adjacent area with clean water
- Immediately paint second area
- Colors meet and blend at boundary
Uses: Smooth sky-to-land transitions, connecting shapes, creating unity.
Timing is critical: Both areas must be wet simultaneously or you’ll get hard edge where they meet.
Creating Specific Effects
Soft Clouds
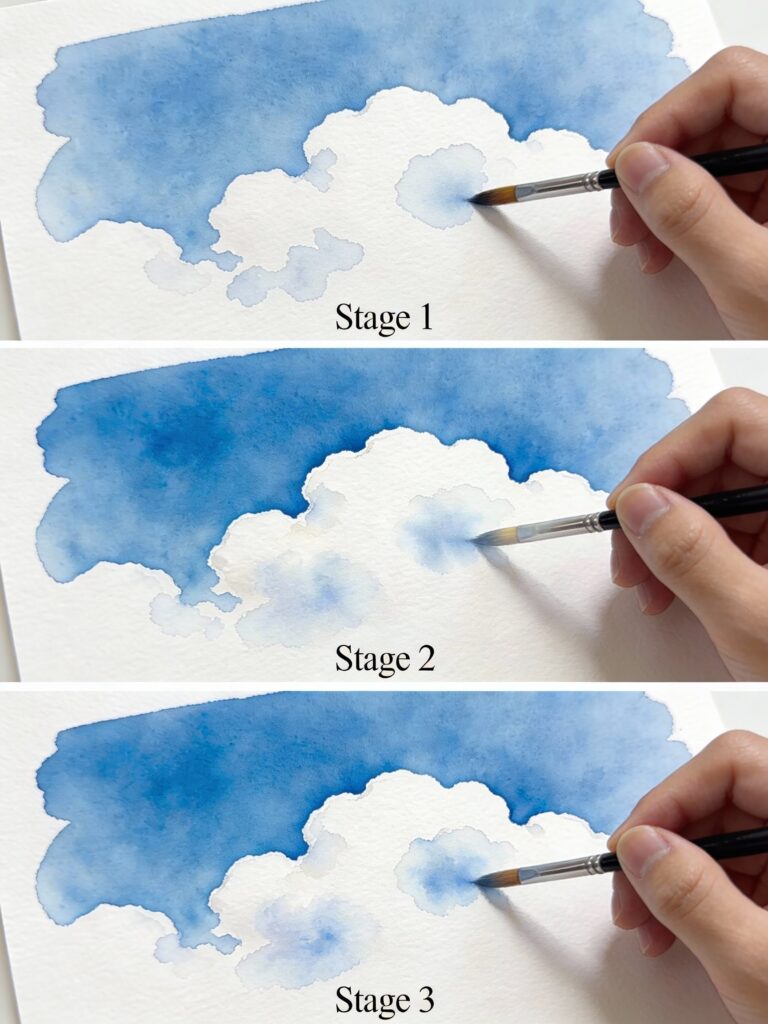
Method:
- Wet sky area to shiny wet
- Apply blue wash leaving white paper for clouds
- While wet, soften cloud edges by pulling color away with clean damp brush
- Let dry
- Add shadow under clouds wet-on-wet using damp stage
Key: Keep cloud areas drier than sky. Let white paper create brightness.
Atmospheric Trees
Method:
- Wet background area
- Drop in varied greens while wet
- Let spread and blend
- Before fully dry (damp stage), add darker greens for definition
- After dry, add trunks and branches wet-on-dry for structure
Key: Vary wetness – wetter areas create soft distant trees, damper areas create more defined middle-ground trees.
Water Reflections
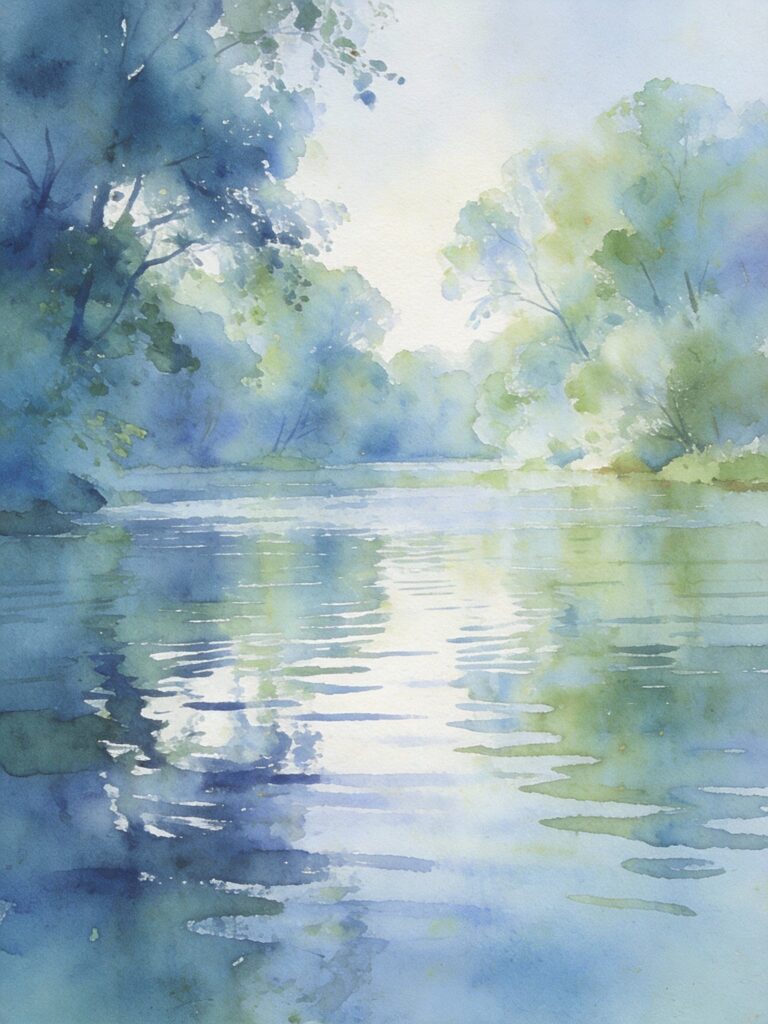
Method:
- Paint subject (boat, building, trees) wet-on-dry at top
- While subject still slightly damp, wet reflection area below
- Pull colors down from subject into wet reflection area with downward strokes
- Add horizontal strokes through wet reflection to break up reflection
- Let dry without touching
Key: Reflections should be softer and slightly darker than subject. The wet-on-wet technique naturally creates this effect.
Sunset Skies
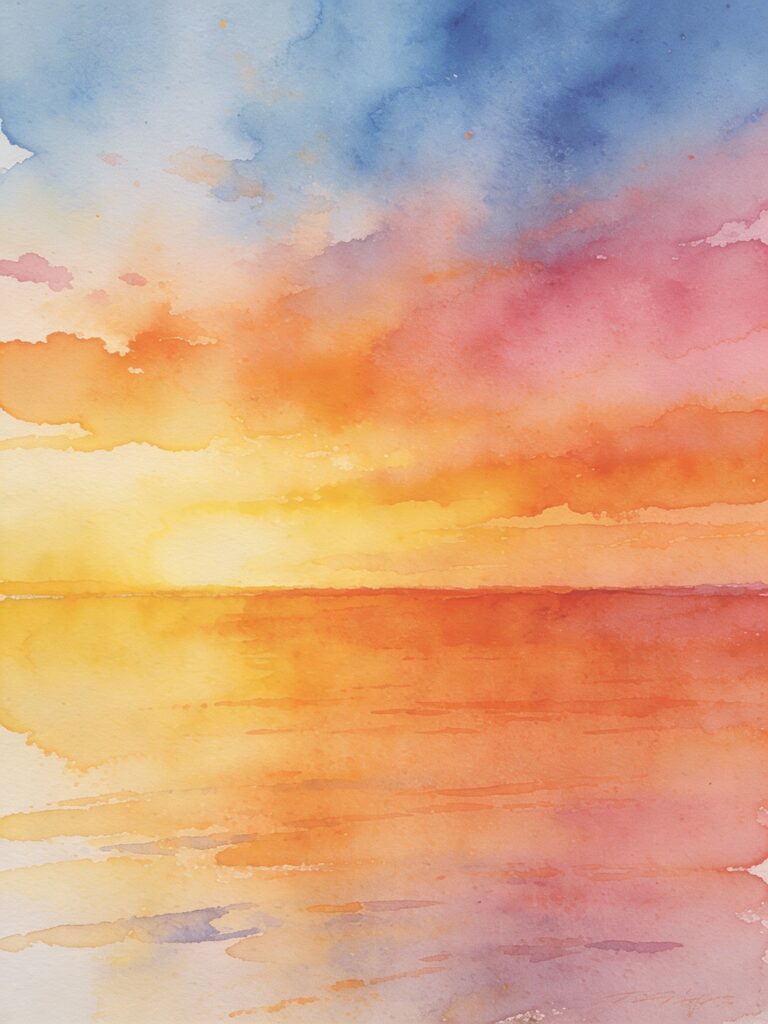
Method:
- Wet entire sky area thoroughly (shiny wet)
- Work fast: apply yellow at horizon
- Add orange above yellow while wet
- Add pink/red above orange
- Add blue at top
- Tilt paper slightly to encourage blending
- Let gravity and water do the work
Key: Use warm colors (yellow, orange, red) in varying temperatures. Work quickly – you have maybe 2 minutes before paper loses ideal wetness.
Soft Flower Petals
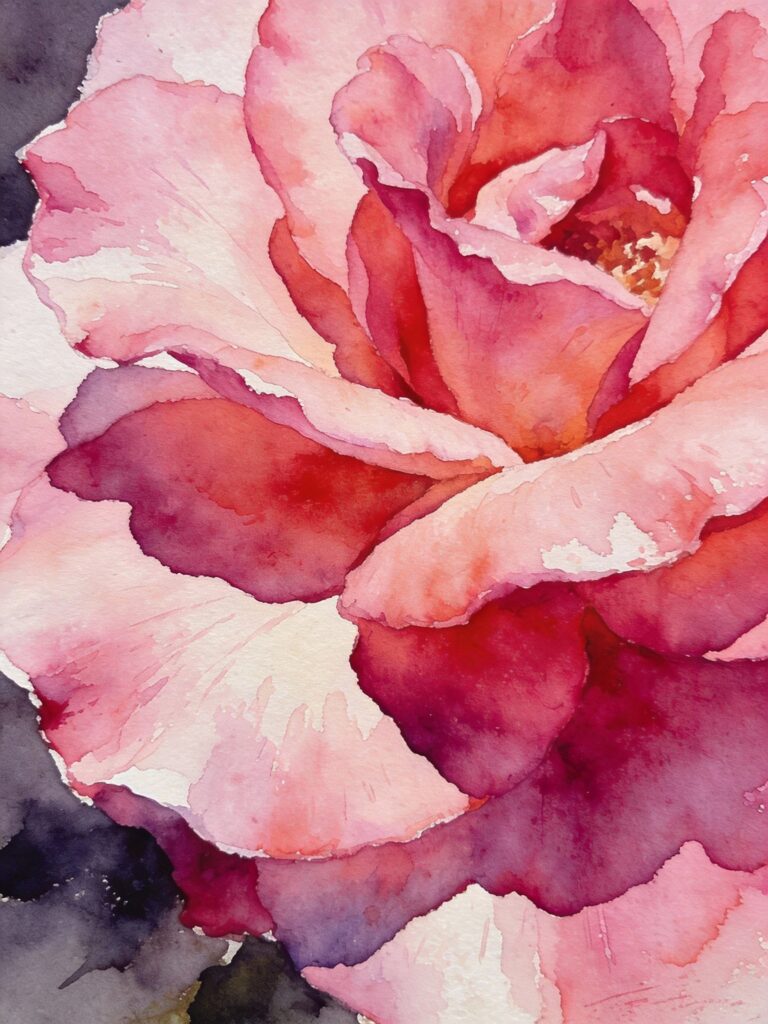
Method:
- Wet single petal shape with clean water
- Drop in light color
- While wet, drop in darker color at base or edges
- Tilt so colors flow in direction of petal form
- Let dry completely before doing adjacent petal
Key: Work one petal at a time. Letting each dry prevents colors bleeding between petals unintentionally.
Blooms and Backruns (Intentional)
Blooms (also called backruns or cauliflowers) are those flower-shaped marks where water pushed back into drying paint. Usually accidents, but beautiful when intentional.
Method to create intentionally:
- Lay wet-on-wet wash
- Let dry to damp stage (lost most shine)
- Drop clean water into area
- Water pushes paint back, creating bloom pattern
- Let dry without touching
Uses: Texture in backgrounds, abstract effects, happy accidents that add interest.
Key: Must add water during damp stage. Too wet and nothing happens, too dry and you get hard-edged water spot.
Common Problems and Solutions
Problem 1: Paint Spreads Too Much, Becomes Too Pale
Cause: Paper too wet (soaking wet level instead of shiny wet) or paint too diluted.
Solutions:
- Blot excess water with barely-damp paper towel before painting
- Wait 30-60 seconds after wetting for water to absorb slightly
- Use more concentrated paint (less water in your mixture)
- Work on heavier paper (200-300 lb) which absorbs water better
Prevention: Check paper wetness by tilting – if water runs, it’s too wet. Wait for even sheen without puddles.
Problem 2: Paint Doesn’t Spread, Creates Hard Edges
Cause: Paper not wet enough (damp or dry instead of shiny wet) or paint too thick.
Solutions:
- Re-wet area immediately with spray bottle or clean brush
- Work faster after wetting paper
- Check that you’re wetting entire area evenly
- Use more water in paint mixture
Prevention: Work during shiny wet stage. If paper starts losing sheen, re-wet it before continuing.
Problem 3: Colors Turn Muddy
Cause: Too many colors mixed on paper or using complementary colors that create brown/gray.
Solutions:
- Limit to 2-3 colors per wet-on-wet area
- Choose analogous colors (neighbors on color wheel)
- Let first color dry before adding drastically different color
- Use less pigment (more water) so colors stay transparent
Prevention: Plan color scheme before wetting paper. Test color combinations on scrap paper first.
Problem 4: Unwanted Backruns and Blooms
Cause: Adding wet paint or water to area that’s already drying (damp stage).
Solutions:
- Once it happens, you can’t fix it – let it dry and work with it or lift whole area when dry
- Prevent by working entirely while paper is shiny wet
- If you must add to drying area, use paint same wetness as paper (not wetter)
Prevention: Work quickly during initial wet stage. If paper starts drying, either let it dry completely or re-wet entire area evenly.
Problem 5: Strokes Show Through Wash
Cause: Not enough water on paper or scrubbing with brush instead of gentle application.
Solutions:
- Wet paper more thoroughly
- Use larger brush with more water capacity
- Apply paint with gentle touches, not scrubbing strokes
- Let paint spread naturally rather than brushing it around
Prevention: Think of wet-on-wet as “placing” paint, not “brushing” paint. Let water do the work.
Problem 6: Can’t Get Soft Edges
Cause: Paper drying too fast (environmental conditions) or working too slowly.
Solutions:
- Work in more humid conditions or use humidifier
- Wet larger area than needed – extra wetness buys time
- Work faster – practice speeds up execution
- Use stay-wet palette so paint mixing doesn’t slow you down
- Spray bottle for quick re-wetting
Prevention: Practice on small areas first to build speed and confidence.
Problem 7: Colors Look Different When Dry
Cause: Watercolor always dries 30-50% lighter than wet appearance.
Solutions:
- Mix colors darker than desired final result
- Do test swatches and let dry to see true color
- Build layers – multiple light layers create richness
- Use more pigment, less water
Prevention: Experience teaches you how much darker to mix. Keep dried test swatches for reference.
Problem 8: Paint Pools in Paper Valleys
Cause: Painting on buckled/warped paper or paper too lightweight.
Solutions:
- Stretch paper before painting (wet it, tape to board, let dry stretched)
- Use 200-300 lb paper that doesn’t buckle
- Paint on watercolor block (paper glued on all sides)
- Keep surface flat while drying
Prevention: Invest in heavier paper or learn to stretch paper properly.
Wet-on-Wet vs. Other Techniques
When to Use Wet-on-Wet
Choose wet-on-wet for:
- Soft, atmospheric effects
- Skies and water
- Backgrounds
- Initial washes
- Expressive, loose style
- Spontaneous, organic effects
- Quick color coverage
- Blended color transitions
Wet-on-wet advantages:
- Creates effects impossible with other techniques
- Fast coverage of large areas
- Beautiful, natural blending
- Signature watercolor look
- Encouraging happy accidents
Wet-on-wet limitations:
- No detail or precision
- Limited control
- Requires good timing
- Can’t create hard edges
- Short working window
When to Use Wet-on-Dry
Choose wet-on-dry for:
- Details and definition
- Hard edges
- Controlled layers
- Crisp shapes
- Text or precision work
- Building darks
- Corrections
Combining both: Most successful watercolors use both. Wet-on-wet for initial washes and atmosphere, wet-on-dry for details and definition. This combination creates paintings with both spontaneity and control.
Typical Painting Workflow
- Wet-on-wet – Initial washes, skies, backgrounds
- Let dry completely
- Wet-on-dry – Mid-tones, shapes, first definition
- Let dry
- Wet-on-wet (selective) – Soft shadows, atmosphere
- Let dry
- Wet-on-dry – Details, darks, final definition
This back-and-forth creates depth, atmosphere, and detail in single painting.
Practice Exercises
Exercise 1: Wetness Level Recognition (20 minutes)
Goal: Learn to identify the four wetness levels.
Steps:
- Wet small area of paper
- Immediately apply paint stroke (soaking wet level)
- Wait 30 seconds, apply another stroke (shiny wet level)
- Wait until shine fades, apply stroke (damp level)
- Wait until completely dry, apply stroke (dry level)
- Compare how paint behaved at each stage
Label each stroke with wetness level. This reference sheet teaches you what to look for.
Exercise 2: Basic Gradient (15 minutes)
Goal: Master smooth wet-on-wet gradient.
Steps:
- Wet rectangle on paper to shiny wet
- Load brush with paint
- Apply concentrated color at one end
- Apply more diluted color at other end
- Let blend naturally
- Repeat with different colors until smooth gradients feel natural
Success: Smooth transition with no hard edges or stripes.
Exercise 3: Variegated Wash (20 minutes)
Goal: Control multiple colors in wet-on-wet.
Steps:
- Wet square on paper
- Drop in yellow at one corner
- Drop in blue at opposite corner
- Drop in red at third corner
- Let colors meet and blend
- Observe how they interact
- Repeat using different color combinations
Success: Distinct colors that blend beautifully where they meet without turning completely to mud.
Exercise 4: Controlled Blooms (15 minutes)
Goal: Create intentional blooms instead of accidental ones.
Steps:
- Wet area and paint with one color
- Let dry to damp stage (loses shine)
- Drop clean water into area
- Watch bloom form
- Let dry completely
- Repeat, experimenting with different dampness levels
Success: Understanding exactly when to add water for bloom effect.
Exercise 5: Sky with Soft Clouds (30 minutes)
Goal: Apply wet-on-wet to realistic subject.
Steps:
- Wet sky area to shiny wet
- Paint blue wash, leaving white areas for clouds
- Soften cloud edges with clean damp brush
- Let dry partially
- Add subtle shadow under clouds while damp
Success: Soft, realistic-looking clouds with natural edges.
Exercise 6: Layered Wet-on-Wet (45 minutes)
Goal: Build depth through multiple wet-on-wet layers.
Steps:
- First layer: wet-on-wet wash, let dry completely
- Second layer: re-wet portion, add darker colors wet-on-wet, let dry
- Third layer: re-wet small area, add darkest values wet-on-wet
- Result: depth created through soft-edged layers
Success: Multiple soft-edged layers creating dimension without hard transitions.
Supplies for Wet-on-Wet Success
Essential Paper
Recommended:
- Arches Cold Press 140 lb or heavier (300 lb even better)
- Fabriano Artistico Cold Press 140 lb+
- Saunders Waterford Cold Press 140 lb+
Why these: Professional sizing, proper absorbency, doesn’t buckle badly, handles multiple wet layers.
Budget option:
- Canson XL Watercolor 140 lb (for practice)
- Strathmore 400 Series 140 lb
Essential Brushes
Large flat or mop brush (1-2 inches): For wetting paper evenly. Natural or synthetic fine, just needs to hold lots of water.
Medium round brush (size 8-12): For applying paint. Round shape lets you work large areas and come to point for some control.
Small round brush (size 4-6): For dropping colors and adding variation.
Quality matters less for wet-on-wet than for detail work. Mid-range synthetics work fine.
Helpful Tools
Spray bottle: Quick re-wetting, creating texture.
Paper towels: Blotting excess water, lifting paint, controlling wetness.
Sponge: Natural sea sponge for texture and lifting.
Tilting surface: Board or easel that props paper at slight angle.
Two water containers: One clean (for wetting paper), one for rinsing brushes.
Paint Considerations
For learning wet-on-wet, choose non-staining, non-granulating pigments:
- Cerulean blue (non-staining, gives you time)
- Raw sienna (non-staining, gentle earth tone)
- Permanent rose (non-staining pink)
- Cobalt blue (non-staining, gentle blue)
Avoid while learning:
- Phthalo colors (spread aggressively)
- Alizarin crimson (staining, hard to control)
- Sap green (staining)
Once comfortable, explore all pigments for their unique wet-on-wet characteristics.
Advanced Tips and Insights
Temperature and Humidity Matter
Cold weather: Paper dries slower, giving more working time. Great for beginners but can lead to overworking.
Hot weather: Paper dries fast, requiring quick work. Spray bottle essential.
Humid days: Longer working time, wetter effects last longer.
Dry days: Brief working window, need to work fast or use humidifier.
Pro tip: Some artists use hair dryer on cool setting to control drying speed, accelerating or slowing specific areas.
Paper Angle Affects Flow
Flat surface: Paint spreads evenly in all directions. Good for controlled work.
Slight tilt (5-10 degrees): Paint flows gently downward. Perfect for skies, gradients, vertical subjects like trees.
Steep angle (20+ degrees): Paint runs quickly. Useful for dramatic effects but harder to control.
Changing angle while wet: Directs paint flow. Turn paper to encourage blending in specific direction.
Pre-Planning Saves Wet-on-Wet
Since wet-on-wet requires fast work, plan before wetting:
- Sketch composition lightly
- Mix colors in advance
- Decide color placement
- Have all tools within reach
- Know your strategy
Five minutes of planning saves frustration when paper is wet and clock is ticking.
The “Too Late to Fix It” Rule
Once paint is at damp stage and you see problem, you usually have two choices:
- Let it dry completely, then fix it (lift or paint over)
- Immediately re-wet entire area and start over
Trying to “fix” partially dry wet-on-wet almost always makes it worse. Adding paint to damp area creates backruns. Adding water creates blooms. Either commit to letting it dry or commit to re-wetting everything.
Whites and Lights Require Planning
In wet-on-wet, you can’t add white (watercolor is transparent). Whites and lights come from paper or light paint applied while wet.
Preserve whites: Don’t wet areas you want white. Or use masking fluid before wetting.
Create lights: Apply very diluted paint to wet area, or lift with clean damp brush immediately.
Can’t decide? In wet-on-wet, go lighter. You can always darken later. Going lighter after dark is nearly impossible.
Let Paper Do the Work
Best wet-on-wet happens when you stop trying to control everything. Place paint thoughtfully, then trust water and paper to create beautiful blending.
Overworking wet-on-wet (going back in, moving paint around, adding more) usually creates mud and destroys the soft edges that made wet-on-wet beautiful in first place.
Place paint, tilt paper if desired, then hands off. This takes practice and trust.
FAQ
Q: How wet should my brush be when painting wet-on-wet? A: More paint than water on brush. If brush is too wet, you’re adding excess water that creates backruns. Ideal is brush well-loaded with paint but not dripping. Test on scrap paper – paint should flow smoothly off brush without pooling.
Q: Why do my wet-on-wet washes look streaky? A: Three common causes: (1) paper not wet enough or not evenly wet, (2) not enough water on paper or in paint mixture, (3) brushing/scrubbing instead of letting paint flow naturally. Solution: wet paper more thoroughly and evenly, use larger brush with more water capacity, place paint with minimal brush strokes.
Q: Can I do wet-on-wet with thick/heavy body paint? A: No, not effectively. Wet-on-wet requires fluid paint that flows with water. Thick paint sits on surface instead of spreading. Dilute paint more than normal for wet-on-wet – it should be inklike consistency, flowing easily off brush.
Q: How do I keep colors from getting muddy in wet-on-wet? A: Use only 2-3 colors per area. Choose colors that harmonize (analogous colors) rather than conflict (complementary colors create neutral browns/grays when mixed). Use transparent pigments rather than opaque. Let layers dry between different color applications if colors don’t work well together wet.
Q: My paper buckles when wet – does this ruin wet-on-wet? A: Buckled paper creates puddles in valleys where paint pools unevenly, making wet-on-wet unpredictable. Solutions: use heavier paper (200-300 lb), stretch paper before painting, or paint on watercolor blocks (glued on all sides). For learning, 140 lb paper taped to board works adequately.
Q: Can I re-wet an area to fix mistakes? A: Depends on pigments used. Non-staining colors (cerulean blue, raw sienna) can be re-wet, lifted, and repainted. Staining colors (phthalo blue, alizarin crimson) resist lifting when re-wet. For staining colors, it’s better to let dry and glaze over than try to re-wet and fix.
Q: How long do I have to work with wet-on-wet before paper dries? A: Typically 2-5 minutes at ideal “shiny wet” stage, depending on humidity, temperature, paper weight, and how wet you got paper initially. Heavier paper (300 lb) holds water longer. Humid days give more time. Hot dry days give less. With practice, you’ll develop sense of timing.
Q: Why does my wet-on-wet look different from YouTube tutorials? A: Multiple factors: paper quality (professional paper behaves better), pigment brands (different flow characteristics), environmental conditions (humidity/temperature), camera color accuracy, and skill/experience level. Don’t expect identical results immediately – wet-on-wet takes practice to master.
Q: Is wet-on-wet better than wet-on-dry? A: Neither is “better” – they’re different tools for different effects. Wet-on-wet creates soft, atmospheric, spontaneous effects. Wet-on-dry creates control, detail, hard edges. Most successful watercolors use both techniques in same painting, playing to each technique’s strengths.
Q: Can I do wet-on-wet on watercolor blocks? A: Yes, watercolor blocks work excellently for wet-on-wet. Since paper is glued on all edges, it doesn’t buckle even when very wet. Only downside is can’t remove painting until dry. But for wet-on-wet work, blocks are often better than loose sheets.
Have any thoughts?
Share your reaction or leave a quick response — we’d love to hear what you think!
-
 0
0
-
0
-
0
-
0
-
0
-
0


